1
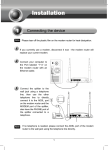
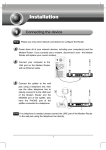
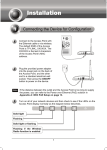
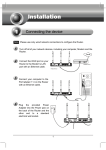
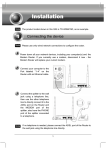
Network Management Card
User Manual
1
Network Management Card
Contents
Contents ________________________________________________________ 2
Chapter 1 Overview _______________________________________________ 3
1.1 NMC package contents _______________________________________________ 4
1.2 NMC CD Resources _________________________________________________ 4
1.3 Features __________________________________________________________ 4
1.4 NMC Applications ___________________________________________________ 5
Chapter 2 NMC parameters setting via serial COM port __________________ 6
2.1 Configure NMC via serial COM port _____________________________________ 6
Chapter 3 NMC&UPS management via web browser ___________________ 12
3.1 NMC Parameters setting via web browser _______________________________ 12
3.1.1 NMC System menu _____________________________________________ 12
3.1.2 Date and Time menu ____________________________________________ 13
3.1.3 Email Notification menu __________________________________________ 13
3.1.4 SNMP TRAP Receivers menu _____________________________________ 14
3.1.5 SNMPv1/2 Configuration _________________________________________ 15
3.1.6 SNMPv3 User Management _______________________________________ 16
3.1.7 Wake On LAN__________________________________________________ 17
3.1.8 Firmware Upload menu __________________________________________ 18
3.1.9 File Management menu __________________________________________ 18
3.1.10 System Log menu______________________________________________ 19
3.1.11 Reboot system menu ___________________________________________ 19
3.1.12 Access Control ________________________________________________ 19
3.2 UPS monitoring via web browser ______________________________________ 21
3.2.1 UPS Status menu _______________________________________________ 21
3.2.2 UPS Alarm menu _______________________________________________ 21
3.2.3 UPS Parameters menu___________________________________________ 22
3.2.4 UPS Powered Devices Menu ______________________________________ 23
3.2.5 UPS Identification menu __________________________________________ 24
3.2.6 UPS Log menu _________________________________________________ 25
3.2.7 UPS Statistics Log menu _________________________________________ 26
3.2.8 Event Log menu ________________________________________________ 27
3.3 UPS control via web browser _________________________________________ 28
3.3.1 UPS Battery Test menu __________________________________________ 28
3.3.2 UPS Battery Test Schedule menu __________________________________ 29
3.3.3 UPS Control menu ______________________________________________ 30
3.3.4 UPS Shutdown Schedule menu ____________________________________ 31
3.3.5 UPS Shutdown menu ____________________________________________ 32
3.3.6 UPS Configuration menu _________________________________________ 33
Chapter 4 NMC & UPS management via SNMP ________________________ 35
Chapter 5 NMC Utility - Find NMC in the LAN _________________________ 36
2
Network Management Card
Chapter 1 Overview
NMC (Network Management Card) can receive the status information of
UPS, and also can send commands to control UPS. User can manage UPS
with NMC via web browser or via network management software which
supports SNMP protocol.
Once UPS output is abnormal or other events are touched off, NMC will
protect server or client operating system being shut down safely by working
with system protect software (SPS) that can be installed on various operating
system. The conditions include: UPS output abnormal, UPS battery low, UPS
overload, over temperature, schedule shutdown, etc. User can set the
condition, once the event is touched off, NMC will inform SPS of the event
and SPS will shut down operating system safely according to the setting of
SPS.
Note: NMC is short for Network Management Card in the following
description.
3
Network Management Card
1.1 NMC package contents
1.
2.
3.
4.
NMC with mounting bracket, packaged with ESD bag.
RJ45 to DB9 converter cable.
Quick Installation Guide.
NMC CD-ROM.
1.2 NMC CD Resources
NMC CD-ROM contains NMC Utility, Quick Installation Guide, User Manual,
MIB files, System Protect Software for various OS, and NMC firmware
upgrade SOP.
1. NMC Utility --- for searching NMC in LAN and linking to web of the card
2. Quick Installation Guide --- for describing how to configure NMC
3. User Manual --- for NMC function introduction and settings
4. MIB files --- for SNMP monitoring use
5. System Protect Software --- for protecting server or client operating
system shutdown safely
6. NMC firmware upgrade SOP --- for describing how to upgrade NMC
firmware
1.3 Features
• UPS management by network connection through RJ45 connector
User can monitor UPS status and control UPS via web browser on the
internet.
• UPS and NMC configuring via SNMP protocol
User can configure parameters of NMC and control UPS via SNMP protocol
on a network management station.
• RTC function supporting
• Standard MIB (RFC1628.mib) and user-defined MIB (EPPC.mib)
• EMP (Environment Monitoring Probe) supporting
• SSL supporting
• Operating system shutdown safely
System Protect Software can protect server or client operating system
shutdown safely.
• Redundant UPS input shutdown
If there is more than one UPS supply power to server, user can configure the
redundant UPS input shutdown function of SPS (System Protect System),
SPS will shut down server safely when the last one UPS can’t supply power.
4
Network Management Card
1.4 NMC Applications
NMC is kind of SNMP (Simple Network Management Protocol) manager to
communicate UPS via Ethernet, it provides access information and send
commands for the UPS. NMC supports two communicating protocols which
are SNMP and HTTP for application. Through NMS (Network Management
Station) or web browser user can access UPS information via Ethernet directly,
meanwhile user can manage both UPS and NMC parameters as well.
NMC provides an application program which named SPS (System Protect
Software) for multi-servers shutdown purpose. The program provides
shutdown function for different operating systems when shutdown events are
appearing on UPS. Shutdown events are configurable by user. The shutdown
software will proceed the automatic shutdown orderly to prevent the abnormal
shut-off of the clients or servers.
5
Network Management Card
Chapter 2 NMC parameters setting via serial COM
port
There are more methods for NMC parameters setting: setting via serial COM
port, setting via telnet program, setting via SSH, and setting via web browser. It
offers basic parameters setting through a serial COM port for NMC configuration
such as IP Configuration, Pass Through, and Reset Configuration to default,
Restart and Password. In this section, it particularly introduces the parameters
setting via serial COM port. It is worth mentioning that the telnet/SSH program
settings menu is same with the serial port settings.
2.1 Configure NMC via serial COM port
1.
2.
3.
4.
Prepare a computer (with Microsoft Windows XP or later version)
Insert NMC into UPS’s intelligent slot exactly.
Tighten NMC with screw.
Connect the serial port of computer with NMC via RJ45 to DB9 converter
cable, the cable is supplied in NMC package.
5. On the computer with Microsoft Windows, for XP operation system, select
Hyper Terminal from startÆ
Æall programs to communicate with serial
port; For XP above version, communicate with serial port via serial port
debug tool (Putty is used as example in this manual).
z
For Windows XP or other Windows operation system that support Hyper
Terminal, select AccessoriesÆ
ÆCommunicationÆ
Æ Hyper Terminal to
create serial communication.
Input a name and select the connection icon.
6
Network Management Card
Select the correct connection port.
Configure the parameters of the serial port: 9600 bps, 8 bits, None parity,
1 stop bit and None flow control.
7
Network Management Card
z
For XP above Windows version, communicate with serial port via serial
port debug toolDŽDouble click Putty icon
ˈopen Putty and
select serial sessionˈconfigure the correct serial port and baud rate
9600 bpsDŽ
8
Network Management Card
Select “Serial” node on the left tree, and configure the parameters of the
serial port on the right window: 9600 bps, 8 bits, None parity, 1 stop bit
and None flow control. And then open the putty serial communication
window by click “open” button.
9
Network Management Card
6. Please turn on UPS and waiting NMC start successfully, there will be
some information shown on the hyper terminal interface. Refer to the
following diagram, input NMC password, the default password of NMC is
password
7. After inputting the NMC password, all main menus will be shown on the
hyper terminal interface, refer to the following diagram.
8. Basing on the main menus, please select “1” to configure IP address,
gateway, subnet mask and DHCP, refer to the following diagram.
10
Network Management Card
9. Basing on the main menus, please select “2” to send command to UPS,
the function is just for double checking UPS reply data correctly or not.
10. Basing on the main menu, please select “3” to configure NMC parameters
to default value.
11. Basing on the main menus, please select “4” to restart NMC.
12. Basing on the main menus, please select “5” to modify NMC password.
13. Basing on the main menus, please select “0” to exit main menus. It is
suggested exit the main menu page when the configurations is completed,
and then close the serial debugging tool.
Note: User can configure NMC through Telnet program; the menu options
of Telnet program are as same as the serial port setting menu.
11
Network Management Card
Chapter 3 NMC&UPS management via web browser
In this section, it particularly introduces how to configure NMC, manage UPS
and monitor UPS parameters via web browser.
3.1 NMC Parameters setting via web browser
Please Note: Before implementing the NMC setting for all configuring
parameters, user has to become NMC administrator first. While configure
parameters for NMC via web browser, there will be a pop-up dialog to ask
the name and password of NMC administrator. Only NMC password can be
changed, regarding to change password by serial COM port, please refer
to the item 15 of the section 2.1.
3.1.1 NMC System menu
NMC system menu can be accessed by SettingsÆ
ÆNMC System. In this
menu it offers configuring for DHCP function, default is enabled; NMC IP
address; SNMP version; SMTP function; UPS description; UPS location; NMC
web language change function and data log interval. Please refer to the
following diagram 3.1.1.
Please Note: NMC must restart via Reboot System menu after changed IP
address via web browser to make IP setting active immediately.
Diagram 3.1.1
12
Network Management Card
3.1.2 Date and Time menu
Date and Time menu can be accessed by SettingsÆ
ÆDate and Time.
There are three methods for configuring NMC date and time: configure the
date and time of NMC same as user’s computer; manually setting the date
and time through input the date and time by user self; enter the NTP server
address and select a time zone, make the NMC clock synchronized with the
NTP server time. Please refer to the following diagram 3.1.2.
Diagram 3.1.2
3.1.3 Email Notification menu
Email Notification menu can be accessed by SettingsÆ
Æ Email
Notification. NMC will send an Email to user when UPS event happens.
Email Message Setting, there are columns which Mail Server, User Account,
User Password, Sender’s Email address, Mail Subject Prefix, Mail Server Port,
Mail Daily Report At and Attached File must be input according to what user
wants to define.
Recipient List Settings, four Email receiver address can be configured at
most; user can input description for each Email address. The functions of Mail
Type and Event Level are as following.
Email Type:
- None: It means that NMC won’t send any Email to the mail account
when event happens on UPS.
- Events: It means that NMC will send an Email when to the mail account
when event happens on UPS.
- Daily status: It means that NMC will send UPS daily logs reports to the
mail account and the delivery time is configured by “Mail Daily Report
At” column. Note: user is able to select History Log, Event Log and
System Log report by tick Attached File column.
13
Network Management Card
-
Events/Status: It means that NMC will send an event report to the mail
account when event happens on UPS and meanwhile NMC will send
the daily logs reports as well.
Event Level:
- Information: It means that NMC will send an Email to the mail account
once event happens on UPS.
- Warning: It means that NMC will send an Email to the mail account
once warning event happens on UPS.
- Severe: It means that NMC will send an Email to the mail account once
severe event happens on UPS.
Refer to the following diagram 3.1.3.
Diagram 3.1.3
3.1.4 SNMP TRAP Receivers menu
SNMP trap receivers menu can be assessed by UPS
ManagementÆ
ÆSNMP TRAP Receivers. In this menu, the columns NMS IP
address, Trap Type, Severity and Description are configured by user’s
demand. The default of Community Strings column is “public”, and it can’t
change by anyone. Trap type support two trap types which are RFC1628 Trap
and EPPC Trap.
Severity:
- Information: It means that NMC will send a trap message to the NMS IP
address once event happens on UPS.
- Warning: It means that NMC will send a trap message to the NMS IP
address once warning event happens on UPS.
14
Network Management Card
-
Severe: It means that NMC will send a trap message to the NMS IP
address once severe event happens on UPS.
User can input description for each NMS IP address in description column.
Refer to the following diagram 3.1.4.
Diagram 3.1.4
3.1.5 SNMPv1/2 Configuration
NMC Support SNMPv1 and SNMPv2 monitor, refer to Diagram 3.1.5.
User can set SNMPv1 and SNMPv2 community strings.
The default public community string is public. And the private community
string is private.
15
Network Management Card
Diagram 3.1.5
3.1.6 SNMPv3 User Management
To enhance security users can enable SNMPv3 management mechanism,
NMC can add SNMPv3 user through setting user name and validate
password.
EnterSettingsÆNMC System, select SNMP Support to SNMPv3, the
SNMPv3 menu option will appear to the left window, and then select settings
ÆSNMPv3 USM Table to add SNMPv3 user, refer to Diagram 3.1.6.
User need set SNMPv3 user name, Authentication password, Private
password, Security level, Authentication, User status.
Security level can choose no Authentication no Private password,
Authentication but no Private, or both Authentication and Private password;
Authentication is MD5 encryption mode;
User status can choose enable or disable.
16
Network Management Card
Diagram 3.1.6
3.1.7 Wake On LAN
Wake On LAN menu can be accessed by SettingsÆ
ÆWake On LAN. This
menu is used to start up client computer from network by MAC address. When
the client PC shutdown cause of UPS shutdown events, "Wake On LAN"
packet will send to client to start up PC after shutdown events returned the
normal. User can set almost 16 MAC address of client from this page. Refer to
Diagram 3.1.7.
17
Network Management Card
Diagram 3.1.7
3.1.8 Firmware Upload menu
Firmware upload menu can be accessed by SettingsÆ
ÆFirmware Upload.
This menu offers upload NMC firmware via web browser. When user is going
to upload NMC firmware, user has to become administrator of NMC first. The
default name is “root”, and the default password is “password” for login as
administrator. Regarding upload NMC firmware procedure, please refer to the
file NMC Firmware Upgrade SOP.pdf for detail information.
3.1.9 File Management menu
NMC file management menu can be accessed by SettingsÆ
ÆFile
Management. The function of this menu is uploading files for the same
configuration for different NMC. Only confsnmp.cfg (about NMC parameters)
and confups.cfg (about UPS parameters set by NMC) these two files are
available for application. After uploaded files NMC has to reboot immediately
to make new configuration active. Regarding to reboot NMC system via web
browser, please refer to section 3.1.9 and for reboot NMC system via serial
COM port, please refer to item 14 in section 2.1. Furthermore it also can
reboot NMC system manually by pull-out and push-in NMC from the Intelligent
slot of UPS.
Note: Once .cfg file is deleted, and then reboots NMC system. The
configuration of NMC system and UPS will be back to the default setting.
If user would like to save .cfg and .csv file on local computer, it can be
achieved by click the file name directly.
18
Network Management Card
3.1.10 System Log menu
NMC system log menu can be accessed by LogsÆ
ÆSystem Log. The
menu allows user to view NMC system logs. Please refer to diagram 3.1.10.
Diagram 3.1.10
3.1.11 Reboot system menu
NMC reboot system menu can be accessed by SettingÆ
ÆReboot System.
The menu offers a function for user to reboot NMC system if it is necessary.
When user is going to reboot NMC system, user has to become administrator
of NMC first. The default name is “root” and the default password is
“password” for login as administrator.
3.1.12 Access Control
NMC Access Control menu can be accessed by SettingÆ
ÆAccess Control.
This menu displays a list of the workstations enabled access to NMC. User
can enter workstation's IP address in IP Address column. 0.0.0.0 means entry
not configured. User can choose access type in Access Type column, the
available options are: Enable/Disable. "Enable" means the entry IPs have
access to visit NMC via web or SNMP, "Disable" means the entry IPs have no
access to visit NMC. For example, an entry 192.168.1.255 means the client
with the IP address within the range from 192.168.1.0 to 192.168.1.255
become the management station with the access type set by Administrator.
Please note 255.255.255.255 grant the access right to all IP. Please refer to
diagram 3.1.12.
19
Network Management Card
Diagram 3.1.12
20
Network Management Card
3.2 UPS monitoring via web browser
3.2.1 UPS Status menu
UPS status menu can be accessed by UPS MonitoringÆ
ÆUPS Status.
User can view real-time operating status of the UPS from the web page
directly. Please refer to diagram 3.2.1.
Diagram 3.2.1
3.2.2 UPS Alarm menu
UPS Alarm menu can be accessed by UPS MonitoringÆ
ÆUPS Alarm.
User can view the current warning of UPS on the interface. Please refer to
diagram 3.2.2.
21
Network Management Card
Diagram 3.2.2
3.2.3 UPS Parameters menu
UPS Parameters menu can be accessed by UPS MonitoringÆ
ÆUPS
Parameters. User can view the rating parameters of UPS on the interface.
Such as rating output voltage, rating output frequency, rating output power,
different parameters shown on the interface is depended on different UPS
type. Please refer to diagram 3.2.3.
22
Network Management Card
Diagram 3.2.3
3.2.4 UPS Powered Devices Menu
UPS Powered Devices menu can be accessed by UPS MonitoringÆ
ÆUPS
Powered Devices. The table shows the amount of computers with SPS
(System Protect Software) connected with NMC. Once UPS output is
abnormal, NMC will send shutdown command to the computer with SPS, and
computer will be shut down safely by SPS.
User can test remote computer with SPS shutdown function by configure
test event.
Please refer to diagram 3.2.4.
23
Network Management Card
Diagram 3.2.4
3.2.5 UPS Identification menu
UPS Identification menu can be accessed by UPS MonitoringÆ
ÆUPS
Identification. There will be UPS type, UPS description (refer to section
3.1.1), UPS firmware version, NMC firmware version and MAC address.
Please refer to diagram 3.2.5.
24
Network Management Card
Diagram 3.2.5
3.2.6 UPS Log menu
UPS Log menu can be accessed by LogsÆ
ÆUPS Log. There are two
hundred latest data logs shown on the interface at most. Please refer to
diagram 3.2.6. User can export upsdata.csv file to view more data logs from
file management interface, please refer to section 3.1.7.
25
Network Management Card
Diagram 3.2.6
3.2.7 UPS Statistics Log menu
UPS Statistics Log menu can be accessed by LogsÆ
ÆUPS Statistics Log.
This page shows a statistics log of the UPS parameters taken over a period of
time. For each of the UPS parameters, minimum, maximum and the average
values is shown in each of the records. Please refer to diagram 3.2.7.
Statistics log interval can be changed by modifying the variable "Statistics Log
Interval" in "NMC System" page.
26
Network Management Card
Diagram 3.2.7
3.2.8 Event Log menu
Event Log menu can be accessed by LogsÆ
ÆEvent Log. There are two
hundred latest event logs shown on the interface at most. Please refer to
diagram 3.2.8. User can export upsevent.csv file to view more event logs
from file management interface, please refer to section 3.1.7.
27
Network Management Card
Diagram 3.2.8
3.3 UPS control via web browser
Please Note: Before implementing the NMC setting for all configuring
parameters, user has to become NMC administrator first. While configure
parameters for NMC via web browser, there will be a pop-up dialog to ask
the name and password of NMC administrator. Only NMC password can be
changed, regarding to change password by serial COM port, please refer
to the item 15 of the section 2.1.
3.3.1 UPS Battery Test menu
UPS Battery Test menu can be accessed by UPS ManagementÆ
ÆUPS
Battery Test. UPS battery latest test result and test time is shown on the
interface. User can configure “Quick Battery Test”, “Test Until Battery Low”,
“Timed Test”, “Cancel Test” and “Clear Test Information”. For some offline
UPS, UPS can’t support “Test Until Battery Low” and “Timed Test” function,
the function is depended on UPS firmware. Please refer to diagram 3.3.1.
28
Network Management Card
Diagram 3.3.1
3.3.2 UPS Battery Test Schedule menu
UPS Battery Test Schedule menu can be accessed by UPS
ManagementÆ
ÆUPS Battery Test Schedule. User can configure schedule
test on specific day or weekly day. User can configure “Quick Battery Test”,
“Test Until Battery Low” and “Timed Test”. “Battery Test setting Time” is for
“Timed Test” function. For some offline UPS, UPS can’t support “Test Until
Battery Low” and “Timed Test” function, the function is depended on UPS
firmware. Please refer to diagram 3.3.2.
29
Network Management Card
Diagram 3.3.2
3.3.3 UPS Control menu
UPS Control menu can be accessed by UPS ManagementÆ
ÆUPS Control.
User can control UPS output on or off on the interface, please refer to
diagram 3.3.3.
When selecting “UPS turn off” item, NMC will send shutdown command to
UPS, UPS will shut down output once the delay time has run out. When
selecting “UPS Sleep” item, NMC will send shutdown command to UPS, UPS
will shut down output once the delay time has run out, and UPS will turn on
output once the UPS sleep time has run out. When selecting “UPS Turn on /
Cancel shutdown” item, NMC will send cancel shutdown command to UPS,
and UPS will turn on output. Users can manual Turn On or Turn off UPS Load
Segment in this page.
30
Network Management Card
Diagram 3.3.3
3.3.4 UPS Shutdown Schedule menu
UPS Shutdown Schedule menu can be accessed by UPS
ManagementÆ
ÆUPS Shutdown Schedule. User can control UPS output on
or off on specific day or on weekly day, please refer to diagram 3.3.4.
31
Network Management Card
Diagram 3.3.4
3.3.5 UPS Shutdown menu
UPS Shutdown menu can be accessed by UPS ManagementÆ
ÆUPS
Shutdown. Please refer to diagram 3.3.5. When the selected event happens,
NMC will inform the computer installed with SPS (System Protect System) of
the event and send the shutdown command to the computer. Here, the
computer installed with SPS is the computer shown on UPS powered devices
interface (refer to section 3.2.4).
Action type:
- Disable: It means that NMC will do nothing even the event happens on
UPS.
- Warning: It means that NMC will inform the computer installed with SPS
of the event once the shutdown condition happens.
- Client Shutdown: It means that NMC will inform the computer installed
with SPS of the event and send shutdown command to the computer
once the shutdown condition happens.
- “UPS Turn Off” means that NMC will inform the computer installed with
SPS of the event, send shutdown command to the computer, and also
send shutdown command to UPS once the shutdown condition
happens, when the delay time has run out, UPS will shut down output.
The default value of delay time is 120 seconds.
Warning period means the overall time the warning will be repeatedly once
event happens. Warning interval means that NMC will inform the event to the
computer installed with SPS every short period once event happens. N=
(Warning period / Warning interval) +1, N means the warning times.
Please Note: for client shutdown setting information, please refer to
System Protect Software User Manual.pdf
32
Network Management Card
Diagram 3.3.5
3.3.6 UPS Configuration menu
UPS Configuration menu can be accessed by UPS ManagementÆ
ÆUPS
Configuration. User can configure the limited point of UPS overload and
over-temperature. For Innova UPS, User can configure UPS buzzer bee. User
can configure the limited point of EMP temperature value and humidity value.
User can configure the warning setting of EMP: “Normally open”, “Normally
closed” or “Not used”. User also can configure UPS last replaced date. User
can set the lower limit of battery capacity. When the battery capacity is below
the set point, NMC will take action that is specified in the UPS Shutdown
menu. The default value is 30%. User can set the lower limit of battery backup
time. When the battery backup time is below the set point, NMC will take
action that is specified in the UPS Shutdown menu. Refer to the following
diagram 3.3.6.
33
Network Management Card
Diagram 3.3.6
34
Network Management Card
Chapter 4 NMC & UPS management via SNMP
Please note: if user wants to use NMC via SNMP protocol, please make
sure IP address and Gateway of NMC correct. Please refer to section 2.1 or
section 3.1.1 for IP address and Gateway settings.
NMC support SNMP protocol, user can manage NMC and UPS via SNMP
NMS (Network Management Station). Load the NMC MIB to the database of
SNMP NMS, and user can read or configure the parameters of NMC and UPS.
The read community strings is “public”, and the write community strings is
“private.” NMC support two type MIB: one is RFC1628.mib, the other is
EPPC.mib. MIB files can be found in NMC CD-ROM packaged with NMC.
Furthermore, NMC can be monitored by Winpower software via SNMP
protocol. For more detail information, please refer to the user manual of
Winpower.
35
Network Management Card
Chapter 5 NMC Utility - Find NMC in the LAN
Via NMC Utility, user can find NMC automatically and quickly in the
LAN. User can link to the web of NMC. Please refer to the following diagram.
NMC Utility can be found in NMC CD-ROM packaged with NMC,
NMC Utility supports Windows XP / Windows 7.
36
System Protect Software User Manual
System Protect Software
User Manual
1/42
System Protect Software User Manual
Table of Contents
1 Introduction ................................................................................................................................... 4
1.1 Supported platforms ........................................................................................................... 4
1.2 Quickly setup for SPS on Windows ..................................................................................... 5
1.3 Quickly setup for SPS on Linux (Mac OS) with GUI ............................................................. 5
1.4 Quickly setup for SPS on Linux (Unix) with CUI ................................................................... 5
2 Installation and configuration for SPS in the Windows .................................................................. 7
2.1 Installing the SPS ................................................................................................................. 7
2.2 Starting the SPS ................................................................................................................... 7
2.3 Configuring the SPS ............................................................................................................. 8
2.4 Uninstall the SPS................................................................................................................ 10
2.4 Configuring the Port .......................................................................................................... 10
3 Installation and configuration in Linux, MAC OS and Unix ........................................................... 12
3.1 Installing the SPS ............................................................................................................... 12
3.2 Starting the SPS ................................................................................................................. 13
3.2.1 Linux (MAC OS) with GUI........................................................................................ 13
3.2.2 Linux (Unix) with CUI .............................................................................................. 14
3.3 Configuring the SPS ........................................................................................................... 14
3.3.1 Linux (MAC OS) with GUI........................................................................................ 14
3.3.2 Linux(Unix) with CUI ............................................................................................... 15
3.4 Uninstall the SPS................................................................................................................ 19
3.5 Configuring the Port .......................................................................................................... 20
4 Installation and configuration for SPS in the VMware ESX ........................................................... 21
4.1 Configuring for VMware ESX ............................................................................................. 21
4.1.1 Configuring VMs startup/shutdown automatically ................................................ 21
4.1.2 VMware tools ......................................................................................................... 22
4.1.3 Configuring the Port ............................................................................................... 23
4.2 Configuring the SPS ........................................................................................................... 23
5 Installation and configuration for SPS in the VMware ESXi (paid version) ................................... 24
5.1 Configuring for VMware ESXi ............................................................................................ 24
5.1.1 Installing and configuring the VMA ........................................................................ 24
5.1.2 Configuring VMs startup/shutdown automatically ................................................ 24
5.2 SPS Configuration .............................................................................................................. 25
6 Installation and configuration for SPS in the Hyper-V Server....................................................... 29
6.1 Hyper-V configuration ....................................................................................................... 29
6.2 Installing and configuring the SPS ..................................................................................... 30
6.3 Uninstall the SPS................................................................................................................ 32
7 Installation and configuration for SPS in the Citrix XenServer ................................................ 33
7.1
Citrix XenServer Configuration .................................................................................... 33
7.1.1
Installing XenServer tools for each Virtual Machine ............................................... 33
2/42
System Protect Software User Manual
7.1.2
Open XenServer host ports ..................................................................................... 35
7.2
Installing and Configuring for SPS ............................................................................... 35
7.2.1
Installing SPS ........................................................................................................... 35
7.2.2
Configuring SPS ....................................................................................................... 35
8 Shutdown Operation .................................................................................................................... 37
8.1 Shutdown flow chart ......................................................................................................... 37
8.2 Shutdown setting˄NMC Webpage Side˅ ...................................................................... 37
8.2.1 Shutdown actions setting ....................................................................................... 37
8.2.2 Warning Period Setting .......................................................................................... 38
8.2.3 UPS Shutdown Delay Setting .................................................................................. 38
8.2.4 Shutdown continue or not if events restored. ....................................................... 39
8.3 Shutdown order ................................................................................................................ 39
8.3.1 Shutdown continue if events restored ................................................................... 39
8.3.2 Shutdown discontinue if events restored............................................................... 40
8.4 Redundant UPS Input shutdown ....................................................................................... 41
8.5 Simulate shutdown by event ............................................................................................. 42
3/42
System Protect Software User Manual
1 Introduction
The SPS (System Protect Software) is one utility which communicates with NMC (Network
Monitoring Card). SPS provides logs events, notifies users of events, arranges actions for
application and is also able to offer shutdown parameters setting for PC when it is necessary. SPS
can provides safety shutdown method against unexpected interrupted due to the power failure.
With the SPS, it can save application’s data and documents before shutdown of system as well.
SPS has two major components: “SPS Service” and “SPS Interface”, SPS Service runs in the
background as a system service; and SPS Interface is a user interface application that allows the
user to tailor the configuration parameters.
1.1 Supported platforms
Supported platforms˄validated˅˖
Windows
Windows XP Home Edition
Windows XP Professional
Windows 2000
Windows Server 2003 x32,x64
Windows Server 2008 x32,x64
Windows Server 2012 x64
Windows Vista x32, x64
Windows 7 x32, x64
Windows 8 x32, x64
Hyper-V Server 2008/2012
LINUX
Red Hat Enterprise Server 5.x for i386,AMD64
Red Hat Enterprise Server 6.x for i386,AMD64
SUSE Enterprise Server 10.x for i386,AMD64
SUSE Enterprise Server 11.x for i386,AMD64
Ubuntu 8.x for i386,AMD64
Ubuntu 9.x for i386,AMD64
Ubuntu 10.x for i386,AMD64
Ubuntu 11.x for i386,AMD64
Ubuntu 12.x for i386,AMD64
MAC OS
Mac OS 10.5 for PPC
MAC OS 10.6/10.7/10.8/10.9 for Intel
4/42
System Protect Software User Manual
VMware Server
VMware ESXi 4.0/4.1/5.0/5.1/5.5(Paid Version)
VMware ESX 4.0/4.1
Citrix XenServer
Citrix XenServer 6.2
Unix
Solaris 10 for Intel/Sparc
FreeBSD 7.X, 8.X, 9.X
HP UX 11.31
1.2 Quickly setup for SPS on Windows
·
·
·
·
·
Download and unzip the SPS installation package, Double click the “setup” program, install
the SPS
The SPS service will be started automatically when the system boots
Double click the SPS icon in the taskbar, open the SPS interface, Input the NMC IP address to
add the device
Select the alarm events from Events list. The alarm events are selected as default:
Ac Fail, Battery Low, Schedule Shutdown, Battery Capacity below Limit, Battery Backup Time
below Limit
To check the setting, simulate the system shutdown by SPS according to section 8.5
1.3 Quickly setup for SPS on Linux (Mac OS) with GUI
·
·
·
·
·
·
Download and unzip the SPS installation package, Enter the command to install the
SPS˖./SPS.install
Go to the installation path “/opt/sps”ˈEnter the command to start the SPS
service˖./SPSService
The SPS service will be started automatically when the system boots
Enter the command to open the SPS interface in the Linux˖./SPS
Input the NMC IP address to add the device
Enter the command to open the SPS interface in the MacOS˖open SPS.app
Input the NMC IP address to add the device
Select the alarm events from Events list. The alarm events are selected as default:
Ac Fail, Battery Low, Schedule Shutdown, Battery Capacity below Limit, Battery Backup Time
below Limit
To check the setting, simulate the system shutdown by SPS according to section 8.5
1.4 Quickly setup for SPS on Linux (Unix) with CUI
·
Download and unzip the SPS installation package, Enter the command to install the
SPS˖./SPS.install
5/42
System Protect Software User Manual
·
·
·
·
·
Go to the installation path “/opt/sps”, Enter the command to start the SPS
service˖./SPSService
The SPS service will be restarted automatically when the system boots
Enter the command: ./SPS -iˈinput the passwordˈthe default password is “admin”, edit the
configuration, find the below lineˈInput the NMC IP address to add the device:
<Remote name="NMC IP" serv="2993" model=""/>
The alarm events are selected as default:
Ac Fail, Battery Low, Schedule Shutdown, Battery Capacity below Limit, Battery Backup Time
below Limit
Restart the SPS Service by the command: ./SPS –r
To check the setting, simulate the system shutdown by SPS according to section 8.5
6/42
System Protect Software User Manual
2 Installation and configuration for SPS in the Windows
2.1 Installing the SPS
·
For Windows XP operating system, open the Windows folder, the installing process can be
executed by double click the program icon (“setup.exe” or “setup.msi”) directly. For
Microsoft Windows Vista, server 2008, server 2012,Windows 7 and 8 operating systems, it
recommends the installing process is executed with the administrator account; If it is not
login as administrator for the operating system the installing process is also able to be
executed by right click the program icon and then click “Run as administrator”. It will execute
the installing process as the administrator account.
For Windows 2000 operating system, open the Windows-2000 folder, the installing process
can be executed by double click the program icon “setup.exe”.
Note: The setup.msi is not available for Windows Vista operating system, Windows 7 and
Windows 8 OS.
·
Follow the instructions step by step to finish the installing process.
- By default of 32 bit operating system, SPS installs to “C:\Program Files\System Protect
Software”.
- By default of 64 bit operating system, SPS installs to “C:\Program Files (x86)\System
Protect Software”
2.2 Starting the SPS
·
SPS service starts automatically when operating system boots as default.
There are two methods to start the SPS manually:
- Select Start menu > All Programs > System Protect Software to start the Tray Icon and
SPS service.
- Select Start menu > Control Panel > Administrative tools > Services, and find the service
System Protect Service. Right click it and select Start to start the SPS service.
7/42
System Protect Software User Manual
·
SPS Icon appears in status area of the task bar after the SPS service startDŽDouble click the
Icon will start up the SPS interface screen.
2.3 Configuring the SPS
·
SPS offers authority system. Only the administrator of SPS has full privilege to configure and
access in SPS. Users have privilege for reading SPS only. The administrator of SPS is able to
login by click “System” > “Act as Administrator” and then enter the password. By default, the
password is “admin”.
·
Enter the IP address of NMC via click “Add” button on the screen of SPS.
Enter the Clusterġname if the computer is protected by the redundant UPS Input.
The NMC UPSs that under the same Cluster name will become a group.
Note: Please add the network id as suffix at the end of IP address (for example: %4) as the
below image, if the IP address is IPV6.
·
The device icon in the tree view will be abnormalġif enter the error IP address.
Click the View button, the Connection Status shows Not Connected
Note˖The connection will fail if the UPS output is off.
8/42
System Protect Software User Manual
Synchronously, the Tray Icon in the task widows will be signed with warning.
Move the mouse to the Tray Icon, The detailed information will be prompted.
·
Select the alarms checkbox in the Event list: When the events occur, the SPS will pop up
alarm dialog or shutdown the computer gracefully.
Unselect the alarms checkbox in the Event list: When the events occur, the SPS will not pop
up alarm dialog and will not shut down the computer.
Supported Alarms:
AC fail, Battery Low, UPS overload, UPS over temperature, Weekly Schedule Shutdown,
Specific Day Schedule Shutdown, EMP over Temperature, EMP over Humidity, EMP Contact1
Alarm, and EMP contact2 Alarm.
·
In the Action option, select Event Warning, Shutdown, or Sleep buttonDŽ
By the default, Shutdown is selected
·
Action
Definition
Event Warning
When the events occurˈThe SPS will pop up the alarm
dialog, but the computer will not shut down or sleep.
Shutdown
When the shutdown condition is met, the SPS will send
the shutdown command to system.
Sleep
When the shutdown condition is met, the SPS will send
the sleep command to system.
In the System shutdown option, set the shutdown parameters.
The parameters are defined as following:
9/42
System Protect Software User Manual
Shutdown Parameters
Definition
Cancel Shutdown if events
Restored in Shutdown Delay
If the checkbox is selected, the shutdown (sleep) will be
cancelled in system delay when the events restore to
normal.
If the checkbox isn’t selected, the system will be shut
down (sleep) in shutdown delay even if the events
restore to normal.
The checkbox isn’t chosen as default.
Shutdown Delay
The SPS will send the shutdown (sleep) command to the
computer after shutdown delay time when the shutdown
condition is met.
The shutdown Delay is 0 s as default.
Run Script Before Shutdown
If the checkbox is selected, the Script will be executed
before the system shutdown (sleep).
By the default, the SPS will not execute the script before
system shutdown.
Script Max Execution Time
The script run will be ended when the max execution
time is met.
The script max execution time is 60s as default.
2.4 Uninstall the SPS
·
Right click the Tray Icon, select Exit.
Select the Exit System Protect Service in the prompted dialog to exit the SPS user interface
and SPS serviceDŽ
·
Select Start menu > All Programs > System Protect Software > Uninstall System Protect
Service, uninstall the SPS
2.4 Configuring the Port
The SPS use UDP 3034 as the communication port with NMC as default. Please open the
port according the command as below:
QHWVKH[HILUHZDOODGGSRUWRSHQLQJXGS6363RUW
10/42
System Protect Software User Manual
Note: If the UDP 3034 is captured by the other program, the number of the port value will
be added 1(range from 3034~3083)
11/42
System Protect Software User Manual
3 Installation and configuration in Linux, MAC OS and
Unix
3.1 Installing the SPS
·
Operation System
packages
Linux i386 with GUI (Graphics User
Interface Mode)
SPS-GUI-*.*.*.*-linux-i386.tar.gz
SPS-CUI-*.*.*.*-linux-i386.tar.gz
The two packages above are supported in GUI
mode
Linux i386 with CUI˄Console User
Interface Mode˅
Linux AMD 64 with GUI(Graphics Mode)
SPS-CUI-*.*.*.*-linux-i386.tar.gz
SPS-GUI-*.*.*.*-linux-x86_64.tar.gz
SPS-CUI-*.*.*.*-linux- x86_64.tar.gz
The two packages above are supported in GUI
mode
Linux AMD 64 with CUI˄Console Mode˅ SPS- CUI-*.*.*.*-linux-x86_64.tar.gz
MAC OS 10.7 for Intel
SPS-*.*.*.*-MACOSX-10.7-intel.tar.gz
MAC OS 10.6 for Intel
SPS-*.*.*.*-MACOSX-10.6-intel.tar.gz
MAC OS 10.5 for PPC
SPS-*.*.*.*-MACOSX-10.5-ppc.tar.gz
Solaris 10 for Intel
SPS-CUI-*.*.*.*-solaris-intel.tar.gz
Solaris 10 for Sparc
SPS-CUI-*.*.*.*-solaris-sparc.tar.gz
·
Extract the file, Enter the command:
tar –zxvf SPS*
Note: for the solaris OS, please extract as following:
gunzip SPS*.tar.gz
tar –xvf SPS*.tar
·
Installing the file, Enter the command:
./SPS.install
Finish the installation, Enter “y”
By default, the SPS is installed to /opt/sps
·
·
12/42
System Protect Software User Manual
3.2 Starting the SPS
3.2.1 Linux (MAC OS) with GUI
·
·
Start the SPS service in the installation directory, enter the command:
./SPSService
SPS service will run automatically in the background when the system boot.
Select to start the SPS service or not when the system boots by the following command in
table.
Operation
System
Starting the SPS Service when system
boot
Stopping the SPS Service when system
boot
RedHat
chkconfig --add SPSService
chkconfig --del SPSService
SUSE
chkconfig --add SPSService
chkconfig --del SPSService
Ubuntu
sudo update-rc.d SPSService defaults
sudo update-rc.d –f SPSService remove
MAC OS
sudo launchctl load
/Library/LaunchDaemons/SPSService.
plist
sudo launchctl unload
/Library/LaunchDaemons/SPSService.p
list
For the Linux , Start the SPS user interface in the installation directory, enter the command˖
./SPS
For the MAC OS, Start the SPS user interface in the installation directory, enter the
command˖
open SPS.APP
The packages in the below table are needed. In generally, the packages will be installed in
the system as default:
Library Name
Provided by Package
gtk-x11-2.0
gtk2
gdk_pixbuf-2.0
gtk2
gthread-2.0
libgthread-2_0-0
glib2
glib-2.0
glib2
glib2
gmodule-2.0
libgmodule
glib2
gobject-2.0
libgobject-2_0-0
glib2
atk-1.0
atk/libatk
pango-1.0
pango
freetype
freetype2
fontconf
fontconfig
Xrender
xorg-x11-libXrender
xorg-x11
x11
xorg-x11-libX11
xorg-x11
Xext
xorg-x11-libX11
xorg-x11
png12
libpng12-0
z
zlib
13/42
Super Package
System Protect Software User Manual
3.2.2 Linux (Unix) with CUI
Note: The GUI mode of SPS for Unix OS is not supported. Please use the CUI mode of SPS for Unix.
·
Start the SPS service in the installation directory, enter the command:
./SPS –s
Restart the SPS service if necessary, Enter the command: ./SPS -r
SPS service starts automatically at system boot as default.
·
The SPS user interface is unavailable in the Linux with CUIˈrefer to the SPS command
parameters in the below table˖
Parameter Function
Comment
-h
Print all the parameters and functions
-v
Show the software version
and copyright
-S
Start SPS service automatically at
system boot
Take effect at next boot
-X
Stop SPS service at system boot
Take effect at next boot
-s
Start SPS service
Take effect immediately
-x
Exit SPS service
Take effect immediately
-r
Restart SPS service
Take effect immediately
-l
List all the device and status
-p
Check the shutdown parameters
-i
Modify the configuration parameters
Enter the password, edit the
configuration by the vi tool
-c
Modify the password
Enter the old password, then
input the new password
3.3 Configuring the SPS
3.3.1 Linux (MAC OS) with GUI
Refer to the SPS configuration in Windows (section 2.3)
Note: Please add the network id as suffix at the end of IPV6 address (for example: %eth0) as the
below image if the communication mode is IPV6.
14/42
System Protect Software User Manual
3.3.2 Linux(Unix) with CUI
Note: The GUI mode of SPS for Unix OS is not supported. Please use the CUI mode of SPS for Unix.
·
Enter the command˖./SPS –i .
Input the password, the password is admin as default. Open the configuration by vi tool.
·
Modify the parameters configuration, save and exit.
15/42
System Protect Software User Manual
3.3.2.1 Add one device, or set the Redundant UPS Input if the computer is protected by
multi-devices.
$GGRQHGHYLFH$GGWKH10&,3DGGUHVVLQWKHQDPHSDUDPHWHUHJWKH10&,3
DGGUHVVLV
<RemoteList>
<Remote name="172.18.139.60" serv="2993" model=""/>
</RemoteList>
Or you can use the following format also:
<RemoteList>
<Remote name="172.18.139.60" serv="2993" model=""/>
<Cluster name="">
<Remote name="" serv="2993" model=""/>
</Cluster>
</RemoteList>
$GGUHGXQGDQWGHYLFHVLQJURXSVV\VWHPZLOOEHVKXWGRZQZKHQHYHUDQ\RIWKH
JURXSPHWWKHVKXWGRZQFRQGLWLRQ˖
For example˖
The IP address of NMC is 172.18.127.65 and 172.18.127.66 in group1
The IP address of NMC is 172.18.127.73 and 172.18.127.74 in group2
<RemoteList>
<Cluster name="group1">
<Remote name="172.18.127.65" serv="2993" model="/>
<Remote name="172.18.127.66" serv="2993" model="/>
</Cluster>
<Cluster name="group2">
<Remote name="172.18.127.73" serv="2993" model=""/>
<Remote name="172.18.127.74" serv="2993" model=""/>
</Cluster>
16/42
System Protect Software User Manual
</RemoteList>
Note: Please add the network id as suffix at the end of IPV6 address (for example: %eth0)
if the communication mode is IPV6. Refer to the section “3.3.1 Linux (MAC OS) with GUI”.
3.3.2.2 Set the alarm attribute
Enable the alarm, set the value to 1. The SPS will pop up alarm in the console and protect
the system to shut down gracefully.
Disable the alarm, set the value to 0. The SPS will not pop up alarm and will not shut down
the system.
The default setting as below˖
<AcFail>1</AcFail>
<BatteryLow>1</BatteryLow>
<Overload>0</Overload>
<OverTp>0</OverTp>
<EMPTp>0</EMPTp>
<EMPHum>0</EMPHum>
<EMPCt1>0</EMPCt1>
<EMPCt2>0</EMPCt2>
<WSS>1</WSS>
<SSS>1</SSS>
<Capacity>1</Capacity>
<RemainTime>1</RemainTime>
Event parameters
Alarm
<AcFail>
Ac Fail
<BatteryLow>
Battery Low
<Overload>
UPS Overload
<OverTp>
UPS Over Temperature
<WSS>
Weekly Schedule Shutdown
<SSS>
Specific Day Schedule Shutdown
<EMPTp>
EMP Over Temperature
<EMPHum>
EMP Over Humidity
<EMPCt1>
EMP Contact1 Alarm
<EMPCt2>
EMP Contact2 Alarm
<Capacity>
Battery Capacity Below Limit
<RemainTime>
Battery Backup Time Below Limit
3.3.2.3 Set the shutdown parameters
<CancelIf>0</CancelIf>
<ShutDelay>0</ShutDelay>
<EnableScript>0</EnableScript>
<Script></Script>
<MaxScriptTime>60</MaxScriptTime>
Shutdown Parameters
Definition
17/42
System Protect Software User Manual
Cancel Shutdown if events Restored
in Shutdown Delay
<CancelIf>0</CancelIf>
Shutdown Delay
If the value is 0, the system will be shut down
(sleep) in shutdown delay even if the events
restore.
If the value is 1, the shutdown (sleep) will be
cancelled in system delay when the events restore.
The SPS will send the shutdown (sleep) command
to the computer after shutdown delay time when
the shutdown condition is met.
The shutdown Delay is 0 s as default.
<ShutDelay>0</ShutDelay>
If the value is 1, enable to run the script
If the value is 0, disable to run the script
Enable or disable the Script
<EnableScript>0</EnableScript>
Run Script Before Shutdown
Enter the path of the script; the script will be
executed before the system shutdown (sleep).
By the default, the SPS will not run the script
before system shutdown.
For example:
<Script></Script>
<Script>/opt/sps/shutdown.sh</Script>
Script Max Execution Time
<MaxScriptTime>60</MaxScriptTime>
The script run will be ended when the max
execution time is met.
The script max execution time is 60s as default
3.3.2.4 Set the actions
<Action>1</Action>
Note: The system should have hibernation function if the action is set to 2.
Action
Definition
Event Warning
(The action value is set to 0)
When the events occurˈThe SPS will pop up the alarm
dialog, but the computer will not shut down or sleep.
Shutdown
(The action value is set to 1)
When the shutdown condition is met, the SPS will send
the shutdown command to system.
Sleep
(The action value is set to 2)
When the shutdown condition is met, the SPS will send
the sleep command to system.
·
Restart the SPS service after configuration end, Enter the command:
./SPS –r
·
View the device status by the command:
./SPS –l
For example: The device status for 172.18.127.65 as below image.
18/42
System Protect Software User Manual
·
View the shutdown configuration by the command:
./SPS –p
For example, the shutdown configuration as below image˖
·
Modify the password, enter the command:./SPS –c
3.4 Uninstall the SPS
·
Exit the SPS user interfaceˈSelect the Exit System Protect Service in the prompted dialog to
exit the SPS serviceDŽ
For the Linux with CUI, exit the SPS service, run the command: ./SPS –x
·
Uninstall the SPS, enter the command in the directory where the installation package
extracted:
19/42
System Protect Software User Manual
./SPS.remove
3.5 Configuring the Port
·
The SPS use UDP 3034 as the communication port with NMC by default.
Note: If the UDP 3034 is captured by the other program, the number of the port will be
added 1(range from 3034~3083)
·
Open the UDP port by the following command:
iptables -I INPUT -p udp --dport 3034 -j ACCEPT
iptables -I OUTPUT -p udp --dport 3034 -j ACCEPT
/etc/rc.d/init.d/iptables save
20/42
System Protect Software User Manual
4 Installation and configuration for SPS in the VMware ESX
4.1 Configuring for VMware ESX
4.1.1 Configuring VMs startup/shutdown automatically
·
Start VMware Client, select Configuration -> Virtual Machine Startup/Shutdown->Properties
·
Select Allow virtual machines to start and stop automatically with the system checkbox.
Enter the settings as shown on the Virtual Machine Startup and Shutdown window:
For each virtual machine, set delay startup for 10 seconds
For each virtual machine, set delay shutdown for 30 seconds
Move up the virtual machines to the Automatic Startup list.
The virtual machines will start/stop when the host start/shutdown automatically.
21/42
System Protect Software User Manual
4.1.2 VMware tools
·
Install the VMware tool for each guest OS.
Select the guest OS, click summary menu, the status for VMware tools will show OK if the
VMware tools is installed successfully.
22/42
System Protect Software User Manual
4.1.3 Configuring the Port
·
The SPS use UDP 3034 as the communication port with NMC as default.
Note: If the UDP 3034 is captured by the other program, the number of the port will be
added 1(range from 3034~3083)
·
Open the UDP port by the following command:
esxcfg-firewall -o 3034,udp,in,SPS
esxcfg-firewall -o 3034,udp,out,SPS
4.2 Configuring the SPS
·
Start the VMware Server host, refer to the chapter 3 (Linux with CUI) to finish the SPS
Installation and configuration.
·
Set the shutdown script for VMware ESX. The document of shutdownESX.sh is the script for
shut down the virtual machinesDŽ
Enter the command: ./SPS -i
Find the two lines in the configuration and edit it as below:
<EnableScript>1</EnableScript>
<Script>/opt/sps/ShutdownScript/shutdown</Script>
·
Set the Script Max Execution Time based on the amount of Virtual machines. Set apart 30s
for each virtual machine.
For example: there are ten virtual machines:
Enter the command: ./SPS -i
Find the line in the configuration and edit it as below:
<MaxScriptTime>300</MaxScriptTime>
·
Restart the SPS service by the command: ./SPS –r
23/42
System Protect Software User Manual
5 Installation and configuration for SPS in the VMware ESXi
(paid version)
5.1 Configuring for VMware ESXi
5.1.1 Installing and configuring the VMA
·
Go to the website :http://www.vmware.com/support/developer/vima/
Download the VMA, and extract it, the format for the VMA document is *.OVF.
·
Start the VMware Client, select File > Deploy OVF Template, click the browse button, select
the OVF document.
Start VMA, the default user name is vi-admin. Set the password for the first login.
·
5.1.2 Configuring VMs startup/shutdown automatically
·
Start VMware Client, select Configuration -> Virtual Machine Startup/Shutdown->Properties
·
Select Allow virtual machines to start and stop automatically with the system checkbox.
Enter the settings as shown on the Virtual Machine Startup and Shutdown window:
For each virtual machine, set delay startup for 10 seconds
For each virtual machine, set delay shutdown for 30 seconds
24/42
System Protect Software User Manual
Move up the virtual machines to the Automatic Startup list
The virtual machines will start/stop when the host start/shutdown automatically.
Note: if the “shutdown” is selected in the Shutdown Action, make sure the vmware tools
installed for each virtual machine.
5.1.3 Configuring the port
·
The SPS use UDP 3034 as the communication port with NMC as default.
The port is opened as default in the vMA.
Note: If the UDP 3034 is captured by the other program, the value of the port will be added
1(range from 3034~3083)
·
Neglect this step unless the port is disabled˖
iptables -I INPUT -p udp --dport 3034 -j ACCEPT
iptables -I OUTPUT -p udp --dport 3034 -j ACCEPT
5.2 SPS Configuration
·
Start VMA,ġ refer to the chapter 3 (Linux with CUI) to finish the SPS Installation and
configuration.
Note: please add with sudo because root privilege is forbid as default.
For example: (the NMC IP address is 172.18.139.60)
1. Enter the /opt/sps directory, start the SPS service by the command: sudo ./SPSService
2. Open the configuration document by the command: sudo ./SPS –i
Input the password: admin
3. Add the NMC IP address
25/42
System Protect Software User Manual
<RemoteList>
<Remote name="172.18.139.60" serv="2993" model=""/>
</RemoteList>
4. Restart the SPS Service by the command: sudo ./SPS –r
5. List the added NMC by the command: sudo ./SPS –l
26/42
System Protect Software User Manual
·
The config.pl is used to add the hosts to be shutdown.
Go to the ShutdownScript subdirectory: cd /opt/sps/ShutdownScript
Enter the command: sudo ./config.pl
Input the target VMware host ip(or hostname), username, password. SPS supports
multi-hosts shutdown.
For example: 172.18.139.35 and 172.18.139.36 will be added:
The VMware host information will be saved in hostlist document.
Note: The password will be encrypted.
·
Set the shutdown script for VMware ESXi. The shutdownESXi.sh is the script to shut down
the host and virtual machines.
Enter the command: sudo ./SPS -i
Find the two lines in the configuration and edit it as below:
<EnableScript>1</EnableScript>
<Script>/opt/sps/ShutdownScript/shutdownESXi.sh</Script>
·
Set the Script Max Execution time. Time based on the amount of Virtual machines. Set apart
30s for each virtual machine.
For example: there are ten virtual machines:
Enter the command: sudo ./SPS -i
Find the line in the configuration and edit it as below:
<MaxScriptTime>300</MaxScriptTime>
·
Restart the SPS service, enter the command : sudo ./SPS –r
27/42
System Protect Software User Manual
·
The time sequence for host and VMs shutdown can be seen by VMware client as below:
28/42
System Protect Software User Manual
6 Installation and configuration for SPS in the Hyper-V Server
6.1 Hyper-V configuration
·
Start Hyper-V Manager in the client
For example: there are two virtual machines, Windows server 2003 and 2008.
Select the VM. Click Setting ->“Automatic Stop Action Save”, there are three methods.
Save the virtual machine state˖
Turn off the virtual machine˖
Shut down the guest operating system˖
·
If the third method is selected, install the “Integration Service” in the Action menu
29/42
System Protect Software User Manual
6.2 Installing and configuring the SPS
·
·
Copy the installation file “setup.exe” to Hyper-V server 2008, enter the path where the
installation file exists
Install the SPS, enter the command: setup.exe.
By the default, the SPS file is installed to the directory C:\Program Files\System Protect
Software for the 32 bit windows. And it is installed to the directory C:\Program
Files(x86)\System Protect Software for the 64 bit windows.
30/42
System Protect Software User Manual
·
Enter to the installation path: cd C:\Program Files(x86)\System Protect Software
Start SPS service and user Interface by the command: StartSPSService.exe
Add the NMC IP address in the SPS interface
31/42
System Protect Software User Manual
·
Refer to the chapter 2.3 to finish the SPS configuration.
The SPS Service will be started automatically when the system boots
If the parameters need to be set, open the SPS interface by the command: SPS.exe
6.3 Uninstall the SPS
·
Close the SPS user interface.
·
Enter to the directory where the installation package existed. Enter the command:
setup.exe:
32/42
System Protect Software User Manual
7 Installation and configuration for SPS in the Citrix XenServer
SPS is installed on the XenServer host. When the shutdown condition is met, the SPS will
notify the XenServer host to shutdown.
The VMs will be shut down automatically before the host shut down.˄This action takes effect
as default by the XenServer˅
7.1 Citrix XenServer Configuration
7.1.1 Installing XenServer tools for each Virtual Machine
·
Open the XenServer Client, Choose the VMs, Right click VMs, Click “Install XenServer Tools”
33/42
System Protect Software User Manual
·
The XenServer Tools is installed as below image:
34/42
System Protect Software User Manual
7.1.2 Open XenServer host ports
·
The SPS use UDP 3034 as the communication port with NMC as default.
Note: If the UDP 3034 is captured by the other program, the value of the port will be added
1(range from 3034~3083)
·
Open the XenServer Client, click the host console, Open the UDP port by the following
command˖
iptables -I INPUT -p udp --dport 3034 -j ACCEPT
iptables -I OUTPUT -p udp --dport 3034 -j ACCEPT
/etc/rc.d/init.d/iptables save
7.2 Installing and Configuring for SPS
7.2.1 Installing SPS
·
·
·
Upload the installation file “SPS-CUI-*.*.*.*-linux-i386.tar.gz” to the XenServer host using
WinSCP tools
Unzip the installation file and install the SPS by the command
tar –zxvf SPS-CUI-*.*.*.*-linux-i386.tar.gz
Install the SPS by the command:
./SPS.install
7.2.2 Configuring SPS
·
·
Enter the /opt/sps directory, start the SPS service by the command: ./SPSService
Open the configuration document by the command: ./SPS –i
Input the password: admin
Add the NMC IP address, for example the NMC IP is “172.18.139.102”
<RemoteList>
<Remote name="172.18.139.102" serv="2993" model=""/>
</RemoteList>
·
Please refer to chapter 3 (Linux with CUI) for more information about shutdown parameter
setting
·
·
Restart the SPS Service by the command: ./SPS –r
Check the NMC is connected or not by the command:
./SPS -l
The NMC will be connected as below:
35/42
System Protect Software User Manual
·
The alarm will pop up when the AC fail as below image
36/42
System Protect Software User Manual
8 Shutdown Operation
8.1 Shutdown flow chart
8.2 Shutdown setting˄NMC Webpage Side˅
8.2.1 Shutdown actions setting
·
Open the NMC website, select UPS Management ->UPS shutdown, and check the Actions
setting.
There are four kinds of define for Actions:
Action
Definition
Disable
The NMC will not send the alarm and shutdown
notification to the SPS client, when the events occur.
Warning
The NMC will send the alarm notification to the SPS client,
when the events occur.
Client Shutdown
The NMC will send the alarm and shutdown notification to
the SPS client, when the events occur.
Client &UPS Shutdown
The NMC will send the alarm and shutdown notification to
the SPS client when the events occur. Besides, the NMC
will send the shutdown command to the UPS.
Note˖Select the action to Client Shutdown or Client &UPS Shutdown, so that the system can
37/42
System Protect Software User Manual
be shut down gracefully by the SPS client.
8.2.2 Warning Period Setting
·
Open the NMC website, select UPS Management ->UPS shutdown. Check the warning
period setting.
For example:
The Warning Period is set to 30S and the Warning Interval is set to 10S.
The NMC will send the alarm notification to the SPS client every 10 seconds and will last
about 30 seconds.
8.2.3 UPS Shutdown Delay Setting
·
·
Open the NMC website, select UPS Management ->UPS shutdown. Check the UPS Shutdown
Delay setting.
The NMC will send the shutdown notification to the SPS client when the warning period is
met, then the UPS will be shut down after the shutdown delay intervalġif the action is “Client
&UPS Shutdown”.
By the default, the UPS shutdown delay timer is 120 seconds.
Make sure the time for UPS Shutdown Delay should be longer than the timer for Shutdown
delay plus Script MAX Execution time in SPS client, or else the warning dialog will pop up
that the time is unreasonable.
For example:
The Shutdown delay timer is 90 seconds and the Script Max Execution Time is 60 seconds,
The total time value is 150 seconds in SPS client.
But the UPS shutdown Delay time is 120 seconds in NMC webpage side.
The UPS shutdown Delay time is shorter than the 150 seconds, so the alarm dialog will pop
up that the time is unreasonable.
38/42
System Protect Software User Manual
8.2.4 Shutdown continue or not if events restored.
Open the NMC website, select UPS Management ->UPS shutdown, enable/disable the checkbox
for Cancel UPS shutdown if events restored.
·
·
Select the checkbox: The NMC will cancel the shutdown notification to the SPS client if the
events restored during the system shutdown delay interval.
Unselect the checkbox: The NMC still send the shutdown notification to the SPS client if the
event restored during the system shutdown delay interval.
8.3 Shutdown order
8.3.1 Shutdown continue if events restored
For example˖
·
NMC webpage side˖
Set the action to Client &UPS Shutdown, set the warning period to 30s, set the UPS
Shutdown Delay to 120s, unselect the Cancel UPS shutdown if event restored checkbox.
39/42
System Protect Software User Manual
·
SPS client side˖
Set the Shutdown Delay to 60s, set Script Max Execution Time to 40s, unselect Cancel
Shutdown if events restored in Shutdown Delay.
·
Shutdown order:
When the events occur, the SPS will pop up warning dialog, the system start to shut down
delay counter after 30 seconds warning.
When the shutdown delay time is met (60s), the system starts to execute the shutdown
script. And the system starts to shut down after 40s.
The UPS will be shut down after 20s (120-60-40=20).
Note: The system and UPS shutdown continue if the events restored during the system
shutdown delay interval. It will take effect to sleep function as also.
8.3.2 Shutdown discontinue if events restored
For example˖
·
NMC webpage side˖
Set the action to Client &UPS Shutdown, set the warning period to 30s, set the UPS
shutdown Delay to 120s. Select the Cancel UPS shutdown if event restored checkbox.
40/42
System Protect Software User Manual
·
SPS client side˖
Set the Shutdown Delay to 60s, set Script Max Execution Time to 40s.
Select Cancel Shutdown if events restored in Shutdown Delay.
·
Shutdown order:
When the events occur, the SPS will pop up warning dialog, the system start to shut down
delay counter after 30 seconds warning.
When the shutdown delay time is met (60s), the system starts to execute the shutdown
script. And the system starts to shut down after 40s.
The UPS will be shut down after 20s (120-60-40=20).
Note: The system and UPS shutdown discontinue if the events restored during the system
shutdown delay interval. It will take effect to sleep function as also.
8.4 Redundant UPS Input shutdown
For a computer powered by more than one NMC UPS, we can add them into cluster.
Enter the IP address of NMC via click “Add” button on the screen of SPS.
Enter a Clusterġname, for example, group1.
Add second NMC IP address, and enter the same Clusterġname.
The NMC UPSs that under the same Cluster name will become a group
The systemġwill start to shut down when the shutdown conditions are all met for the devices
under the group1
41/42
System Protect Software User Manual
8.5 Simulate shutdown by event
Before doing this simulate test, please make sure the computer system is not running critical
mission, and is allowed to shut down for a while.
Open the NMC website, select UPS Management -> UPS Powered Devices.
·
The server for the SPS client will be added to the table if the communication is established
between the SPS and NMC.
·
·
·
Select the event in the Remote PC Shutdown Test list, click submit button, the NMC will send
the warning/shutdown notification to the SPS client.
The SPS will show the alarms and shutdown or sleep the computer system. NMC will send
the shutdown notification during the “UPS Shutdown Delay”.
After the test, wait for “UPS Shutdown Delay” time, then turn on the computer system.
42/42