1
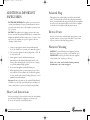
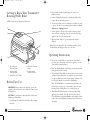
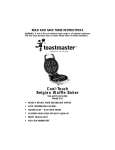
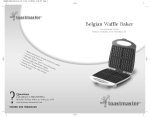
TMRWB_Cover
5/16/06
4:15 PM
Page 1
Rotating
Waffle Baker
USE AND CARE GUIDE
MODEL TMRWB
?
•R
• H ota
ti
fo andl ng c
•P re e
as
• C owe asy fold e
• V rum r in stor s do
• N aria b t dica age wn
on ble ray tor
-st br
lig
ick ow
hts
pla nin
tes g c
on
tro
l
Questions
Call toll free 1-800-233-9054
Monday – Friday, 8:00 a.m. - 5:30 p.m. CST
www.maxim-toastmaster.com
TMRWB
TMRWB_Manual
5/31/06
9:43 AM
Page 1
IMPORTANT SAFEGUARDS
When using electrical appliances, basic safety precautions should
always be followed including the following:
1. Read all instructions.
2. Do not touch hot surfaces. Use handles or knobs. Use oven
mitts or potholders.
3. To protect against electric shock, do not immerse cord, plugs
or appliance in water or other liquid.
4. Close supervision is necessary when any appliance is used by
or near children.
5. Unplug from outlet when not in use and before cleaning.
Allow to cool before putting on or taking off parts, and before
cleaning the appliance.
6. Do not operate any appliance with a damaged cord or plug or
after the appliance malfunctions, or has been damaged in any
manner. Contact Consumer Service for examination, repair or
adjustment.
7. The use of accessory attachments not recommended by the
appliance manufacturer may cause injuries.
8. Do not use outdoors.
9. Do not let cord hang over edge of table or counter, or touch
hot surfaces.
10. Do not place on or near a hot gas or electric burner, or in a
heated oven.
11. Extreme caution must be used when moving an appliance
containing hot oil or other hot liquids.
12. To disconnect, turn the Adjustable Browning Control to
lowest position, then remove plug from wall outlet.
13. Do not use appliance for other than intended use.
SAVE THESE INSTRUCTIONS
For Household Use Only
1.
TMRWB_Manual
5/31/06
9:43 AM
Page 2
ADDITIONAL IMPORTANT
SAFEGUARDS
CAUTION HOT SURFACES: This appliance generate heat and
escaping steam during use. Proper precautions must be taken to
prevent the risk of burns, fires or other injury to persons or damage to property.
CAUTION: This appliance is hot during operation and retains
heat for some time after turning OFF. Always use oven mitts when
handling hot materials and allow metal parts to cool before cleaning. Do not place anything on top of the appliance while it is
operating or while it is hot.
1. All users of this appliance must read and understand this
Use & Care Guide before operating or cleaning this appliance.
2. The cord to this appliance should be plugged into a 120V AC
electrical outlet only.
3. If this appliance begins to malfunction during use,
immediately turn the Adjustable Browning Control to the
lowest position, and unplug the cord. Do not use or attempt
to repair the malfunctioning appliance.
Polarized Plug
This appliance has a polarized plug (one blade is wider than the
other). To reduce the risk of electric shock, this plug is intended to
fit into a polarized outlet only one way. If the plug does not fit fully in
the outlet, reverse the plug. If it still does not fit, contact a qualified
electrician. Do not attempt to modify the plug in any way.
Electric Power
If the electrical circuit is overloaded with other appliances, your
appliance may not operate properly. It should be operated on a
separate electrical circuit from other appliances.
Plasticizer Warning
CAUTION: To prevent Plasticizers from migrating from the
finish of the countertop or tabletop or other furniture, place
NON-PLASTIC coasters or placemats between the appliance
and the finish of the countertop or tabletop.
Failure to do so may cause the finish to darken, permanent
blemishes may occur or stains can appear.
4. Do not leave this appliance unattended during use.
5. When using this appliance, provide adequate air space above
and on all sides for air circulation. Do not allow this appliance
to touch curtains, wall coverings, clothing, dish towels or other
flammable materials during use.
Important: Wearing oven mitts, use the extended Folding Handle
to hold the top cover (Lid) open while placing or removing food
on the cooking surface to prevent accidental closing and injury.
Short Cord Instructions
A short power-supply cord is provided to reduce the risk resulting
from becoming entangled in or tripping over a longer cord.
Do not use an extension cord with this product.
2.
Rotating Waffle Baker Use and Care Guide
3.
TMRWB_Manual
5/31/06
9:43 AM
Page 4
2. Wipe all surfaces with a slightly damp, soft cloth. Never
immerse in water.
Getting to Know Your Toastmaster®
Rotating Waffle Baker
3. Lock the Folding Handle in place by lifting up until it clicks
securely into an extended position.
NOTE: Product may vary slightly from illustration.
4. To burn off residues on the Cooking Plates, it will be necessary
to operate the unit for a few minutes before initial use. Do not
add batter or oil during this time.
1.
4.
2.
5. Set the appliance on a dry, clean and flat countertop surface,
where it can be easily plugged into an electrical outlet. Plug
appliance into 120V AC electrical outlet.
6. Allow the Waffle Baker to operate until smoke and odor
dissipate.
5.
Note: Some odor may still be detected during initial use; this is
normal and should disappear after one or two uses.
Operating Instructions
3.
1. Be sure the Cooking Plates are clean and free from dust. If
necessary, wipe with a damp cloth. Set the appliance on a dry,
clean and flat countertop surface.
1. Green Pre-heat
Indicator Light
2. Red Power ON
Indicator Light
3. Crumb Tray (P/N 22796)
4. Adjustable Browning
Control
5. Folding Handle
(shown extended)
Before First Use
IMPORTANT: Before using for the first time, operate the
appliance without batter in order to burn off residues on the
Cooking Plates.
CAUTION: To avoid burns, caution should be taken when
handling the Waffle Baker.
1. Carefully unpack Waffle Baker and remove all packaging
materials.
4.
Rotating Waffle Baker Use and Care Guide
2. Make sure Folding Handle is locked into extended position by
lifting up until it clicks securely.
3. When using the Waffle Baker for the first time, it is necessary to
condition each Cooking Plate. To condition open grids, brush
the exposed Waffle grid surfaces with cooking oil and close the
Lid. The grids may need occasional reconditioning.
Note: The Waffle Baker is coated with a non-stick surface. Do
not use spray-on oils, grease or shortening, as they can cause
build-up on the Cooking Plates. Use cooking oil instead.
4. Turn Adjustable Browning Control to lowest position. Plug
appliance into a suitable 120V AC electrical outlet; the red
Power ON Indicator Light will illuminate, indicating the unit is
ready to heat when Adjustable Browning Control is turned up,
(clockwise).
5.
TMRWB_Manual
5/31/06
9:43 AM
Page 6
Operating Instructions (Cont.)
5.
Your Waffle Baker has an Adjustable Browning Control with
3 Settings, (L) LIGHT, (M) MEDIUM or (D) DARK.
6.
When preparing a recipe for the first time, it may become
necessary to experiment with the Adjustable Browning
Control. Begin by setting the Control to (M) MEDIUM.
7.
While preparing batter, allow appliance to pre-heat (about 3
minutes). The Green Pre-heat Indicator Light will illuminate
when unit has reached the proper pre-heat temperature.
8.
Using a protective oven mitt, lift the Lid by the extended,
Folding Handle and pour approximately 1 cup of batter onto
the lower Cooking Plate using an “X” pattern and carefully
close the Lid, making sure the upper Lid is set down into
position. Do not force shut. Steam will be released between
the Cooking Plates. Caution should be taken to prevent hands
from coming into contact with the steam. Be careful not to
pour too much batter, as excess batter will seep out from
between the Cooking Plates.
9.
Wait approximately 10 seconds, and then turn the unit
over by rotating the extended Folding Handle to the right
(clockwise).
10. After about 2 minutes, turn the grids back over by rotating
the Folding Handle to the left (counterclockwise). Using a
protective oven mitt, gently lift the Lid by the extended
Folding Handle to check for brownness. If the Lid is difficult
to lift, the waffle may not be done. Close the Lid and watch
for steaming to stop before checking again.
13. When the waffles are cooked, remove them by using a plastic
or wooden spatula. Using plastic or wooden utensils are
recommended to keep your non-stick surface looking new.
Do not use sharp utensils, (i.e. knives, forks, etc.) This could
damage the non-stick surface.
14. After removing cooked waffle, keep the Waffle Baker closed to
preserve the heat until ready for the next batch of waffles.
15. After use, turn the Adjustable Browning Control to the lowest
position (counterclockwise) and then immediately unplug
from the electrical outlet.
16. If waffles are not to be consumed immediately, place the waffles on a paper napkin or cooling rack to absorb condensation.
To keep hot, place in an ovenproof dish on an oven rack, and
warm at about 200° to 250°F. Waffles will keep for about 20
minutes before they begin to dry out.
Note: The lower Adjustable Browning Control Setting, (L) Light,
can be used to reheat previously baked waffles.
User Maintenance Instructions
This appliance requires little maintenance. It contains no user
serviceable parts. Do not try to repair it yourself. Any servicing
requiring disassembly must be performed by a qualified appliance
repair technician.
11. After the first waffle, move the Adjustable Browning Control
up or down to achieve the desired browning of the waffle.
Browning may differ depending on the batter ingredients.
Batters using sugar tend to brown quicker.
12. Total cooking time should take approximately 3 to 5 minutes.
Exact cooking time will be a matter of your taste and will
depend on type of batter and ingredients used. Avoid opening
your Waffle Baker before cooking is completed, as this may
cause the waffle to stick or bake poorly.
6.
Rotating Waffle Baker Use and Care Guide
7.
TMRWB_Manual
5/31/06
9:43 AM
Page 8
Care and Cleaning
CAUTION: Do not immerse the Waffle Baker, cord, or plug in water
or any other liquid. Unplug and allow to cool before cleaning. Do not
use steel wool, scouring pads or abrasive cleaners, as this will damage
the finish.
Helpful Hints and Tips
◆
Sift all dry ingredients.
◆
Egg yolks should be separated from egg whites before mixing.
◆
Beating egg whites separately, and then folding into the batter,
will create lighter and crispier waffles.
◆
Egg whites should be beaten until they form stiff peaks. Stir 1⁄4
of beaten egg whites into batter to lighten it, then gently fold
the rest of the egg whites into the batter (there should be white
streaks in the batter). Do not over-mix batter when adding
egg whites.
◆
It is not necessary to beat egg yolks and milk separately; add to
the combined flour mixture, and use a whisk or hand mixer
to blend.
◆
Do not open the Waffle Baker during the first minute of
baking, or waffles will separate. Completely bake waffles before
removing them from the unit.
◆
When waffles are done, the Lid should lift open easily. Wearing
protective oven mitts use the extended, Folding Handle to gently
lift the Lid. If the Lid pulls, wait another minute and try lifting
it open again.
◆
Waffles can be made ahead of time, then refrigerated or
frozen. When ready to eat, place defrosted waffles in your
Waffle Baker and reheat waffles using the (L) Light Waffle
setting. When serving waffles to several people at once,
a toaster or oven is ideal to reheat.
INSIDE CLEANING
THE UNIT SHOULD NOT BE HOT WHEN CLEANING.
Note: Your Belgian Waffle Baker has non-stick coated Cooking Plates.
Do not use abrasive cleaners, metal cleaning brushes or metal scouring pads. This could damage the non-stick surface.
Although the Cooking Plates are coated with a non-stick coating, some
batter or ingredients may still adhere to the Waffle Baker. To remove,
simply pour a little cooking oil onto the baked-on food. Allow to stand
for 5 to 10 minutes. This should soften the food and make it easy to
remove with absorbent paper towels or a soft cloth. If the preceding
measure fails to remove the food residue, we suggest wiping the
Cooking Plates with a slightly dampened cloth or nylon bristle brush
and a little non-abrasive detergent.
OUTSIDE CLEANING
Wipe with a soft, dry cloth.
STORAGE
Unplug unit and allow to cool. Store in its box or in a clean, dry place.
Never store Waffle Baker while it is hot or still plugged in. Never wrap
cord tightly around the appliance. Do not put any stress on cord
where it enters unit, as this could cause cord to fray and break. The
Waffle Baker’s Folding Handle can be collapsed by pressing down on
the button and folding down.
8.
Rotating Waffle Baker Use and Care Guide
For Low-Fat, Low-Cholesterol Waffles
◆
All recipes work equally well with skim milk.
◆
Leave out egg yolks altogether. All leavening properties come
from the beaten egg whites.
◆
Use liquid vegetable oils, like canola, corn or sunflower, instead
of butter.
9.
TMRWB_Manual
5/31/06
9:43 AM
Page 10
For Higher-Fiber Waffles
◆
Substitute 1⁄2-cup, or more, of white flour with whole wheat flour.
◆
Substitute 1⁄4-cup of wheat or white flour with oat bran.
For Sugar-Free Waffles
◆
◆
Substitute sugar with Splenda® No Calorie Sweetener or any
other sugar substitute. Follow package directions for
substitution quantities.
Enjoy your sugarless waffles with sugar-free maple syrup. There
are many wonderful brands available on the market today.
1. Sift flour, baking powder, and
salt together in a bowl.
2. Use an electric mixer to beat
the whites until soft peaks
form. Sprinkle in the sugar
and continue to beat until stiff.
3. Use the Mixer to blend egg
yolks, milk and vegetable oil
together.
4. Pour the milk mixture into the
dry ingredients and whisk
together until just mixed.
5. Gently fold egg white mixture
into the batter.
10.
Rotating Waffle Baker Use and Care Guide
1. Sift flour, yeast, salt and sugar
together in a bowl.
2. In a microwave or double boiler,
heat milk, water and butter until
very warm, 120°-130°F (butter
does not need to melt).
3. Use an electric mixer to blend
the eggs into the milk mixture.
Waffle Recipes
BASIC WAFFLES
1 3⁄4 cups all-purpose flour
2 teaspoons baking powder
1
⁄2 teaspoon salt
3 eggs, separated
2 tablespoons sugar
1 1⁄2 cups milk
1
⁄2 cup vegetable oil
BELGIAN WAFFLES
2 2⁄3 cups all-purpose flour
2 1⁄4 tsp. RED STAR® active
dry yeast
2 tablespoons sugar
1 teaspoon salt
1 3⁄4 cups milk
1
⁄4 cup water
1
⁄4 cup butter
3 eggs, separated
CORN WAFFLES
2 (8 1⁄2 oz) packages corn
muffin mix
2 eggs
1
⁄4 cup vegetable oil
1 1⁄2 cups milk
1 (15-oz) can whole kernel corn,
drained
2 (4-oz) cans chopped green
chilies, drained
2 cups grated American cheese
1. Use a spoon to stir corn muffin
mix, eggs, vegetable oil, and
milk together. The batter will
be slightly lumpy.
2. Stir in corn, chilies and cheese.
4. Pour the milk mixture into the
dry ingredients and use the
mixer to mix thoroughly.
5. Cover the bowl tightly with plastic wrap or foil and refrigerate
for at least 6 hours or overnight.
CRAISINS® AND PECAN
WAFFLES
1 3⁄4 cups all-purpose flour
2 teaspoons baking powder
1
⁄2 teaspoon salt
3 eggs, separated
2 tablespoons sugar
1 teaspoon vanilla
1 1⁄2 cups milk
1
⁄2 cup vegetable oil
1 cup craisins® (sweetened dried
cranberries)
1 cup chopped pecans
continue to beat until stiff.
Blend in vanilla.
3. Use the Mixer to blend egg
yolks, milk and vegetable oil
together.
4. Pour the milk mixture into the
dry ingredients and whisk
together until just mixed.
5. Gently fold egg white mixture,
craisins® and pecans into the
batter.
CHOCOLATE CHIP WAFFLES
1 3⁄4 cups all-purpose flour
2 teaspoons baking powder
1
⁄2 teaspoon salt
3 eggs, separated
2 tablespoons sugar
1 1⁄2 cups milk
1
⁄2 cup vegetable oil
1 cup semi-sweet chocolate chips
1. Sift flour, baking powder, and
salt together in a bowl.
2. Use an electric mixer to beat
the whites until soft peaks form.
Sprinkle in the sugar and
continue to beat until stiff.
3. Use the Mixer to blend egg
yolks, milk and vegetable oil
together.
4. Pour the milk mixture into the
dry ingredients and whisk
together until just mixed.
5. Gently fold egg white mixture
and chocolate chips into the
batter.
1. Sift flour, baking powder, and
salt together in a bowl.
2. Use an electric mixer to beat
the whites until soft peaks form.
Sprinkle in the sugar and
11.
TMRWB_Manual
5/31/06
9:43 AM
Page 12
WHOLE WHEAT WAFFLES
1 cup all-purpose flour
1 cup whole wheat flour
4 teaspoons baking powder
1
⁄2 teaspoon salt
4 teaspoons sugar
2 eggs, separated
2 cups milk
1
⁄2 cup vegetable oil
Sprinkle in the sugar and
continue to beat until stiff.
Blend in vanilla.
3. Use the mixer to blend the egg
yolks, milk, and butter together.
4. Pour the milk mixture into the
dry ingredients and whisk
together until just mixed.
5. Sir in bananas and nuts.
1. Sift whole wheat flour, all-purpose flour, baking powder, and
salt together in a bowl.
2. Use an electric mixer to beat
the whites until soft peaks form.
Sprinkle in the sugar and
continue to beat until stiff.
3. Use the Mixer to blend egg
yolks, milk and vegetable oil
together.
4. Pour the milk mixture into the
dry ingredients and whisk
together until just mixed.
5. Gently fold egg white mixture
into the batter.
WHOLE WHEAT BANANANUT
WAFFLES
1 cup whole wheat flour
1 cup all-purpose flour
2 teaspoons baking powder
1
⁄2 teaspoon salt
2 eggs, separated
2 tablespoons sugar
1 teaspoon vanilla
1 1⁄2 cups milk
1
⁄4 cup melted butter
2 medium bananas, mashed
1 cup chopped walnuts
6. Gently fold egg white mixture
into batter.
PEANUT BUTTER WAFFLES
2 cups all-purpose flour
4 teaspoons baking powder
1 teaspoon salt
2 eggs, separated
4 tablespoons sugar
1 teaspoon vanilla
2 cups milk
1 tablespoon vegetable oil
1
⁄2 cup peanut butter
1. Sift flour, baking powder, and
salt together in a bowl.
2. Use an electric mixer to beat
the whites until soft peaks form.
Sprinkle in the sugar and
continue to beat until stiff.
Blend in vanilla.
CHOCOLATE WAFFLES
2 cups all-purpose flour
2 teaspoons baking powder
1
⁄2 teaspoon salt
4 teaspoons sugar
2 eggs, separated
1 1⁄3 cups milk
1 1⁄2 teaspoons vanilla
1
⁄4 cup butter
3 (1-oz) squares semi-sweet
chocolate
1. Melt butter and chocolate
together in microwave or
double boiler.
2. Sift flour, baking powder, and
salt together in a bowl.
3. Use an electric mixer to beat
the whites until soft peaks form.
Sprinkle in the sugar and
continue to beat until stiff.
Blend in vanilla.
4. Use the Mixer to blend egg
yolks, milk together.
5. Pour the milk mixture into the
dry ingredients and whisk
together until just mixed.
6. Gently fold egg white mixture
into the batter.
3. Use the Mixer to blend egg
yolks, milk, vegetable oil and
peanut butter together.
4. Pour the milk mixture into the
dry ingredients and whisk
together until just mixed.
5. Gently fold egg white mixture
into the batter.
1. Sift whole wheat flour, all-purpose flour, baking powder, and
salt together in a bowl.
2. Use an electric mixer to beat the
egg whites until soft peaks form.
12.
Rotating Waffle Baker Use and Care Guide
13.
TMRWB_Manual
5/31/06
9:43 AM
Page 14
Keep Dated Sales Receipts for Warranty Service.
LIMITED ONE-YEAR WARRANTY
Warranty Coverage: This product is warranted to be free from defects in materials or workmanship for a period of one (1) year from the original purchase date. This product warranty is
extended only to the original consumer purchaser of the product and is not transferable. For a
period of one (1) year from the date of original purchase of the product, our Repair Center will,
at its option, either (1) repair the product or (2) replace the product with a reconditioned comparable model. These remedies are the purchaser's exclusive remedies under this warranty.
Warranty Service: To obtain warranty service, you must call our warranty service number at
1-800-233-9054 for return instructions on how to deliver the product, in either the original packaging or packaging affording an equal degree of protection to the Repair Center specified below.
You must enclose a copy of your sales receipt or other proof of purchase
to demonstrate eligibility for warranty coverage.
To return the appliance, ship to:
To contact us, please write to, call, or email:
ATTN: Repair Center
708 South Missouri Street
Macon, MO 63552 USA
Consumer Relations Department
PO Box 7366
Columbia, MO 65205-7366 USA
1-800-233-9054
E-mail: [email protected]
Keep this booklet. Record the following for reference:
Date purchased _______________________________________________
Model number _______________________________________________
Date code (stamped on bottom)________________________________
What Is Not Covered: This warranty does not cover damage resulting from misuse, accident,
commercial use, improper service or any other damage caused by anything other than defects
in material or workmanship during ordinary consumer use. This warranty is invalid if the serial
number has been altered or removed from the product. This warranty is valid only in the
United States and Canada.
EVERYBODY EATS. It’s a fact of life.
LIMITATION ON DAMAGES: THERE SHALL BE NO LIABILITY FOR ANY INCIDENTAL OR CONSEQUENTIAL DAMAGES FOR BREACH OF ANY EXPRESS OR IMPLIED WARRANTY OR CONDITION ON THIS PRODUCT.
DURATION OF IMPLIED WARRANTIES: EXCEPT TO THE EXTENT PROHIBITED BY APPLICABLE
LAW, ALL IMPLIED WARRANTIES AND CONDITIONS, INCLUDING, WITHOUT LIMITATION,
IMPLIED WARRANTIES AND CONDITIONS OF MERCHANTABILITY AND FITNESS FOR A PARTICULAR PURPOSE OR USE ON THIS PRODUCT ARE LIMITED IN DURATION TO THE DURATION OF THIS WARRANTY.
But sometimes preparing
meals can become a chore.
That’s why TOASTMASTER has been invited
into millions of kitchens just like yours
so we can HELP YOU MASTER your
mixing, baking, grilling, toasting,
Some jurisdictions do not allow the exclusion or limitation of incidental or consequential damages, or allow limitations on how long an implied warranty lasts, so the above limitations or
exclusions may not apply to you. This warranty gives you specific legal rights and you
may have other rights under the laws of your jurisdiction.
For more information on our products, visit our website: www.maxim-toastmaster.com.
brewing, heating and serving
tasks WITH EASE AND STYLE.
The TOASTMASTER name stands for a
CELEBRATION of INNOVATION designed
© 2006 Toastmaster Inc.
All Rights Reserved
Rev. 5/06
Printed in China
to serve your life and keep you
COOKIN’ IN STYLE.
14.
Rotating Waffle Baker Use and Care Guide
15.
TMRWB_Cover
5/16/06
4:15 PM
Page 1
Rotating
Waffle Baker
USE AND CARE GUIDE
MODEL TMRWB
?
•R
• H ota
ti
fo andl ng c
•P re e
as
• C owe asy fold e
• V rum r in stor s do
• N aria b t dica age wn
on ble ray tor
-st br
lig
ick ow
hts
pla nin
tes g c
on
tro
l
Questions
Call toll free 1-800-233-9054
Monday – Friday, 8:00 a.m. - 5:30 p.m. CST
www.maxim-toastmaster.com
TMRWB