1
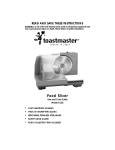
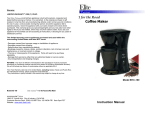
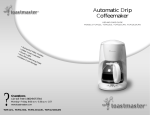
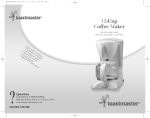
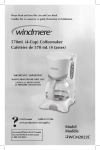
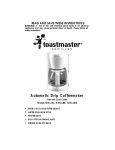
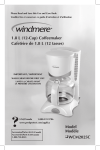
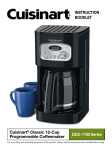
READ AND SAVE THESE INSTRUCTIONS
WARNING: A risk of fire and electrical shock exists in all electrical appliances
and may cause personal injury or death. Please follow all safety instructions.
Automatic Drip Coffeemaker
Use and Care Guide
Models TCM5WCAN, TCM10WCAN, TCM10DWCAN
•
•
•
•
•
SWING-OUT CONE FILTER BASKET
WATER LEVEL INDICATOR
POWER LIGHT
NON-STICK WARMING PLATE
HIDDEN CORD STORAGE
IMPORTANT SAFEGUARDS
When using electrical appliances, basic safety precautions should always
be followed to reduce the risk of fire, electric shock and injury to persons,
including the following:
• Read all instructions before using appliance.
• Do not touch hot surfaces. Use handles or knobs.
• Do not immerse cord, plug, or coffeemaker in water or other liquid. See
instructions for cleaning.
• Close supervision is necessary when any appliance is used near
children.
• This appliance is not for use by children.
• Unplug from outlet when not in use and before cleaning. Allow to cool
before putting on or taking off parts, and before cleaning the
coffeemaker.
• Do not operate any damaged appliance. Do not operate with
a damaged cord or plug, or after the appliance malfunctions or has
been dropped or damaged in any manner. Return appliance to the
nearest authorized service center for examination, repair or adjustment.
• Use attachments only if recommended by Toastmaster Inc.
• Do not use outdoors or while standing in a damp area.
• Do not let cord hang over edge of table or counter, or touch hot surfaces.
• Do not place on or near a hot gas or electric burner, or in a heated oven.
• Use coffeemaker only as indicated in these instructions.
• This carafe is designed for use with this coffeemaker only. It must never
be used on a range top.
• Do not set a hot carafe on a wet or cold surface.
• Do not use a cracked carafe or a carafe having a loose or weakened
handle.
• Do not clean carafe with abrasive cleansers, steel wool pads, or other
abrasive material.
• Scalding may occur if any lids are removed during the brewing cycles.
• Be certain lids are securely in place before operating appliance.
• To disconnect, switch control to off position, then remove plug from wall
outlet.
• Allow filter basket to cool before removing it from coffeemaker.
• Do not pour liquid other than water and the cleaning solution specified
in this manual into the water chamber. See instructions for cleaning.
• Do not move entire unit when carafe contains hot liquid.
• When using the timer feature on model TCM10DWCAN and at all times
before brewing, remember to place carafe on warming plate.
• Coffeemaker must be left to cool down for approximately 10 minutes
before adding more water.
2
•
WARNING–To reduce the risk of fire or electric shock, do not remove
bottom cover. No user serviceable parts inside. Repair should be done
by authorized service personnel only.
SAVE THESE INSTRUCTIONS
CAUTION: A short power supply cord is provided to reduce the risk of personal
injury resulting from becoming entangled in or tripping over a longer cord.
Extension cords are available from local hardware stores and may be used if
care is exercised in their use. If an extension cord is required, special care and
caution is necessary. Also the cord must be: (1) marked with an electrical rating
of 125 V and at least 10 A, 1250 W, and (2) the cord must be arranged so that
it will not drape over the countertop or tabletop where it can be pulled on by
children or tripped over accidentally.
POLARIZED PLUG: This appliance has a polarized plug, (one blade is wider
than the other). As a safety feature to reduce the risk of electrical shock, this
plug is intended to fit in a polarized outlet only one way. If the plug does
not fit fully in the outlet, reverse the plug. If it still does not fit, contact a
qualified electrician. Do not attempt to defeat this safety feature.
ELECTRIC POWER: If the electric circuit is overloaded with other
appliances, your appliance may not operate properly. It should be
operated on a separate electrical circuit from other appliances.
THIS PRODUCT IS FOR HOUSEHOLD USE ONLY
Water Chamber
Cover
Water
Window
PROG
(Program)
Swing-out
Filter Basket
Display
(Power)
Glass
Carafe
Warming
Plate
H
(Hours)
M
(Minutes)
* Model TCM10DWCAN Control
FIGURE 1
FIGURE 2
3
BEFORE YOU USE YOUR COFFEEMAKER
Before preparing coffee in your new coffeemaker, thoroughly clean the
carafe, carafe lid and removable filter basket in hot, sudsy water. Rinse and
dry. Replace disassembled parts. Clean the inside of the coffeemaker by
brewing two full carafes of tap water (see “Brewing Instructions” below. Do
not place coffee in filter basket for this initial cleaning. Note: at the end of
first cycle, turn coffeemaker off and wait ten minutes. Turn unit on and brew
second carafe of water.
COFFEE FILTERS
Cone-shaped paper filters are available locally at grocery stores and where
coffeemakers are sold. Standard #4 filters should be used in the 10-cup
model; #2 filters should be used in the 5-cup model. Permanent gold filters
may also be purchased, eliminating the need for disposable papers filters.
The use of basket-style paper filters is not recommended, since they do not
conform to the shape of the filter basket and may cause coffee to back up
and spill over during brewing.
COFFEE YIELD
10-cup coffeemaker: 10 5-oz. cups
5-cup coffeemaker: 5 5-oz. cups
Note: A 5-oz. cup is the American industry standard and is used by most
coffeemaker manufacturers. To fill up your favorite mug, fill coffeemaker
water chamber with enough water for 2 cups (10 ounces.)
BREWING INSTRUCTIONS
1. Plug coffeemaker into any 120 Volt, AC electrical outlet.
2. Fill carafe with cold tap water and pour into water chamber. Markings
on the carafe indicate level of water required to brew desired number
of cups. No less than two cups is recommended when using 5-cup and
10-cup units.
Note: The amount of brewed coffee will always be less than the
amount of water placed into coffeemaker, since about 10% is
absorbed by coffee grounds and filter.
3. Place coffee filter in filter basket. If you have a 10-cup model use a #4
paper cone-shaped filter. If you have a 5-cup model, use a #2 filter.
Measure one level tablespoon of drip or regular grind coffee for each
cup of coffee desired. For stronger or milder coffee, adjust amount of
coffee to suit your taste.
4. Return filter basket to closed position.
5. Place carafe on warming plate.
6. Switch control to on. (For model TCM10DWCAN with electronic timer
and automatic shut-off, see important instructions on page 5.) The on
light will indicate unit is in operation.
7. If you wish to serve a cup of coffee before brew cycle is completed,
4
8.
9.
10.
11.
simply remove carafe from warming plate. Dripping will automatically
cease. Return carafe to position on warming plate within a few seconds;
dripping will resume.
Upon completion of the brew cycle, wait about one minute until the
brew dripping from the filter basket into the carafe has stopped.
Carafe lid should be kept in place to facilitate safe serving and help
keep coffee at proper serving temperature.
To keep coffee hot, return carafe to the warming plate after serving.
The warming plate will automatically cycle to maintain ideal serving
temperature as long as the coffeemaker is on.
Switch coffeemaker to off when carafe is empty or when unit is not in use.
(Model TCM10DWCAN with automatic shut-off will automatically shut
off after two hours from start of brew cycle when set in auto position. See
further details on page 6.)
To brew another carafe of coffee, turn unit off and wait 10 minutes to
allow heating element to cool. Important: If unit is not allowed to cool
before immediate repeated use, water placed in water chamber may
become overheated and a spray of steam could be released from
opening, creating a risk of burns.
BREWING A SECOND POT OF COFFEE
As mentioned above, it is recommended that the coffeemaker should be in off
position for 10 minutes between cycles, in order to allow unit to cool. While
unit is in off position, dispose of used coffee filter, and rinse carafe and filter
basket in water. Place a fresh filter in basket. Repeat brewing procedure.
SPECIAL INSTRUCTIONS FOR MODEL TCM10DWCAN WITH ELECTRONIC
TIMER AND AUTO-OFF
Setting the clock
1. Plug the power cord into a wall outlet. The display will flash until the
time of day is set. NOTE: A power failure will also cause the display
to flash and it will be necessary to reset the clock.
2. To set the clock, hold the “H” button in for 3 or 4 seconds until the hour
setting begins to change. Push the “H” button until the correct hour is
displayed, noting that PM is indicated on the left of the display.
3. Push the “M” button until the correct minutes are displayed. A few
seconds after you release the button the colon between the hour and
the minutes will begin to flash, indicating that the clock is running.
Setting the timer
1. While holding the “PROG” button down, push and hold the “H”
button until the hour display begins to change. The coffee cup icon on the
left of the display will flash to indicate you are programming the timer.
Continue to press the “H” button until the correct hour is displayed for the
brew time you would like to set, noting that PM is indicated on the left of
the display.
5
2. While holding down the “PROG” button press the “M” button in the
same way until the desired brew time is shown.
3. After the Brew Time is set, press “PROG” again to return the
display to time of day.
4. Pressing the “PROG” button toggles the timer on and off. The
coffee cup icon indicates when the timer is on.
USING THE AUTOMATIC SHUT-OFF FEATURE
The Automatic Shut-Off feature on Model TCM10DWCAN will
automatically shut the coffeemaker off two hours after programmed brew
time. This feature will prevent the coffeemaker from being left on for an
extended period of time, which can be harmful to the coffeemaker and the
coffee carafe. Important: The automatic shut-off feature will only work when
brew time is pre-programmed and the coffeemaker is in timer mode. If you
prefer to manually shut off your coffeemaker you may do so by
pushing the ” “ button when unit is not in use.
HINTS FOR GREAT TASTING COFFEE
A clean coffeemaker is essential for making great tasting coffee.
Regular cleaning, as specified in “Care and Cleaning of your
Coffeemaker” on page 7 is highly recommended.
Always use fresh, cold water in your coffeemaker.
Finer grinds, such as drip and ADC coffee, promote fuller extraction
and provide rich, full-bodied coffee. Regular grind will require
slightly more coffee per cup to provide the strength of a finer grind.
Store coffee in a cool, dry place. Once coffee has been opened, keep
it tightly sealed in the refrigerator to maintain freshness.
For optimum coffee, buy whole beans and grind them finely just
before brewing.
Do not re-use coffee grounds since this will greatly impair coffee flavor.
Reheating coffee is not recommended. Coffee is at its peak flavor
immediately after brewing.
Small oil droplets on the surface of brewed, black coffee is due to the
extraction of oil from the coffee grounds. Oiliness may occur more
frequently if heavily roasted coffees are used. Overextraction may also
cause oiliness, indicating a need to clean your coffeemaker.
6
CARE AND CLEANING
Always make sure coffeemaker is unplugged and warming plate is cool
before attempting to clean. After daily use, the filter basket and carafe
should be washed in hot, sudsy water. Wipe exterior with a damp cloth to
remove superficial stains. For stubborn stains, use a nylon or plastic pad
with a non-abrasive cleanser, such as Bon Ami® or Arm & Hammer®.
Do not use metal scouring pads or abrasive cleansers.
Special cleaning of your coffeemaker is recommended at least once a
month, depending on frequency of use and quality of water used in the unit.
If water in your area is especially hard, the following cleaning
procedure should be performed every two weeks, since minerals in water
can detract from the flavor of the coffee and possibly lengthen brew time.
1. Fill carafe with one part white vinegar to three parts cold water. Pour
water and vinegar solution into the water chamber.
2. Place a paper filter in the filter basket and swing to closed position.
Place carafe on warming plate. Switch control to on. During
cleaning, more steam will occur than during normal brewing.
3. KEEP THE COFFEEMAKER ON UNTIL CARAFE IS HALF FULL. Switch
control to off. When liquid stops dripping from filter basket into the
carafe, remove the basket and carafe and allow liquid to cool in the
carafe for 10 minutes. When cooled, pour liquid back into the water
chamber.
4. Replace basket and return carafe to warming plate.
5. Switch control to on. Repeat procedure, allowing all the cleaning
solution to empty into the carafe. After dripping has stopped,
discard contents of carafe.
6. After allowing coffeemaker to cool for 10 minutes, rinse it out by
brewing a carafe full of cold water. Make sure to insert a fresh filter
into the filter basket before brewing.
7. At end of brew cycle, switch control to off. Discard water in the carafe.
Remove used filter and wash carafe and filter basket in hot sudsy
water. Dry parts.
8. When coffeemaker has cooled, wipe exterior with a dry cloth.
Any servicing requiring disassembly other than the above cleaning must
be performed by an authorized service center.
SERVICE INFORMATION
Please refer to warranty statement to determine if in-warranty service applies.
This appliance must be serviced by a Toastmaster authorized service center.
Unauthorized service will void warranty. Consult your phone directory under
“Appliances-Household-Small-Service and Repair,” or call 1-800-947-3744
in the U.S. and Canada, 52-5-397-2848 in Mexico.
7
If an authorized service center is not available locally, your appliance may be
returned postage prepaid to our National Service Center at the address shown
on the back of this book.
Products must be adequately protected to avoid shipping damage. Surround your
appliance with three inches of protective padding and include a copy of your
dated sales receipt and a note explaining the problem you have
experienced. We recommend insuring your package. No CODs accepted.
KEEP DATED SALES RECEIPT FOR WARRANTY SERVICE.
Keep this booklet. Record the following for reference:
Date purchased
Model number
Date code (stamped on bottom)
8
LIMITED ONE-YEAR GUARANTEE
Toastmaster Inc. warrants this product, to original purchaser, for one year from purchase date to be free of defects in material
and workmanship.
This warranty is the only written or express warranty given by Toastmaster Inc. This warranty gives you specific legal rights. You
may have other rights which vary from state to state. ANY OTHER RIGHT WHICH YOU MAY HAVE, INCLUDING ANY IMPLIED
WARRANTY OF MERCHANTABILITY OR FITNESS FOR A PARTICULAR PURPOSE IS LIMITED IN DURATION TO THE DURATION OF
THIS WARRANTY.
Defective product may be brought or sent (freight prepaid) to an authorized service center listed in the phone book, or to Service
Department, Toastmaster Inc., 708 South MIssouri St., Macon, MO 63552, for free repair or replacement at our option.
Your remedy does not include: cost of inconvenience, damage due to product failure, transportation damages, misuse, abuse, accident or the like, or commercial use. IN NO EVENT SHALL TOASTMASTER INC. BE LIABLE FOR INCIDENTAL OR CONSEQUENTIAL
DAMAGES.
Some states do not allow limitations on how long an implied warranty lasts, or allow the exclusion or limitation of incidental
or consequential damages, so the above limitations or exclusions may not apply to you.
For information, write Consumer Claims Manager, at the Macon address. Send name, address, zip, telephone area code and
daytime number, model, serial number, and purchase date.
EVERYBODY EATS. It’s a fact of life.
But sometimes preparing
meals can become a chore.
That’s why TOASTMASTER has been invited
into millions of kitchens just like yours
so we can HELP YOU MASTER your
mixing, baking, grilling, toasting,
brewing, heating and serving
tasks WITH EASE AND STYLE.
The TOASTMASTER name stands for a
CELEBRATION of INNOVATION designed
to serve your life and keep you
COOKIN’ IN STYLE.
9