1
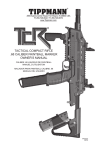
TIPPMANN
PNEUMATICS, INC.
Get Y
our Hear
ound
ing Wit
h A
Yo
Heartt P
Po
unding
With
T ippmann!
WARNING:
• This paintball marker/gun is not a toy nor is
it intended for unsupervised use by persons
under the age of 18 years.
• Misuse may cause serious injury or death.
• Eye Protection designed for paintball use
must be worn by the user and any person
within range.
• Read operation manual before using.
• Do not field strip or remove any parts while
marker is pressurized.
• Always keep in mind that the sport of
Paintball will be viewed and judged upon your
safe and sportsmanlike conduct.
98 CUSTOM
Owner’s Manual
CO2 POWERED
PAINTBALL GUN
TIPPMANN
PNEUMATICS, INC.
3518 Adams Center Road, Fort Wayne, IN 46806
P) 260-749-6022 • F) 260-749-6619
www.tippmann.com
CONGRATULATIONS on your purchase of a “Tippmann
98 CUSTOM” paintball gun. We believe it to be the most
accurate and durable paintball gun available. The 98
CUSTOM will give many years of dependable service if cared
for properly.
Please take time to read through this manual thoroughly and
become familiar with the “Tippmann 98 CUSTOM” parts,
operation, and safety precautions before you attempt to load
or fire this gun.
INDEX
Table of Contents
Warning/Liability Statement ............................................... 5
Safety is your Responsibility .............................................. 5
Specifications ..................................................................... 7
Getting Started ................................................................... 8
1. Tank Installation .................................................. 8
2. Ammo Box .......................................................... 8
3. Velocity Adjustment ............................................ 9
Schematic ................................................................... 10-11
Unloading Your Gun ......................................................... 12
1. Tank Removal ................................................... 12
Cleaning & Maintenance ................................................. 13
Field Stripping .................................................................. 13
1. Receiver Disassembly ...................................... 14
Repairing Tank Leaks ...................................................... 16
Storage ............................................................................ 16
Warranty and Repair Policy ............................................. 17
1. Warranty or Repair Procedure .......................... 18
4
Warning/Liability Statement
This gun is classified as a dangerous weapon and is
surrendered by Tippmann Pneumatics, Inc. with the
understanding that the purchaser assumes all liability
resulting from unsafe handling or any action that
constitutes a violation of any applicable laws or
regulations. Tippmann Pneumatics, Inc. shall not be
liable for personal injury, loss of property or life resulting
from the use of this weapon under any circumstances,
including the intentional, reckless, negligent or accidental
discharges.
All information contained in this manual is subject to
change without notice. Tippmann Pneumatics, Inc.
reserves the right to make changes and improvements
to products without incurring any obligation to incorporate
such improvements in products previously sold.
Safety is Your Responsibility!
The ownership of this weapon places upon you the total
responsibility of its safe and lawful use. You must observe
the same safety precautions as you would any firearm to
assure the safety of not only yourself but everyone around
you. The user should at all times use caution when using
this gun. Always remember that the game of Paintball can
only survive and grow if it remains SAFE!
• Do not load or fire this gun until you have completely
read this manual and are familiar with its mechanical
operation and handling characteristics.
• Handle this and any other gun as if it were loaded at all
times.
5
• Never point the gun at anything you do not intend to
shoot.
• Always keep the muzzle pointed down or in a safe
direction, even if you stumble or fall.
• Avoid alcoholic beverages before and during the use
of this gun. Handling guns while under the influence
of drugs or alcohol is a criminal disregard for public
safety.
• Avoid shooting an opponent at point blank (6 feet or less).
• All persons within a 200 yard radius should always wear
eye protection in the form of approved goggles or full
face mask and never shoot at a person who is not similarly
protected.
• If you purchased a 12 gram cartridge or any other form of
adapter with this gun be sure to read and follow the instructions that came with the adapter.
• Pressurize and load the gun only when the gun will be
immediately used. Unload and remove the CO2 cylinder
immediately after use for safe storage.
• Never fire your gun at personal property of others, the
paintball can stain the paint of automobiles and houses.
• Dress appropriately when playing the game of paintball.
Avoid exposing any skin when playing the game of
paintball. Even a light layer will absorb some of the impact
and protect you from the paintballs.
Specifications
• Keep exposed skin away from escaping CO2 gas when
installing or removing cylinder. CO2 gas is very cold and
can cause frostbite under certain conditions.
• Use only .68 caliber paintballs. Never load or fire any
foreign objects.
• Do not field strip or otherwise disassemble this gun
while it is pressurized with gas.
Model ...................................... Tippmann 98 CUSTOM
Caliber ...................................................................... .68
Action .............. Semi-Automatic (Open bolt blow-back)
Power ........... compressed air, nitrogen or CO2 cylinder
Magazine Capacity .................................. 150 Rd Hopper
Cycle Rate ........................................................... 11 RPS
Standard Barrel Length .............................................. 8.5”
Overall Length (with standard barrel & no tank) ..... 19.63”
Weight (without tank) ........................................... 2.9 lbs.
Effective Range ................................................... 150+ ft.
• Do not look directly into the barrel. Accidental discharge
into the eyes may cause permanent injury or death.
6
7
Getting Started
Note:
3) Velocity Adjustment
Safety goggles must be worn at all times when
handling this gun.
1) Tank Installation
First make sure that the gun is on SAFE mode. Next you
need to cock the gun by sliding the bolt handle all the way
back until it locks into place.
To install the tank, insert the tank valve end into the tank
adapter at the back end of the pistol grip. Twist the tank
clockwise into the gun, until it stops. Adjust the butt plate
if necessary. Your gun is ready to fire once you switch to
firing mode from safe mode.
If the tank is full and you do not hear the CO2 engage, the
pin valve could be too short or the pin valve seal is
damaged.
To adjust the velocity use the 5/32” allen wrench included
with your gun. The velocity adjustment screw is located
on left side receiver at a 45° angle. To adjust the velocity
down, turn the screw inward or clockwise. To turn the
velocity up, turn the screw out or counterclockwise ( Do
not remove velocity screw).
Note:
You must turn the velocity screw all the way in
before doing any disassembly.
2) Ammo Box
4) Rear Sight Adjustment
Make sure that the neck is clean and to keep the paintballs
from breaking and to feed the gun smoothly. You do not
want any sharp edges or debris in your hopper.
If your paintball is hitting low, slide the rear sight back
towards rear of gun. Do the opposite if paintball is hitting
high.
Install the neck into the feed elbow of your gun and tighten
the hopper down with the large allen wrench. Now you
are ready to load your hopper with paintballs.
Note: Do not overtighten or the elbow will break.
8
9
10
11
Unloading Your Gun
Cleaning & Maintenance
To unload your gun remove the ammo box or completely
empty the ammo box. Then, point your gun in a safe
direction and fire several times to be sure there are no
balls lodged in the chamber.
To clean your paintball gun use a damp towel with water
to wipe off paint, oil, and debris. We recommend using
a premium gun oil to maintain your gun in good working
condition. (Hoppes #9 gun oil) Re-oil with a few drops
to the front bolt, rear bolt, linkage arm, and tank o-ring.
We also recommend using white lithium grease on the
barrel o-ring and CO2 tank o-ring.
1) Tank Removal
To remove a charged CO2 cylinder, turn the cylinder
approximately 3/4 of a turn counterclockwise or out. This
allows the tank pin valve to close so that no CO2 will
enter the gun. Point the gun in a safe direction and fire
the remaining CO2 in the gun by pulling the trigger until
the gun stops firing. (This may take 4-5 shots)
Note:
Before doing any cleaning, remove the CO 2
cylinder from your gun and do not use any
cleaning solvents.
Field Stripping
If your gun keeps firing after you have turned the tank 3/
4 of a turn, the tank pin valve has not closed yet and
you may have to turn the tank counterclockwise a little
further.
You must first unload your gun before trying to field strip
it and have the gun in the uncocked position. If your
gun is cocked, hold the bolt handle while pulling the
trigger which will un-cock the gun.
If you turn the tank 3/4 of a turn and it begins to leak
before you pull the trigger you have turned it too far and
may have damaged the tank o-ring.
Note: The barrel and tank adapter must be removed
first. Next, turn the velocity screw in until it stops.
Because of the variances in tank valve parts, each tank
varies slightly on exactly how far it should be turned. If
this process does not work the tank pin valve could be
too long.
12
13
1) Receiver Disassembly
Power tube and valve removal.
Note: Do not remove the gas line fitting unless it is
leaking or you need to replace the valve. If
you should do so you will need some teflon
tape or paste to reinstall it.
1
2
To remove the left-side receiver, unscrew all (6) receiver
connection bolts. Then carefully lift the left-side receiver
to access the internals.
Note: The Safety will stay on the left-side receiver and
should be reassembled the same way.
Once inside, pull the end cap out to remove the drive
spring guide pin and drive spring. These parts must be
removed before the bolt handle will release. Disconnect
the linkage arm from the rear and front bolts. Slide the
front bolt off the power tube and check the o-ring. Clean
and oil the o-ring or if damaged, replace with a new one.
Do the same with the rear bolt o-ring.
14
To release the power tube and valve, unscrew the two
valve bolts on the outer right-side receiver.
When Reinstalling: Do not over tighten bolts when
reinstalling.
Valve removal from power tube: If it is necessary to
remove the valve, use a wrench to slowly unscrew the
gas line fitting. Once the fitting is out, the valve will slide
out the back of the power tube.
Note: Check the external valve o-ring at this time.
If the o-ring is damaged your gun will not
function correctly.
To reinstall valve: insert valve into power tube, align
holes and with teflon tape or paste on gas line fitting
threads, slowly screw into valve and snug with wrench.
15
Repairing Tank Leaks
Warranty and Repair Policy
The most common leak occurs from a bad tank o-ring.
To replace a tank o-ring you must first remove the bad
o-ring and then install a new one. This o-ring is located
on the tip of your tank valve.
Tippmann Pneumatics, Inc. is dedicated to providing you
with the ultimate paintball gun and the quality support
necessary for the utmost satisfaction in its use.
Tippmann Pneumatics, Inc. warrants that this product is
found free from defects in materials and workmanship
for a period of 1 year from the original date of purchase
by the initial owner/purchaser. On claims submitted as
outlined, Tippmann Pneumatics, Inc. will repair or
replace, without charge, any of its guns that have failed
through defect in material or workmanship.
The best tank o-rings are made of urethane. The
urethane o-rings are not affected by high CO2 pressures.
These may be purchased from Tippmann Pneumatics
or your local paintball dealer.
Storage
You should store you gun in a dry area. The only parts
that can rust are the rear bolt and linkage arm. Before
storing your gun make sure that the rear bolt and linkage
arm are cleaned and oiled so that they do not rust. Store
your gun with the bolt in the forward position. Empty
and remove the CO2 tank from the gun.
When removing your gun out of storage you should reoil the rear bolt, linkage arm and the front bolt before
use.
16
In the event warranty or other non-warranty related
repairs are required, send the product(s) to Tippmann
Pneumatics, Inc. We strive to complete the necessary
repair work within 24 hours and return it to you via regular
ground UPS. For assistance with warranty and repair
call 1-800-533-4831.
Note: If you should encounter any problems with your
gun and you have aftermarket parts on your gun, please
test it with the original stock parts before sending it in.
17
TIPPMANN PNEUMATICS, INC. 3518 ADAMS CENTER ROAD FT. WAYNE, IN 46806
P) 260-749-6022 F) 260-749-6619 www.tippmann.com
PHONE # _____________________________________________________________
CITY ________________________________________ STATE _______ ZIP _______
STREET ______________________________________________________________
YOUR NAME (Please print) _______________________________________________
_____________________________________________________________________
(Not Pat. #)
DATE _______ CITY ___________________________ STATE _______ ZIP _______
18
PURCHASED FROM ____________________________________________________
Ship to: Tippmann Pneumatics, Inc.
3518 Adams Center Road
Fort Wayne, IN 46806
98 CUSTOM
MODEL ______________________
SERIAL # ________________________________
Warranty Card Note: The 98 Custom number is just
the name of the gun and the serial number is
on the side of the gun. (It is not the Pat. #)
COMPLETE WARRANTY CARD,
CAREFULLY TEAR OFF AT
PERFORATION AND MAIL.
If you wish to have it returned quicker than regular ground
shipping, you can request for Next day air or Second
day air and include your credit card number with the
expiration date. Your card will be charged the difference
in additional cost of Next day air or Second day air over
regular ground shipping cost.
TIPPMANN
PNEUMATICS, INC.
For warranty and non-warranty repair, ship or deliver
your product(s) to Tippmann Pneumatics, Inc., with
postage or delivery charges prepaid. Include a brief
statement regarding the requested repair, your name,
return address and telephone number where you can
be reached during normal business hours, if possible.
WARRANTY REGISTRATION CARD
Warranty or Repair Procedure