1
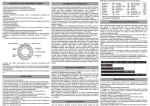
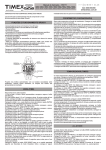
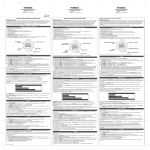
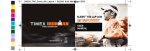
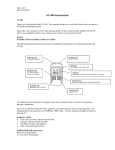
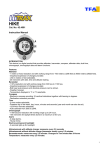
www.timex.com
W-215
THANK YOU FOR PURCHASING YOUR TIMEX® WATCH.
EXTENDED WARRANTY
Available in U.S. only. Extend your warranty for an additional 4 years
from date of purchase for $5. You can pay with AMEX, Discover, Visa or
MasterCard by calling 1 800-448-4639 during normal business hours.
Payment must be made within 30 days of purchase. Name, address,
telephone number, purchase date, and 5-digit model number required.
You can also mail a check for $5 to: Timex Extended Warranty, P.O. Box
1676, Dept. EF, Little Rock, AR 72203.
Please read instructions carefully to understand how to operate your
Timex® watch. Your model may not have all of the features
described in this booklet.
FEATURES AND BASIC OPERATION
•
•
•
•
•
•
All functions work simultaneously
Time with 12- or 24-hour format
Date with MM-DD or DD.MM format
3 time zones
Optional hourly chime
Electronic compass with virtual needle and automatic declination
compensation
• 100-hour chronograph with display of lap and split times
• 24-hour countdown timer (count down and stop or repeat)
• Occasion reminders
• Hydration timer
• 3 daily/weekday/weekend alarms with 5-minute backup
• Customizable mode set (hide unwanted modes)
• INDIGLO® night-light with NIGHT-MODE® feature
Press MODE repeatedly to step through modes: Compass, Chrono, Timer,
Occasion, Hydration, Alarm 1, Alarm 2, and Alarm 3. Press MODE to exit current
mode and return to Time mode.
BUBBLE LEVEL
COMPASS RING
SET
(DONE)
START/SPLIT
(+)
INDIGLO® BUTTON
MODE
(NEXT)
STOP/RESET
(-)
Button functions shown with secondary functions in parentheses
Compass must be calibrated before using to ensure accuracy and avoid
improper headings. Go to www.timex.com/expedition for help.
Watch incorporates magnetic sensor technology from Precision Navigation, Inc.
TIME
To set time, date, and options:
1) With time and date showing, press and hold SET.
2) Current time zone (1, 2, or 3) flashes. Press + or – to select time zone to set,
if desired.
3) Press NEXT. Hour flashes. Press + or – to change hour (including AM/PM);
hold button to scan values
4) Press NEXT. Minutes flash. Press + or – to change minutes
5) Press NEXT. Seconds flash. Press + or – to set seconds to zero.
6) Press NEXT. Month flashes. Press + or – to change month.
7) Press NEXT. Day flashes. Press + or – to change day.
8) Press NEXT. Year flashes. Press + or – to change year.
9) Press NEXT to set options. Press + or – to change value and then press
NEXT to go to next option. Press DONE at any step to exit and save settings.
Available options are 12- or 24-hour time format, MM-DD or DD.MM date
format, hourly chime N, beep for button presses, customizable mode set
(Select “HIDE” for unwanted modes – they are removed from mode
sequence).
If you hide a mode, you can turn it back on later using procedure above.
Press START/SPLIT once and hold to see 2nd time zone. Press START/SPLIT
twice and hold to see third time zone. Continue to hold button for 4 seconds to
switch to displayed time zone.
Press and hold STOP/RESET to see next upcoming occasion (see description
of Occasion mode). Release and immediately press and hold again to see
subsequent occasions.
1
www.timex.com
W-215
COMPASS CALIBRATION
Since a compass uses the earth’s magnetic field, be aware of large metallic
objects, such as vehicles or bridges, or objects that give off electromagnetic
radiation, such as TVs or PCs, which could affect the magnetic field around the
watch. If compass is calibrated near such objects, it will only work properly in
that location. If compass is calibrated away from such objects, it will not work
properly near them. For best results, calibrate in area of intended use.
Also avoid areas that may exhibit higher than normal concentrations of hard
and soft iron, as they may cause inaccurate headings. Whenever a heading is
suspect, recalibrate.
In calibrating and taking headings, it is important, as with all compasses, to keep
compass level. Calibrating or taking a heading when watch is not level can
result in large errors. To keep watch level, hold watch so that bubble is centered
in bubble level window.
Do not store watch near any source of magnetism, such as computers,
appliances, or TVs, as watch can take on a magnetic charge, yielding inaccurate
headings.
To calibrate compass, keep watch level or place on level surface (if band
interferes, place on inverted cup) for entire procedure. Watch may be face
down, but take care to protect watch face. Go to Compass mode and then
press and hold SET. While level, SLOWLY rotate watch two revolutions, taking
at least 15 seconds per revolution. This is critical in achieving proper
calibration. To help you rotate watch at proper speed, a block is shown at
perimeter of display; rotate watch at a speed to keep block pointed in same
direction. When done, press MODE, keeping watch level. Watch displays current
declination angle setting (see DECLINATION ANGLE for more information). If you
do not wish to set declination angle, press DONE. Otherwise, press + or - to
select declination angle and then press DONE.
COMPASS
Compass mode provides an electronic compass reading. Press MODE
repeatedly until COMP appears.
Compass must be calibrated prior to use and calibration should be done in area
of intended use; see COMPASS CALIBRATION. If compass has not been
calibrated since battery replacement, watch displays PLEASE CAL, reminding
you to calibrate.
While holding watch level, using bubble level, press START/SPLIT or
STOP/RESET to activate compass. Watch displays heading in direction of
12 o’clock and virtual needle (one block at head and three blocks at tail) points
north. If watch is turned, heading updates and virtual needle rotates, always
pointing north. After 20 seconds, compass will automatically turn off to
conserve battery life. Press button again at any time to keep compass on for
another 20 seconds.
NOTE: While compass is on, INDIGLO® night-light may flicker slightly when on.
This is normal, as night-light must be turned off briefly during compass readings
to maintain accuracy.
USING THE COMPASS
Once compass is activated, as described above, there are two typical ways to
use virtual needle and turning compass ring.
Which way am I headed? Hold watch so that 12 o’clock is in direction of your
travel. Turn compass ring until virtual needle is pointing to north on ring. Your
heading is direction on ring at 12 o’clock. This should be the same direction
shown on display.
Which way should I go? If you know the direction you want to go (e.g., NE),
turn compass ring until that direction appears at 12 o’clock. Hold watch so that
you are facing 12 o’clock. Then, turn your body until virtual needle points to
north on compass ring. You are now facing the direction you want to go.
DECLINATION ANGLE
A compass detects “magnetic north,” which may be slightly different from “true
north,” which is used on maps. This difference, called the “declination angle,”
which varies around the globe, is typically small and can be ignored in many
cases. However, you may have watch automatically compensate by setting your
declination angle after compass calibration; see COMPASS CALIBRATION. With
proper declination angle set, heading will be more accurate and virtual needle
will point to true north.
Declination angles for major world cities (W is negative and E is positive on
declination scale).
Anchorage . . . .22E
London . . . . . . . .4W
Rio De Janeiro . . .21W
Atlanta . . . . . . .4W
Little Rock . . . . . . .3E
San Francisco . . . .15E
Bombay . . . . . .1W
Livingston, MT . .14E
Seattle . . . . . . . . . .19E
Boston . . . . . .16W
Munich . . . . . . . . .1E
Shanghai . . . . . . . .5W
Calgary . . . . . .18W
New York City . .14W
Toronto . . . . . . . . .11W
Chicago . . . . . . .3W
Orlando . . . . . . . .5W
Vancouver . . . . . .20W
Denver . . . . . . .10E
Oslo . . . . . . . . . . .2W
Washington DC . .10W
Jerusalem . . . . .3E
Paris . . . . . . . . . . .2W
Waterbury, CT . . .14W
For further declination angle information, see www.timex.com/expedition
2
www.timex.com
W-215
CHRONOGRAPH
This mode provides a chronograph (stopwatch) function. Press MODE to go to
Chrono mode.
To start, press START/SPLIT. Chrono counts up by hundredths of a second up
to one hour, then by seconds up to 100 hours. Stopwatch icon w flashes to
indicate chrono is running.
To stop, press STOP/RESET. Stopwatch icon w freezes to indicate chrono is
stopped.
To resume, press START/SPLIT, or to reset (clear) chrono, press and hold
STOP/RESET.
When chrono is already running, chrono continues to run if you exit mode.
Stopwatch icon w appears in TIME mode.
While chrono is running, press START/SPLIT to take a split. Lap and split times
will be displayed with lap number.
To set display format, press SET. Then, press + or – to select desired format.
Press DONE to exit.
NOTE: When a split is taken, times are frozen on the display for 10 seconds.
Press MODE to release display and show running chrono immediately.
LAP 1 = 7.11
LAP 2 = 7.50
LAP 3 = 7.08
LAP 4 = 7.30
SPLIT 1 = 7.11
SPLIT 2 = 15.01
SPLIT 3 = 22.09
SPLIT 4 = 29.39
TIMER
Timer mode provides a countdown timer with alert. Press MODE repeatedly
until TIMER appears.
To set countdown time:
1) Press SET. Hours flash. Press + or – to change hours; hold button to scan
values.
2) Press NEXT. Minutes flash. Press + or – to change minutes.
3) Press NEXT. Seconds flash. Press + or – to change seconds.
4) Press NEXT. Action at end of countdown flashes. Press + or – to select STOP
or REPEAT, indicated by hourglass icon with arrow I.
5) Press DONE at any step when done setting.
To start timer, press START/SPLIT. Timer counts down every second from
countdown time. Hourglass icon H flashes to indicate timer is running.
To pause countdown, press STOP/RESET. Hourglass icon H freezes to indicate
timer is stopped.
To resume countdown, press START/SPLIT, or to reset countdown, press
STOP/RESET.
Watch beeps and night-light flashes when countdown ends (timer reaches zero).
Press any button to silence. If REPEAT AT END selected, timer repeats
countdown indefinitely.
Timer continues to run if you exit mode. Hourglass icon H appears in Time mode.
HYDRATION
Hydration mode provides a countdown timer with alert to remind you to drink
during a workout. Press MODE repeatedly until HYDRA appears.
To set hydration time:
1) Press SET. Minutes flash. Press + or - to change minutes; hold button to
scan values.
2) Press NEXT. Seconds flash. Press + or - to change seconds; hold button to
scan values.
3) Press DONE at any step, when done setting.
To start hydration timer, press START/SPLIT. Timer counts down every second
from countdown time. Drop icon D flashes to indicate timer is running.
To pause countdown, press STOP/RESET. Drop icon D freezes to indicate timer
is stopped.
To resume countdown, press START/SPLIT, or to reset countdown, press
STOP/RESET.
Watch beeps and night-light flashes when countdown ends (timer reaches zero).
Press any button to stop alert.
Hydration timer continues to run, if you exit mode. Drop icon D appears in
Time mode.
3
www.timex.com
W-215
ALARM
The watch has three alarms. Press MODE repeatedly until ALM 1, ALM 2, or
ALM 3 appears.
To set alarm:
1) Press SET. Hour flashes. Press + or – to change hour; hold button to scan
values.
2) Press NEXT. Minutes flash. Press + or – to change minutes.
3) Press NEXT. AM/PM flashes if in 12-hour time format. Press + or – to change.
4) Press NEXT. Alarm day setting flashes. Press + or – to select DAILY, WKDAYS,
or WKENDS.
5) Press DONE at any step when done setting.
To turn alarm on/off, press START/SPLIT.
Alarm clock icon a appears when alarm is on in this mode and in Time mode.
When alarm sounds, night-light flashes. Press any button to silence. If no button
is pressed, alarm will sound for 20 seconds and repeat once five minutes later.
Each of the three alarms has a different alert melody.
OCCASION
Occasion mode allows you to set reminders for occasions, like birthdays,
anniversaries, holidays, and appointments. Press MODE repeatedly until
OCCASN appears.
Today’s date is shown with today’s occasion in top line. Press + or – to step
through dates; hold button to scan dates. Occasion for displayed date is always
shown. Non-recurring occasions may be set for dates up to one year in
advance.
To set occasion:
1) Press SET. Date flashes. Press + or - to select date; hold button to scan
dates. Occasion for displayed date is always shown.
2) Press NEXT. Occasion flashes. Press + or - to change occasion. ANNIV, BDAY,
BILL-YR, and HOLI-YR repeat yearly and BILL-MO repeats monthly.
3) To set occasions for other dates, press NEXT and select date and occasion
as in previous steps.
4) Press DONE at any step when done setting.
Occasion Reminders
Watch alerts you of occasions at 8:00 AM on day of occasion. You may choose
to receive no alert or an alert at a different time or day. You may choose
different alerting for each occasion type. E.g., all birthdays may alert one day
prior while all holidays may have no alert.
To set occasion reminder alerts:
1) Go to today’s date by pressing + or – (hold button to scan dates). You may
also go to today’s date by simply entering Occasion mode.
2) From today’s date, press – to go to ALERT SETUP.
3) Press SET. Occasion type flashes. Press + or – to select occasion type. Your
settings will affect all occasions of the selected type.
4) Press NEXT. Alert status (ON/OFF) flashes. Press + or – to turn alert on or
off for selected occasion type. If OFF selected, next 4 steps are skipped.
5) Press NEXT. Alert time hour flashes. Press + or – to change hour; hold
button to scan values.
6) Press NEXT. Alert time minutes flash. Press + or – to change minutes.
7) Press NEXT. AM/PM flashes if in 12-hour time format. Press + or – to
change.
8) Press NEXT. Alert day flashes. Press + or – to set alert for 0 - 9 days prior
to occasion.
9) To set alerts for other occasion types, press NEXT. Occasion type flashes.
Select occasion type as in step 3 and continue with setting procedure.
10) Press DONE at any step when done setting.
Hand icon F appears when displayed occasion type has a reminder alert.
When alert sounds in Time mode, hand icon F flashes. Press any button to
silence. See Time mode for instructions on viewing upcoming occasions.
TIP: For reminder at end of every month, set BILL-MO for first of month and alert
one day prior.
INDIGLO® NIGHT-LIGHT WITH NIGHT-MODE® FEATURE
Press INDIGLO® button to illuminate watch display for 2 - 3 seconds
(5 - 6 seconds while setting). Patented (U.S. pat. 4,527,096 and 4,775,964)
electroluminescent technology used in the INDIGLO® night-light illuminates
entire watch face at night and in low light conditions. Any button pressed while
INDIGLO® night-light is on keeps it on.
Press and hold INDIGLO® button for 4 seconds to activate NIGHT-MODE®
feature (US. Pat. 4,912,688). Moon icon P will appear in Time mode. Feature
causes any button press to activate INDIGLO® night-light for 3 seconds.
NIGHT-MODE feature may be deactivated by pressing and holding INDIGLO®
button again for 4 seconds, or it automatically deactivates after 8 hours.
4
www.timex.com
W-215
WATER RESISTANCE
If your watch is water-resistant, meter marking or (O) is indicated.
Water-Resistance Depth
p.s.i.a. * Water Pressure Below Surface
30m/98ft
50m/164ft
100m/328ft
60
86
160
*pounds per square inch absolute
WARNING: TO MAINTAIN WATER-RESISTANCE, DO NOT PRESS
ANY BUTTONS UNDER WATER.
1. Watch is water-resistant only as long as lens, push buttons and
case remain intact.
2. Watch is not a diver watch and should not be used for diving.
3. Rinse watch with fresh water after exposure to salt water.
BATTERY
Timex strongly recommends that a retailer or jeweler replace
battery. Battery type is on watch back. If present, push/short
internal reset switch after replacing battery. Battery life estimates
are based on certain assumptions regarding usage; battery life may
vary depending on actual usage.
DO NOT DISPOSE OF BATTERY IN FIRE. DO NOT RECHARGE.
KEEP LOOSE BATTERIES AWAY FROM CHILDREN.
TIMEX INTERNATIONAL WARRANTY
(U.S. – LIMITED WARRANTY – PLEASE SEE FRONT OF INSTRUCTION BOOKLET
FOR TERMS OF EXTENDED WARRANTY OFFER)
Your TIMEX® watch is warranted against manufacturing defects by Timex Corporation for a
period of ONE YEAR from the original purchase date. Timex and its worldwide affiliates will
honor this International Warranty.
Please note that Timex may, at its option, repair your watch by installing new or thoroughly
reconditioned and inspected components or replace it with an identical or similar model.
IMPORTANT — PLEASE NOTE THAT THIS WARRANTY DOES NOT COVER DEFECTS OR DAMAGES TO YOUR WATCH:
1) after the warranty period expires;
2) if the watch was not originally purchased from an authorized Timex retailer;
3) from repair services not performed by Timex;
4) from accidents, tampering or abuse; and
5) lens or crystal, strap or band, watch case, attachments or battery. Timex may charge
you for replacing any of these parts.
THIS WARRANTY AND THE REMEDIES CONTAINED HEREIN ARE EXCLUSIVE AND IN LIEU OF ALL
OTHER WARRANTIES, EXPRESS OR IMPLIED, INCLUDING ANY IMPLIED WARRANTY OF MERCHANTABILITY OR FITNESS FOR PARTICULAR PURPOSE. TIMEX IS NOT LIABLE FOR ANY SPECIAL, INCIDENTAL OR CONSEQUENTIAL DAMAGES. Some countries and states do not allow
limitations on implied warranties and do not allow exclusions or limitations on damages, so
these limitations may not apply to you. This warranty gives you specific legal rights and you
may also have other rights which vary from country to country and state to state.
To obtain warranty service, please return your watch to Timex, one of its affiliates or the Timex
retailer where the watch was purchased, together with a completed original Watch Repair
Coupon or, in the U.S. and Canada only, the completed original Watch Repair Coupon or a
written statement identifying your name, address, telephone number and date and place of
purchase. Please include the following with your watch to cover postage and handling (this is
not a repair charge): a US$ 7.00 check or money order in the U.S.; a CAN$6.00 cheque or
money order in Canada; and a UK£2.50 cheque or money order in the U.K. In other countries,
Timex will charge you for postage and handling. NEVER INCLUDE A SPECIAL WATCHBAND OR
ANY OTHER ARTICLE OF PERSONAL VALUE IN YOUR SHIPMENT.
For the U.S., please call 1-800-448-3689 for additional warranty information. For Canada, call
1-800-263-0981. For Brazil, call 0800-168787. For Mexico, call 01-800-01-060-00. For Central
America, the Caribbean, Bermuda and the Bahamas, call (501) 370-5775 (U.S.). For Asia, call
852-2815-0091. For the U.K., call 44 020 8687 9620. For Portugal, call 351 212 946 017. For
France, call 33 3 81 63 42 00. For Germany, call 49 7 231 494140. For the Middle East and
Africa, call 971-4-310850. For other areas, please contact your local Timex retailer or Timex
distributor for warranty information. In Canada, the U.S. and in certain other locations, participating Timex retailers can provide you with a postage-paid, pre-addressed Watch Repair Mailer
for your convenience in obtaining factory service.
©2005 Timex Corporation. TIMEX and NIGHT-MODE are registered trademarks of Timex
Corporation. INDIGLO is a registered trademark of Indiglo Corporation in the US. and other
countries.
5
www.timex.com