1
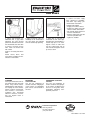
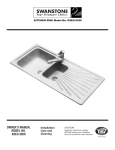
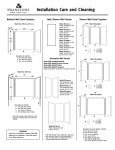
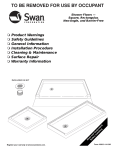
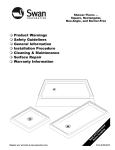
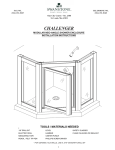
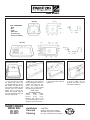
BAR SINKS
BS-1515
TOOLS REQUIRED
• Ruler
• Drill
• Caulk
• Saber Saw
(if counter top
cutout is required)
BS-2515
TRACE COMPLETELY
AROUND EDGE OF SINK
DRAW A 1-1/2ⴖ RADIUS
AT EACH CORNER
DRILL STARTER HOLE
INSIDE OF CUTOUT LINE
CUT INSIDE OF LINE
5/16⬙
CUTOUT LINE
1. If it is necessary to cut out
the counter top, invert sink
and position onto the counter
top. Locate sink front to rear
and so that the bowl will not
interfere with the cabinets
below. Trace a pencil line
around the outside edge of
the sink and remove the sink
from the counter top.
2. Measure in 5/16⬙ from the
initial sink outline and draw a
second line inside the first.
Draw a 1-1/2⬙ radius at each
corner. This second interior
line will be your cutout line.
3. Drill starter hole inside of
cutout line.
Check Cutout
Line Measurements
Model
Width
Depth
BS-1515
14-3/8⬙
14-3/8⬙
BS-2515
24-3/8⬙
14-3/8⬙
Measure the cutout or the
pre-cut opening to be sure it
conforms to the sizes listed.
OWNER’S MANUAL
MODEL NOS.
BS-1515
BS-2515
Installation
Care and
Cleaning
CAUTION:
Read ALL instructions carefully
BEFORE starting your installation.
Save this manual for future reference.
4. Using a saber saw, cut
inside of cutout line. Trial fit
sink to check proper fit.
BAR SINKS
APPLY CAULK
5. Fixture hole locations are
identified with a gray label
indicating the most desired
placement. Position a chisel on
the desired dot and strike with
a hammer to break out the
hole. Clean out fixture hole
with a knife.
If hole is not used, peel off the
label.
Attach faucet, drain, and
accessories according to manufacturer’s instructions.
6. Apply a bead of caulk (not
included) to the underside of
the sink flange and position
sink into counter top opening.
7. Attach four (4) sink clips to
underside of sink. Sink clips
provided will accommodate a
counter top up to 1-1/2⬙ thick.
Tighten screws in front then
rear first. Work from side to
side. Do not overtighten. Clean
up excess caulk.
CLEANING
Clean your Swanstone sink as
you would any other fine bath
fixture, using normal household detergents and cleansers.
Just wiping the wall surfaces
quickly removes watermarks
and residues. Occasional
scrubbing with household
abrasive cleansers ensures
that the original luster is
maintained.
REPAIRING
SOLID COLORS
Use 400 grit sandpaper to
remove scratches and gouges
in the surface. A “scotchbright
pad” can be used to blend in
the area.
AGGREGATE & GALAXY
COLORS
Use 400 grit sandpaper to
remove scratches and gouges
in the surface. To blend in the
area use a fine grade, white,
automotive polishing compound or paste wax.
8. Connect all faucet supply
lines, disposal (if available),
and drain trap fittings per
manufacturer instructions.
CHECK FOR LEAKS
• Supply user tubes to faucet
• Supply riser tubes to shut off
valves or lower connections
• Fill sink with water and check
for leaks around drain
• Release water from sink and
check for possible leaks
• Tighten as needed
The Swan Corporation
One City Centre
St. Louis, MO 63101
(314) 231-8148
Patent Pending
Form #256-11-91-10M