1
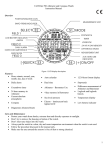
User Manual English TS1401-1 Contents 1. Specification ......................................................................................................................................... 3 2. Getting Started ..................................................................................................................................... 5 2.1 Parts List ..................................................................................................................................... 5 2.2 Precautions ................................................................................................................................. 5 2.3 Installing the Battery .................................................................................................................... 6 3. Operating instructions .......................................................................................................................... 6 3.1 Default mode - time mode ........................................................................................................... 6 3.2 Pedometer mode ......................................................................................................................... 7 3.2.1 Step & distance mode ....................................................................................................... 7 3.2.2 Calorie & sports time mode ............................................................................................... 9 3.3 Altitude & temperature mode ........................................................................................................ 9 3.4 Compass mode ......................................................................................................................... 10 3.5 Backlight.................................................................................................................................... 12 3.6 Low Battery Indicator ................................................................................................................ 12 2 Mini Hiking computer This mini hiking computer is designed small and delicate with multifunction including pedometer, altimeter, compass, thermometer, weather forecast and time with green LED screen display. It looks fashion mini and easy to carry. 1. Specification Pedometer: - Step Counter: 0 - 99999 steps - Calorie: 0 - 9999.9KCAL - Distance: 0 - 99.99(KM)(MILE) - Activity time Altimeter: - Display range: - 2296 ft to 29500ft ( -700m to 9000m) - Resolution: 1m/3ft - Altimeter measurement: Sea level altitude - Unit: M and Ft unit switch available 3 Digital Compass: - 360º with sixteen directions - External magnetic field calibration - Magnetic declination setting - High accuracy, ±3 degrees - Resolution of 1 degree Thermometer: - Thermometer from -10℃ to +60℃ - ℃ or ℉ selectable - Resolution of 1℃ Weather forecast: - The weather forecast for next 12 to 24 hours - 4 weather status indicating, Sunny- Slight sunny- Cloudy- Rain Time & Date: - Time with hour, minute, second - 12h/ 24h format clock display Backlight: - 15 seconds super bright LED 4 2. Getting Started 2.1 Parts List QTY(pcs) 1 1 1 Item Unit Dimensions: 2.5 x 2.0 x 0.6 inches CR2032 battery Carabiner 2.2 Precautions Caution: This unit is water resistant but not water proof. Do not submerse in water. When installing the battery, make sure the gasket is properly seated (see battery installation instructions). Avoid leaving out in the rain. Caution: Keep away from strong magnetic forces, which can destroy the compass. Caution: Do not drop or apply excessive force to the LCD display. When replacing the battery, apply force to the outer ring. Caution: Do not operate outside of the specified temperature range (14 to 140 °F). Use your body warmth to keep within the low temperature range. Note: Do not use a magnetized CR2032 battery, which can corrupt the compass measurement. Note: Do not use near strong magnetic or EMI forces (TVs, computers, electronics) which can corrupt the compass measurement. 5 2.3 Installing the Battery Rotate the back cover counter clockwise about 20°, then gently pry off the back cover with your fingers, exposing the battery compartment. Insert the CR2032 battery (+ side up), and close the back cover, insuring the gasket is firmly seated in the housing trace. To remove the battery, use a small pen or paperclip to pry the battery out of the battery compartment. To close the back cover, rotate the back cover clockwise until the back cover is completely closed. The display should be powered up in the time and date mode, and ready for use. 3. Operating instructions 3.1 Default mode - time mode - LCD display:Display time, date, pressure trend arrow, weather forecast etc. - Pressure trend arrow forecast pressure change in future 12 hours. - Weather forecast shows weather condition in future 12 to 24 hours. Figure 1 Time mode 6 Time, date and unit setting - Under time mode, long press SET to enter setting mode, weather icon will be flashed. Press MODE to switch setting items; Press SET to select items. Long press SET to exit setting. - Steps: Time mode (long press SET) weather forecast (press MODE) 12H/24H (press MODE) hour (press MODE) minute (press MODE) month (press MODE) date (press MODE) temperature unit (℃/℉) (press MODE) altitude unit (m/ ft) (press MODE) magnetic declination (Cb) (long press SET) saving and exit to default mode (time mode) - If there is no operation in 30 seconds, system will save setting and exit to time mode automatically. 3.2 Pedometer mode 3.2.1 Step & distance mode - Under time mode, press MODE to enter Pedometer mode. - LCD display:Display steps, distance etc. Please refer figure 2. - Before using, please set step-length and weight first. Detail method please refer 3.2.1. - Long press SET 3 seconds to clear steps to zero Figure 2 Pedometer mode 7 Pedometer setting - Under step & distance mode, long press SET 6 seconds to turn on pedometer run under other modes and set unit, weight and step-length. Press MODE to switch setting items. Press SET to adjust data. Long press SET to save and exit setting. Turn on or off pedometer under other modes Pedometer unit Step length Weight - When turn on pedometer run, it will work under other modes except digital compass. The icon will display on screen. - When turn on pedometer run, the power is high consumption. After stop sports, please turn off it on time to save more battery. - When changing step length unit to inch, weight unit will change to LBS automatically. - When changing step length unit to cm, weight unit will change to KG automatically 8 3.2.2 Calorie & sports time mode - Under time mode, press MODE 2 times to enter Calorie & sports time mode. - LCD display:Display calorie, sports time etc. Please refer figure 3. Figure 3 Calorie & sports time mode Figure 4 Altitude mode Figure 5 Altitude setting 3.3 Altitude & temperature mode - Under time mode, press MODE 3 times to enter altitude mode. - LCD display:Display altitude, temperature etc. Please refer figure 4. - Long press SET to calibration height or clear to zero. Press MODE to switch digit, press SET to adjust data. Long press SET to exit setting. Please refer figure 5. 9 3.4 Compass mode - Under time mode, press MODE 4 times to enter digital compass mode. - LCD display:Display degree, direction. Please refer figure 6. - The direction have 16- point cardinal direction ( N, NNE, NE, ENE, E, ESE, SE, SSE, S, SSW,SW,WSW,W,WNW,NW,NNW) . - The arrow on screen always indicates North. - If there is no operation in 45 seconds, it will exit compass mode and go to time mode automatically. Figure 6 Compass mode Figure 7 Compass calibration 10 Compass calibration: A. When should we calibrate compass? Using first time or after replacing battery, it requests calibrate compass first. To let compass working more accuracy, we should calibrate compass regularly. When compass decline degree too much, we should calibrate compass B. How to enter into compass calibration? Under compass mode, long press SET to enter into compass calibration. “Cal” will display on screen. Please refer figure 7. Then press SET to start calibration. C. How to calibrate compass? When enter into calibration, “Cal” will display on screen. The following procedure must be carefully and precisely followed or the calibration procedure will fail. 1. On a flat, level surface, slowly rotate the compass in the clockwise direction. When the compass reaches exactly 0°, stop for at least 3 seconds. If you overshoot this reading, slowly rotate counterclockwise until it reads exactly 0°. Proceed to the next step. 2. Rotate the compass clockwise until it reads exactly 90° and stop for at least 3 seconds. If you overshoot this reading, slowly rotate counterclockwise until it reads exactly 90°. Proceed to the next step. 11 3. Rotate the compass clockwise until it reads exactly 180° and stop for at least 3 seconds. If you overshoot this reading, slowly rotate counterclockwise until it reads exactly 180°. Proceed to the next step. 4. Rotate the compass clockwise until it reads exactly 270° and stop for at least 3 seconds. If you overshoot this reading, slowly rotate counterclockwise until it reads exactly 270°. Proceed to the next step. 5. Rotate the compass clockwise until it reads exactly 0° again, and stop for at least 3 seconds. 6. Once calibrated, the CAL icon will disappear and the unit will return to compass mode. If this does not occur, please repeat this procedure again. If successful, the unit will return to compass mode. 3.5 Backlight To activate the backlight, long press MODE to turn on backlight under all modes. The backlight will remain on for 30 seconds of inactivity. 3.6 Low Battery Indicator When the low battery indicator icon is displayed , it is time to replace the battery 12 Userinformation/Contact If your device has a defect or you have problems with it, please contact our Service & Support Centre. If you need to send your device to us, please attend to the following points: 1. Use only the original packaging. 2. Add a detailed error description. 3. Add your full name and address and a copy of your purchase receipt. 4. Stamp and send the package to us (sufficient postage). Address of our Service Center: First Service Center Kleine Düwelstr. 21 DE-30171 Hannover You can call also our hotline: +49 (0)5 11 - 27 04 96 90 or send a Fax: +49 (0)5 11 -161 25 36 or contact us by eMail: [email protected] 13 Guarantee Please keep the proof of purchase for this device for the entire duration of the guarantee period, as it must be produced in the event of any claim. You (as the end user) receive a 36 month guarantee from the date of sale. The article has been manufactured using the most modern production methods and subjected to strict quality controls. Please contact only the manufacturer (not the dealer where you purchased it) in the event of any defects during the guarantee period. Hotline: +49 (0)5 11 - 27 04 96 90 eMail: [email protected] The guarantee does not cover damage caused by improper use or external influence (water, falling, sunlight, breakage or impact). 14