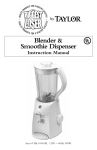
1
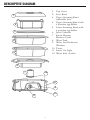
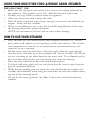
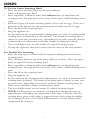
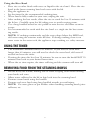
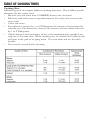
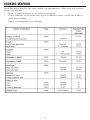
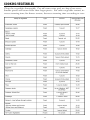
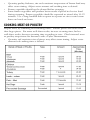
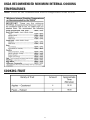
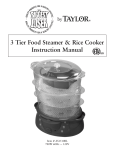
by
Multi Tier Food &
Whole Grain Steamer
Instruction Manual
Item # AS-1500-BL
850W 60Hz, 110-120V
Thank you for your purchase of The Biggest Loser™ Multi Tier Food & Whole
Grain Steamer. Please READ this instruction manual carefully before use.
SAVE THESE INSTRUCTIONS
TABLE OF CONTENTS
Important Safeguards . . . . . . . . . . . . . . . . . . . . . . . . . . . . .3
Special Instructions . . . . . . . . . . . . . . . . . . . . . . . . . . . . . . .4
Introduction . . . . . . . . . . . . . . . . . . . . . . . . . . . . . . . . . . . .4
Descriptive Diagram . . . . . . . . . . . . . . . . . . . . . . . . . . . . . .5
Using your Multi Tier Food & Whole Grain Steamer . . . . . . . .6
Cooking . . . . . . . . . . . . . . . . . . . . . . . . . . . . . . . . . . . . . .7
Tables of Cooking Times . . . . . . . . . . . . . . . . . . . . . . . . . . .9
Cleaning and Maintenance . . . . . . . . . . . . . . . . . . . . . . . . .14
Troubleshooting . . . . . . . . . . . . . . . . . . . . . . . . . . . . . . . .15
Warranty . . . . . . . . . . . . . . . . . . . . . . . . . . . . . . . . . . . . .16
2
IMPORTANT SAFEGUARDS
When using electrical appliances, basic safety precautions should always be followed, including
the following:
1. READ ALL INSTRUCTIONS COMPLETELY BEFORE USING.
2. Do not touch hot surfaces. Use potholders when removing cover or handling hot containers to avoid steam burns. Always use handles.
3. To protect against electrical shock do not immerse cord, plugs or this appliance in water
or any other liquid.
4. Close supervision is necessary when any appliance is used by or near children.
5. Unplug from outlet when not in use, before putting on or taking off any parts and before cleaning. Allow to cool completely before touching.
6. Do not operate any appliance with a damaged cord or plug or after the appliance malfunctions, or has been dropped or damaged in any manner. Return the appliance to
Taylor® (see warranty) for examination, repair or adjustment.
7. Do not use attachments that are not supplied for this appliance from Taylor®. The use
of accessory attachments not recommended by Taylor® may cause fire, electric shock,
injuries or permanently damage this product.
8. Do not use outdoors.
9. Do not let cord hang over edge of table or counter, or touch hot surfaces.
10. Do not operate the appliance while empty or without water in the reservoir.
11. To protect against burns caused by accidental spillage of hot liquid, place the unit on a
level and firm surface away from traffic areas where bumping could upset it. Do not
place on a soft surface (such as carpeting).
12. Do not place on or near a hot gas or electric burner, or in a heated oven.
13. Extreme caution must be used when moving an appliance containing hot liquid.
14. Always attach plug to appliance first, then plug cord into the wall outlet. To disconnect,
turn any control to “off ”, then remove the plug from the wall outlet by grasping the
plug and pulling. Never unplug the appliance by pulling on the cord.
15. Lift and open cover carefully to avoid scalding and allow water to drip into steamer.
16. Use long handled utensils and oven gloves to avoid steam burns on hands and arms
when removing lid, food or rice bowl.
17. When using this appliance, provide adequate air space above and on all sides for air circulation. Do not allow this appliance to touch curtains, wall coverings, clothing, dishtowels or other flammable materials during use.
18. Only use the containers that are supplied in this unit for cooking. Do not cook food in
the water tank.
19. Do not leave the appliance unattended during use.
20. Do not operate uncovered, as this appliance generates steam and could cause injury.
21. Do not use this appliance for other than its intended use.
SAVE THESE INSTRUCTIONS
3
SPECIAL INSTRUCTIONS
This appliance is for HOUSEHOLD USE ONLY.
• This appliance has a polarized plug (one blade is wider than the other). To reduce the risk of electrical shock, this plug will fit in a polarized outlet only one
way. If the plug does not fit fully in the outlet, reverse the plug. If it still does
not fit, contact a qualified electrician. Do not modify the plug in any way.
• Make sure the voltage in your outlet is the same as the voltage indicated on
the appliance. This appliance is for 120 –Volt AC electrical outlet only.
• The length of the cord used on this appliance was selected to reduce the hazards of becoming tangled in, or tripping over a long cord. For safety, it is not
recommended to use an electrical extension cord with this appliance.
• Do not immerse base of unit, plug or cord in water or other liquids.
• Use with wall receptacle only.
• Do not attempt to service this unit yourself.
INTRODUCTION
Now you can learn how to prepare and enjoy great tasting, healthy meals in minutes using your The Biggest Loser™ Multi Tier Food & Whole Grain Steamer by
Taylor®. You will learn how to make the delicious and easy recipes that cut out
calories, but leave in all the taste. The appliance and recipes are great tools to get
you on track. There are over 125 more healthy and delicious recipes that you can
find in the Biggest Loser Cookbook. When you start eating right, you may feel
better, have more energy and feel empowered. For more information on NBC’s
The Biggest Loser, or to join The Biggest Loser Club, please visit the official
Biggest Loser web site at www.nbc.com/The_Biggest_Loser.com or
www.biggestloserclub.com
4
DESCRIPTIVE DIAGRAM
1. Top Cover
2. Rice Bowl
3. Upper Steaming Bowl
removable base
4. Upper Steaming Bowl with
6 position egg holder
5. Lower Steaming Bowl with
6 position egg holder
6. Juice Collector
7. Steam Heating
Element Cover
8. Water Tank
9. Water Level Indicator
Window
10. Timer
11. Power On Light
12. Water Inlet (2 sides)
1
2
3
4
5
6
7
12
8
9
10
11
5
USING YOUR MULTI TIER FOOD & WHOLE GRAIN STEAMER
BEFORE FIRST USE
• Make sure the voltage in your outlet is the same as the voltage indicated on
the appliance. This appliance is for 120 –Volt AC electrical outlet only.
• Remove any bags, labels or stickers from the appliance.
• Clean the water tank with a damp soft cloth
• Wash all of the removable parts using a sponge, warm water and mild dish detergent. Rinse and dry carefully.
• When re-assembling, be sure to put the Steam Heating Element Cover over
the heating element for proper operation.
• NOTE: do not immerse the base unit in water when cleaning
HOW TO USE YOUR STEAMER
•
•
•
•
•
•
Place the unit on a flat, sturdy surface with adequate clearance (i.e., do not
place under wall cabinets or on carpeting or other soft surfaces). The steamer
and components are not for use in convection or conventional ovens, microwaves, or on a stovetop.
Fill the water reservoir with clean, cold water only. Pour the water directly
into the water tank only up to the maximum fill. Do not overfill. NOTE: do
not use seasoning or any other liquid in the water tank. Use of liquids such as
beer, red wine, oil and juice can corrode the unit and cause damage.
Place the juice collector on the tank until firmly in place.
Use fresh cold water with each use and check that the water is up to, but not
past the maximum fill level.
While food is cooking, you can check the water level indicator window and
carefully add additional water using the water inlet on each side without moving any of the steaming bowls.
Do not let the water go below the “Min” level in the water level indicator
window.
6
COOKING
To
•
•
•
•
•
•
•
•
•
Use the Lower Steaming Bowl
Place the lower steaming bowl on the juice collector.
Clean and prepare your food.
Place vegetables, seafood or other food without sauce or liquid into the
steaming bowl. Arrange food in the center of the bowl. Avoid blocking steam
vents.
Both the Upper and Lower steaming bowls can be used for eggs. There are 6
positions in the bottom of each steaming bowl to hold a total of 12 eggs.
Place the lid on the steaming bowl.
Plug the appliance in.
Set the timer for the recommended cooking times (see table of recommended
cooking times included later in this manual). The length of steaming time is
subject to your own personal tastes: depending if you prefer crunchy (shorter
steaming time) or softer, more well-done (longer steaming time) foods.
The on/off light comes on and within 30 seconds steaming begins.
To stop the appliance ahead of set time, turn the timer to the zero position.
For Double Tier Steaming
• Place the largest piece of food with the longest cooking time in the lower
steaming bowl.
• Place the lower bowl on top of the juice collector and base. Place the upper
bowl on top of the lower steaming bowl.
• Place vegetables, seafood or other food without sauce or liquid into the
steaming bowl. Arrange food in the center of the bowl. Avoid blocking steam
vents.
• Place the lid on the steaming bowl.
• Plug the appliance in.
• Set the timer for the recommended cooking times (see table of recommended
cooking times included). The length of steaming time is subject to your own
personal tastes: depending if you prefer crunchy (shorter steaming time) or
softer, more well-done (longer steaming time) foods.
• The on/off light comes on and within 30 seconds steaming begins.
• NOTE: Cooking times are estimates and depend on the quantity, size, required degree of cooking and temperature of the food. Consider all of the
cooking times given in the guide as suggested times when using the double
tier steaming function. Use a Taylor Thermometer to check internal food
temperature for doneness.
7
Using the Rice Bowl
• Place rice or other foods with sauce or liquid in the rice bowl. Place the rice
bowl in the lower steaming bowl and cover with the lid.
• Plug the appliance in.
• Set the timer for the recommended cooking time.
• When food is fully cooked to your taste, unplug the unit.
• After cooking, for best results, allow the rice to stand for 5 to 10 minutes with
the lid on. Carefully open the lid, taking care to avoid escaping steam.
• Use a long handled utensil or rice paddle to mix the rice and allow steam to
escape.
• It is recommended to cook with the rice bowl as a single tier for best steaming results.
• NOTE: If cooking continuously and the water drops below the MIN level,
add water using the exterior water fill slots. If during cooking, there is no
more water in the water tank, the appliance stops cooking as a safety measure.
USING THE TIMER
•
•
•
The maximum controlled time is 60 minutes. If you need to cook food
longer than 60 minutes, you will need to check the water level, add water if
needed and reset the timer.
If setting the timer for less than 15 minutes, be sure to turn the knob PAST 15
minutes than back to your desired lower time.
When the set time expires, the timer will ring and the steamer will turn off.
REMOVING FOOD FROM THE STEAMING BOWLS
•
•
•
•
•
Lift the lid by the handle, making sure to avoid escaping steam from burning
your hands and arms.
Allow water collected in the lid to drip back into the steaming bowl.
Remove steam bowls using the handles
Remove and serve food using long handled utensils to avoid injury.
NOTE: Use oven gloves or pot holders when handling steaming bowls, juice
collector, etc.
8
TABLE OF COOKING TIMES
Cooking Rice
Different types of rice require different cooking directions. Please follow specific
directions for the variety used.
• Measure rice and water then COMBINE them in the rice bowl.
• Fill water tank with water to specified amount. Use only clean water in the
water tank.
• Cover and steam.
• For softer rice, increase by 1 to 2 Tablespoons the amount of water mixed in
with the rice. For firmer rice, decrease the amount of water mixed with rice
by 1 to 2 Tablespoons.
• Check doneness and consistency of rice at the minimum time specified, stirring rice at the same time. When checking rice, be careful not to allow hands
and arms in the path of escaping steam. Use oven mitts and use the unit’s
handles.
• Rice may be seasoned after steaming
9
COOKING SEAFOOD
Steaming times listed in the chart below are approximate. Most fish and seafood
cook very quickly.
• Steam in small portions or in amounts specified.
• Clams, Mussels, and Oysters may open at different times; check the shells to
avoid overcooking.
• Adjust steaming times accordingly.
10
COOKING VEGETABLES
Clean the vegetables thoroughly. Cut off stems; trim, peel or chop if necessary.
Smaller pieces will steam faster than larger pieces. For softer vegetable texture, increase steaming time, for firmer texture, decrease steaming time according to taste.
11
•
•
•
Quantity, quality, freshness, size and consistent temperature of frozen food may
affect steam timing. Adjust water amount and cooking time as desired.
Frozen vegetables should not be thawed before steaming.
Some frozen vegetables will produce better results if placed in the rice bowl
during steaming. Frozen vegetables should be separated or stirred after 10-12
minutes. Use a long-handled fork or spoon to separate or stir to avoid steam
burns on hands and arms.
COOKING MEAT OR POULTRY
Prepare meat, by trimming and removing bones. Smaller pieces will steam faster
than larger pieces. For more well-done results, increase steaming time; for less
well-done results, decrease steaming time according to taste. Check internal meat
or poultry temperature for doneness with a Taylor thermometer.
• Quantity and consistent size of pieces may affect steam timing. Adjust water
amount and cooking time as desired.
12
USDA RECOMMENDED MINIMUM INTERNAL COOKING
TEMPERATURES
Note: These are the recommended internal temperatures of the FOOD
COOKING FRUIT
13
COOKING EGGS
CLEANING AND MAINTENANCE
After each use and before cleaning, unplug the appliance from outlet and allow the
steamer to cool. Do not attempt to clean the unit while still hot.
• CAUTION: NEVER IMMERSE THE BASE UNIT, CORD OR PLUG IN
WATER OR OTHER LIQUID
• Once cooled, empty the juice collector and the water tank. If there is a small
amount of water remaining inside the tank, you can just turn the unit upside
down carefully and the water will come out of the water inlet.
• Wash lid, steaming bowls, rice bowl and drip tray in hot, soapy water. Rinse
and dry all parts. These parts are also top rack only, dishwasher safe.
• Wipe tank with damp sponge and dry completely. If there is any food debris
in the tank area, you may use a sponge with hot, soapy water, and then rinse
with a clean sponge. Do not immerse tank in water. Dry completely.
• Do not use abrasive cleaners.
REMOVING MINERAL SCALE BUILD-UP FROM THE APPLIANCE
In hard water areas, mineral scale may build up on the heating element. If scale is
allowed to accumulate, the steam function could turn off before the food is fully
cooked.
After 7 to 10 uses:
• Remove all parts from the heating element, (bowls, lid, juice collector, steam
heating element cover).
14
•
•
•
•
•
•
•
•
Pour a solution of 64 ounces of cold water and 4 ounces of clear vinegar to
the max fill level. DO NOT use the steam element cover, lid, bowls or juice
collector during this process.
Heat uncovered.
Insert the plug into outlet and set the timer to 20 minutes.
Do not allow the vinegar solution to overflow.
When the timer rings after 20 minutes, unplug the unit, allow to cool, pour
vinegar solution out and use clean cold water several times to rinse and clean
the surface of the heating element.
Dry thoroughly.
Do not use abrasive cleaners.
Do not use any other mineral scale-removing products.
TROUBLESHOOTING
The Multi Tier Food & Whole Grain Steamer will not operate.
• Has a household fuse blown, or has a circuit breaker tripped?
• Is the power supply cord properly seated in the unit and the outlet?
• Has the cord been damaged in some way? If so, DO NOT USE THE FOOD
STEAMER. Contact Customer Service for replacement information.
• Has the auto-shut off feature activated?
The Steamer will not heat properly.
• Are the bowls securely positioned in the base? If not, turn off the unit, allow
the unit to cool and reposition the bowls into the unit base.
• Has the Steamer been overloaded? Attempting to steam large quantities or
large pieces of food may result in undercooked food.
There is excessive moisture in the Steamer.
• Is there anything blocking the vents on the lid?
The lid will not seat properly.
• Is there food blocking the ability of the lid to seal?
Steaming results are not what I expected.
• Is the correct time setting in use?
• Note: individual preferences vary, you may need to experiment with steaming
times to achieve your desired results.
15
WARRANTY INFORMATION
Taylor® warrants this product to be free from defects in material or workmanship
for one (1) year for the original purchaser from date of retail purchase. It does not
cover damages or wear resulting from accident, misuse, abuse, commercial use, or
unauthorized adjustment and/or repair. If service is required, do not return to retailer. Should this product require service (or replacement at our option), please
contact Taylor Customer Service at 1-800-289-0944.
There are no expressed warranties except as listed above.This warranty gives you
specific legal rights, and you may have other rights which vary from state to state.
If you need replacement parts:
• Use only Taylor specified parts. These specified parts will fit right and work
right because they are made with the same precision used to build every new
Taylor appliance.
Keep this book and your sales slip together for future reference. You must provide
proof of purchase for warranty purposes.
For additional product information, or warranty information in Canada or elsewhere outside the USA, please contact us through www.taylorusa.com
Taylor® is a registered trademark of Taylor Precision Products and its affiliated
companies.All rights reserved.
Made to our exact specifications in China. www.taylorusa.com
© 2008 The Biggest Loser is a registered trademark and copyright of NBC Studios, Inc. & Reveille LLC.All Rights Reserved.
AS-1500-BL 9.08