1
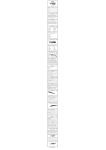
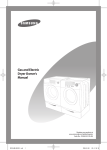
by
Hand Blender
& Chopping Jar
Instruction Manual
Item # AB-1001-BL 120V ~ 60Hz 330W
Thank you for your purchase of The Biggest Loser™ Hand Blender & Chopping Jar.
Please READ this instruction manual carefully before use.
SAVE THESE INSTRUCTIONS
TABLE OF CONTENTS
Important Safeguards . . . . . . . . . . . . . . . . . . . . . . . . . . . . .3
Special Instructions . . . . . . . . . . . . . . . . . . . . . . . . . . . . . . .4
Introduction . . . . . . . . . . . . . . . . . . . . . . . . . . . . . . . . . . . .4
Descriptive Diagram . . . . . . . . . . . . . . . . . . . . . . . . . . . . . .5
Using your Hand Blender & Chopping Jar . . . . . . . . . . . . . . .6
How to Use your Hand Blender . . . . . . . . . . . . . . . . . . . . . .6
Blending Tips . . . . . . . . . . . . . . . . . . . . . . . . . . . . . . . . . . .7
How to Use your Chopper . . . . . . . . . . . . . . . . . . . . . . . . . .8
Chopping Tips . . . . . . . . . . . . . . . . . . . . . . . . . . . . . . . . . .9
Cleaning and Maintenance . . . . . . . . . . . . . . . . . . . . . . . . .10
Troubleshooting . . . . . . . . . . . . . . . . . . . . . . . . . . . . . . . .11
Warranty . . . . . . . . . . . . . . . . . . . . . . . . . . . . . . . . . . . . .12
2
IMPORTANT SAFEGUARDS
When using electrical appliances, basic safety precautions should always be followed, including the following:
1. READ ALL INSTRUCTIONS COMPLETELY BEFORE USING.
2. To protect against the risk of electrical shock do not immerse or rinse cord,
plugs or this appliance in water or any other liquid.
3. Only the detachable blending wand is designed to be immersed in liquid.
Never submerge any other portion of this appliance into liquid. If the Hand
Blender accidently falls into water or any other liquid, unplug it immediately. Do not reach into the liquid to remove the blender until the unit
is unplugged.
4. This appliance should not be used by children and care should be taken when
used near children.
5. Unplug from outlet when not in use, before adding or removing parts and
before cleaning.
6. Avoid all contact with moving parts. Keep hands and utensils out of the container and away from the cutting blade while blending or chopping to prevent the possibility of severe injury to persons or damage to the unit. A
scraper may be used but must be used only when the unit is not running.
7. Do not operate any appliance with a damaged cord or plug or after the appliance malfunctions, or is dropped or has been damaged in any manner. Return the appliance to Taylor® (see warranty) for examination, repair or
adjustment. Do not attempt to repair or replace any parts yourself.
8. Do not use attachments that are not supplied for this appliance by Taylor®.
The use of attachments not recommended or sold by Taylor may cause fire,
electric shock or injury.
9. Do not use outdoors.
10. Do not let cord hang over edge of table or counter, or touch hot surfaces including the stove.
11. Blades are sharp; handle very carefully at all times, especially when cleaning.
12. When mixing liquids, especially hot liquids, use a tall container or make small
quantities at a time to reduce spillage.
13. To reduce the risk of injury, never place the chopper cutting blade on the base
without first putting the bowl properly in place.
14. Be certain the cover is securely locked in place before operating the appliance.
Do not attempt to remove the cover until blades have come to a complete
stop.
15. Do not attempt to defeat the cover’s interlock mechanism as serious injury
may result.
16. Do not leave the appliance unattended during use.
17. To disconnect, be sure the unit is off, then remove the plug from the wall outlet by grasping the plug and pulling. Never unplug the appliance by pulling
on the cord.
3
18. Make sure the motor stops completely and the electrical cord is unplugged
before disassembling or cleaning.
19. Ensure the unit is completely assembled before using.
20. Do not place this appliance near a hot gas or electric burner or in an oven.
21. Do not use this appliance for other than its intended use.
22. Remove the detachable wand before cleaning.
23. Check Chopper bowl for unwanted objects before using.
SAVE THESE INSTRUCTIONS
SPECIAL INSTRUCTIONS
This appliance is for HOUSEHOLD USE ONLY.
• This appliance has a polarized plug (one blade is wider than the other). To reduce the risk of electrical shock, this plug will fit in a polarized outlet only
one way. If the plug does not fit fully in the outlet, reverse the plug. If it still
does not fit, contact a qualified electrician. Do not modify the plug in any
way.
• Make sure the voltage in your outlet is the same as the voltage indicated on
the appliance. This appliance is for 120 –Volt AC electrical outlet only.
• The length of the cord used on this appliance was selected to reduce the hazards of becoming tangled in, or tripping over a long cord. For safety, it is not
recommended to use an electrical extension cord with this appliance.
• Do not immerse or rinse base of unit, plug or cord in water or other liquids.
• Use with wall receptacle only.
• Do not attempt to service this unit yourself.
INTRODUCTION
Now you can learn how to prepare and enjoy great tasting, healthy meals in minutes using your Biggest Loser® Hand Blender & Chopping Jar by Taylor®. You
will learn how to make the delicious and easy recipes that cut out calories, but
leave in all the taste. The appliance and recipes are great tools to get you on track.
There are over 125 more healthy and delicious recipes that you can find in the
Biggest Loser® Cookbook. When you start eating right, you may feel better, have
more energy and feel empowered. For more information on NBC’s The Biggest
Loser®, or to join The Biggest Loser Club, please visit the official Biggest Loser®
web site at www.nbc.com/The_Biggest_Loser.com or www.biggestloserclub.com
4
DESCRIPTIVE DIAGRAM
4
5
3
7
1
8
9
2
10
12
11
1.
2.
3.
4.
5.
6.
7.
8.
9.
10.
11.
12.
6
5
Main Unit
Detachable Blending Wand
Speed Selector
Cord End
Chopper Adaptor
Blending Mug and Lid
Shaker Lid
Chopper Lid
Chopper Bowl
Standard Shaft
Chopping Blade
Miracle Whipping Disc
USING YOUR BLENDER & CHOPPING JAR
BEFORE FIRST USE
• Make sure the voltage in your outlet is the same as the voltage indicated on
the appliance. This appliance is for 120 –Volt AC electrical outlet only.
• The chopper bowl is equipped with a safety locking system to increase security during operation. The chopper function will not work if the chopper
bowl, blades and cover are not properly locked in place.
• Remove any bags, labels or stickers from the appliance.
• Clean the main unit with a damp soft cloth or sponge and dry thoroughly.
• Wash all of the removable parts – chopper bowl, blades and lid, blending mug
and blending lid using a sponge, warm water and mild dish detergent. Rinse
and dry carefully. Do not wash in an automatic dishwasher.
• Wash the blending wand with mild dish detergent and rinse under running
water, being careful not to allow water to enter the hollow shaft. Dry thoroughly.
IMPORTANT NOTES:
• Do not immerse the main unit in water or any other liquid when cleaning.
• Remove blade if you plan to store the chopper bowl in the refrigerator.
• Do not put the chopper bowl or the blending mug in the microwave
HOW TO USE YOUR BLENDER
Best for blending liquids, including soups, gravies, lattes, salad dressings, powdered
drink mixes and sauces. It may also be used to combine dry ingredients or to
emulsify. This blade stirs while adding a minimum of air to the mixture.
1. Wash and dry all components thoroughly as stated above.
2. Assemble with blender components. Always be sure that the appliance is
properly assembled before using. Blender blades are extremely sharp; never
touch the cutting edge of blades.
3. Insert the detachable blending wand into the main unit’s lower part by turning
the foot clockwise.
4. Add ingredients into the blending mug or other container that is tall enough
to avoid splashing. Add ingredients a little at a time to ensure proper blending
and to prevent overflow. Never fill container more than ¾ full; the action of
the blade and immersing the wand into the container will cause ingredients to
rise in the container. Make large recipes in multiple batches.
5. Unless the recipe states differently, pour liquid ingredients into the blender before solid ingredients. The liquid will help the processing time go faster.
6. Plug the appliance into the power outlet.
7. Dip the blending wand as deeply as possible into the mug, but only up to
within one inch of the connection to main unit; then select the speed, switch
on the unit by holding the speed selector button on the front panel.To avoid
splashing, do not turn the unit on until the blade is beneath the surface of the
6
mixture and do not pull the blender out of the mixture while it is running.
8. Work through the ingredients with a gentle up and down motion. When
blending is complete, release the speed selector button and unplug the unit
from the outlet.
9. Detach the blending wand after unplugging the unit by holding the main unit
and turning the blending wand counter-clockwise.
10. When using the hand blender continuously, it is recommended to stop and let
the machine rest for 5 minutes to prevent overheating.
11. When finished, remember to wash and dry all parts as described above.
Blending Tips
• Liquid should not come closer than within an inch of where the wand attaches to the main unit.
• Do not immerse the main unit in liquid or water.
• Do not let the blender stand in a hot pot on the stove while not in use.
• Do not put fruit pits, bones or other hard ingredients into the blending mixture, as these are liable to damage the blades.
• Do not fill the container too full. The level of the mixture will rise when immersing the wand as well as when blending and can splash or overflow the
container. If you are blending large amounts, separate into smaller batches to
blend.
• Adding liquids that are warm, not cold, facilitates blending solids with liquids.
• When recipes call for ice, use crushed ice, not cubed ice.
• The gentle up-and-down motion described above will mix the ingredients
most uniformly and give you the best result.
• To whip air into a mixture, hold the blade just under the surface of the mixture. Be careful not to raise the blade above the surface and cause splashing.
• To make soup creamy in texture, use the Hand Blender to puree solid ingredients to the desired consistency using a gentle up-and-down motion right in
your saucepan.
• When blending butter, remove the butter from the refrigerator and let it come
to room temperature for best results.
7
HOW TO USE YOUR CHOPPER
(Set at high speed – button 2)
NOTE: All attachments used on the Chopping Bowl must be firmly attached to
the spindle. Always adjust the attachments until you are sure that they are correctly fitted.
CHOPPING BLADE
Best for chopping, grinding and mixing; meat, vegetables, dried fruit, nuts or making
bread crumbs. THIS BLADE IS VERY SHARP; HANDLE WITH CARE TO
AVOID INJURY, ESPECIALLY WHEN CLEANING. DO NOT TOUCH
BLADE DIRECTLY.
1. Wash and dry all components thoroughly as stated above.
2. Make sure the appliance is switched off and unplugged.
3. Place the chopping blade over the spindle until it snaps into place. The top of the
chopping blade has a rim. Be sure to slide with the rim side up onto the spindle.
4. Place the chopper bowl on a flat, sturdy surface.
5. Place the assembled blade and spindle into the center of the chopping bowl, sitting it properly in place. Make sure the double bladed knife is running smoothly
by turning the hub. Do not touch the blades.
6. Clean and wash the food to be used.
7. Add food ingredients to the chopping bowl, distributing them evenly with a
spatula (not included). When chopping larger foods, pre-cut them into pieces of
an even size, approximately ½ inch to ¾ inch pieces.
8. Place the chopper cover onto the chopper bowl and turn counter-clockwise
making sure tabs and latches are interlocked. NEVER OPERATE THE
CHOPPER UNLESS THE BLADES AND COVER ARE CORRECTLY LOCKED IN.
9. Attach the chopper adaptor to the main unit by twisting it on.
10. Place the adaptor onto the chopper lid.
11. Plug the appliance into the appropriate power outlet.
12. Turn the unit on and hold the bowl firmly during the chopping process. You can
easily add liquid to the bowl during the chopping process by using the vent holes
on the top of the chopper lid.
13. If additional ingredients need to be added during the chopping process, or when
you have completed your chopping, release the speed selector button then unplug the unit.
14. Remove the main unit and the adaptor from the chopper lid. Detach the adaptor from the main unit by turning clockwise.
15. Remove the lid from the bowl by turning it clockwise. Then remove the blade
from the spindle.
16. If you want to use the chopper bowl to store your food, the shaker lid seals
tightly and twists to allow adding herbs or cheese to your favorite dishes.
17. When finished, remember to wash and dry all parts as described above.
8
Chopping Tips
• Do not put fruit pits, bones or other hard ingredients into the mixture, as
these are liable to damage the blades.
• Do not fill the container too full. The level of the mixture will rise when
chopping begins and can hang up on the blade. If you are chopping large
amounts, separate into smaller batches to chop.
• For best results when adding celery to a recipe, use a peeler to remove outer
strings from the celery stalk before chopping.
MIRACLE WHIPPING BLADE
Best for whipping cream, stiff egg whites and making fluffy omelets.
1. Wash and dry all components thoroughly as stated above.
2. Make sure the appliance is switched off and unplugged.
3. Place the miracle whipping blade over the spindle until it snaps into place.
The top of the blade has a rim. Be sure to slide with the rim side up onto the
spindle.
4. Place the chopper bowl on a flat, sturdy surface.
5. Place the assembled blade and spindle into the center of the chopping bowl,
sitting it properly in place. Make sure the miracle whipping blade is running
smoothly by turning the hub.
6. Add ingredients to the chopping bowl.
7. Place the chopper cover onto the chopper bowl and turn counter-clockwise,
making sure tabs and latches are interlocked. NEVER OPERATE THE
CHOPPER UNLESS THE BLADES AND COVER ARE CORRECTLY LOCKED IN.
8. Attach the chopper adaptor to the main unit by twisting it on.
9. Place the adaptor onto the chopper lid.
10. Plug the appliance into the power outlet.
11. Turn the unit on and hold the bowl firmly during the chopping process. You
can easily add liquid to the bowl during the chopping process by using the
vent holes on the top of the chopper lid.
12. When you have completed your whipping, release the speed selector button
then unplug the unit.
13. Remove the main unit and the adaptor from the chopper lid. Detach the
adaptor from the main unit by turning clockwise.
14. Remove the lid from the bowl by turning it clockwise. Then remove the
blade from the spindle.
15. If you want to use the chopper bowl to store your whipped food, use the
shaker lid to seal it tight.
16. When finished, remember to wash and dry all parts as described above.
9
Miracle Whipping Tips
• To help stabilize egg whites add 1/8 teaspoon of cream of tartar per egg white
prior to whipping.
• Whip egg whites until soft peaks form that do not droop over. Over-whipping will cause them to dry out and become unstable.
• When adding sugar to whipped egg whites, add it slowly when soft peaks
begin to form and continue whipping to form soft peaks that do not droop
over.
• When whipping heavy cream, best results are achieved when cream comes just
out of the refrigerator before whipping.
• Whip cream just before using. If it must be whipped ahead of time, add a
whipped cream stabilizer. Products to stabilize it can be found in stores or via
the internet.
• Whipped cream can be flavored, sweetened or stabilized.
CLEANING AND MAINTENANCE
After each use and before cleaning, unplug the appliance from outlet and allow the
unit to stop. DO NOT ATTEMPT TO CLEAN WHILE THE MOTOR IS
RUNNING OR THE COMPONENTS ARE STILL MOVING.
• CAUTION: NEVER IMMERSE THE MAIN UNIT, CORD OR
PLUG IN WATER. NEVER TOUCH THE BLADE ITSELF. ALWAYS UNPLUG BEFORE CLEANING.
• Clean the main unit with a damp soft cloth or sponge and dry thoroughly.
Never use excess water, treated cloths, harsh cleaning agents, or sprays.
• Wash all of the removable parts – chopper bowl, blades and lid, blending mug
and blending lid using a sponge, warm water and mild dish detergent. Rinse
and dry carefully. Do not wash in an automatic dishwasher.
• To remove the spindle, pull of by using two fingertips. Use caution as the cutting blade is sharp. Do not touch the blade itself.
• To wash the chopping blade, run under hot water. Use a brush for washing,
and use extreme caution when drying. The preferred method of drying is to
lay on a flat surface and air dry. Do not leave the blade where children can
reach it.
• Remove the blending wand from the main unit. Wash the detachable blending wand under running water, being careful not to allow water to enter the
hollow shaft. Dry thoroughly.
• Reassemble and store in a dry place, unplugged and away from the reach of
children.
10
IMPORTANT NOTES:
• Do not wash any components in an automatic dishwasher.
• Do not use harsh or abrasive cleaners or solvents.
• To store, place all components back into the box and store in a cool, dry place
away from the reach of children.
• Remove the blade if you intend to store food in the chopper bowl in the
refrigerator.
• Do not put the chopper bowl or the blending mug in the microwave.
TROUBLESHOOTING
The Hand Blender & Chopping Jar will not operate.
• Has a household fuse blown, or has a circuit breaker tripped?
• Is the power supply cord properly seated in the unit and the outlet?
• Is the inter-locking bowl and lid secured properly if using the chopping feature?
• Has the cord been damaged in some way? If so, DO NOT USE THE APPLIANCE. Contact Customer Service for replacement information.
The lid will not seat properly.
• Is the product assembled properly?
• Is food blocking the ability to close the lid? If so, you may be processing too
much food or pieces are too large. See Chopping Guide.
Food is unevenly chopped.
• Either you are chopping too much food at one time, or the pieces are not
small enough. Try cutting food into smaller pieces of even size and processing
a smaller amount per batch.
Food is chopped too fine or is watery.
• The food is over processed. Use brief pulses, or process for less time.
Food is collecting on the sides of the bowl or container.
• You may be processing too much food. Turn machine off. When the blade
stops completely, remove cover and clean with a spatula, turning food inward
toward the blade.
Food hangs up on the blade.
• You may be processing too much food or pieces are too large. See Chopping
Guide.
Liquid is spilling, splashing or overflowing the container or saucepan.
• You may be blending too much liquid. Divide the mixture into smaller
batches.
• You may have started the blender before submerging the blade into the mixture.
• You may have accidently raised the blade above the surface of the mixture
during blending.
11
WARRANTY
Taylor® warrants this product to be free from defects in material or workmanship
for one (1) year for the original purchaser from date of retail purchase. It does not
cover damages or wear resulting from accident, misuse, abuse, commercial use, or
unauthorized adjustment and/or repair. If service is required, do not return to retailer. Should this product require service (or replacement at our option), please
contact Taylor Customer Service at 1-800-289-0944.
There are no expressed warranties except as listed above.This warranty gives you
specific legal rights, and you may have other rights which vary from state to state.
If you need replacement parts:
• Use only Taylor specified parts. These specified parts will fit right and work
right because they are made with the same precision used to build every new
Taylor appliance.
Keep this book and your sales slip together for future reference. You must provide
proof of purchase for warranty purposes.
For additional product information, or warranty information in Canada or elsewhere outside the USA, please contact us through www.taylorusa.com
Taylor® is a registered trademark of Taylor Precision Products and its affiliated
companies.All rights reserved.
Made to our exact specifications in China. www.taylorusa.com
© 2008 The Biggest Loser is a registered trademark and copyright of NBC Studios, Inc. & Reveille LLC.All Rights Reserved.
AB-1001-BL 8.08
12