1
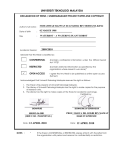
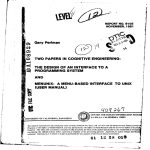
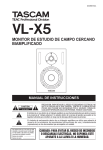
D00822500A
BI-AMPLIFIED NEARFIELD STUDIO MONITOR
OWNER'S MANUAL
CAUTION: TO REDUCE THE RISK OF ELECTRIC SHOCK, DO NOT
REMOVE COVER (OR BACK). NO USER-SERVICEABLE PARTS INSIDE.
REFER SERVICING TO QUALIFIED SERVICE PERSONNEL.
The lightning flash with arrowhead symbol, within an equilateral triangle, is intended to alert
the user to the presence of uninsulated "dangerous voltage" within the product's enclosure
that may be of sufficient magnitude to constitute a risk of electric shock to persons.
The exclamation point within an equilateral triangle is intended to alert the user to the presence of important operating and maintenance (servicing) instructions in the literature
accompanying the appliance.
This appliance has a serial number
located on the rear panel. Please record
the model number and serial number and
retain them for your records.
Model number
Serial number
WARNING: TO PREVENT FIRE OR SHOCK
HAZARD, DO NOT EXPOSE THIS
APPLIANCE TO RAIN OR MOISTURE.
Important safety instructions
1 Read these instructions.
• Do not expose this apparatus to drips or splashes.
2 Keep these instructions.
• Do not place any objects filled with liquids, such as
vases, on the apparatus.
3 Heed all warnings.
4 Follow all instructions.
5 Do not use this apparatus near water.
6 Clean only with dry cloth.
• Do not install this apparatus in a confined space such as
a book case or similar unit.
• The apparatus draws nominal non-operating power from
the AC outlet with its POWER switch in the off position.
7 Do not block any ventilation openings. Install in accordance with the manufacturer's instructions.
• The apparatus should be located close enough to the AC
outlet so that you can easily grasp the power cord plug at
any time.
8 Do not install near any heat sources such as radiators,
heat registers, stoves, or other apparatus (including
amplifiers) that produce heat.
• An apparatus with Class I construction shall be connected to an AC outlet with a protective grounding connection.
9 Do not defeat the safety purpose of the polarized or
grounding-type plug. A polarized plug has two blades
with one wider than the other. A grounding type plug
has two blades and a third grounding prong. The wide
blade or the third prong are provided for your safety. If
the provided plug does not fit into your outlet, consult
an electrician for replacement of the obsolete outlet.
10 Protect the power cord from being walked on or
pinched particularly at plugs, convenience receptacles,
and the point where they exit from the apparatus.
11 Only use attachments/accessories specified by the
manufacturer.
12 Use only with the cart, stand, tripod, bracket, or table
specified by the manufacturer, or sold with the apparatus. When a cart is used, use caution when moving the
cart/apparatus combination to avoid injury from tipover.
13 Unplug this apparatus during lightning storms or when
unused for long periods of time.
14 Refer all servicing to qualified service personnel.
Servicing is required when the apparatus has been
damaged in any way, such as power-supply cord or
plug is damaged, liquid has been spilled or objects
have fallen into the apparatus, the apparatus has been
exposed to rain or moisture, does not operate normally,
or has been dropped.
2
TASCAM VL-X5 Owner's Manual
Important safety instructions
IMPORTANT (for U.K. Customers)
For U.S.A
DO NOT cut off the mains plug from this equipment.
TO THE USER
If the plug fitted is not suitable for the power points in your
home or the cable is too short to reach a power point, then
obtain an appropriate safety approved extension lead or
consult your dealer.
If nonetheless the mains plug is cut off, remove the fuse and
dispose of the plug immediately, to avoid a possible shock
hazard by inadvertent connection to the mains supply.
If this product is not provided with a mains plug, or one has
to be fitted, then follow the instructions given below:
IMPORTANT: The wires in this mains lead are coloured in
accordance with the following code:
GREEN-AND-YELLOW:EARTH
BLUE
: NEUTRAL
BROWN
: LIVE
WARNING: This apparatus must be earthed.
As the colours of the wires in the mains lead of this
apparatus may not correspond with the coloured markings
identifying the terminals in your plug proceed as follows:
The wire which is coloured GREEN-and-YELLOW must be
connected to the terminal in the plug which is marked by the
letter E or by the safety earth symbol ç or coloured
GREEN or GREEN-and-YELLOW.
The wire which is coloured BLUE must be connected to the
terminal which is marked with the letter N or coloured
BLACK.
The wire which is coloured BROWN must be connected to
the terminal which is marked with the letter L or coloured
RED.
When replacing the fuse only a correctly rated approved
type should be used and be sure to re-fit the fuse cover.
IF IN DOUBT
ELECTRICIAN
–
CONSULT
A
This equipment has been tested and found to comply
with the limits for a Class B digital device, pursuant to
Part 15 of the FCC Rules. These limits are designed
to provide reasonable protection against harmful
interference in a residential installation. This
equipment generates, uses, and can radiate radio
frequency energy and, if not installed and used in
accordance with the instruction manual, may cause
harmful interference to radio communications.
However, there is no guarantee that interference will
not occur in a particular installation. If this equipment
does cause harmful interference to radio or television
reception, which can be determined by turning the
equipment off and on, the user is encouraged to try to
correct the interference by one or more of the following
measures.
a) Reorient or relocate the receiving antenna.
b) Increase the separation between the equipment
and receiver.
c) Connect the equipment into an outlet on a circuit
different from that to which the receiver is
connected.
d) Consult the dealer or an experienced radio/TV
technician for help.
CAUTION
Changes or modifications to this equipment not
expressly approved by TEAC CORPORATION for
compliance could void the userís authority to operate
this equipment.
COMPETENT
TASCAM VL-X5 Owner's Manual
3
Table of contents
Introduction ................................................................................................... 5
Features ........................................................................................................ 5
Supplied accessories .................................................................................... 5
Environmental precausions ........................................................................... 5
Installation ..................................................................................................... 6
Placing the VL-X5 ......................................................................................... 7
Rear panel..................................................................................................... 8
Specifications ................................................................................................10
Block diagram ...............................................................................................10
4
TASCAM VL-X5 Owner's Manual
Introduction
Introduction
Thank you for your purchase of the TASCAM VL-X5.
Objectivity, its all about pro studio monitor requirement. It's not an optional, you have to have a objectivity. If you
can't hear from TASCAM studio monitors, sorry it's not really there.
The VL-X5 is not like any other reference monitors in the business. You will see you've been cheated from your bestfriend-a-like monitors after you just taste VL-X5. If you need pure and clear like a mirror performance for your
precious recording or don't want to loose objectivity of your mix, you will need VL-X5.
It's barely nothing added or removed. Custom designed 0.75" natural silk dome tweeter provides not only smooth
wave producing for clear sound but improving cooling function for enhanced power handling than normal metal or
plastic tweeters. 5-1/4" low frequency driver and deeply designed enclosure produced natural, powerful and rich bass
for pure bottom of your sound. Flat frequency response up to 22 kHz is perfect for your mastering environment where
more sampling rates and bits are exist or needed. ASC(Acoustic Space Control) for fine room tuning.
Before connecting and using the unit, please take time to read this manual thoroughly to ensure you understand how to
properly set up and connect the VL-X5, as well as the operation of its many useful and convenient functions. After you
have finished reading this manual, please keep it in a safe place for future reference.
Features
• HF30 W / LF60 W Active Bi-amplified Near Field Studio Monitor System.
• 20 mm (0.75") Natural Silk Dome Tweeter.
• 210 mm (5-1/4") Woofer.
• LF cut 500 Hz function
• 1.5 dB Boost and Cut SW's for 150 Hz or 800 Hz LF Controls (DIP Type).
• 1.5 dB Boost and Cut SW's for 3 kHz or 8 kHz HF Controls (DIP Type).
• Separate Enclosure for Built-in Amplifier.
• ASC (Acoustic Space Control) for Fine Room Tuning Needs.
• Magnetic Shield Enclosure for Desktop Operation.
• Deep and Rich Natural LF Sound.
• Perfectly Matched Dual Power Amp (60W LF and 30W HF) for each Drivers.
• Low Frequency Ports delivering Amazing Bass response.
Supplied accessories
In addition to this manual, the VL-X5 has been packed with the following:
• Power cord
• Warranty document
Should any of these items be missing, or if you encounter any damage, please contact your TASCAM supplier.
This unit was packed in its carton with special materials in order to prevent any damage during shipment.
Please save the carton and packing materials in the event you need to transport the unit in the future.
Environmental precausions
The VL-X5 may be used in most places, but to maintain top performance and prolong operating life, do not place it in
the following locations.
• On an unsteady surface, or where there is frequent vibration or resonance
• Near a window or where it can be exposed to direct sunlight
• Near heating or air conditioning vents, or in very hot or cold places
• Places with high humidity or poor ventilation
• Next to tuners, televisions or video decks, as this could cause noise or affect video images
TASCAM VL-X5 Owner's Manual
5
Installation
Installation
1 Precautions
Handling
Do not grab the speaker driver unit : the VL-X5 is packaged in box fitted tight, so your attention is required when
taking speakers out of the box. To avoid the possible damage to the speaker units, hold both sides of the speaker to
pull it out of the box. The units should not be touched to avoid damage even after it is out of the box.
Recommend to use high quality balanced or unbalanced cable for input connection.
Turn off the power of the VL-X5 and turn the Volume control of the VL-X5 to minimum before kaming the
connection.
Connection
Connect XLR balanced or TRS balanced/unbalanced input of the VL-X5 to the output terminal of the audio
equipment.
2 Connection
Assure that the power switch of VL-X5 is turned off and volume control of VL-X5 is turned to minimum. Connect
male side of XLR balanced cable, TRS balanced cable, or TS unbalanced cable to the input connector of the VLX5.
XLR / TRS Combo Jack
Power Cord
XLR
PIN 1:
PIN 2:
PIN 3:
GND
HOT
COLD
TRS
Tip:
Ring:
Sleeve:
HOT
COLD
GND
Power Cord
XLR Balanced Cable
TRS Balanced or Unbalanced Cable
3 Connecting to the audio equipment
Before connecting, make sure its power is turned off.
Plug the XLR balanced, TRS balanced or TS unbalanced cable to the corresponding output connectors of the audio
equipment.
Pre-Amplifier, Sound card, Mixer Output
VL-X5
6
TASCAM VL-X5 Owner's Manual
VL-X5
Placing the VL-X5
Placing the VL-X5
Placing the speakers is one of the most important procedures to monitor correct sound.
To monitor with VL-X5 at its maximum capability, appropriate listening environment and correct placement are
required. Please, refer to the following to place the VL-X5 correctly.
1 VL-X5's set up position is 60 cm
(Recommendation 100 cm) to the back and
40cm (Recommendation 60 cm) to the side.
40 cm
60 cm
2 Basically, two units and the listener should align to
from a regular triangle.
Left
Right
3 The height of units, more precisely, the top of the
woofer should come up to where your ears are in
normal listening environment.
4 Recommend Place the VL-X5 horizontally. If you
Placing VL-X5 horizontally, refer to the following
diagram.
NOTE
DO NOT place any obstacles that may block the flow of air, which is medium of the sound, or
create reflected sound, especially, the material of high reflection tendency including glass, mirror
or metal. Place those materials away from the path of the sound from VL-X5.
TASCAM VL-X5 Owner's Manual
7
Rear panel
Rear panel
1
2
7
3
4
5
8
9
6
1 XLR INPUT
This jack accept XLR input connection, wire either balanced or unbalanced.
The signal of XLR INPUT is summed together with TRS INPUT through a balanced input amplifier.
So, either may be used as an input or mixed together. Input specifications apply to both inputs.
The INPUT CONNECTIONS wiring chart of XLR connector is following:
Pin 1: GND
Pin 2: HOT
Pin 3: COLD
2 TRS INPUT
This jack accepts a TRS connector, wire either balanced or unbalanced.
For balanced wiring, a 3-conductor TRS plug is necessary. The INPUT CONNECTIONS wiring chart of TRS
connector is as following:
Tip:
HOT (+)
Ring: COLD (-)
Sleeve: GND
Unbalanced wiring works with either a 2 or 3-conductor TRS connector. A 2-conductor TRS plug automatically
ground the minus signal input, whereas a 3-conductor TRS plug wired unbalanced provides the option of leaving the
minus open or grounded. We recommend that you grounded the unused input.
The TRS INPUT is summed together with XLR INPUT through a balanced Input amplifier.
So, either may be used as an input or mixed together. Input specifications apply to both inputs.
3 VOLUME Control
Use the Volume Control to set the output sound
pressure from VL-X5 to proper level required.
< MIN >
< MAX >
4 POWER LED
When power of VL-X5 is on, the LED will be light up. When power of VL-X5 is off, the LED will be turned off.
8
TASCAM VL-X5 Owner's Manual
Rear panel
5 ACOUSTIC SPACE CONTROL SWITCH (HF Control)
For HF control, you can choose two different modes.
1) For ~ 8 kHz
8 kHz controller is set up at 2 ~ 3 meter of hearing position from factory.
And optimum hearing position can be adjustable for longer or shorter distance.
ex) ~2 m distance increase, +1.5dB switch on
~0.5 m distance decrease, -1.5dB switch on
2) For ~3 kHz
This controls HF gain, so it is useful for sound checking in studio.
For impact and heavy sound in music and movie, +1.5 dB switch on.
For soft and mild sound, -1.5 dB switch on.
Your optimums sound can be made by using these two HF controllers together.
6 ACOUSTIC SPACE CONTROL SWITCH (LF Control)
LF control is useful to set VL-X5 for its maximum performance regardless of conditions of room and sound
check. 150 Hz/800 Hz are adjustable by +1.5 dB or -1.5 dB step and for under 500 Hz, there is -12 dB roll off
function per octave.
1) 150 Hz control
VL-X5's set up position is 60 cm (Recommendation 100 cm) to the back and 40 cm (Recommendation 60
cm) to the side. However, if it has to be set up below the recommended set up distance due to important
reason, -1.5 dB switch on to decrease the reflecting sound and LF can be volume up by +1.5 dB switching
on in the venue which has high absorbability of sound.
2) 800 Hz control
This can be apply just like 150 Hz controller and your optimum sound of mid and low frequency range can
be made by using 150 Hz and 800 Hz controller
3) LF CUTTT 500Hz
This function is useful when only LF is boost up and can be use to check only over mid range sound.
CAUTION
Control switch is sensitive. Therefore be careful not to damage.
7 POWER RECEPTACLE
For plugging in detachable 3-circuit line cord.
8 EXT.FUSE HOLDER
For external main fuse.
9 POWER SWITCH
When you push the power switch to 'I', the VL-X5 will be turned on. When you push the switch to 'O', the
VL-X5 will be turned off.
TASCAM VL-X5 Owner's Manual
9
Specifications
Specifications
Frequency Response (1 W @ 1 m)
+/-3 dB
45 Hz ~ 22 kHz
Axial Sensitivity (dB SPL, 60 W @ 1 m)
103
LF amplifier power (RMS)
60 W
HF amplifier power (RMS)
30 W
LF driver
5.25 inch
HF driver
0.75 inch soft silk domes
Crossover frequency
3 kHz
HF control
+/-1.5 dB
3 kHz / 8 kHz (DIP type switch)
LF control
+/-1.5 dB
150 Hz / 800 Hz (DIP type switch)
Low-cut frequencies
40 Hz / 500 Hz (12 db OCT)
System Configuration
2way near-field
studio reference monitors
T.H.D
0.01 % (40 W 1 kHz 8 ohms)
Input connectors
One XLR / TRS Combo
Input Level
200 mV 10 k ohms
Power requirements
100 V ~ 120 V (50 Hz / 60 Hz) or
200 V ~ 240 V (50 Hz / 60 Hz)
Cabinet
MDF
Color
Dark black wood
Dimension (W x H x D mm)
198 x 291 x 290
Weight
7 kg
Block diagram
HF Control
0.75 inch Shielded silk Dome
Active
XLR IN
TRS IN
nd
Balanced Input Amp
2
Order HF
2
Crosspver
XLR / TRS
Combo Jack
HF Driver
Active
nd
Order HF
30W HF Amp
Crossover
5.25 inch Shielded PP
4 th Order High Pass Filter
LF Driver
Volume
Active
nd
Active Subsonic Filter
2
Order LF
Crossover
Active
2
nd
Order LF
Crossover
4 th Order Low Pass Filter
10 TASCAM VL-X5 Owner's Manual
40W HF Amp
LF Control
Memo
TASCAM VL-X5 Owner's Manual
11
VL-X5
TEAC CORPORATION
Phone: +81-422-52-5082
3-7-3, Nakacho, Musashino-shi, Tokyo 180-8550, Japan
TEAC AMERICA, INC.
Phone: +1-323-726-0303
7733 Telegraph Road, Montebello, California 90640
TEAC CANADA LTD.
Phone: +1905-890-8008 Facsimile: +1905-890-9888
5939 Wallace Street, Mississauga, Ontario L4Z 1Z8, Canada
TEAC MEXICO, S.A. De C.V
Phone: +52-555-581-5500
Campesinos No. 184, Colonia Granjes Esmeralda, Delegaacion Iztapalapa CP 09810, Mexico DF
TEAC UK LIMITED
Phone: +44-8451-302511
19 & 20, The Courtyards Hatters Lane Watford, Hertfordshire, WD18 8TE United Kingdom
TEAC EUROPE GmbH
Phone: +49-611-71580
Bahnstrasse 12, 65205 Wiesbaden-Erbenheim, Germany
TEAC ITALIANA S.p.A.
Phone: +39-02-66010500
Via C. Cantu 11, 20092 Cinisello Balsamo, Milano, Italy
www.tascam .com
www.tascam.com
www.tascam.com
www.tascam.com
www.tascam.co.uk
www.tascam.de
www.teac.it
Printed in Korea