1
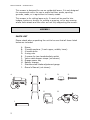
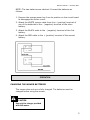
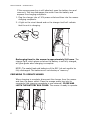
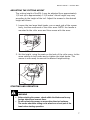
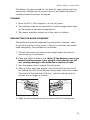
Owner’s Manual
for
™
Electric Rechargeable Power
Reel Mower
(Model EM-1)
™
Sunlawn, Inc.
325 Garfield Street
Fort Collins, CO 80524
Tel: 970-493-5284
FAX: 970-493-5202
For service inquiries, parts replacement,
and maintenance tips, see
www.sunlawn.com
© 2006 by Sunlawn, Inc
Owner’s Manual — Sunlawn EM-1
BEFORE USING THE NEW ELECTRIC RECHARGEABLE
POWER REEL MOWER
Please read this guide and use these operating instructions to become
familiar with the mower and its features. The charging of batteries,
operation of the mower, and notes on safety and maintenance
procedures are important for the use and enjoyment of this product.
WARRANTY
Sunlawn, Inc. (the Manufacturer) guarantees this product for private
use for a period of 2 years from the date of purchase. This guarantee
applies to all serious defects of the product which can be proven to
have been caused by faulty materials or workmanship. The
Manufacturer has the option of supplying a replacement of the product
in perfect working order or repairing the product free of charge at an
authorized facility, provided that the following conditions are fulfilled:
•
•
The appliance has been handled correctly and in accordance with
the instructions in the Owner’s Manual.
Neither the buyer nor a third party has attempted to repair the
product.
This guarantee is void if replacement parts or accessories are used
other than those approved by the Manufacturer.
The product, accompanied by a copy of the original receipt, must be
delivered, prepaid, to a service center authorized by the Manufacturer.
This Manufacturer’s guarantee shall not affect any guarantee claims
against the dealer or seller of the product.
USE OF THIS PRODUCT
!
WARNING
For safety reasons persons of less than 16 years of age
or persons not familiar with these operating instructions
must not use the electric rechargeable mower.
1
Owner’s Manual — Sunlawn EM--1
This mower is designed for use on residential lawns. It is not designed
for commercial use or for use in public facilities, parks, sporting
grounds, roads, or in agriculture or forestry areas.
This mower is for cutting lawns only. It must not be used to trim
hedges, bushes or shrubs, for cutting or pruning, or for any mowing
where both wheels and the roller are not fully supporting the mower.
ASSEMBLY
PARTS LIST
Please check when unpacking the unit to be sure that all items listed
below are included:
A.
B.
C.
D.
E.
F.
G.
H.
I.
J.
Mower
3 handle sections (1 each upper, middle, lower)
4 handle bolts
4 wing nuts
2 screws for two-handed safety switch
Velcro cable keeper straps (not shown)
Orange power key
Battery charger
Stainless steel blade adjustment gauge
Owner’s Manual (not shown)
B.
A.
C.
G.
D.
E.
H.
CHARGED OK
CHARGING
I.
2
Owner’s Manual — Sunlawn EM-1
!
CAUTION
Be careful to keep the mower upright. When
the battery cover is not latched and the mower
is not upright, the batteries may fall out
causing damage to the batteries or the electric
circuits.
ASSEMBLE THE HANDLE SECTIONS
1. Set the cutting height to the highest setting. (See Operation section
– Adjusting the cutting height, page 7). This will make it easier to
attach the lower handle section.
2. Fit the lower section of the handle so that the holes are over the
handle posts on the mower. Then rock the handle to align the locking
tabs and allow the handle section to fit into place.
Bottom Handle Mount Hole
Top / Middle Handle Mount Hole
3. Continue assembly of the middle and top sections of the handle
using the handle bolts and wing nuts. The top section must be
attached with the two holes near the grip area on the right side
(standing behind the mower).
3
Owner’s Manual — Sunlawn EM--1
4. Attach the two-handed safety switch to the top section. Run the
cable along the top side of the handle (so it does not hang down
behind the mower) and close the “clamshell” portion of the safety
switch around the screw holes. Fasten by inserting and tightening the
two screws provided.
5. Secure the cable to the handle using the two Velcro cable keeper
straps.
CONNECTING THE BATTERIES
The batteries come from the factory properly connected. All that is
necessary is to charge them (see section following.)
These instructions are for replacing the batteries if necessary.
!
4
WARNING
•
Be careful to connect batteries correctly. Failure to do so
may result in electric shock or damage to the electrical
system of this mower.
•
Close and latch the battery cover before using or servicing
the mower. Otherwise the batteries can fall out, damaging
the mower
Owner’s Manual — Sunlawn EM-1
NOTE: The two batteries are identical. Connect the batteries as
follows:
1. Remove the orange power key from its position on the circuit board
to disengage the motor circuit.
2. Attach the WHITE jumper cable from the + (positive) terminal of
one of the batteries to the – (negative) terminal of the other
battery.
3. Attach the BLACK cable to the - (negative) terminal of the first
battery.
4. Attach the RED cable to the + (positive) terminal of the second
battery.
OPERATION
CHARGING THE MOWER BATTERIES
The mower does not arrive fully charged. The batteries must be
charged before using the mower.
!
CAUTION
Use only the charger provided
with this mower
5
Owner’s Manual — Sunlawn EM--1
If the orange power key is still attached, open the battery box and
remove it; this key disengages the motor from the battery and
exposes the charging receptacle.
1. Plug the charger into a 110V power outlet and then into the mower
charging receptacle.
2. A light on the circuit board and on the charger itself will indicate
that the unit is charging.
CHARGED OK
CHARGING
Recharging time for the mower is approximately 5-8 hours. The
charger light, which glows red when the battery is not fully charged,
will glow green when charging is complete.
NOTE: The sealed lead acid batteries of the EM-1 do not need to be
fully discharged. The batteries will not develop a “memory.”
PREPARING TO OPERATE MOWER
When charging is complete, disconnect the charger from the mower
and from the power outlet. Place the orange power key into its
receptacle (the charging receptacle is now covered). CLOSE AND
LATCH THE BATTERY BOX COVER. The mower is ready to operate.
6
Owner’s Manual — Sunlawn EM-1
ADJUSTING THE CUTTING HEIGHT
The cutting height of the EM-1 may be adjusted from approximately
1/2 inch up to approximately 2 1/4 inches. Actual height may vary
according to the height of the turf. Adjust the mower to the desired
height as follows:
1. Loosen the two large black knobs, one on each side of the mower
body, to allow movement of the roller arms. NOTE: the handle is
mounted to the roller arms and thus moves with the arms.
2. Set the height, using the scale on the back of the roller arms, to the
same setting on both sides and re-tighten the black knobs. The
mower is now ready to mow at the desired height setting.
STARTING AND OPERATION
!
WARNING
•
•
Before starting the mower, check within the blade area for any
foreign objects and remove them.
Do not operate the mower on areas other than turf surfaces.
The mower should be sitting on its wheels on a level part of the
lawn before starting operation.
7
Owner’s Manual — Sunlawn EM--1
1. To start and operate the mower, press and hold down the red
safety button with one hand, then pull the starting lever back
toward the handle grip with the other hand. There are similar
instructions on the handle itself stating: “To operate pull handle
while depressing safety button.”
2. As soon as the mower has started, release the red safety button.
3. When the starting lever is released, the motor switches off.
4. The mower may be restarted at any time with the same procedure.
NORMAL MOWING
To obtain a clean cut, push the mower in straight lines (passes) at a
deliberate walking pace. Overlap the passes to even the cut and to
avoid any uncut strips.
MOWING USING THE GRASS CATCHER (OPTIONAL ACCESSORY)
The grass catcher collects the clippings as it mows. It attaches at the
grass catcher hooks on the mower and by the strap to the mower
handle. Mow using the same procedure as for normal mowing (above).
The roller apron keeps clippings from falling down between the cutting
bar and the roller thus missing the grass catcher. The roller apron is
installed just behind the cutting bar using the two screws provided.
Once the roller apron is installed it is not necessary to remove it
whether or not you are using the grass catcher.
!
CAUTION
Do not attach or remove the grass
catcher while the motor is running.
OVERLOADING/OVERHEATING
If the mower blade is blocked, the blade drive will overload and cause
slippage of the belt, resulting in a loud “brrrrrrr” sound.
1. Release the starting lever. If there is any foreign object in the blade
area, it must be removed before proceeding.
2. Open the battery box, remove the orange power key, and then
service the blade area by removing the foreign object.
8
Owner’s Manual — Sunlawn EM-1
3. After removing the obstacle replace the orange power key in
position, close and latch the battery box and proceed.
If the motor stops during operation and the battery has charge
remaining, then the motor may be overloaded or overheated. Wait 2-5
minutes to allow an automatic reset before resuming operation.
MANUAL OPERATION
The EM-1 may be used as a manual mower at any time, whether the
batteries are installed or not.
MOWING: GENERAL INFORMATION
THE 1/3 RULE
This is the key to enjoyable mowing and a healthy lawn.
1. The lawn should be mowed regularly, at least once a week during
the growing season.
2. Be guided by observing the lawn and taking care not to remove
more than 1/3 of the total height of the turf at any mowing.
3. Following this rule will stimulate the turf’s root growth, maintain its
health, and encourage its natural ability to crowd out unwanted
weeds.
If the lawn has become too high (over 4 inches in height) then it is
best to set the mower higher than usual and mow, then reset down to
the normal level and mow again within a day or two.
Removing too much of the turf’s height, especially in the heat of
summer, can cause root shock and weaken the lawn; bringing down
the height by successive mowings over two or more days can avoid
this damage and maintain the health of the turf.
If the lawn is overgrown (to higher than 4-5 inches) it may be
advisable to use a brush cutter to remove the excess turf mass before
resuming mowing at normal heights.
9
Owner’s Manual — Sunlawn EM--1
INSPECT THE MOWING AREA
1. Before beginning to mow, remove any foreign objects, such as
stones, branches, or bones, from the area.
2. Continue to check for such obstacles during mowing.
THE LAWN SHOULD BE RELATIVELY DRY
1. Mowing wet grass causes unevenness in the cut and difficulty with
the clippings.
2. Do not mow when it is raining.
MAINTENANCE
!
WARNING
•
Before cleaning or maintenance of the mower, remove the
orange power key from its position on the circuit board.
This key disengages the motor from the battery and will
prevent the motor from starting unintentionally. After
removing the orange power key ALWAYS close and latch the
battery cover.
•
To avoid injury or damage to the unit do not clean the EM-1
using running water, a hose, or a high pressure stream.
CLEANING
After using the mower, clean with a moist cloth. Spray the cylinder
and cutting bar with silicon spray lube.
MAINTENANCE
Regularly check to insure that all bolts, nuts, and screws are tight and
that the mower is in good working order. Worn out and damaged parts
should be replaced.
10
Owner’s Manual — Sunlawn EM-1
The blades, if properly cared for, will mow for years before requiring
sharpening. Sharpening can only be done by a professional using a
cylinder grinder and proper techniques.
STORAGE
1. Store the EM-1, fully charged, in a cool, dry place.
2. The batteries need not be removed for winter storage unless they
will be subject to sub-zero temperatures.
3. The mower should be stored out of the reach of children.
READJUSTING THE BLADE CLEARANCE
The blades are optimally adjusted from the factory. However, after
using the mower for a long period, if the cut is not clean, the blades
need readjusting. The procedure is as follows:
1. Turn off the mower and remove the orange power key from its
position on the circuit board.
2. Close and latch the battery box. Note: If the battery cover is not
latched and the mower is not upright, the batteries can fall
out, causing damage to the batteries or electric circuits.
3. Turn the mower over to expose the cutting bar.
4. Using a 10mm open end wrench, turn the hex bolt at one end of
the cutting bar until the cutting bar and cylinder come into contact.
Then back off the bolt about 1/8 turn, until the cutting bar and
cylinder are no longer in contact.
5. Make the same adjustment at the other end of the cutting bar.
11
Owner’s Manual — Sunlawn EM--1
6. Now check the adjustment using the small 0.05mm gauge (silver
strip) supplied with the EM-1 (or any 0.05mm feeler gauge). If the
gauge is held by the cylinder blades but the cylinder and cutting bar
are not touching then the adjustment is correct.
7. The blades may also be tested by inserting a piece of paper
vertically into the blades while turning them by hand.
!
WARNING
Be careful of injury — handle the blades
carefully to avoid cutting yourself. Wear
appropriate gloves or hand protection.
TECHNICAL DATA
Battery
Motor Drive
Charger
Input:
Output:
UL listed
Mower
2 x 12V / 7.2Ah
24V, 6A, 140W
AC 100 – 240V 50 / 60 Hz 1.5A
24V _ _ _ _ 1500 mA
Cutting width:
40 cm
Weight with battery: 35.2 lb
Cutting height rough (from floor): .4 to 2.2 inches
CE certified: Declaration of Conformity (November 30, 2005)
EMC Order No.
Machinery Order No.
12
MT-E0511395-1
MT-S0511320-1