1
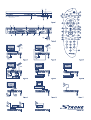
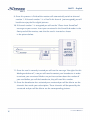
PART 1 • English Table of Contents 1.0 Usage 1.1 1.2 1.3 1.4 1.5 2.0 3.0 4.0 5.0 6.0 A.1 A.2 2 Safety Instructions Features & Accessories Safety Precautions Storage Equipment Set-up Your Receiver 2.1 Front Panel 2.2 Rear Panel Connections 3.1 Connecting to your TV & VCR 3.1.1 Basic connection with a coaxial cable 3.1.2 Basic connection with a Scart cable 3.1.3 Advanced connection 3.1.4 Connection with Audio Cable RCA Connectors 3.1.5 Connection to a digital audio amplifier using the S/PDIF output 3.1.6 Connecting a remote eye 3.1.7 Connecting a serial cable 3.2 Connecting to a satellite dish 3.2.1 Connecting a fixed satellite dish to your receiver 3.2.2 Connecting multiple fixed dishes to your receiver using a DiSEqC1.0 switch 3.2.3 Connecting a dish on a motorized positioner to your receiver Quick start Navigating in the menu 5.1 Main Menu 5.1.1 Channel Organizer Menu 5.1.2 Favourite Organizer Menu 5.1.3 The Timer Menu 5.1.4 The Installation Menu 5.1.4.1 System Set-up Menu 5.1.4.2 LNB Set-up 5.1.4.3 Channel Set-up 5.1.4.3.1 Positioner Set-up (if you are using a Motorised positioner with DiSEqC1.2) 5.1.4.4 Parental Lock - Changing PIN Code 5.1.5 Smartcard Remote Control - Basic functions Troubleshooting Glossary of terms 3 4 5 6 7 7 8 8 8 10 10 10 10 11 11 12 12 12 13 13 13 13 14 17 17 18 22 23 24 24 29 30 33 34 36 37 40 42 PART 1 • English Thank you for choosing this Strong Digital Satellite Receiver. This receiver is of our latest development and it is designed to be capable of upgrading its software through the satellite. It is highly recommended that you read this manual carefully to safely install your receiver and to achieve its optimum performance. 1.0 Usage This user manual is applicable for Strong SRT 6850 Digital Satellite Receiver with Embedded Mediaguard and its related accessories. It is advised that first-time and experienced users read this manual in order to safely install the receiver. Strong has supplied this product with the most recent innovations of software and hardware. Strong reserves the right to make changes in production to the software used by your satellite receiver without prior notification. 3 PART 1 • English 1.1 Safety Instructions: Warning: DO NOT INSTALL YOUR RECEIVER In a closed or poorly ventilated cabinet; Directly on top of or under any another equipment; On a surface which might obstruct the ventilation slots. DO NOT EXPOSE THE RECEIVER OR ITS ACCESSORIES: To direct sunlight or near any other equipment that generates heat; To rain or intense moisture. To any shock which may cause permanent damage to your receiver; To any magnetic objects, such as loudspeakers, transformers, etc.; To intense vibration. Never open the cover. It is dangerous to touch the inside of the receiver due to high voltage currents and possible electrical hazards. Your warranty will be void if the receiver has been opened. When the receiver is not used for a long period of time, you should unplug the power cord from the wall socket. Do not use a damaged power cord. It may cause a fire or an electrical shock. Do not touch a power cord with wet hands. It may cause an electric shock. Place the receiver in a well-ventilated environment. When you are connecting the cables, be sure that the receiver is disconnected from the mains supply voltage. Do not use your receiver in humid environment. Make sure you read this user manual before installing your receiver. This manual provides complete instructions for installing and using this receiver. The following symbols will be used as follows: Bold Characters: Represents a button on the remote control or the receiver. Italic Characters: Represents a menu item within the On Screen Display (OSD) Menu 4 PART 1 • English 1.2 Features & Accessories SRT 6850 Digital Satellite Receiver with Embedded Mediaguard: Embedded Mediaguard decoder Single SmartCard reader Easy to use Graphic MENU Interface Multi-lingual support on screen Menu: English, Dutch, German, French, Italian, Spanish, Polish, Russian, Finnish, Swedish, Danish, Turkish, Farsian, Arabic RS 232 port for service purpose Supports DiSEqC 1.0/1.1/1.2 2-SCART Connectors (TV, VCR) 3 RCA Connectors (CVBS, Audio Left/Right) Multi norm UHF modulator Ch 21-69, channel selectable via menu IR sensor connector for connecting remote eye to control the receiver Remote control with 4 coloured function buttons Editing Functions (TV or Radio Channel, Channel Name, PID, Transponder Name) EPG (Electronic Program Guide) for on screen program information Over 4.000 channels memory capacity Memory for Multi-satellite reception (up to 64) Four Favourite lists, for both TV and Radio Digital Tuner with Loop-through output SCPC/MCPC Receivable from C/KU-band Satellite MPEG-2 Main Profile at Main Level Teletext Supported Through VBI Supports software downloading via satellite (O.T.A.) S/PDIF coaxial output for connection with a digital audio amplifier Accessories User's Manual Remote control unit 2x Batteries (AAA type) 5 PART 1 • English Note: The batteries should not be recharged, disassembled, electrically short-circuited or be mixed or used with other types of batteries. 1.3 Safety Precautions To maintain your receiver's optimum performance, you are advised to apply the following safety precautions: Read this manual carefully and make sure you fully understand the instructions given. Refer all maintenance or servicing to suitably qualified personnel If you wish, you may clean your receiver with a soft lint-free cloth slightly made damp with a mild soap solution, only after disconnecting from the mains voltage supply. Do not use alcohol or ammonia based liquids to clean the receiver. Do not open the receiver cover, as you will be exposed to a shock hazard Do not open the receiver cover this will void your warranty. Do not place any objects on top of the receiver because this might prevent proper cooling of the components inside. Make sure no foreign objects fall through the ventilation slots because this could cause fire or an electric shock. Wait a few seconds after switching off the receiver before you move the receiver or disconnect any equipment; Please ensure that that the electrical power supply corresponds with the voltage on the electrical identification plate at the back of the receiver. It is a necessity that you only use an approved extension and compatible wiring that is suitable for the electrical power consumption of the installed equipment. If the receiver does not operate normally even after strictly following the instructions in this user manual, it is recommended to consult your dealer. 6 PART 1 • English 1.4 Storage Your receiver and its accessories are stored and delivered in a well protective packaging against electric shocks and moisture. When unpacking it, make sure that all the parts are included and keep packaging away from children. When transporting the receiver from one place to another or if you are returning it under warranty make sure to store the receiver in its original packaging with its accessories. Failing to comply with such packaging procedures could void your warranty. 1.5 Equipment Set-up We recommend you to consult a professional installer to set up your equipment. Otherwise, please follow the following instructions: Refer to the user manual of your TV and dish. Make sure that the 220 Volts cable is in a good condition. Make sure that the outdoor components of the dish are in good condition. Make sure that the LNB in the dish is connected with the correct I.F. coaxial cable (75 Ohm) and that the connectors are mounted correctly. 7 PART 1 • English 2.0 Your Receiver 2.1 Front Panel (Please see inside cover Figure 1) 1. Power Button Turns the receiver ON/Stand-by 2. Channel UP/DOWN Buttons Move the channels UP/DOWN or Move the cursor UP/DOWN in Menu state. 3. Stand-by / Power on (2 LED) The red LED is the “stand-by” indicator. The green LED is the “Power On” indicator. 4. Signal LED The Amber LED lights up once the receiver correctly receives the satellite signals. 5. Smart Card reader The smartcard reader is designed for Smartcards used to descramble Pay-TV services broadcasted in Mediaguard encryption. 2.2 Rear Panel (Please see inside cover Figure 2) 1. SAT IN Connect the cable from your LNB in your satellite dish to this connector. 2. SAT OUT Gives you the possibility to connect an extra receiver (analogue or digital). 3. AUDIO Right OUT (Red RCA) and Left OUT (White RCA) These connectors give you the possibility to connect the audio signal to an external amplifier or to the audio input of your TV. 4. VIDEO OUT (Yellow RCA) This connector has a constant video signal for additional Video connections like Wireless video sender. 8 PART 1 • English 5. TV Scart Connector Use this connector to connect your receiver to your TV using a scart cable. 6. VIDEO Scart Connector Use this connector to connect your receiver to your video recorder using a scart cable. Your video recorder signal will now be looped through to your TV. 7. IR SENSOR Use this connector to connect your remote eye (optional accessory) to control your receiver, for example once your receiver is hidden in a well ventilated cabinet 8. RS 232 Serial Port This serial port is for service purpose only. 9. Input Antenna RF Modulator (female part). If you have cable TV or if you have an outdoor antenna, then you can connect the RF cable coming from the antenna or wall connector to this ANT input. 10. To TV RF Modulator (male part). If you do not use a scart cable to connect your receiver to your TV, or if you have connected a cable to the ANT input, you will have to use this connector to connect the receiver to your TV by using a coaxial cable. You can also use this connector to connect a second TV set to your receiver. 11. S/PDIF Use this coaxial output to connect your receiver to the input of your digital audio amplifier. 12. Power Cord Your receiver requires a mains voltage supply of 90~240 V AC (Auto-selectable), 50~60 Hz +/- 5 %. Make sure to check the power specification of the wall outlet before connecting your receiver to the main power 9 PART 1 • English 3.0 Connections 3.1 Connecting to your TV & VCR Warning: If you are not sure how to connect your receiver, do not take the risk of doing it yourself. Ask your Strong dealer to do it for you. They are specially trained by our technicians and can get the best performance out of your receiver. 3.1.1 Basic connection with a coaxial cable (Please see inside cover Figure 4) Connect the satellite signal from the LNB to the SAT IN connector. Connect the TO TV connector at the back of the receiver to the ANT IN connector on your TV set. Optional: Connect a UHF coaxial lead coming from your Cable TV or Outdoor Antenna to the ANT input connector at the back of the receiver. 3.1.2 Basic connection with a Scart cable (Please see inside cover Figure 5) Connect the satellite signal from the LNB to the SAT IN connector. Connect the TV scart connector at the back of the receiver to the scart-in connector on your TV set. Optional: Connect a UHF coaxial lead coming from your Cable TV or Outdoor Antenna to the ANT input connector at the back of the receiver. Note: We recommend you to use a scart cable to connect your satellite receiver to you TV, this will ensure a better Picture and Sound quality. 10 PART 1 • English 3.1.3 Advanced connection (Please see inside cover Figure 6) Connect the satellite signal from the LNB to the SAT IN connector. Connect the TV scart connector at the back of the receiver to the scart-in connector on your TV set. Connect the VCR scart connector at the back of the receiver to the scart-in connector on your VCR set. Connect a UHF coaxial lead coming from your Cable TV or Outdoor Antenna to the ANT input connector at the back of the receiver. Connect a coaxial cable to the TO TV connector at the back of the receiver. Connect the other end of this coaxial cable to the ANT IN connector of your VCR. Connect the TV OUT connector of your VCR to the ANT IN connector of your TV set with a coaxial cable. Optional: Connect the audio left and right RCA-plugs (Red and White) on the back of your receiver to the left and right input of an Audio amplifier, so you can enjoy the excellent quality of the sound that is produced by your Strong receiver. Note: If you have an digital audio amplifier with an coaxial input, use the S/PDIF output. at the back of your receiver. 3.1.4 Connection with Audio Cable RCA Connectors (Please see inside cover Figure 7) On the back of your receiver you will find 3 RCA connectors (Audio Left & Right Red & White, Video - Yellow) Install an audio/video cable between the RCA connectors of the receiver and those of your TV set or amplifier. 11 PART 1 • English 3.1.5 Connection to a digital audio amplifier using the S/PDIF output (Please see inside cover Figure 8) Connect the S/PDIF out connector on the back of your receiver to the S/PDIF input connector of your digital amplifier. Do not forget to turn the S/PDIF function “Enabled” in the menu. 3.1.6 Connecting a remote eye (Please see inside cover Figure 9) Connect the IR sensor to your remote eye if you wish to store your receiver in a place where the IR on your receiver cannot communicate with the remote. For example, if you wish to put your receiver in a closed environment such as a well ventilated closet, then this accessory will be useful because it can allow the remote control to control the receiver through the remote eye. 3.1.7 Connecting a serial cable (Please see inside cover Figure 10) This serial port is for service purpose only, it can only be used by our service department. 12 PART 1 • English 3.2 Connecting to a satellite dish 3.2.1 Connecting a fixed satellite dish to your receiver (Please see inside cover Figure 11) Select the satellite from which you want to receive your TV/Radio channels. Align your dish at the requested satellite. Connect a coaxial cable to your LNB. Connect the other end directly to the SAT IN connector of your receiver. 3.2.2 Connecting multiple fixed dishes to your receiver using a DiSEqC1.0 switch (Please see inside cover Figure 12) If you want to watch programs from more than one satellite (For instance from Astra and from Hot Bird) it is advisable to use fixed dishes and a DiSEqC 1.0 switch. Have your Strong Dealer aim the dishes at the requested satellites. Connect the LNB's with coaxial cables to the IN connectors of the DiSEqC 1.0 switch. Connect the OUT connector of the DiSEqc 1.0 switch to the SAT IN connector at the back of your receiver. 3.2.3 Connecting a dish on a motorized positioner to your receiver (Please see inside cover Figure 13) Another possibility of watching programs from multiple satellites is by mounting a dish to a motorized DiSEqc 1.2 positioner. Have your Strong dealer mount the dish to the positioner with the correct azimuth angle of elevation and let him set the centre point for your positioner. Connect the LNB with a coaxial cable to the LNB IN connector of the positioner. Connect the OUT connector of the positioner to the SAT IN connector at the back of your receiver. 13 PART 1 • English 4.0 Quick start Check if all connections between Satellite receiver, Dish, TV and VCR are correct. Connect the receiver to the mainpower and switch the unit ON with the Power ON / Standby-button on the frontpanel or on the Remote control. Switch ON your TV set. If you have connected your satellite receiver to your TV by using a SCART cable, your TV will automatically switch to the signals coming from your satellite receiver. If you don't see the picture from the satellite receiver now, please switch your TV manually to the External video source, you can do this by pressing the AV or EXT button on the Remote control of your TV. Note: Refer to your TV manual to find out how your TV switches to the External video Source˛ If you have connected your satellite receiver to your TV by using a UHF cable, you will first need to find the correct UHF channel on your TV. Select a free preset on your TV (for example Program number 10). Open the menu of your TV and select the (automatic) channel search option. (refer to the user manual of your TV set if you don't know how to use the search function). Start the channel search option on your TV and search UHF channels until you see the picture from the satellite receiver. Store the position in the TV memory (refer to the user manual of your TV set if you don't know how to store channels in your TV). If you have correctly followed above steps you will now see the System Set UP menu generated by your satellite receiver. You are now ready to Set Up your receiver: 1. The cursor of the menu highlights the “Language Settings”. 14 PART 1 • English 2. Use the UP/DOWN keys on your Remote control, select the language in which you want your menu to be displayed and press OK. The screen of the menu will now change to the language of your choice, and the menu option “Channel SetUp” will appear on your screen. 3. You will see the “Channel Set-Up” screen with different parameters. The pre-set values are correct for the ASTRA satellite. We strongly advise you to NOT change any of the settings before you are sure that your dish is aligned correctly. 4. You will see two signal bar fields at the right lower part of your screen, showing Signal strength and signal quality. 5. Leave the satellite receiver in this menu and start with the alignment of your dish. The ASTRA satellite is located at 19.2° East. Find with a compass what is North and South, keep the Compass in your hand and turn your position until South is in front of your face. Now turn 19 Degrees to he left, this is roughly theposition where the Astra satellite must be found. 6. Now slowly move your dish to the left or to the right , make small steps to allow the (green) signal bars to display the signal level. Note that you will not see any green bars until you have aimed your dish to the ASTRA satellite correctly. If you can not find the signal by turning Left or Right, then increase or decrease the vertical angle of you dish and again turn Left and Right. Repeat these steps until you see the Green signal bars appearing. 7. Once you see the bars, try to optimize the Level and Quality bars my making very small movements with the dish in Left, Right, Upper or Lower direction. Once you are convinced that you have the optimal signal strength, firmly fix you dish on that position. 8. Now you are ready to search the satellite and scan the available channels, you have different options to scan, we recommend you to the keep the settings in the menu as they are. Just press the RED (Automatic) button on your remote control to start the automatic scan. All channels will be found automatically, and once the search is completed the found channels will be stored in a logical order. 15 PART 1 • English 9. Once this process is finished the receiver will automatically switch to channel number 1. If channel number 1 is a Free To Air channel ( not encrypted) you will be able to enjoy the first digital pictures. 10. If channel number 1 is encrypted you will see the ”Please Insert SmartCard” message on your screen. Insert your smartcard in the SmartCard reader in the front-panel of the receiver, note that the card is inserted as shown in the picture below: 11. Once the card is correctly inserted you will see the message “No rights for this Mediaguard channel”, now you will need to contact your broadcaster in order to activate your smartcard. Make sure you have written down the number of your card before you call the broadcaster, they will need this number. 12. Once the broadcaster has activated your smartcard you will be able to see the channels that match your subscription. These channels will be opened by the smartcard and you will be able to see the corresponding pictures. 16 PART 1 • English 5.0 Navigating in the menu You can navigate in the menu with the Channel UP/DOWN and Volume UP/DOWN buttons on your Remote control. Highlight the field of your choice with these buttons. Confirm your choice with the OK button. Pressing the BACK button will cancel your choice and take you 1 step back in the menu. Note: Every time the receiver asks you to put your PIN code, enter '0000' on your remote control using [0-9] numeric keypads. Tip: Always read the Help bar displayed at the bottom of your screen. 5.1 Main Menu All the important settings and features of your receiver can be operated from the Main Menu. The Main Menu consists of several sub-menus such as “Channel Organizer”, “Favourite Organizer”, “Timer”, ”Installation” and “Smartcard”. 17 PART 1 • English 5.1.1 Channel Organizer Menu The “Channel Organizer” menu enables you to sort channels, make your own Favourite channels list, edit channel names and delete channels from the list. Important Note: Channel lists For your convenience we have implemented a “Intelligent channel order system”: Once you search the channels from ASTRA,and once you set “Scan mode” to “Canal Digitaal”. The channels that are defined by Canal Digitaal will be stored in a separate channel list, starting from number 1 (at this time Ned. 1). This list is saved in your receiver under the name “Digitaal”. Note: This list can NOT be sorted in other order. See also page 31, 5.1.4.3 Channel Set-up, Scan Mode. If you want to see the complete channel list (including all FTA and Scrambled channels), please apply following steps: 1. Make sure you are in normal viewing mode (for example watch channel number 22). 2. Press the SAT button on your remote control, now the list with loaded satellites will appear. 3. Select ASTRA satellite and press OK. 4. The receiver will switch to viewing mode (for example channel 200). 5. Now press the OK button again and you will see the general (complete) channel list. If you want to turn back to the Canal Digitaal list, please refer to following steps: 1. Make sure you are in normal viewing mode (for example watch channel number 34). 2.Press the FAV button on your remote control, now the list with canal Digitaal channels will appear. 3.Select any channel from this list and press OK, now you will return to the channel of your choice. 18 PART 1 • English Sorting Channels from the channels list: To sort your channels, please apply the following steps: 1. Press the Menu button. 2. Using UP/DOWN keys, select "Channel Organizer" and press OK. 3. Press the Red (Sort) button to sort your channels. If you press the Red (Name) button, you can sort the list of channels alphabetically: If you press the Green (Type) button, you can sort the channels by the type of the channel , Free or scrambled program. If you press the Yellow (TP) button, you can sort the channels by transponder order. If you press the Blue (Manual) button you can sort the channels manually. A check mark will be shown on the selected channel. Use the UP/DOWN buttons to move to the position that you want the channel to be at, and press the Blue (manual) button once again. The channel will then be moved to the position you selected. Once you have finished sorting the channels, press the BACK button until you are back in the Normal TV mode. Setting Favourite channels from the channel list: You can set a list of Favourite channels from the current TV/Radio channels list. <Screen 18> To set your Favourite channels, please apply the following steps: 1. Press the Menu button. 2. Using UP/DOWN keys, select "Channel Organizer" and press OK. 3. Press the Green (Fav) button to switch into Favourite organizer mode. 4. The default favourite list names are: "Digitaal", "News", "Sports", and "Music". 5. Using UP/DOWN keys, select the channel and press the coloured button on your remote corresponding to the classification of the channel. For example, if you press the Red (Digital) button the channel is designated as "Digitaal" Favourite channels. A red mark will appear behind the channels' name. If the Red button is pressed again the selected channel is un-selected from Digitaal Favourite list. 19 PART 1 • English 6. One channel can be saved into more than one Favourite list. You can change selected Favourite channels in "Favourite Organizer" menu. 7. Press the BACK button until you go back to main menu. You can view the Favourite list you set by pressing the Fav button while you are watching TV or listening to a Radio channel. Editing Channels from the channel list: You can change the channel name, lock a channel and change the skipping functions. Change name of channel: To change the name of the channel, please apply the following steps: 1. Press the Menu button. 2. Using UP/DOWN keys, select "Channel Organizer" and press OK. 3. Using UP/DOWN keys, select the channel. 4. Press the Yellow (Edit) button. 5. The channel name now is displayed 6. Press OK on the channel name and a cursor will appear behind the channel name 7. Use the VOL - button to erase the current name 8. Use CH UP/DOWN to select a letter, and the > button to go to the next letter. 9. Press OK to confirm the changed name when you have finished. 10. Move the cursor to the Confirm field and press OK to save your changes Change lock function: If you lock a channel, you can only watch it from the TV list after entering your PIN Code. To change lock function, apply the following steps: 1. Apply the first four steps detailed in “Change name of channel” described in section 5.1.1). 2. Using UP/DOWN keys, select “Lock” field 3. Press OK and enter your PIN Code. 4. The lock function will be marked. 5. Move your cursor to the Confirm field and press the OK button. 6. To unlock the channel repeat the same procedure. 20 PART 1 • English Change the Skip function: If Skip function is activated, the channel will be skipped when you are scrolling through the TV list in normal watching mode. Please apply the following steps: 1. Apply the first four steps detailed in “Change name of channel” (Described in section 5.1.1). 2. Using UP/DOWN keys, select “Skip field “. 3. Press OK and enter your PIN Code. 4. The skip function will be marked. 5. Move your cursor to the Confirm field and press the OK button. 6. To unlock the channel repeat the procedure. Change Video Package Identifier V-PID, Audio A-PID, Program P-PID Values: 1. Apply the first four steps detailed in “Change name of channel” described previously. 2. Using UP/DOWN keys, select “PID field “. 3. Using the numeric keypad [0-9], enter the new value. 4. Move your cursor to the Confirm field and press the OK button to save your changes. Deleting Channels from channel list: You can delete channels from the channel list by applying the following steps: 1. Press the Menu button. 2. Using UP/DOWN keys, select "Channel Organizer" and press OK. 3. Press the BLUE (Delete) button 4. Using UP/DOWN keys on your remote, select the channel. 5. Press the Red button to delete only the selected channel. 6. Press the Green button to delete all channels from the list. 7. Press the Yellow Button to exit the delete menu 21 PART 1 • English 5.1.2 Favourite Organizer Menu This menu enables you to organize your Favourite channels list. All the channels that you have marked as your Favourite in the “Channel organizer” menu can be sorted by applying the following steps: 1. Press the Menu button. 2. Using UP/DOWN keys , select "Favourite Organizer" and press OK. Sort Red button: Same as the Sort function of “Channel Organizer” menu. Next (Next Favourite Group) Green button: Shows the next Favourite group list. Edit Yellow button: You can edit the name of the favourite group. Press the Yellow button, the favourite channel name will appear. Press the RED button to edit the Group name, the cursor will appear behind the Group name. Use the VOL - button to erase the name. Use the UP/DOWN keys to change the character. Use the VOL+ key to proceed to the next character. Press OK once you have completed the name. Press the GREEN button to save the new Group name. Press the Yellow key to return. Delete Blue button: Removes the highlighted channel directly from the Favourite list that was selected. 22 PART 1 • English 5.1.3 The Timer Menu The timer can automatically switch on or off your receiver at any time. This enables you for example to record programs with your VCR while you are not at home. It also can be used to wake you up at the time you set it. Please apply the following steps: 1. Press the Menu button. 2. Using UP/DOWN keys on your remote, select “Timer Menu” and press OK. Timer number: You can select up to 8 different events. Timer State: Set to “Enabled” to use the timer function, or "Disable” to stop the timer functions of the timer number you selected. Action: You can select the following functions in the action mode: 1. “Power On”: The receiver powers on at the designated date and time. 2. “Power Off”: The receiver powers off at the designated date and time. 3. “Time interval”: The receiver switches on at the designated date and time, displays the channel and then switches off at the designated date and time (The value set at the ending time). Repetition: You can set the cycle of the action designated in the timer mode (one time, Every Day or Every Week). Date: You can set the starting date of the timer action. Enter the new date with the [0-9] keys. Hour: You can set the starting time of the timer action. Enter the new time with [0-9] keys. End Time: You can set the ending time of the channel view when the Action mode is on Time Interval. Enter the new time with [0-9] keys. Channel: You can select the channel to be shown when the receiver timer mode Powers ON. Press OK key, now the channel list will appear. Select the channel of your choice and confirm with OK key. 3. Press the Red button to save and proceed with another timer event. 23 PART 1 • English 4. Press the Green button to save and exit the timer menu. 5. Press the Yellow button to exit the timer menu WITHOUT saving the settings. Tip: You have to select the channel, starting time, and ending time settings if the Action mode is “Time interval”. An error message will appear if any of the settings are incorrect. 5.1.4 The Installation Menu All settings that are related to TV, Dish, LNB and Satellites are within this menu. The installation menu contains several sub menus such as “System Set-up”, “LNB Set-up”, “Channel Set-up” and “Parental Lock”. To access the different sub menus, apply the following: 5.1.4.1 System Set-up Menu To install your receiver to your personal preferences, please apply the following steps: 1. Press the Menu button. 2. Using UP/DOWN keys, select "Installation" and press OK. 3. Enter your PIN code. 4. Using UP/DOWN keys, select “System Set-up” and press OK. Language Settings: You can change the language of the menu, audio and subtitles by applying the following steps: 1. Select “Language” and Press OK or the Right button. 2. Select “Menu Language” and Press OK or the Right button. 3. Using UP/DOWN keys, select the language in which you want your menu to be displayed and press OK. The screen of the menu will change to the language of your choice. 4. You can also choose your preferred first audio language, second audio language and the subtitle language by applying the same steps. 5. Press BACK until you return to the main menu. 24 PART 1 • English Connection Settings: You can set the connection settings to your personal preferences. Check your TV and VCR user manuals for the correct settings. You can change your Connection settings by applying the following steps: 1.Select “Connection” and press OK or the Right button. TV Mode: Press OK or the Right button and set your TV mode to “Multi”, “PAL” or “NTSC”. Video Output: Press OK or the Right button and set your Video mode to “CVBS” (Composite video) or “RGB” (preferred option if your TV set is compatible with it). TV mode: Press OK or the Right button and set your screen mode to “4 : 3” , “4 : 3 Letterbox”, or “16 : 9” format. This depends on the format of your TV. Audio Output : Press OK or the Right button and set your audio output to “Stereo”, “Left” or “Right” (left or Right is for mono TV sets) S/PDIF Output: Press OK or the Right button and activate your S/PDIF output on the back of your receiver, so you can connect it to a digital Audio amplifier using an coaxial cable. If you have connected your digital amplifier, set the SPDIF output to: “Enabled”. VCR Output: Press OK or the Right button and set the scart output to “Automatic” or “Terminal”. If set to “Terminal”, the VCR scart signal is not automatically looped through. RF modulator: Press OK or the Right button and set the UHF mode to “PAL B/G”, “PAL I” or “PAL D/K”. If the TV set is connected using a coaxial (RF) cable, you must select RF modulator type here. The RF modulator type affects the channel audio. (Select PAL I for UK , Pal B/G for use in Central Europe). 25 PART 1 • English RF Channel: Press OK or the Right button and set the UHF channel number to the same UHF channel number of your TV set. This only has to be done if your TV set is connected with a coaxial (RF) Cable. If the UHF Channel numbers of the receiver and the TV set are not set the same, no picture will be displayed. 2.Press BACK until you go back to main menu. Menu Settings: You can set the OSD (On Screen Display) to your personal preferences. You can change the OSD settings by applying the following steps: 1. Select “Menu Settings” and press OK or the Right button. Color Scheme: Press OK or the Right button and set the colours of the OSD menu to “Standard”, “Color 1” or “Color 2”. Transparency: Press OK or the Right button and select how transparent you want your OSD. Brightness: Press OK or the Right button and select how you want the OSD to be. Duration: Press OK or the Right button and select how long you want the information banner to be on the screen when starting up your receiver or when changing channels. 2. Press BACK until you go back to main menu. Time setting: The system uses GMT (Greenwich Mean Time) as a default. To set the time, apply the following steps: 1. Select “Time Settings” and press OK or the Right button. Select Time Zone: Press OK or the Right button, and a list of the GMT plus or minus the hours you need for your country is displayed. Using UP/DOWN keys select the correct one, and the receiver will automatically show the current time in your country. To set the time manually: Select GMT usage: Press OK or the Right button and use the UP/DOWN buttons to set the GMT usage to “off”. Press OK to save your setting. The time setting menu will now activate the bottom two fields of the menu. 26 PART 1 • English Adjust Time: Use your Numeric buttons [0-9] to set the local time. Once set, press OK to save the time. Select Set Date: Press OK or the Right button and set the date the way you have set the time. Note: We advise you to use the GMT time settings, if you use the manual time settings, the time will be lost after the unit has been disconnected from the mainpower. 2. Press the BACK button until you go back to the Main Menu. Power on Channel: This function allows you to set the channel you want when the receiver turns on. To set the power on channel, apply the following steps: 1. Select Power on Channel and press OK or the Right button. Last Channel: The receiver will start-up with the channel that you viewed before turning the receiver off. Defined Channel: This function allows you to set the channel you want when the receiver turns on. To define the channel, apply the following steps: 1. Press OK or the Right button and select in the TV or radio list of channels the channel you want to have your receiver start-up with. Software Upgrade: You can download the latest software available including new technologies to your receiver. To upgrade your system, apply the following steps: 1. Select “Software Upgrade” and press OK. Enter your PIN code. 2. Press the Green button to scan the satellite for availability of a newer software version. If there is a recent software version available for your receiver, it will be detected. 3. Press the Red button to start the upgrade. 4. Press the BACK button until you go back to main menu. Note: Be sure that your receiver is connected to the satellite signal. Do not turn off your receiver while you are downloading new software. 27 PART 1 • English System Info: The system information displays information about your receiver such as model number, software and boot version. To check system information, apply the following steps: 1. Select “System information” and press OK. Press Back to return to the menu Mediaguard: Here you will find information about the embedded Mediaguard decoder. 1. Select “Mediaguard” and press OK. Press Back to return to the menu Factory Reset: Be careful when using this function, because it will erase all the data and parameters you may have set earlier to your receiver. Once you have made a Factory Reset you will have to re-install your preferences and re-scan your channels. To reset your receiver to factory default, apply the following steps: 1. Select “Factory Reset” and press OK. 2. Enter your PIN Code. The receiver will reset itself to the original factory settings. Note: Your PIN code will change back to the factory setting “0000”. 28 PART 1 • English 5.1.4.2 LNB Set-up It is recommended that you read the manual and installation instructions of your LNB, your DiSEqC switch, your 0/12V switch and your Positioner before you start setting up your LNB. To set up your LNB, please apply the following steps: 1. Press the Menu button. 2. Using UP/DOWN keys, select "Installation" and press OK. 3. Using UP/DOWN keys, select "LNB Set-up" and press OK. 4. Check the exact specifications of your LNB through the manufacturers information or your dealer. There are up to 16 types of LNB's available. The Default is set to Universal mode (9750/10600MHz), DiSEqC is not used and the LNB is mounted on a fixed dish. 5. Use the UP/DOWN keys on your remote to select an item and use the LEFT/RIGHT buttons to set up any values. LNB: Up to 16 LNBs are available, select and set-up the correct one according to your LNB specifications. Press OK on the LNB number that you want to set-up. LNB Type: Select the LNB type from Universal 1 ~ 3, and Single. You should type the LNB value in Single. In Single, the item parameter is 0 or another number. In UNI1=9750/10600 MHz, UNI2=9750/10700 MHz, UNI3=9750/10750 MHz. LNB Power: Select 13/18V, 13V or 18V for LNB. Select “Off” if you want to switch the power of the LNB off. LNB Dish: Using the Left/Right buttons, select “Fixed” or “Motorised” (Move) Dish. If you use a motorised dish, read the “Positioner Set-up” DiSEqC switch: The default is Off. To use the DiSEqC switch, set up the DiSEqC version you have (V1.0 or V1.1). DiSEqC Input: Select position 1~4 if DiSEqC switch is DiSEqC V1.0. Select position 1~16 if DiSEqC switch is DiSEqC V1.1. DiSEqC Repeat: Designate the repeat of switching (0 ~ 3). Switch 22 kHz: You can set the 0/22 kHz switch to ON or OFF. 29 PART 1 • English Tip: If you set “LNB type” to “Universal” (UNI1 ~ UNI3), you will not be able to change settings in both the “LNB Power” menu item and the “Switch 22 kHz” menu item. If you want to change any of these two settings you must set “LNB type” to zero. If DiSEqC switch is Off, you will not be able to change settings in both the “DiSEqC Input” and “DiSEqC Repeat” menu items. Alternatively if you set LNB Dish to “Moved”, the DiSEqC switch menu item is automatically switched to off if your “LNB dish” is set to “Fixed” you will be able to select the required DiSEqC level in the DiSEqC switch menu item. 6. Press the Red (Save) button, the Green (Save & Exit) button to save the setting. 7. Press the Yellow (Back) button or BACK button if you don't want to save the setting. 5.1.4.3 Channel Set-up The channel set-up is for downloading the channels available on the satellites. You can select the satellite according to your dish alignment, change the frequency, scan mode, you can edit the satellites name, and edit the transponder of the satellite. You can also display the LNB menu and the Positioner Set-up menu by selecting LNB and Dish Position respectively. 1. Press the Menu button. 2. Using UP/DOWN keys on your remote, select "Installation" and press OK. 3. Using UP/DOWN keys, select "Channel Set-up" and press OK. 4. Use the UP/DOWN keys on your remote to select an item and use the Left/Right button to set up any values. Satellite: Select “Satellite” and press OK or the Right button. The satellite list is displayed and then you can choose a satellite from which you want to download your channels from by pressing OK. 30 PART 1 • English LNB: Select “LNB” and press OK or the Right button. In the “LNB field”, select one of the available LNB's. If you want to set LNB related values, press OK and the LNB Set-up menu (Described in LNB Set-up) will be displayed. Dish Position: Select “Dish position” and press OK or the Right button. It displays the dish position of the current satellite. When you use a DiSEqC 1.2 positioner, you can select dish position in this field. To set a dish position, the status must be “On” (in case the position has already been set) or “Off” (in case the position has not been set). Note: If in the “LNB Set-up” menu described in section 5.1.4.2, the “LNB Dish” item is set to “fixed” you will not be able to change the dish position settings in the channel set up menu. Only when you have selected the “LNB Dish” to “moved”, you will be able to change the settings in the channel set up menu. Press OK button to set dish position. The “Positioner Set-up” menu will be displayed. (Detailed description is in Positioner Set-up section 5.1.4.3.1) Frequency, Polarization, Symbol Rate: Shows the transponder (TP) values of the current satellite. To change the value apply the following steps: 1. Select ”Frequency” and press OK. The list of TP values of the current satellite is displayed. 2. The functions of the colored buttons now represent other functions. <Screen 6>. 3. To edit a TP value, press the Red (Edit) button 4. To Add a TP manually, press the Green (Add) button 5. Press the Blue (Delete) button to delete the current TP value. (Save is only available in the Edit mode or the Add mode.) 6. Press the Yellow (Save) button to save the settings. 31 PART 1 • English Scan Mode: “Canal Digitaal” (Only appears if in the field “Satellite” the “ASTRA” satellite is chosen). Once you search channels in “Canal Digitaal” scan mode the receiver will do a quick scan and will find all channels that have been listed by Canal Digitaal. The found channels will be stored in your receiver in a logical order. “Free only” (Free to Air) only or “All Channels” to find all available channels on the satellite. Scan channels from the satellite: Your receiver allows you to use 4 types of channel scans: AutoScan (Red Button): Starts the automatic channel scan by using the parameters that you have set in the “Channel Set-up menu”. Please also refer to page 18, “5.1.1 Channel Organiser Menu”. Net. Scan (Green Button): “Network Search” Performs network search for a transponder. Transponder Scan (Yellow Button): Search channels from current specific transponder. PID (Blue Button): You can search a specific channel by entering the PID value of a channel. If you press the Blue (PID) button, the PID screen is displayed. Enter the PID value and press the Blue button again. To cancel the PID value, press BACK on the remote control or press the Blue (PID) button to search the channel. You should enter V-PID, A-PID and P-PID as described in “Editing channels from the channel list” (Described in section 5.1.1) Tip: Check the level and quality of the signal bar before searching any channels. The signal level of the TP of the current satellite is displayed. The green bar is displayed if the settings are correct, otherwise the red bar is displayed and you cannot get the channel. In the latter case, check if your dish is aimed at the selected satellite or if the DiSEqC switch of the LNB overlaps with another satellite. Also, change the Frequency with the Left/Right button until the Green bar is displayed to get the valid transponder. If you press the Red (Auto Scan), Green (Net. Scan), Yellow (TP Scan), or Blue (PID) button the channel searching status is displayed. 32 PART 1 • English 5.1.4.3.1 Positioner Set-up (if you are using a Motorised positioner with DiSEqC1.2) If you are using a motorised positioner with DiSEqC 1.2 you will have to set the positions of the satellites you want to scan. This function is available only if in the “LNB Set-up” menu and the LNB Dish field is set to “Moved”. (As described in “LNB Set-up” (Described in section 5.1.4.2). Before you start: 1. Make sure that your installer has set the centre position of your dish. 2. Make sure that the mechanical limits of your motor are set, so that no damage can be done to your dish by moving it too far to the East/West. 3. Make sure you set the highest Symbol Rate (Ksymbols/sec) for your chosen transponder (TP). The Signal level and Quality indicator will help you set up the best dish position possible. 4. Use your UP/DOWN buttons to select the “Dish Position" field in the “Channel Set-up” menu. ( Note that the LNB dish in the LNB setup menu is set to “Motorized”.) 5. Press the OK button and the “Positioner Set-up” Menu will be displayed. 6. Start setting the position of the selected satellite. 7. Use your UP/DOWN buttons to go to field “Centre” and use your Left/Right buttons to put the centre field to “On”. 8. Press OK, and your dish will move to the centre position. It takes your dish maximum 30 seconds to move to its central position. 9. To know in which direction you will need to move your dish, you will need to know the position of the satellite you want it to position to. 10. If correctly installed, your installer has set the centre position of your dish to the “true” South if in the Northern hemisphere and to “true” North if in the Southern Hemisphere. 33 PART 1 • English 11. If for instance you want to set the position for Astra 19.2°East, you know that you will have to move your dish to the left using the Left button. If you want to set the position for instance to Eutelsat 12.5°West, you know that you will have to move your dish to the right using the Right button. (As viewed from the rear of the dish) To set the position of your selected satellite: 1. Use your UP/DOWN buttons to go to the “Movement field”. 2. Use your Left/Right buttons to have your dish turn towards the right direction, and keep this direction button pushed in continuously. Once the receiver has found the right position for the selected satellite, the word “Locked” will appear above the signal level and quality indicator. To be sure you have the strongest signal possible, press the direction you moved your dish in once again, and look if the signal/quality improves. If this is not the case, move the dish back one position, by pressing the other direction once. 3. If you are sure that you have the strongest signal/quality for the selected satellite: Use your UP/DOWN buttons to go to the “Save” field. Use your Left/Right buttons to set to “On” and press OK. The position for the selected satellite is now saved and your dish will move to this position, every time a channel from this satellite is chosen. Repeat this procedure for every satellite position and once you have complete the settings: Use Red (Auto Scan), Green (Net. Scan), Yellow (TP Scan) or Blue (PID) to search channels. 5.1.4.4 Parental Lock - Changing PIN Code This function changes the Personal Identification Number (PIN) that is used to control access to the menu and individual channels. In this function, you can lock/unlock channels and you can change your PIN code by applying the following steps: To lock/unlock the menu, please apply the following steps: 34 PART 1 • English 1. Press the Menu button on your remote. 2. Using UP/DOWN keys on your remote, select "Installation" and press OK. 3. Enter your PIN code. 4. Using UP/DOWN keys, select "Parental lock" and press OK. 5. Using RIGHT/LEFT keys in the “Menu” field, you can select either "lock" or "unlock" and press the Red button to save, the Green button to save & exit, or the Yellow button to return without saving. By selecting "lock", the receiver asks you to enter your PIN every time you want to access the menu. By selecting "unlock" it gives you the possibility to access the menu all the time without the receiver asking you for a PIN code. To change your PIN code, apply the following steps: 1. Press the Menu button on your remote. 2. Using UP/DOWN keys, select "Installation" and press OK. 3. Enter your PIN code 4. Using UP/DOWN keys, select "Parental lock" and press OK. 5. Using UP/DOWN keys, select "Old PIN" and enter your PIN 6. Using UP/DOWN keys, select "New PIN" and enter a new PIN 7. Using UP/DOWN keys select "Verify PIN" and enter the same new PIN 8. Press the Green button on your remote to save & Exit 9. Press the BACK button until you go back to main menu. You are recommended to write down your new PIN code. In case you forget it, you can reset your receiver to factory default settings but you will lose all information you saved. Your Personal PIN Code: _ _ _ _ _ _ _ _ _ _ _ _ _ _ 35 PART 1 • English 5.1.5 Smartcard If you want to check the status of your smartcard, please apply following steps: 1. Press the Menu button on your remote. 2. Using UP/DOWN keys on your remote, select "Smartcard" and press OK. System Info: Using UP/DOWN keys on your remote, select “ System info” to get the card system information. Maturity level: Using UP/DOWN keys on your remote, select “ Maturity Rating” to change the maturity rate level (only works if maturity rating is broadcasted by your pay TV operator) Password: Using UP/DOWN keys on your remote, select “ Password” to set new password for you smartcard. Operators: Using UP/DOWN keys on your remote, select “ Operators” to get information about the available operators, you can check the validation of your card by reading the date that is displayed behind your pay TV operator. If the date is < the date of today you will not be able to see the scrambled pictures broadcasted by your operator. In this case you will need to contact your Pay-TV operator to check your subscription status. 36 PART 1 • English Subscriptions: Using UP/DOWN keys on your remote, select “Subscriptions” to see what subscriptions are entitled on your card Wallets: Using UP/DOWN keys on your remote, select “ Wallets” to get the information about credits on your card. Please note that this function will only work if your pay TV operator uses Pay Per View functions. 6.0 Remote Control - Basic functions All features of the set-top box can be controlled with the remote control. Inserting batteries to the Remote Control Unit: 1. Open the battery cover on the rear of the remote control Unit. 2. Insert the two supplied batteries (1.5V) observing the polarity (+/-) and the “AAA” specification. 3. Firmly replace the battery cover. While viewing TV or Radio channels various functions can be applied using your remote control. Outlined is an explanation of the buttons on your Remote and their corresponding functions that can be performed while watching TV or listening to the Radio. (See inside cover for the illustration of the remote control). 1. STANDBY ON/OFF Switches the Receiver ON or Standby. 2. SUB Shows the list of subtitle languages the current channel supports. You can change the subtitle language you want by using the Up/Down keys and pressing OK on your remote. 3. TEXT Activates Teletext, generated by your receiver. 37 PART 1 • English 4. SAT Displays the list of satellites you have scanned with your receiver. You can change the satellite you want to watch by using the Up/Down keys and pressing the OK button. (The channel list is configured with the channels searched in that satellite. If you have set up a motorized positioner to change the satellite, a message “wait moving” is displayed. The SAT button is disabled in the favourite channel mode because there can be a number of different satellites on which you have different favourite channels. Please also refer to page 18, “5.1.1 Channel Organiser Menu. Important Note: Channel lists for more functions of the SAT key. 5. Mute Enables or disables the sound Mutes. 6. TV/RAD Switches between TV or Radio mode. 7. FAV Displays the list of favourite channels If you press FAV on the remote control in No menu state. You can preview the channel via PIG (Picture in Graphic), and move through the list of channels quickly with the CHANNEL UP/ CHANNEL DOWN buttons. 8. CHANNEL / Up - Down Used for stepping through the channels or navigating within the OSD Menus. 9. VOL / Left - Right Used for adjusting the volume or for navigating within the OSD Menus (left / right). In channel list (as well as in satellites and TP lists) used to scroll list - prev/next 10 items (duplicate Page-/Page+ buttons). 10. OK To confirm actions in the menu systems. In view mode displays the current channel list. (For example TV, Radio or Favourite). 38 PART 1 • English 11. MENU The main menu for setting up the receiver. 12. BACK Exits the current OSD page. In TV mode: switches back to previous channels. 13. AV Selects TV or Digital TV. 14. Information <Please see inside cover Screen 26> Shows program information. 15. EPG Display the EPG (Electronic Program Guide). EPG shows the event information on the current TP channel by time zone. 16. PAUSE Freezes the picture. 17. AUDIO Shows the list of available audio languages for the channel you are watching. You can change the audio language you want to hear by using the Up/Down keys, and pressing the OK button. In addition it sets the current channel audio to stereo ((o)), left-mono ((o or right-mono o)). Pressing the sound button changes the sound icon on the top banner. The selected sound information is saved by channel, and is set to the sound mode when you watch the channel. 18. PAGE / Plus - Minus In menu mode: Scrolling page by page. Page+ for the next 10 items, Page- for the previous 10 items. 19. Color Buttons Within the Videotext mode the color buttons follow the color codes of the broadcaster. In the menu follow the color codes for various functions. 20. 0 - 9 Numeric Direct entry of numerical functions in the menus or in channels selection. 39 PART 1 • English A.1 Trouble Shooting Occasionally receivers can hang-up (just like a PC) so you are recommended to reset the receiver by disconnecting it from mains power. Wait 30 seconds and connect to mains power again and now check if the unit is working as expected. If the receiver does not work properly after checking the trouble shooting section, please contact the dealer. Don't open the receiver cover, it may cause an electrical shock due to high current voltage and the warranty of your receiver will be void if the receiver has been opened. Symptoms Cause The green/red lights The power cord is not Check that the power cord is plugged into on front panel do not plugged in Solution the wall outlet light up No picture and sound TV is set to wrong Check if the TV is switched on and set your channel TV to the correct EXT / AV or UHF channel Problem in cable Check if the scart and/or RF cable is connections between connected correctly to the TV and to the No picture and sound No picture and sound receiver and TV Receiver “hang-up” back of the receiver Disconnect the main power cord of the receiver from the 220V main power. No sound Reapply the power and “Reset” from the menu. Retuning as if for the first time 40 The receiver or TV is Press the MUTE button on the remote in “MUTE” mode control unit of your receiver and TV PART 1 • English Solution Symptoms Cause No sound or picture Problem in scart cable Firmly press the scart connectors on the No picture connections between backside of the TV and receiver. Replace receiver and TV the scart cable Wrong alignment of Check the signal strength with a spectrum the dish analyser and adjust your dish correctly. The receiver displays This is normal, the Once the weather is better the picture will the message “No or bad weather is appear. If not : check if there is no snow on Bad signal” during interfering the signal your dish bad weather conditions between the satellite (heavy rain or snow) and your dish The receiver displays Wrong satellite selected Press the SAT button on the RCU and the message “No or in the menu select the correct satellite Bad signal” The receiver displays Wrong parameters set Check settings in LNB- and Channel set up the message “No or in the menu menu Bad signal” The receiver displays Wrong alignment of Ask your dealer to check the outdoor unit the message “No or and antenna cable to LNB the dish Bad signal” The remote control is The batteries of the Check whether the batteries are inserted not working remote control are correctly in your remote control. Check the not inserted or batteries, and if they are exhausted, exhausted replace them 41 PART 1 • English A.2 Glossary of terms CA Conditional Access. Usually means that the channels are scrambled and require a subscription to be paid. DVB-S Digital Video Broadcasting Satellite - Digital TV via satellite. EPG Electronic program guides that are transmitted by some broadcaster to display information guide about a program content. MPEG The Moving Picture Experts Group is founded by the ISO. MPEG is a standard method for digital transmission of video and audio. Network A network, which is also known as a bouquet, is a set of channels that is offered by a single broadcaster. OSD On Screen Display. A menu system that you navigate from your remote control. PAL Referring to the Phase Alternate Line colour system adopted by European broadcasters. Parental lock This function gives you the possibility to “lock” other several functions of the receiver to prevent unauthorized users such as children to view channels that are not suitable for them. A PIN code is required to use of the parental lock. 42 PART 1 • English ID The transmitted packages have identifiers (PID) that tell the receiver what to do with the received information. Receivers normally use four types of PID, these are V-PID (video PID), A-PID (audio PID), P-PID (Program PID) and data PID (EPG information). IN CODE Personal Identification Number. A personal code that is used for locking or unlocking the parental control feature. RS 232 Serial data port. Subscriber Card A card usually issued by a broadcaster to allow authorized access to their programs. 43 PART 3 • Technical Specification Technical Specifications Demodulator Modulation: QPSK Input Symbol Rate: 2-45 Ms/s SCPC & MCPC signals from C & KU band satellites Video Decoder Profile level: MPEG 2 Main profile @ main level Data Rate: Max. 60 Mbit/s Video Resolution: 720 x 576 (PAL) 720 x 480 (NTSC) Aspect Ratio: 4:3, 4:3 Letterbox and 16:9 Audio Decoder MPEG/MusiCam Layer I & II Audio mode: Stereo, Dual Channel, Mono, Joint Stereo, AC3 Card Reader Embedded Mediaguard Tuner Input Frequency Range: 950 MHz~ 2150 MHz Input Level:-25~0.65 dBm Output Signal Power: 13 V/18 V DC, 22 KHz Current: Max. 600 mA Overload protected DiSEqC Version 1.0 & 1.2 compatible Connectors SAT IN SAT OUT UHF In UHF Out 2 SCART (VCR & TV) 2 RCA Audio L&R OUT 1 RCA Composite Video OUT RS 232 (Serial Port) PC S/PDIF Coaxial OUT External IR Sensor RF Modulator Channels 21-69 (for TV without SCART) Output PAL- B/G, I, D/K Main Processor: STi 5518 Flash Memory: 2 Mbytes SDRAM: 8 Mbytes EEPROM: 64 kBits General Data Operating Temperature: +5˚C-+45˚C Storage Temperature: 0˚C-+50˚C Supply Voltage: 90V AC 0 ~240V AC (SMPS) 50/60 Hz Power Consumption: 13 W Stand-by Mode: <7 W Humidity: 25 %- 70 % Size (WxHxD) in mm: 280 x 40 x 190 Weight: 2kg Technical alterations reserved System & Memory