1
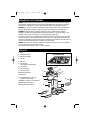
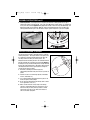
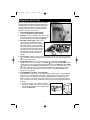
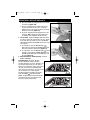
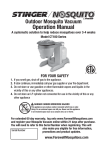
CT100_OM.qx
2/9/07
2:19 PM
Page 1
Outdoor Mosquito Vacuum
Operation Manual
Model CT100
FOR YOUR SAFETY
1. If you smell gas, shut off gas to the appliance.
2. If odor continues, immediately call your gas supplier or your fire
department.
3. Do not store or use gasoline or other flammable vapors and
liquids in the vicinity of this or any other appliances.
4. An LP cylinder not connected for use shall not be stored in the
vicinity of this or any other appliance.
WARNING
FOR OUTDOOR USE ONLY
Improper installation, Alteration, Service or Maintenance can cause injury
or property damage. Read the installation, operating and maintenance
instructions thoroughly before installing or servicing the equipment.
CT100_OM.qx
2/9/07
2:19 PM
Page 2
TABLE
TABLEOF
OFCONTENTS
CONTENTS
Getting Started ......................................................................................... 2
General Safety Instructions ...................................................................... 3
Propane Use and Safety ........................................................................... 4
Parts List .................................................................................................. 4
Assembly Instructions .............................................................................. 5
Mosquito Vacuum Placement ................................................................... 6
Operational Instructions ........................................................................... 7
Remove/Clean Bug Basket ....................................................................... 9
Shut Down Instructions .......................................................................... 10
Maintenance .......................................................................................... 10
For Best Results ..................................................................................... 10
About Mosquitoes .................................................................................. 11
Accessories/Replacement Parts ............................................................. 11
Troubleshooting....................................................................................... 12
Warranty Information ...............................................................................13
GETTING STARTED
Congratulations on your Stinger® Mosquito Vacuum purchase. Designed by a team of engineers and
scientists, the Mosquito Vacuum combines the most effective mosquito attractants known today – carbon
dioxide (CO2), moisture, heat, contrasting color & shape and luring scents. The Mosquito Vacuum mimics
human breathing by generating CO2 from burning propane which is commonly available for use with all
outdoor barbecue grills. Female mosquitoes, attracted to the CO2 and other lures, mistake the machine for
a meal and are sucked into the Bug Basket by a powerful vacuum where they dehydrate and die. Within
4-6 weeks, the reproductive cycles of these biting pests may be interrupted and mosquito populations could
be reduced in your yard. This results in a more pleasant outdoor environment for you and your family.
This manual contains important information about the safety, assembly, operation, use and maintenance of
the Stinger® Mosquito Vacuum. Keep this manual for future reference and for educating any new users.
Safety precautions are essential when using, storing and servicing the Mosquito Vacuum. This product is
fueled by propane gas, which is invisible, odorless and highly flammable. Always heed these precautions,
as they are essential when using propane.
Model No
Coverage
Input Power
Output Power
CT100
1 acre
120 VAC 60Hz
12 VAC 0.8A
Use of any other power pack may result in damage and/or injury.
Type of gas used
Propane
Cylinder Pressure
100-110 psi
Minimum Gas Supply Pressure 11.0 in WC
Input rating
650Btu/Hr
Minimum Clearance
When in use, 5 feet to walls, foliage or overhead material
Use
For outdoor use only – in only well ventilated areas
Only those persons who can understand and follow these instructions should operate or service this
equipment. If you need assistance contact our Consumer Relations Department at 1-800-477-0457.
2
CT100_OM.qx
2/9/07
2:19 PM
Page 3
GENERAL SAFETY INSTRUCTIONS
1. WARNING: Read this instruction manual before unpacking and operating the Stinger® Mosquito Vacuum and
retain for future reference.
2. WARNING: Only use an outdoor extension cord having a 2-prong plug and receptacle that accepts the Stinger®
Mosquito Vacuum’s plug. The trap has a 2-conductor cord and a 2-prong grounding type plug to fit a properly
GFCI protected grounded outlet.
3. WARNING: The electrical rating of the extension cord must be greater than or equal to the electrical rating of the
Mosquito Vacuum (120 Volt / 0.8 Amp). Use an extension cord with 16 gauge or thicker wire and that has a
label stating it is suitable for outdoor use.
4. WARNING: Do not abuse any electrical cord. Never yank it to disconnect from the receptacle. Keep all cords
away from heat, flammable substances and sharp objects. Replace damaged cords.
5. WARNING: The connection between the Mosquito Vacuum and the extension cord must always remain dry and
kept off of the ground.
6. WARNING: Disconnect the Mosquito Vacuum from the power supply when not in use, changing propane tanks,
before servicing and/or cleaning.
7. WARNING: Do not insert foreign objects into this product.
8. WARNING: To avoid electric shock, DO NOT clean the Mosquito Vacuum by spraying water or by immersing any
Mosquito Vacuum part in water.
9. WARNING: All repairs to the Mosquito Vacuum must be performed only by qualified service personnel.
10. WARNING: Young children should be carefully supervised when they are in the area of the Mosquito Vacuum.
11. WARNING: Clothing or other flammable materials should not be hung from or placed on or near the Mosquito
Vacuum.
12. WARNING: Any guard or other protective device removed for servicing the Mosquito Vacuum must be replaced
prior to operating.
13. WARNING: A maximum of a 20 lb. LP-Gas cylinder shall be used with the Mosquito Vacuum.
14. WARNING: Use standard 20 pound LP gas cylinder with a shutoff valve terminating in an LP-gas supply cylinder
valve outlet specified for Connection No. 791 in the Standard for Compressed Gas Cylinder Valve Outlet and Inlet
Connections, ANSI/CGA-V-1 latest edition (Any standard propane tank manufactured in the USA after 1999)
15. WARNING: The installation must conform with local codes or, in the absence of local codes, with the National
Fuel Gas Code, ANSI Z223.1 for US and with the CAN1-B149 for Canada. The LP-Gas cylinder used shall be
constructed and marked in accordance with the specifications for LP-Gas cylinders of the U.S. Department of
Transportation (DOT).
16. WARNING: Do not place the Mosquito Vacuum under overhead unprotected combustible construction. Maintain
a minimum of 5 feet clearance around the perimeter of the Mosquito Vacuum when in use.
17. WARNING: Inspect the hose before each use of the Mosquito Vacuum. If it is evident there is excessive
abrasion or wear, or the hose is cut, it must be replaced prior to operating the Mosquito Vacuum. The
replacement hose shall be that specified by the manufacturer.
18. WARNING: The Mosquito Vacuum shall be used outdoors and only in a well-ventilated space and shall not be
used in a building, garage or any other enclosed area.
19. CAUTION: The Mosquito Vacuum is not intended to be installed in or on recreational vehicles and/or boats.
20. CAUTION: The Mosquito Vacuum should be stored indoors when not in use and kept away from children.
21. CAUTION: If the Mosquito Vacuum is not in use, the gas must be turned off at the supply cylinder. Storage of
the Mosquito Vacuum indoors is permissible only if the cylinder is disconnected and removed. Cylinders must
be stored outdoors out of reach of children and must not be stored in a building, garage or any other enclosed
area.
22. CAUTION: The pressure regulator and hose assembly supplied with the Mosquito Vacuum must be used for
connection to the LP-Gas cylinder. Replacement pressure regulators and hose assemblies must be provided by
Kaz, Inc.
3
CT100_OM.qx
2/9/07
2:19 PM
Page 4
PROPANE USE SAFETY WARNINGS
DANGER! Failure to adequately comply with all the safety precautions and detailed instructions provided
with the Stinger® Mosquito Vacuum can result in death, serious bodily injury and property loss or damage
resulting from the hazards of fire, explosion, burn, asphyxiation and/or carbon monoxide poisoning.
WARNING! Due to the use of propane, combustion by-products produced when using this product contain
certain chemicals known to the State of California to cause cancer, birth defects or reproductive harm.
WARNING! The Mosquito Vacuum is fueled by propane gas, which is invisible, odorless and highly
flammable. An odorant is normally added by the manufacturer, which has a “rotten egg” smell to it. This
additive can fade over time, so leaking gas is not always detectable by smell alone.
Propane gas is heavier than air and leaking propane will sink to the lowest possible level. It can be ignited
by a spark or flame of any kind and from several feet away from a leak. Keep the Mosquito Vacuum clear
and free from combustible materials, gasoline, and other flammable vapors and liquids. The Trap is not to be
used in locations where flammable vapor or explosive dust is likely to exist.
CAUTION! The gas pressure regulator provided with the Mosquito Vacuum must be used. This regulator is
set for an outlet pressure of 11.0 in. Water Column.
The minimum inlet gas supply pressure is 11” WC from regulator.
PARTS LIST
1.
2.
3.
4.
5.
6.
Base
Left Upright Pedestal
Right Upright Pedestal
Left Foot
Right Foot
Vacuum Head
(with regulator & Hose Attached)
7. Lure Chamber
8. Extra Lure Storage
9. User Control Panel
10. Troubleshooting Panel
11. Bug Basket
12. 12 Volt AC Adaptor with 30’ cord
(attached to Vacuum Head)
13. NOsquito™ by Stinger 2-in-1 Power Bait
User Control Panel
11
10
6
14
9
8
12
7
2
14. Hand hold for easy carrying
15. Propane Tank (not included)
3
13
1
4
5
4
CT100_OM.qx
2/9/07
2:19 PM
Page 5
ASSEMBLY INSTRUCTIONS
The Stinger® Mosquito Vacuum is designed to be assembled
with NO tools. For additional questions on assembly, please
contact our Consumer Relations Department at 800-477-0457.
1. Attach Feet. Place Base on level ground. Insert Left Foot
(A) and Right Foot (B) into base (Figure 1).
2. Attach Upright Pedestals. Insert Left Upright Pedestal and
Right Upright Pedestal onto corresponding posts on base.
The ends with “U” cutouts should be at the top. Push down
to secure (Figure 2).
3. Attach the Vacuum Head. Align the left and right posts of
the Vacuum Head Assembly into the Left and Right Upright
Pedestals. Push down to secure (Figure 3).
4. Select and place the Mosquito Vacuum in the optimum
location. Refer to the following MOSQUITO VACUUM
PLACEMENT section for recommendations.
5. Place Propane Tank on Base. Place a full 20 lb tank of
propane on the base. The threaded connection should be
facing the handle area on the trap (Figure 4).
6. Attach the Gas Regulator Valve to the Propane Tank.
Remove the protective plastic cap from the threaded hose
connection on the propane tank and attach regulator, turning
clockwise to tighten. Note: The hose fitting must be
securely hand tightened to prevent gas leakage (Figure 5).
Figure 1
Figure 2
Figure 3
Figure 5
Figure 4
5
CT100_OM.qx
2/9/07
2:19 PM
Page 6
ASSEMBLY INSTRUCTIONS cont’d
7. Install Bug Basket. Ensure Bug Basket is completely closed before installing (bottom mesh cage is
twisted shut and door is hinged closed). Line up the arrow (!) with the unlock symbol ( ) and drop into
the top of the Vacuum Head (Figures 6 & 7) (Bug Basket should sit flush with top of Vacuum Head). Turn
Bug Basket handle counter-clockwise
180° until the arrow (!) aligns with the lock symbol ( ).
The Bug Basket will twist open in the unit and be ready to capture mosquitoes as you lock it in place.
Figure 6
Figure 7
MOSQUITO VACUUM PLACEMENT
The placement of the Stinger® Mosquito Vacuum is critical to
catching mosquitoes. The largest amount of mosquitoes will
be captured by positioning the Mosquito Vacuum 30 to 40
feet away from the location you want to protect. The
Mosquito Vacuum should be placed in the normal down-wind
direction towards were mosquitoes live and breed (Figure 8).
Breeding areas may include standing water, marshy wetlands,
bushes and shady wooded areas. Mosquitoes will be lured to
the Mosquito Vacuum and be captured, before coming into
contact with you and your family.
1. Determine a suitable place with level ground,
approximately 30-40 feet away from the area you want to
protect.
2. Position at least 5 feet from foliage (bushes, flowerbeds,
tree line, marshbed, etc.)
3. It is recommended the Mosquito Vacuum be place in the
shade, mosquitoes avoid sunlight.
4. Do not place the Mosquito Vacuum directly above a water
source (sprinklers, hoses, etc.)
5. Make sure AC extension cord (if used) or low voltage
extension cord (provided with unit) are placed in such a
manner that they are away from any human or animal
activity and cannot be run over with a lawn mower or
other such outdoor equipment.
6
Figure 8
Trees
Stinger
0'
30-4
Home
Pond
CT100_OM.qx
2/9/07
2:19 PM
Page 7
OPERATIONAL INSTRUCTIONS
Once you start your Stinger® Mosquito Vacuum, it will begin
Figure 9
working immediately luring and trapping mosquitoes but it is
recommended to run the Mosquito Vacuum continuously in
season to interrupt breeding cycles and reduce mosquito
populations. Allow 3-4 weeks to see drastically reduced
populations of mosquitoes in your yard.
1. Place Mosquito Vacuum in optimal location.
See previous MOSQUITO VACUUM PLACEMENT.
2. Plug in Unit. Plug the low voltage power connector end of
the power supply into the underside of the Vacuum Head
located behind the Right Pedestal Upright (Figure 9).
3. Attach Unit to Power Supply. Plug the power
supply into approved 120V GFCI receptacle
Figure 10
and position cord such that it will not interfere
with outdoor activities. If using an approved
outdoor extension cord (not provided), plug the
power supply into approved outdoor extension
cord, plug extension cord into approved 120V
GFCI receptacle and position extension cord
such that it will not interfere with outdoor
activities.
4. Turn on Propane. Slowly turn propane tank on to the full open position (turn valve counter-clockwise
). Check for gas leaks by wiping non-ammonia soapy water on the connector and looking for any
signs of small bubbles forming.
5. Start Mosquito Vacuum. This unit has child secure controls. Press and hold POWER ( ) for 3
seconds to start the unit. The fan will go on and POWER ( ) indicator light will blink GREEN in warmup mode until it reaches operating temperature (approximately 5 minutes) (Figure 10). When POWER
( ) indicator light is steady GREEN, the Mosquito Vacuum is ready to lure and trap mosquitoes. If unit
fails to light, it will cycle through the start up mode two additional times automatically. If unable to
start, an error light will be illuminated on the User Control Panel. See TROUBLESHOOTING in this
manual or on the unit for help.
6. Install the NOsquito™ by Stinger® 2-in-1 Power Bait.
Use only NOsquito™ by Stinger® lures. Your Stinger® Mosquito Vacuum includes one 30 day NOsquito™
by Stinger® 2-in-1 Power Bait (NCL2). This bait has 2 active ingredients designed to attract a wider
range of mosquitoes, including those which may transmit West Nile Virus, encephalitis and other
diseases, away from you and your family and to this device that can kill these potentially dangerous
pests. The lure has a slow release and will emit an octenol and lactic acid-scented bait continuously
for 30 days.
a. To install, remove tape on top of bait and activate by
Figure 11A
snapping the cartridge in half, fold over and secure both
ends together by interlocking the two small tabs found
at either end (Figure 11A).
7
CT100_OM.qx
2/9/07
2:19 PM
Page 8
OPERATIONAL INSTRUCTIONS cont’d.
b. Open Lure Chamber by pulling door down at the bottom Figure 11B
of exhaust ring (Figure 11B).
c. Fit the lure cartridge into the Chamber and push the
lure door closed until it locks in place. Purchased
additional lures can be stored in the Extra Lure Storage
Drawer for convenience (Figure 12).
d. To remove, simply discard bait appropriately in a trash
receptacle. Note: although there may residue left in
the cartridge, active ingredients will be exhausted.
7. Set Lure Timer. Setting the REPLACE LURE Timer will tell
you when to replace the chemical bait to the trap. Always
set the timer when you install a new lure. The REPLACE
LURE indicator light will blink YELLOW when the lure needs Figure 12
to be replaced.
a. For a 60 day lure, press the REPLACE LURE ( )
button and hold 3 seconds until YELLOW indicator light
blinks twice (indicates a 60 day timer) (Figure 13).
b. For a 30 day lure, press the REPLACE LURE ( ) button
and hold 1 second and Press POWER ( ) button until
YELLOW indicator light blinks one time (indicates a 30
day timer) (Figure 14).
8. Ensure Bug Basket is installed properly. See above
INSTALL BUG BASKET.
SmartTemp Mode: The Stinger® Mosquito
Figure 13
Vacuum is designed to function only when
mosquito populations are present. Mosquitoes are
present when temperatures are in the range of
50-95°F. If the temperature, night or day, is out of
this range, the unit enters a SmartTemp Mode
where the burner shuts down to conserve gas and
the fan continues to run to keep captured
mosquitoes within the Bug Basket. During this
mode, the POWER ( ) light indicator blinks
GREEN. The Mosquito Vacuum will automatically Figure 14
turn itself back on when the temperature falls
back in the optimal mosquito range.
8
CT100_OM.qx
2/9/07
2:19 PM
Page 9
(Continued)
ASSEMBLY
REMOVE/CLEAN
BUG BASKET
1. To Remove Bug Basket. Turn Bug Basket handle
clockwise
so the arrow on the Bug Basket aligns
with the “Unlocked” symbol ( ) on the top of the
Vacuum head (Figure 15). (The Bug Basket is
designed to twist close so that no live mosquitoes can
escape when the Bug Basket is removed). Pull
straight up. CHECK BUG BASKET ( ) indicator will
light RED while Bug Basket is removed.
2. To Empty/Clean Bug Basket. Unhook the small latch
on the bottom mesh door and empty mosquitoes
(Figures 16 & 17). Gently tap Bug Basket on the
ground to completely empty. If mosquitoes are still
alive, leave Bug Basket in the sun for a few hours so
the insects dehydrate. Empty as described above. If
necessary, use small brush to remove any debris.
3. To Replace Bug Basket. Ensure bottom mesh door
of Bug Basket is snapped securely in place, and the
Basket is in the closed position. Line up the arrow on
the Bug Basket with the “Unlocked” symbol ( ) on
the top of the Vacuum head and drop the Bug Basket
in the intake area. Turn the Bug Basket handle
counter-clockwise
until the arrow on the Bug
Basket aligns with the “Locked” symbol ( ) on the
Vacuum head (Figure 18). The Bug Basket will twist
open and be ready to capture mosquitoes as you lock
it in place.
Figure 15
Figure 16
Figure 17
Figure 18
9
CT100_OM.qx
2/9/07
2:19 PM
Page 10
SHUT DOWN INSTRUCTIONS
1. Close the gas valve on the propane tank by
Figure 19
turning it clockwise
.
2. Press POWER ( ), hold 3 seconds until
GREEN indicator light blinks (Figure 19). This
puts the unit in a cool-down mode which lasts
approximately 2 minutes. When the POWER
light goes out and the fan shuts down the
Mosquito Vacuum is OFF.
3. Disconnect low voltage extension cord from
power supply while unit is not in use.
MAINTENANCE
1. Check and clean the Bug Basket on a regular Figure 20
basis. The CHECK BUG BASKET ( ) indicator
light will light RED if the Bug Basket is full,
removed or installed improperly (Figure 20).
See REMOVE/CLEAN BUG BASKET.
2. Refill propane tank every 21 days or as
needed. The CHECK PROPANE ( ) indicator
light will light RED when propane needs to be
refilled (Figure 21). Be sure POWER ( ) is
off and unit is unplugged before changing
Figure 21
propane tanks.
3. Replace the NOsquito™ by Stinger® 2-in-1
Power Bait lure every 60 days. The REPLACE
LURE ( ) indicator light will light YELLOW
when the lure needs to be refilled.
4. Clean the Mosquito Vacuum’s outside surfaces
with a mild detergent and a damp cloth. DO
NOT spray with or immerse any part in water.
5. Route the power cord in the safest possible manner to avoid personal injury.
FOR BEST RESULTS
• Position the Stinger® Mosquito Vacuum in optimal mosquito breeding area; move if necessary to follow
change breeding sites.
• Run the Mosquito Vacuum early and continuously in season to interrupt breeding cycles and reduce
mosquito populations.
• The Mosquito Vacuum will run in the rain.
• If there is an interruption of power, restart the Mosquito Vacuum if necessary.
• Do not move the Mosquito Vacuum with propane tank attached.
• Empty Bug Basket as needed.
• Replace NOsquito™ by Stinger® 2-in-1 Power Bait every 30 days.
10
CT100_OM.qx
2/9/07
2:19 PM
Page 11
ABOUT MOSQUITOES
Approximately 3,000 species of mosquitoes have been identified worldwide, with approximately 170
species found in the United States. They live and breed near water and thrive in areas with low lying
foliage. They are most active in the early morning, at dusk and in into the evening. Some mosquitoes are
daytime feeders and are especially active in shady areas and on cloudy days. Geography and weather
conditions affect mosquito populations and activity. Only female mosquitoes bite. She hunts for a blood
as protein to grow her eggs. She is lured to a blood meal by sensing body warmth, CO2 from breathing,
bodily chemicals, movement and visual cues such as size, color and contrast. A single female mosquito
may lay thousands of eggs so attracting, capturing and killing female mosquitoes with your Stinger®
Mosquito Vacuum can interrupt breeding cycles and greatly reduce mosquito populations in your yard.
ACCESSORIES/REPLACEMENT
ACCESSORIES/REPLACEMENTPARTS
PARTS
We offer a full line of accessories to make the Stinger® Mosquito Vacuum more convenient. Please visit
our website at www.StingerProducts.com for more information.
PART
DESCRIPTION
NCL2
NOsquito™ by Singer® 2-in-1 Power Bait
CTC1
NOsquito™ Tank Cover
CTLC
Lure Chamber
CTBB
Bug Basket
CTXL
Extra Lure Tray
Kaz also manufactures other devices made for indoor and outdoor pest and insect control. Please visit
www.kaz.com or call consumer relations for more information about these devices.
To order accessories:
Telephone: Call 800-477-0457 with your Visa, MasterCard or Discover.
Online: Visit www.kaz.com with your Visa, MasterCard or Discover.
Fax: 508-481-0509. Include part number, quantity, shipping information, telephone number, Visa,
MasterCard or Discover number, expiration date, and name on the card.
Mail: Send check or money order to:
Kaz Incorporated
Consumer Relations Dept.
250 Turnpike Road
Southborough, MA 01772
Include $6.95 for shipping and handling. Add applicable taxes in MA, NY and TN
Orders are generally received 7-10 days after being placed. Please allow 2-6 weeks for mailed in orders.
11
CT100_OM.qx
2/9/07
2:19 PM
Page 12
ACCESSORIES/REPLACEMENT
TROUBLESHOOTING
PARTS
POWER ( ) does not go on:
1. Press and hold POWER ( ) for 3 seconds and wait for GREEN light.
2. Be sure all power connections are secure.
3. Be sure AC adapter and extension cords are properly plugged in.
4. Check fuse, and replace if necessary.
5. If light does not light, call for service.
CHECK PROPANE ( ) is RED
1. Be sure propane tank is properly connected and tightened securely.
2. Be sure propane tank has gas.
3. Be sure propane tank valve is open.
CHECK BUG BASKET ( ) is RED
1. Bug Basket is full (See REMOVE/CLEAN BUG BASKET).
2. Bug Basket is not installed correctly (Arrow (!) on Bug Basket should be in locked (
3. Remove Bug Basket, empty and replace correctly (See INSTALL BUG BASKET).
) position).
REPLACE LURE (
) is YELLOW
1. NOsquito™ by Stinger® 2-in-1 Power Bait is out.
2. Replace with new bait and reset.
CHECK PROPANE ( ) + CHECK BUG BASKET (
1. Service Needed.
2. Call 1-800-477-0457.
) blink RED
Unit does not seem to be catching mosquitoes:
1. Be sure unit is on.
2. Be sure lure and propane are filled.
3. Mosquitoes become less active in higher or lower temperatures.
Confirm temperature is in 50-95°F range.
4. Mosquito population may be low.
5. Move Mosquito Vacuum to more optimum trapping area.
ATTENTION!
PLEASE DO NOT RETURN THIS PRODUCT TO THE STORE.
CONTACT KAZ CONSUMER RELATIONS - WE CAN ASSIST YOU!
CALL: 1-800-477-0457
Email: [email protected] or
write: Kaz, Inc., Consumer Relations Dept.,
250 Turnpike Rd., Southborough, MA 01772
12
CT100_OM.qx
2/9/07
2:19 PM
Page 13
LIMITED WARRANTY
Kaz Inc warranties to the original purchaser that this product is free from defective materials and
workmanship. This warranty is limited to remedy any defective part for a period of 1 year from date of
original date of purchase. Retain your original receipt as proof of purchase. This warranty does not apply
to problems arising from abnormal wear, or failure to adhere to the enclosed instructions. In addition, the
foregoing warranty shall not applied to product that have been defaced, subjected to negligence, accident,
improper operation, maintenance or storage; product damaged by circumstances beyond Kaz, Inc’s
control; or products modified (including but not limited to modifications through the use of unauthorized
parts or attachments) or repaired by anyone other than Kaz, Inc or its designee. This warranty gives does
not apply to this unit if purchased outside the United States, excluding Canada. In no case shall Kaz Inc.
be liable for any incidental, punitive, consequential, or any other damages of any kind for breach of this or
any other warranty, expressed or implied, whatsoever. Some states do not allow limitation on how long an
implied warranty lasts, so the above limitation or exclusion may not apply to you. This warranty gives you
specific legal rights, and you may also have other rights that vary from state to state.
If you experience unsatisfactory operation, first refer to the TROUBLESHOOTING section and follow those
suggestions. If Troubleshooting doesn’t work, please contact Kaz for repair/service instructions.
Call: 1-800-477-0457
Email: [email protected]
Write: Kaz, Inc., Consumer Relations Dept., 250 Turnpike Road, Southborough, MA 01772
If you have questions of comments, please call Kaz at 800-477-0457 or email
[email protected]
Stinger®
Kaz, Inc
4411 Route 9, Hudson, NY 12534
Consumer Service 800-477-0457 – Fax 508-481-0509
Or visit us online at www.StingerProducts.com
Made in USA
EPA Est. No. 072336-NY-001
13
J.0800