1
DOT MATRIX PRINTER
SP2000 SERIES
USER’S MANUAL
MODE D’EMPLOI
BEDIENUNGSANLEITUNG
MANUALE DI ISTRUZIONI
Federal Communications Commission
Radio Frequency Interference
Statement
This equipment has been tested and found to comply with the limits for a Class A digital
device, pursuant to Part 15 of the FCC Rules. These limits are designed to provide
reasonable protection against harmful interference when the equipment is operated in a
commercial environment. This equipment generates, uses and can radiate radio frequency
energy and, if not installed and used in accordance with the instruction manual, may cause
harmful interference to radio communications. Operation of this equipment in a residential
area is likely to cause harmful interference in which case the user will be required to correct
the interference at his own expense.
For compliance with the Federal Noise Interference Standard, this equipment requires a
shielded cable.
This statement will be applied only for the printers marketed in U.S.A.
Statement of
The Canadian Department of Communications
Radio Interference Regulations
This digital apparatus does not exceed the Class A limits for radio noise emissions from
digital apparatus set out in the Radio Interference Regulations of the Canadian Department
of Communications.
Le présent appareil numérique n’émet pas de bruits radioélectriques dépassant les limites
applicables aux appareils numériques de la classe A prescrites dans le Règlement sur le
brouillage radioélectrique édicté par le ministère des Communications du Canada.
The above statement applies only to printers marketed in Canada.
CE
Manufacturer’s Declaration of Conformity
EC Council Directive 89/336/EEC of 3 May 1989
This product, has been designed and manufactured in accordance with the International
Standards EN 50081-1/01.92 and EN 50082-1/01.92, following the provisions of the
Electro Magnetic Compatibility Directive of the European Communities as of May 1989.
EC Council Directive 73/23/EEC and 93/68/EEC of 22 July 1993
This product, has been designed and manufactured in accordance with the International
Standards EN 60950, following the provisions of the Low Voltage Directive of the
European Communities as of July 1993.
The above statement applies only to printers marketed in EU.
Trademark acknowledgments
SP2000 Series: Star Micronics Co. Ltd.
ESC/POS: Seiko Epson Corporation
Notice
• All rights reserved. Reproduction of any part of this manual in any form whatsoever,
without STAR’s express permission is forbidden.
• The contents of this manual are subject to change without notice.
• All efforts have been made to ensure the accuracy of the contents of this manual at the
time of going to press. However, should any errors be detected, STAR would greatly
appreciate being informed of them.
• The above notwithstanding, STAR can assume no responsibility for any errors in this
manual.
©
Copyright 1999 Star Micronics Co., Ltd.
TABLE OF CONTENTS
1. Outline ............................................................................................................... 1
2. Unpacking and Installation ................................................................................ 2
2-1. Unpacking .............................................................................................. 2
2-2. Locating the Printer ................................................................................ 3
2-3. Handling Care ........................................................................................ 3
2-4. Maintenance ...........................................................................................3
3. Parts Identification and Nomenclature .............................................................. 4
4. Optional AC Adapter ......................................................................................... 6
5. Connecting ......................................................................................................... 8
5-1. Ferrite Core Installation .........................................................................8
5-2. Connecting to host computer (serial interface) ...................................... 9
5-3. Connecting to host computer (parallel interface) ................................. 10
5-4. Connecting to a Peripheral Unit ...........................................................10
6. Loading the Ribbon Cartridge and Paper ........................................................ 12
6-1. SP2300 type .........................................................................................12
6-2. SP2500 type .........................................................................................15
6-3. Removing the Paper .............................................................................20
7. Control Panel ................................................................................................... 21
7-1. Basic Operation ....................................................................................21
7-2. Errors ................................................................................................... 22
7-3. Switch Operation (Combined Switch Operation) ................................ 23
8. Control Codes .................................................................................................. 27
8-1. Star Mode Commands .........................................................................27
8-2. ESC/POS Mode Commands ................................................................ 32
9. Optional Near-end Sensor ...............................................................................35
9-1. Adjusting the Near-end Sensor ............................................................35
Appendix A: General Specifications .................................................................151
Power Supply Specifications ......................................................................154
Appendix B: Serial Interface .............................................................................155
B-1. Pins and Signal Names ......................................................................155
B-2. Interface Connections (Serial Interface) ............................................ 156
Appendix C: Parallel Interface .......................................................................... 157
C-1. Table of Connection Signals for Each Mode .....................................157
Appendix D: DIP Switch Setting ......................................................................159
D-1. Parallel Interface ................................................................................ 159
D-2. Serial Interface ...................................................................................161
Appendix E: Memory Switch Settings .............................................................. 164
Appendix F: Peripheral Unit Driver Circuit .....................................................165
1. Outline
ENGLISH
The SP2000 Series Serial Impact Dot Matrix Printer is designed for use with
electronic instruments such as POS, banking equipment, computer peripheral
equipment, etc.
The major features of the SP2000 series are as follows:
1. Bi-directional printing at approx. 3.1 lines/sec.
2. Serial interface or parallel interface.
3. The data buffer allows the unit to receive print data even during printing.
4. Peripheral unit drive circuit enables control of external devices such as cash
drawers.
SP2
3
2
0
M
D
42
–
24
No. of print columns
42 : 42 columns (16 CPI)
Interface
D : Serial interface (RS-232C)
C : Parallel interface
Paper feed
M : Friction paper feed method
Mechanism
2 : Single color, 42 columns (16 CPI)
6 : Two color, 42 columns (16 CPI)
Printer type
3 : Standard type
5 : Auto cutter equipped type
SP2000 series printer
–1–
2-1. Unpacking
After unpacking the unit, check that all the necessary accessories are included in
the package.
SP2300 type
Ribbon cartridge
Printer
User’s manual
Ferrite core
Fasteners
SP2500 type
Ribbon cartridge
Printer
User’s manual
Ferrite core
Fasteners
Fig. 2-1 Unpacking
If anything is missing, contact the dealer where you bought the printer and ask
them to supply the missing part. Note that it is a good idea to keep the original box
and all the packing materials just in case you need to pack the printer up again and
send it somewhere at a later date.
–2–
ENGLISH
2. Unpacking and Installation
2-2. Locating the Printer
ENGLISH
When you locate your printer, keep the following tips in mind:
1. Protect your printer from excessive heat such as direct sunlight or heaters, and
keep it away from moisture and dust.
2. Place the printer on a firm, level surface which is fairly vibration-free.
3. A steady power supply that is not subject to power surges should be connected
to the printer.
For example, do not connect it to the same circuit as a large, noise-producing
appliance such as a refrigerator or an air conditioner.
4. Make sure the line voltage is the voltage specified on the printer’s identification plate.
5. To disconnect the printer, the plug has to be disconnected from the wall socket,
which has to be located close to the printer, and easy to access.
2-3. Handling Care
1. Be careful not to drop paper clips, pins or other foreign matter into the unit as
these cause the printer to malfunction.
2. Do not attempt to print when either paper or ribbon cartridge is not located in
the printer, otherwise the print head can be damaged.
3. Do not open the cover while printing.
4. Do not touch the print head immediately after printing as it gets very hot.
5. Use only roll paper that is not glued to the core.
6. When the paper end mark appears on the paper, replace the roll paper before
it runs out.
2-4. Maintenance
Essentially, your printer is a robust piece of equipment, but should be treated with
a modicum of care in order to avoid malfunctions. For example:
1. Keep your printer in a “comfortable” environment. Roughly speaking, if you
feel comfortable, then the environment is suitable for your printer.
2. Do not subject the printer to physical shocks or excessive vibration.
3. Avoid over-dusty environments. Dust is the enemy of all precision mechanical devices.
4. To clean the exterior of the printer, use a cloth barely dampened with either
water with a little detergent or a little alcohol, but do not allow any liquid to
fall inside the printer.
5. The interior of the printer may be cleaned with a small cleaner or a compressed-air aerosol (sold for this purpose). When performing this operation,
be sure not to bend or damage any cable connections or electronic components.
–3–
ENGLISH
3. Parts Identification and Nomenclature
SP2300 type
Cover
Protects the printer from dust and reduces noise.
Do not open the cover while printing.
Control panel
Features two control switches and
two indicators to indicate printer
status.
Power switch
Turns printer power on
and off.
AC adapter
Refer to the following
section for installation
instructions.
Peripheral unit drive circuit
connector
Connects to peripheral units
such as cash drawers, etc.
Do not connect this to a
telephone.
Interface connector
Connects the printer with
host computer.
DIP switch
Use to make various
settings.
Fig. 3-1 External view of the printer (SP2300 type)
–4–
SP2500 type
ENGLISH
Cover
Protects the printer from dust and reduces noise.
Do not open the cover while printing.
Control panel
Features two control switches and two
indicators to indicate printer status.
Power switch
Turns printer power on
and off.
AC adapter
Refer to the following
section for installation
instructions.
Peripheral unit drive circuit
connector
Connects to peripheral units
such as cash drawers, etc.
Do not connect this to a
telephone.
Interface connector
Connects the printer with
host computer.
DIP switch
Use to make various
settings.
Fig. 3-2 External view of the printer (SP2500 type)
–5–
Power code
AC adaptor
Adaptor holder
Screws
Cord holder
Fastener
Fig. 4-1
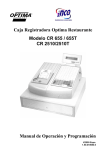
Use the following procedure to install the optional AC adapter.
Adapter holder
AC adapter
AC adapter cord
Fasteners
Cord holder
[After AC adaptor installed]
[Before AC adaptor installed]
Fig. 4-2 Flat side faces this way
1 Turn the printer over.
2 Plug the AC adapter’s cord into the socket as shown in the above illustration.
Make sure the flat side of the plug is facing towards the inside of the printer.
3 Use one of the nylon fasteners that comes with the printer to fasten the cord
at the point indicated in the illustration.
–6–
ENGLISH
4. Optional AC Adapter
ENGLISH
Fig. 4-3 Fasten cord here
4 Coil the AC adapter cord into the space provided, and insert the AC adapter
into its space.
5 Use the adapter holder and screw to secure the AC adapter and the cord holder
and screw to secure the cord.
6 Turn the printer back right side up.
7 Plug the female end of the power cord into the AC adapter, and plug the other
end into a power outlet.
–7–
The computer sends data to the printer through a cable to the printer’s interface
(Serial Interface Connector Type: D-sub 25-pin or Parallel Interface Connector
Type: 36-pin Centronics compatible). This printer does not come with a cable, so
it is up to you to obtain one that suits your needs.
Important!
• The following instructions apply to the cable that is used with an IBMcompatible personal computer. Note that they do not apply to all types of
computers and cables. If you are unsure about what type of cable you should use
to connect with your computer, consult your dealer.
• Make sure that the printer is turned off and unplugged from the AC outlet and
that the computer is turned off before connecting them.
5-1. Ferrite Core Installation
1 Affix the larger ferrite core onto the
cable as shown in the illustration
below.
Ferrite core (28 mm diameter)
Interface cable
Fig. 5-1
–8–
ENGLISH
5. Connecting
5 cm
maximum
2 Pass the fastener through the ferrite
core.
ENGLISH
Fastener
Fig. 5-2
3 Loop the fastener around the cable
and lock it. Use scissors to cut off
any excess.
Pull and cut
Fig. 5-3
5-2. Connecting to host computer (serial interface)
Ferrite core
Screws
Screwdriver
Fig. 5-4 Connecting the serial
interface cable
1 Turn off power to both the host
computer and the printer.
2 Insert the connector at one end of
the interface cable into the connector on the printer and the other connector into the connector for the
host computer.
3 Next, fasten the right and left screws
for the respective interface connectors to fix them in place on the
connectors.
–9–
Ferrite core
1 Turn off power to both the host
computer and the printer.
2 Insert one terminal of the interface
cable into the printer’s connector,
as shown in the diagram, and fasten
it there with the clasp.
3 Insert the other terminal of interface
cable into the host computer’s connector, and again fasten it with the
clasp.
Fig.5-5 Connecting the parallel
interface cable
5-4. Connecting to a Peripheral Unit
You can connect a peripheral unit to the printer using a modular plug. The
following describes how to install the ferrite core and make the actual connection.
See “Modular plug” on page 165 for details about the type of modular plug that
is required. Note that this printer does not come with a modular plug or wire, so
it is up to you to obtain one that suits your needs.
Important!
Make sure that the printer is turned off and unplugged from the AC outlet and
that the computer is turned off before making connections.
Ferrite core (20 mm diameter)
Connector
1 Affix the smaller ferrite core onto
the modular wire as shown in the
illustration below.
Cable
Fig. 5-6
– 10 –
ENGLISH
5-3. Connecting to host computer (parallel interface)
2 Pass the fastener through the ferrite
core.
5 cm
maximum
ENGLISH
Fastener
Fig. 5-7
Pull and cut
Fig. 5-8
3 Loop the fastener around the cable
and lock it. Use scissors to cut off
any excess.
4 Plug one end of the modular cable
into the modular jack of the peripheral.
5 Remove the modular jack cover
from the back of the printer and plug
the other end of the modular cable
into the jack of the printer.
– 11 –
6-1. SP2300 type
6-1-1. Loading the Ribbon Cartridge
1 Turn off power to the printer.
2 Lift the cover up approx. 3 cm. Hold
the cover tilted at this angle, then
pull it toward you to remove it.
3 Place the ribbon cartridge in the
direction shown in Fig. 6-2 and press
it down to load it. If loading of the
ribbon cartridge is not satisfactory,
press down the cartridge while rotating the ribbon feed knob in the
direction of the arrow.
4 Turn the ribbon feed knob of the
ribbon cartridge in the direction of
the arrow to remove slack in the
ribbon.
5 Mount the cover by reversing the
procedure outlined in step 2 above.
Cover
Power off
Fig. 6-1 Removing the cover
Ribbon separater
Print head
Ink ribbon
Ribbon
feed knob
Notched part
Ribbon
cartridge
Fig. 6-2 Loading the ribbon cartridge
– 12 –
ENGLISH
6. Loading the Ribbon Cartridge and Paper
ENGLISH
Note: When removing the ribbon
cartridge, raise the A section
and then remove it by holding the B section as shown in
Fig. 6-3.
A
B
Fig. 6-3 Removing the ribbon cartridge
6-1-2. Loading the paper
Cover
1 Lift the cover up approx. 3cm. Hold
the cover tilted at this angle, then
pull it toward you to remove it.
2 Cut off the front edge of the roll
paper perpendicularly.
3 Confirm that the power of the printer
is turned on.
Fig. 6-4 Removing the cover
– 13 –
Fig. 6-5 Setting the paper
5 Insert the edge of the paper into the
paper feeder. If inserted correctly,
the edge of the paper will pass
through the paper exit.
6 Insert the top edge of the paper into
the tear bar slot, then mount the cover
by reversing the procedure for removing the cover in step 1 above.
Note: When the paper end mark appears on the paper, replace the
roll paper before it runs out.
Paper exit
Tear bar
Paper feeder
Roll paper
Fig. 6-6 Loading the paper
– 14 –
Fig. 6-7
ENGLISH
4 While observing the direction of the
roll, set the paper roll into the hollow as shown in Fig. 6-5.
Roll paper
6-2. SP2500 type
6-2-1. Loading the Ribbon Cartridge
ENGLISH
Cover
1 Turn off power to the printer.
2 Lift the cover up approx. 3 cm. Hold
the cover tilted at this angle, then
pull it toward you to remove it.
Power off
Fig. 6-8 Removing the cover
Auto cutter
3 Lift up the auto cutter and put it in a
vertical position, as shown in Fig. 69.
Fig. 6-9 Raise the auto cutter
– 15 –
Print head
Ink ribbon
Auto cutter
Ribbon
feed knob
Notched
part
Ribbon
cartridge
Fig. 6-10 Loading the ribbon cartridge
4 Place the ribbon cartridge in the
direction shown in Fig. 6-10 and
press it down to load it. If loading of
the ribbon cartridge is not satisfactory, press down the cartridge while
rotating the ribbon feed knob in the
direction of the arrow.
5 Turn the ribbon feed knob of the
ribbon cartridge in the direction of
the arrow to remove slack in the
ribbon.
6 Close the Auto Cutter.
7 Mount the cover by reversing the
procedure outlined in step 2 above.
8 When removing the ribbon cartridge,
raise the A section and then remove
it by holding the B section as shown
in Fig. 6-11.
A
B
Fig. 6-11 Removing the ribbon cartridge
– 16 –
ENGLISH
Ribbon separater
6-2-2. Loading the Paper
Cover
ENGLISH
1 Lift the cover up approx. 3 cm. Hold
the cover tilted at this angle, then
pull it toward you to remove it.
Fig. 6-12 Removing the cover
Roll paper
2 Cut off the front edge of the roll
paper perpendicularly.
3 Confirm that the power of the printer
is turned on.
4 While observing the direction of the
roll, set the paper roll into the hollow as shown in Fig. 6-13.
Fig. 6-13 Setting the paper
– 17 –
5 Inset the edge of the paper into the
paper feeder. If inserted correctly,
the edge of the paper will pass
through the auto cutter paper slit.
The paper will be cut once.
6 Remove the cut tip, and mount the
cover by reversing the procedure
outlined in step 1.
Note: when the paper end mark
appears on the paper, replace
the paper roll before it runs
out.
Auto cutter paper
slit
Paper feeder
Roll paper
Fig. 6-14 Loading the paper
[When using multi-ply paper]
Paper
insertion
slit
Upper
paper
Auto cutter
Upper paper
Print head
Platen
Lower paper
Lower paper
Print head
Platen
Fig. 6-15 Insertion of the paper into the auto cutter
(When using copying paper)
5 Lift up the auto cutter and place it in
a vertical position.
6 Insert the edge of the paper into the
paper feeder. If inserted correctly,
the edge of the paper will pass
through the paper exit.
– 18 –
ENGLISH
[When using single-ply paper]
ENGLISH
Paper
outlet
Auto cutter
7 Insert only the original (the upper
paper) into the slit of the auto cutter.
Insert the paper onto which you
wish to copy (the lower paper) between the platen and the auto cutter.
8 Pull on the edge of the paper to
remove any slack and then lower the
auto cutter.
9 Insert the paper through the paper
outlet and then replace the cover by
reversing the removal steps.
Note: • When the paper end mark
appears on the paper, replace the roll paper before it
runs out.
• When using the optional
paper rewinder, please refer to the separate User’s
Manual PW2000-24.
Fig. 6-16 Paper outlet of the front
cover
Fig. 6-17 Mounting the cover
– 19 –
Remove the cover, then cut off the paper near the rear of the paper guide and press
the FEED switch to feed out the paper remaining in the unit.
When the paper runs out, the POWER lamp will blink.
Note 1. Remove the paper remaining in the printer by pressing the FEED
switch.
2. When the paper end mark appears on the paper, replace the roll
paper before it runs out.
– 20 –
ENGLISH
6-3. Removing the Paper
7. Control Panel
ENGLISH
7-1. Basic Operation
4
ON LINE
FEED
POWER
1
2
3
Fig. 7-1 Control panel
1 ON LINE switch
Switches the printer between ON
LINE and OFF LINE. ON LINE
and OFF LINE switching is possible only when paper is loaded in the
printer.
2 FEED switch
• When this switch is pressed and
then released within 0.5 sec., the
paper feeds on line.
• When this switch is held depressed
for more than 0.5 sec., the paper
feeds continuously.
(The above paper feed operation is
possible for both ON LINE and OFF
LINE modes.)
3 POWER lamp (green LED)
LED lit : Power to the printer is ON.
LED off : Power to the printer is OFF.
4 ON LINE lamp (green LED)
LED lit : Printer is ON LINE
LED off : Printer is OFF LINE
– 21 –
Determine the nature of the error by the flashing of the lamp or the sound of the
buzzer.
Error Description
No paper
Power lamp
On-line lamp
Buzzer
Recovery
Conditions
Flashes at 1second intervals
Off
Paper near end of
roll (when Near End
Stop is operative)
Flashes at 2second intervals
Off
On (after on-line
switch pushed)
None
Mechanical error
(other than cutter
error)
Flashes at 0.25second intervals
Off
One short (0.13
sec.) and one long
(0.5 sec.) beep
*3
Cutter error (on
models with cutter
only)
Flashes at 0.125second intervals
Off
Two short (0.13
sec.) and one long
(0.5 sec.) beep
*3
Print-order overload
error
Flashes at 0.5second intervals
On
None
RAM R/W error
Off
On
None
*5
CPU error
Off
Flashes at 0.25second intervals
Sounds for 2
seconds
*5
4 short beeps
(0.13 seconds)
repeated twice
*1
*2
*4
*1 After changing the paper, press the On-line switch.
*2 Press the On-line switch to continue printing; or change the paper and press
the On-line switch.
*3 After clearing the paper jam or remedying another problem, press the On-line
switch.
*4 Printing will resume automatically after some time has elapsed. (Recovery is
automatic after the print head has cooled.)
*5 This is not a recoverable error. Consult dealer for repairs.
– 22 –
ENGLISH
7-2. Errors
7-3. Switch Operation (Combined Switch Operation)
7-3-1. Self Printing
ENGLISH
FEED + POWER ON (Turn the power on while holding the FEED switch
depressed.)
Self-printing will be performed according to the VER. NO., DIP switch
settings and character order. When the FEED switch is held continuously or
when the FEED switch is depressed at the time of the end of self-printing, only
the characters will be printed out repeatedly.
Fig. 7-2 Self printing sample (when using serial interface printer)
– 23 –
ON LINE + POWER ON (Turn the power on while holding the ON LINE
switch depressed.)
Each of the signals sent from the computer to the printer will be printed out in
hexadecimal code.
This function allows you to check if a control code sent to the printer by the
program being used is correct or not. The last line is not printed if its data is
less than one full line. However, if the ON LINE switch is pressed to set the
off line mode, the last line will be printed. To turn off the mode, it is necessary
to turn off the printer completely.
Fig. 7-3 Hexadecimal dump printing sample
7-3-3. Adjusting the Dot Alignment
You may never have to use the procedure described in this section, but after
you have been using your printer for some time you may find that the dots of
some graphics do not align correctly. For example, what should look like:
may come out looking like one of the following:
or like this
– 24 –
ENGLISH
7-3-2. Hexadecimal Dump Mode
ENGLISH
This is caused when mechanical parts of the printer get out of alignment. This
happens only rarely and you may never experience it at all throughout the life
of the printer. If you do have problems, use the following procedure to correct
it.
• Turn on the printer and insert a piece of paper.
• Turn off printer power.
• While holding down the control panel’s ON LINE and FEED switches,
turn the printer back on to enter the Dot Alignment Adjust Mode, which is
indicator by a flashing POWER indicator flashes.
Entering the Dot Alignment Adjust Mode causes seven blocks to be
printed, each of which indicates a dot alignment setting, as shown below.
An asterisk to the left of the blocks indicates which block is currently
selected.
• Use FEED to specify the block that appears to have the best aligned
characters. Press FEED once to specify the first block, twice to specify the
second block, and so on up to seven times to specify the seventh block.
Warning beep will sound if you press FEED more than seven times.
• After specifying a block, press ON LINE to register your selection and exit
the Dot Alignment Adjust Mode.
– 25 –
Note: You setting is not registered if you turn off printer power before
pressing ON LINE to exit the Dot Alignment Adjust Mode.
If a paper feed error occurs during this mode, the printer ejects the
paper and this mode is cancelled.
– 26 –
ENGLISH
The dots alignment adjustment setting you selected is stored in printer
memory and a pattern is printed using the selected setting followed by the
message “Adjust Complete!” The printer ejects the paper after printing is
complete.
8. Control Codes
ENGLISH
This printer supports two different command modes: the Star mode and the ESC/
POS mode.
The Star mode emulates previous Star printers. The ESC/POS mode emulates the
Epson TM-U200 or TM-U300 printer.
This chapter provides you with all of the commands supported by this printer.
Important!
Access the following URL for the latest version of this manual and for updates
on supported commands: http://www.star-micronics.co.jp/service/
sp_sup_e.htm
8-1. Star Mode Commands
The following tables show the Star mode commands that are supported by this
printer.
8-1-1. Character Selection
Control Codes
Hexadecimal Codes
Function
<ESC> “R” n
1B 52 n
Selects the international character set
<ESC> “/” “1”
<ESC> “/” <1>
1B 2F 31
1B 2F 01
Selects slash zero
<ESC> “/” “0”
<ESC> “/” <0>
1B 2F 30
1B 2F 00
Selects normal zero
<ESC> <GS> “t” n
1B 1D 74 n
Selects the character code table
<ESC> “M”
1B 4D
Selects the 7 × 9 (half dot) font (Default)
<ESC> “P”
1B 50
Selects the 5 × 9 (2 pulses per dot) font
<ESC> “:”
1B 3A
Selects the 5 × 9 (3 pulses per dot) font
<ESC> <SP> n
1B 20 n
Sets character spacing
<SO>
0E
Sets the printing magnified double in character width
<DC4>
14
Resets the printing magnified in character width
(Default)
– 27 –
Hexadecimal Codes
Function
1B 57 31
1B 57 01
Selects double magnification in character width
<ESC> “W” “0”
<ESC> “W” <0>
1B 57 30
1B 57 00
Resets magnification in character width
<ESC> “h” “1”
<ESC> “h” <1>
1B 68 31
1B 68 01
Selects double magnification in character height
<ESC> “h” “0”
<ESC> “h” <0>
1B 68 30
1B 68 00
Resets magnification in character height
<ESC> “–” “1”
<ESC> “–” <1>
1B 2D 31
1B 2D 01
Selects underlining
<ESC> “–” “0”
<ESC> “–” <0>
1B 2D 30
1B 2D 00
Cancels underlining (Default)
<ESC> “_” “1”
<ESC> “_” <1>
1B 5F 31
1B 5F 01
Selects upperlining
<ESC> “_” “0”
<ESC> “_” <0>
1B 5F 30
1B 5F 00
Cancels upperlining (Default)
<ESC> “4”
1B 34
Selects red color printing (SP2360/2560)
Selects highlight printing (SP2320/2520)
<ESC> “5”
1B 35
Cancels red color printing (SP2360/2560)
Cancels highlight printing (SP2320/2520)
<ESC> “6”
1B 36
Selects character set #2
<ESC> “7”
1B 37
Selects character set #1
<SI>
0F
Inverted printing
<DC2>
12
Cancels inverted printing (Default)
<ESC> <RS> “i” “0”
<ESC> <RS> “i” <0>
1B 1E 96 30
1B 1E 96 00
Cancels rotated print mode for text (Default)
<ESC> <RS> “i” “1”
<ESC> <RS> “i” <1>
1B 1E 96 31
1B 1E 96 01
Specifies rotated print mode for text with a
270˚ rotation.
<ESC> <RS> “i” “2”
<ESC> <RS> “i” <2>
1B 1E 96 32
1B 1E 96 02
Specifies rotated print mode for text with a
90˚ rotation.
<ESC> “E”
1B 45
Selects emphasized printing
<ESC> “F”
1B 46
Cancels emphasized printing (Default)
<ESC> “U” n
1B 55 n
Selects print direction
– 28 –
ENGLISH
Control Codes
<ESC> “W” “1”
<ESC> “W” <1>
8-1-2. Print Position Control
Control Codes
ENGLISH
<LF>
Hexadecimal Codes
0A
Function
Line feed
<VT>
0B
Vertical tab
<FF>
0C
Form feed
<CR>
0D
Carriage Return
<ESC> “a” n
1B 61 n
Feeds paper n lines
<HT>
09
Horizontal tab
<ESC> “A” n
1B 41 n
Defines n/72-inch line spacing
<ESC> “2”
1B 32
Sets n/72-inch line spacing
<ESC> “z” “0”
<ESC> “z” <0>
1B 7A 30
1B 7A 00
Sets line spacing to 1/12-inch
<ESC> “z” “1”
<ESC> “z” <1>
1B 7A 31
1B 7A 01
Sets line spacing to 1/6-inch (Default)
<ESC> “0”
1B 30
Sets line spacing to 1/8-inch
<ESC> “1”
1B 31
Sets line spacing to 7/72-inch
<ESC> “J” n
1B 4A n
One time n/72-inch feed
<ESC> “3” n
1B 33 n
Sets line spacing to n/216-inch approximately
<ESC> “y”
1B 79 n
<ESC> “D” n1 n2 ... <0> 1B 44 n1 n2 ... 00
Sets line spacing to n/144-inch
Sets horizontal tab stops
<ESC> “l” n
1B 6C n
Sets left margin
<ESC> “Q” n
1B 51 n
Sets right margin
<ESC> <GS> “a” “0”
<ESC> <GS> “a” <0>
1B 1D 61 30
1B 1D 61 00
Left justification (Default)
<ESC> <GS> “a” “1”
<ESC> <GS> “a” <1>
1B 1D 61 31
1B 1D 61 01
Centering
<ESC> <GS> “a” “2”
<ESC> <GS> “a” <2>
1B 1D 61 32
1B 1D 61 02
Right justification
<ESC> “B” n1 n2 ... <0> 1B 42 n1 n2 ... 00
Set vertical tab stops
– 29 –
8-1-3. Dot Graphics Control
Hexadecimal Codes
Function
1B 4B n 00 m1 m2
...
<ESC> “L” n1 n2
m1 m2 ...
1B 4C n1 n2 m1 m2
8 dot high density graphics
...
8 dot normal density graphics
8-1-4. Download Graphics Printing
Control Codes
Hexadecimal Codes
Function
<ESC> “&” <0> n1 n2 .. 1B 26 00 n1 n2 ..
Defines download characters
<ESC> “%” “1”
<ESC> “%” <1>
1B 25 31
1B 25 01
Enables download character set
<ESC> “%” “0”
<ESC> “%” <0>
1B 25 30
1B 25 00
Disables download character set (Default)
8-1-5. Peripheral Device Control
Control Codes
<ESC> <BEL> n1 n2
Hexadecimal Codes
Function
1B 07 n1 n2
Defines drive pulse width for peripheral device #1
<BEL>
07
Controls peripheral device #1
<FS>
1C
Controls peripheral device #1 immediately
<EM>
19
Controls peripheral device #2 immediately
<SUB>
1A
Controls peripheral device #2 immediately
– 30 –
ENGLISH
Control Codes
<ESC> “K” n <0>
m1 m2 ...
8-1-6. Auto Cutter Control (SP2500 type only)
Control Codes
Hexadecimal Codes
Function
ENGLISH
<ESC> “d” “0”
<ESC> “d” <0>
1B 64 30
1B 64 00
Full-cut command to the auto cutter
<ESC> “d” “1”
<ESC> “d” <1>
1B 64 31
1B 64 01
Partial-cut command to the auto cutter
<ESC> “d” “2”
<ESC> “d” <2>
1B 64 32
1B 64 02
Full-cut command to the auto cutter after paper
feed
<ESC> “d” “3”
<ESC> “d” <3>
1B 64 33
1B 64 03
Partial-cut command to the auto cutter after paper
feed
8-1-7. Commands to Set the Page Format
Control Codes
<ESC> “C” n
Hexadecimal Codes
1B 43 n
Function
Set page length in lines
<ESC> “C” <0> n
1B 43 00 n
Set page length in inches
<ESC> “N” n
1B 4E n
Set bottom margin
<ESC> “O”
1B 4F
Cancel bottom margin (Default)
8-1-8. Other Commands
Control Codes
Hexadecimal Codes
Function
<CAN>
18
Cancels printer buffer & Initialize printer
<DC3>
13
Deselects printer
<DC1>
11
Sets select mode (Default)
<RS>
1E
Beeps the buzzer
1B 23 N 2C n1 n2
<ESC> “#N, n1 n2 n3 n4”
n3 n4
<LF> <NUL>
0A 00
Sets memory switch
<ESC> “@”
1B 40
Initialize printer
<EOT>
04
Transmits EOT status
<ENQ>
05
Transmits ENQ status
<ETB>
17
Confirms finish of printing
<ESC> <ACK> <S0>
IB 06 01
Transmits automatic status
<ESC> <RS> “a” n
IB IE 61 n
Enables/disables automatic status
<ESC> “?” <LF> <NUL> 1B 3F 0A 00
Resets printer hardware and produce a test print
– 31 –
The following table lists the TM-U200 and TM-U300 emulation commands that
are supported by this printer.
Control Codes
<HT>
Hexadecimal Codes
09
Function
Horizontal tab
TMU200
⁄
TMU300
⁄
<LF>
0A
Line feed
⁄
⁄
<CR>
0D
Prints and carriage return
⁄
⁄
<DLE> <EOT>
10 04
Enables real-time status send
⁄
<DLE> <ENQ>
10 05
Real-time request to printer
⁄
<ESC> SP
1B 20
Sets size of space to right of character
⁄
⁄
<ESC> !
1B 21
Enables batch print mode
⁄
⁄
<ESC> #
1B 23
Sets memory switch
<ESC> %
1B 25
Enables/disables download
character set
⁄
⁄
<ESC> &
1B 26
Defines download character
⁄
⁄
<ESC> *
1B 2A
Selects bit image mode
⁄
⁄
<ESC> “–”
1B 2D
Selects/cancels underlining
⁄
⁄
<ESC> 2
1B 32
Selects 1/6-inch line spacing
⁄
⁄
<ESC> 3
1B 33
Selects n/144-inch line spacing
⁄
⁄
<ESC> =
1B 3D
Selects peripheral device
⁄
<ESC> ?
1B 3F
Cancels download character
⁄
⁄
<ESC> @
1B 40
Initializes the printer
⁄
⁄
<ESC> D
1B 44
Sets horizontal tab position
⁄
⁄
<ESC> E
1B 45
Enables/disables emphasized mode
⁄
⁄
<ESC> G
1B 47
Enables/disables double-strike mode
⁄
⁄
<ESC> J
1B 4A
Prints and n/144-inch paper feed
⁄
⁄
<ESC> K
1B 4B
Prints and n/144-inch reverse paper feed
⁄
⁄
– 32 –
ENGLISH
8-2. ESC/POS Mode Commands
Control Codes
Hexadecimal Codes
Function
ENGLISH
TMU200
⁄
TMU300
⁄
⁄
⁄
<ESC> R
1B 52
Selects international character set
<ESC> U
1B 55
Selects/cancels unidirectional
printing mode
<ESC> V
1B 56
Designates/cancels 90˚ character
rotation
<ESC> a
1B 61
Aligns position
⁄
<ESC> c3
1B 63 33
Selects the paper-end sensor for
sending the no-paper signal
⁄
⁄
<ESC> c4
1B 63 34
Selects the paper-end sensor for
stopping printing
⁄
⁄
<ESC> c5
1B 63 35
Enables/disables control panel switches
⁄
⁄
<ESC> d
1B 64
Prints or feeds n lines
⁄
⁄
⁄
⁄
<ESC> e
1B 65
Prints or reverse feeds n lines
<ESC> i
1B 69
Full-cut command to the auto cutter
<ESC> m
1B 6D
Partial-cut command to the anto cutter
<ESC> p
1B 70
Generates specified pulse
<ESC> r
1B 72
Selects print color
<ESC> t
1B 74
Selects character code table
<ESC> u
1B 75
Sends peripheral status
⁄
<ESC> v
1B 76
Sends paper sensor status
⁄
<ESC> {
1B 7B
Enables/disables inverted printing
⁄
<GS> I
1D 49
Sends printer ID
⁄
⁄
⁄
⁄
⁄
⁄
<GS> V
1D 56
Cut command to the auto cutter
⁄
<GS> a
1D 61
Enables/disables automatic status
⁄
<GS> r
1D 72
Sends printer status
⁄
<GS> z0
1D 7A 30
Setting of on-line recovery wait time
⁄
– 33 –
⁄
⁄
⁄
Control Codes
Hexadecimal Codes
Function
TMU200
⁄
TMU300
<ESC> <
1B 3c
Ignored (Returns home)
<ESC> c 0 n
1B 63 30 n
Ignored (Selects paper type(s)
for printing)
⁄
<ESC> f t1 t2
1B 66 t1 t2
Ignored (Sets cut sheet wait time)
⁄
<GS> E n
1D 45 n
Ignored (Selects head control method)
⁄
– 34 –
ENGLISH
Ignored Commands
9. Optional Near-end Sensor
ENGLISH
The near-end sensor detects when the roll of paper loaded in it is reaching the end.
The near-end sensor is normally disabled when the printer is shipped from the
factory, but it can be enabled by your dealer using the memory switch. The
information in this chapter applies only to printers whose near-end sensor is
enabled.
Important!
Installation of the near-end sensor should normally be left to your dealer.
9-1. Adjusting the Near-end Sensor
Use the following procedure to adjust the near-end sensor so it is compatible with
the size of roll paper you are using.
Important!
Regardless of the overall diameter of the paper roll, the heavy paper core at the
center off the roll must have an inside diameter of 12 mm and an outside
diameter of 18 mm for proper detection.
1 Make sure that the printer is turned
off and unplugged from its power
outlet.
2 Remove the printer cover.
3 Remove the roll paper.
Fig. 9-1
– 35 –
Level 3
Level 2
Level 1
Distance A
Approximate 9 mm
Approximate 7 mm
Approximate 5 mm
…
……
………
Setting
Level 3
Level 2
Level 1 *1
Indicator
ooo
oo
o
*1 Cannot be used with 2 and 3 ply.
Fig. 9-2
A
ø18 mm
ø12 mm
A
Roll paper core
Fig. 9-3
Note:
1. Since the distance A corresponding to the adjustment position on
the chart is a calculated value,
there may variations due to the
actual mechanism.
2. If there is an end mark at the end
of a roll of paper, that end mark
is an adhesive that may lift the
entire roll of paper. In such a
case, the remaining roll paper
amount (Distance A) shown in
the chart above will not apply.
3. The quality of some paper may
cause it to become jammed. This
can result in erroneous detection.
5 Insert the tip of a ballpoint pen or
similar pointer object into the hole
of the adjuster. While pressing the
adjuster, slide it up or down to the
setting you that matches the roll
paper you are using.
6 Make sure the tab indicated by the
arrow in the illustration is inside
one of the grooves.
– 36 –
ENGLISH
4 Determine the diameter of the roll
paper you are using and find the
required setting in the table below.
1. Introduction ..................................................................................................... 39
2. Déballage et Inspection ................................................................................... 40
2-1. Déballage ............................................................................................. 40
2-2. Emplacement de l’imprimante .............................................................41
2-3. Précautions de manipulation ................................................................ 41
2-4. Entretien ............................................................................................... 41
3. Identification des Pièces et Nomenclature ...................................................... 42
4. Adaptateur secteur en option ........................................................................... 44
5. Raccordement .................................................................................................. 46
5-1. Installation du tore de ferrite ................................................................ 46
5-2. Raccordement à l’ordinateur hôte (interface série) .............................. 47
5-3. Raccordement à l’ordinateur hôte (interface parallèle) ....................... 48
5-4. Raccordement d’un appareil périphérique ...........................................48
6. Installation d’une cartouche à ruban et chargement du papier ........................ 50
6-1. Modèle SP2300 ....................................................................................50
6-2. Modèle SP2500 ....................................................................................53
6-3. Enlèvement d’un rouleau de papier ..................................................... 58
7. Panneau de Commande ................................................................................... 59
7-1. Fonctionnement de base ....................................................................... 59
7-2. Erreurs .................................................................................................. 60
7-3. Utilisation des touches (Utilisation combinée des touches) ................ 61
8. Codes de contrôle ............................................................................................ 65
8-1. Les commandes du mode Star .............................................................65
8-2. Commandes du mode ESC/POS .......................................................... 70
9. Capteur de fin de papier en option ..................................................................73
9-1. Réglage du capteur de fin de papier ..................................................... 73
APPENDICE .....................................................................................................151
L’appendice n’est pas traduit.
– 38 –
FRANÇAIS
TABLE DES MATIERES
1. Introduction
FRANÇAIS
L’imprimante série à impact et matrice de points est conçue pour une utilisation
avec des instruments électroniques tels que des terminaux points de vente, du
matériel bancaire, du matériel périphérique pour ordinateurs, etc.
Les caractéristiques principales des modèles de la série SP2000 sont les suivantes:
1. Impression bi-directionnelle à 3,1 lignes/sec. environ.
2. Interface série ou parallèle.
3. Tampon de données permettant à l’appareil de recevoir des données d’impression même pendant le travail d’impression.
4. Circuit de contrôle d’appareils périphériques permettant la commande de
dispositifs extérieurs tels que des tiroirs-caisses.
SP2
3
2
0
M
D
42
–
24
Nombre de colonnes d’impression
42 : 42 colonnes (16 ccp)
Interface
D : Interface série (RS-232C)
C : Interface parallèle
Alimentation de papier
M : Alimentation de papier par friction
Mécanisme
2 : Une couleur, 42 colonnes (16 ccp)
6 : Deux couleurs, 42 colonnes (16 ccp)
Type d’imprimante
3 : Type standard
5 : Type avec unité de découpage
automatique
Imprimante de la série SP2000
– 39 –
2. Déballage et Inspection
2-1. Déballage
Après avoir déballé l’appareil, vérifiez si tous les accessoires nécessaires se
trouvent dans la boîte.
Cartouche à ruban
FRANÇAIS
Modèle SP2300
Imprimante
Mode d’emploi
Tore de ferrite
Attache
Modèle SP2500
Cartouche à ruban
Imprimante
Mode d’emploi
Tore de ferrite
Attache
Fig. 2-1 Déballage
Si l’un des éléments mentionnés ci-dessus ne se trouve pas dans la caisse,
adressez-vous au magasin où vous avez acheté l’imprimante et demandez que la
pièce manquante vous soit fournie. Il est préférable de conserver la caisse
d’origine ainsi que tous les emballages. Ceux-ci vous seront utiles s’il vous faut
emballer l’imprimante ou la transporter.
– 40 –
2-2. Emplacement de l’imprimante
FRANÇAIS
Pour installer correctement l’imprimante, gardez à l’esprit les conseils suivants:
1. Mettez l’imprimante à l’abri de températures excessivement élevées comme en plein
soleil ou à proximité d’un appareil de chauffage, et à l’abri de l’humidité et de la
poussière.
2. Installez l’imprimante sur une surface stable et de niveau sur laquelle l’imprimante
ne sera pas soumise à des vibrations.
3. Veillez à ce que l’imprimante soit branchée sur une source secteur stable.
Par exemple, ne pas brancher l’imprimante sur la prise secteur d’un circuit alimentant
déjà un appareil électroménager gros consommateur de courant et producteur de
parasites, tel qu’un réfrigérateur ou un climatiseur.
4. Veillez à ce que la tension du secteur corresponde bien à la tension spécifiée sur la
plaque d’identification de l’imprimante.
5. Pour débrancher l’imprimante, la fiche doit être débranchée de la prise murale, et
celle-ci doit être située à proximité de l’imprimante et facile d’accès.
2-3. Précautions de manipulation
1. Faites attention à ne pas laisser tomber de trombones, punaises ou autres objets dans
l’imprimante. Un dysfonctionnement pourrait en résulter.
2. Ne pas essayer d’imprimer quand il n’y a pas de papier ou de cartouche à ruban dans
l’imprimante. La tête d’impression pourrait être endommagée.
3. Ne pas ouvrir le capot pendant l’impression.
4. Ne pas toucher la tête d’impression immédiatement après un travail d’impression car
elle devient très chaude.
5. Utilisez seulement un rouleau de papier dont l’extrémité n’est pas collée au tube
central.
6. Quand le repère de fin de papier apparaît sur le papier, remplacez le rouleau de papier
avant qu’il soit terminé.
2-4. Entretien
Avant tout, cette imprimante est un appareil robuste, mais un minimum de précautions
sont à prendre pour éviter les dysfonctionnements. Par exemple:
1. Laissez l’imprimante dans un environnement “confortable”. En gros, si vous êtes à
l’aise, l’environnement sera acceptable pour l’imprimante.
2. Ne pas soumettre l’imprimante à des chocs ou à des vibrations excessives.
3. Évitez les environnements excessivement poussiéreux. La poussière est l’ennemi de
tous les appareils mécaniques de précision.
4. Pour nettoyer l’extérieur de l’imprimante, utilisez un chiffon légèrement imbibé
d’eau ou d’alcool, mais ne laissez aucun liquide pénétrer à l’intérieur de l’imprimante.
5. L’intérieur de l’imprimante peut être nettoyé avec une petite brosse de nettoyage ou
un aérosol à air comprimé (vendu à cet effet). Pendant cette opération, veillez à ne pas
plier ni endommager les connexions ou les composants électroniques.
– 41 –
3. Identification des Pièces et Nomenclature
Modèle SP2300
FRANÇAIS
Capot
Protège l’imprimante de la poussière et réduit le bruit.
Ne pas ouvrir le capot pendant l’impression.
Panneau de commande
Comprend deux commutateurs de
commande et trois témoins indiquant
le statut de l’imprimante.
Interrupteur d’alimentation
Cet interrupteur vous
permet de mettre
l’imprimante sous
tension et hors tension.
Adaptateur secteur
Consulter la section suivante
pour les instructions concernant
son installation
Connecteur de pilotage
d’appareils périphériques
Ce connecteur vous permet
de raccorder l’imprimante à
des appareils périphériques
tels que des tiroirs-caisses,
etc.Ne pas raccorder à un
téléphone.
Connecteur d’interface
Ce connecteur vous permet de
raccorder l’imprimante à
l’ordinateur hôte.
Commutateurs DIP
Ces commutateurs permettent d’effectuer divers
réglages.
Fig. 3-1 Vue externe de l’imprimante (Modèle SP2300)
– 42 –
Modèle SP2500
Capot
Protège l’imprimante de la poussière et réduit le bruit.
Ne pas ouvrir le capot pendant l’impression.
FRANÇAIS
Panneau de commande
Comprend deux commutateurs de commande et
deux témoins indiquant le statut de l’imprimante.
Interrupteur d’alimentation
Cet interrupteur vous
permet de mettre
l’imprimante sous
tension et hors tension.
Adaptateur secteur
Consulter la section suivante
pour les instructions concernant
son installation
Connecteur de pilotage
d’appareils périphériques
Ce connecteur vous permet
de raccorder l’imprimante à
des appareils périphériques
tels que des tiroirs-caisses,
etc.Ne pas raccorder à un
téléphone.
Connecteur d’interface
Ce connecteur vous permet de
raccorder l’imprimante à
l’ordinateur hôte.
Commutateurs DIP
Ces commutateurs permettent d’effectuer divers
réglages.
Fig. 3-2 Vue externe de l’imprimante (Modèle SP2500)
– 43 –
4. Adaptateur secteur en option
Câble d’alimentation
Adaptateur secteur
Plaque de fixation du
cordon
Attache
Fig. 4-1
Procéder de la manière suivante pour installer l’adaptateur secteur en option.
Adaptateur secteur
Plaque de fixation
de l’adaptateur
Cordon de l’adaptateur secteur
Attache
Plaque de fixation du cordon
[Après l’installation de l’adaptateur secteur]
[Avant l’installation de l’adaptateur secteur]
Fig. 4-2 Vue côté plat
1 Retourner l’imprimante.
2 Brancher le cordon de l’adaptateur secteur dans la prise comme illustré cidessous. Vérifier que le côté plat de la fiche soit tourné vers l’intérieur de
l’imprimante.
3 Utiliser une des attaches en nylon livrées avec l’imprimante pour fixer le
cordon au point marqué sur l’illustration.
– 44 –
FRANÇAIS
Plaque de fixation de
l’adaptateur
Vis
FRANÇAIS
Fig. 4-3 Fixer le cordon ici
4 Enrouler le cordon de l’adaptateur secteur dans l’espace prévu et insérer
l’adaptateur secteur dans son logement.
5 Utiliser la plaque de fixation de l’adaptateur et la visser pour caler l’adaptateur ; utiliser la plaque de fixation du cordon et la visser pour caler le cordon.
6 Retourner l’imprimante et la mettre à l’endroit.
7 Brancher la fiche femelle du cordon d’alimentation dans l’adaptateur secteur
et brancher l’autre extrémité du cordon dans une prise de courant.
– 45 –
L’ordinateur communique les données à l’imprimante via le câble connecté à
l’interface de l’imprimante (type de connecteur d’interface série : D-Sub à 25
broches ou type de connecteur d’interface parallèle : compatible Centronics à 36
broches). Ce câble n’est pas fourni avec l’imprimante. Vous devrez donc vous en
procurer un.
Attention!
• Les instructions suivantes concernent le câble de connexion employé sur un
ordinateur personnel compatible IBM. Notez que ces instructions ne s’appliquent pas à tous les types d’ordinateurs et de câbles. Si vous n’êtes pas sûr du
type de câble adapté à votre ordinateur, demandez conseil à votre revendeur.
• Assurez-vous que l’imprimante est hors tension, qu’elle est débranchée de la
prise secteur et que l’ordinateur est hors tension avant de les connecter.
5-1. Installation du tore de ferrite
1 Fixez la grande gaine en ferrite sur
le câble comme illustré.
Tore de ferrite (28 mm de diamètre)
Interface câble
Fig. 5-1
– 46 –
FRANÇAIS
5. Raccordement
2 Passez l’attache dans le tore de ferrite.
5 cm
maximum
Attache
FRANÇAIS
Fig. 5-2
3 Passez l’attache autour du tore de
ferrite et serrez-la. Coupez l’extrémité de l’attache à l’aide de ciseaux.
Tirez et coupez
Fig. 5-3
5-2. Raccordement à l’ordinateur hôte (interface série)
Tore de ferrite
Vis
Toumevis
1 Mettez l’ordinateur hôte et l’imprimante hors tension.
2 Insérez un des connecteurs du câble
d’interface dans la prise de l’imprimante et l’autre dans la prise de
l’ordinateur hôte.
3 Serrez ensuite les vis droite et gauche des connecteurs pour les fixer
aux prises.
Fig. 5-4 Connexion du câble
d’interface série
– 47 –
Tore de ferrite
1 Mettez l’ordinateur hôte et l’imprimante hors tension.
2 Insérez un des connecteurs du câble
d’interface dans la prise de l’imprimante comme indiqué dans le
schéma, et fixez-le avec les fermoirs
3 Insérez l’autre connecteur du câble
d’interface dans la prise de l’ordinateur hôte, puis fixez-le également
avec les fermoirs.
Fig.5-5 Connexion du câble
d’interface parallèle
5-4. Raccordement d’un appareil périphérique
Vous pouvez raccorder un appareil périphérique à l’imprimante à l’aide d’une
fiche modulaire. Nous expliquons ci-dessous comment installer le tore de ferrite
et faire le raccordement proprement dit. Pour les détails sur le type de fiche
modulaire à utiliser, reportez-vous à la page 165. Notez que le fil ou la fiche
modulaires ne sont pas fournis avec l’imprimante. Vous devrez donc vous les
procurer.
Attention!
Assurez-vous que l’imprimante est hors tension, qu’elle est débranchée de la
prise secteur et que l’ordinateur est hors tension avant d’effectuer les connexions.
Tore de ferrite (20 mm de diamètre)
1 Fixez la petite gaine en ferrite sur le
câble modulaire comme illustré cidessous.
Connecteur Câble
Fig. 5-6
– 48 –
FRANÇAIS
5-3. Raccordement à l’ordinateur hôte (interface parallèle)
5 cm
maximum
2 Passez l’attache dans le tore de ferrite.
Attache
FRANÇAIS
Fig. 5-7
Tirez et coupez
Fig. 5-8
3 Passez l’attache autour du tore de
ferrite et serrez-la. Coupez l’extrémité de l’attache à l’aide de ciseaux.
4 Raccordez une extrémité du câble
modulaire à la prise modulaire du
périphérique.
5 Retirez le cache de prise modulaire
au dos de l’imprimante, et raccordez l’autre extrémité du câble modulaire dans la prise de l’imprimante.
– 49 –
6. Installation d’une cartouche à ruban et chargement du papier
6-1. Modèle SP2300
Capot
Hors tension
Fig. 6-1. Dépose du capot
Séparateur de ruban
Tête d’impression
Ruban encreur
1 Mettez l’imprimante hors tension.
2 Soulevez le capot d’environ 3 cm.
Tout en tenant le couvercle incliné à
cet angle, tirez-le vers vous pour
l’enlever.
3 Mettez la cartouche à ruban en place
dans le sens indiqué dans la figure
6-2 et appuyez légèrement sur la
cartouche afin qu’elle se mette en
place. Si la mise en place de la
cartouche n’est pas satisfaisante,
appuyez sur la cartouche tout en
faisant tourner le bouton d’alimentation du ruban de la cartouche dans
le sens de la flèche.
4 Pour tendre le ruban, faites tourner
le bouton d’alimentation du ruban
de la cartouche dans le sens de la
flèche.
5 Pour remettre en place le capot, suivant la procédure décrite à l’étape
2 dans le sens inverse.
Bouton
d’alimentation du ruban
Parties avec
encoches
Cartouche à ruban
Fig. 6-2 Mise en place de la
cartouche à ruban
– 50 –
FRANÇAIS
6-1-1. Installation d’une cartouche à ruban
Remarque: Pour enlever la cartouche à
ruban, soulevez la partie A,
puis enlevez la cartouche en la
tenant par la partie B comme
indiqué dans la figure 6-3.
A
FRANÇAIS
B
Fig. 6-3 Dégagement de la
cartouche du ruban
6-1-2. Ehargement du papier
Capot
1 Soulevez le capot d’environ 3 cm.
Tout en tenant le couvercle incliné à
cet angle, tirez-le vers vous pour
l’enlever.
2 Coupez l’extrémité du papier perpendiculairement.
3 Vérifiez si l’imprimante est bien
sous tension.
Fig. 6-4 Dépose du capot
– 51 –
4 En faisant attention au sens du rouleau, mettez le rouleau de papier en
place dans le creux, comme indiqué
dans la figure 6-5.
FRANÇAIS
Rouleau de papier
Fig. 6-5 Chargement du papier
Mécanisme d’avance
de papier
Fente de sortie
de papier
5 Insérer le bord du papier dans le
mécanisme d’avance de papier. S’il
est inséré correctement, le bord du
papier ressortira par la fente de sortie de papier.
6 Insérez l’extrémité du papier dans
la fente de sortie où se trouve la
barre de découpage, puis remettez
le capot en place en suivant la procédure de dépose du capot décrite à
l’étape 1 ci-dessus dans le sens
inverse.
Remarque:Quand le repère de fin
de papier apparaît sur
le papier, remplacez le
rouleau de papier avant
qu’il soit terminé.
Barre de
découpage
Rouleau de papier
Fig. 6-6 Chargement du papier
– 52 –
Fig. 6-7
6-2. Modèle SP2500
6-2-1. Installation d’une cartouche à ruban
Capot
FRANÇAIS
Hors tension
1 Mettez l’imprimante hors tension.
2 Soulevez le capot d’environ 3 cm.
Tout en tenant le couvercle incliné à
cet angle, tirez-le vers vous pour
l’enlever.
Fig. 6-8 Dépose du capot
Unité de découpage
automatique
3 Soulevez l’unité de découpage automatique pour la mettre en position
verticale, comme indiqué dans la
figure 6-9.
Fig. 6-9 Redressement de l’unité
de découpage automatique
– 53 –
4 Mettez la cartouche à ruban en place
dans le sens indiqué dans la figure
Téte d’impression
6-10 et appuyez légèrement sur la
Ruban encreur
cartouche afin qu’elle se mette en
Unité de découplace. Si la mise en place de la
page automatique
Bouton
cartouche n’est pas satisfaisante, apd’alimentation
du ruban
puyez sur la cartouche tout en faiParties avec
sant tourner le bouton d’alimentaencoches
tion du ruban de la cartouche dans le
sens de la flèche.
5 Pour tendre le ruban, faites tourner
le bouton d’alimentation du ruban
de la cartouche dans le sens de la
flèche.
Cartouche à
6
Refermez l’unité de découpage autoruban
matique.
7 Pour remettre en place le capot, suiFig. 6-10 Mise en place de la
vez la procédure décrite à l’étape 2
cartouche à ruban
dans le sens inverse.
8 Pour enlever la cartouche à ruban,
soulevez la partie A, puis enlevez la
cartouche en la tenant par la partie B
comme indiqué dans la figure 6-11.
A
B
Fig. 6-11 Dégagement de la
cartouche du ruban
– 54 –
FRANÇAIS
Séparateur de ruban
6-2-2. Chargement du papier
Capot
1 Soulevez le capot d’environ 3 cm.
Tout en tenant le couvercle incliné à
cet angle, tirez-le vers vous pour
l’enlever.
FRANÇAIS
Fig. 6-12 Dépose du capot
Rouleau de papier
2 Coupez l’extrémité du papier perpendiculairement.
3 Vérifiez si l’imprimante est bien
sous tension.
4 En faisant attention au sens du rouleau, mettez le rouleau de papier en
place dans le creux, comme indiqué
dans la figure 6-13.
Fig. 6-13 Chargement du papier
– 55 –
Mécanisme
d’avance de papier
Fente de sortie
de papier
Rouleau de papier
Fig. 6-14 Chargement du papier
5 Insérez l’extrémité du papier dans
le mécanisme d’avance de papier.
S’il est inséré correctement, le bord
du papier passera par la fente de
l’unité de découpage automatique.
Le papier sera coupé une fois.
6 Enlevez le bout coupé et remettez le
capot en place en suivant la procédure inverse de celle décrite à l’étape
1.
Remarque: Quand la marque de fin
de papier apparaît sur
le papier, remplacez le
rouleau avant qu’il soit
épuisé.
[Avec du papier pour copie]
Fente
d’insertion
du papier
Feuille
supérieure
Unité de découpage
automatique
Feuille supérieure
Tête d’impression
Cylindre
Feuille inférieure
Feuille inférieure
Tête d’impression
Cylindre
Fig. 6-15 Insertion du papier dans l’unité de découpage
automatique (avec utilisation de papier pour copie)
5 Soulevez l’unité de découpage automatique pour la mettre en position
verticale.
6 Insérez le bord du papier dans le
mécanisme d’avance de papier. S’il
est inséré correctement, le bord du
papier ressortira par la fente de sortie de papier.
– 56 –
FRANÇAIS
[Avec une feuille de papier simple]
FRANÇAIS
Sortie de
papier
Unité de
découpage
automatique
Fig. 6-16 Fente de sortie du cache
avant
7 Insérez seulement l’original (feuille
supérieure) dans la fente de l’unité
de découpage automatique. Insérez
le papier sur lequel vous souhaitez
effectuer la copie (feuille inférieure)
entre le cylindre et l’unité de découpage automatique.
8 Tirez sur l’extrémité du papier afin
de tendre le papier, puis rabaissez
l’unité de découpage automatique.
9 Insérez le papier dans la sortie de
papier, puis remettez le capot en
place en suivant la procédure de
dépose du capot dans le sens inverse.
Remarque:
• Quand le repère de fin de papier apparaît sur le papier, remplacez le rouleau de papier avant
qu’il soit terminé.
• Quand vous utilisez la
rembobineuse de papier en option, veuillez vous reporter au
mode d’emploi séparé
PW2000-24.
Fig. 6-17 Remise en place du capot
– 57 –
6-3. Enlèvement d’un rouleau de papier
Remarques 1. Enfoncez la touche d’avance FEED pour retirer le reste du
papier qui se trouve dans l’imprimante.
2. N’attendez pas que le rouleau de papier soit épuisé avant de
le remplacer. Remplacez-le dès que le repère de fin de
rouleau apparaît.
– 58 –
FRANÇAIS
Retirez le capot, puis coupez le papier juste derrière le guide de papier et appuyez
sur la touche d’avance FEED afin de faire sortir le reste du papier qui se trouve
toujours dans l’imprimante.
Quand tout le papier est sorti, le témoin POWER clignote.
7. Panneau de Commande
7-1. Fonctionnement de base
FRANÇAIS
4
ON LINE
FEED
POWER
1
2
3
Fig. 7-1 Panneau de commande
1 Touche ON LINE
Cette touche permet de mettre l’imprimante en ligne ou hors ligne.
Vous ne pouvez effectuer cette commutation que si du papier est chargé
dans l’imprimante.
2 Touche d’avance FEED
• Si vous appuyez sur cette touche,
puis la relâchez moins de 0,5 seconde après, le papier avancera
d’une ligne à la fois.
• Si vous maintenez la pression sur
cette touche pendant plus de 0,5
seconde, le papier avancera de façon continue.
(Cela est valable que l’imprimante
soit en ligne ou hors ligne.)
3 Témoin d’alimentation POWER (DEL verte)
LED allumée : L’imprimante est sous tension.
LED éteinte : L’imprimante est hors tension.
4 Témoin ON LINE (DEL verte)
DEL allumée : L’imprimante est en ligne
DEL éteinte : L’imprimante est hors ligne
– 59 –
7-2. Erreurs
Description
de l’erreur
Pas de papier
Témoin
d’alimentation
Témoin en ligne
Sonnerie
Conditions
de reprise
4 bips courts
(0,13 seconde)
répétés deux fois
*1
Clignote à des
intervalles d’une
seconde
Éteint
Le rouleau de papier
est presque épuisé
(quand la fonction
d’arrêt automatique
en fin de rouleau est
en service)
Clignote à des
intervalles de 2
secondes
Éteint
Allumé (après
une pression sur
le commutateur
en ligne)
Rien
Erreur mécanique
(autre qu’une erreur
de l’unité de
découpage)
Clignote à des
intervalles de
0,25 seconde
Éteint
Un bip court
(0,13 seconde) et
un bip long (0,5
seconde)
*3
Erreur de l’unité de
découpage (sur les
modèles avec unité de
découpage seulement)
Clignote à des
intervalles de
0,125 seconde
Éteint
Deux bip courts
(0,13 seconde) et
un bip long (0,5
seconde)
*3
Erreur de surcharge
de commandes
d’impression
Clignote à des
intervalles de 0,5
seconde
Allumé
Erreur de lecture/
écriture de la
mémoire vive
Éteint
Allumé
Erreur du processeur
Éteint
*2
Rien
*4
Rien
*5
Clignote à des
intervalles de
0,25 seconde
Retentit pendant
2 secondes
*5
*1 Après avoir changé le papier, appuyez sur le commutateur en ligne.
*2 Appuyez sur le commutateur en ligne pour continuer l’impression; ou
changez le papier et appuyez sur le commutateur en ligne.
*3 Après avoir remédié au bourrage de papier ou à un autre problème, appuyez
sur le commutateur en ligne.
*4 L’impression reprendra automatiquement après un certain temps. (La reprise
est automatique après le refroidissement de la tête d’impression).
*5 La reprise n’est pas possible avec cette erreur. Consultez un revendeur pour
les réparations.
– 60 –
FRANÇAIS
Déterminez la nature de l’erreur en fonction du clignotement du témoin ou du son
de la sonnerie.
7-3. Utilisation des touches (Utilisation combinée des touches)
7-3-1. Test d’impression
FRANÇAIS
FEED + POWER ON (Mettez l’imprimante sous tension tout en maintenant
la touche FEED enfoncée.)
Le test d’impression sera effectué conformément au réglage du numéro de
vérification, des commutateurs DIP et de l’ordre des caractères. Si vous
maintenez la pression sur la touche FEED ou si vous appuyez sur la touche
FEED à la fin du test d’impression, seuls les caractères seront imprimés à
plusieurs reprises.
Fig. 7-2 Exemple d’impression d’essai
(quand l’imprimante est utilisée avec l’interface série)
– 61 –
ON LINE + POWER ON (Mettez l’imprimante sous tension tout en
maintenant la touche ON LINE enfoncée.)
Chacun des signaux envoyés de l’ordinateur à l’imprimante sera imprimé en
code hexadécimal.
Cette fonction vous permet de vérifier si un code de contrôle envoyé à
l’imprimante par le programme utilisé est correct ou non. La dernière ligne
n’est pas imprimée si les données correspondantes ne remplissent pas une
ligne complète. Néanmoins, si vous appuyez sur la touche ON LINE pour
mettre l’imprimante hors ligne, la dernière ligne sera imprimée. Pour sortir de
ce mode, il est nécessaire de mettre l’imprimante hors tension.
Fig. 7-3 Exemple d’impression d’essai avec vidage hexadécimal
7-3-3. Réglage de l’alignement des points
Vous n’aurez peut-être jamais besoin d’effectuer les réglages décrits dans
cette section, mais près avoir utilisé l’imprimante pendant un certain temps,
vous remarquerez peut-être que les points de certains graphiques ne sont pas
alignés correctement. Ainsi par exemple, ce qui devrait être imprimé comme
ceci :
pourrait être imprimé comme cela :
ou encore comme cela
– 62 –
FRANÇAIS
7-3-2. Vidage hexadécimal
FRANÇAIS
Ce problème est causé par un décalage des pièces mécaniques de l’imprimante. Ce problème est relativement rare et il est possible que vous ne le
rencontriez jamais. Si toutefois vous rencontrez ce problème, suivez les
instructions ci-dessous afin de le corriger.
• Mettez l’imprimante sous tension et introduisez un morceau de papier.
• Mettez l’imprimante hors tension.
• Tout en maintenant les touches ON LINE et FEED du tableau de commande enfoncées, remettez l’imprimante sous tension afin d’activer le
mode de réglage d’alignement des points, qui est signalé par le clignotement du témoin POWER.
Une fois le mode de réglage d’alignement des points activé, l’imprimante
imprime sept blocs de caractères de la manière indiquée ci-dessous,
chacun représentant un réglage d’alignement des points. Un astérisque (*)
à gauche des blocs vous indique le réglage sélectionné.
• Utilisez la touche FEED pour spécifier le bloc dont l’alignement des
caractères semble optimal. Appuyez une fois sur FEED pour spécifier le
premier bloc, deux fois pour spécifier le deuxième bloc, et ainsi de suite
jusqu’à sept fois pour spécifier le septième bloc.
Un avertisseur sonore fait entendre si vous appuyez plus de sept fois sur la
touche FEED .
• Après avoir spécifié un bloc, appuyez sur ON LINEpour sauvegarder votre
sélection et quitter le mode de réglage d’alignement des points.
– 63 –
FRANÇAIS
Le réglage d’alignement des points que vous avez sélectionné est sauvegardé
dans la mémoire, et l’imprimante imprime une série de lignes graduées
correspondant à l’état d’impression sélectionné, suivie du message “Adjust
Completed!”, vous indiquant que le réglage est terminé. L’imprimante éjecte
ensuite le morceau de papier fort.
Remarque: Votre réglage ne sera pas sauvegardé si vous mettez l’imprimante hors tension avant d’appuyer sur ON LINE pour quitter le
mode de réglage d’alignement des points. En cas d’erreur
d’alimentation de papier dans ce mode, l’imprimante éjecte le
papier et le mode est annulé.
– 64 –
8. Codes de contrôle
FRANÇAIS
L’imprimante supporte deux modes de commande différents : le mode STAR, et
le mode ESC/POS.
Le mode Star émule les imprimantes Star précédentes. Le mode ESC/POS émule
l’imprimante de bordereaux TM-U200 ou TM-U300 Epson.
Ce chapitre donne la liste de toutes les commandes supportées par l’imprimante.
Attention!
Pour obtenir la dernière version de ce manuel et pour les mises à jour des
commandes supportées, consultez l’adresse URL suivante : http://www.starmicronics.co.jp/service/sp_sup_e.htm
8-1. Les commandes du mode Star
Les tableaux ci-dessous vous montrent les commandes du mode Star qui sont
supportées par l’imprimante
8-1-1. Sélection des Caractères
Code de contrôle
Code hexadécimal
Fonction
<ESC> “R” n
1B 52 n
Sélection du jeu de caractères internationaux
<ESC> “/” “1”
<ESC> “/” <1>
1B 2F 31
1B 2F 01
Sélectionne le zéro barré
<ESC> “/” “0”
<ESC> “/” <0>
1B 2F 30
1B 2F 00
Sélectionne le zéro normal
<ESC> <GS> “t” n
1B 1D 74 n
Pour sélectionner un caractère dans le tableau des
codes
<ESC> “M”
1B 4D
Sélection de la police 7 × 9 (demi-point) (Défaut)
<ESC> “P”
1B 50
Sélection de la police 5 × 9 (deux impulsions = 1
point)
<ESC> “:”
1B 3A
Sélection de la police 5 × 9 (trois impulsions = 1
point)
<ESC> <SP> n
1B 20 n
Réglage de l’espacement des caractères
<SO>
0E
Sélectionne la largeur double des caractères
<DC4>
14
Invalidation de la largeur double des caractères
(Défaut)
– 65 –
Code hexadécimal
Fonction
1B 57 31
1B 57 01
Sélectionne d’agrandissement double de largeur de
caractère
<ESC> “W” “0”
<ESC> “W” <0>
1B 57 30
1B 57 00
Invalidation d’agrandissement de largeur de caractére
<ESC> “h” “1”
<ESC> “h” <1>
1B 68 31
1B 68 01
Sélectionne d’agrandissement double de hauteur de
caractére
<ESC> “h” “0”
<ESC> “h” <0>
1B 68 30
1B 68 00
Invalidation d’agrandissement de hauteur de
caractére
<ESC> “–” “1”
<ESC> “–” <1>
1B 2D 31
1B 2D 01
Validation du soulignement
<ESC> “–” “0”
<ESC> “–” <0>
1B 2D 30
1B 2D 00
Invalidation du soulignement (Défaut)
<ESC> “_” “1”
<ESC> “_” <1>
1B 5F 31
1B 5F 01
Validation du surlignement
<ESC> “_” “0”
<ESC> “_” <0>
1B 5F 30
1B 5F 00
Invalidation du surlignement (Défaut)
<ESC> “4”
1B 34
Sélectionne l’impression en rouge (SP2360/2560)
Validation de l’impression surintensifiée (SP2320/
2520)
<ESC> “5”
1B 35
Sélectionne l’impression en rouge (SP2360/2560)
Invalidation de l’impression surintensifiée (SP2320/
2520)
<ESC> “6”
1B 36
Sélectionne le jeu de caractères n°2
<ESC> “7”
1B 37
Sélectionne le jeu de caractères n°1
<SI>
0F
Impression inversée
<DC2>
12
Invalidation de l’impression inversée (Défaut)
<ESC> <RS> “i” “0”
<ESC> <RS> “i” <0>
1B 1E 96 30
1B 1E 96 00
Pour annuler le mode d’impression de texte
avec rotation (Défaut)
<ESC> <RS> “i” “1”
<ESC> <RS> “i” <1>
1B 1E 96 31
1B 1E 96 01
Pour spécifier le mode d’impression de texte avec
rotation de 270˚.
<ESC> <RS> “i” “2”
<ESC> <RS> “i” <2>
1B 1E 96 32
1B 1E 96 02
Pour spécifier le mode d’impression de texte avec
rotation de 90˚.
<ESC> “E”
1B 45
Validation de l’impression mise en valeur
<ESC> “F”
1B 46
Invalidation de l’impression mise en valeur (Défaut)
<ESC> “U” n
1B 55 n
Sélection du sens d’impression
– 66 –
FRANÇAIS
Code de contrôle
<ESC> “W” “1”
<ESC> “W” <1>
8-1-2. Commandes de position d’impression
Code de contrôle
<LF>
Code hexadécimal
0A
Fonction
Avance d’une ligne
FRANÇAIS
<VT>
0B
Tabulation verticale
<FF>
0C
Saut de page
<CR>
0D
Retour chariot
<ESC> “a” n
1B 61 n
Avance du papier de n lignes
<HT>
09
Tabulation horizontale
<ESC> “A” n
1B 41 n
Sélection d’un interligne de n/72èmes de pouce
<ESC> “2”
1B 32
Validation d’un interligne de n/72èmes de pouce
<ESC> “z” “0”
<ESC> “z” <0>
1B 7A 30
1B 7A 00
Validation d’un interligne de 1/12ème de pouce
<ESC> “z” “1”
<ESC> “z” <1>
1B 7A 31
1B 7A 01
Validation d’un interligne de 1/6ème de pouce
(Défaut)
<ESC> “0”
1B 30
Validation d’un interligne de 1/8ème de pouce
<ESC> “1”
1B 31
Validation d’un interligne de 7/72èmes de pouce
<ESC> “J” n
1B 4A n
Avance une fois de n/72èmes de pouce
<ESC> “3” n
1B 33 n
Validation d’un interligne de n/216èmes de pouce
environ
<ESC> “y”
1B 79 n
<ESC> “D” n1 n2 ... <0> 1B 44 n1 n2 ... 00
Validation d’un interligne de n/144èmes de pouce
Pose des arrêts de tabulation horizontaux
<ESC> “l” n
1B 6C n
Réglage de la marge gauche
<ESC> “Q” n
1B 51 n
Réglage de la marge droite
<ESC> <GS> “a” “0”
<ESC> <GS> “a” <0>
1B 1D 61 30
1B 1D 61 00
Alignement à gauche (Défaut)
<ESC> <GS> “a” “1”
<ESC> <GS> “a” <1>
1B 1D 61 31
1B 1D 61 01
Centrage
<ESC> <GS> “a” “2”
<ESC> <GS> “a” <2>
1B 1D 61 32
1B 1D 61 02
Alignement à droite
<ESC> “B” n1 n2 ... <0> 1B 42 n1 n2 ... 00
Réglage d’arrêts de tabulation verticale
– 67 –
8-1-3. Commandes de graphiques en points
Code hexadécimal
Fonction
1B 4B n 00 m1 m2
...
<ESC> “L” n1 n2
m1 m2 ...
1B 4C n1 n2 m1 m2
Impression de graphiques à haute densité
...
Impression de graphiques à densité normale
8-1-4. Impression de graphiques téléchargés
Code de contrôle
Code hexadécimal
Fonction
<ESC> “&” <0> n1 n2 .. 1B 26 00 n1 n2 ..
Définition des caractères à télécharger
<ESC> “%” “1”
<ESC> “%” <1>
1B 25 31
1B 25 01
Validation du jeu de caractères téléchargés
<ESC> “%” “0”
<ESC> “%” <0>
1B 25 30
1B 25 00
Invalidation du jeu de caractères téléchargés
(Défaut)
8-1-5. Commande de pilotage des périphériques
Code de contrôle
Code hexadécimal
Fonction
<ESC> <BEL> n1 n2
1B 07 n1 n2
Définition de l’impulsion d’entraînement du périphérique n°1
<BEL>
07
Commande de pilotage du périphérique n°1
<FS>
1C
Commande de pilotage immédiat du périphérique
n°1
<EM>
19
Commande de pilotage immédiat du périphérique
n°2
<SUB>
1A
Commande de pilotage immédiat du périphérique
n°2
– 68 –
FRANÇAIS
Code de contrôle
<ESC> “K” n <0>
m1 m2 ...
8-1-6. Commandes de pilotage de l’unité de découpage automatique
(Modèle SP2500 seulement)
Code de contrôle
Code hexadécimal
Fonction
FRANÇAIS
<ESC> “d” “0”
<ESC> “d” <0>
1B 64 30
1B 64 00
Commande de découpage complet adressée à l’unité
de découpage automatique
<ESC> “d” “1”
<ESC> “d” <1>
1B 64 31
1B 64 01
Commande de découpage partiel adressée à l’unité
de découpage automatique
<ESC> “d” “2”
<ESC> “d” <2>
1B 64 32
1B 64 02
Commande de coupe complè te au couteau
automatique après une avance de papier.
<ESC> “d” “3”
<ESC> “d” <3>
1B 64 33
1B 64 03
Commande de d’ecoupe partielle au mécanisme
automatique après une avance de papier.
8-1-7. Commandes de réglage du format de page
Code de contrôle
Code hexadécimal
Fonction
<ESC> “C” n
1B 43 n
Réglage de la longueur de page en lignes
<ESC> “C” <0> n
1B 43 00 n
Réglage de la longueur de page en pouces
<ESC> “N” n
1B 4E n
Réglage de la marge inférieure
<ESC> “O”
1B 4F
Annulation de la marge inférieure (Défaut)
8-1-8. Autres commandes
Code de contrôle
Code hexadécimal
Fonction
<CAN>
18
Suppression de la mémoire tampon et réinitialisation
de l’imprimante
<DC3>
13
Désélection de l’imprimante
<DC1>
11
Réglage du mode de sélection (Défaut)
<RS>
1E
Activation de la sonnerie
1B 23 N 2C n1 n2
<ESC> “#N, n1 n2 n3 n4”
n3 n4
<LF> <NUL>
0A 00
Réglage de l’interrupteur de mémoire
<ESC> “@”
1B 40
Initialisation de l’imprimante
<EOT>
04
Transmet l’état en temps réel (EOT)
<ENQ>
05
Transmet l’état en temps réel (ENQ)
<ETB>
17
Confirmation de la fin de l’impression
<ESC> <ACK> <S0>
IB 06 01
Transmission du statut automatique
<ESC> <RS> “a” n
IB IE 61 n
Validation/Invalidation du statut automatique
<ESC> “?” <LF> <NUL> 1B 3F 0A 00
Initialisation de l’imprimante et test d’impression
– 69 –
8-2. Commandes du mode ESC/POS
Code de contrôle
<HT>
Code hexadécimal
09
Fonction
Tabulation horizontale
TMU200
⁄
TMU300
⁄
<LF>
0A
Avance de ligne
⁄
⁄
<CR>
0D
Imprime et revient à la ligne
⁄
⁄
<DLE> <EOT>
10 04
Validation de l’envoi d’état en
temps réel
⁄
<DLE> <ENQ>
10 05
Envoi de demande en temps réel
à l’imprimante
⁄
<ESC> SP
1B 20
Réglage de l’espace à droite du caractère
⁄
⁄
<ESC> !
1B 21
Validation de l’impression en mode lots
⁄
⁄
<ESC> #
1B 23
Réglage de l’interrupteur de mémoire
<ESC> %
1B 25
Validation/invalidation du jeu de
caractères téléchargés
⁄
⁄
<ESC> &
1B 26
Définition des caractères téléchargés
⁄
⁄
<ESC> *
1B 2A
Sélection du mode image en mode points
⁄
⁄
<ESC> “–”
1B 2D
Validation/invalidation du sou lignement
⁄
⁄
<ESC> 2
1B 32
Sélection d’un espacement de
ligne de 1/6 pouce
⁄
⁄
<ESC> 3
1B 33
Validation de l’interligne de
n/144èmes de pouce environ
⁄
⁄
<ESC> =
1B 3D
Sélection du périphérique
⁄
<ESC> ?
1B 3F
Annulation de caractère télé chargé
⁄
⁄
<ESC> @
1B 40
Initialisation de l’imprimante
⁄
⁄
<ESC> D
1B 44
Réglage de la position de
tabulation horizontale
⁄
⁄
<ESC> E
1B 45
Valide/invalide le mode accentué
⁄
⁄
<ESC> G
1B 47
Valide/invalide le mode double frappe
⁄
⁄
<ESC> J
1B 4A
Imprime et fait avancer le papier
de n/144èmes de pouce environ
⁄
⁄
<ESC> K
1B 4B
Imprime et fait reculer le papier de
n/144èmes de pouce environ
⁄
⁄
– 70 –
FRANÇAIS
Le tableau ci-dessous donne la liste des commandes d’émulation de la TM-U200
ou TM-U300 qui sont supportées par l’imprimante.
Code de contrôle
Code hexadécimal
Fonction
TMU200
TMU300
FRANÇAIS
<ESC> R
1B 52
Sélection du jeu de caractères
internationaux
⁄
⁄
<ESC> U
1B 55
Sélectionne/annule le mode
d’impression unidirectionnelle
⁄
⁄
<ESC> V
1B 56
Désignation/annulation de la
rotation de 90˚ des caractères
<ESC> a
1B 61
Alignement de la position
⁄
<ESC> c3
1B 63 33
Commande au capteur de papier
d’envoyer le signal “papier épuisé”
⁄
⁄
<ESC> c4
1B 63 34
Commande au capteur de papier
d’interrompre l’impression
⁄
⁄
<ESC> c5
1B 63 35
Validation/invalidation des interrupteurs
du tableau de commande
⁄
⁄
<ESC> d
1B 64
Impression ou avance de “n” lignes
⁄
⁄
<ESC> e
1B 65
Impression ou avance inverse de
“n” lignes
⁄
⁄
<ESC> i
1B 69
Envoie une commande de découpe
complète au coupe-papier automatique
⁄
<ESC> m
1B 6D
Envoie une commande de découpe
partielle au coupe-papier automatique
⁄
<ESC> p
1B 70
Génération de l’impulsion spécifiée
<ESC> r
1B 72
Sélectionne la couleur d’impression
1B 74
Réglage du tableau des codes
de caractères
<ESC> t
⁄
⁄
⁄
⁄
⁄
<ESC> u
1B 75
Envoi de l’état du périphérique
⁄
<ESC> v
1B 76
Demande de l’état du capteur de papier
⁄
<ESC> {
1B 7B
Validation/invalidation de
l’impression inversée
⁄
<GS> I
1D 49
Envoi de l’ID imprimante
⁄
<GS> V
1D 56
Envoie la commande de découpe
au coupe-papier automatique
⁄
<GS> a
1D 61
Validation/Invalidation du statut
automatique
⁄
<GS> r
1D 72
Envoi de l’état d’imprimante
⁄
1D 7A 30
Réglage du temps d’attente de
récupération en ligne
⁄
<GS> z0
– 71 –
⁄
Commandes ignorées
Code hexadécimal
Fonction
TMU200
⁄
TMU300
<ESC> <
1B 3c
Ignorée (Retour au début)
<ESC> c 0 n
1B 63 30 n
Ignorée (Sélection du type de
papier pour l’impression)
⁄
<ESC> f t1 t2
1B 66 t1 t2
Ignorée (Réglage du temps
d’attente avant coupure du papier)
⁄
<GS> E n
1D 45 n
Ignorée (Sélection de la méthode
de contrôle de la tête)
⁄
– 72 –
FRANÇAIS
Code de contrôle
9. Capteur de fin de papier en option
FRANÇAIS
Le capteur détecte lorsque le rouleau chargé arrive presque à la fin du papier. Ce
capteur est normalement désactivé à la sortie d’usine mais on peut l’activer à
l’aide de l’interrupteur de mémoire (ou s’adresses à son revendeur). Les informations contenues dans le présent chapitre concernent uniquement les imprimantes
dont le capteur de détection de fin de papier est activé.
Attention!
L’installation du capteur de fin de papier doit normalement être effectuée par
le revendeur.
9-1. Réglage du capteur de fin de papier
Procéder de la manière suivante pour régler le capteur de fin de papier de sorte
qu’il soit compatible avec les dimensions du rouleau de papier utilisé.
Attention!
Quel que soit le diamètre global du rouleau de papier, le rouleau intérieur (en
carton) se trouvant au centre doit avoir un diamètre intérieur de 12 mm et un
diamètre extérieur de 18 mm pour permettre une détection adéquate.
1 Vérifier si l’imprimante est hors tension et débranchée de la prise secteur.
2 Retirer le couvercle de l’imprimante
3 Retirer le rouleau de papier.
Fig. 9-1
– 73 –
Distance A
Environ 9 mm
Environ 7 mm
Environ 5 mm
Niveau 3 …
Niveau 2 ……
Niveau 1 ………
Réglage
Niveau 3
Niveau 2
Niveau 1 *1
Indicateur
ooo
oo
o
*1 Ne pas utiliser avec des papiers à 2 ou 3 exemplaires.
Fig. 9-2
A
ø18 mm
ø12 mm
Mandrin du rouleau de
papier
Fig. 9-3
A
Remarque:
1. Etant donné que la distance A
correspondant à la position de
réglage sur le tableau est une
valeur calculée, certaines variations dues au mécanisme peuvent se produire.
2. Lorsqu’il y a une marque finale
à la fin du rouleau de papier,
cette marque est adhésive et peut
soulever tout le rouleau de papier. Dans ce cas, la quantité
restante du rouleau de papier
(Distance A) indiquée dans le
tableau ci-dessus n’est pas d’application.
3. La qualité de certains papiers
peut provoquer des bourrages et
causer une détection d’erreur.
5 Insérer la pointe d’un stylo à bille ou
d’un objet pointu similaire dans l’orifice du curseur de réglage. Appuyer
sur le curseur et le faire glisser vers
le haut ou vers le bas jusqu’au réglage correspondant au rouleau de
papier utilisé.
6 Vérifier si le taquet indiqué par la
flèche sur l’illustration se trouve
inséré dans une des rainures.
– 74 –
FRANÇAIS
4 Définir le diamètre du rouleau de
papier utilisé et situer le réglage
correspondant dans le tableau cidessous.
1. Kurzbeschreibung ............................................................................................ 77
2. Auspacken und Aufstellen ...............................................................................78
2-1. Überprüfen ...........................................................................................78
2-2. Wahl eines Aufstellungsorts für den Drucker ...................................... 79
2-3. Hinweise zum Umgang ........................................................................79
2-4. Wartung ............................................................................................... 79
3. Beschreibung und Bezeichnung der Geräteteile .............................................. 80
4. Als Sonderzubehör erhältlicher Netzadapter ................................................... 82
5. Anschließen ..................................................................................................... 84
5-1. Anbringen des Ferritkerns.................................................................... 84
5-2. Anschließàn an den Hostcomputer (serielle Schnittstelle) .................. 85
5-3. Anschließàn an den Hostcomputer (parallele Schnittstelle) ................ 86
5-4. Anschluß an ein Peripheriegerät .......................................................... 86
6. Einlegen von Farbbandkassette und Papier ..................................................... 88
6-1. Typ SP2300 ..........................................................................................88
6-2. Typ SP2500 ..........................................................................................91
6-3. Entfernen des Rollenpapiers ................................................................ 96
7. Bedienfeld ........................................................................................................ 97
7-1. Grundlegender Betrieb .........................................................................97
7-2. Fehler ................................................................................................... 98
7-3. Tastenbedienung (kombinierte Tastenbedienung) ...............................99
8. Steuercodes ....................................................................................................103
8-1. Befehle des Star-Modus ..................................................................... 103
8-2. Befehle des ESC/POS-Modus ...........................................................108
9. Als Sonderzubehör erhältlicher Papierende-Sensor ...................................... 111
9-1. Den Papierende-Sensor einstellen......................................................111
ANHANG ..........................................................................................................151
Der Anhand dieser Bedienungsanleitung ist nur in englischer Sprache.
– 76 –
DEUTSCH
INHALTSVERZEICHNIS
1. Kurzbeschreibung
Der serielle Nadeldrucker der Serie SP2000 ist zur Verwendung mit elektronischen Instrumenten wie POS, Bankgeräte, Computerzubehör, etc. gedacht.
Die wichtigsten Merkmale der Serie SP2000 sind:
1. Bidirektioneller Druck mit ca. 3,1 Zeilen/s
2. Serielle oder parallele Schnittstelle
3. Pufferspeicher erlaubt, Druckdaten auch während des Druckvorgangs zu
empfangen.
4. Peripherie-Steuerschaltung zur Steuerung von externen Geräten wie Registrierkassen:
DEUTSCH
SP2
3
2
0
M
D
42
–
24
Anzahl der Druckspalten
42 : 42 Spalten (16 cpi)
Schnittstelle
D : Serielle Schnittstelle (RS-232C)
C : Parallele Schnittstelle
Papiervorschub
M : Walzenvorschub
Mechanismus
2 : Einfarbig, 42 Spalten (16 cpi)
6 : Zweifarbig, 42 Spalten (16 cpi)
Druckertyp
3 : Standardtyp
5 : Mit automatischem Schneidwerk
Drucker Serie SP2000
– 77 –
2. Auspacken und Aufstellen
2-1. Überprüfen
Sie den Kartoninhalt, und vergewissern Sie sich, daß alle unten abgebildeten
Teile vorhanden sind.
Typ SP2300
Farbbandkassette
DEUTSCH
Drucker
Bedienungsanleitung
Ferritkern
Befestigungsband
Typ SP2500
Farbbandkassette
Drucker
Bedienungsanleitung
Ferritkern
Befestigungsband
Abb. 2-1 Auspacken
Falls Teile fehlen, wenden Sie sich zwecks Nachlieferung bitte an den Fachhandel, bei dem das Gerät gekauft wurde. Im Hinblick auf einen eventuellen
zukünftigen Transport des Druckers empfiehlt es sich, den Lieferkarton und das
gesamte Verpackungsmaterial aufzubewahren.
– 78 –
2-2. Wahl eines Aufstellungsorts für den Drucker
DEUTSCH
Bevor Sie den Drucker auspacken, sollten Sie einige Minuten damit verbringen,
einen geeigneten Aufstellungsort auszusuchen. Denken Sie dabei an die folgenden
Punkte:
1. Den Drucker vor Hitzequellen wie direktem Sonnenlicht oder Heizkörpern
schützen und von Feuchtigkeit und Staub fernhalten.
2. Den Drucker auf einem flachen, aber festen Untergrund aufstellen, wo keine
Vibrationen vorhanden sind.
3. Sicherstellen, daß der Drucker an eine einwandfreie Stromzufuhr angeschlossen ist.
Er sollte nicht an Steckdosen angeschlossen werden, an denen bereits Geräte mit
möglichen Netzstörungen wie Kopierer, Kühlschränke u.a. angeschlossen sind.
4. Die Versorgungsspannung muß dem Spannungswert auf dem Typenschild an der
Unterseite des Druckers entsprechen.
5. Die verwendete Steckdose soll in der Nähe und frei zugänglich sein.
2-3. Hinweise zum Umgang
1. Achten Sie darauf, keine Papierclips oder anderen Fremdkörper in den Drucker
fallen zu lassen. Diese können Betriebsstörungen oder Schäden am Gerät hervorrufen.
2. Versuchen Sie nicht zu drucken, wenn kein Papier oder keine Farbbandkassette
eingelegt ist, da sonst der Druckkopf beschädigt werden kann.
3. Öffnen Sie nicht die Frontabdeckung während des Druckens.
4. Berühren Sie nicht den Druckkopf sofort nach dem Druckvorgang, da dieser sehr
heiß wird.
5. Verwenden Sie nur Rollenpapier, das nicht am Rollenkern festgeklebt ist.
6. Wenn die Papierende-Markierung erscheint, tauschen Sie die Papierrolle aus,
bevor sie ganz verbraucht ist.
2-4. Wartung
Ihr Drucker ist ein robust gebautes Gerät, sollte aber trotzdem mit einem gewissen
Maß an Vorsicht behandelt werden, um Fehlfunktionen zu vermeiden. Zum Beispiel:
1. Stellen Sie den Drucker in einer “komfortablen” Betriebsumgebung auf. Als
Faustregel gilt: Wo Sie sich wohlfühlen, fühlt sich der Drucker ebenfalls wohl.
2. Setzen Sie den Drucker keinen Erschütterungen oder starken Vibrationen aus.
3. Vermeiden Sie sehr staubige Umgebungen. Staub ist der Erzfeind aller Präzisionsgeräte.
4. Zum Reinigen des Gehäuses verwenden Sie einen nur leicht mit Wasser, sehr
milder wässriger Seifenlösung oder ein wenig Alkohol angefeuchteten Lappen.
Lassen Sie auf keinen Fall Flüssigkeiten in das Innere des Druckers geraten.
5. Das Innere des Druckers kann mit einem kleinen Reiniger oder einem Luftspray
(in Fachgeschäften erhältlich) gereinigt werden. Bei dieser Arbeit darauf achten,
keine Kabelverbindungen oder elektronische Bauteile zu verbiegen oder zu
beschädigen.
– 79 –
3. Beschreibung und Bezeichnung der Geräteteile
Typ SP2300
DEUTSCH
Abdeckung
Schüzt den Drucker vor Staub, und reduziert das
Betriebsgeräsch. Nicht die Frontabdeckung
würend des Druckens öfnen.
Bedienfeld
Hat zwei Bedienungstasten und zwei
Anzeigen zur Anzeige des
Druckerzustands.
Netzschalter
Zum Ein-und
Ausschalten des
Druckers.
Netzadapter
Anweisungen für die
Installation finden sich
im nachstehenden
Abschnitt.
PeripheriegerätSteueranschluß
Zum Anschluß an
Peripheriegeräte wie
Registrierkassen etc.
Nicht zum Anschluß an
ein Telefon!
Schnittstellenbuchse
Zum Anschluß des Druckers
an den Hostcomputer.
DIP-Schalter
Für verschiedene
Geräteeinstellungen.
Abb. 3-1 Außenansicht des Druckers (Typ SP2300)
– 80 –
Typ SP2500
Abdeckung
Schützt den Drucker vor Staub, und reduziert das
Betriebsgeräusch. Nicht die Frontabdeckung
während des Druckens öffnen.
DEUTSCH
Bedienfeld
Hat zwei Bedienungstasten und zwei
Anzeigen zur Anzeige des Druckerzustands.
Netzschalter
Zum Ein-und
Ausschalten des
Druckers.
Netzadapter
Anweisungen für die
Installation finden sich
im nachstehenden
Abschnitt.
PeripheriegerätSteueranschluß
Zum Anschluß an
Peripheriegeräte wie
Registrierkassen etc.
Nicht zum Anschluß an
ein Telefon!
Schnittstellenbuchse
Zum Anschluß des Druckers
an den Hostcomputer.
DIP-Schalter
Für verschiedene
Geräteeinstellungen.
Abb. 3-2 Außenansicht des Druckers (Typ SP2500)
– 81 –
4. Als Sonderzubehör erhältlicher Netzadapter
Netzkabel
Netzadapter
Adapterhalter
Schrauben
Kabelhalter
Befestigungsband
Den als Sonderzubehör erhältlichen Netzadapter auf folgende Weise installieren.
Adapter holder
Netzadapter
Netzadapterkabel
[Vor Installation des Netzadapters]
Befestigungsband
Kabelhalter
[Nach Installation des Netzadapters]
Abb. 4-2 Ansicht der flachen Seite
1 Den Drucker umlegen.
2 Das Kabel des Netzadapters, wie in der nachstehenden Abbildung dargestellt,
in die Buchse einstecken. Darauf achten, daß die flache Seite des Steckers in
Richtung auf die Innenseite des Druckers zeigt.
3 Das Kabel mit einem der mit dem Drucker gelieferten Kunststoffhalter an dem
in der Abbildung angezeigten Punkt befestigen.
– 82 –
DEUTSCH
Abb. 4-1
DEUTSCH
Abb. 4-3 Kabel hier befestigen
4 Das Kabel des Netzadapters in den dafür vorgesehenen Raum gewickelt
einlegen und den Netzadapter in den dafür vorgesehenen Raum einlegen.
5 Den Netzadapter mit dem Adapterhalter und der Schraube und das Kabel mit
dem Kabelhalter und der Schraube sichern.
6 Den Drucker wieder in Normalstellung aufrichten.
7 Die Buchsensteckverbindung des Netzkabels in den Netzadapter und die
andere Seite in die Wandsteckdose einstecken.
– 83 –
5. Anschließen
Wichtig!
• Die folgende Anleitung bezieht sich auf das von IBM-kompatiblen PCs
benutzte Kabel und ist deshalb nicht auf alle Computer und Kabel zutreffend.
Wenden Sie sich bitte an Ihren Fachhändler, falls Sie Fragen hinsichtlich des
für Ihren Computer geeigneten Kabeltyps haben.
• Vor dem Anschließen der Kabel sicherstellen, daß der Drucker ausgeschaltet
und vom Netz getrennt ist.
5-1. Anbringen des Ferritkerns
1 Befestigen Sie den großen Ferritkern am Kabel, wie das in der folgenden Abbildung gezeigt wird.
Ferritkern (28 mm Durchmesser)
Kable
Abb. 5-1
– 84 –
DEUTSCH
Die Datenübertragung vom Computer zum Drucker erfolgt über ein Kabel, das
an die Schnittstelle des Druckers (serieller Anschluß, Typ D-sub, 25 polig bzw.
paralleler Anschluß, Typ Centronics-kompatibel, 36 polig) angeschlossen wird.
Das Kabel ist im Lieferumfang dieses Druckers nicht enthalten und muß getrennt
gekauft werden.
2 Führen Sie den Kabelbinder durch
den Ferritkern.
Maximum
5 cm
Kabelbinder
Abb. 5-2
DEUTSCH
Ziehen und
abschneiden
3 Führen Sie den Kabelbinder um das
Kabel und sperren Sie ihn.
Schneiden Sie überschüssiges Band
mit einer Schere ab.
Abb. 5-3
5-2. Anschließàn an den Hostcomputer (serielle Schnittstelle)
Ferritkern
Schrauben
Schraubenzieher
Abb. 5-4 Anschließen des
Schnittstellenkabels
1 Schalten Sie sowohl den Hostcomputer als auch den Drucker aus.
2 Stecken Sie den Stecker des
Schnittstellenkabels in die entsprechenden Buchsen am Drucker und
am Hostcomputer ein.
3 Ziehen Sie die linken und rechten
Schrauben an den Steckern fest, um
den festen Sitz des Steckers zu sichern.
– 85 –
Ferritkern
Abb.5-5 Anschließen des parallelen Schnittstellenkabels
1 Schalten Sie sowohl den Hostcomputer als auch den Drucker aus.
2 Stecken Sie einen Stecker des
Schnittstellenkabels in die parallele
Schnittstellenbuchse am Drucker,
und klemmen Sie ihn mit den Haltebügeln fest.
3 Stecken Sie den anderen Stecker
des Schnittstellenkabels in die parallele Schnittstellenbuchse am
Hostcomputer, und klemmen Sie ihn
mit den Haltebügeln fest.
5-4. Anschluß an ein Peripheriegerät
Es kann ein Peripheriegerät an den Drucker mit einem Modularstecker angeschlossen werden. Im folgenden wird beschrieben, wie der Ferritkern angebracht
und die Verbindung hergestellt wird. Siehe “Modularstecker” auf Seite 165 für
den Typ von Modularstecker, der dazu erforderlich ist. Beachten Sie, daß der
Drucker nicht mit einem Modularstecker oder Kabel ausgestattet ist. Diese Teile
müssen vom Anwender besorgt werden.
Wichtig!
Vor dem Anschließen der Kabel sicherstellen, daß der Drucker ausgeschaltet
und vom Netz getrennt ist.
Ferritkern (20 mm Durchmesser)
1 Befestigen Sie den kleineren Ferritkern am seriellen Kabel, wie das in
der folgenden Abbildung gezeigt
wird.
Modularstecker Kabel
Abb. 5-6
– 86 –
DEUTSCH
5-3. Anschließàn an den Hostcomputer (parallele
Schnittstelle)
2 Den Kabelbinder durch den Ferritkern führen.
Maximum
5 cm
Kabelbinder
Abb. 5-7
DEUTSCH
Ziehen und
abschneiden
Abb. 5-8
3 Das Befestigungsband um das Kabel wickeln und sperren. Schneiden
Sie überschüssiges Band mit einer
Schere ab.
4 Einen Stecker des Modularkabels
in die Modularbuchse am
Peripheriegerät stecken.
5 Die Modularbuchsenabdeckung von
der Rückseite des Druckers abnehmen, und den anderen Stecker des
Modularkabels in die Modularbuchse am Drucker stecken.
– 87 –
6. Einlegen von Farbbandkassette und Papier
6-1. Typ SP2300
Frontabdeckung
Netzschalter
aus
Abb. 6-1 Abdeckung abnehmen
Abstandhalter für
Farbband
Druckkopf
1 Den Netzschalter am Drucker in
Aus-Stellung stellen.
2 Zum Abnehmen der Frontabdeckung diese ca. 3 cm anheben,
und nach vorne ziehen.
3 Die Farbbandkassette in der Richtung einsetzen wie in der Abbildung
6-2 gezeigt und eindrücken, bis sie
hörbar einrastet. Wenn die
Farbbandkassette nicht richtig sitzt,
eingedrückt halten und gleichzeitig
den Farbbandknopf in Pfeilrichtung
drehen.
4 Um Schlaufen im Farbband aufzuwickeln, den Farbbandzuführknopf
der Farbbandkassette in Pfeilrichtung drehen.
5 Zum Anbringen der Frontabdeckung
die Ausbauschritte wie in 2 oben
beschrieben in umgekehrter Reihenfolge ausführen.
Farbband
Farbbandzuführknopf
Kerbteil
Farbbandkassette
Abb. 6-2 Einlegen der Farbbandkassette
– 88 –
DEUTSCH
6-1-1. Einlegen der Farbbandkassette
Hinweis: Beim Entfernen der Farbbandkassette den Teil A anheben und
dann die Kassette an Teil B halten und Abziehen wie in Abbildung 6-3 gezeigt.
A
DEUTSCH
B
Abb. 6-3 Farbbandkassette ausbauen
6-1-2. Einlegen von Papier
Abdeckung
1 Die Abdeckung um etwa 3 cm anheben. Die Abdeckung in diesem Winkel halten, und dann zum Entfernen
nach vorne ziehen.
2 Schneiden Sie die Vorderkante des
Rollenpapiers in einer geraden Linie
ab.
3 Bestätigen Sie, daß der Drucker eingeschaltet ist.
Abb. 6-4 Entfernen der Abdeckung
– 89 –
Abb. 6-5 Einlegen von Papier
Uscita della carta
Alimentatore della
carta
5 Die Kante des Papiers in den Papiereinzug setzen. Wenn richtig eingesetzt, läuft die Kante des Papiers
durch den Papieraus lauf.
6 Führen Sie die Oberkante des Papiers in den Abreißkantenschlitz ein,
und bringen dann die Abdeckung
an, indem Sie die Ausbauschritte
von Schritt 1 oben in umgekehrter
Reihenfolge ausführen.
Hinweis: Wenn die Papierendmarkierung auf dem Papier erscheint, das Rollenpapier
austauschen, bevor es zu
Ende geht.
Abreißschlitz
Rollenpapier
Abb. 6-6 Papier einlegen
Abb. 6-7
– 90 –
DEUTSCH
4 Unter Beachtung der Richtung des
Rollenpapiers das Rollenpapier in
die Vertiefung setzen, wie in Abbildung 6-5 gezeigt.
Rollenpapier
6-2. Typ SP2500
6-2-1. Einlegen der Farbbandkassette
1 Stellen Sie den Netzschalter am
Drucker in Aus-Stellung.
2 Zum Abnehmen der Frontabdeckung heben Sie diese ca. 3 cm
an, und ziehen sie dann nach vorne.
Frontabdeckung
Netzschalter aus
DEUTSCH
Abb. 6-8 Abdeckung abnehmen
3 Heben Sie das Schneidwerk an und
stellen es in senkrechte Stellung,
wie in Abbildung 6-9 gezeigt.
Schneidwerk
Abb. 6-9 Anheben des Schneidwerks
– 91 –
4 Die Farbbandkassette in der Richtung einsetzen wie in der Abbildung
Druckkopf
6-10 gezeigt und eindrücken, bis sie
Farbband
hörbar einrastet. Wenn die
Farbbandkassette nicht richtig sitzt,
Schneidwerk
eingedrückt halten und gleichzeitig
Farbbandden Farbbandknopf in Pfeilrichtung
knopf
drehen.
Kerbteil
5 Um Schlaufen im Farbband aufzuwickeln, den Farbbandzuführknopf
der Farbbandkassette in Pfeilrichtung drehen.
6 Das Schneidwerk schließen.
7 Zum Anbringen der Frontabdeckung
Farbbanddie Ausbauschritte wie in 2 bekassette
schrieben in umgekehrter Reihenfolge ausführen.
Abb. 6-10 Einlegen einer Farbband8
Beim Entfernen der Farbbandkassette
kassette den Teil A anheben und
dann die Kassette an Teil B halten
und Abziehen wie in Abbildung 611 gezeigt.
A
B
Abb. 6-11 Farbbandkassette ausbauen
– 92 –
DEUTSCH
Abstandhalter für
Farbband
6-2-2. Einlegen von Papier
Abdeckung
1 Die Abdeckung um etwa 3 cm anheben. Die Abdeckung in diesem Winkel halten, und dann zum Entfernen
nach vorne ziehen.
DEUTSCH
Abb. 6-12 Entfernen der Abdeckung
Rollenpapier
2 Schneiden Sie die Vorderkante des
Rollenpapiers in einer geraden Linie ab.
3 Bestätigen Sie, daß der Drucker eingeschaltet ist.
4 Unter Beachtung der Richtung des
Rollenpapiers das Rollenpapier in
die Vertiefung setzen, wie in Abbildung 6-13 gezeigt.
Abb. 6-13 Einlegen von Papier
– 93 –
Uscita della carta
Alimentatore della
carta
Rollenpapier
5 Die Papierkante in den Papiereinzug setzen. Wenn richtig eingesetzt,
läuft die Papierkante durch den
Schlitz des automatischen Papierabschneiders. Das Papier wird einmal abgeschnitten.
6 Die abgeschnittene Spitze entfernen, und den Deckel in umgekehrter Reihenfolge wie in Schritt 1
beschrieben wieder anbringen.
Hinweis: Wenn die PapierendeMarkierung auf dem Papier erscheint, das Rollenpapier ersetzen, bevor es
verbraucht ist.
Abb. 6-14 Einlegen des Papiers
[Bei Verwendung von mehrlagigem Papier]
Papiereinführschlitz
Oberes
Papier
Schneidwerk
Oberes Papier
Druckkopf
Druckwalze
Unteres Papier
Unteres
Papier
Druckkopf
Druckwalze
Abb. 6-15 Einführen des Papiers in das Schneidwerk
(bei Verwendung von Durchschlagpapier)
5 Die automatische Papierabschneideinheit heben und in senkrechte Stellung stellen.
6 Die Papierkante in den Papiereinzug setzen. Wenn richtig eingesetzt,
läuft die Papierkante durch den
Papierauslauf.
– 94 –
DEUTSCH
[Bei Verwendung von einlagigem Papier]
Papierauslaß
DEUTSCH
Schneidwerk
Abb. 6-16 Papierauslaß an der Frontabdeckung
7 Nur das Original (obere Papier) in
den Schlitz des automatischen Abschneiders setzen. Das Papier auf
dem kopiert werden soll (das untere
Papier) zwischen Druckwalze und
automatischen Abschneider setzen.
8 Ziehen Sie die Kante des Papierstau, um Schlaufen zu beseitigen,
und senken Sie dann das Schneidwerk ab.
9 Führen Sie das Papier durch den
Papierauslaß, und setzen Sie dann
die Abdeckung wieder auf, indem
Sie die Ausbauschritte in umgekehrter Reihenfolge ausführen.
Hinweis:
• Wenn die Papierend-markierung auf dem Papier erscheint,
das Rollenpapier austauschen,
bevor es zu Ende geht.
• Bei Verwendung des optionalen Papieraufwicklers siehe separate Bedienungsanleitung
PW2000-24.
Abb. 6-17 Anbringen der Abdeckung
– 95 –
6-3. Entfernen des Rollenpapiers
Nehmen Sie die Abdeckung ab, und schneiden Sie das Papier in der Nähe der
Papierführung ab. Dann drücken Sie die FEED-Taste, um den Rest des Papiers
auszugeben, der noch in der Einheit ist.
Wenn das Papier verbraucht ist, blinkt das Lämpchen POWER.
DEUTSCH
Hinweis 1. Durch Drücken der FEED-Taste wird der Rest des noch im
Drucker befindlichen Papiers ausgegeben.
2. Wenn die Papier-Verbraucht-Markierung auf dem Papier erscheint, tauschen Sie die Rolle aus, bevor das Papier ganz zu
Ende ist.
– 96 –
7. Bedienfeld
7-1. Grundlegender Betrieb
4
ON LINE
FEED
POWER
1
2
3
DEUTSCH
Abb. 7-1 Bedienfeld
1 Taste ON LINE
Schaltet den Drucker zwischen Online und Off-line Betrieb um. Umschalten ist nur möglich, wenn Papier im Drucker eingelegt ist.
2 FEED-Taste
• Wenn diese Taste gedrückt und dann
innerhalb von 0,5 s losgelassen wird,
wird das Papier um eine Zeile vorgeschoben.
• Wenn diese Taste länger als 0,5 s
gedrückt gehalten wird, wird das
Papier kontinuierlich vorgeschoben.
(Der obige Vorschubvorgang ist sowohl im On-line als auch im Offline Betrieb möglich.)
3 Netzlämpchen POWER (grüne LED)
LED leuchtet : Stromversorgung für Drucker ist eingeschaltet.
LED erloschen : Stromversorgung für Drucker ist ausgeschaltet.
4 Lämpchen ON LINE (grüne LED)
LED leuchtet : Drucker im On-line-Betrieb
LED erloschen : Drucker im Off-line-Betrieb
– 97 –
7-2. Fehler
Die Art des Fehlers anhand der blinkenden Lampe oder des Signaltons bestimmen.
Kein Papier
Betriebslämpchen On-line-Lämpchen
Signaltongeber
Bedingungen zur
Wiederherstellung
4 kurze Pieptöne
(0,13 Sekunden)
zweimal
wiederholt
*1
Blinkt in 1SekundenIntervallen
Aus
Papierende der Rolle
fast erreicht (wenn
Fast-Ende-Stopp
aktiviert ist)
Blinkt in 2SekundenIntervallen
Aus
Ein (nachdem
On-line-Schalter
gedrückt)
Kein
Mechanischer Fehler
(anderer als
Schneidwerkfehler)
Blinkt in 0,25SekundenIntervallen
Aus
Ein kurzer (0,13
s) und ein langer
(0,5 s) Piepton
*3
Schneidwerkfehler
(nur bei Modellen
mit Schneidwerk)
Blinkt in 0,125SekundenIntervallen
Aus
Zwei kurze (0,13
s) und ein langer
(0,5 s) Piepton
*3
DruckauftragÜberlast-Fehler
Blinkt in 0,5SekundenIntervallen
Ein
RAM S/L Fehler
Aus
Ein
Kein
*5
CPU-Fehler
Aus
Blinkt in 0,25SekundenIntervallen
Ertönt 2
Sekunden lang
*5
*2
Kein
*4
*1 Nach dem Papierwechsel den On-line-Schalter drücken.
*2 Den On-line-Schalter drücken, um den Druck fortzusetzen; oder das Papier
wechseln und den On-line-Schalter drücken.
*3 Nach dem Beheben des Papierstaus oder Beheben einer anderen Störung den
On-line-Schalter drücken.
*4 Der Druck wird automatisch nach Ablauf kurzer Zeit fortgesetzt. (Automatische Wiederherstellung nach Abkühlen des Druckkopfes.)
*5 Dies ist kein behebbarer Fehler. Beim Fachhändler bezüglich Reparatur
nachfragen.
– 98 –
DEUTSCH
Fehlerbeschreibung
7-3. Tastenbedienung (kombinierte Tastenbedienung)
7-3-1. Selbstdruck
FEED + POWER ON (Gerät einschalten, während die Taste FEED gedrückt
gehalten wird.)
Der Selbstdruck wird entsprechend der VER.NO. DIP-Schaltereinstellung
und der Zeichenfolge ausgeführt. Wenn die Taste FEED kontinuierlich
gedrückt gehalten wird oder wenn FEED am Ende des Selbstdrucks gedrückt
wird, werden nur die Zeichen wiederholt ausgedruckt.
DEUTSCH
Abb. 7-2 Selbstdruck-Beispiel (bei Verwendung eines
Druckers mit serieller Schnittstelle)
– 99 –
ON LINE + POWER ON (Gerät einschalten, während die Taste ONLINE
gedrückt gehalten wird.)
Bei diesem Befehle werden alle Codes (Zeichencodes und Steuercodes), die
vom Computer zum Drucker gesandt werden, in sedezimaler Form ausgedruckt.
Der sedezimale Datenausdruck ist nützlich, um zu prüfen, ob vom Drucker
ausgegebene Steuercodes richtig sind. Die letzte Zeile wird nicht ausgedruckt,
wenn sie nicht vollständig mit Daten gefüllt ist. Wenn die Taste ONLINE
gedrückt wird, um den Drucker auf off-line zu stellen, wird die letzte Zeile
aber gedruckt. Um diesen Modus zu beenden, muß der Drucker einmal
ausgeschaltet werden.
Abb. 7-3 Beispiel für sedezimalen Datenausdruck
7-3-3. Einstellen der Punktausrichtung
Das hier beschriebene Verfahren wird nur selten nötig. Es kann aber vorkommen, daß nach längerem Gebrauch des Druckers die Punkte einzelner Grafiken nicht mehr richtig miteinander übereinstimmen. So kann z.B. was
folgendermaßen aussehen soll:
kann folgendermaßen aussehen:
oder wie
– 100 –
DEUTSCH
7-3-2. Sedezimale Datenausgabe
DEUTSCH
Der Grund dafür ist, daß mechanische Teile des Druckers gegeneinander
verschoben werden. Dies geschieht nur selten, und die meisten Anwender
werden während der Lebensdauer des Druckers damit nicht konfrontiert
werden. Falls aber dieses Problem auftritt, kann es auf folgende Weise
behoben werden.
• Schalten Sie den Drucker ein und legen Sie ein Blatt Papier ein.
• Den Drucker ausschalten.
• Die Tasten ON LINE und FEED am Bedienfeld gedrückt halten, und den
Drucker erneut einschalten, um auf Punktausrichtung zu schalten. Die
Betriebsart wird durch das Blinken der POWER-Anzeige angezeigt.
Wenn der Punktjustierung-Modus eingeschaltet wird, werden sieben
Zeichenblöcke ausgedruckt, wie unten gezeigt. Ein Sternchen erscheint
links neben den Blöcken, um anzuzeigen, welcher Block momentan
gewählt ist.
• Die Taste FEED drücken, um den Block zu wählen, der die am besten
ausgerichteten Zeichen hat. Die Taste einmal drücken, um den ersten
Block zu wählen, zweimal für den zweiten Block, und so weiter bis zum
siebten Block.
Wenn die Taste mehr als sieben Mal gedrückt wird, ertönt ein Warnton.
• Nach dem Wählen eines Blocks die Taste ON LINE drücken, um die Wahl
einzugeben, und den Punkteinstellmodus zu verlassen.
– 101 –
Hinweis: Wenn der Drucker ausgeschaltet wird, ohne die Taste ON LINE
zum Verlassen des Punkteinstellmodus zu drücken, werden die
Einstellungen nicht gespeichert. Tritt in diesem Modus ein Fehler
beim Papiereinzug auf, wirft der Drucker das Papier aus und bricht
diesen Modus ab.
– 102 –
DEUTSCH
Die Einstellungen für die Punktausrichtung werden im Druckerspeicher
gespeichert, und ein Muster wird mit der gewählten Einstellung ausgedruckt,
gefolgt von der Meldung “Adjust Complete!”. Der Drucker gibt das Papier
nach dem Druckvorgang aus.
8. Steuercodes
Dieser Drucker unterstützt zwei verschiedene Befehlsmodi: den Star-Modus und
den ESC/POS-Modus,
Der Star-Modus emuliert den Befehlssatz der Star-Drucker. Der Modus ESC/
POS emuliert den Epson TM-U200 oder TM-U300 Quittungsdrucker.
In diesem Kapitel werden alle von diesem Drucker unterstützten Befehle aufgeführt.
DEUTSCH
Wichtig!
Die neueste Version dieser Anleitung und Aktualisierungen der unterstützten
Befehlssätze sind im Internet bei der folgenden URL erhältlich: http://www.starmicronics.co.jp/service/sp_sup_e.htm
8-1. Befehle des Star-Modus
Die folgenden Tabellen zeigen die Star-Modus-Befehle, die von diesem Drucker
unterstützt werden.
8-1-1. Wählen von Zeichen
Steuerbefehle
Sedezimal-Codes
Funktion
<ESC> “R” n
1B 52 n
Internationalen Zeichensatz einstellen
<ESC> “/” “1”
<ESC> “/” <1>
1B 2F 31
1B 2F 01
Wahl einer Null mit Querstrich
<ESC> “/” “0”
<ESC> “/” <0>
1B 2F 30
1B 2F 00
Wahl einer Null ohne Querstrich
<ESC> <GS> “t” n
1B 1D 74 n
Wählt die Zeichencode-Tabelle
<ESC> “M”
1B 4D
7 × 9 (Halbpunkt) Schriftart wählen (Standard)
<ESC> “P”
1B 50
5 × 9 (2 Impulse pro Punkt) Schriftart wählen
<ESC> “:”
1B 3A
5 × 9 (3 Impulse pro Punkt) Schriftart wählen
<ESC> <SP> n
1B 20 n
Zeichenabstand einstellen
<SO>
0E
Druck mit doppelter Zeichenbreite
<DC4>
14
Druck mit doppelter Zeichenbreite ausschalten (Standard)
– 103 –
Sedezimal-Codes
Funktion
1B 57 31
1B 57 01
Wählt Vergrößerung auf doppelte Zeichenbreite
<ESC> “W” “0”
<ESC> “W” <0>
1B 57 30
1B 57 00
Hebt Vergrößerung der Zeichenbreite auf
<ESC> “h” “1”
<ESC> “h” <1>
1B 68 31
1B 68 01
Wählt Vergrößerung auf doppelte Zeichenhöhe
<ESC> “h” “0”
<ESC> “h” <0>
1B 68 30
1B 68 00
Hebt Vergrößerung der Zeichenhöhe auf
<ESC> “–” “1”
<ESC> “–” <1>
1B 2D 31
1B 2D 01
Unterstreichen einschalten
<ESC> “–” “0”
<ESC> “–” <0>
1B 2D 30
1B 2D 00
Unterstreichen ausschalten (Standard)
<ESC> “_” “1”
<ESC> “_” <1>
1B 5F 31
1B 5F 01
Überstreichen einschalten
<ESC> “_” “0”
<ESC> “_” <0>
1B 5F 30
1B 5F 00
Überstreichen ausschalten (Standard)
<ESC> “4”
1B 34
Wählt roten Farbdruck (SP2360/2560)
Hervorgehobener Ausdruck einschalten (SP2320/2520)
<ESC> “5”
1B 35
Hebt roten Farbdruck (SP2360/2560)
Hervorgehobener Ausdruck ausschalten (SP2320/2520)
<ESC> “6”
1B 36
Wählt Zeichensatz #2
<ESC> “7”
1B 37
Wählt Zeichensatz #1
<SI>
0F
Invertierter Druck einschalten
<DC2>
12
Invertierter Druck ausschalten (Standard)
<ESC> <RS> “i” “0”
<ESC> <RS> “i” <0>
1B 1E 96 30
1B 1E 96 00
Hebt Rotationsdruckmodus für Text auf (Standard)
<ESC> <RS> “i” “1”
<ESC> <RS> “i” <1>
1B 1E 96 31
1B 1E 96 01
Gibt Rotationsdruckmodus für Text mit
einer 270-Grad-Drehung ein.
<ESC> <RS> “i” “2”
<ESC> <RS> “i” <2>
1B 1E 96 32
1B 1E 96 02
Gibt Rotationsdruckmodus für Text mit
einer 90-Grad-Drehung ein.
<ESC> “E”
1B 45
Fettdruck einschalten
<ESC> “F”
1B 46
Fettdruck ausschalten (Standard)
<ESC> “U” n
1B 55 n
Wahl der Druckrichtung
– 104 –
DEUTSCH
Steuerbefehle
<ESC> “W” “1”
<ESC> “W” <1>
8-1-2. Ändern der Druckposition
Steuerbefehle
<LF>
Sedezimal-Codes
0A
Funktion
Zeilenvorschub
DEUTSCH
<VT>
0B
Vertikaler Tabulator
<FF>
0C
Seitenvorschub
<CR>
0D
Wagenrücklauf
<ESC> “a” n
1B 61 n
Papiervorschub n Zeilen einstellen
<HT>
09
Nächste horizontale Tabulatorposition
<ESC> “A” n
1B 41 n
Zeilenabstand n/72 Zoll definieren
<ESC> “2”
1B 32
Zeilenabstand von n/72 Zoll ausführen
<ESC> “z” “0”
<ESC> “z” <0>
1B 7A 30
1B 7A 00
Zeilenabstand 1/12 Zoll einstellen
<ESC> “z” “1”
<ESC> “z” <1>
1B 7A 31
1B 7A 01
Zeilenabstand 1/6 Zoll einstellen (Standard)
<ESC> “0”
1B 30
Zeilenabstand 1/8 Zoll einstellen
<ESC> “1”
1B 31
Zeilenabstand 7/72 Zoll einstellen
<ESC> “J” n
1B 4A n
Einmaliger Zeilenvorschub von n/72 Zoll
<ESC> “3” n
1B 33 n
Angenäherten Zeilenabstand n/216 Zoll einstellen
<ESC> “y”
1B 79 n
Zeilenabstand n/144 Zoll einstellen
<ESC> “D” n1 n2 ... <0> 1B 44 n1 n2 ... 00
Horizontale Tabulatorpositionen setzen
<ESC> “l” n
1B 6C n
Linken Rand setzen
<ESC> “Q” n
1B 51 n
Rechten Rand setzen
<ESC> <GS> “a” “0”
<ESC> <GS> “a” <0>
1B 1D 61 30
1B 1D 61 00
Linksbündig (Standard)
<ESC> <GS> “a” “1”
<ESC> <GS> “a” <1>
1B 1D 61 31
1B 1D 61 01
Zentrieren
<ESC> <GS> “a” “2”
<ESC> <GS> “a” <2>
1B 1D 61 32
1B 1D 61 02
Rechtsbündig
<ESC> “B” n1 n2 ... <0> 1B 42 n1 n2 ... 00
Vertikale Tabulatoren definieren
– 105 –
8-1-3. Druck von Rastergrafiken
Steuerbefehle
Sedezimal-Codes
<ESC> “K” n <0>
m1 m2 ...
1B 4B n 00 m1 m2
...
Funktion
<ESC> “L” n1 n2
m1 m2 ...
1B 4C n1 n2 m1 m2
Grafikdruck in hoher Auflösung
...
Grafikdruck in normaler Auflösung
8-1-4. Druck von heruntergeladenen Zeichen
Sedezimal-Codes
Funktion
Heruntergeladenes Zeichen definieren
<ESC> “%” “1”
<ESC> “%” <1>
1B 25 31
1B 25 01
Heruntergeladenen Zeichensatz aktivieren
<ESC> “%” “0”
<ESC> “%” <0>
1B 25 30
1B 25 00
Heruntergeladenen Zeichensatz deaktivieren
(Standard)
8-1-5. Steuern von Peripheriegeräten
Steuerbefehle
Sedezimal-Codes
Funktion
<ESC> <BEL> n1 n2
1B 07 n1 n2
Treiberimpuls für Peripheriegerät definieren #1
<BEL>
07
Steuerbefehl für Peripheriegerät #1
<FS>
1C
Sofortiger Steuerbefehl für Peripheriegerät #1
<EM>
19
Sofortiger Steuerbefehl für Peripheriegerät #2
<SUB>
1A
Sofortiger Steuerbefehl für Peripheriegerät #2
– 106 –
DEUTSCH
Steuerbefehle
<ESC> “&” <0> n1 n2 .. 1B 26 00 n1 n2 ..
8-1-6. Steuerung für Schneidwerk (nur Typ SP2500)
Steuerbefehle
Sedezimal-Codes
Funktion
<ESC> “d” “0”
<ESC> “d” <0>
1B 64 30
1B 64 00
Voll-Abschneiden-Befehl für Schneidwerk
<ESC> “d” “1”
<ESC> “d” <1>
1B 64 31
1B 64 01
Teil-Abschneiden-Befehl für Schneidwerk
<ESC> “d” “2”
<ESC> “d” <2>
1B 64 32
1B 64 02
Befehl an den automatischen Abschneider zum
Schnitt nach Papiervorschub
<ESC> “d” “3”
<ESC> “d” <3>
1B 64 33
1B 64 03
Befehl an den automatischen Abschneider zum
teilweisen schnitt nach Papiervorschub
8-1-7. Befehle zum Festlegen der Seitengröße
DEUTSCH
Steuerbefehle
Sedezimal-Codes
Funktion
<ESC> “C” n
1B 43 n
Seitenlänge in Zeilen definieren
<ESC> “C” <0> n
1B 43 00 n
Seitenlänge in Zoll definieren
<ESC> “N” n
1B 4E n
Unteren Rand definieren
<ESC> “O”
1B 4F
Unteren Rand löschen (Standard)
8-1-8. Weitere Befehle
Steuerbefehle
Sedezimal-Codes
Funktion
<CAN>
18
Druckerspeicher löschen und Drucker initialisieren
<DC3>
13
Drucker Offline schalten
<DC1>
11
Drucker Online schalten (Stardard)
<RS>
1E
Druckersignal
1B 23 N 2C n1 n2
<ESC> “#N, n1 n2 n3 n4”
n3 n4
<LF> <NUL>
0A 00
Speicherschalter einstellen
<ESC> “@”
Drucker initialisieren
1B 40
<EOT>
04
Überträgt EOT-Status
<ENQ>
05
Überträgt ENQ-Status
<ETB>
17
Bestätigt Druckende
<ESC> <ACK> <S0>
IB 06 01
Überträgt Automatikstatus
<ESC> <RS> “a” n
IB IE 61 n
<ESC> “?” <LF> <NUL> 1B 3F 0A 00
Aktiviert/deaktiviert Automatikstatus
Drucker-Hardware zurücksetzen und Testausdruck
ausführen
– 107 –
8-2. Befehle des ESC/POS-Modus
Steuerbefehle
<HT>
Sedezimal-Codes
09
Funktion
Horizontaler Tab
TMU200
⁄
TMU300
⁄
<LF>
0A
Zeilenvorschub
⁄
⁄
<CR>
0D
Drucken und Wagenrücklauf
⁄
⁄
<DLE> <EOT>
10 04
Übertragung in Echtzeit aktivieren
⁄
<DLE> <ENQ>
10 05
Echtzeitanforderung an Drucker
⁄
<ESC> SP
1B 20
Leerstelle rechts neben Zeichen
einstellen
⁄
⁄
<ESC> !
1B 21
Batch-Druckmodus aktivieren
⁄
⁄
<ESC> #
1B 23
Speicherschalter einstellen
<ESC> %
1B 25
Heruntergeladenen Zeichensatz
aktivieren/deaktivieren
⁄
⁄
<ESC> &
1B 26
Heruntergeladenes Zeichen definieren
⁄
⁄
<ESC> *
1B 2A
Bitbildmodus wählen
⁄
⁄
<ESC> “–”
1B 2D
Unterstreichen einschalten/ausschalten
⁄
⁄
<ESC> 2
1B 32
1/6-Zoll-Zeilenabstand wählen
⁄
⁄
<ESC> 3
1B 33
Angenäherten Zeilenabstand
n/144 Zoll einstellen
⁄
⁄
<ESC> =
1B 3D
Peripheriegerät wählen
⁄
<ESC> ?
1B 3F
Heruntergeladenen Zeichen
ausschalten
⁄
⁄
<ESC> @
1B 40
Drucker initialisieren
⁄
⁄
<ESC> D
1B 44
Horizontale Tab-Position einstellen
⁄
⁄
<ESC> E
1B 45
Hervorgehobenen Ausdruck
ein- bzw. ausschalten
⁄
⁄
<ESC> G
1B 47
Druck mit doppelter Zeichenbreite
ein- bzw. ausschalten.
⁄
⁄
<ESC> J
1B 4A
Ausdruck und n/144 Zoll
(ungefährer Wert) Papiervorschub
⁄
⁄
<ESC> K
1B 4B
Ausdruck und n/144 Zoll (ungefährer
Wert) Papierrücktransport
⁄
⁄
– 108 –
DEUTSCH
Die folgende Tabelle führt die TM-U200 und TM-U300 Emulationsbefehle aus,
die von diesem Drucker unterstützt werden.
Steuerbefehle
Sedezimal-Codes
TMU200
Internationalen Zeichensatz wählen ⁄
Funktion
TMU300
⁄
DEUTSCH
<ESC> R
1B 52
<ESC> U
1B 55
Druck in einer Richtung wählen
bzw. annullieren
<ESC> V
1B 56
90˚ Zeichendrehung EIN/AUS
<ESC> a
1B 61
Position ausrichten
⁄
<ESC> c3
1B 63 33
Papierende-Sensor für PapierendeSignal einstellenn
⁄
⁄
<ESC> c4
1B 63 34
Papierende-Sensor für
Druckabbruch einstellen
⁄
⁄
<ESC> c5
1B 63 35
Bedienfeldschalter aktivieren/
deaktivieren
⁄
⁄
<ESC> d
1B 64
n Zeilen drucken oder vorschieben
⁄
⁄
<ESC> e
1B 65
n Zeilen drucken oder zurückschieben
⁄
⁄
<ESC> i
1B 69
Ganzschnitt-Befehl an den
Automatikschneider
⁄
<ESC> m
1B 6D
Teilschnitt-Befehl an den
Automatikschneider
⁄
<ESC> p
1B 70
Spezifizierten Impuls erzeugen
<ESC> r
1B 72
Wählt Druckfarbe
<ESC> t
1B 74
Zeichencodetabelle wählen
<ESC> u
1B 75
Peripheriestatus übertragen
⁄
<ESC> v
1B 76
Papiersensorstatus anfragen
⁄
<ESC> {
1B 7B
Invertierten Drucke aktivieren/
deaktivieren
⁄
<GS> I
1D 49
Drucker-ID übertragen
⁄
<GS> V
1D 56
Schneidbefehl an den
Automatikschneider
⁄
<GS> a
1D 61
Aktiviert/deaktiviert Automatikstatus
⁄
<GS> r
1D 72
Druckerstatus übertragen
⁄
<GS> z0
1D 7A 30
Online-WiederherstellungsWartezeit einstellen
⁄
– 109 –
⁄
⁄
⁄
⁄
⁄
⁄
⁄
⁄
Ignorierte Befehle
Steuerbefehle
Sedezimal-Codes
Funktion
TMU200
TMU300
<ESC> <
1B 3c
Ignoriert (Rückkehr in
Grundstellung)
<ESC> c 0 n
1B 63 30 n
Ignoriert (Wählt Papiertyp(en)
für Druck)
⁄
<ESC> f t1 t2
1B 66 t1 t2
IIgnoriert (Stellt SchnittblattWartezeit ein)
⁄
<GS> E n
1D 45 n
Ignoriert (Wählt Kopf-Steuermethode)
⁄
DEUTSCH
⁄
– 110 –
9. Als Sonderzubehör erhältlicher Papierende-Sensor
Der Papierende-Sensor stellt fest, wenn sich die eingelegte Papierrolle dem Ende
nähert. Der Papierende-Sensor ist normalerweise bei Versand des Druckers ab
Werk ausgeschaltet, er kann aber mit dem Speicherschalter eingeschaltet werden
(ggf. Sich an den Fachhändler wenten). Die Angaben in diesem Kapitel beziehen
sich nur auf Drucker, deren Papierende-Sensor eingeschaltet ist.
Wichtig!
Die Installation des Papierende-Sensors ist normalerweise dem Fachhändler
vorbehalten.
DEUTSCH
9-1. Den Papierende-Sensor einstellen
Der Papierende-Sensor wird auf nachstehende Weise eingestellt, damit er mit
dem Format des von Ihnen verwendeten Papiers übereinstimmt.
Wichtig!
Unabhängig vom Gesamtdurchmesser der Papierrolle muß der Pappkern in
der Mitte der Rolle einen Innendurchmesser von 12 mm und einen Außendurchmesser von 18 mm aufweisen, damit er einwandfrei abgetastet werden
kann.
1 Dafür sorgen, daß der Drucker abgeschaltet und der Stecker aus der
Netzsteckdose herausgezogen ist.
2 Die Abdeckung des Druckers abnehmen.
3 Die Papierrolle herausnehmen.
Abb. 9-1
– 111 –
4 Den Durchmesser der von Ihnen
verwendeten Papierrolle ermitteln
und die erforderliche Einstellung in
der nachstehenden Tabelle ablesen.
Abstand A
Etwa 9 mm
Etwa 7 mm
Etwa 5 mm
Stufe 3 …
Stufe 2 ……
Stufe 1 ………
Einstellung
Stufe 3
Stufe 2
Stufe 1 *1
Anzeige
ooo
oo
o
Abb. 9-2
A
ø18 mm
ø12 mm
Kern der Papierrolle
Abb. 9-3
A
Hinweis:
1. Da der Abstand A, welcher der
Einstellungsposition in der grafischen Darstellung entspricht,
einen rechnerischen Wert darstellt, kann es aufgrund der jeweiligen Mechanik zu Abweichungen kommen.
2. Wenn sich am Ende der Papierrolle eine Endmarkierung befindet, handelt es sich bei dieser
Markierung um eine angeklebte,
durch die die ganze Papierrolle
angehoben werden kann. In diesem Falle kann der Rest der Papierrolle (Abstand A), der in der
grafischen Darstellung dargestellt
ist, nicht verwendet werden.
3. Die Qualität mancher Papiere
kann einen Papierstau verursachen. Dies kann Fehlermeldungen auslösen.
5 Die Spitze eines Kugelschreibers
o.ä. in die Öffnung der Einstellvorrichtung einsetzen und durch
Druck auf die Einstellvorrichtung
diese nach oben oder unten auf die
Einstellung schieben, die der von
Ihnen verwendeten Papierrolle entspricht.
6 Darauf achten, daß die Zunge, die
durch den Pfeil in der Abbildung
angezeigt ist, sich in einer der Aussparungen befindet.
– 112 –
DEUTSCH
*1 Für 2 und 3 Lagen ungeeignet.
1. Descrizione ....................................................................................................115
2. Disimballaggio e installazione ......................................................................116
2-1. Disimballaggio ...................................................................................116
2-2. Collocazione della stampante ............................................................117
2-3. Precauzioni per l’uso.......................................................................... 117
2-4. Manutenzione .....................................................................................117
3. Identificazione delle parti e nomenclatura .................................................... 118
4. Adattatore CA opzionale ...............................................................................120
5. Connessione ................................................................................................... 122
5-1. Installazione dell’anello di ferrite ......................................................122
5-2. Collegamento al computer ospite (interfaccia seriale) .......................123
5-3. Collegamento al computer ospite (interfaccia parallela) ...................124
5-4. Collegamento ad un’unità periferica .................................................. 124
6. Inserimento della cartuccia nastro e della carta ............................................. 126
6-1. Tipo SP2300 ...................................................................................... 126
6-2. Tipo SP2500 ...................................................................................... 129
6-3. Rimozione della carta ........................................................................134
7. Pannello comandi ..........................................................................................135
7-1. Funzionamento basilare ..................................................................... 135
7-2. Errori .................................................................................................. 136
7-3. Operazioni con gli interruttori
(operazioni combinate degli interruttori) ...........................................137
8. Codici di controllo .........................................................................................141
8-1. Comandi del modo Star ..................................................................... 141
8-2. Comandi del modo ESC/POS ............................................................146
9. Sensore opzionale di “quasi fine” ..................................................................149
Regolazione del sensore di “quasi fine” .....................................................149
APPENDICE .....................................................................................................151
L’Appendice appare solo nella sezione in inglese di questo manuale.
– 114 –
ITALIANO
INDICE
1. Descrizione
La stampante seriale a matrice di impunti a impatto SP2000 è stata progettata per
l’uso con strumenti elettronici come POS, apparecchiature bancarie, periferiche
computer, ecc.
Le principali caratteristiche della serie SP2000 sono come segue:
1. Stampa bidirezionale a circa 3,1 righe/sec.
2. Interfaccia seriale o interfaccia parallelo
3. Buffer dati per la ricezione di dati di stampa anche durante la stampa
4. Circuito di pilotaggio unità periferiche per controllare dispositivi esterni
come registri di cassa.
SP2
3
2
0
M
D
42
–
24
ITALIANO
N. di colonne di stampa
42 : 42 colonne (16 CPI)
Interfaccia
D : Interfaccia seriale (RS-232C)
C : Interfaccia parallelo
Alimentazione carta
M : Metodo di alimentazione carta a frizione
Meccanismo
2 : Colore singolo, 42 colonne (16 CPI)
6 : Due colori, 42 colonne (16 CPI)
Tipo di stampante
3 : Tipo normale
5 : Tipo dotato di taglierina automatica
Stampante serie SP2000
– 115 –
2. Disimballaggio e installazione
2-1. Disimballaggio
Dopo aver disimballato l’unità, controllare che tutti gli accessori necessari siano
inclusi nella confezione.
Tipo SP2300
Cartuccia nastro
Stampante
Fascetta di fissaggio
Tipo SP2500
Cartuccia nastro
Stampante
Manuale di istruzioni
Anello di ferrite
Fascetta di fissaggio
Fig. 2-1 Disimballaggio
Se dovesse mancare qualcosa, contattare il concessionario da cui si è acquistata
la stampante e richiedere la parte mancante. Notare che è consigliabile conservare
lo scatolone originale e tutti i materiali di imballaggio in caso si debba reimballare
e spedire la stampante in futuro.
– 116 –
ITALIANO
Manuale di istruzioni
Anello di ferrite
2-2. Collocazione della stampante
Quando si colloca la stampante, tenere presenti le seguenti considerazioni:
1. Proteggere la stampante da calore eccessivo come luce solare diretta o
caloriferi e tenerla lontana da umidità e polvere.
2. Collocare la stampante su una superficie stabile e piana che non sia soggetta
a vibrazioni.
3. Collegare alla stampante una fonte di alimentazione stabile che non sia
soggetta a picchi.
Per esempio non collegarla sullo stesso circuito di apparecchiature grandi che
producono disturbi, come frigoriferi o condizionatori d’aria.
4. Assicurarsi che la tensione della linea corrisponda alla tensione specificata
sulla piastrina di identificazione della stampante.
5. Per scollegare la stampante, scollegare la spina dalla presa di corrente, che si
deve trovare vicino alla stampante e in un luogo facilmente accessibile.
2-3. Precauzioni per l’uso
ITALIANO
1. Fare attenzione a non lasciar cadere graffette, spilli e altri oggetti estranei
nell’unità perché potrebbero causare problemi di funzionamento.
2. Non tentare di stampare quando la carta o la cartuccia nastro non sono inserite
nella stampante, altrimenti la testina di stampa potrebbe essere danneggiata.
3. Non aprire il coperchio durante la stampa.
4. Non toccare la testina di stampa immediatamente dopo la stampa perché
scotta.
5. Usare solo carta in rotoli che non è incollata all’anima di cartone.
6. Quando il segno di fine carta appare sulla carta, sostituire il rotolo di carta
prima che finisca.
2-4. Manutenzione
La stampante è fondamentalmente robusta, ma deve essere trattata con una certa
cura per evitare problemi di funzionamento. Per esempio:
1. Tenere la stampante in un ambiente “confortevole”. In parole povere, se
l’ambiente è confortevole per le persone sarà adatto anche per la stampante.
2. Non esporre la stampante a urti o vibrazioni eccessive.
3. Evitare ambienti troppo polverosi. La polvere è il nemico di tutte le
apparecchiature meccaniche di precisione.
4. Per pulire l’esterno della stampante usare un panno appena inumidito con
acqua e un poco di detergente o di alcool, ma evitare la penetrazione di liquido
nella stampante.
5. L’interno della stampante può essere pulito con un piccolo pulitore o una
bombola di aria compressa (venduta a questo scopo). Quando si esegue questa
operazione, assicurarsi di non piegare o danneggiare i collegamenti dei cavi
o i componenti elettronici.
– 117 –
3. Identificazione delle parti e nomenclatura
Tipo SP2300
ITALIANO
Coperchio
Protegge la stampante dalla polvere e riduce il rumore.
Non aprire il coperchio durante la stampa.
Pannello comandi
Dispone di due interruttori di controllo
e due indicatori dello stato della
stampante.
Interruttore di alimentazione
Per accendere e
spegnere la stampante.
Adattatore CA
Fare riferimento alla
seguente sezione per
le istruzioni d’installazione.
Connettore circuito pilota per
unità periferiche
Per il collegamento a unità
periferiche come registri di
cassa, ecc. Non collegarlo ad
un telefono.
Connettore interfaccia
CPer collegare la
stampante al computer
ospite.
DInterruttori DIP
Usarli per eseguire
varie impostazioni.
Fig. 3-1 Vista esterna della stampante (tipo SP2300)
– 118 –
Tipo SP2500
Coperchio
Protegge la stampante dalla polvere e riduce il rumore.
Non aprire il coperchio durante la stampa.
ITALIANO
Pannello comandi
Dispone di due interruttori di controllo e
due indicatori dello stato della stampante.
Interruttore di alimentazione
Per accendere e
spegnere la stampante.
Adattatore CA
Fare riferimento alla
seguente sezione per
le istruzioni d’installazione.
Connettore circuito pilota per
unità periferiche
Per il collegamento a unità
periferiche come registri di
cassa, ecc. Non collegarlo ad
un telefono.
Connettore interfaccia
CPer collegare la
stampante al computer
ospite.
DInterruttori DIP
Usarli per eseguire
varie impostazioni.
Fig. 3-2 Vista esterna della stampante (tipo SP2500)
– 119 –
4. Adattatore CA opzionale
Cavo di alimertazione
Adattatore CA
Supporto adattatore
Viti
Fascettadi
fissaggio
Supporto cavo
Fig. 4-1
Utilizzare la seguente procedura per installare l’adattatore CA opzionale
Supporto adattatore
Fascetta di fissaggio
ITALIANO
Adattatore CA
Cavo adattatore CA
Supporto cavo
[Dopo l’installazione dell’adattatore CA]
[Prima dell’installazione
dell’adattatore CA]
Fig. 4-2 La parte piana è rivolta in questa direzione
1 Capovolgere la stampante.
2 Inserire il cavo dell’adattatore CA nella presa come mostrato nella figura
sotto. Accertarsi che la parte piana della spina sia rivolta verso l’interno della
stampante.
3 Utilizzare uno dei dispositivi di fissaggio in dotazione per fissare il cavo nel
punto indicato nella figura.
– 120 –
ITALIANO
Fig. 4-3 Fissare il cavo in questo punto
4 Avvolgere il cavo dell’adattatore CA nello spazio previsto, quindi inserire
l’adattatore CA nel suo alloggiamento.
5 Utilizzare il supporto dell’adattatore avvitandolo per fissare l’adattatore CA,
quindi utilizzare il supporto del cavo avvitandolo per fissare il cavo.
6 Rimettere la stampante in posizione dritta.
7 Inserire l’estremità femmina del cavo di alimentazione nell’adattatore CA,
quindi inserire l’altra estremità in una presa di corrente.
– 121 –
5. Connessione
Il computer invia dati alla stampante tramite un cavo collegato all’interfaccia
della stampante (tipo connettore interfaccia seriale: D-sub a 25 terminali o tipo
connettore interfaccia parallela: compatibile Centronics a 36 terminali). Questa
stampante non è dotata di cavo, che deve essere acquistato a seconda delle
esigenze di impiego.
5-1. Installazione dell’anello di ferrite
1 Fissare l’anello di ferrite più grande
al cavo come mostrato nell’illustrazione qui sotto.
Anello di ferrite (diametro 28 mm)
Cavo
Fig. 5-1
– 122 –
ITALIANO
Importante!
• Le seguenti istruzioni si applicano al cavo usato con personal computer
compatibili IBM. Notare che non si applicano a tutti i tipi di computer e di cavo.
Se non si è sicuri di quale tipo di cavo usare per il proprio computer, consultare
il proprio rivenditore.
• Assicurarsi che la stampante sia spenta e scollegata dalla presa di corrente e che
il computer sia spento prima di collegare i due.
2 Far passare la fascetta di fissaggio
attraverso l’anello di ferrite.
5 cm massimo
Fascetta di
fissaggio
Fig. 5-2
Tirare e
tagliare
3 Avvolgere la fascetta intorno al cavo
e fissarla. Usare delle forbici per
tagliare la parte in eccesso.
ITALIANO
Fig. 5-3
5-2. Collegamento al computer ospite (interfaccia seriale)
Anello di ferrite
Viti
Cacciavite
1 Spegnere sia il computer ospite che
la stampante.
2 Inserire il connettore ad un capo del
cavo interfaccia nel connettore sulla stampante e l’altro connettore nel
connettore sul computer ospite.
3 Fissare le viti destra e sinistra dei
rispettivi connettori interfaccia per
fissare in posizione i connettori.
Fig. 5-4 Collegamento del cavo
interfaccia
– 123 –
5-3. Collegamento al computer ospite (interfaccia parallela)
1 Spegnere sia il computer ospite che
la stampante.
2 Inserire un terminale del cavo
interfaccia nel connettore sulla stampante, come mostrato nella figura, e
fissarlo con il morsetto.
3 Inserire l’altro terminale del cavo
interfaccia nel connettore sul computer ospite e fissare anche questo
con il morsetto.
Anello di ferrite
Fig.5-5 Collegamento del cavo
interfaccia parallelo
Si può collegare un’unità periferica alla stampante usando una spina modulare.
Di seguito descriviamo come installare l’anello di ferrite ed eseguire il collegamento. Vedere “Modulare necessario” a pagina 165 per dettagli sul tipo di spina
modulare necessario. Notare che la stampante non è dotata di spina o filo
modulare, che devono essere acquistati in base alle esigenze di impiego.
Importante!
Assicurarsi che la stampante sia spenta e scollegata dalla presa di corrente e che
il computer sia spento prima di eseguire il collegamento.
Anello di ferrite (diametro 20 mm)
Connector
1 Fissare l’anello di ferrite più piccolo al cavo modulare come mostrato
nell’illustrazione qui sotto.
Cavo
Fig. 5-6
– 124 –
ITALIANO
5-4. Collegamento ad un’unità periferica
2 Far passare la fascetta di fissaggio
attraverso l’anello di ferrite.
5 cm
massimo
Fascetta di
fissaggio
Fig. 5-7
Tirare e tagliare
ITALIANO
Fig. 5-8
3 Avvolgere la fascetta intorno al cavo
e fissarla. Usare delle forbici per
tagliare la parte in eccesso.
4 Collegare un capo del cavo modulare alla presa modulare della periferica.
5 Rimuovere il coperchio presa modulare dal retro della stampante e
collegare l’altro capo del cavo modulare alla presa sulla stampante.
– 125 –
6. Inserimento della cartuccia nastro e della carta
6-1. Tipo SP2300
Coperchio
Spegnere
Fig. 6-1 Rimozione del coperchio
Separatore del
nastro
Testina di stampa
1 Spegnere la stampante.
2 Sollevare il coperchio di 3 cm circa.
Tenere il coperchio inclinato a questa angolazione e tirarlo verso di sè
per rimuoverlo.
3 Inserire la cartuccia nastro nella direzione mostrata nella Fig. 6-2 e
premerla in basso per caricarla. Se il
caricamento della cartuccia nastro
non è soddisfacente, premere in basso la cartuccia nastro girando la
manopola di avanzamento nastro in
direzione della freccia.
4 Girare la manopola di avanzamento
nastro della cartuccia nastro in direzione della freccia per eliminare
l’allentamento del nastro.
5 Montare il coperchio con il procedimento inverso a quanto descritto al
punto 2 sopra.
Nastro
inchiostrato
Manopola di
avanzamento nastro
Parte
incassata
Cartuccia
nastro
Fig. 6-2 Inserimento della cartuccia
nastro
– 126 –
ITALIANO
6-1-1. Inserimento della cartuccia nastro
Nota: Quando si rimuove la cartuccia
nastro, sollevare la parte A e
quindi rimuovere la cartuccia
tenendo la parte B come mostrato nella Fig. 6-3.
A
B
Fig. 6-3 Rimuovere la cartuccia
del nastro
ITALIANO
6-1-2. Inserimento della carta
Coperchio
1 Sollevare il coperchio di 3 cm circa.
Tenere il coperchio inclinato a questa angolazione e tirarlo verso di sè
per rimuoverlo.
2 Tagliare perpendicolarmente l’estremità iniziale della carta del rotolo.
3 Verificare che la stampante sia accesa.
Fig. 6-4 Rimozione del coperchio
– 127 –
Fig. 6-5 Inserimento della carta
Uscita della carta
Alimentatore
della carta
5 Inserire il bordo della carta nell’alimentatore della carta. Se è inserito
correttamente, il bordo della carta
passa attraverso l’uscita della carta.
6 Inserire l’estremità superiore della
carta nella fessura della barra di
strappo e quindi montare il coperchio con il procedimento inverso di
quello usato per rimuovere il coperchio al punto 1 sopra.
Nota: Quando il segno di fine carta
appare sulla carta, sostituire
il rotolo di carta prima che
finisca.
Barra di
strappo
Rotolo di carta
Fig. 6-6 Inserimento della carta
– 128 –
Fig. 6-7
ITALIANO
4 Osservando l’orientamento del rotolo, collocare il rotolo di carta nel
vano come mostrato in Fig.6-5.
Rotolo di carta
6-2. Tipo SP2500
6-2-1. Inserimento della cartuccia nastro
Coperchio
Spegnere
1 Spegnere la stampante.
2 Sollevare il coperchio di 3 cm circa.
Tenere il coperchio inclinato a questa angolazione e tirarlo verso di sè
per rimuoverlo.
ITALIANO
Fig. 6-8 Rimozione del coperchio
Taglierina
automatica
3 Sollevare la taglierina automatica e
collocarla in posizione verticale,
come mostrato nella Fig. 6-9.
Fig. 6-9 Sollevamento della
taglierina automatica
– 129 –
Testina di stampa
Manopola di
avanzamento nastro
Nastro inchiostrato
Taglierina
automatica
Parte
incassata
Cartuccia
nastro
Fig. 6-10 Inserimento della cartuccia
nastro
4 Inserire la cartuccia nastro nella direzione mostrata nella Fig. 6-10 e
premerla in basso per caricarla. Se il
caricamento della cartuccia nastro
non è soddisfacente, premere in basso la cartuccia nastro girando la
manopola di avanzamento nastro in
direzione della freccia.
5 Girare la manopola di avanzamento
nastro della cartuccia nastro in direzione della freccia per eliminare
l’allentamento del nastro.
6 Chiudere la taglierina automatica.
7 Montare il coperchio con il procedimento inverso a quanto descritto al
punto 2 sopra.
8 Quando si rimuove la cartuccia nastro, sollevare la parte A e quindi
rimuovere la cartuccia tenendo la
parte B come mostrato nella Fig. 611.
A
B
Fig. 6-11 Rimuovere la cartuccia del
nastro
– 130 –
ITALIANO
Separatore del
nastro
6-2-2. Inserimento della carta
Coperchio
1 Sollevare il coperchio di 3 cm circa.
Tenere il coperchio inclinato a questa angolazione e tirarlo verso di sè
per rimuoverlo.
Fig. 6-12 Rimozione del coperchio
ITALIANO
Rotolo di carta
2 Tagliare perpendicolarmente l’estremità iniziale della carta del rotolo.
3 Verificare che la stampante sia accesa.
4 Osservando l’orientamento del rotolo, collocare il rotolo di carta nel
vano come mostrato in Fig.6-13.
Fig. 6-13 Inserimento della carta
– 131 –
[Quando si usa carta semplice]
5 Inserire il bordo della carta nell’alimentatore carta. Se è inserito correttamente, il bordo della carta passa
attraverso la fessura carta della taglierina automatica. La carta viene tagliata una volta.
6 Rimuovere l’estremità tagliata e
montare il coperchio seguendo in
ordine inverso il procedimento descritto al punto 1.
Nota: Quando il segno di fine carta
appare sulla carta, sostituire
il rotolo prima che finisca.
Uscita della carta
Alimentatore
della carta
Rotolo di carta
ITALIANO
Fig. 6-14 Inserimento della carta
[Quando si usa carta multipla]
Fessura di
inserimento carta
Foglio superiore
Taglierina automatica
Foglio superiore
Testina di stampa
Rullo
Foglio inferiore
Foglio
inferiore
Testina di
stampa
Rullo
Fig. 6-15 Inserimento della carta nella taglierina automatica
(quando si usa carta autocopiante)
5 Sollevare la taglierina automatica e
disporla in posizione verticale.
6 Inserire il bordo della carta nell’alimentatore carta. Se è inserito correttamente, il bordo della carta passa
atraverso l’uscita carta.
– 132 –
Uscita
carta
ITALIANO
Taglierina
automatica
Fig. 6-16 Uscita carta sul coperchio
anteriore
7 Inserire solo la carta dell’originale
(foglio superiore) nella fessura della taglierina automatica. Inserire la
carta di copia (foglio inferiore) tra il
rullo e la taglierina automatica.
8 Tirare il bordo del carta per eliminare eventuali allentamenti e quindi
abbassare la taglierina automatica.
9 Inserire la carta attraverso l’apertura carta e quindi rimettere il coperchio seguendo in ordine inverso il
procedimento di rimozione.
Nota: • Quando il segno di fine
carta appare sulla carta, sostituire il rotolo di carta
prima che finisca.
• Quando si usa il
riavvolgitore
carta
opzionale, fare riferimento al Manuale utilizzatore
PW2000-24 separato.
Fig. 6-17 Montaggio del coperchio
– 133 –
6-3. Rimozione della carta
Rimuovere il coperchio, quindi tagliare la carta vicino al retro della guida carta
e premere l’interruttore FEED per far fuoriuscire la carta rimanente nell’unità.
Quando la carta è finita la spia POWER lampeggia.
ITALIANO
Nota 1. Rimuovere la carta rimanente nella stampante premendo l’interruttore FEED.
2. Quando il segno di fine carta appare sulla carta, sostituire il rotolo
di carta prima che finisca.
– 134 –
7. Pannello comandi
7-1. Funzionamento basilare
4
ON LINE
FEED
POWER
1
2
3
Fig. 7-1 Pannello comandi
ITALIANO
1 Interruttore ON LINE
Alterna lo stato della stampante tra
“on-line” e “off-line”. La
commutazione tra “on-line” e “offline” è possibile solo quando c’è
carta inserita nella stampante.
2 Interruttore FEED
• Quando si preme questo interruttore e lo si rilascia entro 0,5 sec., la
carta avanza di una riga.
• Quando si tiene premuto questo interruttore per più di 0,5 sec., la carta
avanza continuamente.
(L’operazione di avanzamento carta sopra descritta è possibile in entrambi i modi “on-line” e “off-line”.
3 Spia POWER (LED verde)
LED illuminato : La stampante è accesa.
LED spento
: La stampante è spenta.
4 Spia ON LINE (LED verde)
LED illuminato : Stampante “on-line”
LED spento
: Stampante “off-line”
– 135 –
7-2. Errori
Determinare la natura dell’errore in base al lampeggiamento della spia o al suono
del cicalino.
Spia di
alimentazione
Spia in linea
Cicalino
Condizioni di
ripristino
4 segnali brevi
(0,13 secondi) ripetuti due volte
*1
Lampeggia a
intervalli di 1
secondo
Spenta
Carta vicina alla fine
del rotolo (quando è
attivato l’arresto
vicino alla fine)
Lampeggia a
intervalli di 2
secondi
Spenta
Accesa (dopo che
si è premuto l’interruttore On-line)
Nessun segnale
Errore meccanico
(diverso da errore
taglierina)
Lampeggia a
intervalli di 0,25
secondi
Spenta
Un segnale breve
(0,13 sec.) e uno
lungo (0,5 secondi)
*3
Errore taglierina
(solo sui modelli
dotati di taglierina)
Lampeggia a
intervalli di 0,125
secondi
Spenta
Due segnali brevi
(0,13 sec.) e uno
lungo (0,5 sec.)
*3
Errore sovraccarico
ordine di stampa
Lampeggia a
intervalli di 0,5
secondi
Accesa
Errore lettura/
scrittura RAM
Spenta
Accesa
Nessun segnale
Errore CPU
Spenta
Lampeggia a intervalli di 0,25
secondi
Suona per 2 secondi
*2
Nessun segnale
*4
*5
*5
*1 Dopo aver cambiato la carta, premere l’interruttore On-line.
*2 Premere l’interruttore On-line per continuare la stampa; oppure cambiare la
carta e premere l’interruttore On-line.
*3 Dopo aver eliminato l’inceppamento carta o risolto il problema, premere
l’interruttore On-line.
*4 La stampa riprende automaticamente dopo che è trascorso qualche tempo. (Il
ripristino è automatico dopo che la testina di stampa si è raffreddata.)
*5 Questo errore non è risolvibile. Consultare il concessionario per riparazioni.
– 136 –
ITALIANO
Descrizione
dell’errore
Carta assente
7-3. Operazioni con gli interruttori (operazioni combinate
degli interruttori)
7-3-1. Stampa automatica
FEED + POWER ON (accendere tenendo premuto l’interruttore FEED)
La stampa automatica viene eseguita secondo le impostazioni degli interruttori VER NO., DIP e l’ordine dei caratteri. Se si tiene premuto l’interruttore
FEED o se si preme l’interruttore FEED alla fine della stampa automatica,
solo i caratteri sono stampati ripetutamente.
ITALIANO
Fig. 7-2 Esempio di stampa automatica
(quando si usa la stampante a interfaccia seriale)
– 137 –
7-3-2. Modo di scaricamento esadecimale
Fig. 7-3 Esempio di stampa a scaricamento esadecimale
7-3-3. Regolazione dell’allineamento punti
Può non essere mai necessario eseguire il procedimento descritto in questa
sezione, ma dopo che si è usata la stampante per qualche tempo, si può notare
che i punti di qualche grafico non sono allineati correttamente. Per esempio,
ciò che dovrebbe essere:
può apparire come uno dei seguenti:
oppure così
– 138 –
ITALIANO
ON LINE + POWER ON (accendere tenendo premuto l’interruttore
ON LINE )
Ciascuno dei segnali inviati dal computer alla stampante viene stampato in
codice esadecimale.
Questa funzione permette di controllare se un codice di controllo inviato alla
stampante dal programma usato è corretto o meno. L’ultima riga non viene
stampata se i suoi dati non consistono di una riga completa. Tuttavia, se si
preme l’interruttore ON LINE per impostare il modo “off-line” l’ultima riga
viene stampata. Per disattivare questo modo, è necessario spegnere completamente la stampante.
Questo è causato da una perdita di allineamento delle parti meccaniche della
stampante. Questo succede solo raramente e può non verificarsi mai durante
l’uso della stampante. Se si hanno problemi, usare il seguente procedimento
per correggerli.
• Accendere la stampante ed inserire un foglio di carta.
• Spegnere la stampante.
• Tenendo premuti i tasti ON LINE e FEED della stampante, accendere la
stampante per passare al modo di regolazione allineamento punti, indicato
dal lampeggiamento dell’indicatore POWER.
Quando si passa al modo di regolazione allineamento punti sono stampati
sette blocchi, ciascuno dei quali corrisponde ad un’impostazione di allineamento, come indicato sotto. Un asterisco a sinistra dei blocchi indica
quale blocco è attualmente selezionato.
ITALIANO
• Usare FEED per specificare il blocco che sembra avere i caratteri allineati
meglio. Premere FEED una volta per specificare il primo blocco, due volte
per specificare il secondo e così via fino a sette volte per specificare il
settimo blocco.
Viene emesso un segnale acustico di avvertimento se si preme FEED più
di sette volte.
• Dopo aver specificato un blocco, premere ON LINE per registrare la
selezione e uscire dal modo di regolazione allineamento punti.
– 139 –
L’impostazione di allineamento punti selezionata viene conservata nella
memoria della stampante e viene stampato uno schema che impiega
l’impostazione selezionata seguito dal messaggio “Adjust complete!”. La
stampante espelle la carta una volta completata la stampa.
ITALIANO
Nota: Le impostazioni non sono registrate se si spegne la stampante prima di
premere REVERSE per uscire dal modo di regolazione allineamento
punti. In caso di errore di alimentazione della carta durante l’uso di
questo modo, la stampante espelle la carta e il modo viene disattivato.
– 140 –
8. Codici di controllo
Questa stampante supporta due diversi modi di comando: il modo Star e il modo
ESC/POS.
Il modo Star emula i modelli precedenti di stampanti Star. Il modo ESC/POS
emula la stampante slip Epson TM-U200 o TM-U300.
Questo capitolo fornisce tutti i comandi supportati dalla stampante.
Importante!
Accedere alla seguente URL per la versione più recente di questo manuale e
per aggiornamenti sui comandi supportati: http://www.star-micronics.co.jp/
service/sp_sup_e.htm
8-1. Comandi del modo Star
ITALIANO
Le seguenti tabelle mostrano i comandi del modo Star supportati da questa
stampante.
8-1-1. Selezione caratteri
Codici di controllo
Codici esadecimali
Funzione
<ESC> “R” n
1B 52 n
Seleziona il gruppo caratteri internazionali
<ESC> “/” “1”
<ESC> “/” <1>
1B 2F 31
1B 2F 01
Seleziona lo zero barrato
<ESC> “/” “0”
<ESC> “/” <0>
1B 2F 30
1B 2F 00
Seleziona lo zero normale
<ESC> <GS> “t” n
1B 1D 74 n
Seleziona la tabella codici carattere
<ESC> “M”
1B 4D
Seleziona il font 7 × 9 (mezzo punto) (Default)
<ESC> “P”
1B 50
Seleziona il font 5 × 9 (due impulsi per punto)
<ESC> “:”
1B 3A
Seleziona il font 5 × 9 (tre impulsi per punto)
<ESC> <SP> n
1B 20 n
Imposta la spaziatura dei caratteri
<SO>
0E
Imposta la stampa a doppia larghezza del carattere
<DC4>
14
Annulla la stampa a larghezza ingrandita del carattere (Default)
– 141 –
Codici esadecimali
Funzione
1B 57 31
1B 57 01
Seleziona il doppio fattore d’ingrandimento per la
larghezza del carattere
<ESC> “W” “0”
<ESC> “W” <0>
1B 57 30
1B 57 00
Imposta il fattore di ingrandimento per la larghezza
del carattere
<ESC> “h” “1”
<ESC> “h” <1>
1B 68 31
1B 68 01
Seleziona il doppio fattore d’ingrandimento per l’al
tezza del carattere
<ESC> “h” “0”
<ESC> “h” <0>
1B 68 30
1B 68 00
Imposta il fattore di ingrandimento per l’altezza del
carattere
<ESC> “–” “1”
<ESC> “–” <1>
1B 2D 31
1B 2D 01
Seleziona la sottolineatura
<ESC> “–” “0”
<ESC> “–” <0>
1B 2D 30
1B 2D 00
Annulla la sottolineatura (Default)
<ESC> “_” “1”
<ESC> “_” <1>
1B 5F 31
1B 5F 01
Seleziona la sopralineatura
<ESC> “_” “0”
<ESC> “_” <0>
1B 5F 30
1B 5F 00
Annulla la sopralineatura (Default)
<ESC> “4”
1B 34
Seleziona la stampa di colore rosso (SP2360/2560)
Seleziona la stampa evidenziata (SP2320/2520)
<ESC> “5”
1B 35
Annulla la stampa di colore rosso (SP2360/2560)
Annulla la stampa evidenziata (SP2320/2520)
<ESC> “6”
1B 36
Seleziona la serie di caratteri #2
<ESC> “7”
1B 37
Seleziona la serie di caratteri #1
<SI>
0F
Seleziona la stampa invertita
<DC2>
12
Annulla la stampa invertita (Default)
<ESC> <RS> “i” “0”
<ESC> <RS> “i” <0>
1B 1E 96 30
1B 1E 96 00
Disattiva il modo di stampa ruotata per il testo
(Default)
<ESC> <RS> “i” “1”
<ESC> <RS> “i” <1>
1B 1E 96 31
1B 1E 96 01
Specifica il modo di stampa ruotata per il testo con
una rotazione di 270˚
<ESC> <RS> “i” “2”
<ESC> <RS> “i” <2>
<ESC> “E”
1B 1E 96 32
1B 1E 96 02
1B 45
Specifica il modo di stampa ruotata per il testo con
una rotazione di 90˚
Seleziona la stampa enfatizzata
<ESC> “F”
<ESC> “U” n
1B 46
1B 55 n
Annulla la stampa enfatizzata (Default)
Seleziona la direzione di stampa
– 142 –
ITALIANO
Codici di controllo
<ESC> “W” “1”
<ESC> “W” <1>
8-1-2. Controllo della posizione di stampa
Codici di controllo
<LF>
Codici esadecimali
0A
Funzione
Avanzamento riga
ITALIANO
<VT>
0B
Tabulazione verticale
<FF>
0C
Avanzamento pagina
<CR>
0D
Ritorno carrello
<ESC> “a” n
1B 61 n
Avanzamento carta di n righe
<HT>
09
Tabulazione orizzontale
<ESC> “A” n
1B 41 n
Definisce l’interlinea a n/72 di pollice
<ESC> “2”
1B 32
Imposta l’interlinea a n/72 di pollice
<ESC> “z” “0”
<ESC> “z” <0>
1B 7A 30
1B 7A 00
Imposta l’interlinea a 1/12 di pollice
<ESC> “z” “1”
<ESC> “z” <1>
1B 7A 31
1B 7A 01
Imposta l’interlinea a 1/6 di pollice (Default)
<ESC> “0”
1B 30
Imposta l’interlinea a 1/8 di pollice
<ESC> “1”
1B 31
Imposta l’interlinea a 7/72 di pollice
<ESC> “J” n
1B 4A n
Singolo avanzamento di n/72 di pollice
<ESC> “3” n
1B 33 n
Imposta l’interlinea a circa n/216 di pollice
<ESC> “y”
1B 79 n
Imposta l’interlinea a n/144 di pollice
<ESC> “D” n1 n2 ... <0> 1B 44 n1 n2 ... 00
Imposta arresti di tabulazione orizzontali
<ESC> “l” n
1B 6C n
Imposta il margine sinistro
<ESC> “Q” n
1B 51 n
Imposta il margine destro
<ESC> <GS> “a” “0”
<ESC> <GS> “a” <0>
1B 1D 61 30
1B 1D 61 00
Giustificazione a sinistra (Default)
<ESC> <GS> “a” “1”
<ESC> <GS> “a” <1>
1B 1D 61 31
1B 1D 61 01
Centratura
<ESC> <GS> “a” “2”
<ESC> <GS> “a” <2>
1B 1D 61 32
1B 1D 61 02
Giustificazione a destra
<ESC> “B” n1 n2 ... <0> 1B 42 n1 n2 ... 00
Imposta tabulazioni verticali
– 143 –
8-1-3. Controllo grafica a punti
Codici di controllo
Codici esadecimali
Funzione
<ESC> “K” n <0>
m1 m2 ...
1B 4B n 00 m1 m2
...
<ESC> “L” n1 n2
m1 m2 ...
1B 4C n1 n2 m1 m2
Stampa la grafica ad alta densità
...
Stampa la grafica a densità normale
8-1-4. Stampa di grafica scaricata
Codici di controllo
Codici esadecimali
Funzione
<ESC> “&” <0> n1 n2 .. 1B 26 00 n1 n2 ..
Definisce i caratteri di scarico
<ESC> “%” “1”
<ESC> “%” <1>
1B 25 31
1B 25 01
Abilita il gruppo caratteri di scarico
<ESC> “%” “0”
<ESC> “%” <0>
1B 25 30
1B 25 00
Disabilita il gruppo caratteri di scarico (Default)
Codici di controllo
Codici esadecimali
Funzione
<ESC> <BEL> n1 n2
1B 07 n1 n2
Definisce l’ampiezza del segnale di attivazione del
dispositivo periferico #1
<BEL>
07
Invia un segnale di controllo al dispositivo periferico
#1
<FS>
1C
Invia subito un segnale di controllo al dispositivo
periferico #1
<EM>
19
Invia subito un segnale di controllo al dispositivo
periferico #2
<SUB>
1A
Invia subito un segnale di controllo al dispositivo
periferico #2
– 144 –
ITALIANO
8-1-5. Controllo dispositivo periferico
8-1-6. Controllo della taglierina automatica (solo tipo SP2500)
Codici di controllo
Codici esadecimali
Funzione
<ESC> “d” “0”
<ESC> “d” <0>
1B 64 30
1B 64 00
Comando di taglio completo alla taglierina
automatica
<ESC> “d” “1”
<ESC> “d” <1>
1B 64 31
1B 64 01
Comando di taglio parziale alla taglierina
automatica
<ESC> “d” “2”
<ESC> “d” <2>
1B 64 32
1B 64 02
Invia alla taglierina automatica un comando di taglio
completo dopo l’alimentazione della carta
<ESC> “d” “3”
<ESC> “d” <3>
1B 64 33
1B 64 03
Invia alla taglierina automatica un comando di taglio
parziale dopo l’alimentazione della carta
8-1-7. Comandi di impostazione del formato pagina
Codici di controllo
Codici esadecimali
Funzione
ITALIANO
<ESC> “C” n
1B 43 n
Imposta la lunghezza pagina in righe
<ESC> “C” <0> n
1B 43 00 n
Imposta la lunghezza pagina in pollici
<ESC> “N” n
1B 4E n
Imposta il margine inferiore
<ESC> “O”
1B 4F
Annulla il margine inferiore (Default)
8-1-8. Altri comandi
Codici di controllo
Codici esadecimali
Funzione
<CAN>
18
Svuota il buffer di stampa e inizializza la stampante
<DC3>
13
Deseleziona la stampante
<DC1>
11
Imposta il modo di selezione (Default)
<RS>
1E
Fa emettere un segnale acustico al cicalino
1B 23 N 2C n1 n2
<ESC> “#N, n1 n2 n3 n4”
n3 n4
<LF> <NUL>
0A 00
Imposta l’interruttore di memoria
<ESC> “@”
Inizializza la stampante
1B 40
<EOT>
04
Trasmette lo stato EOT
<ENQ>
05
Trasmette lo stato ENQ
<ETB>
17
Conferma la fine della stampa
<ESC> <ACK> <S0>
IB 06 01
Trasmette lo stato automatico
<ESC> <RS> “a” n
IB IE 61 n
<ESC> “?” <LF> <NUL> 1B 3F 0A 00
Abilita/disabilita lo stato automatico
Ripristino hardware della stampante ed esecuzione
di una stampa di prova
– 145 –
8-2. Comandi del modo ESC/POS
Codici di controllo
<HT>
Codici esadecimali
09
Funzione
Tabulazione orizzontale
TMU200
⁄
TMU300
⁄
<LF>
0A
Avanzamento di riga
⁄
⁄
<CR>
0D
Stampa e ritorno del carrello
⁄
⁄
<DLE> <EOT>
10 04
Abilita l’invio di stato in tempo reale
⁄
<DLE> <ENQ>
10 05
Richiesta in tempo reale alla stampante
⁄
<ESC> SP
1B 20
Imposta le dimensioni dello
spazio a destra del carattere
⁄
⁄
<ESC> !
1B 21
Abilita il modo di stampa in gruppi
⁄
⁄
<ESC> #
1B 23
Imposta l’interruttore di memoria
<ESC> %
1B 25
Abilita/disabilita il gruppo di
caratteri di scarico
⁄
⁄
<ESC> &
1B 26
Definisce il carattere di scarico
⁄
⁄
<ESC> *
1B 2A
Seleziona il modo di immagine di bit
⁄
⁄
<ESC> “–”
1B 2D
Selezina/Annulla la sottolineatura
⁄
⁄
<ESC> 2
1B 32
Seleziona l’interlinea da 1/6
di pollice
⁄
⁄
<ESC> 3
1B 33
Imposta l’interlinea a circa n/144
di pollice
⁄
⁄
<ESC> =
1B 3D
Seleziona il dispositivo periferico
⁄
<ESC> ?
1B 3F
Cancella il carattere di scarico
⁄
⁄
<ESC> @
1B 40
Inizializza la stampante
⁄
⁄
<ESC> D
1B 44
Imposta la posizione della
tabulazione orizzontale
⁄
⁄
<ESC> E
1B 45
Abilita/disabilita la messa in evidenza
⁄
⁄
<ESC> G
1B 47
Abilita/disabilita la battitura ripetuta
⁄
⁄
<ESC> J
1B 4A
Stampa e avanzamento carta di n/144
di pollice (valore approssimativo)
⁄
⁄
<ESC> K
1B 4B
Stampa e arretramento carta di n/144
di pollice (valore approssimativo)
⁄
⁄
– 146 –
ITALIANO
La seguente tabella elenca i comandi di emulazione TM-U200 o TM-U300
supportati da questa stampante.
Codici di controllo
Codici esadecimali
Funzione
TMU200
TMU300
ITALIANO
<ESC> R
1B 52
Selezione il gruppo caratteri
internazionali
⁄
⁄
<ESC> U
1B 55
Seleziona/cancella il modo di
stampa unidirezionale
⁄
⁄
<ESC> V
1B 56
Attiva/disattiva la rotazione di 90˚
del carattere
<ESC> a
1B 61
Allinea la posizione di stampa
⁄
<ESC> c3
1B 63 33
Slezionare il sensore carta per
l’invio del segnale di assenza
⁄
⁄
<ESC> c4
1B 63 34
Selezionare il sensore di fine
carta per l’arresto
⁄
⁄
<ESC> c5
1B 63 35
Abilita/disabilita gli interruttori
del panello comandi
⁄
⁄
<ESC> d
1B 64
Stampa o fa avanzare di n righe
⁄
⁄
<ESC> e
1B 65
Stampa o fa retrocedere di n righe
⁄
⁄
<ESC> i
1B 69
Comando di taglio intero al
coltello automatico
⁄
<ESC> m
1B 6D
Comando di taglio parziale al
coltello automatico
⁄
<ESC> p
1B 70
Genera l’impulso specificato
<ESC> r
1B 72
Seleziona il colore di stampa
⁄
⁄
<ESC> t
1B 74
Seleziona la tabella codici carattere
<ESC> u
1B 75
Invia lo stato periferica
<ESC> v
1B 76
Invia lo stato sensore carta
<ESC> {
1B 7B
Abilita/disabilita la stampa invertita
⁄
<GS> I
1D 49
Invia l’identità stampante
⁄
<GS> V
1D 56
Comando di taglio al coltello
automatico
⁄
<GS> a
1D 61
Abilita/disabilita lo stato automatico
⁄
<GS> r
1D 72
Invia lo stato stampante
⁄
1D 7A 30
Imposta il tempo di attesa di
ripristino online
⁄
<GS> z0
– 147 –
⁄
⁄
⁄
⁄
⁄
⁄
Comandi ignorati
Codici di controllo
Codici esadecimali
Funzione
TMU200
TMU300
<ESC> <
1B 3c
Ignorato (ritorno alla posizione
iniziale)
<ESC> c 0 n
1B 63 30 n
Ignorato (seleziona il tipo di
carta per la stampa)
⁄
<ESC> f t1 t2
1B 66 t1 t2
Ignorato (imposta il tempo di
attesa taglio foglio)
⁄
<GS> E n
1D 45 n
Ignorato (seleziona il metodo di
controllo testina)
⁄
ITALIANO
⁄
– 148 –
9. Sensore opzionale di “quasi fine”
Il sensore di “quasi fine” determina quando il rotolo di carta che è stato caricato
sta per terminare. Questo sensore è normalmente disattivato quando la stampante
viene spedita dalla fabbrica, ma può essere attivato dal vostro negoziante grazie
all’interruttore di memoria. I dati di questo capitolo si riferiscono unicamente a
stampanti con sensori di “quasi fine” attivati.
Importante!
L’installazione del sensore di “quasi fine” dovrebbe essere effettuata dal
vostro negoziante.
9-1. Regolazione del sensore di “quasi fine”
Utilizzare la seguente procedura per regolare il sensore di “quasi fine” affinché
sia compatibile con le dimensioni del rotolo di carta che viene adoperato.
ITALIANO
Importante!
Indipendentemente dal diametro complessivo del rotolo di carta, la parte
centrale di carta robusta distante dal rotolo deve avere un diametro interno di
12 mm e un diametro esterno di 18 mm per una corretta rivelazione.
1 Accertarsi che la stampante sia spenta con la spina staccata.
2 Togliere il coperchio della stampante.
3 Togliere il rotolo di carta.
Fig. 9-1
– 149 –
4 Determinare il diametro del rotolo
di carta che si utilizza e individuare
nella tabella riportata sotto
l’impostazione richiesta.
distanza A
Circa 9 mm.
Circa 7 mm.
Circa 5 mm.
Livello 3 …
Livello 2 ……
Livello 1 ………
Impostazione
Livello 3
Livello 2
Livello 1 *1
Indicatore
ooo
oo
o
Fig. 9-2
A
ø18 mm
ø12 mm
Centro del rotolo di carta
Fig. 9-3
A
Nota:
1. Poiché la distanza A corrispondente alla posizione di
regolazione sul grafico è un valore calcolato, potrebbero esserci variazioni dovute al meccanismo effettivo.
2. Se c’è un segno di fine al termine
del rotolo di carta, detto segno si
comporta come adesivo in grado
di sollevare l’intero rotolo di carta. In tal caso, ciò non riguarderà
la quantità di carta rimanente
(distanza A) indicata nel grafico
sopracitato.
3. Una determinata qualità di carta
può provocare l’inceppamento
della stessa, dando luogo a una
determinazione errata.
5 Inserire la punta di una penna a
sfera. Premendo il regolatore, farla
scorrere in alto o in basso fino
all’impostazione che corrisponde al
rotolo di carta utilizzato.
6 Accertarsi che la linguetta indicata
dalla freccia nella figura sia all’interno di uno degli incavi.
– 150 –
ITALIANO
*1 Non si può utilizzare con 2 o 3 pieghe.
Appendix A: General Specifications
Printing method:
Print direction:
Number of head pins:
Number of print columns:
Character set:
Font configuration
Printing width:
Print speed:
Line spacing:
APPENDIX
Paper feed method:
Paper feed speed:
Paper specifications
Paper type:
Paper width:
Roll diameter:
Internal diameter of roll:
Serial impact dot matrix
Bi-directional
9 wires
42 columns
ASCII
96 (characters)
Extended graphics: 128 × 40 pages
(Star mode)
128 × 6 pages
(ESC/POS)
International characters: 46 (Star mode)
37 (ESC/POS)
7 (Half dots) × 9 or 5 × 9
63 mm, 210 dots
Approx. 3.1 lines per sec.
1/6-inch (default), n/144-inch (programmable by command)
Friction feed
Approx. 3.5 inches/sec.
Ordinary bond and carbonless copy paper
76±0.5 mm (3.0 inches)
85mm (3.35 inches) max.
12±1 mm
Note: The paper must not be glued to the core.
Thickness
SP2300
SP2500
(single) 0.07 mm to 0.10 mm
(copies) Original + 2 copies (Max. 0.2 mm)
(single only) 0.07 mm to 0.10 mm
Note: The auto-cutter that is fitted to the SP2500 series
is designed to cut single ply paper to a maximum
thickness of 0.1mm. Cutting multi-ply paper, or
paper thicker than 0.1mm is not recommended as
the specifications of the auto-cutter cannot be
guaranteed.
– 151 –
Ribbon material:
Ribbon life:
Interface
Serial interface:
Bidirectional parallel interface:
Peripheral unit drive circuit:
Overall dimensions:
Weight:
300,000 cut (MCBF)
Cartridge cassette
SP2320/2520 type: Single color (Purple or
black)
SP2360/2560 type: Two color (Black and
red)
Nylon 66 (#40 denier)
Single color:
Purple 3,000,000 characters
Black 1,200,000 characters
Two color:
Black on two color 600,000 characters
Red on two color 300,000 characters
RS-232C
IEEE/1284 compatibility, nibble, byte modes
2 circuits (24V, max. 1A)
160W × 253D × 173H (mm)
Printer: Approx. 2.1 kg
Optional AC adaptor: 350 g
Optional AC cable: 150g
– 152 –
APPENDIX
Paper cutter reliability
(SP2500 type only)
Ink ribbon specifications
Ribbon type:
Color:
ON LINE
160
FEED
POWER
SP2300 Type
173
253
FEED
ON LINE
160
253
173
APPENDIX
POWER
SP2500 Type
Fig. A-1 Overall dimensions (mm)
– 153 –
Ambient temperature/humidity
Operating temperature:
Operating humidity:
Storage temperature:
Storage humidity:
Mechanism reliability:
Print head life:
0°C to +50°C
10% to 80% RH (at 40°C, without condensation)
–20°C to +70°C
5% to 90%RH (at 40°C, without condensation)
5,000,000 lines MCBF (except head life and
auto cutter)
70 million characters
Power Supply Specifications
Power Supply:
Optional AC Adaptor:
Input:
Output:
Plug:
PS48-24A, switching type
90 to 264V AC, 50/60Hz
24V DC ± 5%, 2.0A
3-pin POWER JACK TCP 8927 (Hoshiden
brand or equivalent.)
Operating:
(approximate averages)
Stand-by:
(approximate averages)
Conditions: 24V, excluding perpheral unit
driving
Continuous ASCII printing: 0.7A
Solid block printing: 1.5A
Peak (solid printing): 3.1A
0.24 A
Important!
When using a printer power supply other than the optional AC adaptor (PS4824A), be sure that the following cautions are observed.
• Use a power supply of DC 24 V ±5% and more than 2.0 A.
• Be careful about installing the printer in an area where there is noise. Take the
appropriate measures to protect against electrostatic AC line noise, etc.
– 154 –
APPENDIX
Consumption Current:
Appendix B: Serial Interface
B-1. Pins and Signal Names
Pin No.
Signal Name Direction
1
FG
—
2
TXD
OUT
3
RXD
IN
4
RTS
OUT
5
N.C.
6
DSR
Function
Frame ground
Transmission data
Receive data
When Memory Switch 4-D = 0: Same as DTR signal
When Memory Switch 4-D = 1: Always SPACE
Not connected
IN
APPENDIX
• DIP Switch 2-7 = OFF
STAR Mode
Status of this signal is not checked.
ESC/POS Mode
In DTR/DSR communication mode when Memory Switch4-5 = 0,
indicates whether data receive from host is enabled or disabled.
Space: Receive enabled
Mark: Receive disabled
In DTR/DSR communication mode when Memory Switch 4-5=1,
status of this signal is not checked.
This signal is not checked in the X-ON/X-OFF communication
mode.
• DIP Switch 2-7 = ON
This signal used for external reset. Printer is reset whenever signal
is in mark state with pulse width of 1mS or more.
7
SG
Signal ground
8 -19
N.C.
Not connected
20
DTR
OUT
Indicates whether data receive from host is enabled or disabled.
DTR/DSR Communication Mode
Space when receive is enabled.
Printer status
1. During the period from when the power is
turned on (including resetting using the interface) to when the printer is ready to receive data.
2. During self printing and dot alignment adjustment.
3. During paper feeling using the paper feed
button (ESC/POS mode only).
4. When the printer stops printing due to a
paper end or a paper near end.
5. When an error has occurred.
6. When the receive buffer becomes full.
– 155 –
Memory switch 1-7
0
1
BUSY
BUSY
BUSY
BUSY
BUSY
—
BUSY
—
BUSY
BUSY
—
BUSY
Pin No.
Signal Name Direction
20
DTR
21 - 24
N.C.
25
INIT
OUT
Function
X-On/X-Off Communication Mode
Always space, except during following conditions:
• Period between reset and communication enabled
• During self printing and dot alignment adjustment
Not connected
IN
• DIP Switch 2-8 = OFF
This signal not used.
• DIP Switch 2-8 = ON
This signal becomes reset signal. Printer is reset whenever
signal is in space state with pulse width of 1mS or more.
Note: DIP switch 2 displays the switches on the interface card.
13
1
25
14
Refer to the interface specifications of the host for details on connecting to its
interface connector. The following illustration shows a typical connection
configuration.
Printer side
(D-sub 25 pin)
IBM PC side
25 pin
9 pin
F-GND
1
1
TXD
2
2
3
TXD
RXD
3
3
2
RXD
RTS
4
4
7
RTS
5
8
CTS
6
6
6
DSR
S-GND
7
7
5
S-GND
DTR
20
8
1
DCD
INIT
25
20
4
DTR
DSR
– 156 –
F-GND
APPENDIX
B-2. Interface Connections (Serial Interface)
Appendix C: Parallel Interface
The two-way parallel interface is compatible with the IEEE1284 compatibility
mode, nibble mode and byte mode. Refer to the separate programmer’s manual
for details.
C-1. Table of Connection Signals for Each Mode
Pin No. Direction
Compatibility Mode
Signal Name
Nibble Mode
Signal Name
Byte Mode
Sginal Name
1
In
nStorobe
HostClk
HostClk
2
In/Out
Data0
Data0
Data0
3
In/Out
Data1
Data1
Data1
4
In/Out
Data2
Data2
Data2
5
In/Out
Data3
Data3
Data3
6
In/Out
Data4
Data4
Data4
7
In/Out
Data5
Data5
Data5
8
In/Out
Data6
Data6
Data6
APPENDIX
9
In/Out
Data7
Data7
Data7
10
Out
nAck
PtrClk
PtrClk
11
Out
Busy
PtrBusy/Data3,7
PtrBusy
12
Out
PError
AckDataReq/Data2,6
AckDataReq
13
Out
Select
Xflag/Data1,5
Xflag
14
In
nAutoFd
HostBusy
HostBusy
15
N/C
—
—
16
GND
GND
GND
17
Flame GND
Flame GND
Flame GND
18
Logic High
Logic High
Logic High
19
OUT
GND
GND
GND
20
GND
GND
GND
21
GND
GND
GND
22
GND
GND
GND
23
GND
GND
GND
24
GND
GND
GND
25
GND
GND
GND
26
GND
GND
GND
27
GND
GND
GND
28
GND
GND
GND
29
GND
GND
GND
30
GND
GND
GND
– 157 –
In
32
Out
nFault
nDataAvail/Data0,4
nDataAvail
EXT GND
—
—
34
Out
Compulsion Status
—
—
35
Out
+5V
—
—
36
In
nSelectIn
1284Active
1284Active
33
Nibble Mode
Signal Name
nInit
Byte Mode
Sginal Name
nInit
Note: 1. The prefix “n” on the signal name refers to low active signals.
If the host does not have any one of the signal lines listed above,
two-way communication fails.
2. For interfacing, signal lines should always use twisted pair cables
with the return sides connected to the signal ground level.
3. Cautions when resetting the printer using the nInit signal (#31 pin).
Reset can be made from #31 pin (nInit signal) of the interface when
the DIP switch 1-1 is set to on. (Factory setting is on.)
In addition, when reset has been enabled by #31 pin (nInit signal),
it can be set to reset when the following conditions have been
established: DIP switch 1-2 has been set to off, #36 pin (nSelectIn/
1284 active signal) is low, and #31 pin (nInit signal) is low.
4. During factory output, IFEE 1284 printer device ID reply will be
“Invalid.” To get the device ID, change memory switch 6-C to
“Valid.” For instructions on setting the memory switch, please
refer to the separate Programmer’s Manual.
– 158 –
APPENDIX
31
Compatibility Mode
Signal Name
nInit
Pin No. Direction
Appendix D: DIP Switch Setting
D-1. Parallel Interface
Be sure to turn the power to both the printer and host computer off before
changing the setting of the DIP switches.
Power off
ON
OFF
1
8
DIP switch 1
APPENDIX
Fig. D-1 DIP switch array
■ DIP switch 1
Factory presetting: All on*1
SW
1-1
1-2
Function
Reset input conditions or Enable/disable
conditions IEEE1284 reverse mode
1-3
Always ON
1-4
Auto Cutter *1
1-5
Printing width *2
1-6
Automatic status function *3
1-7
Should not be change
1-8
Command emulation
ON
OFF
See table below
Should be set on
Invalid
210 dots
(420 half dots)
Invalid
Valid
200 dots
(400 half dots)
Valid
(Should be set on)
Star
– 159 –
ESC/POS
Enable/disable
IEEE1284 reverse mode
Enable
Switch 1-1
Switch 1-2
Reset input conditions
ON
ON
#31 pin (nInit) “Low” input
ON
OFF
#31 pin (nInit) “Low” input and #36 pin
(nSelectIn/1284 active) “Low” input
Enable
OFF
OFF
ON
OFF
Reset input disabled
#31 pin (nInit) “Low” input
Enable
Disable *4
*1.The factory settings for enabling/disabling the auto-cutter are as follows.
Models without auto-cutter (SP2300 Series): Invalid (Switch 1-4 = on)
Models with auto-cutter (SP2500 Series): Valid (Switch 1-4 = off)
Note: If the auto-cutter is valid on models without this function, a mechanical
error will occur. Do not enable.
*2 Total dot number for one line.
(This setting determines the default print range and number of digits as
follows.)
Print range
ON
63 mm
42/35 digits
OFF
60 mm
40/33 digits
*3 Automatic status function
When valid, the status occurrence conditions are as follows.
Star mode:
All status occurrences enabled.
ESC/POS mode: Online/offline factors only. (Same conditions as <GS>a 2).
*4 Disable if using #36 pin (nSelectIn/1284 Active) interface for functions other
than IEEE1284.
– 160 –
APPENDIX
ANK default digits (ANK 7 × 9/5 × 9)
Switch 1-5
D-2. Serial Interface
Be sure to turn the power to both the printer and host computer off before
changing the setting of the DIP switches.
Power off
ON 1
OFF
8
DIP switch 2
ON 1
OFF
8
DIP switch 1
Fig. D-2 DIP switch array
APPENDIX
The following is the procedure for changing the settings on DIP switch No. 2.
1. Turn the power to both the printer and computer off.
2. Remove the 2 screws.
3. Remove the serial interface board unit.
4. Change the setting of the DIP switches.
DIP switch 2
Fig. D-3 DIP switch 2
– 161 –
■ DIP switch 1
Factory presetting: All ON*1
SW
1-1
Not used
Function
ON
1-2
Hand shaking (BUSY condition)
1-3
Always ON
1-4
Auto Cutter *1
1-5
Printing width *2
1-6
1-7
Automatic status function *3
Should not be change
1-8
Command emulation
OFF
(Always ON)
Receive buffer
full or offline
Recive
buffer full
Should be set on
Invalid
210 dots
(420 half dots)
Valid
200 dots
(400 half dots)
Invalid
Valid
(Should be set on)
Star
ESC/POS
*2 Total dot number for one line.
(This setting determines the default print range and number of digits as
follows.)
ANK default digits (ANK 7 × 9/5 × 9)
Switch 1-5
Print range
ON
63 mm
42/35 digits
OFF
60 mm
40/33 digits
*3 Automatic status function: When valid, the status occurrence conditions are
as follows.
Star mode:
All status occurrences enabled.
ESC/POS mode: Online/offline factors only. (Same conditions as <GS>a2).
– 162 –
APPENDIX
*1.The factory settings for enabling/disabling the auto-cutter are as follows.
Models without auto-cutter (SP2300 Series): Invalid (Switch 1-4 = on)
Models with auto-cutter (SP2500 Series): Valid (Switch 1-4 = off)
Note: If the auto-cutter is valid on models without this function, a mechanical
error will occur. Do not enable.
■ DIP switch 2
The following table shows all the possible settings for the DIP switch. The factory
default settings are ON for switches 2-1 through 2-6 and OFF for switches 2-7
through 2-8.
Switch
2-1
2-2
2-3
Function
ON
Data Length
8 bits
7 bits
2-4
Parity Check
Disabled
Enabled
2-5
2-6
Parity
Handshake
Odd
DTR/DSR
Even
XON/XOFF
2-7
Pin 6 (DSR) Reset Signal
Enabled
Disabled
2-8
Pin 25 (INIT) Reset Signal
Enabled
Disabled
Baud Rate
OFF
See table below
Baud Rate
Switch 2-1
Switch 2-2
1200BPS
2400BPS
OFF
ON
OFF
OFF
4800BPS
OFF
ON
9600BPS
ON
ON
APPENDIX
– 163 –
Appendix E: Memory Switch Settings
Each memory switch is a 16-bit word store in EEPROM. For details on the
functions and settings of memory switches, see the separate Programmer’s
Manual.
The table below shows the factory settings for the memory switches.
Memory Switch
0
Hexadecimal Code
0000
1
0000
2
3
0000
0000
4
0000
5
6
0000
0000
APPENDIX
Warning!
Changing the memory switch settings can cause the printer to fail to operate
correctly.
– 164 –
Appendix F: Peripheral Unit Driver Circuit
This printer is equipped with a circuit for driving peripheral units, such as cash
drawers. A 6-pin modular connector for connection of the peripheral unit is
located on the back of the printer. To connect to the drive circuit, connect the
peripheral unit to the modular connector using a cable supplied by you like that
one shown in the figure below.
Important!
Never connect any other type of plug to the peripheral unit connector.
Modular plug
Modular plug: MOLEX 90075-0007,
AMP641337, or JAPAN BURNDY B-66-4
Shield
1
6
Wire lead
APPENDIX
– 165 –
Drive circuit
The recommended drive unit is shown below.
1
F.G
With shield
2
TR1
D1
Peripheral
unit 1
3
7824
+24V
M-GND
L1
4
D2
TR2
L2
R3
4.7kΩ
1/4W
5
M-GND
Peripheral
unit 2
+5V
R1
Compulsion
switch
6
TR3
R2
Frame
ground
User side
Notes
• Peripheral Units 1 and 2 cannot be driven simultaneously.
• For continuous driving, do not use drive duty greater than 20%.
• The status of the compulsion switch can be known from the following.
Star mode
: The status of the compulsion switch can be known by using
the automatic status function or <ENQ> commands. In the
case of ENQ status, bit 7 will be “1”when pin No. 6 of the
peripheral unit drive circuit is high (switch on).
ESC/POS mode : The status of the compulsion switch can be known by using
the automatic status function, <DLE><EOT>n, and
<ESC>“u”n commands.
Parallel interface : The status of the compulsion switch can be known by pin
No. 34 on the parallel interface connector. When the
compulsion switch is on, pin No. 34 will be low. This can
be checked by using the compatibility mode.
• Minimum resistance for coils L1 and L2 is 24Ω.
• Absolute maximum ratings for diodes D1 and D2 (Ta = 25°C) are:
Average Rectified Current Io = 1A
Maximum forward surge current (60Hz, 1-cycle sine wave) IFSM = 40A
• Absolute maximum rating for transistors TR1 and TR2 (Ta = 25°C) are:
Collector current Ic = 2A
Collector loss Pc = 1.2W
– 166 –
APPENDIX
Printer side
ELECTRONIC PRODUCTS DIVISION
STAR MICRONICS CO., LTD.
OVERSEAS SUBSIDIARY COMPANIES
STAR MICRONICS AMERICA, INC.
536 Nanatsushinnya, Shimizu, Shizuoka,
424-0066 Japan
Tel: 0543-47-0112, Fax: 0543-48-5013
70-D Ethel Road West, Piscataway, NJ 08854 U.S.A
Tel: 732-572-9512, Fax: 732-572-5095
STAR MICRONICS U.K. LTD.
Please access the following URL
http://www.star-micronics.co.jp/service/sp_sup_e.htm
for the lastest revision of the manual.
Star House, Peregrine Business Park, Gomm Road,
High Wycombe, Bucks, HP13 7DL, U.K.
Tel: 01494-471111, Fax: 01494-473333
1999.10.20
Printed in Japan, 80870206