1
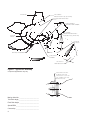
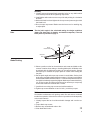
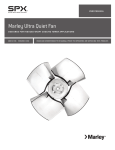
/ Marley HP7i Fan 72" thru 168" Diameter – 6 Blade /
User Manual 92-1471E
FAN BLADE
CAP SCREWS
TORQUE 10-15 FT·LBƒ (14-20 N·M)
RESILIENT WASHERS
HUB ASSEMBLY
IDENTIFICATION NUMBER
CAP SCREWS
TORQUE PROGRESSIVELY
TO 30-35 FT·LBƒ (41-48 N·M)
2
FAN HUB
COVER
DRAIN
HOLES
3
BALANCE HARDWARE
HUB
HUB SOCKET
NUMBER
SET PITCH 2"
FROM BLADE TIP
Figure 1 –Typical Fan Assembly
Component appearance may vary
Marley Order No._________________________
Trial Pitch Angle__________________________
Final Pitch Angle_________________________
Speed-RPM_____________________________
Contract hp_ ____________________________ 2
THE BLADE DOES NOT
FIT WITHIN THE HUB.
AFTER PITCH IS SET THE
CAP SCREWS HOLD THE
BLADE IN PLACE.
Assembly
1. Visually inspect all tapped blade mounting holes for any debris which
could cause problems when tightening cap screws.
2. Install blades with rotation arrow on top side and pointing in a clockwise
direction.
3. Hold each blade level and tighten the six cap screws just enough to hold
the blade level.
4. Do not torque cap screws. Blades must be free to turn in retaining ring
to adjust pitch.
Note
The trial pitch angle is the calculated setting for design conditions
(water rate, heat load, air density, and brake horsepower). The trial
blade pitch is provided on page 2.
BEVEL
PROTRACTOR
ROTATION
AIR
FLOW
STRAIGHT
EDGE
PITCH ANGLE
± 1/4°
Blade Pitching
5. Select a position on the fan circumference and rotate each blade to this
common location when setting or checking blade pitch. All blades must
be pitched with the blade axis pointing in the same direction. Support
the blade tip to maintain the proper plane of rotation while setting the
fan pitch.
6. Set the pitch angle and torque cap screws for each blade. Set the pitch
angle using a straight edge and bevel protractor 2" (51mm) from blade tip
as illustrated. Blades should be within ±1⁄4° of the desired pitch. After the desired pitch is obtained progressively tighten blade cap screws to 30-35 ft·lbƒ
(41-47 N·m) torque. A crowfoot wrench may be necessary to torque cap
screws that cannot be reached with a socket.
7. Install hub cover using cap screws and resilient washers.
8. Tighten cap screws between 10 and 15 ft·lbƒ (14-20 N·m) torque.
Maintenance
Preventative maintenance will prolong useful life and assure continued
trouble-free operation. After the first week of operation and subsequently
at six month intervals:
1. Visually inspect the fan for airborne debris damage and corrosive attack.
2. Torque blade cap screws.
3. Remove any accumulated scale or dirt.
4. Clear blade drain holes.
➠
3
Motor Load
1. The corrected horsepower should be close to but not exceed the contract
horsepower specified (see page 2). Determine corrected horsepower
with this equation:
HPC =
VOLTSA × AMPSA × DENSITYD
VOLTSN × AMPSN × DENSITYA
× HPN
HPC
=
Corrected Horsepower
VOLTSN
=
Nameplate Volts
VOLTSA
=
Actual Volts
AMPSN
=
Nameplate Amperage
AMPSA
=
Actual Amperage
HPN
=
Nameplate Horsepower
DENSITYA =
Actual Air Density
DENSITYD =
Design Air Density
Actual volts and amperage must be obtained with the fan running and the
specified rate of water flowing over the tower after the motor and Geareducer
have reached operating temperature (approximately 30 minutes of operation).
2. The blade pitch can be changed to obtain contract horsepower. A one
degree pitch change will change the power about eight horsepower. If
blades are repitched, follow pitching and fastener tightening instructions
detailed in the Fan Assembly section of this manual.
Caution
Measurements taken on motors operating with Variable Frequency
Drive controls may read up to 15% high from errors in measuring the
approximated sine wave. Instruments capable of measuring a squared
off wave form accurately should be used for measuring power in this
situation.
When checking and/or changing blade pitch or cycling fan in normal
operation, do not exceed 30 sec/hour total motor starting time as motor may be overheated.
Service
When contacting your Marley sales representative for repair or replacement
parts, please refer to the tower serial number.
Replacement blades can be installed without rebalancing. The fan series—
HP7i—and diameter are required when ordering replacement parts.
If rebalancing is required, return the fan hub to Marley for factory rebalance. Obtain a Customer Return Material tag from your Marley sales
representative.
7401 WEST 129 STREET | OVERLAND PARK, KANSAS 66213 UNITED STATES | 913 664 7400 | [email protected] | spxcooling.com
In the interest of technological progress, all products are subject to design and/or material change without notice.
©2009 SPX Cooling Technologies, Inc. | Printed in USA
Manual 92-1471E