1
Changer Control
Audio Master
Operating Instructions
US
CT
사용설명서
Owner’s Record
The model and serial numbers are located on the bottom of the unit.
Record these numbers in the space provided below.
Refer to these numbers whenever you call upon your Sony dealer regarding this product.
Model No. WX-4500X Serial No.
For installation and connections, see the supplied installation/connections manual.
설치 및 접속에 대해서는 부속된 설치/접속 사용설명서를 참조하여 주십시오.
WX-4500X
© 2001 Sony Corporation
KR
Warning
Welcome !
This equipment has been tested and found to
comply with the limits for a Class B digital
device, pursuant to Part 15 of the FCC Rules.
These limits are designed to provide reasonable
protection against harmful interference in a
residential installation. This equipment
generates, uses, and can radiate radio frequency
energy and, if not installed and used in
accordance with the instructions, may cause
harmful interference to radio communications.
However, there is no guarantee that interference
will not occur in a particular installation. If this
equipment does cause harmful interference to
radio or television reception, which can be
determined by turning the equipment off and on,
the user is encouraged to try to correct the
interference by one or more of the following
measures:
– Reorient or relocate the receiving antenna.
– Increase the separation between the equipment
and receiver.
– Connect the equipment into an outlet on a
circuit different from that to which the receiver
is connected.
– Consult the dealer or an experienced radio/TV
technician for help.
Thank you for purchasing this Sony Changer
Control Audio Master. You can enjoy its various
features even more with:
• Optional CD/MD units (both changers and
players)*1.
• CD TEXT information (displayed when a CD
TEXT disc*2 is played).
• Optional controller accessory
Rotary commander RM-X4S
Card remote commander RM-X114
You are cautioned that any changes or
modifications not expressly approved in this
manual could void your authority to operate this
equipment.
THIS DEVICE COMPLIES WITH PART 15
OF THE FCC RULES. OPERATION IS
SUBJECT TO THE FOLLOWING TWO
CONDITIONS;
(1) THIS DEVICE MAY NOT CAUSE
HARMFUL INTERFERENCE, AND
(2) THIS DEVICE MUST ACCEPT ANY
INTERFERENCE RECEIVED, INCLUDING
INTERFERENCE THAT MAY CAUSE
UNDESIRED OPERATION.
CAUTION
The use of optical instruments with this product
will increase eye hazard.
2
*1 This unit works with Sony products only.
*2 A CD TEXT disc is an audio CD that includes
information such as the disc name, artist name,
and track names. This information is recorded on
the disc.
Table of Contents
Location of controls . . . . . . . . . . . . . . . . . . . 4
Precautions . . . . . . . . . . . . . . . . . . . . . . . . . . 6
Notes on discs . . . . . . . . . . . . . . . . . . . . . . . . 7
Notes on Cassettes . . . . . . . . . . . . . . . . . . . . 8
Getting Started
Resetting the unit . . . . . . . . . . . . . . . . . . . . . 8
Setting the clock . . . . . . . . . . . . . . . . . . . . . . 9
CD Player
CD/MD Unit (optional)
Playing a disc . . . . . . . . . . . . . . . . . . . . . . . . 9
Display items . . . . . . . . . . . . . . . . . . . . . . . 10
Playing tracks repeatedly
— Repeat Play . . . . . . . . . . . . . . . . . . . . 10
Playing tracks in random order
— Shuffle Play . . . . . . . . . . . . . . . . . . . . 10
Labeling a CD
— Disc Memo. . . . . . . . . . . . . . . . . . . . . 11
Locating a disc by name
— List-up . . . . . . . . . . . . . . . . . . . . . . . . 12
Selecting specific tracks for playback
— Bank . . . . . . . . . . . . . . . . . . . . . . . . . . 12
Cassette Player
Listening to a tape . . . . . . . . . . . . . . . . . . . 13
Playing a tape in various modes . . . . . . . . . 14
Radio
Storing stations automatically
— Best Tuning Memory (BTM) . . . . . .
Receiving the stored stations . . . . . . . . . . .
Storing only the desired stations . . . . . . . .
Storing station names
— Station Memo . . . . . . . . . . . . . . . . . .
Tuning in a station through a list
— List-up . . . . . . . . . . . . . . . . . . . . . . . .
14
15
15
16
17
Other Functions
Using the rotary commander . . . . . . . . . . .
Adjusting the sound characteristics . . . . . .
Quickly attenuating the sound . . . . . . . . . .
Changing the sound and display settings
— Menu . . . . . . . . . . . . . . . . . . . . . . . . .
Setting the Dynamic Soundstage Organizer
(DSO) . . . . . . . . . . . . . . . . . . . . . . . . . .
Setting the equalizer . . . . . . . . . . . . . . . . . .
Adjusting the front and rear volume . . . . .
Adjusting the volume of the
subwoofer(s) . . . . . . . . . . . . . . . . . . . . .
Selecting the spectrum analyzer . . . . . . . .
17
19
19
19
20
20
21
22
22
Additional Information
Maintenance . . . . . . . . . . . . . . . . . . . . . . . .
Specifications . . . . . . . . . . . . . . . . . . . . . . .
Troubleshooting . . . . . . . . . . . . . . . . . . . . .
Error displays/Messages . . . . . . . . . . . . . .
23
24
25
27
3
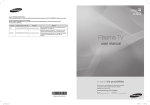
Location of controls
CD
DSO
EQ7
DSPL
SCRL
OFF
SA
SEEK/AMS
SOUND
4
MENU
TAPE
ATT
SEEK/AMS
MODE
SOURCE
Refer to the pages listed for details.
CD/MD : During CD/MD playback
MENU : During menu mode
TAPE : During tape playback
a Frequency select switch (located on the
left side of the unit)
See “Frequency select switch” in the
Installation/Connections manual.
b DSO button 20
c SCRL (scroll) button 10
d Display window
e Receptor for the card remote
commander
f EQ7 button 20
g CD Z (eject) button 9
h DSPL (display mode change) button
10, 11, 16
i OFF (Stop/Power off) button* 8, 9, 13
j SOUND button 19, 21, 22
k MENU button 9, 10, 11, 12, 13, 14, 15,
16, 20, 21, 22
l SA (spectrum Analyzer) button 22
m SEEK/AMS buttons (–/+)
CD/MD 9
TAPE 13
RADIO 15
MENU 9, 10, 11, 12, 13, 14, 15, 16, 19,
20, 21, 22
m
RADIO : During radio reception
n Jog roller
Jog roller usually functions as a volume
control except in some adjusting modes.
CD/MD 11, 12
RADIO 15, 16, 17
MENU 9, 10, 11, 12, 13, 14, 15, 16, 20,
21, 22
o ATT button 19
p MODE (o) button
CD/MD 10, 11
TAPE 13, 14
RADIO 14, 15
q SOURCE (Power on/CD/MD/Tape/
Radio) button 9, 10, 11, 13, 14, 15, 19,
20, 21, 22
r Reset button 8
s TAPE Z (eject) button 13
* Warning when installing in a car without
an ACC (accessory) position on the
ignition switch
After turning off the ignition, be sure to press
(OFF) on the unit for 2 seconds to turn off the
clock display.
Otherwise, the clock display does not turn off and
this causes battery drain.
n
To select upwards
SEEK/AMS
SEEK/AMS
To select leftwards/.
To select rightwards/>
To select downwards
In menu mode, the currently selectable directions are indicated with a “v” in the display.
continue to next page t
5
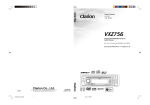
Card remote commander RM-X114
(optional)
DSPL
MODE
PRESET +
MENU
SEEK–
SOUN
D
DISC +
SOURCE
DISC –
LIST
SEEK+
R
ENTE
PRESET –
OFF
+
ATT
VOL
Precautions
• If your car was parked in direct sunlight, allow
the unit to cool off before operating it.
• Power antennas will extend automatically
while you select the radio reception.
• If no power is being supplied to the unit, check
the connections first. If everything is in order,
check the fuse.
• If no sound comes from the speakers of a twospeaker system, set the fader control to the
center position.
• When a tape is played back for a long period,
the cassette may become warm because of the
built-in power amplifier. However, this is not a
sign of malfunction.
• Do not use the CUSTOM FILE feature while
driving, or perform any other function which
could divert your attention from the road.
–
If you have any questions or problems
concerning your unit that are not covered in this
manual, please consult your nearest Sony dealer.
Moisture condensation
The corresponding buttons of the card
remote commander control the same
functions as those on this unit.
a
b
c
d
e
f
g
h
i
j
k
l
DSPL button
MENU button
SOURCE button
SEEK (</,) buttons
SOUND button
OFF button
VOL (–/+) buttons
MODE button
LIST button
DISC/PRESET (M/m) buttons
ENTER button
ATT button
Note
If the unit is turned off by pressing (OFF) for 2
seconds, it cannot be operated with the card remote
commander unless (SOURCE) on the unit is pressed,
or a CD or cassette is inserted to activate the unit first.
Tip
Refer to “Replacing the lithium battery” for details on
how to replace the batteries (page 23).
6
On a rainy day or in a very damp area, moisture
condensation may occur inside the lenses and
display of the unit. Should this occur, the unit
will not operate properly. In such a case, remove
the disc and wait for about an hour until the
moisture has evaporated.
To maintain high quality sound
Be careful not to splash juice or other soft drinks
onto the unit or tapes.
Notes on discs
• To keep the disc clean, do not touch the surface.
Handle the disc by its edge.
• Keep your discs in their cases or disc
magazines when not in use.
Do not subject the discs to heat/high
temperature. Avoid leaving them in parked cars
or on dashboards/rear trays.
Notes on CD-R/CD-RW discs
• You can play CD-Rs (recordable CDs)/CDRWs (rewritable CDs) designed for audio use
on this unit.
Look for these marks to distinguish CD-Rs/
CD-RWs for audio use.
These marks denote that a disc is not for audio
use.
• Do not attach labels, or use discs with sticky
ink/residue. Such discs may stop spinning
when used, causing a malfunction, or may ruin
the disc.
• Some CD-Rs/CD-RWs (depending on the
equipment used for its recording or the
condition of the disc) may not play on this unit.
• You cannot play a CD-R/CD-RW that is not
finalized*.
* A process necessary for a recorded CD-R/CD-RW
disc to be played on the audio CD player.
• Discs with non-standard shapes (e.g., heart,
square, star) cannot be played on this unit.
Attempting to do so may damage the unit. Do
not use such discs.
• You cannot play 8 cm (3 in.) CDs.
• Before playing, clean the discs with a
commercially available cleaning cloth. Wipe
each disc from the center out. Do not use
solvents such as benzine, thinner, commercially
available cleaners, or antistatic spray intended
for analog discs.
7
Notes on Cassettes
Getting Started
Cassette care
• Do not touch the tape surface of a cassette, as
any dirt or dust will contaminate the heads.
• Keep cassettes away from equipment with
built-in magnets such as speakers and
amplifiers, as erasure or distortion on the
recorded tape could occur.
• Do not expose cassettes to direct sunlight,
extremely cold temperatures, or moisture.
• Slack in the tape may cause the tape to be
caught in the machine. Before you insert the
tape, use a pencil or similar object to turn the
reel and take up any slack.
Resetting the unit
Before operating the unit for the first time, or
after replacing the car battery or changing the
connections, you must reset the unit.
Press the reset button with a pointed object, such
as a ball-point pen.
CD
DSO
EQ7
DSPL
SCRL
OFF
SEEK/AMS
SOUND
MENU
MD
ATT
SA
SEEK/AMS
MODE
SOURCE
Slack
Reset button
• Distorted cassettes and loose labels can cause
problems when inserting or ejecting tapes.
Remove or replace loose labels.
• The sound may become distorted while playing
the cassette. The cassette player head should be
cleaned after each 50 hours of use.
The use of cassettes longer than 90 minutes
is not recommended except for long
continuous play
The tape used for these cassettes is very thin and
tends to stretch easily.
Frequent playing and stopping of these tapes
may cause them to become entangled in the
cassette deck mechanism.
8
Notes
• Pressing the reset button will erase the clock setting
and some stored contents.
• When you connect the power supply cord to the unit
or reset the unit, wait for about 10 seconds before
you insert a CD or cassette. If you insert a CD or
cassette within these 10 seconds, the unit will not be
reset, and you will have to press the reset button
again.
• When you press the reset button or (OFF), the
demonstration display will appear in the display. To
deactivate the demonstration display, set the Motion
Display mode to off (page 19).
Setting the clock
The clock uses a 12-hour digital indication.
CD Player
CD/MD Unit (optional)
Example: To set the clock to 10:08
1
Press (MENU), then rotate the jog
roller until “Clock” appears.
In addition to playing a CD with this unit, you
can also control external CD/MD units.
Note
If you connect an optional CD unit with the CD TEXT
function, the CD TEXT information will appear in the
display when you play a CD TEXT disc.
1 Push the jog roller.
The hour indication flashes.
Playing a disc
2 Rotate the jog roller to set the hour.
(With this unit)
3 Press (SEEK/AMS +).
The minute indication flashes.
Insert the disc (labeled side up).
Playback starts automatically.
4 Rotate the jog roller to set the
minute.
2
Push the jog roller.
The clock starts. After the clock setting is
completed, the display returns to normal play
mode.
Tip
When Motion Display mode is set to “off” or “1,” and
D.Info mode is set to “on,” the time is always displayed
(page 19).
Note
If your car has no ACC position on the ignition switch,
be sure to turn the unit on by pressing (SOURCE) or
inserting a CD or cassette before setting the clock.
If a disc is already inserted, press (SOURCE)
repeatedly until “CD” appears to start playback.
To
Press
Stop playback
(OFF)
Eject the disc
CD Z
Skip tracks
– Automatic
Music Sensor
(SEEK/AMS) (./>)
[once for each track]
Fast-forward/
reverse
– Manual Search
(SEEK/AMS) (m/M)
[hold to desired point]
Notes
• When the last track on the disc is over, playback
restarts from the first track of the disc.
• With optional unit connected, playback of the same
source will continue on to the optional CD/MD unit.
continue to next page t
9
(With optional unit)
1
Press (SOURCE) repeatedly to select
“CD” or “MD.”
2
Press (MODE) repeatedly until the
desired unit appears.
Playback starts.
Locating a disc
— Disc selection
(see “Locating a disc by name” on page 12.)
Tip
With the optional MG Memory Stick System-up Player
MGS-X1 connected to the unit, press (SOURCE) to
select “MD,” then press (MODE) to select “MS.”
Display items
When the disc/track changes, any prerecorded
title*1 of the new disc/track is automatically
displayed (if the Auto Scroll function is set to
“on,” names exceeding 13 characters will be
scrolled (page 19)).
Displayable items
• Disc name*1/artist name*2
• Track title*1
Tip
When Auto scroll is set to off and the disc/track name
is changed, the disc/track name does not scroll.
Playing tracks repeatedly
— Repeat Play
The disc in the main unit will repeat a track or
the entire disc when it reaches the end. For repeat
play, you can select:
• Repeat 1 — to repeat a track.
• Repeat 2* — to repeat a disc.
* Available only when one or more optional CD/MD
units are connected.
1
Press (MENU), then rotate the jog
roller until “Repeat” appears.
2
Press (SEEK/AMS +) repeatedly to
select the desired setting.
3
Push the jog roller.
Repeat Play starts.
To return to normal play mode, select “Repeat
off ” in step 2.
Playing tracks in random
order
— Shuffle Play
Disc
number
Track
number
To
Press
Switch display
item
(DSPL)
Elapsed
playing time
Scroll display item (SCRL)
*1 Available only when one or more optional CD (MD)
units are connected.
*2 Available only when one or more optional CD units,
or two or more optional MD units are connected.
*1 When pressing (DSPL), “NO D.Name” or “NO
T.Name” indicates that there is no Disc Memo
(page 11) or prerecorded name to display.
*2 Only for CD TEXT discs with the artist name.
1
Press (MENU), then rotate the jog
roller until “Shuffle” appears.
2
Press (SEEK/AMS +) repeatedly to
select the desired setting.
3
Push the jog roller.
Shuffle Play starts.
Notes
• Some characters cannot be displayed.
• For some CD TEXT discs with very many
characters, information may not scroll.
• This unit cannot display the artist name for each
track of a CD TEXT disc.
• The source name, disc name, track title, and
elapsed playing time may not be displayed
depending on the Motion or SA settings.
10
You can select:
• Shuffle 1 — to play the tracks on the current
disc in random order.
• Shuffle 2*1 — to play the tracks in the current
optional CD (MD) unit in random order.
• Shuffle all*2 — to play all the tracks in all the
connected CD (MD) units (including this unit)
in random order.
To return to normal play mode, select “Shuffle
off ” in step 2.
Note
“Shuffle all” will not shuffle tracks between CD units
and MD units.
Labeling a CD
— Disc Memo (For a CD unit with the
CUSTOM FILE function)
You can label each disc with a custom name
(Disc Memo). You can enter up to 8 characters
for a disc. If you label a CD, you can locate the
disc by name (page 12).
Tips
• Simply overwrite or enter “ ” to correct or erase a
name.
• There is another way to start labeling a CD: Push
the jog roller for 2 seconds instead of performing
steps 2 and 3.
• You can label CDs on a unit without the CUSTOM
FILE function if that unit is connected along with a
CD unit that has the function. The Disc Memo will be
stored in the memory of the CD unit with the
CUSTOM FILE function.
Note
Repeat/shuffle play is suspended until the Name Edit
is complete.
Viewing the Disc Memo
Caution
Do not use the CUSTOM FILE feature while
driving, or perform any other function which
could divert your attention from the road.
1
Start playing the disc you want to
label.
2
Press (MENU), then rotate the jog
roller until “Name Edit” appears.
3
Push the jog roller.
As a display item, the Disc Memo always takes
priority over any original CD TEXT information.
To
Press
View
(DSPL) during CD/CD
TEXT disc playback
Tip
To find out about other items that can be displayed,
see page 10.
Erasing the Disc Memo
4
1
Press (SOURCE) repeatedly to select
“CD.”
The unit will repeat the disc during the
labeling procedure.
2
Press (MODE) repeatedly to select the
CD unit storing the Disc Memo.
Enter the characters.
3
1 Rotate the jog roller to select the
desired character.
Press (MENU), then rotate the jog
roller until “Name Delete” appears.
4
Push the jog roller.
The stored names will appear.
5
Rotate the jog roller to select the disc
name you want to erase.
The stored names will appear.
6
Push the jog roller for 2 seconds.
The name is erased.
Repeat steps 5 and 6 if you want to erase
other names.
7
Press (MENU) twice.
The unit returns to normal CD play mode.
A t B t C ... t 0 t 1 t 2 ... t +
t–t
... t * t A
*
* (blank space)
2 Press (SEEK/AMS +) after locating
the desired character.
If you press (SEEK/AMS -), you can move
back to the left.
3 Repeat steps 1 and 2 to enter the
entire name.
5
Notes
• When the Disc Memo for a CD TEXT disc is erased,
the original CD TEXT information is displayed.
• If you cannot find the Disc Memo you want to erase,
try selecting a different CD unit in step 2.
To return to normal CD play mode,
push the jog roller.
11
Locating a disc by name
— List-up (For a CD unit with the CD TEXT/
CUSTOM FILE function, or an MD unit)
You can use this function for discs that have been
assigned custom names*1 or for CD TEXT
discs*2.
*1 Locating a disc by its custom name: when you
assign a name for a CD (page 11) or an MD.
*2 Locating discs by the CD TEXT information: when
you play a CD TEXT disc on a CD unit with the CD
TEXT function.
1
During playback, push the jog roller.
The name assigned to the current disc appears
in the display.
2
Rotate the jog roller until you find the
desired disc.
3
Push the jog roller to play the disc.
Notes
• Some letters cannot be displayed (exception: Disc
Memo).
• If you do not perform any operation for more than 5
seconds with the list displayed, the display returns to
normal playback mode.
Operating with the card remote
commander
12
1
2
During playback, press (LIST).
3
Press (ENTER).
Press (DISC/PRESET -) or
(DISC/PRESET +) repeatedly until you
find the desired disc.
Selecting specific tracks for
playback
— Bank (For a CD unit with the CUSTOM FILE
function)
If you label the disc, you can set the unit to skip
or play the tracks of your choice.
1
Start playing the disc you want to
label.
2
Press (MENU), then rotate the jog
roller until “Bank Sel” appears.
3
Push the jog roller.
4
Label the tracks.
1 Press (SEEK/AMS -) or (SEEK/AMS +)
repeatedly to select the track you
want to label.
2 Push the jog roller to select “Play”
or “Skip.”
5
Repeat step 4 to set “Play” or “Skip”
for all the tracks.
6
Press (MENU) twice.
The unit returns to normal CD play mode.
Notes
• You can set “Play” and “Skip” for up to 24 tracks.
• You cannot set “Skip” for all the tracks on a CD.
Playing specific tracks only
You can select:
• Bank on — to play the tracks with the “Play”
setting.
• Bank inv (Inverse) — to play the tracks with
the “Skip” setting.
1
During playback, press (MENU), then
rotate the jog roller until “Bank on,”
“Bank inv,” or “Bank off” appears.
2
Press (SEEK/AMS +) repeatedly until
the desired setting appears.
3
Push the jog roller.
Playback starts from the track following the
current one.
To return to normal play mode, select “Bank off”
in step 2.
Cassette Player
Listening to a tape
Insert a cassette.
Playback starts automatically.
If a cassette is already inserted, press (SOURCE)
repeatedly until “FORWARD B” or
“REVERSE b” appears to start playback.
FORWARD B: The side facing up is played.
REVERSE b: The side facing down is played.
To
Press
Change the tape’s (MODE) (o)
playback direction
Stop playback
(OFF)
Eject the cassette
TAPE Z
Skip tracks
– Automatic
Music Sensor
(SEEK/AMS) (./>)
[once for each track]
Fast-forward/
Rewind
(SEEK/AMS) (m/M)
[hold for 2 seconds]
Tip
To start playback during fast-forward or rewind, press
(MODE) (o).
Note
The AMS function may not work when:
– the blanks between tracks are shorter than 4
seconds.
– there is noise between tracks.
– there are long sections of low volume or quiet
sections.
13
Playing a tape in various
modes
You can play the tape in various modes:
• Met al lets you play a metal or CrO2 tape.
• BL.Skip (Blank Skip) skips blanks longer than
8 seconds.
• ATA (Automatic Tuner Activation) turns on the
tuner automatically when fast-winding the tape.
• NR (Dolby NR) lets you select the Dolby* NR
B system.
* Manufactured under license from Dolby
Laboratories. “Dolby” and the double-D symbol are
trademarks of Dolby Laboratories.
The unit can store up to 10 stations per band
(FM1, FM2, and AM).
Caution
When tuning in stations while driving, use Best
Tuning Memory to prevent accidents.
Storing stations
automatically
1
2
During tape playback, press (MENU).
— Best Tuning Memory (BTM)
Rotate the jog roller until the desired
mode appears.
3
Press (SEEK/AMS +) to select “on.”
Example: ATA mode
The unit selects the stations with the strongest
signals within the selected band, and stores them
in the order of their frequency.
4
Push the jog roller.
Play mode starts.
To return to normal playback mode, select “ off ”
in step 3.
Note
Power antennas will extend when ATA is set to on.
Playing tracks repeatedly
— Repeat Play
1
Press (MENU), then rotate the jog
roller until “Repeat” appears.
2
3
Press (SEEK/AMS +) to select “on.”
Push the jog roller.
Repeat play starts.
To return to normal playback mode, select
“Repeat off ” in step 2.
Tip
During repeat playback, press (MODE). “REP”
disappears from the display and repeat mode is
canceled.
14
Radio
1
Press (SOURCE) repeatedly to select
the radio.
2
Press (MODE) repeatedly to select the
band.
3
Press (MENU), then rotate the jog
roller until “B.T.M” appears.
4
Push the jog roller.
A beep sounds when the setting is stored.
Notes
• If only a few stations can be received due to weak
signals, some stored numbers will retain their former
settings.
• When a number is indicated in the display, the unit
starts storing stations from the one currently
displayed.
Receiving the stored stations
1
Press (SOURCE) repeatedly to select
the radio.
2
Press (MODE) repeatedly to select the
band.
3
4
Push the jog roller.
5
Push the jog roller to tune in the
desired station.
Rotate the jog roller until you find the
desired station.
Tip
Press (DISC/PRESET -) or (DISC/PRESET +) on the
card remote commander to receive the stations in the
order they are stored in memory (Preset Search
function).
If preset tuning does not work
Press (SEEK/AMS -) or (SEEK/AMS +) to
search for the station (automatic
tuning).
Scanning stops when the unit receives a
station. Repeat until the desired station is
received.
Tips
• If automatic tuning stops too frequently, turn on the
Local Seek to limit seek to stations with stronger
signals (see “Changing the sound and display
settings” on page 19).
• If you know the frequency of the station you want to
listen to, press and hold (SEEK/AMS -) or
(SEEK/AMS +) to locate the approximate frequency,
then press (SEEK/AMS) repeatedly to fine adjust to
the desired frequency (manual tuning).
If FM stereo reception is poor
Select monaural reception mode.
(see “Changing the sound and display
settings” on page 19). The sound improves,
but becomes monaural (“ST” disappears).
Tip
If FM broadcasts are difficult to hear, set DSO to off.
Automatic reception frequency
adjustment
— IF Auto function
While receiving FM stereo, interference from a
nearby station may make listening difficult. In
such cases, the “IF Auto” function of this unit
will automatically narrow the reception
frequency to eliminate noise. For this reason,
some FM stereo broadcasts may become
monaural. If you would like to hear such
broadcasts in stereo, manually switch to the
“Wide” setting.
1
During FM radio reception, press
(MENU).
2
Rotate the jog roller until “IF Auto”
appears.
3
4
Press (SEEK/AMS +) to select “Wide.”
Push the jog roller.
Note
Return to the “IF Auto” setting from the “Wide” setting
if interference makes FM stereo difficult to listen to.
Storing only the desired
stations
You can manually preset the desired stations.
1
Press (SOURCE) repeatedly to select
the radio.
2
Press (MODE) repeatedly to select the
band.
3
Press (SEEK/AMS -) or (SEEK/AMS +) to
tune in the station that you want to
store.
4
5
Push the jog roller.
6
Push the jog roller for 2 seconds until
“Memory” appears.
The stored station indication appears in the
display.
Rotate the jog roller to select the
stored number.
Note
If you try to store another station on the same stored
number, the previously stored station will be erased.
15
Storing station names
— Station Memo
You can assign a name to each radio station and
store it in memory. The name of the station
currently tuned in appears in the display. You can
assign a name using up to 8 characters for a
station.
Storing the station names
1
Tune in a station whose name you
want to store.
2
Press (MENU), then rotate the jog
roller until “Name Edit” appears.
3
Push the jog roller.
4
A t B t C ... t 0 t 1 t 2 ... t +
... t * t A
t–t
*
* (blank space)
2 Press (SEEK/AMS +) after locating
the desired character.
If you press (SEEK/AMS -), you can move
back to the left.
3 Repeat steps 1 and 2 to enter the
entire name.
Push the jog roller.
Tips
• Simply overwrite or enter “ ” to correct or erase a
name.
• There is another way to start storing station names:
Push the jog roller for 2 seconds instead of
performing steps 2 and 3.
16
Switch the display item to frequency or station
name*.
To
Press
Switch display
item
(DSPL) during radio
reception
* If the station name is not stored, “NO Name”
appears in the display for one second.
Erasing the station name
1
During radio reception, press (MENU),
then rotate the jog roller until “Name
Delete” appears.
2
3
Push the jog roller.
4
Push the jog roller for 2 seconds.
The name is erased.
Repeat steps 3 to 4 if you want to erase other
names.
5
Press (MENU) twice.
The unit returns to normal radio reception
mode.
Enter the characters.
1 Rotate the jog roller to select the
desired character.
5
Displaying the station name
Rotate the jog roller to select the
station whose name you want to
erase.
Note
If you have already erased all of the station names,
“NO Data” appears in step 4.
Tuning in a station through a
list
Other Functions
— List-up
You can also control the unit (and optional CD/
MD units) with a rotary commander (optional).
1
During radio reception, push the jog
roller.
The frequency or the name assigned to the
station currently tuned in flashes.
Using the rotary commander
First, attach the appropriate label depending on
how you want to mount the rotary commander.
The rotary commander works by pressing
buttons and/or rotating controls.
2
Rotate the jog roller until you find the
desired station.
If no name is assigned to the selected station,
the frequency appears in the display.
3
Push the jog roller to tune in the
desired station.
Note
If you do not perform any operation for more than 5
seconds with the list displayed, the display returns to
normal radio reception mode.
SOUND
MODE
DSPL
DSPL
MODE
SOUND
By pressing buttons
(ATT)
(SOUND)
Operating with the card remote
commander
3
During radio reception, press (LIST).
(SOURCE)
OFF
1
2
(MODE)
Press (DISC/PRESET -) or
(DISC/PRESET +) repeatedly until you
find the desired station.
(DSPL)
(OFF)
Rotate the VOL control
to adjust the volume.
Press (ENTER).
Press
To
(SOURCE)
Change source (radio/CD/
MD*1/Tape)/Power on
(MODE)
Change operation
(radio band/CD unit*1/MD
unit*1/tape playback
direction)
(ATT)
Attenuate sound
(OFF)*2
Stop playback or radio
reception/Power off
(SOUND)
Adjust the sound menu
(DSPL)
Change the display item
continue to next page t
17
*1 Only if the corresponding optional equipment is
connected.
*2 If your car has no ACC (accessory) position on the
ignition key switch, be sure to press (OFF) for 2
seconds to turn off the clock indication after turning
off the ignition.
Changing the operative direction
The operative direction of controls is factory-set
as shown below.
To increase
By rotating the control
To decrease
SEEK/AMS
control
If you need to mount the rotary commander on
the right hand side of the steering column, you
can reverse the operative direction.
Rotate and release to:
– Skip tracks on the disc.
– Locate the beginning of tracks on the tape.
– Tune in stations automatically.
Rotate, hold, and release to:
– Fast-forward/reverse a track.
– Fast-wind the tape.
– Find a station manually.
Tip
To start playback while fast-winding the tape, press
(MODE).
By pushing in and rotating the control
PRESET/
DISC control
Push in and rotate the control to:
– Receive preset stations.
– Change the disc*.
* When an optional CD/MD unit is connected.
18
Press (SOUND) for 2 seconds while
pushing the VOL control.
Tip
You can also change the operative direction of these
controls with the unit (see “Changing the sound and
display settings” on page 19).
Adjusting the sound
characteristics
You can adjust the bass, treble, balance, fader,
and subwoofer volume.
The bass and treble levels and subwoofer volume
can be stored independently for each source.
1
Press (SOURCE) to select a source
(radio, CD, MD, or tape).
2
Press (SOUND) repeatedly to select
the item you want to adjust.
Each time you press (SOUND), the item
changes as follows:
BAS (bass) t TRE (treble) t
BAL (left-right) t FAD (front-rear) t
Sub (subwoofer volume)
3
Press (SEEK/AMS -) or (SEEK/AMS +) to
adjust the selected item.
When adjusting with the rotary commander,
press (SOUND) and rotate the VOL control.
Note
Adjust within 3 seconds after selecting the item.
Changing the sound and
display settings
— Menu
The following items can be set:
Set up
• Clock (page 9)
• Beep — to turn the beeps on or off.
• RM (Rotary Commander) — to change the
operative direction of the controls of the rotary
commander.
– Select “norm” to use the rotary commander
as the factory-set position.
– Select “rev” when you mount the rotary
commander on the right side of the steering
column.
• Key ill (Key illumination) — to change the
illumination of the unit’s buttons.
– Select “Auto” to have the buttons light up
only with the car lights on. (Functions only
when the illumination control lead is
connected to the car’s illumination feed.)
– Select “on” to light up the buttons.
Dspl (Display)
Quickly attenuating the
sound
Press (ATT).
“ATT on” appears in the display momentarily.
To restore the previous volume level, press
(ATT) again.
Tip
When the interface cable of a car telephone is
connected to the ATT lead, the unit decreases the
volume automatically when a telephone call comes in
(Telephone ATT function).
• D.Info (Dual Information) — to display the
clock and the play mode at the same time (on).
(Functions only when Motion is set to “1” or
“off.”)
• Dimmer — to change the brightness of the
display.
– Select “Auto” to dim the display only when
you turn the lights on. (Functions only when
the illumination control lead is connected to
the car’s illumination feed.)
– Select “on” to dim the display.
– Select “off” to deactivate the Dimmer.
• Display
– When Display is set to “off,” the display
comes on only during an operation.
• Motion (Motion Display) — to select the
Motion Display mode from “1,” “2,” and “off.”
• A.Scrl (Auto Scroll)*
– Select “on” to scroll all automatically
displayed names exceeding 13 characters.
– When Auto scroll is set to off and the disc/
track name is changed, the disc/track name
does not scroll.
* When no CD or MD is playing, this item will not
appear.
continue to next page t
19
Sound
• HPF (High pass filter) (page 21)
• LPF (Low pass filter) (page 22)
• Loud (Loudness) — to enjoy bass and treble
even at low volumes. The bass and treble will
be reinforced.
P.Mode (Play Mode)
• Local on/off (Local seek mode) (page 15)
– Select “on” to only tune into stations with
stronger signals.
• Mono on/off (Monaural mode) (page 15)
– Select “on” to hear FM stereo broadcast in
monaural. Select “off” to return to normal
mode.
• IF Auto/Wide (page 15)
1
Press (MENU).
To set A.Scrl, press (MENU) during CD/MD
Playback.
2
Rotate the jog roller until the desired
item appears.
3
Press (SEEK/AMS -) or (SEEK/AMS +) to
select the desired setting (Example:
“on” or “off”).
4
Push the jog roller.
After the mode setting is completed, the
display returns to normal play mode.
Notes
• The displayed item will differ depending on the
source.
• If you do not perform any operation for more than 5
seconds with the menu displayed, the display
returns to normal play mode.
Tip
You can easily switch among categories (“Set up,”
“Dspl,” “P.Mode,” “Sound,” and “Edit”) by pressing
(DISC/PRESET -) or (DISC/PRESET +) on the card
remote commander for 2 seconds.
Operating with the card remote
commander
1
2
Press (MENU).
3
Press (SEEK/AMS -) or (SEEK/AMS +) to
select the desired setting.
4
Press (ENTER).
Press (DISC/PRESET -) or
(DISC/PRESET +) repeatedly until the
desired item appears.
Setting the Dynamic
Soundstage Organizer (DSO)
If your speakers are installed into the lower part
of the doors, the sound will come from below
and may not be clear.
The DSO (Dynamic Soundstage Organizer)
function creates a more ambient sound as if there
were speakers in the dashboard (virtual
speakers).
You can store the DSO setting for each source.
1
Press (SOURCE) to select a source
(radio, CD, MD, or tape).
2
Press (DSO) repeatedly until “DSO
on” appears.
To cancel the DSO function, select “DSO off” in
step 2.
Notes
• Depending on the type of car interior or type of
music, DSO may not have a desirable affect.
• If FM broadcasts are difficult to hear, set DSO to off.
Setting the equalizer
You can select an equalizer curve for 7 music
types (Vocal, Club, Jazz, New Age, Rock,
Custom, and Xplod).
You can store a different equalizer setting for
each source.
Selecting the equalizer curve
1
Press (SOURCE) to select a source
(radio, CD, MD, or tape).
2
Press (EQ7) repeatedly until the
desired equalizer curve.
Each time you press (EQ7), the item
changes.
To cancel the equalizing effect, select “off.”
After 3 seconds, the display returns to the
normal playback mode.
20
Note
When DSO is set to on, equalizer settings are
automatically adjusted for best overall effect.
Adjusting the equalizer curve
You can store and adjust the equalizer settings
for frequency and level.
1
Press (SOURCE) to select a source
(radio, CD, MD, or tape).
2
Press (MENU), then rotate the jog
roller until “EQ Tune” appears.
3
4
Push the jog roller.
5
Press (SEEK/AMS -) or (SEEK/AMS +) to
select the desired equalizer curve,
then push the jog roller.
Each time you press (SEEK/AMS), the item
changes.
Adjusting the front and rear
volume
1
During playback or radio reception,
press (SOUND) repeatedly until “FAD”
appears.
2
Press (SEEK/AMS -) or (SEEK/AMS +) to
adjust the volume of front/rear
speakers.
After 3 seconds, the display returns to normal
playback mode.
Select the desired frequency and level.
1 Press (SEEK/AMS -) or (SEEK/AMS +)
to select the desired frequency.
Each time you press (SEEK/AMS), the
frequency changes.
To match the characteristics of the installed
speaker system, you can select the cut-off
frequency of the speakers.
Level
62 Hz y 157 Hz y 396 Hz y 1.0 kHz
y 2.5 kHz y 6.3 kHz y 16 kHz
Adjusting the cut-off frequency for the
front/rear speakers
Cut-off frequency
off
2 Rotate the jog roller to adjust the
desired level.
The level is adjustable by 1 dB steps from
–10 dB to +10 dB.
Frequency (Hz)
To restore the factory-set equalizer curve,
push the jog roller for 2 seconds.
6
1
During playback or radio reception,
press (MENU).
2
Rotate the jog roller until “HPF”
appears.
3
Press (SEEK/AMS -) or (SEEK/AMS +) to
select the cut-off frequency.
Each time you press (SEEK/AMS), the
frequency changes as follows:
4
Push the jog roller.
After the frequency setting is complete, the
display returns to normal playback mode.
Push the jog roller.
When the effect setting is complete, the
normal playback mode appears.
off (default setting) y 78 Hz y 125 Hz
21
Adjusting the volume of the
subwoofer(s)
3
Press (SEEK/AMS -) or (SEEK/AMS +) to
select the cut-off frequency.
Each time you press (SEEK/AMS), the
frequency changes as follows:
off (default setting) y 125 Hz y 78 Hz
1
Press (SOURCE) to select a source
(radio, CD, MD, or tape).
2
Press (SOUND) repeatedly until “Sub”
appears.
4
Push the jog roller.
After the frequency setting is complete, the
display returns to normal playback mode.
Selecting the spectrum
analyzer
3
Press (SEEK/AMS -) or (SEEK/AMS +) to
adjust the volume.
After 3 seconds, the display returns to normal
playback mode.
The sound signal level is displayed on a spectrum
analyzer. You can select a display from 7 patterns
(SA 1 to SA 7), or the automatic display mode
where all the patterns appear.
Tip
The volume level is adjustable from –10 dB to +10 dB.
(Below –10 dB, “ATT” is displayed.)
During playback or radio reception,
press (SA) repeatedly to select the
desired setting.
Each time you press (SA), the item changes.
Adjusting the cut-off frequency for the
subwoofer(s)
Level
To match the characteristics of the connected
subwoofer(s), you can cut out the unwanted high
and middle frequency signals entering the
subwoofer(s). By setting the cut-off frequency
(see the diagram below), the subwoofer(s) will
output only low frequency signals so you can get
a clearer sound image.
Cut-off frequency
off
Frequency (Hz)
22
1
During playback or radio reception,
press (MENU).
2
Rotate the jog roller until “LPF”
appears.
To cancel the Spectrum Analyzer, select “SA off”
in step 2.
Note
When the Motion Display mode is set to “1” or “2,” the
Spectrum Analyzer does not appear.
Replacing the lithium battery
Additional Information
Maintenance
Under normal conditions, batteries will last
approximately 1 year. (The service life may be
shorter, depending on the conditions of use.)
When the battery becomes weak, the range of the
card remote commander becomes shorter.
Replace the battery with a new CR2025 lithium
battery.
Fuse replacement
When replacing the fuse, be sure to use one
matching the amperage rating stated on the
original fuse. If the fuse blows, check the power
connection and replace the fuse. If the fuse blows
again after replacement, there may be an internal
malfunction. In such a case, consult your nearest
Sony dealer.
x
+ side up
Fuse (10 A)
Warning
Never use a fuse with an amperage rating
exceeding the one supplied with the unit as this
could damage the unit.
Notes on lithium battery
• Keep the lithium battery out of the reach of
children. Should the battery be swallowed,
immediately consult a doctor.
• Wipe the battery with a dry cloth to assure a
good contact.
• Be sure to observe the correct polarity when
installing the battery.
• Do not hold the battery with metallic tweezers,
otherwise a short-circuit may occur.
WARNING
Battery may explode if mistreated.
Do not recharge, disassemble, or dispose of
in fire.
23
Specifications
AUDIO POWER SPECIFICATIONS
POWER OUTPUT AND TOTAL HARMONIC DISTORTION
23 watts per channel minimum continuous average power into 4 ohms, 4
channels driven from 20 Hz to 20 kHz with no more than 5% total harmonic
distortion.
CD Player section
Signal-to-noise ratio
Frequency response
Wow and flutter
Laser Diode Properties
Material
Wavelength
Emission Duration
Laser output power
AM
92 dB
10 – 20,000 Hz
Below measurable limit
GaAlAs
780 nm
Continuous
Less than 44.6 µW*
* This output is the value measured at a distance of
200 mm from the objective lens surface on the
Optical Pick-up Block.
Cassette Player section
Tape track
Wow and flutter
Frequency response
Signal-to-noise ratio
4-track 2-channel stereo
0.08 % (WRMS)
30 – 18,000 Hz
Cassette type
Dolby B NR
Dolby NR off
TYPE II, IV
67 dB
58 dB
TYPE I
64 dB
55 dB
Tuning range
Antenna terminal
Intermediate frequency
Sensitivity
Power amplifier section
Outputs
Speaker impedance
Maximum power output
Outputs
Inputs
FM
Tuning range
24
Speaker outputs
(sure seal connectors)
4 – 8 ohms
50 W × 4 (at 4 ohms)
General
Tuner section
FM tuning interval:
50 kHz/200 kHz switchable
87.5 – 108.0 MHz
(at 50 kHz step)
87.5 – 107.9 MHz
(at 200 kHz step)
Antenna terminal
External antenna connector
Intermediate frequency
10.7 MHz/450 kHz
Usable sensitivity
8 dBf
Selectivity
75 dB at 400 kHz
Signal-to-noise ratio
65 dB (stereo),
70 dB (mono)
Harmonic distortion at 1 kHz
0.7 % (stereo),
0.4 % (mono)
Separation
35 dB at 1 kHz
Frequency response
30 – 15,000 Hz
AM tuning interval:
9 kHz/10 kHz switchable
531 – 1,602 kHz
(at 9 kHz step)
530 – 1,710 kHz
(at 10 kHz step)
External antenna connector
10.7 MHz/450 kHz
30 µV
Tone controls
Loudness
Power requirements
Dimensions
Mounting dimensions
Mass
Audio outputs
Subwoofer output (mono)
Power antenna relay control
lead
Power amplifier control lead
Telephone ATT control lead
Illumination control lead
BUS control input
connector
BUS audio input connector
Remote controller input
connector
Antenna input connector
Bass ±10 dB at 62 Hz
Treble ±10 dB at 16 kHz
+8 dB at 100 Hz
+2 dB at 10 kHz
12 V DC car battery
(negative ground)
Approx. 178 × 100 × 186
mm (71/8 × 4 × 73/8 in.)
(w/h/d)
Approx. 178 × 100 × 165
mm (71/8 × 4 × 61/2 in.)
(w/h/d)
Approx. 2.1 kg (4 lb 10 oz)
Supplied accessories
Optional accessories
Optional equipment
Parts for installation and
connections (1 set)
Rotary commander
RM-X4S
Card remote commander
RM-X114
BUS cable (supplied with
an RCA pin cord)
RC-61 (1 m), RC-62 (2 m)
CD changer (10 discs)
CDX-848X, CDX-747X,
CDX-646X
MD changer (6 discs)
MDX-65
Source selector
XA-C30
Note
This unit cannot be connected to a digital preamplifier
or an equalizer.
Design and specifications are subject to change
without notice.
Troubleshooting
The following checklist will help you remedy
problems you may encounter with your unit.
Before going through the checklist below, check
the connection and operating procedures.
General
No sound.
• Rotate the jog roller upward to adjust the
volume.
• Cancel the ATT function.
• Set the fader control to the center position for
a 2-speaker system.
• When using the optional Sony MD changer,
an MD recorded in LP mode is being played.
(“LP: ···” is shown in the display.)
The contents of the memory have been
erased.
• The reset button has been pressed.
t Store again into the memory.
• The power cord or battery has been
disconnected.
• The power connecting cord is not connected
properly.
No beep sound.
• The beep sound is canceled (page 19).
• An optional power amplifier is connected
and you are not using the built-in amplifier.
Indications disappear from/do not appear in
the display.
• The clock display disappears if you press
(OFF) for 2 seconds.
t Press (OFF) again for 2 seconds to
display the clock.
• The Display is set to “off” (page 19).
Stored stations and correct time are erased.
The fuse has blown.
Makes noise when the ignition key is in the
ON, ACC, or OFF position.
The leads are not matched correctly with the
car’s accessory power connector.
No power is being supplied to the unit.
• Check the connection. If everything is in
order, check the fuse.
• The car does not have an ACC position.
t Press (SOURCE) (or insert a CD or
cassette) to turn on the unit.
The power is continuously supplied to the
unit.
The car does not have an ACC position.
t Press (OFF) for 2 seconds.
The power antenna does not extend.
The power antenna does not have a relay box.
continue to next page t
25
Cannot turn off the “--------” indication.
You entered the name edit mode.
t Push the jog roller or press (LIST) on the
card remote commander for 2 seconds.
“ATT” appears in the display, and volume is
reduced.
The telephone ATT control lead is shorting on
a metal part of the car.
t Insulate any exposed wires with electrical
tape to avoid any short circuit.
CD/MD playback
A disc cannot be loaded.
• Another CD/MD is already loaded.
• The CD/MD is forcibly inserted upside down
or in the wrong way.
Playback does not begin.
• Defective MD or dirty CD.
• CD-R/CD-RW that is not finalized.
• You tried to playback a CD-R/CD-RW not
designed for audio use.
• Some CD-Rs/CD-RWs may not play due to
its recording equipment or the disc
condition.
A disc is automatically ejected.
The ambient temperature exceeds 50°C
(122°F).
The operation buttons do not function.
CD will not be ejected.
Press the reset button.
The sound skips from vibration.
• The unit is installed at an angle of more than
30°.
• The unit is not installed in a sturdy part of
the car.
The sound skips.
Dirty or defective disc.
Tape playback
The sound is distorted.
• The tape head is contaminated.
t Clean the head with a commercially
available dry-tape cleaning cassette.
• A tape recorded with Dolby NR off is played
back with Dolby NR on.
t Set the Dolby NR to “off” (page 14).
The AMS does not operate correctly.
• There is noise in the space between tracks.
• A blank space is too short (less than 4
seconds).
• A long pause, or a passage of low
frequencies or very low sound level is treated
as a blank space.
26
Radio reception
Preset tuning is not possible.
• Store the correct frequency in the memory.
• The broadcast signal is too weak.
The stations cannot be received.
The sound is hampered by noises.
• Connect a power antenna control lead (blue)
or accessory power supply lead (red) to the
power supply lead of a car’s antenna booster.
(Only when your car has built-in FM/AM
antenna in the rear/side glass.)
• Check the connection of the car antenna.
• The auto antenna will not go up.
t Check the connection of the power
antenna control lead.
• Check the frequency.
• When the DSO mode is on, the sound is
sometimes hampered by noises.
t Set the DSO mode to “off” (page 20).
Automatic tuning is not possible.
• The local seek mode is set to “on.”
t Set the local seek mode to “off” (page
20).
• The broadcast signal is too weak.
t Perform manual tuning.
The “ST” indication flashes.
• Tune in the frequency accurately.
• The broadcast signal is too weak.
t Set to the monaural reception mode (page
20).
A program broadcast in stereo is heard in
monaural.
The unit is in monaural reception mode.
t Cancel monaural reception mode (page
20).
Interference occurs during FM reception.
The wide mode is selected.
t Set the IF mode to “IF Auto” (page 20).
Error displays/Messages
Messages
LCL Seek +/–
The Local Seek mode is on during automatic
tuning (page 15).
Error displays
(For this unit and optional CD/MD changers)
The following indications will flash for about 5
seconds, and an alarm sound will be heard.
Blank*1
No tracks have been recorded on an MD.*2
t Play an MD with recorded tracks on it.
Error*1
• A CD is dirty or inserted upside down.*2
t Clean or insert the CD correctly.
• A CD/MD cannot play because of some
problem.*2
t Insert another CD/MD.
“
” or “
”
You have reached the beginning or the end of
the disc and you cannot go any further.
NO Name
The CD you are playing back has no Disc
Memo and “Bank Sel” is selected.
********
• The disc has not been given a name.
• The disc contains no CD TEXT.
????????
Disc information has not been read yet.
High Temp
The ambient temperature is more than 50°C
(122°F).
t Wait until the temperature goes down
below 50°C (122°F).
NO Disc
No disc is inserted in the CD/MD unit.
t Insert discs in the CD/MD unit.
NO Mag
The disc magazine is not inserted in the CD/
MD unit.
t Insert the magazine in the CD/MD unit.
Not Ready
The lid of the MD unit (MDX-40) is open or
the MDs are not inserted properly.
t Close the lid or insert the MDs properly.
Push Reset
The CD/MD unit cannot be operated because
of some problem.
t Press the reset button on the unit.
*1 When the CD/MD changer is connected to the unit,
the disc number of the CD or MD appears in the
display.
*2 The disc number of the disc causing the error
appears in the display.
If these solutions do not help improve the
situation, consult your nearest Sony dealer.
27
!"#$%&'
()*+,-% .
• /* 010 23 456)789):;
<=>
• 0?@A? BC4;89 0?@A? D6 > EF
G=
• HIJKLMNOAP
QRJSKMNOATTP
!"#$%&'
( )*+,-.'(/0123452367
89
2
KLMU3 VVVVVVVVVVVVVVVVVVVVVVVVVP
WXYZ, VVVVVVVVVVVVVVVVVVVVVV[
D6XYZ, VVVVVVVVVVVVVVVVVVVVVVVV\
QJ]^*XYZ, VVVVVVVVVVVVVVVVVV_
`a) VVVVVVVVVVVVVVVVVVVVVVVVVVVV_
bcEd VVVVVVVVVVVVVVVVVVVVVVVVVVVVe
89D6 VVVVVVVVVVVVVVVVVVVVVVVVVVVVe
FG,f VVVVVVVVVVVVVVVVVVVVVVVVVVVTg
hi89jk
lmn89-% VVVVVVVVVVVVVVVVVTg
oYpq89jk
lr)89-% VVVVVVVVVVVVVVVVVTg
st 0
lD6uvw-% 4(^ x?y
z{|@ -%* 0 23= VVVVVVVVVVVVVTT
}~D6
l-% 4(^ 0?@A?1x?y
z{|@ -%* 0 23
0 23= VVVVT
/c*jk89
lk-%4(^ x?yz{|@ -%
* 0 23=VVVVVVVVVVVVVVVVVVVVVVT
l-% 4?=VVVVVV TP
* VVVVVVVVVVVVVVVVVV T
¡* VVVVVVVVVVVVVVVVVV T
l-% VVVVVVVVVVVVVVVVV T[
}~¢
l-% VVVVVVVVVVVVVVVVVVVVV T\
HIJKLM VVVVVVVVVVVVVVVVVV T\
£¤¥¦§ VVVVVVVVVVVVVVVVVVVVVV Te
¨©ª«¥¬ VVVVVVVVVVVVVVVVVVVVVV Te
®¥¯7FGbc
l/° VVVVVVVVVVVVVVVVVVVVVVVVV Te
bc±¤²³´ 40y= VVVVVVVVVVV g
bc:µM VVVVVVVVVVVVVVVVVVVVVVVV g
£W¶·¸¤M¥¬ VVVVVVVVVVVVVV T
£¹«¥¸¤M¥¬ VVVVVVVVVVVVVV
/º»¼½¾ VVVVVVVVVVVVVVVVVVVV
!"
¿À VVVVVVVVVVVVVVVVVVVVVVVVVVVVVV
ÁÂ VVVVVVVVVVVVVVVVVVVVVVVVVVVVV P
ÃÄÅÆ VVVVVVVVVVVVVVVVVVVVVVVVVV
ÇFG 1 BC VVVVVVVVVVVVVVVVVVVV [
]^ VVVVVVVVVVVVVVVVVVVVVVVVVVVT
J89]^ VVVVVVVVVVVVVVVVVTP
3
CD
DSO
EQ7
DSPL
SCRL
OFF
SA
SEEK/AMS
SOUND
4
MENU
TAPE
ATT
SEEK/AMS
MODE
SOURCE
ÈÉÊË#ÌÍÎÏ
CD/MD . Ð;89 010 TAPE . Ð;89]^ RADIO . Ð;Ñ8
MENU . Ð;/°J
a 4U()ÒÓ=
n GH
b
c
d
e
f
g
h
i
j
k
o
p
l
m
ÍÎÔ2ÕÖ×ØÙÊËÚÛ*ܺÝ/
Þßà
!"
#$% Z &' (
) *+,-.
//0
11 *23 4 567.
>8/(/9
:; (//
<#;: (////9/=/>/0/
//
? @ABC ##D4?< E4F
CD/MD (
TAPE 9
RADIO >
MENU (////9/=/>/0/
(///
q
r
s
Æá(âã£Jä#åæçè¥
¬KL
CD/MD /
RADIO >/0/%
MENU (////9/=/>/0/
//
?II (
<# *o.
CD/MD /
TAPE 9/=
RADIO =/>
:#*56J 44<4 KL 4 MNO.
(///9/=/>/(///
PQ
8
I?)#Z &' 9
(OFF)
!"
#$%&'()*+,-
m
n
D9:B
SEEK/AMS
SEEK/AMS
DL:B M.
8:;<=>
DN:B M>
DO:B
?@A:B1CD8EFGH I vJKF
t
5
• éê*ëìí;îïðD #ñ;òèW
óô)õ¼ö÷
DSPL
• ø/ùÖÙE#úÖûü
MODE
ý
• ê)þ#ÌôØÙ
ê
Ðç#ñÌ¿
PRESET +
MENU
SEEK–
SOUN
D
DISC +
SOURCE
DISC –
• ê׸¤M*¸¤M¤#Ìû
LIST
KLM3(U3
• ýE89]^#]^%<3-Ý
9M~ÃÄ
SEEK+
ENTE
• ; ! x?yz{|@ -%#
ò
R
è"#%¼$%×*XY&*-%
PRESET –
OFF
+
ê'(ß()*)*
+,#
ÊËÚþ-.#Ì/!0*
123
45
ATT
VOL
–
*+,
a
b
c
d
e
f
g
h
i
j
k
l
!"#$%&
'()
)
<#;:
:#
##D *<4,.
:;
11
R *E4F.
<#
SI
S4)##I *M4m.
#;I#
?II
PPQR(OFF) STUVWXY Z[\QV
91(SOURCE)Q]^_ ^`abcV de
fghi=jklmnjkop
PPTq&rstWu vwx IstyWuJz { |
} ~
6
;6ú
ç78*9:#)*;<7
FG=<>?@8ABCDEF#)
ûùGÐçHIFE#ÌûD6J#
KLMNE#îO8AP
EQøR#
!ûST
"UVWX;
)
]^Y
• Z¿[D6\]#
!Ù^_`JD6
EÌ["ab
!"#!"$ %&'()*+
• )89Z¥ºb* 0ON D64w
0=10ON D6 4m 0=
XYãs# :¡èZ¥º*0O
N10ON D6
• EÌûD62¢D6c
D6d<
!D6ef 1 gh*i¯jkû
D6lm;ín*ìo<¶¾
·pq
Y
ãsGFD6¥º
• !rss#
^t§uv1wmx
*D6yD6;E>ízI#{
|}ÃÄ
~D6
• )%ùG89âã 0ON10ON D64¢
D6w£E bu
D6c=
• )ùG89¤¥¦§ > * 0ON10ON D
6
718 V9
1
• )%89s*D6 4E#R
#Ð#=ê
G89FyD
6#ñ%)
!FyD6
• )%89 _ D6
• ;89W#Ì3\]\]D6{
D6*R/ä
!¶
¶²2*\].(m¤)R
*K
7
,-'.
• Ì!^¨QJ]^]^*_#Zo©
ªx
«¬>®]¯
• ¿[QJ]^°±<²]§x³*bu#E
¸¤M79M#´z]^Y w£*B
Cµ¶
·¸
• Ì!ûQJ]^¹º(îïðD¶«h
7
8*»¼
• ½¾*]^#%>¿ÀÁ^)ÂF#
;2]^W#ÌÃÄ
yÅ*ÆÇÈ¢]
^*IÉHʽ¾*]^
;ÚÛ)W#
$5ÜìÝ
®ØÙ·#Þó)`a
ßxà`aàá#EaâÄ
CD
DSO
EQ7
DSPL
SCRL
OFF
SEEK/AMS
SOUND
MENU
MD
ATT
SA
SEEK/AMS
MODE
SOURCE
• ®*QJ]^7½*ssË%;]^
Ì¢
ÍE@)*ÌÆÎ
$5½
*ss
• 89QJ]^E#¤¥%>·¸Ï
~ g ÐNE#QJ]^89)*]¯ÑóÒ
\]
-./0123456789:;<=>2
1?@A BC DEFG
yQJ]^ *]^çÓ#ÔÕ
Öµ×ý®
y]^µºØ989.íz#>|}]
^¿ÀQJ]^ëÙ*)Â
8
• QQ] ZG,51
• ?WX^VG v\ S ¡
Y¢_ ^`a£8 S _ ^`a
Ve¤¥
¦¢QQ]§
• ?¥QQ]^(OFF) Q] E=¨©ªF«
EF£¬®F«EF A¯°EF<=
T ±{ ² }³
!"
Edã T NEäåFG
æEçûEdbcZ Tg.g_
1
(MENU)
1 NEGèé
2 !"#$
3 (SEEK/AMS +)
¼dGèé
4 !"%&
2
)Æ89 0 ä#ðKLäÙ* 01
0 23
PP£É:Ê1a Ë1 ?
G Ì 23©ª8EF¨
9
#$
/012
'()* +,-./01
89Þê
EdÞêÁEEdbcëì·#FG
íîïÐç89J
PP?¯°EF<=I´´J^IJ µ ¶·¸¹º
<= I
JG G»¼½EF ±{ ² }³
ê2¢D6#¡Þê89ñhià
(SOURCE)àá#îOñ Ü0à
PP£¥1¾¿ÀÁÂT9ÃÄ Å Æ vÇ
8
G@
¦Q(SOURCE)Q] ^_ ^`aH
ÈÂVWX
0
%
íz89
(OFF)
ÍD6
0Z
ò~jk
(SEEK/AMS)ô./>õ
– ¥jóM ö Ûò~÷jk ø
¨ù 1 ¨ú
– ûüý
(SEEK/AMS)ôm/Mõ
ö àÀîOþ¡*U3 ø
• ?ÍYÎ-.ÏÐ eÑ1{Î-.
ÒÓ¼
• ?Ä:ÔG ÕÖX1×Ø8:Ô1
MÙ 9ÚHÛÜ
t
9
/034
1
23 (SOURCE) 4 56
75
2
23(MODE)89'
:
89Þê
56%&74
8%&9
ô ÌÍÚ T Ï Ü}~D6àõ
PP:Ê1 ÙÝÙÞßàáâãäåáÞßæçèéêëÞàÙÝæ
ìVG Q (SOURCE) Q]:B IÙJ ¡
YQ (MODE) Q]:B IÙJ
%&
ø®D6 1 jkE#D6 1 jk*
ws* > íµFG 4êFG%bcZ Ü
à#¹~ T Ðå*ûµ
FG 4Ú Te Ï==
FG,f
• > >
• >
PP?þö°ËTU µ' M .'G
' M .'¤Øö°EF
'(#$)*
8:;<=>?
ø89CE#)*D6ûmn89
Ðjk
ÐD6/ mn
89ç
• NT lmn89÷jk
• N> lmn89
D6
q?É^õÉ:Ê1 MÙ G
1
(MENU)
;<=<>?
2
23 (SEEK/AMS +)48@9
!"
3
mn89Þê
¡îïÐç89J#; /
ÜN
à
+,-.#$)*
8@2<=>?
0
%
5FG,f
(DSPL)
FG,f
(SCRL)
?Q(DSPL)Q] I¸º¶¸ëßÞJ^I¸º¶¸ëßÞJ
KFfíî7±{ }³^ï\71'(A
ðEF
qa)ñ'1 M • Ä5òófgEF
• Ä5aôõòó1 23fgö°EF
• V¤EF 9÷-.1)ñø'
• ùú¤Ö1¯°^ Å EF X'(û'(û
-.üý,G»A¤EF
/ç
• T loYpq89øWD6*j
k
• >loYpq89øW/ 0
40=23*jk
• > l oYpq89øW ØÙ* 0 40=23 4)=*
jk
q?É^õÉ:Ê1 ±Ù³G
qÉ^õÉ:Ê1 ^É
ÉH9:Ê1 Ù G
1
(MENU)
ABCDD<
2
23 (SEEK/AMS +)48@9
!"
3
r)89Þê
¡îïÐç89J#; /
Ü
à
10
PPIç´´êÞëêêJ¤ØÈ V, Ù V
Õ/»1-.
/0 12
• ¬s^Z'( _Ó'(^_
I J
• Ägü QR° S A
, |
• &$aºÙ¹· Ë1 eAH8Ã
Ä!Ë1>m "üíî7
8#Ä ºÙ¹· Ë1 6$%>
8%&ABC>? 0- !DEFGHIJK
>?' !" 34
PP8'(&'()*G
%cstÏ
D6 4D6
uvw-%=
%Ï
D6¢+ _ Ð
åêst 0#ñ}~D6
4Ú T Ï=
NO%&ABCPQ
LM
; ! x?yz{|@ -%#
òè"#%¼$%×*XY&*-%
1
2
3
EFGH9,I)*
(MENU)
J>K<LMN? ;st~#)ûhi89D6
4
O(PQ
1 48@9PQ
t t ... t t t ... t R t S
t ... t > t *
D6uvw<ÕèZFG,#"FG
ô(D6a* 0?@A? BC
0
%
;89 010?@A? D6E
à(DSPL)àá
PP/0n1A2EF134
1
2
23(SOURCE)4 5
23 (MODE) 4fg)*hi
j 5 ':
3
(MENU)
J>K<5<<?<
4
ñ*
5
4k9lm)*^_
ñ*
6
n o pq íµÆ
ê¡Æ"U#Ìmn 7
[ *òè
7
rs(MENU)
)íïfÐç 0 89J
2 TU8@9PQ (SEEK/AMS +)
ESà (SEEK/AMS -)àá#ñûî
ïfÒaå
wx{ }
RS%&ABC
±³
Ò+ M ,V-G>.
• ?1íî725ZY eEFÄ
1 23
• &6(78¥9¬5Z1íî7 v:;8
>:B 3 VWXY1ZXY2[O(\]^
_
5
9`abcGHde
11
345678
9:;
8TU>? 0- !"FKF#!DEFG
HIJK >?' !" 34V " 34
8YZ>?0- !DEFGHIJK >?'
!" 34
%%1~c > *D6
0
?@A? D6 > F-%
ê¡%D6st#ñ%)ùIbc#
ò~
89/*jk
<nþ='(>7?m z { } ~ ^
Ù ?'G
< 23>78#Ä Ë
1 9 1
1
2
)*#$
EFGH9,I)*
(MENU)
v>wA<
3
4
xyz,I
tGH$
ZøW89D6*ñ;FG=
Y
1 23(SEEK/AMS -)6(SEEK/AMS +)
2
3
GH)*
• Ä5ò@fg2EF ±Aíî7³
• £EF!47BCS ("Drop EF¨
EFìG<=
0WX
12
4{9,Iyz
TU8@9)*
1
2
tGHu(LIST)
3
(ENTER)
23(DISC/PRESET -)6
(DISC/PRESET +)TU8@9
)*
2 4 |>}6 AN=
5
VWXY ~8gyz!"|>}6
AN=
6
rs(MENU)
)íïfÐç 0 89J
• ¥ÍõA H Î-.IéêëJ,IäâèJ<=
• ¥¤mI 91JÄ-.KIäâèJ<=
[<=\]^Y
/ç
•
l89^ Üàbc*jk
• 4h/=l89^ Üàb
c*jk
1
tGHu(MENU)
v>wwv>wNw
6 v>wDD
<=
2
23 (SEEK/AMS +)8
@9!" 3
{øWjk*
'(
89Þê
÷Þê89
¡îïÐç89J#; /
Ü
à
ê 2 ¢ D 6#¡ Þ ê 8 9 ñ h i à
(SOURCE)àá#îOñÜzyNN0 Bà
ÜN@ @N@ bà
HG$_" Bç89!Y*_
K`KEK bç89! *_
0
%
®]^89
/
(MODE) 4o=
íz89
(OFF)
ÍQJ]^
?@ Z
ò~jk
(SEEK/AMS)ô./>õ
– ¥jóM ö Ûò~÷jk ø
¨ù 1 ú^
(SEEK/AMS)ôm/Mõ
ö àÀ "# ø
PP£¬8L"^Ma¼
4o³Q]
vQ (MODE)
PP8ONOPO ÅÙ ËA¤p
– -./»QRq H S
Р-./ȀS
– ÄTUVWXY^ZXY
13
>?@#$
J89]^ç
• J 89$%]^
y ]
^
• |V 4ò&'(=J ò~¹~
_ "*'()
• ? 4M*=J;]^¨+
EÞ*M
• ,N40
-,N=(/ 0
->,N [\]^_`abcIêdJ,e üf\
]^_`1gü
1
2
3
GHu(MENU)
8@9de
(SEEK/AMS +)4 w
æEç? J
);ÏÐ.) 4zT¶z 7 =
+ Tg Ð
ø;ì~¡E#ó
-%#k@ZÃ
ABCDEF
8cdefgh>? iF
);/c*.)Y//012*
#à3U4*ºÝpqùI
1
2
3
4
89JÞê
¡îïÐç89J#; /
Ü à
PP? ÅÅ Â
W°hØij
ab<=^Y
8:;<=>?
1
(MENU)
;<=<>?
2
3
(SEEK/AMS +)4 w
mn89Þê
¡îïÐç89J#; /
ÜN
à
PP8Ò+>Q(MODE)Q]IkéJÑEF¨
9l Ò+<=2m
14
4
23(SOURCE)4
23(MODE)4
(MENU)
v7
øbcëìE#)Ü5à*¤
• £nopq/rs8ôtWÉ e5
1puvwxnH@1
• ?EF¨9EFyòG VØÑ?@EF1y
ò¼WÉ
<=GCDEF
1
2
3
4
5
23(SOURCE)4
23(MODE)4
TU89
89
PPQjkl91(DISC/PRESET -)^(DISC/PRESET +)
Q] Q86$%>1
sWÉ ±ïz{Ë
³
jklm'efno
(SEEK/AMS -) 6 (SEEK/AMS +) +1
ø)ÙfÐE#67ííz
EFhiîOÙf ¡*
• &þ°|}>.~ eÂz{Ë z
{4ü8op
1WÉ ±vwx{ ² } I
,EFJ³
• £¥0J¬s1WÉ vQR (SEEK/AMS -)
^(SEEK/AMS +)Q] 78T ¡YQ
(SEEK/AMS)Q]H|8J¬1 ±°
|}³
p H qr'stuvw
4de
ô ÌÍÚ Te ÏÜ®¥¯7FGbcàõ
¤¥8f9#:®}°¤;4Ü?à
FG<·=
PP&6 ¹Ù ô
v º TU
xyez{s|}
8 IH_~ >?
ø z =>¤E# ?0*@
A%>Ô+,;B #)
* Ü{z
à-%>CÙº^<
ÆD¤E(Ða#âã z =>¤Ñ8
>®}°¤;ESFf=>¤Ñ8#Ì
û
5O Üàbc
1
2
3
4
t 7 $ (MENU) C?
(SEEK/AMS +) NM<
PP&6s ¹Ù %ô
EFì I·¹ÅçáJ
v IâÞJ
HCDIJEF
ûb ¡*
1
2
3
4
5
6
23(SOURCE)4
23(MODE)4
(SEEK/AMS -) 6 (SEEK/AMS +) ({9f
4f(
n o pq7<K}
¢1GGí;FG=Yñ
PP£¥;8_1pu9WÉ eH
@_1WÉ2Z
15
CDEF56
8gh>?
ÏÐùÖcÐ
ûU¢>øW¢*í
ñ;FG=YZÏÐc+H _
Ðå*
1
2
3
4
(k9f^_
(MENU)
J>K<LMN?
O(PQ
1 48@9PQ
t t ... t t t ... t R t S
t ... t > t *
±³
2 TU8@9PQ(SEEK/AMS +)
ESà (SEEK/AMS -)àá#ñûî
ïfÒaå
3 VWXY1ZXY2[O(\]^
_
5
• ¬s^Z'( _Ó'(^_
I J
• ¥A<CgWÉ'(QR° S A , |
16
IFG,f
5fºÝ
>
0
%
5FG,f
;Eà
(DSPL)àá
&ÌWÉ'((_ I¸º¸ëßÞJ8EF¨9E
FS
S
1
t $(MENU)
J>K<5<<?<
2
3
4
5
rs(MENU)
)îïOÐç¥)ÙJ
4k9lm^_
n o pq íµÆ
ê¡<Æ"##mn O
P
PP£¥ZXWÉ'( e8 H >EFI¸º
ëáëJ
34KLMNEF
8TU>?
1
t¡¢ $
øW¢*ºÝ7*;
FG=Yèé
JHIJKLM ./012KL
) 47/* 010 23=
OP
2
TU8@9
ê/*¥c#ñ*ºÝ
FG;FG=Y
3
(89
÷ô#KLbF*HIJKLMÔ2
JrYMN*ss
HIJKLM}~ààá71
IK
LMùIòè
PP£EF!47B S ("Drop EF¨
EFGfWs<=
SOUND
MODE
DSPL
0WX
1
2
t¡¢ u(LIST)
3
(ENTER)
DSPL
MODE
SOUND
(ATT)
23 (DISC/PRESET -) 6 (DISC/PRESET +)
TU8@9
(SOUND)
(MODE)
OFF
(SOURCE)
(DSPL)
(OFF)
%
0
(SOURCE)
®¥ 4¥) 101
0>1 ]^=Þ
(MODE)
®òè
4¥).) 10 23 >
10 23 >1 ]^89
/=
(ATT)
O¥¬
(OFF)>
íz89
ùÖ
Ù 1 ß
(SOUND)
(DSPL)
£¤¥/°
®FG,f
?ÄÕ 1:ÊG
&¾¿1¡¢ÂTÃÄ ±Å³±£¤³Æ ¥¦
8¾¿¥¢YQR(OFF)Q]¦ÜS HTU
GEF
t
17
y
WX
KLME
c
G*òè/ZQb
,-
!"#$ ./
34
56&
789
– ò~D6Y*jk
– ]^Yjk*Þ¯U3
– ¢
êþ¡ûHIJKLMÔ2;Üì/
É*RÓ#ûKLM*òè/h
3
34
:;
56&
789
– ¨ù 1 ¨ú÷jk
– ¨©+]^
– ûP
PP¬8`aL§>¼
AQ(MODE)Q]
y
t£ ¤¥¦§¨©ª$n
(SOUND) o p&
%& '"()*+
<=>34?@A
789
– b*
– $5D6 >
?Ä MÙ :ÊG
18
PP¥Ö¨AHV45kl1opC
D ±vwx{ ² } I,EFJ³
MQRSTU
£«¥¶g¥¶Sµ¶¥¬
7¹«¥¸¤M*¥¬
%ÏÐ¥¼¡"«¥7g¥
S#.¹«¥¸¤M*¥¬
1
(SOURCE) 4«]¬+
575 61
2
23(SOUND)49®¯°
ÏàÛ(SOUND)àá#,f®§E ç
BCD .EF2 tGHI .JF2 t
BCK .LMN2 tOCP .QM2 t
DRS .TEFUVAFW2
3
(SEEK/AMS -)6(SEEK/AMS +)
®84¯°
HIKLM£E#à (SOUND)àá
I y| KLM
PP:B$34/Y ¦8 | S"|©
VWXYSZ
(ATT)
Ü??
à;FG=YñRQ
¡T`aô*¥¬SE#ÌUàÛ
(ATT)àá
PP?¿ªW«1W¬8 Å 9 e8Ä
W«È_GVØþ°®¯W ±W« Š˳
[\S]^%&
8
bc
,fç
E~
• ô Ú e Ï õ
• lVÞ
ßW Ü55àXY¤
• N 4HIJKLM=l ®HIJKLM
Y*KLMòè/
– / Ü
à#íàÆQbcU3H
IJKLM
– øûHIJKLMÔ2;Üì/É
*RÓE#/ Üà
• Z4àá3Ë=l®)àá*3
Ë[\
– / Ü
à#;Üì3ËVÞE][
àá3Ë4F-%;3ËKL^ÖØÙ
;Üì3ËÖ×YE_`=
– / Ü
à][àá3Ë
"
• 0V{
4mBC=laEFGEd78
9Jô Þ õ
4F-%;HJbcZ ÜTà
Ü
à
E_`=
• 0l®FG=[\
– / Ü
à#;VÞÜì3ËEF
G=®b4F-%;3ËKL^ÖØÙ
;Üì3ËÖ×YE_`=
– / Ü
àFG=®b
– / Ü
àßWDM
• 0
– ø 0 bcZ Ü
à#ñ;òèE
_ñFG
• 4HFG= l { ÜTà#Üà7
Ü
à/HFGJ
• Vô õ>
– /Ü
àñFG ý\¹~ T Ðå
FG*
– ø-%bZßW#cD6 1 k
®E#D6 1 k>FG
?(8 ^ Ù G
!34¤©ª
t
19
E~
• dz 4g}e.M=4Ú T Ï=
• |z 4«}e.M=4Ú Ï=
• |
4g¤=l ;á(«¥¬Ef%>g
f«¥7g¥«¥7g¥ûµh2
<= • |
O
1
49üýJ=4Ú T Ï=
– / Ü
àñi¢01j2*
• O
1
4°¤;J=4Ú T Ï=
– / Ü
àñ°¤;z=>¤Ñ
8/ Ü
àñîïÐçJ
• {z
1ô Ú T Ï õ
1
(MENU) ¡bcV#ñ; 010 89~à
(MENU)àá
2
3
8@9¯°
4
(SEEK/AMS -) 6 (SEEK/AMS +) 48@9!" +±²³w6
DD1
ë}Edbc·#FGíîïÐç89
J
• JEF134ùúX¤ÖÄJ°±
• £EF!:;BCS ("Drop
EFG<=
EF¨
PP²¬QRjkl91 (DISC/PRESET -)^
(DISC/PRESET +)Q] S A³´8µ04
±IÞáçèJIåèêJ Ié¶ÙÞJIç
J,IâáJ³
/»"¶t
0WX
1
2
(MENU)
(DISC/PRESET -)623
(DISC/PRESET +)8@9
¯°
3
(SEEK/AMS -) 6 (SEEK/AMS +) 48@9!"
4
(ENTER)
B_R`ab c2def
ê*¸¤M2;ìk*j«¼#ñ¤
¥û{ _ó#c%\l
0y 4±¤²³´M=-%%m|$
Ò»n*¤¥#oÅ;¾p<2+и¤
M 4qr¸¤M=
ZÏÐ¥ 0y bc
1
(SOURCE) 4¬ +
575 61
2
23(DSO)5A¥w ¡J< 0y -%#; / Ü0y
à
• ùú¤Ö1¾¿X0·,-0· ºË¤
¸Ú¹º1»6
• &6 ¹Ù ô v º TU
gh
Z \ ¥jy 4 #-#
stt#,u#N
#
7 A
=/
:µkÖ
ZÏÐ¥Ða*:µ
Mbc
9¡¢Y£
1
(SOURCE) 4¬ +
575 61
2
23 (EQ7) 8@9´µ
z¢
ÏàÛ(EQ7)àá#FG,fÑ®
¡J<:µ`S#/ Ü
à "#
·#FG=îïÐç89J
PP? º ÂG K¼lØþ°|©Í
½1%»6
20
7£:µMbc*ºÝ7
S
1
(SOURCE) 4«]¬+
575 61
2
(MENU) L¶Cw<
3
4
5
4k89·¸Z¹
(SEEK/AMS -)6(SEEK/AMS +)
48@9´µz¢
ÏàÛ (SEEK/AMS ) àá#,fvr
®
1 (SEEK/AMS -)6(SEEK/AMS +)
48@9·¸
ÏàÛ(SEEK/AMS)àá#ºÝr
®
MQijkR
SZ
1
tGH6
$23(SOUND)
5 2
(SEEK/AMS -) 6 (SEEK/AMS +) ®º » ¼©½
"#·#FG=îïÐç89J
ez¤ # ¥¦'§¨|}©
Zz Ô2*¸¤M¦§{|}#
/¸¤M*~zºÝ
89
ez¡¢Y£
XY Z[ y \]^ Z[ y _`X Z[ y \.a
bZ[ y Yc]bZ[ y Xc_bZ[ y \XbZ[
23 4567
2 ®8@9¹
¥¬S T Zwx#{ OTg O
yTg ùI£
0123
:;;
1
tGHu6¡¢ $(MENU)
2
¾|
3
(SEEK/AMS -) 6 (SEEK/AMS +) 4¿À·¸
ÏàÛ(SEEK/AMS)àá#ºÝE
®ç
E¡`aOQbc*:µkÖ#ÌàÀ
åæ "#
6
øë}`Sbc·#ññÐç89
J
DD 4bbc= yÁ¾ÃyÄožÃ
4
ë}ºÝbc·#FG=íîïÐç8
9J
21
MQlYSkR
SZ
1
(SOURCE) 4¬ +
575 61
2
23(SOUND)ACÆ 3
(SEEK/AMS -) 6 (SEEK/AMS +) ®½
"#·#FG=îïÐç89J
PPW1A|©«¾æ¿ìÀ¿±£Vq
æ¿Á ØEF IÅJ³
ª«¦ez§¨|}
89
Zz ØÙ*¹«¥¸¤M¦§{|
}#~ù¢¹«¥¸¤M*þ¡*
gº7ºC1}~bc~zºÝ 4Î
=#¹«¥¸¤Mû«ºC1#
%8$\l*¤
3
(SEEK/AMS -) 6 (SEEK/AMS +) 4¿À·¸
ÏàÛ(SEEK/AMS)àá#ºÝE
®ç
DD 4bbc= yÄožÃyÁ¾Ã
4
ë}ºÝbc·#FG=íîïÐç8
9J
9:mnopq
¤¥C1SFG;º»¼½¾Y
{FGJ 4T O \=/
#
;ñFGJE/FG
J
tGH6
$23(SA)
48@9!"
ÏàÛ(SA)àá#FG,fÑr
®
0123
:;;
¡J<º»¼½¾-%#Ì; /
Ü
à
PP?¯°EF<= IJ^ IJG
ªÂYÃÄË
23 4567
22
1
tGHu6¡¢ $(MENU)
2
¦|
e¤©
¬°±
B #Ý%[M*E
4%>®#J(Ý*
=øÝ*&®OE#QRJS
KM*òè±û®FE#Ì$5Ð
* Ng Ý
!"
rs
¬®¯
$5¿E#Þó¿ *¿
za¿*Ô
ä{aê¿#Ì
ØÙU$5¿ê¿$
5·µ#ñ%
<ÃÄFE#Ì
/0* 12345
x
+CDEFG
<=> ?@A+#B
!cÔ
ä¹~)!^¿
Ô
ä*¿#ñ>)
°±'()*+
• Ý9;Ö^.*9
Ý#Ì=í@
• Ý#¿[Ù^o
• Ô2ÝE#Þó¿§Ð
• ¡$%âÎÝ#ñ> ×
Ýá3ø> Ý¡¢
!%Ýõ#£¤
¥¢¦
23
tu
!" <=2²³
,-<=2²³
!"#
$%&'()*+,
-%
HIJKLM
(:NOP+Q+R&
(:NOP+R& S
p£¤¥¦¦R¦{
Q;
6%
p£¤¥¦
Q
66
./01
ABCD
I
JKLM
OPM
/TUVR7 ?
WXM
I
./01
ABCD
I
KLM
>}=´²³
Z[
\ H`a
cde
Z[
24
Z[
Zn
.k
M
hxyz
ef²³
HI
µ¶·u
2* ./34 5
67879:
%;$6%$*
<67=>?@
%;$6;$*
<7=>?@
EFABGFH
$;*867
% N
7 ? ;6
Q6 <"# @R
; <S !@
O
O $;& <"# @R
$& <S !@
7? -6
-6
Y* ./34 5
7879:
6-Q7
<7 =>?@
6-;7
<7 =>?@
EFABGFH
$;*867
-µV
\ HZ[
<]^_GFH@
% b
6(f < b?@
Z[
g\ HZ[ <S
!@
hiABjhHklB
e
mdHklB
ho Ypp klBqrk
lB
s+ kZnGFH
s+ ZnGFH
tkHZnGFH
ABZnGFH
Q?u
Q7?vu
? w%
7? w
{|} ~h
<F@
;%ff%Q
< 8 v 8 @
;%ffQ6
< 8 v 8 @
$7
GFJ<@
9kH
)*+
tkH
)*
s+ h<)}Y
lB@
)}Q<@R)}Q<@
}|:¡¢ <¡@
}|%%R}|;;R
}|QQ
*| :¡¢ <Q¡@
*|Q6
xOPH
Y}-
PPV¤yò@Tl^K¼l
PPÅ,Æ£Äs
Ǥ<0
vwxy
§(¤)E
%¨f*)*
; _*W#ÌØÙ7
òè
Ð
µ¶·u
JK,
• /YIå棥¬
• J< ?? -%
• û׸¤M*KLbc;R
U3
• Ð;/*
056)89|J
w£*04FG=YFGÜ|çVVVà=
LMNOPQR-,
• à `aàá
t Uûbc¢
• Ö
ݵÞ
• ØÙÖ¥µÐØÙ
J STTUK,
• Ü55à¤-%µJ< 4Ú Te Ï=
• ØÙ/*-Ý9M#¥<3
-Ý9M
VWXYZW[R\ ] ^_`ZW[,
• ESàÀ(OFF)àá[© "##Ed
FGû<·
t UÛàÀ(OFF)àá[© "#
EdmFG
• FG=bcZ Ü
à4Ú Te Ï=
abcdefghiQR-,
jklPmn,
opqr st7 u sHH 7vw
xyK,
^ÖzÜ쪧ØÙM¥Ð|}
z{qr|d}~,
• *ØÙê
Ðç#ñÌ
¿
• ÜìÇ U
t à(SOURCE)àá4
2¢
D6
]^=#23Þ*
J3d,
ÜìÇ U
t àÀ(OFF)àá "d
^_,
&ü«úÖ¥2¬M
J
S--------UVW,
ù¢®J
t àÀåæ
QRJSKMY* (LIST)
àá "#
SU_`ZW[76,
¯ ?? KL^ÖzÜì$%¼@
×
tûäº*^ÖM°^±b#jk
?@o©×
!"#" <=
J,
• 2¢²ä* 010
• 010 µY ³ú
Ç*G2I2
¢
Jz5,
• 0 ´µ
0 ª
• 0ON10ON ¥¦§
• ¶89*
¥º* 0ON10ON
• E(w£bu
D6*a#ã
0ON10ON %ùG89
Q_,
»¼h\¹~ g·
%&J,
J_,
à`aàá
K6wx6,
• )Ô2¸\( g¹
• )¥Ô2;ÜìYjº»*¼
6,
0 ª
0 2h
,-=
K6\,
• ]¯e®¼
t Ì*J]¯^]¯
• 0N
89 0N
w£
*]^
t û 0
N bcZÜ
à4Ú T
Ï=
I :gh,
• ¥
• ( "d • E#
ûºÝ
¤¥
*è
t
25
n£{s
:+,
8z%& { |}
J de,
y6¡¢,
±>r²³´ ]I µ
• ûÐ*ºÝ;><
• Ñ8C1¿O
• ÌØÙúÖKL^Ö 4ÀÁ=
§
^Ö 4ÃÁ=OÜìúÖÄÅM*
^Ö4ø*Üì;· 1 ÓÆÇ<
<3 z1 úÖE=
• ÜìúÖ*ØÙ
• úÖ%YÄ
t úÖKL^Ö*ØÙ
• ºÝ
• 0yJÞ*E#¤¥E>efD¥*
i¯
t û 0y JbcZÜ
à4Ú g Ï=
:+,
• 9üPJbc; Ü
à
t û9üPJbc; Ü
à4Ú g
Ï=
• Ñ8C1¿O
t û
SUVW£¤,
• 9ºÝ
• Ñ8C1¿O
t bcO°¤;ÙJ 4Ú g Ï=
¥¦§¨K©ª«¬K®,
)á;°¤;ÙJ
t J<°¤;ÙJ 4Ú g Ï=
¥ HI ©¯7°x¡¢,
/È.)J
t û {z JbcZÜ{z
à4Ú g Ï=
¸¹
ÉGûèé "dÒR#rûf
XY¤
¶·¸¹º
0 Yþw£jk> t 89w£jk* 0
»¼¼½¼
• 0 ª
0 2h> t û 0 Ê
Ð92¢ 0
• E(âãa#010 %89> t 2¢²
010
¾¿ÀÁÂÃÄÅ
»¼h\¹~ g·
t KL)h\«( g·
ts¿ÆÇ
010 23¥2¢D6
t ûD62¢ 010 23
tsÂI¸À
D6d¥2¢ 010 23
t ûD6d2¢ 010 23
t½ÈÂÉøÊË
0 2340AOPg=*ËâµVÞ
0 ¥µ
Ð92¢
t ßYËâ
Ð92¢ 0
ÌÍÆÁÂÉÃÆÃÈ
âãa 010 23%Æè
t à )*`aàá
? MÙ tVVG ^ Ù 1pu
©ª8EF¨9
È*ÉÊ1pu©ª8EF¨9
ES㤽fùG§9B#Ì/
0*
123¾5
26
º»
ÎÎÂÃúÂÏ]Ð
;E#|
JZÞ*±
4Ú T Ï=
S
Uu S
U
fHD6*Þ¯
CÌ#ùGU¬©/
W
tsÂt¸ÄÃ
Ð;89* 0 ù 0
#c/J
Üà
********
• FD6¥ÍÎ
• FD6² 0?@A?
ÑÑÑÑÑÑÑÑ
D6BCð¥µÏJ
27
환영합니다!
이번에 Sony 체인저 컨트롤 오디오 마스터를
구입해 주셔서 대단히 감사합니다. 다음과 함과
제품을 이용하면 각종 기능을 즐기실 수 있습니
다:
• 옵션 CD/MD 장치(체인저 및 플레이어)*1.
• CD TEXT 정보(CD TEXT 디스크*2를 재생
할 때에만 표시).
• 옵션 컨트롤러 액세서리
회전 커맨더 RM-X4S
카드형 리모컨 RM-X114
*1 본 제품은 Sony 제품에서만 사용하실 수 있습니다.
*2 CD TEXT 디스크는 디스크 이름, 음악가 이름, 곡 이
름 등의 정보가 포함된 오디오 CD입니다. 그 정보는 디
스크에 수록되어 있습니다.
2
목차
컨트롤 스위치류의 위치
사용상의 주의 . . . . . . .
디스크에 관한 주의 . . .
카세트에 관한 주의 . . .
.
.
.
.
.
.
.
.
.
.
.
.
.
.
.
.
.
.
.
.
.
.
.
.
.
.
.
.
.
.
.
.
.
.
.
.
.
.
.
.
.
.
.
.
.
.
.
.
.4
.6
.7
.8
처음에
본 장치를 리세트하기 . . . . . . . . . . . . . . 8
시계를 설정하기 . . . . . . . . . . . . . . . . . . 9
CD 플레이어
CD/MD 장치(옵션)
디스크를 재생하기 . . . . . .
화면표시 항목 . . . . . . . . .
곡을 반복해서 재생하기
— 반복 재생 . . . . . . . .
곡을 랜덤 순서로 재생하기
— 셔플 재생 . . . . . . . .
CD의 라벨을 만들어 놓기
— 디스크 메모 . . . . . .
이름으로 디스크를 찾기
— 리스트업 . . . . . . . .
재생할 곡을 선택하기
— 뱅크 . . . . . . . . . . . .
...........9
. . . . . . . . . . 10
. . . . . . . . . . 10
. . . . . . . . . . 10
. . . . . . . . . . 11
. . . . . . . . . . 12
. . . . . . . . . . 12
카세트 플레이어
테이프를 듣기 . . . . . . . . . . . . . . . . . . . 13
각종 모드로 테이프를 재생하기 . . . . . . 14
라디오
방송국을 자동 저장하기
— 베스트 튜닝 메모리(BTM) . . . .
저장해 놓은 방송국을 수신하기 . . . . .
원하는 방송국만 저장시켜 놓기 . . . . .
방송국 이름을 저장하기
— 방송국 메모 . . . . . . . . . . . . . .
리스트를 사용해서 방송국을 수신하기
— 리스트업 . . . . . . . . . . . . . . . . .
. . 14
. . 15
. . 15
. . 16
. . 17
그 밖의 기능
회전 커맨더를 사용하기 . . . . . . . . . . . . 17
사운드 특성을 조절하기 . . . . . . . . . . . . 19
신속하게 사운드를 작게 하기 . . . . . . . . 19
사운드와 화면표시 설정을 변경하기
— 메뉴 . . . . . . . . . . . . . . . . . . . . . . 19
다이내믹 사운드스테이지 오가나이저(DSO)
를 설정하기 . . . . . . . . . . . . . . . . . . 20
이퀄라이저를 설정하기 . . . . . . . . . . . . 20
프론트 및 리어 음량을 조절하기 . . . . . . 21
서브우퍼의 음량을 조절하기 . . . . . . . . . 22
스펙트럼 아날라이저를 선택하기 . . . . . 22
추가 정보
손질법 . . . . . . . . . . . . .
주요 제원 . . . . . . . . . . .
고장일까? 하고 생각되면
에러 표시/메시지 . . . . . .
.
.
.
.
.
.
.
.
.
.
.
.
.
.
.
.
.
.
.
.
.
.
.
.
.
.
.
.
.
.
.
.
.
.
.
.
.
.
.
.
. 23
. 24
. 25
. 26
3
컨트롤 스위치류의 위치
CD
DSO
EQ7
DSPL
SCRL
OFF
SA
SEEK/AMS
SOUND
4
MENU
TAPE
ATT
SEEK/AMS
MODE
SOURCE
자세한 내용은 각 페이지를 참조하여 주십시오.
CD/MD : CD/MD의 재생 중에 TAPE : 테이프의 재생 중에 RADIO : 라디오의 수신 중에
MENU : 메뉴 모드 중에
a 주파수 선택 스위치(장치 왼쪽에 있음)
설치/접속 사용설명서의 “주파수 선택 스위
치”를 참조하여 주십시오.
b DSO 버튼 20
c SCRL(스크롤) 버튼 10
d 표시창
e 카드형 리모컨의 수광부
f EQ7 버튼 20
g CD Z(이젝트) 버튼 9
h DSPL(화면표시 모드 전환) 버튼 10, 11, 16
i OFF(정지/전원 오프) 버튼* 8, 9, 13
j SOUND 버튼 19, 21, 22
k MENU 버튼 9, 10, 11, 12, 13, 14, 15, 16,
20, 21, 22
l SA(스펙트럼 아날라이저) 버튼 22
m SEEK/AMS 버튼(-/+)
CD/MD 9
TAPE 13
RADIO 15
MENU 9, 10, 11, 12, 13, 14, 15, 16,
19, 20, 21, 22
m
n 조그 롤러
조그 롤러는 일부 조절 모드를 제외하고는
일반적으로 음량 조절에 사용합니다.
CD/MD 11, 12
RADIO 15, 16, 17
MENU 9, 10, 11, 12, 13, 14, 15, 16,
20, 21, 22
o ATT 버튼 19
p MODE(o) 버튼
CD/MD 10, 11
TAPE 13, 14
RADIO 14, 15
q SOURCE(전원 온/CD/MD/테이프/라디오)
버튼 9, 10, 11, 13, 14, 15, 19, 20, 21, 22
r 리세트 버튼 8
s TAPE Z(이젝트) 버튼 13
* 시동키에 ACC(액세서리) 위치가 없는 자동차에
설치하는 경우의 경고
엔진을 끈 후에 장치의 (OFF)는 반드시 2초 이
상 눌러서 시계 표시를 꺼 주십시오.
그렇지 않으면 시계 표시가 꺼지지 않고 배터리
가 소모됩니다.
n
위를 선택하는 경우
SEEK/AMS
SEEK/AMS
왼쪽/.를 선택하는 경우
오른쪽/>를 선택하는 경우
아래를 선택하는 경우
메뉴 모드에서 현재 선택 가능한 방향은 표시창에 “v”가 나타납니다.
다음 페이지에 계속 t
5
카드형 리모컨 RM-X114(옵션)
DSPL
MODE
PRESET +
MENU
SEEK–
SOUN
D
DISC +
SOURCE
DISC –
LIST
SEEK+
ENTE
R
PRESET –
OFF
+
ATT
VOL
–
사용상의 주의
• 자동차를 직사광선이 닿는 장소에 주차했던
경우에는 본 장치는 온도가 내려간 다음에 사
용하여 주십시오.
• 라디오의 수신을 선택하면 파워 안테나가 자
동으로 펴집니다.
• 본 장치의 전원이 공급되지 않을 때에는 우선
접속을 확인하여 주십시오. 아무 문제가 없을
때에는 퓨즈를 확인하여 주십시오.
• 투 스피커 시스템의 스피커에서 소리가 출력
되지 않을 때에는 페이더 컨트롤을 중앙으로
설정하여 주십시오.
• 테이프를 장시간 재생하면 내장 파워 앰프로
인하여 카세트가 따뜻해지는 경우가 있습니
다. 단 그것은 고장이 아닙니다.
• 운전 중이나 도로에서 주의가 산만해지는 원
인이 되는 행동을 할 때에는 CUSTOM FILE
기능을 사용하지 마십시오.
본 사용설명서에 기재되지 않는 본 장치에 관한
불분명한 점이나 문제점이 있을 때에는 가까운
Sony 판매점으로 문의하여 주십시오.
카드형 리모컨에 대응하는 버튼은 본 장치와 같은
기능을 제어할 수 있습니다.
a
b
c
d
e
f
g
h
i
j
k
l
DSPL 버튼
MENU 버튼
SOURCE 버튼
SEEK(</,) 버튼
SOUND 버튼
OFF 버튼
VOL(–/+) 버튼
MODE 버튼
LIST 버튼
DISC/PRESET(M/m) 버튼
ENTER 버튼
ATT 버튼
주의점
(OFF)를 2초 이상 눌러서 장치의 전원을 껐을 때에는 장
치의 (SOURCE)를 누르거나 또는 CD나 카세트를 넣어서
우선 장치를 기동시키지 않으면 카드형 리모컨으로 조작
할 수 없습니다.
잠깐 한마디
배터리 교환에 관한 자세한 내용은 “리튬 배터리를 교환하
기”를 참조하여 주십시오(23페이지).
6
결로
비 내리는 날이나 습도가 매우 높은 장소에서는
본 장치의 렌즈에 결로 현상이 생기는 경우가
있습니다. 그런 경우에는 본 장치가 정상으로
작동하지 않을 경우가 있습니다. 디스크를 꺼내
고 수분이 증발될 때까지 약 1시간 정도 기다려
주십시오.
높은 음질을 유지하려면
본 장치 또는 테이프에 주스 등의 음료수를 흘
리지 않도록 주의하십시오.
디스크에 관한 주의
• 디스크가 더러워지지 않도록 표면은 만지지
마십시오. 디스크는 가장자리 부분을 잡아 주
십시오.
• 디스크를 사용하지 않을 때에는 케이스 또는
디스크 매거진에 넣어 주십시오.
디스크는 열원 가까이나 고온이 되는 장소에
보관하지 마십시오. 주차시킨 자동차 안이나
계기판 또는 뒷면 트레이 위에 방치하지 마십
시오.
• 라벨을 붙이거나 잉크나 더러워서 끈적끈적
한 디스크는 사용하지 마십시오. 그런 디스크
를 사용하면 회전이 중지되어 고장나거나 또
는 디스크가 손상되는 원인이 됩니다.
CD-R/CD-RW 디스크에 관한 주의
• 본 장치에서는 오디오용 CD-R(Recordable
CD)/CD-RW(Rewritable CD)를 재생할 수
있습니다.
오디오용 CD-R/CD-RW는 다음의 마크로
구분하여 주십시오.
이 마크는 디스크가 오디오용이 아님을 나타냅
니다.
• 일부 CD-R/CD-RW(녹음에 사용한 장치나
디스크 상태에 따름)는 본 장치에서 재생할
수 없는 경우가 있습니다.
• 미완성* CD-R/CD-RW는 재생할 수 없습니
다.
* 녹음을 마친 CD-R/CD-RW를 오디오 CD 플레이어에
서 재생하기 위해 필요한 처리를 말합니다.
• 색다른 모양의 디스크(하트 모양, 사각형, 별
모양 등)는 본 장치에서는 재생할 수 없습니
다. 재생하려고 하면 장치가 고장나는 원인이
됩니다. 그런 디스크는 사용하지 마십시오.
• 8 cm CD는 재생할 수 없습니다.
• 재생하기 전에 시판용 클리닝 헝겊으로 디스
크 닦아 내십시오. 각 디스크는 중심에서 바깥
쪽을 향해서 닦아 내십시오. 벤젠, 시너 등 용
해제, 시판용 클리너, 아날로그 디스크용 정전
기 방지 스프레이는 사용하지 마십시오.
7
카세트에 관한 주의
처음에
카세트의 손질
• 카세트의 테이프 면은 지저분하거나 먼지가
있으면 헤드가 더러워지므로 만지지 마십시
오.
• 카세트는 스피커나 앰프 등 자석을 내장한 장
치 가까이에 놓으면 녹음한 테이프 내용이 소
거되거나 테이프가 뒤틀리는 원인이 되므로
그런 장치에서 멀리하여 주십시오.
• 카세트는 직사광선이 닿거나 극단적으로 기
온, 습도가 낮거나 높은 곳에 방치하지 마십시
오.
• 테이프가 늘어져 있을 때에는 테이프가 장치
에 감길 염려가 있습니다. 테이프를 넣기 전에
연필 등으로 릴을 돌려서 늘어져 있는 부분을
제거하여 주십시오.
본 장치를 리세트하기
본 장치는 맨 처음 사용하기 전에 자동차 배터
리를 교환한 후에 또는 접속을 변경한 경우에는
장치를 리세트해야 합니다.
볼펜처럼 끝이 뾰족한 물건으로 리세트 버튼을
눌러 주십시오.
CD
DSO
EQ7
DSPL
SCRL
OFF
SEEK/AMS
SOUND
MENU
MD
ATT
SA
SEEK/AMS
MODE
SOURCE
리세트 버튼
늘어진 부분
• 변형된 카세트나 라벨이 거의 떨어진 카세트
는 테이프를 넣거나 뺄 때 이상이 생기는 경우
가 있습니다. 거의 떨어진 라벨은 떼버리거나
교환하여 주십시오.
• 카세트 재생 중에 소리가 왜곡되는 경우가 있
습니다. 카세트 플레이어 헤드는 약 50시간
사용할 때마다 한 번씩 클리닝하여 주십시오.
90분을 초과하는 테이프는 장시간 연속 재생을 제
외한 목적으로는 사용하지 마십시오.
그런 카세트 테이프는 상당히 늘어나기 쉬운 테
이프입니다.
그런 테이프로 재생, 정지 조작하면 카세트 데
크 메커니즘에 테이프가 감기는 원인이 됩니다.
8
주의점
• 리세트 버튼을 누르면 시계 설정 및 저장해 놓은 일부 기
능이 소거됩니다.
• 전원 코드를 본 장치에 접속하거나 본 장치를 리세트할
때에는 10초 정도 지난 후에 CD나 카세트를 넣어 주십
시오. 10초 이내에 CD나 카세트를 넣으면 본 장치가 리
세트되지 않으므로 다시 한 번 리세트 버튼을 눌러야 합
니다.
• 리세트 버튼이나 (OFF)를 누르면 표시창에 데몬스트레
이션이 나타납니다. 데몬스트레이션을 중지하려면 모션
표시 모드를 오프로 설정하여 주십시오(19페이지).
시계를 설정하기
시계는 12시간 디지털 표시 방식입니다.
CD 플레이어
CD/MD 장치(옵션)
예: 시계를 10:08로 설정하는 경우
1
(MENU)를 누르고 “Clock”이 나타날 때까
지 조그 롤러를 돌립니다.
1 조그 롤러를 누릅니다.
시 표시가 점멸합니다.
본 장치에서 CD를 재생할 수 있을 뿐만 아니라
외장 CD/MD 장치를 조작할 수도 있습니다.
주의점
CD TEXT 기능이 탑재된 옵션 CD 장치를 접속하면 CD
TEXT 디스크를 재생하면 표시창에 CD TEXT 정보가 나
타납니다.
디스크를 재생하기
2 조그 롤러를 돌려서 시를 설정합니다.
(본 장치를 사용)
3 (SEEK/AMS +)를 누릅니다.
분 표시가 점멸합니다.
디스크를 넣습니다(라벨 면을 위로).
자동으로 재생이 시작됩니다.
4 조그 롤러를 돌려서 분을 설정합니다.
2
조그 롤러를 누릅니다.
시계가 작동하기 시작합니다. 시계 설정이
끝나면 화면 표시는 통상 재생 모드로 되돌
아갑니다.
잠깐 한마디
모션 표시 모드는 “off” 또는 “1”로 설정하고 D.Info 모드를
“on”으로 설정하면 항상 시각이 표시됩니다(19페이지).
주의점
사용 중인 자동차의 시동키에 ACC 위치가 없을 때에는 시
계를 설정하기 전에 (SOURCE)를 누르거나 CD 또는 카세
트를 넣고 반드시 장치의 전원을 켜 주십시오.
CD가 이미 들어 있을 때에는 “CD”가 나타날 때
까지 (SOURCE)를 반복해서 눌러서 재생을 시
작합니다.
목적
누르는 버튼
재생 중지
(OFF)
CD Z
CD 추출
곡의 스킵
– 자동 뮤직 센서
(SEEK/AMS) (./>)
고속감기/되감기
– 수동 검색
(SEEK/AMS) (m/M)
[곡마다 한 번]
[원하는 위치까지 누르고
있음]
주의점
• 디스크의 마지막 곡이 끝나면 디스크의 맨 처음 곡부터
재생이 다시 시작됩니다.
• 옵션 장치를 선택한 상태에서는 같은 소스의 재생은 옵
션 CD/MD 장치까지 계속됩니다.
다음 페이지에 계속 t
9
(옵션 장치를 사용)
1
(SOURCE)를 반복해서 눌러서 “CD” 또는
2
원하는 장치가 나타날 때까지 (MODE)를 반
복해서 누릅니다.
재생이 시작됩니다.
잠깐 한마디
자동 스크롤을 오프로 설정하고 디스크/곡의 이름을 변경
하면 디스크/곡의 이름은 스크롤되지 않습니다.
“MD”를 선택합니다.
디스크를 찾기
— 디스크의 선택
(12페이지의 “이름으로 디스크를 찾기”을 참조)
잠깐 한마디
옵션 MG Memory Stick 시스템업 플레이어 MGS-X1을
본 유닛에 접속했을 때에는 (SOURCE)를 눌러서 “MD”를
선택하고 (MODE)를 눌러서 “MS”를 선택하십시오.
화면표시 항목
디스크/곡을 변경하면 새 디스크/곡에 만들어
놓은 타이틀*1 이 자동으로 나타납니다(자동 스
크롤 기능이 “on”으로 설정되어 있을 때에는 13
문자를 초과하는 이름은 자동으로 스크롤됩니
다(19페이지)).
화면표시 가능한 항목
• 디스크 이름*1/음악가 이름*2
• 곡 타이틀*1
곡을 반복해서 재생하기
— 반복 재생
본체에 들어있는 디스크가 마지막까지 재생되
면 곡이나 디스크 전체를 반복해서 재생합니다.
반복 재생에서는 다음 중에서 한 가지를 선택할
수 있습니다:
• Repeat 1 — 곡을 반복하려면
• Repeat 2* — 디스크를 반복하려면
* 옵션 CD/MD 장치를 접속하고 있는 경우에만 이용할 수
있습니다.
1
(MENU)를 누르고 “Repeat”가 나타날 때까
지 조그 롤러를 돌립니다.
2
(SEEK/AMS +)를 반복해서 눌러서 원하는
3
조그 롤러를 누릅니다.
반복 재생이 시작됩니다.
설정을 선택합니다.
통상 재생 모드로 되돌리려면 순서 2에서 “Repeat
off”를 선택하여 주십시오.
곡을 랜덤 순서로 재생하기
— 셔플 재생
디스크 번호
곡 번호
경과 재생 시간
목적
누르는 버튼
화면표시 항목의 전환
(DSPL)
화면표시 항목의 스크롤
(SCRL)
*1 (DSPL)을 눌렀을 때 “NO D. Name” 또는 “NO T.
Name”이 나타나면 디스크 메모(11페이지) 또는 만들
어 놓은 이름이 없음을 나타냅니다.
*2 음악가 이름이 포함된 CD TEXT 디스크에서만 나타
납니다.
주의점
• 일부 문자는 나타나지 않습니다.
• 문자수가 매우 많은 일부 CD TEXT에서는 정보가 스크
롤되지 않는 경우가 있습니다.
• 본 장치는 CD TEXT 디스크의 각 곡에 대하여 음악가
이름을 표시할 수는 없습니다.
• 소스 이름, 디스크 이름, 곡 타이틀, 경과 재생 시간은 모
션이나 SA 설정에 따라 표시되지 않는 경우가 있습니다.
10
다음 중에서 한 가지를 선택합니다:
• Shuffle 1 — 재생 중인 디스크의 곡을 랜덤
순서로 재생합니다.
• Shuffle 2*1 — 사용 중인 옵션 CD(MD) 장치
에 있는 디스크의 곡을 랜덤 순서로 재생합니
다.
• Shuffle all*2 — 접속한 모든 CD(MD) 장치(
본 장치를 포함)에 있는 디스크의 모든 곡을
랜덤 순서로 재생합니다.
*1 옵션 CD(MD) 장치를 접속한 경우에만 이용할 수 있
습니다.
*2 옵션 CD 장치 또는 여러 대의 옵션 MD 장치를 접속한
경우에만 이용할 수 있습니다.
1
(MENU)를 누르고 “Shuffle”가 나타날 때까
지 조그 롤러를 돌립니다.
2
(SEEK/AMS +)를 반복해서 눌러서 원하는
3
조그 롤러를 누릅니다.
셔플 재생이 시작됩니다.
설정을 선택합니다.
통상 재생 모드로 되돌리려면 순서 2에서 “Shuffle
off”를 선택하여 주십시오.
주의점
“Shuffle all”은 CD 장치와 MD 장치 사이에서 번갈아 가
며 곡을 셔플하지는 않습니다.
CD의 라벨을 만들어 놓기
— 디스크 메모(CUSTOM FILE 기능이 탑재
된 CD 장치인 경우)
커스텀 이름의 라벨을 각 디스크에 만들어 놓을
수 있습니다(디스크 메모). 한 장의 디스크에는
8문자까지 입력할 수 있습니다. CD의 라벨을
만들어 놓으면 이름으로 디스크를 찾을 수 있습
니다(12페이지).
주의 사항
운전이나 그 밖의 운전에 방해가 될 때에는
CUSTOM FILE 기능은 사용하지 마십시오.
1
라벨을 만들어 놓고 싶은 디스크의 재생을
시작합니다.
2
(MENU)를 누르고 “Name Edit”가 나타날
3
조그 롤러를 누릅니다.
때까지 조그 롤러를 돌립니다.
잠깐 한마디
• 이름을 정정 또는 소거하려면 덮어쓰기 하거나 “ ”를
입력하여 주십시오.
• CD 라벨을 만드는 다른 방법: 순서 2와 3을 조작하는 대
신 조그 롤러를 2초 이상 누릅니다.
• CUSTOM FILE 기능이 탑재되지 않은 장치에서도 그
기능을 탑재한 CD 장치와 함께 그 장치를 접속하면 CD
의 라벨 을 만 들어 놓을 수 있습 니다. 디 스 크 메모 는
CUSTOM FILE 기능이 탑재되어 있는 CD 장치의 메모
리에 저장됩니다.
주의점
반복/셔플 재생은 이름 편집이 끝날 때까지 중단됩니다.
디스크 메모를 보기
디스크 메모는 화면표시 항목으로서 원래 CD
TEXT 정보보다 항상 우선됩니다.
목적
누르는 버튼
보기
CD/CD TEXT 디 스 크 의
재생 중에 (DSPL)
잠깐 한마디
그 밖의 화면표시 가능한 항목을 보려면 10페이지를 참조
하여 주십시오.
디스크 메모를 소거하기
1
장치에서 라벨을 만드는 작업 중에 디스크
는 반복 재생됩니다.
4
2
(MODE)를 반복해서 눌러서 디스크 메모를
저장해 놓은 CD 장치를 선택합니다.
3
(MENU)를 누르고 “Name Delete”가 나타
날 때까지 조그 다이얼을 돌립니다.
4
조그 롤러를 누릅니다.
저장해 놓은 이름이 나타납니다.
5
조그 롤러를 돌려서 소거하고 싶은 디스크
이름을 선택합니다.
저장되어 있는 이름이 나타납니다.
6
조그 롤러를 2초 이상 누르고 있습니다.
이름이 소거됩니다.
그 밖의 이름을 소거하고 싶을 때에는 순서
5와 6을 반복 조작하여 주십시오.
7
(MENU)를 두 번 누릅니다.
문자를 입력합니다.
1 조그 롤러를 돌려서 원하는 문자를 선택
합니다.
A t B t C ... t 0 t 1 t 2 ... t +
t–t
... t * t A
*
* (공백)
2 원하는 문자를 찾았으면 (SEEK/AMS +)
를 누릅니다.
(SEEK/AMS -)를 누르면 왼쪽으로 되돌
아갈 수 있습니다.
3 순서 1 과 2를 반복해서 이름 전체를 입
력합니다.
5
(SOURCE)를 반복해서 눌러서 “CD”를 선택
합니다.
장치는 통상 CD 재생 모드로 되돌아갑니다.
주의점
• CD TEXT 디스크의 디스크 메모를 소거하면 원래 CD
TEXT 정보가 나타납니다.
• 소거하고 싶은 디스크 메모를 찾을 수 없을 때에는 순서
2에서 다른 CD 장치를 선택해 보십시오.
통상 CD 재생 모드로 되돌아가려면 조그 롤
러를 누릅니다.
11
이름으로 디스크를 찾기
재생할 곡을 선택하기
— 리 스 트 업(CD TEXT/CUSTOM FILE 기
능이 탑재된 CD 장치 또는 MD 장치)
— 뱅크(CUSTOM FILE 기능이 탑재된 CD
커스텀 이름이 할당된 디스크*1 나 CD TEXT
디스크*2에서 이 기능을 사용할 수 있습니다.
디스크의 라벨을 만드는 경우에 곡을 선택해서
스킵 또는 재생하도록 장치에서 설정할 수 있습
니다.
*1 커스텀 이름으로 디스크를 찾기: CD(11페이지) 또는
MD에 이름을 만들어 놓은 경우.
*2 CD TEXT 정보로 디스크를 찾기: CD TEXT 기능이
탑재된 CD 장치에서 CD TEXT 디스크를 재생하는 경
우.
12
1
재생 중에 조그 롤러를 누릅니다.
재생 중인 디스크에 할당된 이름이 표시창
에 나타납니다.
2
조그 롤러를 돌려서 원하는 디스크를 찾습
니다.
3
조그 롤러를 눌러서 디스크를 재생합니다.
장치인 경우)
1
라벨을 만들어 놓고 싶은 디스크의 재생을
시작합니다.
2
(MENU)를 누르고 “Bank Sel”이 나타날 때
까지 조그 롤러를 돌립니다.
3
조그 롤러를 누릅니다.
4
곡의 라벨을 만듭니다.
1 (SEEK/AMS -)또는 (SEEK/AMS +)를 반
복해서 눌러서 라벨을 만들어 놓고 싶은
곡을 선택합니다.
2 조그 롤러를 눌러서 “Play” 또는 “Skip”을
선택합니다.
주의점
• 일부 문자는 나타나지 않습니다(예외: 디스크 메모).
• 리스트가 표시된 상태에서 5초 이상 조작하지 않으면 화
면 표시는 통상 재생 모드로 되돌아갑니다.
5
순서 4를 반복 조작해서 모든 곡에 대하여
“Play” 또는 “Skip”을 설정합니다.
카드형 리모컨을 사용해서 조작하기
6
(MENU)를 두 번 누릅니다.
1
2
재생 중에 (LIST)를 누릅니다.
3
(ENTER)를 누릅니다.
(DISC/PRESET -)또는 (DISC/PRESET +)를
눌러서 원하는 디스크를 찾습니다.
장치는 통상 CD 재생 모드로 되돌아갑니다.
주의점
• “Play”또는 “Skip”은 24곡까지 설정할 수 있습니다.
• CD의 모든 곡에 대해서 “Skip”을 설정해 놓을 수는 없습
니다.
특정 곡만 재생하기
다음 중에서 한 가지를 선택할 수 있습니다:
• Bank on — “Play”를 설정한 곡을 재생합니다.
• Bank inv(Inverse) — “Skip”을 설정한 곡을
재생합니다.
카세트 플레이어
1
재생 중에 (MENU)를 누르고 “Bank on” 또
는 “Bank inv”, “Bank off” 중에서 한 가지가
나타날 때까지 조그 롤러를 돌립니다.
테이프를 듣기
2
원하는 설정이 나타날 때까지
(SEEK/AMS +)를 반복해서 누릅니다.
3
조그 롤러를 누릅니다.
재생 중인 곡의 다음 곡부터 재생이 시작됩
니다.
통상 재생 모드로 되돌리려면 순서 2에서 “Bank
off”를 선택하여 주십시오.
카세트를 넣습니다.
자동으로 재생이 시작됩니다.
카세트가 이미 들어 있을 때에는
“FORWARDB” 또는 “REVERSEb” 가 나타날
때까지 (SOURCE)를 반복해서 눌러서 재생을
시작합니다.
FORWARD B: 윗면을 재생합니다.
REVERSE b: 아랫면을 재생합니다.
목적
누르는 버튼
테이프의 주행
방향 전환
(MODE) (o)
재생을 중지
(OFF)
TAPE Z
카세트 추출
곡의 스킵
– 자동 뮤직 센서
(SEEK/AMS) (./>)
고속감기/되감기
(SEEK/AMS) (m/M)
[곡마다 한 번]
[2초 이상 누른 상태를 유지]
잠깐 한마디
고속감기 또는 되감기 중에 재생을 시작하려면 (MODE)
(o)를 누릅니다.
주의점
다음과 같은 경우에는 AMS 기능은 작동하지 않는 경우가
있습니다:
– 곡과 곡 사이에 공백이 4초 미만인 경우
– 곡과 곡 사이에 노이즈가 있을 경우
– 소리가 작거나 무음 부분이 긴 경우
13
각종 모드로 테이프를 재생
하기
테이프를 각종 모드로 재생할 수 있습니다:
• Metal은 CrO2 또는 메탈 테이프를 재생합니
다.
• BL.Skip(공백 스킵)은 공백이 8초 이상 있을
때에 스킵합니다.
• ATA(자동 튜너 기동)는 테이프의 고속감기
중에 튜너를 자동 기동합니다.
• NR(Dolby NR)에서는 Dolby* NR B 방식을
선택할 수 있습니다.
* Dolby Laboratories의 사용허가 아래 제작되었음.
“Dolby”및 이중-D 심볼은 Dolby Laboratories의 상표
임.
1
2
테이프의 재생 중에 (MENU)를 누릅니다.
3
(SEEK/AMS +)를 눌러서 “on”을 선택합니다.
원하는 모드가 나타날 때까지 조그 롤러를
돌립니다.
예: ATA 모드
라디오
본 장치에는 각 밴드(FM1, FM2, AM)에 대하
여 최대 10개 방송국을 저장해 놓을 수 있습니
다.
주의 사항
운전 중에 방송국을 수신할 때에는 사고 방지를
위해서 베스트 튜닝 메모리를 사용하여 주십시
오.
방송국을 자동 저장하기
— 베스트 튜닝 메모리(BTM)
본 장치는 선택한 밴드에서 가장 전파가 강한
방송국을 선택해서 주파수 순서대로 기억합니
다.
1
2
4
조그 롤러를 누릅니다.
재생 모드가 시작됩니다.
통상 재생 모드로 되돌리려면 순서 3에서 “off”
를 선택하여 주십시오.
주의점
ATA를 온으로 설정하면 파워 안테나가 자동으로 펴집니
다.
곡을 반복 재생하기
— 반복 재생
1
(MENU)를 누르고 “Repeat”가 나타날 때까
지 조그 롤러를 돌립니다.
2
3
(SEEK/AMS +)를 눌러서 “on”을 선택합니다.
조그 롤러를 누릅니다.
반복 재생이 시작됩니다.
통상 재생 모드로 되돌리려면 순서 2에서 “Repeat
off”를 선택하여 주십시오.
잠깐 한마디
반복 재생 중에 (MODE)를 누릅니다. 표시창에서 “REP”
가 지워지고 반복 모드가 취소됩니다.
14
(SOURCE)를 반복해서 눌러서 라디오를 선
택합니다.
(MODE)를 반복해서 눌러서 밴드를 선택합
니다.
3
(MENU)를 누르고 “B.T.M.”이 나타날 때까
4
조그 롤러를 누릅니다.
설정이 저장되면 비프음이 울립니다.
지 조그 롤러를 돌립니다.
주의점
• 전파가 약한 몇 개 방송국만 수신되었을 때에는 이전에
설정한 일부 숫자가 그대로 남아있는 경우가 있습니다.
• 표시창에 숫자가 나타나면 본 장치에는 현재 나타나 있
는 방송국부터 저장되기 시작합니다.
저장해 놓은 방송국을 수신
하기
자동 수신 주파수 조절
- IF 자동 기능
니다.
FM 스테레오 방송을 수신 중에 가까운 방송국
에서 전파간섭이 있으면 잘 들리지 않게 됩니다.
그런 경우에는 본 장치의 “IF Auto” 기능이 자동
으로 수신 주파수를 좁혀서 노이즈를 줄여줍니
다. 그러면 일부 FM 스테레오 방송은 모노럴이
됩니다. 그런 방송국을 스테레오로 듣고 싶을 때
에는 “Wide” 설정으로 수동 전환시켜 주십시오.
3
4
조그 롤러를 누릅니다.
1
조그 롤러를 돌려서 원하는 방송국을 찾습
니다.
FM 라디오 방송을 수신 중에 (MENU)를 누
릅니다.
2
5
조그 롤러를 눌러서 원하는 방송국을 수신
합니다.
“IF Auto”가 나타날 때까지 조그 롤러를 돌
립니다.
3
1
2
(SOURCE)를 반복해서 눌러서 라디오를 선
택합니다.
(MODE)를 반복해서 눌러서 밴드를 선택합
잠깐 한마디
카드형 리모컨의 (DISC/PRESET -)또는 (DISC/PRESET +)
를 눌러서 메모리에 저장된 순서대로 방송국을 수신할 수
있습니다(프리세트 검색 기능).
프리세트 튜닝이 작동하지 않을 때에는
4
(SEEK/AMS +)를 눌러서 “Wide”를 선택합
니다.
조그 롤러를 누릅니다.
주의점
전파간섭으로 FM 방송이 잘 들리지 않을 때에는 “Wide”
설정을 “IF Auto”설정으로 되돌려 주십시오.
(SEEK/AMS -) 또는 (SEEK/AMS +)를 눌러
서 방송국을 검색합니다(자동 튜닝).
본 장치가 방송국을 수신하면 선국이 정지
됩니다. 원하는 방송국을 수신할 때까지 이
조작을 반복하여 주십시오.
잠깐 한마디
• 자동 튜닝에서 너무 자주 정지될 때에는 로컬 시크 기능
을 기동해서 찾는 방송국을 상대적으로 전파가 강한 방
송국만으로 한정하여 주십시오(19페이지의 “사운드와
화면표시 설정을 변경하기”를 참조).
• 듣고 싶은 방송국의 주파수를 알고 있을 때에는
(SEEK/AMS -)또는 (SEEK/AMS +)를 눌러서 그 주파수
를 대강 맞춘 다음 (SEEK/AMS)를 반복해서 눌러서 원
하는 주파수에 미조정합니다(수동 튜닝).
원하는 방송국만 저장시켜
놓기
원하는 방송국을 수동 조작으로 기억시켜 놓을
수 있습니다.
1
2
(SOURCE)를 반복해서 눌러서 라디오를 선
택합니다.
(MODE)를 반복해서 눌러서 밴드를 선택합
니다.
3
모노럴 수신 모드를 선택합니다.
(19페이지의 “사운드와 화면표시 설정을 변
경하기” 를 참조). 잘 들리게 되지만 모노럴
로 됩니다(“ST”가 지워짐).
(SEEK/AMS -) 또는 (SEEK/AMS +)를 눌러
서 기억시켜 놓고 싶은 방송국을 수신합니
다.
4
5
조그 롤러를 누릅니다.
잠깐 한마디
FM 방송국이 잘 들리지 않을 때에는 DSO를 오프로 설정
하여 주십시오.
6
조그 롤러를 2초 동안 누르면 “Memory”가
나타납니다.
기억시킨 방송국이 표시창에 나타납니다.
FM 방송이 잘 들리지 않을 때에는
조그 롤러를 돌려서 기억시키고 싶은 번호
를 선택합니다.
주의점
이미 방송국이 기억되어 있는 번호에 다른 방송국을 기억
시키면 이전에 기억시킨 방송국은 소거됩니다.
15
방송국 이름을 표시하기
방송국 이름을 저장하기
— 방송국 메모
각 라디오 방송국에 이름을 만들어서 그것을 메
모리에 저장해 놓을 수 있습니다. 현재 수신 중
인 방송국 이름이 표시창에 나타납니다. 방송국
에는 최대 8문자의 이름을 만들어 놓을 수 있습
니다.
방송국 이름을 저장하기
1
이름을 기억시키고 싶은 방송국을 수신합니
다.
2
(MENU)를 누르고 “Name Edit”가 나타날
3
조그 롤러를 누릅니다.
4
누르는 버튼
화면표시 항목의
전환
라디오 수신 중에 (DSPL)
* 저장된 방송국 이름이 없으면 표시창에 “NO Name”이 1
초 동안 나타납니다.
방송국 이름을 소거하기
1
라디오 수신 중에 (MENU)를 누르고
“Name Delete”가 나타날 때까지 조그 롤러
를 돌립니다.
2
3
조그 롤러를 누릅니다.
4
조그 롤러를 2초 동안 누릅니다.
이름이 소거됩니다.
다른 이름을 소거하고 싶을 때에는 순서 3∼
4를 반복 조작합니다.
5
(MENU)를 두 번 누릅니다.
문자를 입력합니다.
A t B t C ... t 0 t 1 t 2 ... t +
t – t ... t * t A
*
* (공백)
2 원하는 문자를 찾았으면 (SEEK/AMS +)
를 누릅니다.
(SEEK/AMS -)를 누르면 왼쪽으로 되돌
아갈 수 있습니다.
3 순서 1과 2를 반복해서 이름 전체를 입
력합니다.
조그 롤러를 누릅니다.
잠깐 한마디
• 이름을 정정 또는 소거하려면 덮어쓰기 하거나 “ ”를
입력하여 주십시오.
• 방송국 이름을 저장하는 또 다른 방법이 있습니다:
순서 2와 3을 조작하는 대신 조그 롤러를 2초 이상 누릅
니다.
16
목적
때까지 조그 롤러를 돌립니다.
1 조그 롤러를 돌려서 원하는 문자를 선택
합니다.
5
화면표시 항목을 주파수 또는 방송국 이름*으
로 전환할 수 있습니다.
조그 롤러를 돌려서 이름을 소거하고 싶은
방송국을 선택합니다.
본 장치는 통상 라디오 수신 모드로 되돌아
갑니다.
주의점
방송국이 이미 모두 소거되어 있을 때에는 순서 4에서
“NO Data”가 나타납니다.
리스트를 사용해서 방송국을
수신하기
그 밖의 기능
— 리스트업
본 장치(및 옵션 CD/MD 장치)는 회전 커맨더
(옵션)로 조작할 수 있습니다.
1
라디오의 수신 중에 조그 롤러를 누릅니다.
현재 수신 중인 방송국의 주파수 또는 이름
이 점멸합니다.
회전 커맨더를 사용하기
우선 회전 커맨더의 설치 방법에 따라 라벨을
붙입니다. 회전 커맨더를 누르거나 컨트롤을 돌
려서 조작합니다.
2
조그 롤러를 돌려서 원하는 방송국을 찾습
니다.
선택한 방송국에 할당된 이름이 없을 때에
는 표시창에 주파수가 나타납니다.
3
조그 롤러를 눌러서 원하는 방송국을 수신
합니다.
주의점
리스트가 표시된 상태에서 5초 이상 조작하지 않으면 화면
표시는 통상 라디오 수신 모드로 되돌아갑니다.
SOUND
MODE
DSPL
DSPL
MODE
SOUND
버튼을 누르는 방법
(ATT)
(SOUND)
카드형 리모컨을 사용해서 조작하기
라디오의 수신 중에 (LIST)를 누릅니다.
(DISC/PRESET -) 또는
(DISC/PRESET +)를 반복해서 눌러서 원하
(MODE)
(SOURCE)
OFF
1
2
는 방송국을 찾습니다.
3
(DSPL)
(ENTER)를 누릅니다.
(OFF)
VOL 컨트롤을 돌려서 음량
을 조절합니다.
누르는 버튼
목적
(SOURCE)
소 스( 라 디 오/CD/MD*1/ 테
이프)/전원 온을 변경
(MODE)
조작(라디오의 밴드/CD 장
치*1/MD 장 치*1/ 테 이 프 의
재생 방향)을 변경
(ATT)
사운드를 줄임
(OFF)*2
재생 정지나 라디오의 수신/
전원 오프
(SOUND)
(DSPL)
사운드 메뉴 조절
화면표시 항목 전환
*1 대응하는 옵션 장치를 접속한 경우에 한합니다.
*2 자동차 시동키에 ACC(액세서리) 위치가 없을 때에는
엔진을 끈 후에 반드시 (OFF)를 2초 동안 눌러서 시계
표시를 꺼 주십시오.
다음 페이지에 계속 t
17
컨트롤을 돌리는 방법
조작 방향을 전환하기
공장 출하시의 컨트롤 조작 방향은 다음과 같이
설정되어 있습니다.
높이려면
SEEK/AMS
컨트롤
낮추려면
다음의 조작을 할 때에는 돌리고 놓습니다:
– 디스크의 곡을 스킵
– 테이프 곡의 첫부분검출
– 방송국의 자동 선국
회전 커맨드를 핸들 오른쪽에 장착하는 경우는
조작 방향을 반대로 할 수 있습니다.
다음의 조작을 할 때에는 돌린 채 있다가 놓습
니다:
– 곡의 고속감기/되감기
– 테이프의 되감기
– 방송국의 수동 검색
잠깐 한마디
테이프의 되감기 중에 재생을 시작하려면 (MODE)를 누
릅니다.
컨트롤을 누르고 돌리는 방법
VOL 컨트롤을 누르면서 (SOUND)을 2초
동안 누릅니다.
잠깐 한마디
이 컨트롤의 조작 방향은 장치에서 전환할 수 있습니다
(19페이지의 “사운드와 화면표시 설정을 변경하기”를 참
조).
PRESET/DISC
컨트롤
다음의 조작을 할 때에는 컨트롤을 누르고 돌
립니다:
– 프리세트 방송국의 수신
– 디스크 교환*
* 옵션 CD/MD 장치를 접속한 경우입니다.
18
사운드 특성을 조절하기
저음, 고음, 밸런스, 페이더, 서브우퍼의 음량을
조절할 수 있습니다.
저음과 고음 레벨, 서브우퍼의 음량은 각 소스
별로 저장할 수 있습니다.
1
(SOURCE)를 눌러서 소스(라디오 또는 CD,
2
(SOUND)를 반복해서 눌러서 조절하고 싶
MD, 테이프)를 선택합니다.
은 항목을 선택합니다.
(SOUND)를 누를 때마다 항목은 다음과 같
이 변경됩니다:
BAS (저음) t TRE (고음) t BAL (좌우)
t FAD (전후)t Sub (서브우퍼 레벨)
3
(SEEK/AMS -) 또는 (SEEK/AMS +)를 눌러
서 선택한 항목을 조절합니다.
회전 커맨더로 조절할 때에는 (SOUND)를
누르고 VOL 컨트롤을 돌립니다.
주의점
항목을 선택한 후에는 3초 이내에 조절하여 주십시오.
신속하게 사운드를 작게 하기
(ATT)를 누릅니다.
사운드와 화면표시 설정을
변경하기
— 메뉴
다음과 같은 항목을 설정할 수 있습니다:
Set up(설정)
• Clock(시계)(9페이지)
• Beep(비프음) — 비프음의 온과 오프를 전환
합니다.
• RM(회전 커맨더) — 회전 커맨더 컨트롤의
조작 방향을 전환합니다.
– 회전 커맨더를 공장 출하시의 설정대로 사
용하려면 “norm”을 선택합니다.
– 핸들 오른쪽에 회전 커맨더를 장착하려면
“rev”를 선택합니다.
• Key ill(키 조명) - 장치의 버튼 조명을 전환
합니다.
– 자동차의 라이트 켜질 때에만 버튼을 켜려
면 “Auto”를 선택합니다.(조도 조절용 리드
선을 자동차의 조명 전원에 접속하고 있을
때에만 작동합니다.)
– 버튼을 켜려면 “on”을 선택합니다.
Dspl(표시창)
• D.Info(듀얼 정보) — 시계와 재생 모드를 동
표시창에 한 순간 “ATT”가 나타납니다.
이전 음량 레벨로 되돌리려면 다시 한 번
(ATT)를 눌러 주십시오.
•
잠깐 한마디
자동차 전화의 인터페이스 케이블을 ATT 리드선에 접속
했을 때에는 전화 착신이 있으면 장치에서는 자동으로 음
량이 낮춰집니다(전화 ATT 기능).
•
•
•
시에 표시합니다(온).
(모션이 “1” 또는 “off”로 설정되어 있을 때에
만 작동합니다.)
Dimmer(디머) — 표시창의 밝기를 조절합니다.
– 라이트를 켰을 때에만 표시창을 어둡게 하
려면 “Auto”를 선택합니다.(조도 조절용 리
드선을 자동차 조명 전원에 접속했을 때에
만 작동합니다.)
– 표시창을 어둡게 하려면 “on”을 선택합니다.
– 디머를 사용하지 않을 때에는 “off”를 선택
합니다.
Display(표시창)
– 표시창을 “off”로 설정하면 조작 중에만 표
시창이 켜집니다.
Motion(모션 표시) — 모션 표시 모드의 “1”,
“2”, “off”를 선택합니다.
A.Scrl(자동 스크롤)*
– 13문자를 초과하는 이름은 전체를 자동 스
크롤 표시하려면 “on”을 선택합니다.
– Auto 스크롤이 오프로 설정하고 디스크/곡
의 이름을 변경하면 디스크/곡의 이름은 스
크롤되지 않습니다.
* CD 또는 MD를 재생하고 있을 때가 아니면 이 항목은 나
타나지 않습니다..
다음 페이지에 계속 t
19
사운드
• HPF(하이 패스 필터)(21페이지)
• LPF(로 패스 필터)(22페이지)
• Lound(라우드니스) — 작은 소리도 저음과
고음을 즐길 수 있습니다. 저음과 고음을 강조
합니다.
P.Mode(플레이 모드)
• Local on/off(로컬 시크 모드)(15페이지)
– 전파가 강한 방송국만 수신하려면 “on"을 선
택합니다. “off”를 선택하면 통상 모드로 되
돌아갑니다.
• Mono on/off(모노럴 모드)(15페이지)
– FM 스테레오 방송을 모노럴로 청취할 때에
는 “on” 을 선택합니다. “off” 를 선택하면 통
상 코드로 되돌아갑니다.
• IF Auto/Wide(IF 자동/와이드)(15페이지)
1
다이내믹 사운드스테이지 오
가나이저(DSO)를 설정하기
스피커가 도어의 아랫부분에 장착되어 있을 때
에는 사운드가 아랫쪽에서 들리고 명료하지 않
는 경우가 있습니다.
DSO(다이내믹 사운드스테이지 오가나이저)
기능은 스피커가 계기판에 있는 것처럼 음향의
일체감을 만들어 줍니다(가상 스피커).
각 소스에 대하여 DSO의 설정을 저장해 놓을
수 있습니다.
1
(SOURCE)를 눌러서 소스(라디오 또는 CD,
MD, 테이프)를 선택합니다.
2
“DSO on”이 나타날 때까지 (DSO)를 반복
해서 누릅니다.
(MENU)를 누릅니다.
A.Scrl을 설정하려면 CD/MD의 재생 중에
(MENU)를 누릅니다.
2
원하는 항목이 나타날 때까지 조그 롤러를
돌립니다.
3
(SEEK/AMS -) 또는 (SEEK/AMS +)를 눌러
4
서 원하는 설정을 선택합니다(예: “on” 또는
“off”).
조그 롤러를 누릅니다.
모드 설정이 끝나면 화면표시는 통상 재생
모드로 되돌아갑니다.
주의점
• 나타나는 항목은 소스에 따라 달라집니다.
• 리스트가 표시된 상태에서 5초 이상 조작하지 않으면 화
면 표시는 통상 재생 모드로 되돌아갑니다.
잠깐 한마디
카드형 리모컨의 (DISC/PRESET -)또는 (DISC/PRESET +)
를 누르면 카테고리(“Set up”, “Dspl” “P.Mode”, “Sound”,
“Edit”)를 간단히 전환할 수 있습니다.
카드형 리모컨을 사용해서 조작하기
1
2
(MENU)를 누릅니다.
3
(SEEK/AMS -) 또는 (SEEK/AMS +)를 눌러
4
(ENTER)를 누릅니다.
원하는 항목이 나타날 때까지
(DISC/PRESET -) 또는 (DISC/PRESET +)를
반복해서 누릅니다.
서 원하는 설정을 선택합니다.
DSO 기능을 취소하려면 순서 2에서 “DSO off”
를 선택합니다.
주의점
• 자동차의 인테리어나 음악 종류에 따라서는 DSO에서도
원하는 효과를 얻을 수 없는 경우가 있습니다.
• FM 방송국이 잘 들리지 않을 때에는 DSO를 오프로 설
정하여 주십시오.
이퀄라이저를 설정하기
7 종 류 의 음 악(Vocal, Club, Jazz, New Age,
Rock, Custom, Xplod) 이퀄라이저 곡선을 선
택할 수 있습니다.
각 소스에 대하여 따로따로 이퀄라이저를 설정
할 수 있습니다.
이퀄라이저 곡선을 선택하기
1
(SOURCE)를 눌러서 소스(라디오 또는 CD,
MD, 테이프)를 선택합니다.
2
원하는 이퀄라이저 곡선이 나타날 때까지
(EQ7)을 반복해서 누릅니다.
(EQ7)을 누를 때마다 항목은 변경됩니다.
이퀄라이징 효과를 취소하려면 “off”를 선택
합니다. 3초 후에는 화면표시가 통상 재생
모드로 되돌아갑니다.
20
주의점
DSO가 온으로 설정되어 있을 때 이퀄라이저 설정은 전체
적인 효과를 가장 효과적으로 높여줄 수 있도록 자동 조절
됩니다.
이퀄라이저 곡선을 조절하기
주파수와 레벨에 대하여 이퀄라이저 설정을 저
장하거나 조절할 수 있습니다.
1
(SOURCE)를 눌러서 소스(라디오 또는 CD,
2
(MENU)를 누르고 “EQ Tune”이 나타날 때
3
4
조그 롤러를 누릅니다.
5
MD, 테이프)를 선택합니다.
프론트 및 리어 음량을 조절
하기
1
재생 또는 라디오 수신 중에 “FAD”가 나타
날 때까지 (SOUND)를 반복해서 누릅니다.
2
(SEEK/AMS -) 또는 (SEEK/AMS +)를 눌러
서 프론트/리어 스피커의 음량을 조절합니
다.
3초 후에는 화면표시가 통상 재생 모드로 되
돌아갑니다.
까지 조그 롤러를 돌립니다.
(SEEK/AMS -) 또는 (SEEK/AMS +)를 눌러
서 원하는 이퀄라이저 곡선을 선택하고 조
그 롤러를 누릅니다.
(SEEK/AMS -)를 누를 때마다 항목이 변경됩
니다.
원하는 주파수 및 레벨을 선택합니다.
1 (SEEK/AMS -) 또는 (SEEK/AMS +)를 눌
러서 원하는 주파수를 선택합니다.
(SEEK/AMS)를 누를 때마다 주파수가 변
경됩니다.
프론트/리어 스피커의 차단 주파수를 조절하기
설치한 스피커 시스템의 특성에 맞추어 스피커
의 차단 주파수를 선택할 수 있습니다.
레벨
62 Hz y 157 Hz y 396 Hz y 1.0 kHz
y 2.5 kHz y 6.3 kHz y 16 kHz
2 조그 롤러를 돌려서 원하는 레벨로 조절
합니다.
레벨은 -10 dB∼+10 dB 범위에서 1 dB
단위로 조절할 수 있습니다.
차단 주파수
off
주파수(Hz)
1
재생 또는 라디오 수신 중에 (MENU)를 누
릅니다.
2
“HPF”가 나타날 때까지 조그 롤러를 돌립니
다.
3
(SEEK/AMS -) 또는 (SEEK/AMS +)를 눌러
서 차단 주파수를 선택합니다.
(SEEK/AMS)를 누를 때마다 주파수는 다음
과 같이 변경됩니다:
공장 출하시의 이퀄라이저 곡선으로 되돌리
려면 조그 롤러를 2초 동안 누릅니다.
6
조그 롤러를 누릅니다.
효과 설정이 끝나면 통상 재생 모드가 나타
납니다.
오프(공장 출하시의 설정) y 78 Hz y
125 Hz
4
조그 롤러를 누릅니다.
주파수 설정이 끝나면 화면표시는 통상 재
생 모드로 되돌아갑니다.
21
서브우퍼의 음량을 조절하기
1
(SOURCE)를 눌러서 소스(라디오 또는 CD,
2
“Sub”가 나타날 때까지 (SOUND)를 반복해
서 누릅니다.
3
(SEEK/AMS -) 또는 (SEEK/AMS +)를 눌러
서 프론트/리어 스피커의 음량을 조절합니
다.
3초 후에는 화면표시가 통상 재생 모드로 되
돌아갑니다.
서브우퍼의 차단 주파수를 조절하기
레벨
접속한 서브우퍼의 특성에 맞추어 서브우퍼에
입력되는 필요없는 고주파수 및 중간 주파수를
제거할 수 있습니다. 차단 주파수(아래 그림 참
조)를 설정하면 서브우퍼는 저주파수의 신호만
출력하므로 명료한 사운드를 즐기실 수 있습니
다.
차단 주파수
off
주파수(Hz)
1
재생 또는 라디오 수신 중에 (MENU)를 누
릅니다.
2
“LPF”가 나타날 때까지 조그 롤러를 돌립니
다.
(SEEK/AMS -) 또는 (SEEK/AMS +)를 눌러
서 차단 주파수를 선택합니다.
(SEEK/AMS)를 누를 때마다 주파수는 다음
과 같이 변경됩니다.
오프(공장 출하시의 설정) y 125 Hz y
MD, 테이프)를 선택합니다.
잠깐 한마디
음량 레벨은 -10 dB∼+10 dB 범위에서 조절 가능합니다.
(-10 dB 미만이면 “ATT”가 나타납니다.)
22
3
78 Hz
4
조그 롤러를 누릅니다.
주파수 설정이 끝나면 화면표시는 통상 재
생 모드로 되돌아갑니다.
스펙트럼 아날라이저를 선택
하기
사운드 신호 레벨은 스펙트럼 아날라이저로 나
타납니다. 7가지 패턴(SA 1∼SA 7) 중에서 한
가지를 선택 표시하거나 또는 모든 패턴을 표시
하는 자동 표시 모드를 선택할 수 있습니다.
재생 또는 라디오 수신 중에 (SA)를 반복해
서 눌러서 원하는 설정을 선택합니다.
(SA)를 누를 때마다 항목이 변경됩니다.
스펙트럼 아날라이저를 취소하려면 순서 2에서
“SA off”를 선택합니다.
주의점
모션 표시 모드를 “1” 또는 “2,”로 설정한 경우는 스펙트럼
아날라이저는 나타나지 않습니다.
리튬 배터리를 교환하기
배터리는 일반적인 상태에서 약 1년 동안 사용
할 수 있습니다.(사용 상태에 따라 수명이 짧아
지는 경우가 있습니다.) 배터리가 소모되면 카
드형 리모컨으로 조작할 수 있는 거리가 짧아집
니다. 새 CR2025 리튬 배터리로 교환하여 주
십시오.
추가 정보
손질법
퓨즈의 교환
퓨즈를 교환할 때에는 반드시 퓨즈에 기재된 정
격 전류치에 적절한 퓨즈를 사용하여 주십시오.
퓨즈가 끊어졌을 때에는 전원의 접속 상태를 확
인한 후에 퓨즈를 교환하여 주십시오. 교환했는
데 또 퓨즈가 끊어졌을 때에는 내부가 고장났을
경우가 있습니다. 그런 경우에는 가까운 Sony
판매점으로 문의하여 주십시오.
x
+ 측을 위로
퓨즈(10 A)
경고
본 장치에 부속된 퓨즈의 정격 전류치를 초과하
는 퓨즈를 사용하면 본 장치가 고장나는 원인이
되므로 절대로 사용하지 마십시오.
리튬 배터리에 관한 주의
• 리튬 배터리는 어린이의 손이 닿지 않는 장소
에 보관하십시오. 만일 배터리를 삼켰을 때에
는 즉시 의사의 진단을 받아 주십시오.
• 배터리는 접촉 불량을 방지하기 위해서 헝겊
으로 닦아 내십시오.
• 배터리는 반드시 바른 방향으로 넣어 주십시
오.
• 배터리는 금속 핀셋으로 집으면 단락될 염려
가 있으므로 삼가 하십시오 .
경고
배터리는 잘못 취급하면 파열될 염려가 있
습니다. 충전하거나 분해, 불 속에 던지지 마
십시오.
23
주요 제원
CD 플레이어부
신호대 잡음비
주파수 응답특성
워우 플러터
일반 제원
92 dB
10 - 20,000 Hz
측정한계미만
입력 단자
카세트 플레이어부
테이프 트랙
워우 플러터
주파수 응답특성
신호대 잡음비
4트랙 2채널 스테레오
0.08 %(WRMS)
30-18,000 Hz
카세트 타입
Dolby B NR
Dolby NR 오프
톤 컨트롤
TYPE II, IV
67 dB
58 dB
라우드니스
TYPE I
64 dB
55 dB
튜너부
튜닝 범위
안테나 단자
중간 주파수
사용 가능 감도
선택성
신호대 잡음비
FM 튜닝 간격:
50 kHz/200 kHz 전환 가능
87.5 - 108.0 MHz
(50 kHz 단위)
87.5 - 107.9 MHz
(200 kHz 단위)
옥외 안테나 단자
10.7 MHz/450 kHz
8 dBf
400 kHz에서 75 dB
65 dB(스테레오)
70 dB(모노럴)
1 kHz에서 주파수 왜곡율
신호 분리
주파수 응답특성
0.7 %(스테레오)
0.4 %(모노럴)
1 kHz에서 35 dB
30 - 15,000 Hz
AM
튜닝 범위
안테나 단자
중간 주파수
감도
AM 튜닝 간격:
9 kHz/10 kHz 전환 가능
531 - 1,602 kHz
(9 kHz 단위)
530 - 1,710 kHz
(10 kHz 단위)
옥외 안테나 단자
10.7 MHz/450 kHz
30 µV
파워 앰프
출력 단자
스피커 임피던스
최대 출력
필요 전원
외형치수
FM
24
출력 단자
스피커 단자
(안전 실 커넥터)
4 - 8옴
50 W × 4(4옴에서)
설치시의 외형치수
중량
부속 액세서리
옵션 액세서리
옵션 장치
음성 출력
서브우퍼 출력(모노럴)
파워 안테나 릴 컨트롤 리드선
파워 앰프 컨트롤 리드선
전화 ATT 컨트롤 리드선
조명 컨트롤 리드선
BUS 컨트롤 입력 커넥터
BUS 음성 입력 커넥터
리모컨 입력 커넥터
안테나 입력 커넥터
저음은 62 Hz에서 ±10 dB
고음은 16 kHz에서 ±10 dB
100 Hz에서 +8 dB
10 kHz에서 +2 dB
12 V DC 자동차 배터리
(부접지)
약 178 × 100 × 186 mm
(w/h/d)
약 178 × 100 × 165 mm
(w/h/d)
약 2.1 kg
설치 및 접속용 부품(1세트)
회전 커맨더
RM-X4S
카드형 리모컨
RM-X114
BUS 케이블(RCA핀 코드
부속)
RC-61(1 m), RC-62(2 m)
CD 체인저(10디스크)
CDX-848X, CDX-747X,
CDX-646X
MD 체인저(6디스크)
MDX-65
소스 셀렉터
XA-C30
주의점
본 장치는 디지털 프리앰프 또는 이퀄라이저에는 접속할
수 없습니다.
디자인 및 주요 제원은 예고 없이 변경할 경우가 있습니다.
고장일까? 하고 생각되면
본 장치의 사용 중에 이상이 생겼을 때에는 다음
의 점검 리스트에서 문제를 해소하여 주십시오.
다음의 점검 리스트를 읽으시기 전에 접속과 조
작 방법을 확인하여 주십시오.
일반적인 문제
소리가 출력되지 않는다.
• 조그 롤러를 위로 돌려서 음량을 조절하여
주십시오.
• ATT 기능을 취소하여 주십시오.
• 2스피커 시스템에서는 페이더 컨트롤을 중
앙 위치로 설정하여 주십시오.
• 옵션 Sony MD 체인저를 사용하는 경우는
LP 모드로 녹음한 MD를 재생하고 있습니다.
(표시창에 “LP: ...”가 나타남.)
메모리의 내용이 소거되었다.
• 리세트 버튼을 눌렀습니다.
t 메모리에 다시 저장시켜 주십시오.
• 전원 코드 또는 배터리가 빠졌습니다.
• 전원 코드가 바르게 접속되지 않았습니다.
비프음이 울리지 않는다.
• 비프음이 소거되었습니다(19페이지).
• 옵션 파워 앰프가 접속되어 있어서 내장 앰
프를 사용할 수 없습니다.
표시창의 표시가 지워진다/나타나지 않는다.
• (OFF)를 2초 동안 누르면 시계 표시가 나
타나지 않습니다.
t (OFF)를 다시 한 번 2초 동안 눌러서
시계를 표시하여 주십시오.
• Display가 “off”로 설정되어 있습니다(19
페이지).
기억시킨 방송국과 바른 시각이 소거되었다.
퓨즈가 끊어져 있다.
시동키가 ON, ACC, OFF 위치일 때 노이즈가 생
긴다.
리드선이 자동차 액세서리용 전원 커넥터와
일치하지 않습니다.
“--------” 표시가 지워지지 않는다.
이름 편집 모드로 들어갔습니다.
t 조그 롤러를 누르거나 카드형 리모컨의
(LIST)를 2초 동안 눌러 주십시오.
표시창에 “ATT”가 나타나고 음량이 낮아진다.
전화 ATT 컨트롤 리드선이 자동차의 금속
부분에 의해서 단락되었습니다.
t 단락을 방지하기 위해서는 와이어의 모든
노출 부분은 전기 테이프로 절연하여 주
십시오.
CD/MD 재생
디스크가 들어가지 않는다.
• 이미 다른 CD/MD가 들어 있습니다.
• CD/MD를 반대 방향 또는 잘못된 방향으로
무리하게 넣으려고 하고 있습니다.
재생이 시작되지 않는다.
• MD가 손상되었거나 CD가 더러워져
니다.
• 미완성 CD-R/CD-RW입니다.
• 오디오용이 아닌 CD-R/CD-RW를
하려고 했습니다.
• 일부 CD-R/CD-RW는 녹음 장치나
크의 상태에 따라서는 재생되지 않는
가 있습니다.
있습
재생
디스
경우
디스크 자동으로 배출된다.
주위 온도가 50°C를 초과했습니다.
조작 버튼이 작동되지 않는다.
CD를 꺼낼 수 없다.
리세트 버튼을 눌러 주십시오.
진동이 있으면 소리가 튄다.
• 본 장치가 30° 이상 경사지게 설치되어 있
습니다.
• 본 장치가 자동차의 안정된 장소에 설치되
지 않았습니다.
소리가 튄다.
디스크가 더러워져 있거나 문제가 있습니다.
본 장치에 전원이 공급되지 않는다.
• 접속을 확인하여 주십시오. 문제가 없을 때
에는 퓨즈를 확인하여 주십시오.
• 자동차에 ACC 위치가 없습니다.
t (SOURCE)를 눌러서(또는 CD나 카세
트를 넣어서) 장치의 전원을 켜 주십시
오.
다음 페이지에 계속 t
본 장치에 전원이 항상 공급된다.
자동차에 ACC 위치가 없습니다.
t (OFF)를 2초 동안 눌러 주십시오.
파워 안테나가 펴지지 않는다.
파워 안테나에 릴 박스가 없습니다.
25
테이프의 재생
소리가 왜곡된다.
• 테이프 헤드가 더러워져 있습니다.
t 시판용 건식 테이프 클리닝 카세트로 헤
드를 클리닝하여 주십시오.
• Dolby NR을 오프로 해서 녹음한 테이프에
대해서 Dolby NR을 온으로 하고 재생하고
있습니다.
t Dolby NR을 “off”로 설정하여 주십시오
(14페이지).
AMS가 정상으로 작동하지 않는다.
• 곡과 곡 사이의 공백에 노이즈가 있습니다.
• 공백 부분이 너무 짧습니다(4초미만).
• 긴 공백 부분이나 저음 또는 작은 소리는 공
백으로서 처리되고 있습니다.
라디오의 수신
프리세트 튜닝을 할 수 없다.
• 바른 주파수를 메모리에 기억시켜 주십시오.
• 방송 전파가 너무 약합니다.
방송국을 수신할 수 없다.
잡음으로 소리를 들을 수 없다.
• 파워 안테나 컨트롤 리드선(청색) 또는 액
세서리 전원 리드선(적색)을 자동차의 안
테나 부스터의 전원 리드선에 접속하여 주
십시오.(자동차의 뒤/옆 유리에 FM/AM 안
테나가 내장되어 있는 경우만.)
• 자동차 안테나의 접속을 확인하여 주십시오.
• 자동 안테나가 펴지지 않았습니다.
t 파워 안테나 컨트롤 리드선의 접속을 확
인하여 주십시오.
• 주파수를 확인하여 주십시오.
• DSO 모드가 온일 때 사운드가 노이즈로 인
하여 가끔 들리지 않는 경우가 있습니다.
t DSO 모드를 “off”로 설정하여 주십시오
(20페이지).
자동 튜닝을 할 수 없다.
• 로컬 시크 모드가 “on”으로 설정되어 있습
니다.
t 로컬 시크 모드를 “off”로 설정하여 주십
시오(20페이지).
• 방송 전파가 너무 약합니다.
t 수동 튜닝하여 주십시오.
“ST” 표시가 점멸한다.
• 주파수에 정확하게 맞추어 주십시오.
• 방송 전파가 너무 약합니다.
t 모노럴 수신 모드(20페이지)로 설정하
여 주십시오.
스테레오 방송이 모노럴로 들린다.
본 장치가 모노럴 수신 모드입니다.
t 모노럴 수신 모드(20페이지)를 취소하
여 주십시오.
FM 수신 중에 수신 장애가 생긴다.
26
와이드 모드를 선택하고 있습니다.
t IF 모드를 “IF Auto”(20페이지)로 설정
하여 주십시오.
에러 표시/메시지
에러 표시
(본 장치와 옵션 CD/MD 체인저의 경우)
아래의 표시가 약 5초간 점멸되고 경고음이 울
립니다.
Blank*1
MD에 곡이 녹음되지 않았습니다.*2
t 곡이 녹음되어 있는 MD를 재생하여 주십
시오.
Error*1
• CD가 더러워져 있거나 상하 반대로 들어있
습니다.*2
t CD를 클리닝하거나 바르게 넣어 주십시
오.
• CD/MD가 어떤 문제로 인하여 재생할 수
없습니다.*2
t 다른 CD/MD를 넣어 주십시오.
High Temp
주위 온도가 50°C를 초과했습니다.
t 온도가 50°C 이하로 될 때까지 기다려
주십시오.
NO Disc
CD/MD 장치에 디스크에 들어있지 않습니다.
t CD/MD 장치에 디스크를 넣어 주십시오.
NO Mag
CD/MD 장치에 디스크 매거진이 들어있지
않습니다.
t CD/MD 장치에 매거진을 넣어 주십시오.
Not Ready
MD 장 치(MDX-40) 커 버 가 열 려 있 거 나
MD가 바르게 들어있지 않습니다.
t 커버를 닫거나 MD를 바르게 넣어 주십시
오.
Push Reset
CD/MD 장치를 어떤 문제로 조작할 수 없습
니다.
t 장치의 리세트 버튼을 눌러 주십시오.
*1 장치에 CD/MD 체인저를 접속하고 있을 때에는 표시
창에 CD 또는 MD의 디스크 번호가 나타납니다.
*2 에러의 원인이 된 디스크 번호가 표시창에 나타납니다.
상기 대책을 실시해도 상황에 변화가 없을 때에
는 가까운 Sony 판매점으로 문의하여 주십시
오.
메시지
LCL Seek +/-
자동 튜닝 중에 로컬 시크 모드가 온으로 되
어 있습니다(15페이지).
“
”
” 또는 “
디스크의 맨 처음 또는 맨 마지막이 되었으므
로 그 이상 앞으로 진행할 수 없습니다.
NO Name
재생하고 있는 CD에는 디스크 메모가 없으
므로 “Bank Sel”이 선택되었습니다.
********
• 디스크에는 만들어 놓은 이름이 없습니다.
• 디스크에 CD TEXT가 없습니다.
????????
디스크 정보를 아직 읽지 못했습니다.
27
Sony Corporation Printed in Japan