1
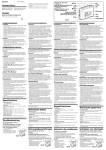
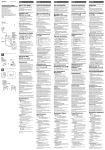
3-231-764-11(1)
FM Stereo/AM Radio
• In vehicles or in buildings, radio
reception may be difficult or noisy.
Try listening near a window.
• To clean the casing, use a soft cloth
dampened with a mild detergent
solution.
Notes on Headphones
Road safety
Operating Instructions
Mode d’emploi
Bedienungsanleitung
Manual de instrucciones
SRF-86
Gebruiksaanwijzing
Instruzioni per l’uso
Manual de instruções
Preventing hearing damage
FM/AM WALKMAN
Sony Corporation © 2001
Do not use headphones while driving,
cycling, or operating any motorized
vehicle. It may create a traffic hazard
and is illegal in many areas. It can also
be potentially dangerous to play your
headphones at high volume while
walking, especially at pedestrian
crossings. You should exercise
extreme caution or discontinue use in
potentially hazardous situations.
Avoid using headphones at high
volume.
Hearing experts advise against
continuous, loud and extended play. If
you experience a ringing in your ears,
reduce the volume or discontinue use.
Printed in China
Caring for others
A
R6 (size AA) × 1
Pile R6 (format AA) × 1
Batterie R6 (Größe AA) × 1
R6 (tamaño AA) × 1
R6 (AA-formaat) batterij × 1
R6 (formato AA) × 1
Pilha R6 (tamanho AA) × 1
Insert the # side of the battery first.
Insérez d’abord le pôle # de la pile.
Zuerst die Minusseite (#) einlegen.
Inserte en primer lugar el lado # de la pila.
Leg de batterijen met de # kant eerst in.
Inserire prima il lato # della pila.
Insira o lado # da pilha primeiro.
B
Front
Avant
Vorderseite
Parte frontal
Voorzijde
Davanti
Parte frontal
Cautions on Splash-resistance
This radio is designed so that it can be
used with slight exposure to rain,
snow and other forms of moisture, but
there are several points on which
caution should be observed.
• Do not allow it to come in contact
with large amounts of water.
• Do not immerse it in water.
• If water should get on it or if it
should fall into water, take it out
immediately and wipe it off with a
dry cloth. The interior of the
battery compartment has no
splash-resistance. The battery may
corrode, so wipe out the interior of
the battery compartment as follows:
– Open or close the battery
compartment with dry hands in a
place without exposure to any
water.
– Wipe off the battery and the inside
of the battery compartment. Give
special attention to the contacts so
that no water remains on them.
Warning
If there is lightning when you are
using the unit, take off the headphones immediately.
i
If you have any questions or problems
concerning your unit, please consult
your nearest Sony dealer.
Dial scale
Echelle de fréquences
Abstimmskala
Escala de frecuencias
Afstemchaal
Scala delle frequenze
Escala de frequências
Rear
Arrière
TUNE
Rückseite
Parte posterior
Achterzijde
Retro
Parte posterior
Keep the volume at a moderate level.
This will allow you to hear outside
sounds and to be considerate to
people around you.
Installing the Battery
(See Fig. A)
1
Open the battery
compartment lid and install
one battery.
2 Close the lid.
Battery Life
(Approx. hours)
(EIAJ*)
VOL
POWER
FM
AM
Sony alkaline
LR6 (size AA)
95
130
Sony R6
(size AA)
35
45
* Measured value by the standard of
EIAJ (Electronic Industries Association
of Japan)
The battery life may shorten depending
on the operation of the unit.
When replacing the battery
a
Replace the battery when the sound
becomes weak or distorted. Remove
the old battery and insert a new one.
Notes on Battery
• Insert the battery with correct
polarity.
• The battery can not be charged.
• Remove the battery when the unit is
not to be used for a long time.
• Should any battery leakage occur,
wipe the battery case well and install
a new battery.
C
Operating the radio
(See Fig. B)
1
a
2
3
Connect the supplied
headphones to i
(headphones) jack.
Set the POWER switch to ON
to turn on the radio.
Select the BAND.
FM
DX : for FM reception, normally
set it to DX.
LOCAL : if a very strong signal
causes noise, set it to
LOCAL.
AM : for AM reception.
b
4
5
Adjust the volume with VOL.
Tune in the desired station.
To turn off the radio
Set the POWER switch to OFF.
To improve the reception
English
• Requires only 1.5 V DC from one R6
(size AA) battery
• The AVLS (Automatic Volume
Limiter System) selector to allow
you to limit the maximum volume
without degrading the sound quality
Precautions
Before You Begin
Thank you for choosing the Sony
radio! It will give you many hours of
reliable service and listening pleasure.
Before operating the radio, please read
these instructions thoroughly and
retain them for future reference.
Features
• Splash-resistant for all-weathers
• Can be attached to your hand, arm,
or your waist
• Operate the unit only on 1.5 V DC
with one R6 (size AA) battery.
• The nameplate indicating operating
voltage, etc. is located on the rear
exterior.
• Avoid exposure to temperature
extremes, direct sunlight, moisture,
sand, dust or mechanical shock.
Never leave in a car parked in the
sun.
• Should any solid object or liquid fall
into the unit, remove the battery,
and have the unit checked by a
qualified personnel before operating
it any further.
FM : The headphones cord serves as
the antenna, so extend it as long as
possible.
AM : A ferrite bar antenna is built into
the radio for AM reception. Rotate the
radio horizontally for optimum
reception.
Using the AVLS function
• En cas de fuite des piles, essuyez
bien le logement de la pile avant
d’installer une pile neuve.
Français
Avant de commencer
Nous vous remercions d’avoir choisi
cette radio Sony qui vous apportera de
nombreuses heures de service fiable et
de divertissement musical.
Avant d’utiliser cette radio, veuillez
lire attentivement cette notice que
vous conserverez pour toute référence
future.
2
3
Caractéristiques
• Etanche aux éclaboussures par tous
les temps
• Attachable à la main, au bras ou au
poignet.
• Nécessite uniquement 1,5 V CC
provenant d’une pile R6 (format
AA).
• Le sélecteur AVLS (Automatic
Volume Limitar System) sert à
limiter le niveau du volume
maximum sans dégrader la qualité
du son.
Precautions
• Faites fonctionner l’appareil
seulement sur le courant continu de
1,5 V avec une pile R6 (format AA).
• La plaque signalétique indiquant la
tension de fonctionnement, etc. se
trouve à l’arrière de l’appareil.
• Evitez d’exposer l’appareil à des
températures extrêmes, à la lumière
du soleil, à l’humidité, au sable ou à
des chocs mécaniques. Ne jamais
laisser l’appareil dans une voiture
garée en plein soleil.
• Si un solide ou liquide tombe dans la
radio, enlevez la pile faites- vérifier
la radio par un technicien qualifié
avant de la remettre en service.
• Dans un véhicule ou un bâtiment, la
réception radio peut être difficile ou
parasitée. Ecoutez près d’une
fenêtre.
• Quand le coffret est sale, nettoyez-le
avec un chiffon doux imprégné
d’une solution détergente neutre.
4
5
prise i (casque).
Régler l’interrupteur POWER
sur ON pour mettre la radio
en marche.
Choisir la gamme (BAND).
FM
DX : pour la réception FM, régler
normalement sur DX.
LOCAL : si un signal très puissant
cause des interférence
régler sur LOCAL.
AM : pour la réception AM
Régler le volume avec VOL.
Accorder une station.
Pour éteindre la radio
Régler l’interrupteur POWER sur OFF.
Pour améliorer la réception
FM : Le cordon de casque servant
d’antenne, il est nécessaire de le tirer
le plus possible.
AM : Une barre de ferrite intégrée
dans l’appareil sert à la réception AM.
Faire pivoter la radio à l’horizontale
pour améliorer la réception.
Utilisation de la fonction
AVLS
Lorsque le sélecteur AVLS (voir fig.
B-a) est réglé sur la position 1 ou 2
le volume est maintenu à un niveau
modéré sans dégradation de la qualité
du son, même si vous essayez de
l’augmenter.
Lorsque voux mettez hors service le
sélecteur AVLS, vous pouvez profiter
entièrement du volume de votre radio.
Fixation à la ceinture
(Voir Fig. C)
Utiliser le clip pour attacher l'appareil
à votre ceinture.
Pour attacher le clip, voir la fig. C-a.
Pour détacher le clip, voir la fig.C-b.
Sécurité routière
N’écoutez pas avec le casque pendant
la conduite d’une voiture, d’un vélo
ou de tout autre véhicule motorisé.
Cela peut être dangereux et c’est
interdit dans certains pays.
Il peut être également dangereux
d’écouter à volume élevé en marchant,
spécialement aux passages piétons.
Soyez toujours extrêmement prudent
et cessez d’écouter dans les situations
présentant des risques d’accident.
Prévention des dommages
auditifs
Evitez d’écouter par le casque à
volume élevé.
Les médecins déconseillent une écoute
continuelle à volume trop élevé. Si
vous percevez un sifflement dans les
oreilles, mieux vaut réduire le volume
ou cesser d’écouter.
Civisme
Maintenez un volume modéré
d’écoute. Vous pourrez ainsi entendre
les sons extérieurs et ne dérangerez
pas votre entourage.
Précautions relatives à
l’étanchéité
Cette radio est conçue de manière à
pouvoir être exposée à une pluie,
neige et autre forme d’humidité
légère, mais il faut respecter les
consignes suivantes.
• Ne pas soumettre la radio à une
grande quantité d’eau.
• Ne pas immerger la radio dans l’eau.
• Si de l’eau tombe sur la radio ou si
celle-ci tombe dans l’eau, essuyez-la
immédiatement avec un chiffon sec.
L’intérieur du logement de la pile
n’est pas étanche. S’il est humide,
essuyez-le de la façon suivante pour
empêcher la formation de corrosion.
– Ouvrez ou fermez le logement de
la pile avec des mains sèches à un
endroit non exposé à l’humidité.
– Essuyez le pile et l’intérieur du
logement de la pile. Assurez-vous
en particulier que les contacts sont
bien secs.
Deutsch
Vor dem Betrieb
Wir beglückwünschen Sie zu Ihrem
neuen Sony Radio und sind überzeugt
davon, dass Sie lange Freude an
diesem zuverlässigen Gerät haben
werden.
Lesen Sie diese Anleitung bitte vor der
Inbetriebnahme des Radios sorgfältig
durch, und bewahren Sie sie für später
gut auf.
Besondere Merkmale
• Spritzwassergeschütztes
Gehäuse für Betrieb bei jedem
Wetter.
• An Hand, Arm oder Gürtel
anbringbar
• Benötigt lediglich 1,5 V
Gleichspannung aus einer
Mignonzelle (R6/Größe AA).
• AVLS-Wähler (Automatic Volume
Limiter System) zur Begrenzung der
maximalen Lautstärke ohne
Beeinträchtigung der Klangqualität.
Zur besonderen
Beachtung
Mise en place de la pile
• Betreiben Sie das Gerät nur an 1,5 V
Gleichspannung mit einer
Mikrozelle (R6/Größe AA).
• Das Typenschild mit Angabe der
Betriebsspannung usw. befindet sich
an der Rückseite.
• Achten Sie darauf, dass das Gerät
keinen extremen Temperaturen,
keinem direkten Sonnenlicht, keiner
Feuchtigkeit, keinem Sand, keinem
Staub und keinen Stößen ausgesetzt
wird. Lassen Sie es auch nicht in
einem in der Sonne geparkten Auto
zurück.
• Wenn ein Fremdkörper oder
Flüssigkeit in das Gerät gelangt,
nehmen Sie die Batterie heraus und
lassen Sie das Gerät von
Fachpersonal überprüfen, bevor Sie
es weiterverwenden.
• In Fahrzeugen und Gebäuden kann
der Empfang schwach und
verrauscht sein. Betreiben Sie das
Gerät dann möglichst in der Nähe
eines Fensters.
• Verwenden Sie zur Reinigung des
Gehäuses ein weiches, leicht mit
mildem Haushaltsreiniger
angefeuchtetes Tuch.
(Voir fig. A)
Hinweise zum Kopfhörer
Attention
Si vous utilisez votre radio pendant un
orage, accompagné d’éclairs, retirez le
casque immédiatement.
Pour toute question ou problème au
sujet de cette radio, veuillez consulter
votre revendeur Sony le plus proche.
1
Ouvrez le couvercle du
logement de la pile et insérez
une pile.
2 Refermez le couvercle.
Autonomie de la pile
(nombre d’heures approx.)(EIAJ*)
FM
AM
Sony alcaline
95
LR6 (format AA)
130
Sony R6
(format AA)
45
35
* Valeur mesurée conformément aux
normes de l’EIAJ (Electronic Industries
Association of Japan)
L’autonomie de la pile peut être plus
courte suivant les conditions
d’utilisation de l’appareil.
Attaching to your belt
Remarques sur la pile
(See Fig. C)
• Insérer la pile en respectant la
polarité.
• La pile ne peut pas être rechargée.
• Enlever la pile si l’appareil ne doit
pas être utilisé pendant longtemps.
Remplacement de la pile
Remplacer la pile lorsque le son est
faible ou déformé. Enlever la pile usée
et installer la neuve.
Dieses Radio ist so ausgelegt, dass es
bis zu einem gewissen Grad Regen,
Schnee oder anderer Feuchtigkeit
ausgesetzt werden kann. Beachten Sie
jedoch die folgenden wichtigen
Hinweise, da es sonst zu
Beschädigungen kommen kann:
• Das Gerät darf nicht über längere
Zeit mit Wasser in Kontakt kommen.
• Das Gerät darf nicht in Wasser
eingetaucht werden.
• Wenn das Gerät ins Wasser gefallen
ist, nehmen Sie es sofort heraus und
wischen Sie es mit einem Tuch
trocken. Auch wenn es aus anderen
Gründen nass geworden ist, sollte es
sofort abgetrocknet werden. Im
Inneren des Batteriefachs ist kein
Spritzwasserschutz vorgesehen.
Wenn das Innere nass geworden
ist, wischen Sie es unter
Beachtung der folgenden
Angaben trocken, da sonst die
Batterie korrodieren kann.
– Das Batteriefach darf nur an einem
trockenen Platz geöffnet bzw.
geschlossen werden. Trocken Sie
Ihre Hände, bevor Sie das
Batteriefach öffnen oder schließen.
– Wischen Sie die Batterie und das
Batteriefach trocken. Achten Sie
insbesondere auch darauf, dass die
Kontakte trocken sind.
Warnung
Nehmen Sie bei einem Gewitter
umgehend den Kopfhörer ab.
Bei weiterführenden Fragen wenden
Sie sich bitte an den nächsten Sony
Händler.
Einlegen der Batterie
(Siehe Abb. A)
1
Öffnen Sie den
Batteriefachdeckel und legen
Sie die Batterie ein.
2 Schließen Sie den Deckel.
Batterie-Lebensdauer
(ungefähre Angaben in Stunden) (EIAJ*)
UKW MW
Sony Alkalibatterie
LR6 (Größe AA)
Remarques sur le casque
When the AVLS selector (see fig.
B-a) is set to either position 1 or 2,
the volume will be kept at a moderate
level without degradation of the
sound quality, even if you attempt to
turn the volume up higher.
When the AVLS selector is turned off,
you will be able to enjoy the full
volume capability of your radio.
Use the belt clip when attaching the
unit to your belt.
To attach the belt clip, see fig. C-a.
To detach the belt clip, see fig. C-b.
Fonctionnement de la
radio (Voir Fig. B)
1 Raccorder le casque fourni à la
Wichtige Hinweise zum
Spritzwasserschutz
Verkehrssicherheit
Tragen Sie beim Auto fahren, Fahrrad
fahren oder Betrieb irgendeines
motorisierten Fahrzeugs keinen
Kopfhörer, da dies gefährlich und in
einigen Ländern gesetzlich verboten
ist. Auch beim Gehen kann
Kopfhörerbetrieb mit hoher
Lautstärke gefährlich sein,
insbesondere an Kreuzungen und
Fußgängerüberwegen. Nehmen Sie
den Kopfhörer in Gefahrensituationen
sofort ab.
Vermeidung von Gehörschäden
Betreiben Sie den Kopfhörer nicht mit
hoher Lautstärke, da dies schädlich
für Ihre Hörorgane ist. Wenn Sie ein
dumpfes Gefühl in Ihren Ohren
verspüren, reduzieren Sie die
Lautstärke oder brechen Sie den
Betrieb ab.
Rücksicht auf andere
Stellen Sie stets einen mäßigen
Lautstärkepegel ein. So können Sie
Außengeräusche noch wahrnehmen,
und andere Leute werden nicht
gestört.
Sony Batterie
R6 (Größe AA)
95
35
130
45
* Werte gemessen nach EIAJ (Electronic
Industries Association of Japan)
Die Lebensdauer der Batterie kann sich
je nach Gebrauch des Geräts verkürzen.
Wann muss die Batterie
gewechselt werden?
Wechseln Sie die Batterie aus, wenn
der Ton schwach oder verzerrt ist.
Hinweise zur Batterie
• Legen Sie die Batterie mit richtiger
Polarität ein.
• Die Batterie kann nicht wieder
aufgeladen werden.
• Nehmen Sie bei längerer
Nichtverwendung die Batterie
heraus.
• Wenn die Batterie ausgelaufen ist,
wischen Sie das Batteriegehäuse ab,
bevor Sie eine neue Batterie
einlegen.
Radiobetrieb (Siehe Abb. B)
1 Schließen Sie den
2
3
4
5
mitgelieferten Kopfhörer an
die Kopfhörerbuchse (i) an.
Zum Einschalten des Radios
stellen Sie den POWERSchalter auf ON.
Wählen Sie den Wellenbereich
(BAND).
FM
DX : Für UKW-Empfang
normalerweise diese
Position wählen.
LOCAL : Wenn der UKWEmpfang durch zu
starke Sendersignale
beeinträchtigt ist, diese
Position wählen.
AM : Für MW-Empfang
Stellen Sie an VOL die
Laustärke ein.
Stimmen Sie auf den
gewünschten Sender ab.
Zum Ausschalten des Radios
Stellen Sie den POWER-Schalter auf
OFF.
Zur Verbesserung des
Empfangs
UKW : Breiten Sie das Kopfhörerkabel
auf volle Länge aus. Das
Kopfhörerkabel dient gleichzeitig als
UKW-Antenne.
MW : Drehen Sie das Gerät um die
vertikale Achse, bis der Empfang
optimal ist. In diesem Wellenbereich
arbeitet die eingebaute
Ferritstabantenne.
Verwendung der AVLSFunktion
Wenn der AVLS-Wähler (siehe Abb.
B-a) in die Position 1 oder 2 gestellt
ist, werden Signalpegel, die über
einem bestimmten Wert liegen
automatisch reduziert, ohne dass es
hierdurch zu
Klangbeeinträchtigungen kommt.
Bei ausgeschaltetem AVLS-Wähler
findet keine automatische
Pegelreduzierung statt, so dass der
volle Lautstärkebereich zur Verfügung
steht.
Anbringen am Gürtel
(Siehe Abb. C)
Mit dem Gürtelclip können Sie das
Gerät an Ihrem Gürtel tragen.
Zum Anbringen des Gürtelclips siehe
Abb. C-a.
Zum Abnehmen des Gürtelclips siehe
Abb. C-b.
Español
Antes de comenzar
¡Muchas gracias por la elección de esta
radio Sony! Esta radio le ofrecerá
muchas horas de servicio fiable y
placer de escucha.
Antes de utilizar la radio, lea
detenidamente estas instrucciones y
consérvelas para futuras referencias.
Particularidades
• Resistente a las salpicaduras para
todo tiempo
• Posibilidad de sujetarla a su mano,
brazo, o cintura
• Haga funcionar la unidad solamente
con 1,5 V cc de una pila R6 (tamaño
AA).
• Selector AVLS (Automatic Volume
Limiter System), que permite limitar
el volumen máximo sin degradar la
cualidad del sonido.
Precauciones
• Alimente la unidad sólo con 1,5 V cc
con una pila R6 (tamaño AA).
• La placa de características, en la que
se indica la tensión de alimentación,
etc., se encuentra en la parte exterior
posterior.
• Evite exponer la unidad a
temperaturas extremadas, la luz
solar directa, la humedad, arena,
polvo, y golpes. No la deje nunca en
un automóvil aparcado al sol.
• Si cae algo dentro de la unidad,
quite la pila y haga que sea
comprobada por personal
cualificado antes de volver a
utilizarla.
• En vehículos o en edificios es posible
que la radiorrecepción resulte difícil
o ruidosa. Trate de escuchar cerca
de una ventana.
• Para limpiar la caja, utilice un paño
suave humedecido en una solución
poco concentrada de detergente.
• Cuando no vaya a utilizar la unidad
durante mucho tiempo, extraiga la
pila para evitar los daños que podría
causar el electrólito de la misma en
caso de fugarse.
• Si el electrólito de la pila se fuga,
limpie el compartimiento de la
misma con un paño seco antes de
insertar otra nueva.
Utilización de la radio
(Consulte la fig. B)
1
2
3
4
5
Conecte los auriculares
suministrados en la toma i
(auriculares).
Ponga el interruptor POWER
en ON para conectar la radio.
Seleccione la banda (BAND).
FM
DX : para la recepción de FM,
normalmente déjelo en DX.
LOCAL : si una señal muy
intensa produce ruido,
póngalo en LOCAL.
AM : para la recepción de AM.
Ajuste el volumen con VOL.
Sintonice la emisora deseada.
Para desconectar la
alimentación de la radio
Ponga el interruptor POWER en OFF.
Para mejorar la recepción
FM : El cable de los auriculares sirve
como antena, por lo que debrá
extenderlo los más posible.
AM : Para la recepción de AM se ha
incorporado una antena de barra de
ferrita en la radio. Gire
horizontalmente la radio.
Utilización de la función
AVLS
Cuando el selector AVLS (consulte la
fig. B-a) esté en la posición 1 o 2, el
volumen se mantendrá a un nivel
moderado sin degradar la cualidad del
sonido, incluso aunque eleve
demasiado el volumen.
Cuando el selector AVLS esté
desactivado, usted podrá escuchar la
radio al volumen máximo posible.
Notas sobre los auriculares
Fijación a su cinturón
Seguridad en la carretera
(Consulte la fig. C)
No utilice los auriculares cuando
conduzca, vaya en bicicleta, o maneje
cualquier vehículo motorizado. Esto
podría suponer un peligro para el
tráfico, y es ilegal en ciertos países.
También puede resultar
potencialmente peligroso escuchar a
través de los auriculares a gran
volumen mientras camine,
especialmente en pasos cebra. En
situaciones potencialmente peligrosas,
deberá tener mucho cuidado o dejar
de utilizar los auriculares.
Utilice la presilla para cinturón
cuando desee fijar la unidad a su
cinturón.
Para fijar la presilla para cinturón,
consulte la fig. C-a.
Para quitar la presilla para cinturón,
consulte la fig. C-a.
Nederlands
Cuidado de sus oídos
Evite utilizar los auriculares a gran
volumen. Los expertos en oídos
desaconsejan la escucha prolongada a
gran nivel. Si experimenta un silbido
en sus oídos, reduzca el volumen, o
deje de escuchar a través de los
auriculares.
Respeto a los demás
Mantenga el volumen a un nivel
moderado. Esto le permitirá escuchar
los sonidos del exterior y respetar a
quienes se encuentren a su alrededor.
Precauciones sobre la
resistencia al agua
Esta radio ha sido diseñada para
poder utilizarse exponiéndola
ligeramente a la lluvia, la nieve, y
otras formas de humedad, pero hay
varios puntos que habrá que tener en
cuenta.
• No permita que la radio entre en
contacto con gran cantidad de agua.
• No la sumerja en agua.
• Si cae al agua o ésta entra en ella,
séquela inmediatamente con un
paño seco.
El interior del compartimiento de
la pila no es resistente al agua. La
pila podrían corroerse, por lo que
tendrá que secar el compartimiento
de las mismas de la forma siguiente.
– Abra o cierre el compartimiento de
la pila con las manos secas en un
lugar no expuesto al agua.
– Seque la pila y el interior de su
compartimiento. Preste especial
atención a los contactos para que no
quede agua en ellos.
Advertencia
Cuando esté utilizando la unidad, si
hay una tormenta eléctrica, quítese
inmediatamente los auriculares.
Si tiene alguna pregunta o problema
con respecto a la unidad, póngase en
contacto con su proveedor Sony.
Colocación de la pila
(Consulte la Fig. A)
1
Abra la tapa del
compartimiento de la pila e
instale una pila.
2 Cierre la tapa.
Duración de la pila
(Horas aproximadas)
(EIAJ*)
FM
AM
Una pila alcalina
95
LR6 Sony (tamaño AA)
130
Una pila R6 Sony
(tamaño AA)
45
35
* Valor determinado por el estándar de
EIAJ (Electronic Industries Association
of Japan)
La duración de las pilas puede verse
reducida. Ello dependerá del uso de la
unidad.
Cuándo reemplazar la pila
Reemplace la pila cuando el sonido se
oiga débil o distorsionado. Extraiga la
pila vieja e instale otra nueva.
Notas sobre la pila
• Inserte la pila con la polaridad
correcta.
• La pila no puede cargarse.
Allereerst
Hartelijk dank voor uw aankoop van
deze Sony radio! Dit toestel zal u vele
uren trouwe dienst bewijzen en u veel
luisterplezier verschaffen.
Lees voor het gebruik van de radio
deze aanwijzingen aandachtig door en
bewaar deze handleiding voor
eventuele naslag.
Kenmerken
• Spatbestendig voor gebruik onder
alle weersomstandigheden.
• Gemakkelijk draagbaar, in de hand,
aan uw arm of aan een ceintuur.
• Voeding van slechts één R6 (AAformaat) batterij, voor 1,5 V
gelijkstroom.
• AVLS begrenzingsschakelaar om de
geluidssterkte automatisch te beperken (Automatic Volume Limiter
System), zonder dat de
geluidskwaliteit hierdoor afneemt.
Voorzorgsmaatregelen
• Gebruik deze radio uitsluitend op
1,5 V gelijkstroom van één R6 (AAformaat) batterij.
• Een naamplaatje met de
bedrijfsspanning e.d. bevindt zich
achterop de radio.
• Stel de radio niet bloot aan extreme
hitte of koude, niet aan directe
zonnestraling, vocht, stof, zand, of
mechanische trillingen of schokken.
Nooit achterlaten in een auto die in
de zon geparkeerd staat.
• Mocht er vloeistof of een voorwerp
in het apparaat terechtkomen,
verwijder dan de batterij en laat het
apparaat eerst door een deskundige
nakijken alvorens het weer in
gebruik te nemen.
• In voertuigen of gebouwen kan de
radio-ontvangst wel eens problematisch zijn of met storing gepaard
gaan. Probeer dan of de ontvangst
beter is in de buurt van een raam.
• Voor het reinigen van de behuizing
gebruikt u een zacht doekje, licht
bevochtigd met wat milde vloeibare
zeep.
Opmerkingen betreffende
hoofdtelefoons
Voor veilig verkeer
Vermijd het luisteren naar uw
hoofdtelefoon tijdens autorijden,
fietsen, en dergelijke. Het is gevaarlijk
en op veel plaatsen verboden. Zelfs als
u over straat loopt, kan luisteren met
een te hoog volume al gevaar met zich
meebrengen. Vooral bij het oversteken
van de straat, weg of spoorlijn is het
beter de hoofdtelefoon af te nemen of
in ieder geval de geluidssterkte te
verminderen.
Denk om uw gehoor
Vermijd het langdurig luisteren naar
een luid ingestelde hoofdtelefoon. Dit
zou kunnen leiden tot beschadiging
van uw gehoor. Als uw oren suizen,
dient u de geluidssterkte te verminderen of liever de hoofdtelefoon een
tijdje niet te gebruiken.
Houd rekening met anderen
Houd a.u.b. rekening met uw
medemensen, en stel de weergave niet
te hard in, ook al om geluiden in uw
omgeving en mensen die tegen u
praten altijd te kunnen horen.
Waarschuwingen omtrent de
waterbestendigheid
Deze radio is in zekere mate
weersbestendig, zodat u het apparaat
zonder bezwaar kunt gebruiken in
lichte regen, sneeuw en op plaatsen
met veel vocht of opspattend water,
maar wees toch voorzichtig en let op
de volgende punten.
• Laat het apparaat niet in contact
komen met stromend water.
• Dompel het apparaat niet onder
water.
• Als er een plens water op het
apparaat komt of als het in het water
valt, droog het dan zo snel mogelijk
af met een droge doek. Het
inwendige van de batterijhouder
is niet waterbestendig. Als er
water in achterblijft, kan de
batterij gaan lekken, dus maak de
batterijhouder grondigen droog, als
volgt.
– Open of sluit de batterijhouder
alleen met droge handen, op een
plaats waar er geen water op kan
spatten.
– Veeg de batterij en het inwendige
van de batterijhouder zorgvuldig
droog. Let ook vooral op de
aansluitcontacten en zorg dat daar
geen druppels op achterblijven.
Waarschuwing
Als er bliksem is terwijl u buiten naar
dit apparaat aan het luisteren bent,
neem dan onmiddellijk de
hoofdtelefoon af.
Mocht u vragen hebben of problemen
met het apparaat, neem dan a.u.b.
contact op met uw dichtstbijzijnde
Sony handelaar.
Batterij-inleg (zie afb. A)
1 Open het deksel van het
batterijvak en plaats er een
batterij in.
2 Sluit het deksel.
Gebruiksduur van de batterij
(in uren, ongeveer)
(EIAJ*)
FM
AM
Sony alkali-batterij
LR6 (AA-formaat)
95
130
Sony R6
(AA-formaat)
35
45
* Meetwaarde conform EIAJ (Electronic
Industries Association of Japan) norm
De levensduur van de batterij kan
korter zijn afhankelijk van de
gebruiksomstandigheden van het
toestel.
Wanneer de batterij te
vervangen
Vervang de batterij wanneer het
geluid zwak of vervormd gaat
klinken. Verwijder de oude batterij en
plaats een nieuwe.
Betreffende de batterij
• Let op dat u de batterij niet
omgekeerd in het batterijvak legt.
• Probeer niet een gewone batterij op
te laden.
• Verwijder de batterij als u weet dat u
de radio voorlopig niet meer
gebruikt.
• Als de batterij heeft gelekt, maakt u
dan eerst het batterijvak zorgvuldig
schoon en plaatst u daarna een
nieuwe batterij.
Bediening van de radio
(Zie afb. B)
1
2
3
4
5
Sluit de bijgeleverde
hoofdtelefoon aan op de
i hoofdtelefoon-uitgang.
Zet de aan/uit-schakelaar
(POWER) op “ON” om de
radio in te schakelen.
Kies de gewenste afstemband
(BAND).
FM
DX : Gewoonlijk kunt u de
keuzeschakelaar voor FM
ontvangst in de “DX” stand
laten staan.
LOCAL : Als aangrenzende
zenders te krachtig
doorkomen en storing
veroorzaken, zet u de
schakelaar in deze
stand.
AM : Voor de ontvangst van AM
radiozenders.
Stel de geluidssterkte naar
wens in met de VOL regelaar.
Stem af op de gewenste
radiozender.
Uitschakelen van de radio
Zet u de POWER schakelaar terug op
“OFF”.
Verbeteren van de radioontvangst
FM : Het snoer van de hoofdtelefoon
dient tevens als antenne, dus strek het
hoofdtelefoonsnoer zo ver mogelijk uit
voor de beste ontvangst.
AM : De AM-ontvangst verloopt via
een ferrietstaaf-antenne, die in de
radio is ingebouwd. Draai de radio in
een horizontaal vlak totdat u de beste
ontvangst heeft verkregen.
Gebruik van de AVLS
volumebegrenzing
Met de AVLS begrenzingsschakelaar
(Zie afb. B-a) in stand 1 of 2 zal de
geluidssterkte automatisch beperkt
worden (door het Automatic Volume
Limiter System), zonder dat de
geluidskwaliteit ierbij afneemt. Hoger
instellen van de volumeregelaar heeft
dan geen effect. Met de AVLS
begrenzingsschakelaar in de uit-stand
zult u van het volledig
muziekvermogen van de radio
kunnen genieten.
Quando si sostituisce la pila
Aan uw ceintuur
dragen (Zie afb. C)
Met de ceintuurklem kunt u het
apparaat aan uw ceintuur bevestigen.
Zie voor het aanbrengen afb. C-a.
Zie voor het losmaken afb. C-b.
Italiano
Prima di cominciare
Grazie per avere acquistato questa
radio Sony! Vi fornirà numerose ore di
funzionamento affidabile e piacere di
ascolto.
Prima di usare la radio, leggere
attentamente queste istruzioni e
conservarle per riferimenti futuri.
Sostituire la pila quando il suono
diventa debole o distorto. Estrarre la
pila vecchia e installarne una nuova.
Note sulla pila
• Inserire la pila osservando la corretta
polarità.
• La pila non può essere ricaricata.
• Estrarre la pila quando non si usa
l’apparecchio per un lungo periodo.
• Se si verificano perdite di fluido
della pila, pulire bene il comparto
pila e inserire una pila nuova.
Uso della Radio
(Vedere la Fig. B)
1
2
3
Caratteristiche
• Resistente agli schizzi per l’uso in
tutte le condizioni atmosferiche.
• Possibilità di applicare l’apparecchio
alla mano, al braccio o alla cintura.
• Richiede solo 1,5 V CC da una pila
R6 (formato AA).
• Selettore AVLS (Automatic Volume
Limiter System) che consente di
limitare il volume massimo senza
degradare la qualità del suono.
Precauzioni
• Alimentare l’apparecchio solo a
1,5 V CC, con una pila tipo R6
(formato AA).
• La piastrina indicante la tensione
operativa, ecc. si trova all’esterno sul
retro.
• Evitare l’esposizione ad estremi di
temperatura, luce solare diretta,
umidità, sabbia, polvere o scosse
meccaniche. Non lasciare mai la
radio in un’auto parcheggiata al
sole.
• Se qualsiasi oggetto solido o un
liquido penetra nell’apparecchio
estrarre la pila e far controllare
l’apparecchio da personale
qualificato prima di usarlo
ulteriormente.
• All’interno di veicoli o edifici, la
ricezione radio può essere
difficoltosa o disturbata. Provare ad
ascoltare vicino ad una finestra.
• Per pulire il rivestimento usare un
panno morbido inumidito con una
blanda soluzione detergente.
Note sulle cuffie
Sicurezza stradale
Non usare le cuffie durante la guida,
in bicicletta o durante l’uso di
qualsiasi veicolo motorizzato. Questo
può creare pericoli per il traffico ed è
illegale in molte zone. È inoltre
potenzialmente pericoloso ascoltare ad
alto volume con le cuffie anche mentre
si cammina, particolarmente nei pressi
di passaggi pedonali. Fare la massima
attenzione o cessare l’uso in situazioni
potenzialmente pericolose.
Prevenzione di danni all’udito
Evitare di usare le cuffie ad alto
volume. Gli esperti in materia di udito
sconsigliano un ascolto continuo ad
alto volume per periodi prolungati.
Se si sentono ronzii alle orecchie
abbassare il volume o cessare l’uso.
Rispetto per il prossimo
Tenere il volume ad un livello
moderato. Questo permette di udire i
suoni esterni e non disturba le persone
circostanti.
Precauzioni per
l’impermeabilità
Questa radio è stata progettata in
modo da poter essere usata con una
leggera esposizione a pioggia, neve e
altre forme di umidità, ma è
comunque necessario osservare alcune
precauzioni.
• Evitare che venga in contatto con
grandi quantità di acqua.
• Non immergere in acqua.
• Se acqua cade sopra la radio o se
essa cade in acqua, tirarla fuori
immediatamente e asciugarla con un
panno asciutto. L’interno del
comparto pila non ha alcuna
resistenza all’acqua. La pila può
corrodersi e quindi asciugare
l’interno del comparto pila come
segue.
– Aprire o chiudere il comparto pila
con le mani asciutte in un luogo
dove non vi sia alcuna esposizione
all’acqua.
– Asciugare la pila e l’interno del
comparto pila. Fare particolare
attenzione ai contatti in modo che
non vi rimanga alcuna traccia di
acqua.
Attenzione
Se ci sono fulmini durante l’uso
dell’apparecchio togliersi
immediatamente le cuffie.
In caso di interrogativi o problemi
riguardanti l’apparecchio, consultare il
proprio rivenditore Sony.
Inserimento della pila
4
5
Collegare le cuffie in
dotazione alla presa i (cuffie).
Regolare l’interuttore POWER
su ON per accendere la radio.
Selezionare la banda con
BAND.
FM
DX : Per la ricezione FM,
normalmente regolare sulla
posizione DX.
LOCAL : Se segnali molti forti
causano dei disturbi,
regolare sulla posizione
LOCAL.
AM : Per la ricezione AM.
Regolare il volume con VOL.
Sintonizzare la stazione
desiderata.
Per spegnere la radio
Regolare l’interruttore POWER su OFF.
Per migliorare la ricezione
FM : Il filo delle cuffie funge da
antenna, per cui va estereo il più
possible.
AM : Un’antenna a barra di ferrite è
incorporata nell’apparecchio per la
ricezione AM. Ruotare l’apparecchio
orizzontalmente per trovare la
ricezione ottimale.
Uso della funzione AVLS
Quando il selettore AVLS (vedere la
fig. B-a) viene regolato sulla
posizione 1 o 2 il volume viene
mantenuto ad un livello moderato
senza che ci sia uno scadimento della
qualità sonora, anche se si tenta di
alzare il volume di più.
Quando il selettore AVLS è
disattivato, è possibile struttare
pienamente le capacità di volume di
questa radio.
Applicazione alla
cintura (Vedere la Fig. C)
Usare il gancio per cintura per
applicare l’apparecchio alla cintura.
Per applicare il gancio per cintura,
vedere la fig. C-a.
Per staccare il gancio per cintura,
vedere la fig. C-b.
Português
Medidas preliminares
Muito obrigado pela escolha do rádio
Sony! Este aparelho irá proporcionarlhe incontáveis horas de serviço
confiável e audição prazerosa.
Antes de operar o seu rádio, leia este
manual completamente e guarde-o
para futuras consultas.
Características
• Resistente a salpicos de água sob
qualquer condição climática.
• Pode ser presa à sua mão, ao seu
braço ou à sua cintura.
• Requer apenas 1,5 V CC de uma
pilha R6 (tamanho AA).
• O selector AVLS (Automatic Volume
Limiter System) permite-lhe limitar
o volume máximo sem degradar a
qualidade do som.
Precauções
• Opere o aparelho somente em 1,5 V
CC com uma pilha R6 (tamanho
AA).
• A placa de identificação que indica a
voltagem de funcionamento, etc.
está localizada no lado posterior
externo.
• Evite expor o aparelho a
temperaturas extremas, luz solar
directa, humidade, areia, poeira ou
choques mecânicos. Nunca o deixe
dentro de um automóvel
estacionado sob o sol.
• Caso caia algum objecto sólido ou
líquido dentro do aparelho, remova
a pilha e submeta o aparelho a uma
averiguação técnica por pessoal
qualificado antes de voltar a
utilizálo.
• No interior de veículos ou edifícios,
a recepção do rádio pode ser difícil
ou ruidosa. Experimente a audição
nas proximidades de uma janela.
• Para limpar a parte externa do
aparelho, utilize um pano macio
humedecido com uma solução de
detergente suave.
(Vedere la Fig. A)
Notas acerca dos
auscultadores
1
Segurança na estrada
Aprire il coperchio del
comparto pila e inserire una
pila.
2 Chiudere il coperchio.
Durata della pila
(ore circa)
(EIAJ*)
FM
AM
Alcalina Sony
95
LR6 (formato AA)
130
Sony R6
(formato AA)
45
35
* Valore misurato secondo lo standard
dell’EIAJ (Electronic Industries
Association of Japan)
La durata della pila può essere inferiore
a seconda del modo di impiego
dell’apparecchhio.
Não utilize os auscultadores durante a
condução de automóveis, bicicletas ou
qualquer veículo motorizado. Do
contrário, poderá criar riscos ao
tráfego e infringir a lei em muitas
áreas. Pode também ser
potencialmente perigoso utilizar
auscultadores a altos volumes durante
caminhadas, especialmente em
cruzamentos para pedestres.
Recomenda-se exercer a máxima
cautela ou interromper o uso em
situações potencialmente perigosas.
Prevenção de avarias no
sistema auditivo
Evite utilizar os auscultadores a
volumes elevados.
Especialistas em sistema auditivo
advertem contra o seu uso contínuo,
prolongado, a altos volumes. Caso
perceba tinidos nos ouvidos, reduza o
volume ou descontinue o uso dos
auscultadores.
Consideração por terceiros
Mantenha o volume a um nível
moderado. Isto irá permitir-lhe escutar
os sons externos e respeitar as pessoas
ao seu redor.
Cuidados acerca da
resistência a salpicos de
água
Este rádio foi concebido de tal modo
que possa ser utilizado sob leve
exposição a chuva, neve e outras
formas de humidade, mas há diversos
pontos que merecem cuidado.
• Não permita o contacto do aparelho
com grande quantidade de água.
• Não imerja o aparelho em água.
• Se o aparelho entrar em contacto
com água ou cair dentro d'água,
retire-o imediatamente e limpe-o
com um pano seco. O interior do
compartimento da pilha não
possui resistência a salpicos de
água. A pilha pode corroer-se,
portanto limpe o interior do
compartimento da pilha como segue.
– Abra ou feche o compartimento da
pilha com as mãos secas, num local
sem nenhuma exposição a água.
– Limpe a pilha e o interior do
compartimento da pilha. Dê
especial atenção aos contactos, de
maneira que nenhum resquício de
água reste.
Advertência
Na ocorrência de relâmpagos durante
a utilização do aparelho, retire os
auscultadores imediatamente.
Caso surjam quaisquer dúvidas ou
problemas concernentes a este
aparelho, consulte o seu agente Sony
mais próximo.
Instalação da pilha
(Veja fig. A)
1
Abra a tampa do
compartimento da pilha e
instale uma pilha.
2 Feche a tampa.
Duração da pilha
(Horas aprox.)
(EIAJ*)
FM
AM
Pilha alcalina LR6 95
Sony (tamanho AA)
130
Pilha R6 Sony
(tamanho AA)
45
35
* Valor medido segundo a norma da
EIAJ (Electronic Industries Association
of Japan)
A duração da pilha pode ser menor
dependendo do tipo de utilização do
aparelho.
Quando substituir a pilha
Substitua a pilha quando o som
tornar-se fraco ou distorcido. Retire a
pilha usada e coloque uma nova.
Notas acerca da pilha
• Insira a pilha observando a
correspondência correcta dos pólos.
• A pilha não pode ser recarregada.
• Quando o aparelho não for ser
utilizado por um intervalo
prolongado, remova a pilha.
• Caso ocorra fuga de electrólito de
uma pilha, limpe bem o
compartimento da pilha antes de
inserir uma pilha nova.
Funcionamento do
radio (Veja fig. B)
1 Ligue os auscultadores
2
3
4
5
fornecidos à tomada i
(auscultadores).
Ajuste o interruptor POWER
em ON para ligar o rádio.
Seleccione a banda com
BAND.
FM
DX : para a recepção de FM,
ajuste normalmente em DX.
LOCAL : caso o sinal seja muito
forte, causando ruídos,
ajuste em LOCAL.
AM : para a recepção de AM.
Ajuste o volume com VOL.
Sintonize a estação desejada.
Para desligar a alimentação
do rádio
Ajuste o interruptor POWER em OFF.
Para melhorar a recepção
FM : O fio dos auscultadores funciona
como uma antena, portanto estenda-o
o mais longo possível.
AM : Gire o rádio na horizontal para
uma óptima recepção de AM através
da antena de barra de ferrite
incorporada no rádio.
Utilização da função AVLS
Quando o selector AVLS (veja fig.
B-a) estiver ajustado em 1 ou em 2,
o volume será mantido a um nível
moderado, sem degradar a qualidade
do som, mesmo que tente aumentar o
volume.
Quando o selector AVLS estiver
desactivado, poderá desfrutar da
capacidade máxima de volume do seu
rádio.
Para prender no seu
cinto (Veja fig. C)
Utilize a presilha para cinto quando
for prender o aparelho ao seu cinto.
Para colocar a presilha para cinto, veja
fig C-a.
Para retirar a presilha para cinto, veja
fig C-b.
D1
Upper side
Haut
Oben
Lado superior
Bovenste
opening
Lato superiore
Parte superior
Lower side
Bas
Unten
Lado inferior
Onderste
opening
Lato interiore
Parte inferior
3
1
Pull
Tirer
Ziehen
Tire
Trekken
Tirare
Puxe
2
2
Mount
Monture
Befestigungsplatte
Soporte
Gesp
Fibbia
Adaptador
English
A side
Face A
Seite A
Lado A
Uiteinde A
Lato A
Lado A
Velcro tape
Bande Velcro
Klettband
Cinta velcro
Klittenband
Nastro Velcro
Fita velcro
A side
Face A
Seite A
Lado A
Uiteinde A
Lato A
Lado A
Si vous utilisez l'appareil en
pratiquant un sport, utilisez le bracelet
pour attacher l'appareil à votre
poignet.
3
4
Thread the arm band to the
lower side of the mount.
The arm band which has
Velcro tape must be above.
Thread the A side to the upper
side of the mount.
Attach the A side to the band
1 and pull the band 2 to
extend the loop.
Attach the B side to the A side.
Connecting the mount to
the unit (See Fig. E)
1
2
Upper side
Haut
Oben
Lado superior
Bovenkant
Lato superiore
Parte superior
Connect the mount that is
attached the arm band to the
knob of the unit.
Fasten the shaft using a coin.
2
3
4
Attaching to your
hand (See Fig. H)
1 Put your hand into the loop.
2 Pull the B side.
3 Attach the B side to the A side.
Attaching to your arm
2
(See Fig. I)
Upper side
Haut
Oben
Lado superior
Bovenkant
Lato superiore
Parte superior
Pull
Tirer
Ziehen
Tire
Trekken
Tirare
Puxe
Upper side
Haut
Obere Seite
Lado superior
Bovenkant
Lato superiore
Parte superior
Lower side
Bas
Unten
Lado inferior
Onderkant
Lato
inferiore
Parte inferior
1
2
3
4
Put your arm into the loop.
Pull the B side.
Attach the B side to the A side.
Rotate the unit.
Specifications
Frequency range:
FM: 87.6 - 108 MHz
AM: 530 - 1 710 kHz
Power output:
Headphones: 3.6 mW + 3.6 mW
(at 10 % harmonic distortion)
Output:
Headphones jack (ø 3.5 mm stereo
minijack) load impedance 16 Ω
Power requirements:
1.5 V DC, one R6 (size AA) battery
Dimensions:
Approx. 65 × 96.8 × 26 mm (w/h/d)
(25⁄8 × 37⁄8 × 11⁄16 inches) excl.
projecting parts and controls
Mass:
Approx. 95.8 g (3.4 oz) incl. battery
Supplied accessories
Design and specifications are subject
to change without notice.
A side
Face A
Seite A
Lado A
Uiteinde A
Lato A
Lado A
3
Lower side
Bas
Unten
Lado inferior
Onderkant
Lato inferiore
Parte inferior
2
3
B side
Face B
Seite B
Lado B
Uiteinde B
Lato B
Lado B
B side
Face B
Seite B
Lado B
Uiteinde B
Lato B
Lado B
4
A side
Face A
Seite A
Lado A
Uiteinde A
Lato A
Lado A
B side
Face B
Seite B
Lado B
Uiteinde B
Lato B
Lado B
Antes de prender na
sua mão ou no seu
braço
Beim Sport können Sie das Gerät mit
dem Armband an der Hand oder am
Arm tragen.
Cuando utilice la unidad al practicar
deportes, utilice la banda para el brazo
a fin de fijarla a su mano o brazo.
Anbringen des Bandes
Para pasa la para el brazo
por el soporte
Voor gebruik van de radio tijdens
sporten e.d. kunt u het apparaat met
de armband om uw pols of bovenarm
bevestigen.
Quando si porta con sé l’apparecchio
durante attività sportive, usare la
fascia per attaccarlo alla mano o al
braccio.
Quando utilizar o aparelho enquanto
pratica esportes, use a cinta de braço
para prender o aparelho na sua mão
ou no seu braço.
Bevestigen van de gesp
aan de armband
Applicazione della fascia
alla fibbia
Passando a cinta pelo
adaptador (Veja fig. D)
(Zie afb. D)
(Vedere la Fig. D)
1
1
Steek het uiteinde van de
armband door de onderste
opening van de gesp.
Houd de kant met het
klittenband boven.
Steek het uiteinde A door de
bovenste opening van de gesp.
Maak het uiteinde A vast aan
de armband 1 en trek aan de
band 2 om de lus groter te
maken.
Bevestig het uiteinde B
bovenop uiteinde A.
1
Aanbrengen van de radio
op de gesp (Zie afb. E)
1
(Siehe Abb. D)
1
2
3
Schieben Sie das Armband
durch die untere Öffnung der
Befestigungsplatte.
Das Teil mit dem Klettband
muss nach oben weisen.
Schieben Sie die Seite A durch
die obere Öffnung der Platte.
Befestigen Sie das Klettband
auf Seite A 1 und ziehen Sie
dann am Band 2, um eine
Schlaufe zu bilden.
Bringen Sie die Seite B an der
Seite A an.
(Consulte la fig. D)
1
2
3
4
2
Pour serrer ou desserrer le
bracelet (Voir Fig. G)
Changez la position du côté A et
rattacher le bracelet.
1
2
Bringen Sie die
Befestigungsplatte des
Armbandes am Gerät an.
Arretieren Sie die Platte mit
einer Münze.
Stellen Sie die Länge des
Bandes ein (Siehe Abb. F)
1
2
Nehmen Sie die Seite B von
der Seite A ab.
Vergrößern Sie die Schlaufe,
so dass Ihr Arm bzw. Ihre
Hand hindurchpasst.
Pase la para el brazo por el
lado inferior del soporte.
La parte con la cinta velcro
debe quedar hacia arriba.
Pase el lado A por la parte
superior del soporte.
Fije el lado A a la banda 1 y
tire de la banda 2 para
alargar el lazo.
Fije el lado B al lado A.
Conexión del soporte a la
unidad (Consulte la fig. E)
Conecte la montura fijada a la
banda para el brazo al mando
de la unidad.
Apriete el eje utilizando una
moneda.
(Consulte la fig. F)
1
2
Quite el lado B del lado A.
Extienda el lazo para poder
pasar su mano o brazo.
Para apretarla (o aflojarla)
(Consulte la fig. G)
Cambie la posición de la parte A y
vuelva a fijar la banda.
Zum Straffen (oder lockern)
Fijación a su mano
(Voir Fig. H)
(Siehe Abb. G)
(Consulte la fig. H)
1
2
3
Passer la main dans la boucle.
Tirer le côté B.
Fixer le côté B sur le côté A.
Fixation à Au bras
(Voir Fig. I)
1
2
3
4
Passer le bras dans la boucle.
Tirer le côté B.
Fixer le côté B sur le côté A.
Tourner l’allareil.
Spécifications
Gamme de fréquences:
FM: 87,6 - 108 MHz
AM: 530 - 1 710 kHz
Puissance de sortie:
Casque d’ecoute: 3,6 mW + 3,6 mW
(à 10 % de distorsion harmonique)
Sortie:
Prise de casque (minijack 3,5 mm ø,
stéréo) à basse impédance 16 Ω
Alimentation:
Courant continu de 1,5 V, une pile
R6 (format AA)
Dimensions:
Env. 65 × 96,8 × 26 mm (l/h/p)
(25⁄8 × 37⁄8 × 11⁄16 pouces)
saillies et commandes non comprises
Poids:
Env. 95,8 g (3,4 on.) pile comprise
Accessoires fournis
Casque stéréo (1, type s’adaptant
verticalement sur l’oreille), Clip de
ceinture (1), Bracelet (1), Monture (1)
Bringen Sie das Klettband von Seite A
an einer anderen Stelle an.
Anbringen an der
Hand (Siehe Abb. H)
1 Führen Sie Ihre Hand durch
2
3
die Schlaufe.
Ziehen Sie an der Seite B.
Bringen Sie die Seite B an der
Seite A an.
Anbringen am Arm
(Siehe Abb. I)
1
2
3
4
Stecken Sie Ihren Arm in die
Schlaufe.
Ziehen Sie an der Seite B.
Bringen Sie die Seite B an der
Seite A an.
Drehen Sie das Gerät.
Technische Daten
Empfangsbereich:
UKW: 87,6 - 108 MHz
MW: 530 - 1 710 kHz
Augangsleistung:
Kopfhörer: 3,6 mW + 3,6 mW
(bei 10 % Klirrgrad)
Ausgang:
Kopfhörerbuchse (StereoMinibuchse, ø 3,5 mm) für
Kopfhörer mit einer Impedanz von
16 Ω
Stromversorgung:
1,5 V Gleichspannung aus einer
Mignonzelle (R6/Größe AA)
Abmessungen:
ca. 65 × 96,8 × 26 mm (B/H/T)
ausschl. vorspringender Teile und
Bedienungselemente
Gewicht:
ca. 95,8 g (einschl. Batterie)
2
3
4
1
Ajuste de la longitud de
la banda
Fixation à la main
1
2
3
Coloque su mano en el lazo.
Tire del lado B.
Fije el lado B al lado A.
2
Plaats de armband met de
schroefknop van de gesp op
de uitsparing achterin de
radio.
Draai de schroefknop vast met
een muntstuk.
Stel de lengte van de
band bij (Zie afb. F)
1
2
Maak uiteinde B los van
uiteinde A.
Maak de lus ruim genoeg om
uw arm of hand er doorheen
te kunnen steken.
Strakker (of losser)
bevestigen (Zie afb. G)
Maak uiteinde A los en druk het op
een betere plaats weer vast.
Om uw pols dragen
Fijación a su brazo
(Zie afb. H)
(Consulte la fig. I)
1
2
3
1
2
3
4
Pase su brazo por el lazo.
Tire del lado B.
Fije el lado B al lado A.
Gire la unidad.
Steek uw hand door de lus.
Trek het uiteinde B strak.
Bevestig uiteinde B bovenop
uiteinde A.
Om uw arm dragen
Especificaciones
(Zie afb. I)
Gama de frecuencias:
FM: 87,6 - 108 MHz
AM: 530 - 1 710 kHz
Salida de potencia:
Auriculares: 3,6 mW + 3,6 mW
(al 10 % de distorsión armónica)
Salida:
Toma de auriculares (minitoma
estéreo de 3,5 mm de diá)
impedancia de carga de 16 Ω
Alimentación:
1,5 V CC, una pila R6 (tamaño AA)
Dimensiones:
Aprox. 65 × 96,8 × 26 mm (an/al/
prf) excluyendo partes y controles
salientes
Masa:
Aprox. 95,8 g sin incluir la pila
1
2
3
Accesorios suministrados
Auriculares estereo (1), vertical en el
oido
Presilla para cinturón (1), Banda para
el brazo (1), Soporte (1)
Diseño y especificaciones sujetos a
cambio sin previo aviso.
4
Steek uw arm door de lus.
Trek het uiteinde B strak.
Bevestig uiteinde B bovenop
uiteinde A.
Draai de radio in de gewenste
stand.
Technische gegevens
Frequentiebereik:
FM: 87,6-108 MHz
AM: 530-1 710 kHz
Uitgangsvermogen:
Hoofdtelefoon: 3,6 mW + 3,6 mW
(bij 10 % harmonische vervorming)
Uitgang:
Hoofdtelefoon-aansluiting (stereo
ministekkerbus, 3,5 mm ø),
belastingsimpedantie 16 Ω
Stroomvoorziening:
1,5 volt gelijkstroom, van één R6
(AA-formaat) batterij
Afmetingen:
Ca. 65 × 96,8 × 26 mm (b/h/d)
zonder uitstekende delen en
knoppen
Gewicht:
Ca. 95,8 g, inclusief batterij
Bijgeleverd toebehoren
Stereo-Kopfhörer (1, (vertikal im Ohr
sitzend)), Gürtelclip (1), Armband (1),
Befestigungsplatte (1)
Stereo hoofdtelefoon (1), (verticaal in
het oor passend)
Ceintuurklem (1), armband (1),
gesp (1)
Änderungen, die dem technischen
Fortschritt dienen, bleiben
vorbehalten.
Wijzigingen in ontwerp en technische
gegevens voorbehouden, zonder
kennisgeving.
Mitgeliefertes Zubehör
A side
Face A
Seite A
Lado A
Uiteinde A
Lato A
Lado A
B side
Face B
Seite B
Lado B
Uiteinde B
Lato B
Lado B
Prima di applicare
l’apparecchio alla
mano o al braccio
(Siehe Abb. E)
Détacher le côté B du côté A.
Agrandir la boucle afin de
pouvoir passer le bras ou la
main.
Português
Voorbereidingen voor
het dragen om pols of
arm
1
1
2
Italiano
Antes de fijar la para
el brazo a su mano o
brazo
Anbringen des Gerätes
an der
Befestigungsplatte
Fixer la monture attachée au
bracelet sur le bouton de
l'appareil.
Serrer l’axe à l’aide d’une
pièce.
Nederlands
Vor dem Anbringen
des Gerätes an Ihrer
Hand oder Ihrem Arm
1
La conception et les spécifications
peuvent être modifiées sans préavis.
2
Upper side
Haut
Oben
Lado superior
Bovenkant
Lato superiore
Parte superior
Español
4
Régler la longueur du
bracelet (Voir Fig. F)
Detach the B side from the A
side.
Extend the loop to be able to
insert your hand or arm.
Deutsch
Fixation de la monture
sur l’appareil (Voir Fig. E)
1
Change the position of the A side and
reattach to the band.
A side
Face A
Seite A
Lado A
Uiteinde A
Lato A
Lado A
Enfiler le bracelet sur le bas de
la monture.
La partie du bracelet avec la
bande Veicro doit être tournée
vers haut.
Enfiler le côté A sur le haut de
la monture.
Fixer le côté A au ruban 1 et
tirer le ruban 2 pour allonger
la boucle.
Fixer le côté B sur le côté A.
2
Stereo headphones (1, Vertical-in-theear type), Belt Clip (1), Arm band (1),
Mount (1)
I1
1
To adjust more tightly
(or loosely) (See Fig. G)
G
H1
Enfiler le bracelet sur la
monture (Voir Fig. D)
Adjusting the length of
the band (See Fig. F)
2
Lower side
Bas
Unten
Lado inferior
Onderkant
Lato inferiore
Parte inferior
Lower side
Bas
Untere Seite
Lado inferior
Onderkant
Lato inferiore
Parte inferior
When you use the unit while doing
sports, use the arm band to attach the
unit to your hand or arm.
2
A side
Face A
Seite A
Lado A
Uiteinde A
Lato A
Lado A
2
B side
Face B
Seite B
Lado B
Uiteinde B
Lato B
Lado B
Avant de l’attacher á
la main ou au bras
Threading the arm band
to the mount (See Fig. D)
B side
Face B
Seite B
Lado B
Uiteinde B
Lato B
Lado B
E1
F1
Before attaching to
your hand or arm
1
4
Français
2
3
4
Far passare la fascia nel lato
inferiore della fibbia.
La parte con il nastro velcro
deve essere rivolta verso l’alto.
Far passare il lato A nel lato
superiore della fibbia.
Applicare il lato A alla fascia
1 e tirare la fascia 2 per
estendere il cappio.
Applicare il lato B al lato A.
Collegamento della
fibbia all’apparecchio
2
3
4
Fixação do adaptador ao
aparelho (Veja fig. E)
1
(Vedere la Fig. E)
2
Collegare la fibbia attaccata
alla fascia alla manopola
sull’apparecchio.
Stringere il fermo usando una
moneta.
Regozione della la
lunghezza della fascia
2
Staccare il lato B dal lato A.
Estendere il cappio per
inserirvi la mano o il braccio.
Per stringere (o allentare)
Fixe o adaptador ajustado com
cinta de braço à saliência do
aparelho.
Aperte o fecho usando uma
moeda.
Ajuste do comprimento
da cinta (Veja fig. F)
1
2
(Vedere la Fig. F)
1
2
Passe a cinta de braço pela
parte inferior do adaptador.
A parte com a fita velcro deve
estar voltada para cima.
Passe o lado A pela parte
superior do adaptador.
Fixe o lado A na cinta 1 e
puxe a cinta 2 para alongar a
alça.
Fixe o lado B ao lado A.
Desprenda o lado B do lado A.
Estire a alça de modo que
possa inserir sua mão ou seu
braço.
Para ajustar mais apertado
(ou mais folgado) (Veja Fig. G)
Altere a posição do lado A e recoloque
a cinta.
(Vedere la Fig. G)
Cambiare la posizione del lato A e
riattaccarlo alla fascia.
Applicazione alla
mano (Vedere la Fig. H)
1 Inserire la mano nel cappio.
2 Tirare il lato B.
3 Attaccare il lato B al lato A.
Para prender na sua
mão (Veja fig. H)
1 Passe a sua mão por dentro da
2
3
alça.
Puxe o lado B.
Fixe o lado B ao lado A.
(Vedere la Fig. I)
Para prender no seu
braço (Veja fig. I)
1 Passe o seu braço por dentro
1
2
3
4
2
3
4
Applicazione al braccio
Inserire il braccio nel cappio.
Tirare il lato B.
Attaccare il lato B al lato A.
Ruotare l’apparecchio.
Caratteristiche
tecniche
da alça.
Puxe o lado B.
Fixe o lado B ao lado A.
Gire o aparelho.
Especificações
Campo di trequenza:
FM: 87,6 - 108 MHz
AM: 530 - 1 710 kHz
Uscita di potenza:
Cuffie: 3,6 mW + 3,6 mW (al 10 % di
distorsione armonica)
Uscita:
Presa cuffie (ø 3,5 mm, minipresa
stereo), impedenza di carico 16 Ω
Alimentazione:
1,5 V CC, una pila R6 (formato AA)
Dimensioni:
Circa 65 × 96,8 × 26 mm (l/a/p)
esclusi comandi e parti sporgenti
Massa:
Circa 95,8 g, inclusa la pila
Gama de frequências:
FM: 87,6 - 108 MHz
AM: 530 - 1 710 kHz
Potência de saida:
Auscultadores: 3,6 mW + 3,6 mW
(a 10 % de distorção harmónica)
Saida:
tomada dos auscultadores (minitomada estéreo de ø 3,5 mm) com
impedância de carga de 16 Ω
Alimentação:
1,5 V CC, 1 pilha R6 (tamanho AA)
Dimensões:
Aprox. 65 × 96,8 × 26 mm (l/a/p)
excluindo partes e controlos
salientes
Peso:
Aprox. 95,8 g incluindo a pilha
Accessori in dotazione
Acessórios fomecidos
Cuffie stereo (1, tipo verticale
nell’orecchio)
Gancio per cintura (1), Fascia per
braccio (1), Fibbia (1)
Disegno e caratteristiche tecniche sono
soggetti a modifiche senza preavviso.
1 par de auscultadores estéreo (tipo
vertical)
1 Presilha para cinto
1 cinta de braço
1 adaptador
Design e especificações sujeitos a
alterações sem aviso prévio.