1
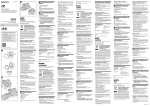
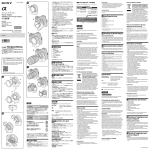
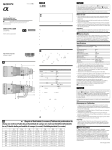
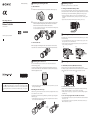
4-416-308-11(1) Attaching/detaching the lens To attach the lens 1 Remove the front and rear lens caps and the camera body cap. Attaching a tripod Attach the tripod to the lens, not to the camera. To change vertical/horizontal position Loosen the collar-locking knob on the tripod-mounting collar and rotate the camera either direction. The camera can be quickly switched between vertical and horizontal positions while maintaining stability when using a tripod. The tripod-mounting collar has a rotation stopping mechanism every 90°. Rotating the camera until it clicks into place lets you adjust the camera position precisely. Tighten the collar-locking knob firmly after the camera position is set. Interchangeable Lens 2 Operating Instructions 500mm F4 G SSM SAL500F40G Align the orange index on the lens barrel with the orange index on the camera (mounting index), then insert the lens into the camera mount and rotate it clockwise until it locks. Do Do not press the lens release button on the camera when mounting the lens. not mount the lens at an angle. A-mount Attaching the strap ©2012 Sony Corporation Attach the strap so that the lens can be carried easily. Follow steps (1) and (2) to attach the strap. To To remove the lens While pressing and holding the lens release button on the camera, rotate the lens counterclockwise until it stops, then detach the lens. prevent the lens from dropping, be sure to attach the strap properly so that the strap will not come loose from the lens. When carrying the camera with the lens attached, use the strap on the lens. Do not use the strap on the camera. (1) (2) Attaching the lens hood Focusing It is recommended that you use a lens hood to reduce flare and ensure maximum image quality. To switch AF (auto focus)/MF (manual focus) Loosen the locking screw on the lens hood and slip the lens hood over the front of the lens. Check that lens hood is attached properly, and then tighten the screw. The focus mode can be switched between AF and MF on the lens. For AF photography, both the camera and lens should be set to AF. For MF photography, either or both the camera or lens should be set to MF. (1) (2) Printed in Japan You can find information on using the lens in “ Operating Instructions.” Refer to “ Operating Instructions” on the names of parts, depth-of-field table (in meters). Other information, such as notes on use, can be found in “ Operating Instructions” and “Precautions before using” on a separate sheet. When using a built-in camera flash, make sure to remove the lens hood to avoid blockage of the flash light. Attaching the lens front cap When storing, turn the lens hood back over the lens, and tighten the screw to secure the lens hood to the lens. Attach the lens to the lens front cap firmly, zip the fastener tape and tighten with the stopper. When attaching the lens front cap to the lens hood, align the holder of the lens hood on the hole of the lens front cap. To set the focus mode on the lens Slide the focus-mode switch to the appropriate mode, AF or MF (1). Refer to the camera manuals to set the focus mode of the camera. MF, turn the focusing ring to adjust the focus (2) while looking through the viewfinder, etc. In To use a camera equipped with an AF/MF control button Press the AF/MF control button to switch AF to MF when both the camera and lens are set to AF. Press the AF/MF control button to switch MF to AF when the camera is set to MF and the lens is set to AF. Direct manual focus (DMF) Even when AF is set, the setting is switched to MF automatically if you rotate the focusing ring while pressing the shutter button halfway. This provides quick fine adjustment of focusing (DMF). Select the mode for correct DMF from the following. Set the DMF-mode switch to whichever you prefer. Switching focus range (AF range) Using the audio signal The focus-range limiter enables you to reduce the auto focusing time. This is useful when the subject distance is definite. You can also set the desired focus range and select it. The audio signal beeps when the focusing range is customized with the focus-range setting switch or the prefocus distance is set or recalled with the focus preset button. Slide the focus-range limiter to select the focus range. FULL: The focus range is not limited. AF is set to the entire focus range. - 6.4m: AF is set to 6.4 m (21 feet) to infinity. SET: AF is set to the appointed focus range, both far and near positions. Standard DMF (STD) Rotate the focusing ring to set correct DMF when the focus is locked in AF-A (automatic auto focus) or AF-S (single-shot auto focus). Using this mode is recommended for normal subjects. Changing the plug-in filters DMF is not available in AF-C (continuous auto focus), when out of focus, or with continuous advance in AF-A after the second focus is confirmed. A normal filter is equipped with your lens. The filter is a part of optical system component. Be sure to attach either the normal filter or the polarizing (circular) filter when taking pictures. Full-time DMF (F TIME) In any AF mode (AF-A/S/C), rotate the focusing ring while pressing the shutter button halfway to set correct DMF. This is useful to catch a fastmoving subject. Shooting at infinity in MF The focusing ring can be rotated slightly past the infinity to provide accurate focusing under various operating temperatures. Do not rotate the focusing ring all the way to the end when focusing manually, even at infinity. Look through the viewfinder, etc., and set the focus precisely. Depth-of-field scale (See Exhibit Operating Instructions-) To set the focus range 1 2 Slide the focus-range limiter to SET. 3 To change the plug-in filter 1 Focus the lens to the desired far or near distance. The The focusing distance can be set in any focus mode: AF, MF or DMF. far and near focusing distance can be set in either order. Slide the focus-range setting switch to FAR or NEAR for the appropriate focus range position (depending on which position you set first). focus-range setting switch automatically returns to the original position. If the audio-signal switch is set to ON, a beep will be heard when the focus range is set. The focus range to be set is effective until a new focus range is set. 2 Align the filter-holder lock orange index with the filter holder, face the side with the filter to the camera body, and then insert the filter holder into the lens barrel. When attaching the polarizing (circular) filter to the lens, make sure to point the arrow tip of the filter holder to the lens front. The Using focus-hold buttons Push down the filter-holder lock and turn it counterclockwise 90° towards the lens front until the orange index is aligned with the filter holder, and then lift the filter holder up. The When focus is set on a subject, anything at that same distance will appear sharp, and anything within a certain range before and beyond the subject will also appear in focus; this is called depth of field. Depth of field depends on the subject distance and aperture you choose and is indicated by the lines on the depth-of-field scale corresponding to the aperture. depth-of-field scale and depth-of-field table are for 35mm-format cameras. The depth-of-field is shallower when you use an Interchangeable Lens Digital Camera equipped with an APS-C sized image sensor. Slide the audio-signal switch to BEEP ON to activate the signal. To set the signal off, slide the audio-signal switch to OFF. Using prefocus A specific subject distance can be stored and recalled at any time. With the distance set, this is useful for catching fast-moving subjects, such as a moving train, events at a sports festival, or horse and car races, etc. 3 Push down the filter-holder lock and turn it 90° clockwise to lock. The filter-holder lock orange index is perpendicular to the holder. This lens has 4 focus-hold buttons. Press the focus-hold button in AF to cancel AF. The focus is fixed and you can release the shutter on the fixed focus. Release the focus-hold button while pressing the shutter button halfway to start AF again. To set the subject distance Set the focus-hold/prefocus switch to FOCUS HOLD and press the focus-hold button. The function of the focus-hold button can be changed on cameras with custom function capability. Refer to the camera manuals for details. 1 2 3 Slide the focus-hold/prefocus switch to PREFOCUS. Focus the lens on the distance to be set. The focusing distance can be set in any focus mode: AF, MF or DMF. Press the focus preset button to store the subject distance. The stored subject distance is effective until a new subject distance is set. the audio-signal switch is set to ON, a beep will be heard when the subject distance is stored. To use the plug-in polarizing (circular) filter 1 2 Adjust the focus precisely while looking through the viewfinder, etc. Rotate the adjust ring on the plug-in polarizing (circular) filter holder while looking through the viewfinder, etc., to adjust degree of polarization for shooting. If To recall the preset subject distance 1 2 Slide the focus-hold/prefocus switch to PREFOCUS. Set the focus hold button function to FOCUS HOLD for cameras with custom function capability. Press the focus-hold button so that the lens will focus to the prefocus position. When AF is set, press and hold the focus-hold button while taking pictures. If the focus-hold button is released, AF will be reactivated and the subject focus distance will be changeable. If the audio-signal switch is set to ON, a beep will be heard when the preset subject distance is recalled. The polarizing (circular) filter can reduce or eliminate unwanted reflections (polarized light) from nonmetallic surfaces of water, glass, windows, shiny plastics, ceramics, paper, etc. It can also filter out polarized light from the atmosphere in general to produce richer colors. You can adjust the polarizing degree to get good contrast when taking photos of blue sky. Generally, reflected light (polarization) should be minimized in photography, however you can adjust the polarizing degree for the desired effect. The amount of light reaching the image sensor decreases. If your camera is set to manual exposure mode and you are using a commercially available exposure meter, or if your camera is set to manual exposure mode and you are using the Manual Flash Control function available on some external flash units, adjust the exposure compensation by opening the aperture 1 or 2 stops to the + side.