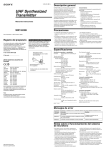
1
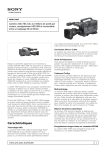
For the customers in the USA (RM-VJ1)
This equipment has been tested and found to comply with the limits for a
Class A digital device, pursuant to Part 15 of the FCC Rules. These limits
are designed to provide reasonable protection against harmful interference
when the equipment is operated in a commercial environment. This
equipment generates, uses, and can radiate radio frequency energy and, if
not installed and used in accordance with the instruction manual, may
cause harmful interference to radio communications. Operation of this
equipment in a residential area is likely to cause harmful interference in
which case the user will be required to correct the interference at his own
expense.
3-865-908-02(1)
,
Remote Control Unit
,
You are cautioned that any changes or modifications not expressly
approved in this manual could void your authority to operate this equipment.
The shielded interface cable recommended in this manual must be used
with this equipment in order to comply with the limits for a digital device
pursuant to Subpart B of Part 15 of FCC Rules.
Operating Instructions
Mode d’emploi
Bedienungsanleitung
For the customers in Europe (RM-VJ1P)
This product with the CE marking complies with the EMC Directive(89/336/
EEC) issued by the Commission of the European Community.
Compliance with this directive implies conformity to the following European
standards:
• EN55103-1: Electromagnetic Interference (Emission)
• EN55103-2: Electromagnetic Susceptibility (Immunity)
This product is intended for use in the following Electromagnetic
Environment(s):
E1 (residential), E2 (commercial and light industrial), E3 (urban outdoors)
and E4 (controlled EMC environment, ex. TV studio)
Pour les clients européens (RM-VJ1P)
Ce produit portant la marque CE est conforme à la Directive sur la
compatibilité électromagnétique (EMC) (89/336/CEE) émise par la
Commission de la Communauté européenne.
La conformité à cette directive implique la conformité aux normes
européennes suivantes:
• EN55103-1: Interférences électromagnétiques (émission)
• EN55103-2: Sensibilité électromagnétique (immunité)
Ce produit est prévu pour être utilisé dans les environnements
électromagnétiques suivants:
E1 (résidentiel), E2 (commercial et industrie légère), E3 (urbain extérieur) et
E4 (environnement EMC contrôlé ex. studio de télévision).
Für Kunden in Europa (RM-VJ1P)
Dieses Produkt besitzt die CE-Kennzeichnung und erfüllt die EMV-Direktive
(89/336/EEC) der EG-Kommission. Die Erfüllung dieser Direktive bedeutek
Konformität für die folgenden Europäischen Normen:
• EN55103-1: Elektromagnetische Interferenz (Emission)
• EN55103-2: Elektromagnetische Empfindlichkeit (Immunität)
Dieses Produkt ist für den Einsatz unter folgenden elektromagnetischen
Bedingungen ausgelegt:
E1 (Wohnbereich), E2 (kommerzieller und in beschränktem Maße
industrieller Bereich), E3 (Stadtbereich im Freien) und E4 (kontrollierter
EMV-Bereich, z.B. Fernsehstudio)
Sony online
Istruzioni per l’uso
RM-VJ1/VJ1P
Printed in Japan
©1998 by Sony Corporation
Aperçu
Français
La RM-VJ1/VJ1P, une télécommande conçue pour le camescope numérique
DSR-300/300P/500WS/500WSP Sony, permet de rapporter un événement d’une
main et d’opérer simultanément le camescope. Elle comprend un affichage LCD
couleur 2,5 pouces incorporé et un microphone.
Voir le manuel du camescope concerné pour les informations sur la connectabilité
d’autres camescopes.
Précautions
•
•
•
•
•
•
Overview
English
Kurzbeschreibung
Deutsch
The RM-VJ1/VJ1P, a remote control unit designed for use with a Sony Digital
Camcorder, such as DSR-300/300P/500WS/500WSP, allows a person to singlehandedly report an event and operate the camcorder at the same time. It comes
with a built-in 2.5-inch color LCD monitor and a microphone.
Die Fernbedienungseinheit RM-VJ1P wurde speziell für den Digital Camcorder
DSR-300P/500WSP von Sony entwickelt. Die Fernbedienung ermöglicht es ein
und derselben Person gleichzeitig als Reporter und Kamerapersonal zu arbeiten.
Die RM-VJ1P verfügt über einen 2,5-Zoll-LCD-Monitor und ein Mikrofon.
For information about the connectability of other camcorders, refer to the
operation manual of the relevant comcorder.
Hinweise zur Kompatibilität mit anderen Camcordern entnehmen Sie bitte der
Bedienungsanleitung des betreffenden Camcorders.
Precautions
• Always use the supplied connecting cable. Other cables may produce noise in the
microphone.
• The RM-VJ1/VJ1P is not designed for immersion in water. Do not use this unit
with wet hands or in the rain.
• A highly sophisticated production method ensures flawless operation of more
than 99.99% of the LCD panel segments. A small percentage of the segments,
however, may fail during extended use, but with little overall effect to viewing
quality. Should a color segment fail, it either remains off or stays on.
• The type of lens attached to the RM-VJ1/VJ1P determines the zoom speed when
you press down T or W of the ZOOM/FOCUS button.
• Make sure to set the ZOOM SELECT 1/2 switch to the position that corresponds
with the brand of the attached lens. If this switch is not set correctly, the ZOOM/
FOCUS (T/W) button may operate in reverse.
1: Setting for a FUJINON lens
2: Setting for a Canon lens
The switch is factory set to “1”.
• The audio level may be adjusted with the AUDIO LEVEL control on the RMVJ1/VJ1P when the AUDIO SELECT switch on the camcorder is set to AUTO.
It is normal practice, however, to adjust the level on the camcorder in advance,
and then to use the AUDIO LEVEL control on the RM-VJ1/VJ1P only for fine
adjustments.
• The microphone unit can be replaced with a Sony Lavalier Microphone, such as
the ECM-44BC, ECM-55BC or ECM-77BC series.
• To prevent damaging the microphone unit, disconnect the connecting cable before
replacing the microphone.
Italiano
L’RM-VJ1P, un’unità di controllo a distanza progettata per l’uso con una
camcorder digitale Sony, come la DSR-300P/500WSP, consente ad una persona di
fare la cronaca di un avvenimento e di azionare contemporaneamente la camcorder
con una sola mano. Essa dispone di un monitor a cristalli liquidi (LCD) a colori da
2,5 pollici incorporato e di un microfono.
Per informazioni sulla possibilità di collegamento di altre camcorder, fare
riferimento al manuale di istruzioni della camcorder in questione.
Avvertenze
• Utilisez toujours le câble de raccordement fourni. D’autres câbles pourraient
produire du bruit dans le microphone.
• La télécommande RM-VJ1/VJ1P n’est pas conçue pour l’immersion dans l’eau.
Ne la manipulez pas les mains mouillées ou sous la pluie.
• Une méthode de fabrication très sophistiquée assure un fonctionnement sans faille
de plus de 99,99% des segments de l’affichage LCD. La défaillance d’un petit
pourcentage de segments est cependant possible pendant un usage prolongé, mais
aura un effet moindre sur la qualité de l’image. En cas de défaillance, un segment
couleur reste éteint ou allumé.
• Le type d’objectif fixé à la RM-VJ1/VJ1P détermine la vitesse de zoom à la
pression de T ou W du bouton ZOOM/FOCUS.
• Vérifiez que le sélecteur ZOOM SELECT 1/2 est à la position correspondant à la
marque de l’objectif monté. S’il est mal réglé, le fonctionnement du bouton
ZOOM/FOCUS (T/W) sera inversé.
1: Réglage pour un objectif FUJINON
2: Réglage pour un objectif Canon
Le réglage usine du sélecteur est “1”.
• Le niveau audio est ajustable avec la commande AUDIO LEVEL de la RM-VJ1/
VJ1P quand le sélecteur AUDIO SELECT du camescope est réglé à AUTO.
Ordinairement, on ajuste préalablement le niveau au camescope, puis utilise la
commande AUDIO LEVEL de la RM-VJ1/VJ1P pour peaufiner le réglage.
• Vous pouvez remplacer le microphone par un microphone Sony Lavalier, ECM44BC, ECM-55BC ou de série ECM-77BC par exemple.
• Déconnectez le câble de raccordement avant de remplacer le microphone pour
éviter d’endommager ce dernier.
•
•
Descrizione
Zur besonderen Beachtung
• Verwenden Sie ausschließlich das mitgelieferte Anschlußkabel. Andere Kabel
können zu einem Verrauschen des Mikrofontons führen.
• Die RM-VJ1P ist nicht wasserfest. Arbeiten Sie nicht mit nassen Händen oder im
Regen.
• Fortschrittliche Produktionsverfahren gewährleisten, daß mehr als 99,99 % der
LCD-Feldsegmente einwandfrei arbeiten. Ein sehr geringer Anteil von
Segmenten kann mit der Zeit ausfallen, was sich jedoch unwesentlich auf die
Gesamtqualität des LCD-Monitors auswirkt. Ein defektes Segment (Pixel) ist
daran zu erkennen, daß es entweder stets ein- oder stets ausgeschaltet ist.
• Die Zoomgeschwindigkeit beim Drücken von T oder W der ZOOM/FOCUSTaste hängt im wesentlichen vom verwendeten Objektivtyp ab.
• Vergewissern Sie sich davon, daß die Stellung des ZOOM SELECT 1/2-Schalters
dem Fabrikat des verwendeten Objektivs entspricht. Andernfalls kann die ZOOM/
FOCUS (T/W)-Taste genau entgegengesetzt wirken.
1: Einstellung für ein FUJINON-Objektiv
2: Einstellung für ein Canon-Objektiv
Der Schalter steht ab Werk auf Stellung „1“.
• Wenn der AUDIO SELECT-Schalter des Camcorders auf AUTO steht, läßt sich
der Mikrofon-Aufnahmepegel mit dem AUDIO LEVEL-Regler der RM-VJ1P
aussteuern. In der Regel sollte der Ton jedoch im voraus am Camcorder
ausgesteuert werden, so daß der AUDIO LEVEL-Regler der RM-VJ1P lediglich
zu Feineinstellungen herangezogen wird.
• Das Mikrofon kann gegen ein Sony Lavalier-Mikrofon wie z.B. der ECM-44BC-,
ECM-55BC- oder der ECM-77BC-Serie ausgetauscht werden.
• Um eine Beschädigung des Mikrofons zu vermeiden, trennen Sie vor dem
Auswechseln des Mikrofons dessen Anschlußkabel.
• Usare sempre il cavo di collegamento in dotazione. Altri cavi potrebbero produrre
rumore nel microfono.
• L’RM-VJ1P non è stata progettata per l’immersione in acqua. Non usare questa
unità con le mani bagnate o sotto la pioggia.
• Un metodo di produzione altamente sofisticato assicura il perfetto funzionamento
di più del 99,99% dei segmenti del pannello LCD. Una piccola percentuale dei
segmenti, tuttavia, potrebbe presentare problemi di funzionamento durante l’uso
per un periodo prolungato, ma l’effetto globale sulla qualità di visione è
trascurabile. Nel caso in cui dovessero verificarsi problemi di funzionamento con
un segmento a colori, questo rimane o spento o acceso.
• Il tipo di obiettivo applicato all’RM-VJ1P determina la velocità di zoomata
quando si preme T o W del tasto ZOOM/FOCUS.
• Accertarsi di regolare l’interruttore ZOOM SELECT 1/2 nella posizione che
corrisponde alla marca dell’obiettivo applicato. Se questo interruttore non è regolato
correttamente, il tasto ZOOM/FOCUS (T/W) potrebbe funzionare al contrario.
1: Regolazione per un obiettivo FUJINON
2: Regolazione per un obiettivo Canon
L’interruttore è stato regolato in fabbrica su “1”.
• Il livello audio può essere regolato con il comando AUDIO LEVEL sull’RM-VJ1P
quando l’interruttore AUDIO SELECT sulla camcorder è regolato su AUTO.
Tuttavia, è di prassi regolare prima il livello sulla camcorder, e poi usare il comando
AUDIO LEVEL sull’RM-VJ1P soltanto per effettuare regolazioni precise.
• L’unità microfono può essere sostituita con un microfono da collo Sony, come
quelli ECM-44BC, ECM-55BC o della serie ECM-77BC.
• Per evitare di danneggiare l’unità microfono, scollegare il cavo di collegamento
prima di sostituire il microfono.
3
Localisation et fonctions des organes
et commandes
4
1
1
1 Boutons de commande du camescope
Utilisez ces boutons pour contrôler le camescope raccordé à la RM-VJ1/VJ1P.
Voir le mode d’emploi du camescope pour les détails sur la fonction de chaque bouton.
2 Témoin POWER
Est allumé quand le camescope est sous tension.
3 Affichage LCD 2,5 pouces
4 Protection anti-vent du microphone
5 Interrupteur POWER
ON: Toutes les opérations télécommandées sont validées (l’affichage est allumé).
SAVE: L’affichage s’éteint pour économiser l’énergie.
6 Commutateur ZOOM/FOCUS
Sélectionne la fonction zoom ou mise au point. La fonction de mise au point est
utilisable seulement avec des objectifs à mise au point validée (disponibles dans
l’avenir).
7 Commande BRIGHT
Ajuste la luminosité de l’affichage.
8 Bouton ZOOM/FOCUS (T/W) (seule la fonction zoom est disponible
actuellement)
Maintenez le bouton pressé pour augmenter la vitesse de zoom (sauf en mode REC).
T: Téléobjectif W: Grand-angle
9 Câble de raccordement
Raccordez-le au connecteur REMOTE 2 du camescope.
0 Attache pour dragonne
!¡ Levier de blocage du couvercle de l’affichage
Appuyez dessus pour ouvrir le couvercle.
!™ Commande AUDIO LEVEL
Ajuste le niveau sonore du microphone.
!£ Commutateur LOW CUT
Le filtre passe-haut est activé quand ce commutateur est réglé à ON.
!¢ Sélecteur ZOOM SELECT 1/2
1: Pour un objectif FUJINON
2: Pour un objectif Canon
!∞ Microphone omnidirectionnel (interchangeable)
Pour éviter d’endommager le microphone, déconnectez le câble de raccordement
avant de remplacer le microphone.
2
REC REVIEW
REC
2 POWER
NG
3 2.5
LCD
4
5 POWER
TAKE
ON
SAVE
6 ZOOM/FOCUS
5
6
7
8
0
7 BRIGHT
9
To remove the wind screen
Pour retirer la protection anti-vent
Entfernen des Windschirms
Per rimuovere lo schermo di
protezione dal vento
ZZZZZZZ
To remove the cover
Pour retirer le couvercle
Zum Entfernen der Abdeckung
Per rimuovere il coperchio
ZZZZZZZ
8 ZOOM/FOCUS
T
T/W
W
9
0
!¡
!™ AUDIO LEVEL
0
!£ LOW CUT
!¡
!¢ ZOOM SELECT 1/2
!∞
!™
Spécifications
!£
!∞
To detach the microphone
Pour détacher le microphone
Zum Abnehmen des Mikrofons
Per staccare il microfono
ZZZZZZZZZ
!¢
To attach the microphone
Pour fixer le microphone
Zum Anbringen des Mikrofons
Per applicare il microfono
ZZZZZZZZ
•
Locations and Functions of Parts
and Controls
•
Notes
• If images are displayed on the LCD monitor but no text, or if the camcorder operation
buttons on the RM-VJ1/VJ1P do not function, make sure that the baud rate is set to 38400
in the camcorder’s setting menu. If it is set to 9600, communications between the
camcorder and the RM-VJ1/VJ1P will not take place. When you change the baud rate
from 9600 to 38400, you must restart the camcorder.
• When you connect the RM-VJ1/VJ1P to a DSR-300/300P camcorder, the ROM
inside the camcorder must be Ver.1.03 ROM or later. To verify the ROM version,
consult your Sony dealer. A Ver.1.03 ROM or a later version is installed in a DSR300/300P with the following serial numbers:
DSR-300: Serial No.10306 and higher DSR-300P: Serial No.40571 and higher
Remarques
• Si les images apparaissent sur l’affichage LCD mais pas de texte, ou si les touches
de commande du camescope sur la télécommande RM-VJ1/VJ1P ne fonctionnent
pas, vérifiez que le débit est réglé à 38400 au menu de réglage du camescope. S’il est
réglé à 9600, les communications entre le camescope et la RM-VJ1/VJ1P seront
impossibles. Redémarrez le camescope si vous modifiez le débit de 9600 à 38400.
• Si vous raccordez la RM-VJ1/VJ1P à un camescope DSR-300/300P, le ROM à
l’intérieur du camescope doit être de version 1,03 ou ultérieure. Adressez-vous à
votre revendeur Sony pour la vérification de sa version. Un ROM de version 1,03 ou
ultérieure est installé dans les DSR-300/300P portant les numéros de série suivants:
DSR-300: n˚ de série 10306 et plus DSR-300P: n˚ de série 40571 et plus
Hinweise
• Wenn auf dem LCD-Monitor Bilder aber kein Text abgebildet werden oder die
Funktionstasten der RM-VJ1P unwirksam sind, vergewissern Sie sich davon, daß
im Einstellmenü des Camcorders eine Baudrate von 38400 eingestellt ist. Bei
9600 Baud ist keine Kommunikation zwischen Camcorder und Fernsteuerung
möglich. Nach dem Ändern der Baudrate von 9600 auf 38400 muß der
Camcorder einmal kurz aus- und dann wieder eingeschaltet werden.
• Für den Anschluß der RM-VJ1P an einen Camcorder DSR-300P, ist eine ROMVersion ab 1,03 im Camcorder erforderlich. Im Zweifelsfalle wenden Sie sich
bitte an Ihren Fachhändler. Camcorder DSR-300P mit einer ROM-Version ab
1,03 tragen eine Seriennr. Ab 40571.
Note
• Se sul monitor LCD vengono visualizzate le immagini ma non il testo, o se i tasti
di controllo camcorder sull’RM-VJ1P non funzionano, accertarsi che la velocità
di trasmissione sia impostata su 38400 nel menu di impostazione della camcorder.
Se la velocità di trasmissione è impostata su 9600, la trasmissione tra la
camcorder e l’RM-VJ1P non avrà luogo. Quando si cambia la velocità di
trasmissione da 9600 in 38400, si deve riavviare la camcorder.
• Quando si collega l’RM-VJ1P ad una camcorder DSR-300P, la ROM all’interno
della camcorder deve essere una ROM versione 1,03 o successiva. Per controllare
la versione della ROM, rivolgersi al rivenditore Sony di fiducia. Una ROM di
versione 1,03 o successiva è installata in una DSR-300P con numero di serie
40571 o uno maggiore.
Français
English
1 Camcorder operation buttons
Use these buttons to control the camcorder connected to the RM-VJ1/VJ1P.
For details on the function of each button, refer to the operation manual for the
camcorder.
2 POWER lamp
Lights up when power is supplied from the camcorder.
3 2.5-inch LCD monitor
4 Wind screen for the microphone
5 POWER switch
ON: All remote operations are enabled (the monitor is on).
SAVE: The monitor turns off to save power.
6 ZOOM/FOCUS switch
Selects the zoom or focus function. The focus function can be used only with
focus-enabled lenses (available in the near future).
7 BRIGHT control
Adjusts the brightness of the monitor.
8 ZOOM/FOCUS (T/W) button (only the zoom function is currently available)
Hold down this button to increase the zoom speed (except in REC mode).
T: telephoto W: wide-angle
9 Connecting cable
Connect to the REMOTE 2 connector on the camcorder.
0 Hand strap post
!¡ Lock lever for the monitor cover
Pull down to open the cover.
!™ AUDIO LEVEL control
Adjusts the audio level of the microphone.
!£ LOW CUT switch
The low cut filter is activated when this switch is set to ON.
!¢ ZOOM SELECT 1/2 switch
1: For a FUJINON lens 2: For a Canon lens
!∞ Omnidirectional microphone (interchangeable)
To prevent damaging the microphone unit, disconnect the connecting cable before
replacing the microphone.
Specifications
Signal input
LCD panel
Normal scan
Horizontal resolution
Microphone type
Power consumption
Operating temperature
Dimensions (W/H/D)
Mass
Supplied accessories
Design and specifications are subject to change without notice.
1 Tasti di controllo camcorder
Usare questi tasti per controllare la camcorder collegata all’RM-VJ1P.
Per i dettagli sulla funzione di ciascun tasto, fare riferimento al manuale di
istruzioni della camcorder.
2 Spia di alimentazione (POWER)
Si illumina quando l’alimentazione è fornita dalla camcorder.
3 Monitor LCD da 2,5 pollici
4 Schermo di protezione dal vento per il microfono
5 Interruttore di alimentazione (POWER)
ON: Tutte le operazioni di controllo a distanza sono abilitate (il monitor è acceso).
SAVE: Il monitor si spegne per risparmiare corrente.
6 Interruttore di zoom/messa a fuoco (ZOOM/FOCUS)
Seleziona la funzione di zoom o di messa a fuoco. La funzione di messa a fuoco può
essere usata soltanto con obiettivi abilitati per la messa a fuoco (disponibili tra breve).
7 Comando di luminosità (BRIGHT)
Regola la luminosità del monitor.
8 Tasto di zoom (teleobiettivo/grandangolo)/messa a fuoco (ZOOM/FOCUS
(T/W)) (attualmente è disponibile soltanto la funzione di zoom)
Tenere premuto questo tasto per aumentare la velocità di zoomata (tranne che nel
modo REC).
T: Teleobiettivo W: Grandangolo
9 Cavo di collegamento
Collegarlo al connettore REMOTE 2 sulla camcorder.
0 Attacco per la cinghia
!¡ Leva di blocco per il coperchio del monitor
Abbassarla per aprire il coperchio.
!™ Comando del livello audio (AUDIO LEVEL)
Regola il livello audio del microfono.
!£ Interruttore di filtro taglia basso (LOW CUT)
Il filtro taglia basso è attivato quando questo interruttore è regolato su ON.
!¢ Interruttore di selezione obiettivo (ZOOM SELECT 1/2)
1: Per un obiettivo FUJINON 2: Per un obiettivo Canon
!∞ Microfono omnidirezionale (intercambiabile)
Per evitare di danneggiare l’unità microfono, scollegare il cavo di collegamento
prima di sostituire il microfono.
Entrée du signal
Affichage LCD
Balayage normal
Vidéo composite (NTSC/PAL, 4:3/16:9)
Panneau TFT 2,5 pouces, 180.000 points
balayage de plus de 90% de la zone effective de
l’affichage LCD
Résolution horizontale
Plus de 200 lignes TV (section centrale)
Type de microphone
Omnidirectionnel
Consommation
3 W en fonctionnement
1,3 W en mode économie d’énergie (affichage désactivé)
Température de fonctionnement
0 à +40˚C (32 à 104˚F)
Dimensions (lh/p)
77,4 × 261 × 32,5 mm (3 1/8 × 10 3/8 × 1 5/16 pouces)
(couvercle de l’affichage exclu)
Poids
240 g (8,5 onces)
Accessoires fournis
Câble de raccordement CCA-7-7A (7 m (23 pieds)) (1)
Dragonne (1)
Ingresso del segnale
Pannello LCD
La conception et les spécifications sont sujettes à modification sans préavis.
Design e caratteristiche tecniche soggetti a modifiche senza preavviso.
Lage und Funktion der Teile
Deutsch
1 Tasten für den Camcorder-Betrieb
Steuern Sie mit diesen Tasten den an der RM-VJ1P angeschlossenen Camcorder.
Einzelheiten zu den Tasten entnehmen Sie bitte der Bedienungsanleitung des
Camcorders.
2 POWER-Anzeige
Leuchtet, wenn die RM-VJ1P vom Camcorder mit Strom versorgt wird.
3 2,5-Zoll-LCD-Monitor
4 Windschirm für Mikrofon
5 POWER-Schalter
ON: Alle Fernbedienungsoperationen sind steuerbar (Monitor eingeschaltet).
SAVE: Um Strom zu sparen, wird der Monitor ausgeschaltet.
6 ZOOM/FOCUS-Schalter
Zur Wahl zwischen Zoom- und Fokussierbetrieb. Letzterer ist nur mit entsprechend
konstruierten Objektiven möglich (in Kürze lieferbar).
7 BRIGHT-Regler
Zur Einstellung der Monitorhelligkeit.
8 ZOOM/FOCUS (T/W)-Taste (unterstützt gegenwärtig nur Zoomfunktionen)
Diese Taste gedrückt halten, um die Zoomgeschwindigkeit zu erhöhen (außer
während der Aufnahme).
T: Tele W: Weitwinkel
9 Anschlußkabel
Für den Anschluß an die REMOTE 2-Buchse des Camcorders.
0 Handriemensicherung
!¡ Verriegelungshebel für die Monitorabdeckung
Zum Öffnen der Abdeckung nach unten ziehen.
!™ AUDIO LEVEL-Regler
Zur Aussteuerung des Mikrofonpegels.
!£ LOW CUT-Schalter
In Stellung ON dieses Schalters ist das Hochpaßfilter aktiviert.
!¢ ZOOM SELECT 1/2-Schalter
1: Für ein FUJINON-Objektiv 2: Für ein Canon-Objektiv
!∞ Omnidirektionales Mikrofon (austauschbar)
Um eine Beschädigung des Mikrofons zu vermeiden, trennen Sie vor dem
Auswechseln des Mikrofons dessen Anschlußkabel.
Signaleingang
LCD-Feld
Normale Abtastung
Horizontalauflösung
Mikrofontyp
Leistungsaufnahme
Betriebstemperatur
Abmessungen (B/H/T)
Gewicht
Im Lieferumfang
Italiano
Caratteristiche tecniche
Technische Daten
Composite video (NTSC/PAL, 4:3/16:9)
2.5-inch, 180,000 dot TFT LCD panel
90% overscan of LCD effective screen area
more than 200 TV lines (center section)
Omnidirectional
3 W at operation
1.3 W in power save mode (the monitor is off)
0 ˚C to +40 ˚C (+32 ˚F to +104 ˚F)
77.4 × 261 × 32.5 mm (3 1/8 × 10 3/8 × 1 5/16 inches)
(not including monitor cover)
240 g (8.5 oz)
Connecting cable CCA-7-7A (7 m (23 feet)) (1)
Hand strap (1)
Posizione e funzione delle parti e
dei comandi
FBAS (PAL, 4:3/16:9)
2,5-Zoll-Dünnfilm-Flüssigkristallanzeige mit 180.000
Bildpunkten
90 % der effektiven LCD-Bildschirmfläche
mehr als 200 Linien
Omnidirektional
3 Watt bei Betrieb
1,3 Watt im Stromsparmodus (Monitor ausgeschaltet)
0 °C bis 40 °C
77,4 × 261 × 32,5 mm (ohne Monitorabdeckung)
240 g
Anschlußkabel CCA-7-7A (7 m) (1)
Handriemen (1)
Änderungen, die dem technischen Fortschritt dienen, bleiben vorbehalten.
Video composito (PAL, 4:3/16:9)
Pannello a cristalli liquidi TFT da 2,5 pollici,
180.000 punti
Scansione normale
Iperscansione del 90% dell’area di schermo effettiva del
pannello LCD
Risoluzione orizzontale Più di 200 linee TV (sezione centrale)
Tipo di microfono
Omnidirezionale
Consumo
3 W durante il funzionamento
1,3 W nel modo di risparmio di corrente (monitor
spento)
Temperatura di impiego Da 0°C a +40°C
Dimensioni (L/A/P)
77,4 × 261 × 32,5 mm (escluso il coperchio del monitor)
Massa
240 g
Accessori in dotazione
Cavo di collegamento CCA-7-7A (7 m) (1)
Cinghia (1)