1
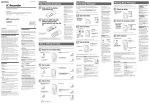
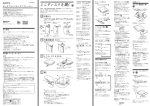
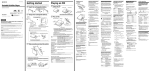
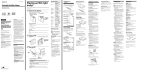
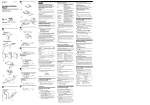
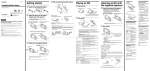
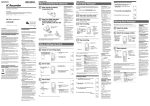
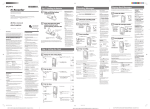
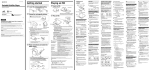
B Various ways of
playback
3-220-082-11(1)
Getting Started
Portable MiniDisc Player
Operating instructions
XXXXXX (XXXX)
Playing an MD
A
You should charge the supplied rechargeable battery before using it for
the first time. You can also operate the player on house current (For
more details, see “Using house current.”)
1 Insert a rechargeable battery.
Bottom side of the player
The player automatically switches to play the monaural sound
according to the recorded monaural sound.
1 Playing an MD
1
Player
“WALKMAN” is a
registered trademark of
Sony Corporation.
i jack
3 N/>
DISPLAYD
Sony Corporation © 2000 Printed in Japan
To prevent fire or shock
hazard, do not expose
the unit to rain or
moisture.
To avoid electrical
shock, do not open the
cabinet. Refer servicing
to qualified personnel
only.
Caution
The use of optical instruments with this
product will increase eye hazard.
Information
IN NO EVENT SHALL SELLER BE LIABLE
FOR ANY DIRECT, INCIDENTAL OR
CONSEQUENTIAL DAMAGES OF ANY
NATURE, OR LOSSES OR EXPENSES
RESULTING FROM ANY DEFECTIVE
PRODUCT OR THE USE OF ANY
PRODUCT.
Certain countries may regulate disposal of the
battery used to power this product.
Please consult with your local authority.
Welcome!
Welcome to the world of the MiniDisc!
Below are some of the features you will
discover with the new MiniDisc player.
• Compact body with newly developed
head-loading system.
Insert or eject an MD with the slightest
touch of a finger.
• Simple-to-charge folding standup
battery charger
Insert the MD player into the folding
standup battery charger for simple, onestep charging. By connecting an optional
car battery cord to the battery charger, you
can listen to the player in the car without
worrying about battery rundown.
• LCD display built into player for easy
viewing in the car
An easy-to-see LCD display built into the
player allows you to monitor track
numbers when the remote control display
is out of view.*
• Personalized sound through Digital
Sound Preset functions
You can store two sets of sound quality
adjustments (made during playback) to
two switches.
• Small body almost the size of a MiniDisc
jacket
• Low power-consumption design for
extended battery life.
• Easy-to-operate earphones remote
control with backlit LCD
• Shock-resistant memory offsets up to 40
seconds of optical read errors.
* Do not operate the unit when you drive.
2 Charge the rechargeable battery.
1
To a wall
outlet
Charging starts.
Indications cycle as shown in
the illustration. When charging
is complete, the indications
disappear.
When you select bass-setting mode, “B”
appears. When you select treble-setting
mode, “T” appears.
1 Connect the earphones to the remote control.
2 Connect the earphones with the remote control to the i jack.
3 Press > N (or press the control towards N/> or . on the remote
control).
The player starts to play the first track and “1” is displayed on the player.
When using the remote control, a short beep sounds in the earphones.
4 Press VOLUME +/– to adjust the volume.
The volume indicator appears on the player and the remote control to allow you to
check the volume. When you adjust the volume, a number from 0 to 10 is
displayed to indicate the volume level on the player, and the volume level bar is
indicated on the remote control.
The charging stand
(supplied)
AC power
adaptor
(supplied)
To stop play, press x.
A stop indication is displayed on the player.
See “Player display indications” below.
When using the remote control, a long beep sounds in the earphones. The display on
the remote control turns off a short while after you push x.
For more details about the display on the remote control, see “To know the track name
and playing time.”
Open up the stand
To DC IN 3V
After inserting the rechargeable battery, place the player on the
charging stand. Battery charging automatically starts and the
battery charging indications cycles in the display as shown in the
illustration above. After about 3 hours, the indications disappear
and charging ends. (To get maximum performance from the
battery, continue charging it for another 2 hours after the
indications disappear.) The rechargeable battery can be
recharged about 300 times.
Notes
• Before charging the battery, push x to stop playback. The battery cannot be charged
during playback. Pressing the playback button during charging will cause starting the
playback and charging to stop.
• Charging is displayed on the remote control display during battery charging and the
battery mark changes as follows: ecrctcycu
• While playing the MD with the charging stand, the player gives out mechanical noise.
However, this is not a malfunction.
Using on a dry battery
Insert one LR6 (size AA) alkaline battery (not supplied) into the supplied
battery case.
The playing time will be even longer if you use both a dry battery and a
rechargeable battery at the same time.
HOLDG
2
HOLD
3
Playing tracks repeatedly
C
Do this (Beeps in the earphones)
Press X on the remote control. (Continuous short beeps)
Press X on the remote control again to resume play.*1
Find the beginning of
the current track
Find the beginning of
the previous tracks
Find the beginning of
the next track
Go backwards while
playing*1
Go forward while
playing*1
Remove the MD
Press .once.
Press the control towards . on the remote control.
(Three short beeps)
Press . repeatedly.
Press the control towards . on the remote control
repeatedly. (Continuous three short beeps)
Press > N once. Press the control towards N/>
on the remote control. (Two short beeps)
Hold down ..
Press and hold the control towards . on the remote
control.
Hold down > N.
Press and hold the control towards N/> on the
remote control.
Press x, and then slip open the loading shutter.*2
*1 When you press . or > N on the player during pause (X), the player resumes
playback.
If you hold down . or > N on the player (or press and hold the control towards
. or N/> on the remote control) during pause (X), you can fast forward/rewind
without listening to the playback sound.
2
* Once you slip open the loading shutter, the point to start playback will change to the
beginning of the first track.
2
Press PLAYMODE on the remote control
while the player is playing an MD.
Each time you press PLAYMODE, the play
mode indication changes as follows.
(none) (normal play)
b
m
“
4
” (all repeat)
All the tracks are played repeatedly.
“
m
” (single repeat)
A single track is played repeatedly.
m
“
g
Insert the battery into the battery
case (minus) end first.
4
3
Turn towards LOCK.
To release the battery case,
turn towards RELEASE.
Appears when operation of
the player is attempted while
Hold function is on.
2Push the MD into the
compartment until it
locks into place. The
loading shutter will
close at that time.
Press x to stop playback, and then
slip open the loading shutter to
eject the MD.
You can check the battery condition with the
battery indication on the remote control while
using the player.
t
v
r
v
e
Elapsed time of the track
Track number
m
Track name*
m
Playing, rewinding, or fastforwarding during track 3, or
cueing to track 3
Paused track 3
Number of tracks recorded on the MD
Volume indication
The volume level is indicated
as a number from 0 to 10, with
three levels for each number.
(EX: ,
,
)
The total number of volume
levels is 32.
AVLS switch is set to “LIMIT.” (flashing)
Appears when the volume
level exceeds the limit level.
* Appears only with MDs that have been
electronically labeled.
Connect the car connecting pack and the
remote control as shown in the
illustration below.
CPA-9C car connecting pack
(not supplied)
The batteries have gone out. “LOW
BATT” flashes in the display on the
remote control, and the power goes off.
To i jack
Ni-MH
rechargeable battery
(NH-14WM)
Approx. 24 hours*
One (size AA)
alkaline battery**
Approx. 37 hours
One (size AA)
alkaline battery**
and a Ni-MH
rechargeable
battery
(NH-14WM)
Approx. 64 hours
Press DISPLAY or PLAYMODE.
The sound settings are saved and the
playback display appears again.
If you perform no sound adjustments for
a given duration of time, the playback
display appears again and any settings
that were made are saved.
4
To protect your hearing
(AVLS) F
The AVLS (Automatic Volume Limiter
System) function keeps down the maximum
volume to protect your ears.
Insert the end of the car battery cord into
the cigarette lighter socket.
** When using a LR6 (SG) Sony “STAMINA”
alkaline dry battery (produced in Japan).
Note
The battery life may be shorter depending on
operating conditions, the surrounding
temperature, and the battery type.
As long as the charging stands AC power
cord is plugged into a wall outlet, you can
operate the player, even if the rechargeable
battery is not inserted.
1
2
3
Connect the supplied AC power adaptor
to the DC IN 3V jack on the charging
stand.
Place the player into the charging stand.
Connect the AC power adaptor to an wall
outlet.
to a wall outlet
AC power adaptor
(supplied)
NORM LIMIT
AVLS
Set AVLS to LIMIT.
The volume is kept at a moderate level, even
if you try to turn the volume above the
limited level. See “Player display
indications” in “Playing an MD.”
To cancel the AVLS function
Set AVLS to NORM to cancel the AVLS
function.
Connect the car battery cord to the DC
IN 3V jack on the charging stand.
To a cigatrette lighter socket
Using house current I
• Settings can also be changed while playback is
momentarily paused (X).
• Settings cannot be changed through the
operation buttons on the player.
• Settings cannot be changed while the DIGITAL
SOUND PRESET switch is set to OFF.
3
* With a fully charged battery
••
Track number
Place the player into the charging stand.
Make sure the terminals on the stand are
firmly connected to the player.
Secure the player by turning the screw on
the bottom of the charging stand
clockwise.
To car cassette deck
Weak batteries
If you hold down PLAYMODE while in
bass-setting mode, the mode will change
to treble-setting mode. If you hold down
DISPLAY while in treble-setting mode,
the mode will change to bass-setting
mode.
Notes
Press DISPLAY on the remote control while
the player is playing an MD.
Each time you press DISPLAY, the display
changes as follows.
2
Battery power decreasing
Playback
The factory settings of the DIGITAL SOUND
PRESET are the followings:
• DIGITAL SOUND PRESET 1:
bass +1, treble ±0
• DIGITAL SOUND PRESET 2:
bass +3, treble ±0
To know the track name
and playing time D
Disc name*
Paused (Flashing)
Removing the MD
When to replace or
recharge the battery H
Batteries
The factory settings of the Digital SOUND
PRESET
All the tracks are played repeatedly in
random order.
No Disc/BlankDisc (flashing)
There is no disc in the
player or the disc is
blank disc.
1
You can use the player on a dry battery,
house current, or a Ni-MH rechargeable
battery.
Holding (flashing)
Stopped
3 Insert an MD.
1Insert an MD into
the disc
compartment,
aligning it along the
groove in the lid.
Display
Indicates the total number of
tracks on the disc (12 tracks in
this example).
By using the car connecting pack (not
supplied) and car battery cord (not supplied),
you can listen to the player inside of a car,
even without the rechargeable battery.
B Power sources
–4
±0
+3
The sound can be adjusted in 8 steps
(–4, –3…±0…+2, +3).
” (shuffle repeat)
Do not slip open the loading shutter during playback. If you do, playback stops.
Immediately after inserting a disc
Slide HOLD on the player in the direction of
the . to lock the controls of the unit.
Slide HOLD on the remote control in the
direction of the . to lock the controls of the
remote control.
To connect a car stereo J
Battery life*
Play mode indication
b
Player display indications
To prevent the buttons from being
accidentally operated when you carry the
player, use this function.
You can play tracks repeatedly in three ways
— all repeat, single repeat, and shuffle repeat.
Note
1
Press N/> or . on the remote
repeatedly to adjust the bass or the treble.
Example: While adjusting the bass.
The cursor moves. (Position: –2)
All the tracks are played once.
To
Pause
During playback, hold down DISPLAY
or PLAYMODE until the following
indicator appears on the remote control.
Press DISPLAY to select bass, and
PLAYMODE to select treble.
PLAYMODEC
x
Make sure the plug is firmly inserted into the remote control.
Plug the supplied AC power adaptor cord as
shown in the illustration below and place
the player on the charging stand.
2
Remote control
4VOL
Slide and push the lid
as shown by the arrow
in the illustration.
OFF 1 2
DIGITAL SOUND PRESET
HOLDG
HOLD
.
WARNING
Slide DIGITAL SOUND PRESET to select
1 or 2.
To lock the controls
(HOLD) G
•••
Remote control
4VOL
x
3> N
Insert the battery (minus) end
first.
You can make adjustments to the sound
quality to suit your taste, and then store
two sets of these adjustments.
DIGITAL SOUND PRESETE
AVLSF
Before operating the player, make sure the HOLD function is off.
For details, see “To lock the controls.”
e
MZ-E800
B
To adjust the sound
quality (DIGITAL SOUND
PRESET) E
Notes
• If the terminals on the stand are not firmly
connected to the terminals on the player, player
operation or battery charging will not be
possible.
• For details about charging the battery, see
“Getting started.”
DCC-E230 car battery
cord (not supplied)
Notes
• Do not leave the player and the charging stand
in the car.
• Do not leave the car battery cord connected.
• Do not use the earphones while driving.
BAdditional information
Precautions
On safety
• Make sure to keep the player in the
supplied carrying pouch. If the terminals
on the player, charger, or battery case are
accidently brought into contact with a
metallic object, they may short-circuit and
begin to heat up.
• Keep the terminals on the player or on the
battery case away from metallic objects or
surfaces. Such contact may short-circuit
the terminals and cause dangerous heat
generation. When carrying the player with
you, always keep the battery case attached
to the player and the player in the supplied
carrying pouch.
• When you carry the supplied charging
battery, be sure to put it in the supplied
rechargeable battery carrying case.
Carrying the charging battery without the
case may cause a short-circuit with metallic
objects such as coins, key rings, or
necklace. As a result, a heat may generate.
• Do not put any foreign objects in the DC
IN 3V jack.
On heat build-up
Warning
• Do not carry or store the dry battery or
battery case in the same place with metallic
objects such as coins, key rings, or
necklaces. This may cause a short-circuit
to occur and the generation of heat.
• Incorrect battery usage may lead to leakage
of battery fluid or bursting batteries. To
prevent such accidents, observe the
following precautions:
— Install batteries with the + and – poles
aligned correctly.
— Do not try to recharge dry batteries.
— When the player is not to be used for a
long time, be sure to remove the
batteries.
• If a battery leak should develop, carefully
and thoroughly wipe away battery fluid
from the battery compartment before
inserting new ones.
About power sources
• For use in your house or car: Use the
supplied AC power adaptor or the
DCC-E230 car battery cord (not supplied)
to supply power to the player. Do not use
any other power supply.
Polarity of the plug
• If you are not going to use this player for a
long time, be sure to disconnect the power
supply (AC power adaptor, dry battery, or
rechargeable battery). To remove the AC
power adaptor from the wall outlet, grasp
the adaptor plug itself; never pull the cord.
About charging
• The supplied charging stand can be used
only with the MZ-E800. Any other model
cannot be charged.
• If the terminals on the charging stand and
on the player become dirty, the battery
may not be able to charge the battery. In
this case, wipe the terminals with a dry
cloth.
• Do not use it to charge any other battery
besides the one designated for it
(NH-14WM).
• Charging time may vary depending on the
battery condition. The capacity of the
battery may be shorter than normal when
it is used for the first time or after a long
period of disuse. In this case, charge and
discharge the battery several times. The
battery life will be restored.
• If the rechargeable battery capacity
becomes half the normal life, replace it
with a new one.
• Remove the rechargeable battery when the
unit is not to be used for a long time.
• Though the charging stand and battery
may become hot during the charging
procedure, this poses no danger.
If the support on the charging stand
accidentally detaches
Heat may build up in the player if it is used
for an extended period of time. This,
however, is not a malfunction.
On mechanical noise
The player gives out mechanical noise while
operating, which is caused by the powersaving system of the player. This is not a
malfunction.
On installation
• Never use the player where it will be
subjected to extremes of light, temperature,
moisture or vibration.
• Never wrap the player in anything when it
is being used with the AC power adaptor.
Heat build-up in the player may cause
malfunction or injury.
On the earphones
Road safety
Do not use earphones while driving, cycling,
or operating any motorized vehicle. It may
create a traffic hazard and is illegal in many
areas. It can also be potentially dangerous to
play your player at high volume while
walking, especially at pedestrian crossings.
You should exercise extreme caution or
discontinue use in potentially hazardous
situations.
Preventing hearing damage
Avoid using earphones at high volume.
Hearing experts advise against continuous,
loud and extended play. If you experience a
ringing in your ears, reduce the volume or
discontinue use.
Caring for others
Keep the volume at a moderate level. This
will allow you to hear outside sounds and to
be considerate of the people around you.
On the MiniDisc cartridge
• Do not touch the internal disc directly.
Forcing the shutter open may damage the
internal disc.
• Do not place the cartridge where it will be
subjected to light, temperature, moisture or
dust.
On cleaning
• Clean the player casing with a soft cloth
slightly moistened with water or a mild
detergent solution. Do not use any type of
abrasive pad, scouring powder or solvent
such as alcohol or benzene as it may mar
the finish of the casing.
• Wipe the disc cartridge with a dry cloth to
remove dirt.
• Dust on the lens may prevent the unit from
operating properly. Be sure to close the
disc compartment lid after inserting or
ejecting an MD.
• To maintain good sound quality, use a soft
cloth to clean the plug of the remote
control. A dirty plug may cause noise or
skipping during playback.
If you have any questions or problems
concerning your player, please consult your
nearest Sony dealer.
Attach the stand as shown in the illustration
below.
Troubleshooting
Should any problem persist after you have
made these checks, consult your nearest Sony
dealer.
On dry batteries and the battery
carrying case
The supplied battery case is designed for use
with the MZ-E800 only. Never use another type
of battery case with this player.
Handling
• Do not drop or give a bump the player.
This may cause the player to malfunction.
• Do not pull on the remote control or
earphones cords.
• Do not place the player in the following
places:
— A place exposed to direct sunlight or
near a heater.
— In a car with the windows rolled up
(especially in the summer).
— In a damp place such as a bathroom.
— In a dusty place.
— Near a source of electromagnetic fields
such as a magnet, speaker, or TV.
• If you experience an allergic reaction to the
supplied earphones, stop using them at
once and consult a doctor or a Sony service
center.
The player does not work or works
poorly.
•You tried to play with no disc in the
player (“
” flashes on the player,
“NO DISC” flashes on the remote
control).
b Insert an MD.
•The hold function is activated and the
controls are locked. (If you press any of
the operation buttons on the player,
“
” flashes on the player, “HOLD”
flashes on the remote control.)
b Slide HOLD against the direction of
the arrow to release the hold
function.
•Moisture has condensed inside the
player.
b Take the MD out and wait for
several hours until the moisture
evaporates.
•The rechargeable battery or dry battery
is weak (“ ” flashes on the player,
“LOW BATT” flashes on the remote
control).
b Replace a new dry battery or
recharge the battery.
•The rechargeable battery or dry battery
has been installed incorrectly.
b Install the battery with correct
polarity.
•An MD with no recording on it is
inserted (“
” flashes on the player,
“BLANKDISC” flashes on the remote
control).
b Insert a recorded MD.
•The player cannot read the disc (it’s
scratched or dirty) (“
” flashes on the
player, “DISC Err” flashes on the
remote control).
b Reinsert or replace the disc.
•While operating, the player received a
mechanical shock, too much static,
abnormal power voltage caused by
lightning etc.
b Restart as follows.
1 Disconnect all the power sources.
2 Leave the player for about
30 seconds.
3 Connect the power source.
The MD is not played normally.
•The player is set to the repeat mode
(“ ” is displayed on the remote
control).
b Press PLAYMODE repeatedly until
“ ” disappears, then start playing.
An MD is not played from the first track.
•Disc playing stopped before it came to
the last track.
b Press . repeatedly or eject and
reinsert the MD once to go back to
the beginning of the disc, and restart
playing after checking the track
number in the display.
The Digital Sound Preset function does
not function.
•The DIGITAL SOUND PRESET switch
is set to OFF.
b Set the switch to 1 or 2.
Playback sound skips.
•The player is placed where it receives
continuous vibration.
b Put the player on a stable place.
•A very short track may cause sound to
skip.
Sound has a lot of static.
•Strong magnetism from a television or
such device is interfering with
operation.
b Move the player away from the
source of strong magnetism.
The rechargeable battery does not start
charging (in case of a charger with a
lid).
•The lid of the battery charger is not
closed properly.
b Close the lid and slide the lock.
•A disc is playng.
b Stop playback.
No sound comes through the
earphones.
•The earphones plug is not firmly
connected.
b Connect the earphones plug firmly
to the remote control.
b Connect the earphones plug firmly
to the i jack.
•Volume is too low.
b Adjust the volume by pressing
VOLUME +/– (VOL +/– on the
remote control).
•AVLS is on.
b Slide AVLS to NORM.
Specifications
System
Audio playing system
MiniDisc digital audio system
Laser diode properties
Material: GaAlAs
Wavelength: λ = 790 nm
Emission duration: continuous
Laser output: less than 44.6 µW*
* This output is the value measured at a distance
of 200 mm from the objective lens surface on
the optical pick-up block with 7 mm aperture.
Revolutions
600 rpm to 2250 rpm
Error correction
Advanced Cross Interleave Reed Solomon Code
(ACIRC)
Sampling frequency
44.1 kHz
Coding
Adaptive TRansform Acoustic Coding (ATRAC)
Modulation system
EFM (Eight to Fourteen Modulation)
Number of channels
2 stereo channels
1 monaural channel
Frequency response
20 to 20,000 Hz ± 3 dB
Wow and Flutter
Below measurable limit
Outputs
Earphones: stereo mini-jack, maximum output
level 5 mW + 5 mW, load impedance 16 ohms
Parts and controls
English (Traditional Chinese)
As you read, refer to the
illustrations in the English text.
The Player
General
Power requirements
Nickel metal hydride rechargeable battery
One NH-14WM (supplied): 1.2V, 1,400 mAh
One LR6 (size AA) battery (not supplied)
Sony AC Power Adaptor* (supplied) connected
to the DC IN 3V jack
Battery operation time
See “When to replace or charge the batteries”
Dimensions
Approx. 79.5 × 76.7 × 17.0 mm (w/h/d) (not
including projecting parts and controls)
Mass
Approx. 110g (the player only)
Supplied accessories
Earphones with a remote control (1)
Charging stand (1)
Nickel metal hydride rechargeable battery (1)
AC power adaptor (1)
Dry battery case (1)
Rechargeable battery carrying case (1)
Carrying pouch (1)
Optional accessories
CPA-9C Car connecting pack
DCC-E230 Car battery cord
MDR series stereo earphones**
SRS series Active Speakers
* The operative voltage for the AC power
adaptor varies depending upon the country in
which it is sold. Therefore, purchase the AC
power adaptor in the country you intend to
use it.
5
Welcome!
1
6
2
7
3
8
4
9
1
2
3
4
5
6
7
i (earphones) jack
DIGITAL SOUND PRESET switch
VOL (volume) +/– button
Battery compartment (at the bottom)
Mini-disc loading shutter (EJECT)
HOLD (Locking the control) switch
AVLS (Automatic Volume Limiter
System) NORM/LIMIT switch
8 Mini-disc control button
9 Terminals for charging stand (at the
bottom)
** Whether you should plug the earphones
directly to the i jack on the main unit or to a
remote control, use only earphones with
stereo mini plugs.
stereo mini plugs
BMD playing
BVarious ways of playback
To lock the controls (HOLD) G
Playing an MD B
Playing tracks repeatedly C
The player automatically switches to play the
monaural sound according to the recorded
monaural sound.
Press PLAYMODE on the remote control
while the player is playing an MD.
Each time you press PLAYMODE, the play
mode indication changes as follows:
On the player, slide HOLD in the direction of
the . to lock the controls of the player.
On the remote control, slide HOLD in the
direction of the . to lock the controls of the
remote control.
1 Playing an MD.
Welcome to the world of the MiniDisc! Below
are some of the features you will discover
with the new MiniDisc player.
Before operating the player, make sure
the HOLD function is off. For details, see
“To lock the controls.”
• Compact body with newly developed
head-loading system.
Insert or eject an MD with the slightest
touch of a finger.
• Simple-to-charge folding standup battery
charger
Insert the MD player into the folding
standup battery charger for simple, onestep charging. By connecting an optional
car battery cord to the battery charger, you
can listen to the player in the car without
worrying about battery rundown.
• LCD display built into player for easy
viewing in the car
An easy-to-see LCD display built into the
player allows you to monitor track
numbers when the remote control display
is out of view.*
• Personalized sound through Digital
Sound Preset functions
You can store two sets of sound quality
adjustments (made during playback) to
two switches.
• Small body almost the size of a MiniDisc
jacket
• Low power-consumption design for
extended battery life.
• Easy-to-operate earphones remote control
with backlit LCD
• Shock-resistant memory offsets up to 40
seconds of optical read errors.
1 Connect the earphones to the remote
control.
Make sure the plug is firmly inserted
into the remote control.
2 Connect the earphones with the
remote control to the i jack.
3 Press > N (or press the control
towards N/> or . on the
remote control).
The player starts to play the first track
and “1” is displayed on the player.
When using the remote control, a
short beep sounds in the earphones.
4 Press VOLUME +/– to adjust the
volume.
The volume indicator appears on the
player and the remote control to allow
you to check the volume. When you
adjust the volume, a number from 0 to
10 is displayed to indicate the volume
level on the player, and the volume
level bar is indicated on the remote
control.
To stop play, press x.
A stop indication is displayed on the player.
When using the remote control, a long beep
sounds in the earphones. The display on the
remote control turns off a short while after
you push x.
For more details about the display on the
remote control, see “To know the track name
and playing time.”
* Do not operate the unit when you drive.
Other disc operation
The earphones with a remote
control
Your dealer may not handle some of the above
listed accessories. Please ask the dealer for
detailed information about the accessories in
your country.
“WALKMAN” is a registered trademark of
Sony Corporation.
To
A
BGetting Started
Pause
Getting Started A
US and foreign patents licensed from Dolby
Laboratories Licensing Corporation.
Design and specifications are subject to change
without notice.
B
G
C
H
D
I
E
J
F
1 Earphones
Can be replaced with optional earphones.
2 Stereo mini plug
3 HOLD (Locking the control) switch
4 X (pause) button
5 PLAYMODE button
6 DISPLAY button
7 x (stop) button
8 Control
To play, press towards N/> during
stop.
Press towards N/> during play to
search the beginning of the succeeding
track; hold in this position to fast-foward.
Press towards .during play to search
the beginning of the preceding track;
hold in this position to rewind.
9 VOL (volume) +/– button
q; Display window
You should charge the supplied rechargeable
battery before using it for the first time. You
can also operate the player on house current
(For more details, see “Using house current”)
1 Insert a rechargeable battery.
2 Charge the rechargeable battery.
After inserting the rechargeable battery,
place the player on the charging stand.
Battery charging automatically starts and
the battery charging indications cycles in
the display. After about 3 hours, the
indications disappear and charging ends.
(To get maximum performance from the
battery, continue charging it for another 2
hours after the indications disappear.)
The rechargeable battery can be
recharged about 300 times.
To use a dry battery, insert one LR6 (size
AA) alkaline battery (not supplied) into
the supplied battery case, and attach the
battery case to the player.
Notes
•Before charging the battery, push x to stop
playback. The battery cannot be charged
during playback. Pressing the playback
button during charging will cause starting
the playback and charging to stop.
•Charging is displayed on the remote
control display during battery charging
and the battery mark changes as follows:
ecrctcycu
•While playing the MD with the charging
stand, the player gives out mechanical
noise. However, this is not a malfunction.
3 Insert an MD.
1 Insert an MD into the disc
compartment, aligning it along the
groove in the lid.
2 Push the MD into the compartment
until it locks into place. The loading
shutter will close at that time.
For removing the MD, press x to stop
playback, and then slip open the
loading shutter to eject the MD.
Do this (Beeps in the
earphones)
Press . once.
Press the control towards
. on the remote
control. (Three short
beeps)
Find the
beginning of
the previous
tracks
Press . repeatedly.
Press the control towards
. on the remote control
repeatedly. (Continuous
three short beeps)
Find the
beginning of
the next track
Press > N once.
Press the control towards
N/> on the remote
control. (Two short beeps)
Go backwards Hold down ..
while playing* Press and hold the control
towards . on the
remote control.
Go forward
Hold down > N.
while playing* Press and hold the control
towards N/> on the
remote control.
Press x, and then slip
open the loading
shutter.**
* When you press . or > N on the player
during pause (X), the player resumes
playback.
If you hold down . or > N on the
player (or press and hold the control towards
. or N/> on the remote control)
during pause (X), you can fast forward/
rewind without listening to the playback
sound.
** Once you slip open the loading shutter, the
point to start playback changes to the
beginning of the first track.
B
v
“ ” (all repeat)
All the tracks are played repeatedly.
v
“
” (single repeat)
A single track is played repeatedly.
v
“
” (shuffle repeat)
All the tracks are played repeatedly in
random order.
To know the track name and
playing time D
Press DISPLAY on the remote control while
the player is playing an MD.
Each time you press DISPLAY, the elapsed
time of the current track and the track
number, the track name and number, and the
disc name and the number of tracks recorded
on the MD appear.
To adjust the sound quality
(DIGITAL SOUND PRESET) E
You can make adjustments to the sound
quality to suit your taste, and then store
two sets of these adjustments.
1 Slide DIGITAL SOUND PRESET to select
1 or 2.
2 During playback, hold down DISPLAY
or PLAYMODE until the indicator shown
in the English text (see DIGITAL SOUND
PRESET E) appears on the remote
control.
Press DISPLAY to select bass, and
PLAYMODE to select treble.
Press X on the remote
control. (Continuous short
beeps)
Press X on the remote
control again to resume
play.*
Find the
beginning of
the current
track
Remove the
MD
(none) (normal play)
All the tracks are played once.
3 Press N/> or . on the remote
repeatedly to adjust the bass or the treble.
If you hold down PLAYMODE while in
bass-setting mode, the mode will change
to treble-setting mode. If you hold down
DISPLAY while in treble-setting mode,
the mode will change to bass-setting
mode.
The sound can be adjusted in 8 steps
(–4, –3, ...±0...+2, +3).
4 Press DISPLAY or PLAYMODE.
The sound settings are saved and the
playback display appears again.
Factory settings of the MD player
Factory settings are the followings:
• DIGITAL SOUND PRESET 1:
bass +1, treble ±0
• DIGITAL SOUND PRESET 2:
bass +3, treble ±0
Notes
• Settings can also be changed while playback is
momentarily paused (X).
• Settings cannot be changed through the
operation buttons on the player.
• Settings cannot be changed while the
DIGITAL SOUND PRESET switch is set to
OFF.
To protect your hearing (AVLS)
F
Set AVLS (Automatic Volume Limiter
System) to LIMIT.
The volume is kept at a moderate level, even
if you try to turn the volume above the
limited level.
To cancel the AVLS function
Set AVLS to NORM to cancel the AVLS
function.
BPower Sources
When to recharge or replace the
battery H
The battery should power consecutive
playback for about 37 hours before you need
to replace it. If you use both a dry battery
and a rechargeable battery (consecutively),
the total playback time should be about
64 hours.
When the battery indication changes to r,
the rechargeable battery or the dry battery is
weak. Recharge the rechargeable battery or
replace the dry battery. When the battery is
exhausted, “LOW BATT” flashes in the
display on the remote control and the power
goes off.
Note
The battery life may be shorter depending on
operating conditions, the surrounding
temperature, and the battery type.
Using house current I
Using the charging stand
As long as the charging stands AC power
cord is plugged into a wall outlet, you can
operate the player, even if the rechargeable
battery is not inserted.
1 Connect the supplied AC power adaptor
to the DC IN 3V jack on the charging
stand.
2 Place the player into the charging stand.
3 Connect the AC power adaptor to an wall
outlet.
Notes
• If the terminals on the stand are not firmly
connected to the terminals on the player,
player operation or battery charging will not be
possible.
• For details about charging the battery, see
“Getting started.”
To connect a car stereo J
By using the car connecting pack (not
supplied) and car battery cord (not supplied),
you can listen to the player inside of a car,
even without the rechargeable battery.
1 Place the player into the charging stand.
Make sure the terminals on the stand are
firmly connected to the player.
Secure the player by turning the screw on
the bottom of the charging stand
clockwise.
2 Connect the car connecting pack and the
remote control.
3 Connect the car battery cord to the DC
IN 3V jack on the charging stand.
4 Insert the end of the car battery cord into
the cigarette lighter socket.
Notes
• Do not leave the player and the charging stand
in the car.
• Do not leave the car battery cord connected.
• Do not use the earphones while driving.
US and foreign patents licensed from Dolby
Laboratories Licensing Corporation.