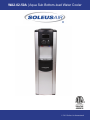
1
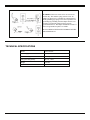
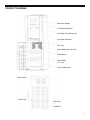
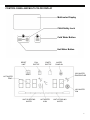
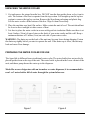
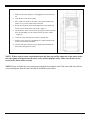
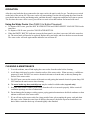
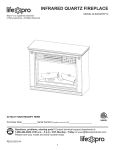
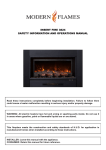
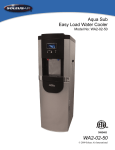
WA2-02-50A | Aqua Sub Bottom-load Water Cooler
4002638
© 2011 Soleus Air International
Thank you for choosing a Soleus Air Water Cooler. This owner’s manual will provide you with
valuable information necessary for the proper care and maintenance of your new product.
Please take a few moments to thoroughly read the instructions and familiarize yourself with all
the operational aspects of your new water cooler.
For your own records, please attach a copy of your sales receipt to this manual. Also, write the
store name/location, date purchased, and serial number below:
Store Name: ____________________________________________________
Location: ______________________________________________________
Date Purchased: _________________________________________________
Serial Number (located on back of unit): ______________________________
IMPORTANT SAFETY INSTRUCTIONS
When using electrical appliances, basic safety precautions should be followed to reduce the risk of fire,
electric shock, and injury to persons or property. Read all instructions before using any appliance.
1. Do not let hot water touch bare skin. Keep combustible material such as furniture, bedding, pillows,
clothes, and/or papers away from the back of the unit.
2. Do not operate this, or any other appliance, with a damaged power cord. No other appliance should be
plugged into the same outlet. Be sure that the plug is fully inserted into the outlet.
3. Do not run the power cord over carpeting or other heat insulators. Do not cover the cord. Keep cord away
from high traffic areas, and do not submerge in water.
4. We do not recommend the use of extension cord as it may overheat and cause a risk of fire.
5. Exercise caution and use reasonable supervision when the appliance is used by or near children.
6. Do not use your water dispenser outdoors. Place the water dispenser away from direct sunlight and make
sure that there is at least 4 inches (10cm) of space between the back of your unit and wall. Keep a minimum of 2 inches (5cm) on each side of your unit free.
7. Do not use this product to dispense anything other than water.
8. To avoid a hazard due to instability of the appliance, it must be placed on even and flat surface.
9. If the supply cord is damaged, the manufacturer or its service agent or a similarly qualified person must
replace it in order to avoid a hazard.
10. This water cooler must be positioned so that the plug is accessible.
11. Disconnect the plug from the outlet when not in use.
12. Remove power plug or disconnect from the main power source before servicing the appliance.
PLEASE SAVE THESE INSTRUCTIONS.
2
WARNING: This water cooler is for use on 120 volt
outlets only. The cord has a plug as shown in A. An
adapter as shown in C is available for connecting threeblade grounding-type plugs to two-slot receptacles. The
grounding lug extending from the adapter must be connected to a permanent ground such as a properly
grounded outlet box. The adapter should not be used if a
three-slot grounded receptacle is available.
DO NOT DEFEAT THE SAFETY PURPOSE OF THE
GROUNDED PLUG.
TECHNICAL SPECIFICATIONS
Model
WA2-02-50A
Power Supply
115V, 60Hz
Electrical Rating
4.7 Amps, 485 Watts
Refrigerant and Quantity
R134a, 1.34oz
Weight
40.5 lbs.
Dimensions
13.25"W x 16.5"D x 42" H
3
PRODUCT DIAGRAM
Multi-color Display
Cold Water Dispenser
Hot Water Child Safety Lock
Hot Water Dispenser
Drip Tray
Water Bottle Cap with Hose
Reset Button
Water Bottle
(Not included)
Lower Cabinet Door
Power Switch
Power Cord
Drain Plug
Condenser
4
CONTROL PANEL AND MULTI-COLOR DISPLAY
Multi-color Display
Child Safety Lock
Cold Water Button
Hot Water Button
RESET
UNIT
FULL
BOTTLE
EMPTY
BOTTLE
WATER
PUMP ON
COLD WATER
TEMPERATURE
HOT WATER
TEMP.
COLD WATER
ICON
UNIT IS HEATING
WATER
HOT WATER
ICON
UNIT IS COOLING
WATER
5
UNPACKING THE WATER COOLER
1. Cut and remove the straps from the box. DO NOT turn the box upside down, or lay it on its
side. The bottom of the box is separate from the top section. Lift straight up on the top box
section to remove the top box section. Remove the Styrofoam packaging and plastic bag.
Lift the water cooler off the bottom of the box. Wipe it clean if necessary.
2. Place the machine on a hard, flat surface. Make certain the unit is level. The unit should not
be close to direct sunlight or other source of heat.
3. It is best to place the water cooler in an area with good air circulation. Make sure there is at
least 4 inches (10cm) of space between the back of your water cooler and the wall. Keep a
minimum distance of 2 inches (5cm) on each side of your water cooler.
WARNING: The drain cap on the back of the unit may become loose during shipping. Fasten
the drain cap tightly before you start to operate the unit. If the drain cap is loose, the unit may
leak and cause floor damage.
PREPARING THE WATER COOLER FOR USE
The Aqua Sub is different from a traditional water cooler. The water bottle does not need to be
placed upside down on the top of the unit. The water bottle is placed in the lower cabinet of the
unit, and then a pump draws the water up to the dispenser.
Much like a new refrigerator with an ice maker or water dispenser, it is recommended to
run 1 or 2 water bottles full of water through the system before use.
Figure 1
Figure 2
6
1.
Make sure the water dispenser is not plugged into an electrical outlet.
2.
Open the door of the lower cabinet.
3.
Place a full water bottle in the center of the cabinet. Remove the
plastic cover over the mouth of the water bottle.
4.
Put the hose inside the water bottle and place the water bottle cap
firmly over the mouth of the water bottle. (Figure 1)
5.
Attach the hose to the water cooler by pressing in on the knob of the
hose cap and sliding over the connector at the top of the cabinet.
(Figure 2)
6.
Center the water bottle and close the lower cabinet door.
7.
Plug the water cooler into a grounded power outlet and turn on the
power switch located on the back.
8.
The unit will start to operate, but you should wait at least half an
hour before using the water cooler.
NOTE: If there is not a secure connection between the hose cap and the connector on the water cooler,
the water pump will operate but the water cooler will not dispense water. Make sure the hose is connected to the water cooler correctly.
NOTE: Please wait until the water pump stops running before using the unit. If the water tank is not full, no
water will dispense from the cold water faucet and the hot water faucet.
7
OPERATION
After the water bottle has been connected to the water cooler, the unit is ready for use. Turn the power switch
on the back of the unit to ON. The water cooler will start running. First the unit will pump the water from the
water bottle into the cooling and heating tanks, and then the unit’s compressor and heater will start to operate.
The first time the water cooler is used, you will have to wait at least half an hour for hot and cold water.
Using the Water Cooler (See PAGE 5 for Button Placement)
•
•
•
To dispense HOT water, press the HOT WATER BUTTON and CHILD SAFETY LOCK BUTTON at the
same time.
To dispense COLD water, press the COLD WATER BUTTON.
When the EMPTY BOTTLE indicator icon on the front panel is on, there is no water left in the water bottle. The water bottle will need to be replaced. Replace the water bottle, and close the door to reset the unit.
The water cooler will work again and the indicator icon will turn off.
CLEANING & MAINTENANCE
1. To avoid accidents, turn off and unplug the water cooler from the outlet before cleaning.
2. A soft damp cloth may be used to clean the surface of the water cooler. When necessary, a mild detergent may be used. DO NOT use erosive chemical solvents to clean the unit, as this may damage the
surface of the water cooler.
3. DO NOT pour water on the exterior of the unit to avoid getting the internal electrical system damp. DO
NOT immerse the unit in water when cleaning.
4. The water bottle cap, hose, and drip tray may be washed in a dishwasher (top rack only).
5. Keep the water cooler 6 inches (15cm) away from the wall so it can work properly. Make certain all
ventilation openings are clear of obstruction.
6. Do not damage the heating or cooling system, paying particular attention to the black condenser or heat
radiator on the back of the water cooler.
7. If you will not use the water cooler for a long period of time, please unplug the power cord and drain
the water cooler. Drain the water from all faucets, then remove the drain cap on back and allow it to
drain. Make certain the drain cap is fastened tightly when finished.
8
TROUBLESHOOTING
Please check the troubleshooting chart below. It includes several common problems, which you can correct
at home, making a customer service call unnecessary.
Problem
Unit does not dispense hot
and cold water.
Unit does not dispense
cold water.
Unit does not dispense hot
water.
Unit is noisy during operation.
Water leaks from the faucet.
Water is dripping out of
the water cooler and onto
the floor.
The water being dispensed
has a strange taste.
Possible Cause
Remedy
Unit is unplugged.
Main power supply is off.
Damaged water dispenser
The water bottle cap is not attached
properly to the connector on the
water cooler.
Over consumption of cold water in
a short time.
System Malfunction
The ventilation around the unit is
insufficient.
The temperature of water in the
water bottle is too high. (When the
bottle is exposed to direct sunlight
for a long time.)
Over consumption of hot water in a
short time.
System Malfunctions
Plug the power cord into an outlet.
Reestablish main power supply.
Replace the dispenser.
Connect properly. There will be a
give when the hose cap slides properly over the connector.
Wait a moment for the water to
cool.
Contact Soleus Air for service
Space the unit from the wall by
more than 15 cm.
The appliance is not level.
Unit is touching other objects.
The top portion of the faucet has
become loose.
The faucet has been damaged.
The Hose Connector is not connected properly or the inside hot or
water tanks are leaking.
The drain cap on the back is not
fastened properly.
This is not uncommon with new
water coolers. Do not worry, this is
not dangerous to your health. This
water cooler is FDA approved.
Place the water bottle in a cool location out of direct sunlight.
Wait a moment for the water to
heat.
Contact Soleus Air for service
Place the unit on a level, flat surface.
Move the unit away from other objects.
Tighten the top threaded portion of
the faucet.
Call the customer service telephone
number to repair the faucet.
Make sure the hose connector is
properly connected. Contact Soleus
Air Service if a water tank is leaking
Tighten the drain cap. If the sealing
silicon material inside the drain cap
is torn or damaged, then replace
with a new one.
Clean the hose in the dishwasher
(top rack only) or let it soak in dish
soap. The strange taste usually goes
away after the first bottle has been
used up.
9
WARRANTY
One Year Limited Warranty
Soleus International Inc. warrants the accompanying Soleus Air Water Cooler to be free of defects in material and
workmanship for the applications specified in its operation instruction for a period of ONE (1) year from the date of
original retail purchase in the United States.
If the unit exhibits a defect in normal use, Soleus International Inc. will, at its option, either repair or replace it, free of
charge within a reasonable time after the unit is returned during the warranty period.
As a condition to any warranty service obligation, the consumer must present this Warranty Certificate along with a
copy of the original purchase invoice.
THIS WARRANTY DOES NOT COVER:
• Damage, accidental or otherwise, to the unit while in the possession of a consumer not caused by a defect in
material or workmanship.
• Damage caused by consumer misuse, tampering, or failure to follow the care and special handling provisions
in the instructions. This includes dents, accidental or otherwise, to the base and head of the unit.
• Damage to the finish of the case, or other appearance parts caused by wear.
• Damage caused by repairs or alterations of the unit by anyone other than those authorized by Soleus
International Inc.
• Freight and Insurance cost for the warranty service.
ALL WARRANTIES, INCLUDING ANY IMPLIED WARRANTY OF MERCHANT ABILITY ARE LIMITED TO
ONE-YEAR DURATION OF THIS EXPRESS LIMITED WARRANTY. SOLEUS INTERNATIONAL INC.
DISCLAIMS ANY LIABILITY FOR CONSEQUENTIAL OR INCIDENTAL DAMAGES AND IN NO EVENT
SHALL SOLEUS INTERNATIONAL INC’S LIABILITY EXCEED THE RETAIL VALUE OF THE UNIT FOR
BREACH OF ANY WRITTEN OR IMPLIED WARRANTY WITH RESPECT TO THIS UNIT.
This warranty covers only new products purchased from our authorized dealers or retailers. It does not cover used, salvaged, or refurbished products.
As some states do not allow the limitation or exclusion of incidental or consequential damages, or do not allow
limitation on implied warranties, the above limitations and exclusions may not apply to you. This warranty gives you
specific legal rights, and you may also have other rights that vary from state to state.
For Technical Support & Warranty Service
Please Call (888) 876-5387
Or Write To:
Soleus International Inc.
20035 E Walnut Dr. North
City of Industry, CA 91789 USA
www.soleusair.com
10