1
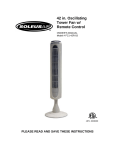
38 in. Oscillating
Tower Fan w/
Remote Control &
Multi-Color Display
OWNER’S MANUAL
Model # FC1-38R-21
3029200
PLEASE READ AND SAVE THESE INSTRUCTIONS
38 IN. OSCILLATING TOWER FAN W/ REMOTE CONTROL &
MULTI-COLOR DISPLAY
Thank you for choosing a Soleus Air fan. This owner’s manual will provide you with
valuable information necessary for the proper care and maintenance of your new
product. Please take a few moments to thoroughly read the instructions and familiarize
yourself with all the operational aspects of your new fan.
For your own records, please attach a copy of your sales receipt to this manual. Also,
write the store name/location and date purchased below:
Store Name: ___________________________________________________
Location: ______________________________________________________
Date Purchased: ________________________________________________
IMPORTANT SAFETY INSTRUCTIONS
When using this electric unit, basic safety precautions should always be followed to
reduce the risk of fire, electric shock and personal injury, including the following:
1)
Read all instructions before using this unit.
2)
Use only for intended household use as described in this manual.
3)
Plug the fan directly into a 120 V A/C electrical outlet.
4)
Never insert your fingers, pencils, or other objects through the fan grill during
operation.
5)
The fan should be used on a stable and level surface.
6)
Do not expose the fan to excessive heat or humidity. This could cause damage
to the electrical components.
7)
Do not immerse in any type of liquid. Do not use near water.
8)
The fan should be kept out of the reach of children. Close supervision is
necessary when the fan is used by or near children.
9)
To reduce the risk of fire or explosion, do not store or use gasoline or other
flammable vapors or liquids in the vicinity of the fan.
10) Do not operate this or any appliance with a damaged cord, if the unit
malfunctions, or if it has been dropped or damaged in any manner. Connect to
properly polarized outlets only.
2
11) Do not cover the cord or place near heat sources. Keep the cord away from high
traffic areas, and do not submerge in water.
12) Unplug the fan before moving, cleaning or making repairs. NOTE: If for any
reason this unit requires service, return appliance to manufacturer or a similarly
qualified service agent to ensure safety.
13) To reduce the risk of fire or electric shock, do not use this fan with any solid-state
speed control device.
14) To disconnect, grip plug and pull from wall outlet. Never pull on the cord to
unplug.
15) For indoor use only.
WARNING: This fan is equipped with a polarized plug (one blade is wider than the
other). The plug is intended to fit into a power outlet only one way, with the wide blade
in the wide slot. This is a safety feature; if you are unable to insert the plug fully into the
outlet, try reversing the plug. If the plug still does not fit, contact a qualified electrician.
DO NOT DEFEAT THE SAFETY PURPOSE OF THE POLARIZED PLUG.
TECHNICAL SPECIFICATIONS
Voltage Rating
120V, 60Hz
Power Consumption
50W (Max.)
Unit Size
11 in. (W) x 11 in. (D) x 37.8 in. (H)
Unit Weight
10 lbs
3
ASSEMBLY
1. First, attach the pedestal to the fan body. The pedestal is made of two separate
halves. Make sure to pass the power cord through the middle of the pedestal
before snapping the pedestal pieces together.
2. Now, attach the pedestal to the fan body using the included screws.
3. Attach the fan base to the pedestal. Like the pedestal, the fan base is made up of
two separate halves. Make sure the power cord passes through the middle of the
fan base. There is a groove on the bottom of the fan base for the power cord.
Make sure this groove is aligned with the back of the fan prior to securing the fan
base to the pedestal.
4. Once the groove on the bottom of the fan is aligned, attach the fan base using
the included base screws. Last, pass the cord through the groove on the bottom
of the fan base.
4
OPERATING INSTRUCTIONS
Set the fan on a stable, level surface. Plug the cord into a standard 120V A/C outlet.
POWERING ON THE FAN
The fan can be turned by pressing the POWER button on the fan control panel or using
the supplied remote control. The POWER button is also used to turn the fan off.
FAN SPEED
The default fan speed is low. To increase the fan speed to medium or high, press the
SPEED button on the fan control panel or the remote control. By pressing the SPEED
button, the fan will cycle through the 3 fan speeds until the desired speed is selected.
OSCILLATION
The fan can operate in oscillation or stationary mode. Press the OSCILLATE button on
the control panel to start oscillation, or press the OSC button on the supplied remote. To
turn Oscillation off, simply press the OSCILLATE button or OSC button once more.
WIND MODES
Press the MODE button on the fan control panel or remote to select one of the three
wind modes. When the fan is initially powered-on, the default wind mode (normal) is
selected. Press the MODE button once to select Natural wind mode, and twice to select
Rhythm wind mode. During Natural wind mode, the fan will simulate the airflow of the
wind by randomly alternate through its 3 fan speeds. During Rhythm wind mode the fan
cycles through the fan speeds in order of Low, Medium, and High.
IONIZER
This fan is equipped with a built-in ionizer to help clean the air around you. To operate
the ionizer, press the IONIZER button on the fan control panel or the supplied remote
control. To turn off the ionizer, simply press the IONIZER button again.
TIMER
The fan can be programmed to automatically shut-off after a set period of time. The
timer can be set for 30 minute increments. The maximum programmed time is 12 hours.
Once the timer reaches 0:00, the fan will automatically shut-off. To start the Timer,
press the TIMER button on the control panel or the supplied remote. Each press of the
TIMER button will increase the timer by 30 minutes. Press the TIMER button until the
desired time is visible on the multi-color display. To quickly set the timer, hold down the
TIMER button until the desired time is visible on the control panel.
CLOCK
When the fan is not operating, the timer will stay on in clock mode. Once the clock is
set, the display will show the current time when the fan is off. To set the clock, turn the
fan off and then press the SPEED button until the correct hour is visible on the display.
To set the minutes press the TIMER button until the correct minutes are visible on the
display. The fan will keep the correct time as long as it is plugged-in. If the fan is
unplugged, or there is a power-loss, the clock will reset to 0:00. To quickly set the clock,
simply hold down the SPEED and TIMER buttons (separately) on the control panel until
the current hour and minutes are shown on the display.
5
CLEANING/MAINTENANCE
• Turn the fan off and unplug the unit.
• Clean the tower fan, pedestal, and base using a dry cloth.
• Never use abrasive cleaning agents or solvents. This may cause damage or
deterioration to the surface of the unit.
• Do not immerse the fan in any form of liquid. Do not allow water to drip on or into
the fan motor housing.
STORAGE
When not in use, store the fan in a cool, dry location. To prevent dust and dirt build-up,
use the original packaging to repack the unit.
6
WARRANTY
One Year Limited Warranty
Soleus International Inc. warrants the accompanying Soleus Air FC1-38R-21 to be free from
defects in material and workmanship for the applications specified in its operation instruction for
a period of ONE (1) year from the date of original retail purchase in the United States.
If the unit exhibits a defect in normal use, Soleus International, Inc. will, at its option, either
repair or replace it, free of charge within a reasonable time after the unit is returned during the
warranty period.
As a condition to any warranty service obligation, the consumer must present this Warranty
Certificate along with a copy of the original purchase invoice.
This Warranty Does Not Cover
1) Damage, accidental or otherwise, to the unit while in the possession of a consumer not
caused by a defect in material or workmanship.
2) Damage caused by consumer misuse, tampering, or failure to follow the care and special
handling provisions in the instructions.
3) Damage to the finish of the case, or other appearance parts caused by wear.
4) Damage caused by repairs or alterations of the unit by anyone other than those authorized
by Soleus International Inc.
5) Freight and Insurance cost for the warranty service.
ALL WARRANTIES, INCLUDING ANY IMPLIED WARRANTY OF MERCHANTABILITY ARE
LIMITED TO A ONE-YEAR DURATION OF THIS EXPRESS LIMITED WARRANTY. SOLEUS
INTERNATIONAL, INC. DISCLAIMS ANY LIABILITY FOR CONSEQUENTIAL OR
INCIDENTAL DAMAGES AND IN NO EVENT SHALL SOLEUS INTERNATIONAL INC’S
LIABILITY EXCEED THE RETAIL VALUE OF THE UNIT FOR BREACH OF ANY WRITTEN
OR IMPLIED WARRANTY WITH RESPECT TO THIS UNIT.
This warranty covers only new products purchased from our authorized dealers or retailers. It
does not cover used, salvaged, or refurbished products.
As some states do not allow the limitation or exclusion of incidental or consequential damages,
or do not allow limitation on implied warranties, the above limitations and exclusions may not
apply to you. This warranty gives you specific legal rights, and you may also have other rights
that vary from state to state.
For Warranty, Technical Support, Customer Service, Missing or Defective Parts, before
returning to your retailer, please call (888) 876-5387.
Or Write To:
Soleus International Inc.
9451 Telstar Ave.
El Monte, CA 91731 USA
www.soleusair.com
7