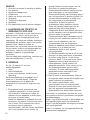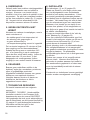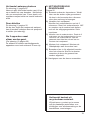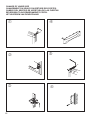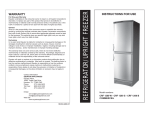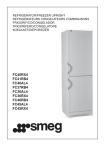
1
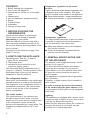
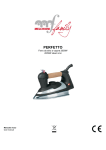
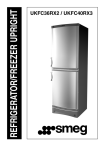
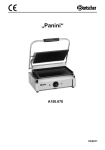
REFRIGERATOR
REFRIGERATEUR
FRIGORIFICO
FRIGORIFERO
KOELKAST
FA 40B4
FA 40X4
Please read these instructions carefully before putting the
appliance into service. They are brief and contain only information which will help you to obtain the best performance from the
appliance.
Take care of all accessories supplied with the appliance.
Il est important de lire attentivement le mode d’emploi avant
d’utiliser votre appareil. Il contient des informations très utiles
pour obtenir les meilleures performances possibles et assurer
un fonctionnement parfait de votre appareil.
Prenez soin de tous les accessoires fournis avec votre appareil.
Antes de usar su nuevo refrigerador, debe leer cuidadosamente
todas las instrucciones contenidas en este folleto. Contiene
solamente las informaciones necesarias para que Vd. puede
tener el máximo rendimiento de su nuevo electrodoméstico.
Tenga cuidado de guardar todos los accesorios del frigorífico en
un lugar adecuado.
Prima di utilizzare l’apparecchio vogliate leggere attentamente e
per intero il libretto con le istruzioni d’utilizzo al fine di sfruttare al
meglio le caratteristiche del prodotto.
Conservate questo documento insieme agli accessori in
dotazione all’apparecchio.
Het is belangrijk deze gebruiksaanwijzing aandachtig te lezen
alvorens uw toestel in werking te stellen. Ze bevat belangrijke
informatie die u zal helpen uw toestel optimaal en probleemloos
te gebruiken.
2
GB ............................................................... 4
F .................................................................. 7
E ................................................................ 10
I ................................................................. 13
NL ............................................................. 16
3
CONTENTS
1. Before starting the refrigerator.
2. How to use the appliance.
3. General advice on the use of the appliance.
4. Maintenance.
5. Has the appliance stopped working?
6. Safety.
7. Technical data.
8. Installation.
9. Change of hinge side.
Temperature regulation of the cooler
section:
A glass shelf with slide damper separates the
refrigerator and cooler sections. This glass
shelf is situated in the middle of the appliance.
l Open slide damper = lower temperature.
l Closed slide damper = higher temperature.
1. BEFORE STARTING THE
REFRIGERATOR
Check that the cabinet is undamaged.
Please report any transport damage
immediately to your dealer.
Wash the cabinet and inner lining with a
mild unscented detergent and wipe it dry.
Do not use abrasive scouring powder, steel
wool or similar.
Connection to the electricity supply: See
head (7) and (8).
2. HOW TO USE THE APPLIANCE
Operating panel: See fig. (1) page 21.
1. Lamp for the refrigerator.
2. Thermostat knob.
3. Indicator for the connection to the
electricity supply (green).
The thermostat knob is adjustable from 0
(stop) to 7 (coldest). Find the position of the
thermostat which gives you the desired
temperature. Start at position 4.
The refrigerator section
Never store hot foodstuffs in the cabinet and
remember always to wrap up the foodstuffs.
The evaporator of the refrigerator section is
automatically defrosted. The defrost water
is led to a tray on top of the compressor
where it evaporates.
The cooler section
The cooler section of the cabinet corresponds to former times’ larder. The temperature in the cooler section is higher than
in the refrigerator section as the two
sections are separated by a glass plate. The
temperature ranges between +8°C and
+12°C.
4
Temperature regulation:
The slide damper above the crisper bin makes
it possible to regulate both the temperature
and the humidity in the crisper bins.
l Open slide damper reduces the temperature and the humidity.
l Closed slide damper increases the temperature and the humidity.
3. GENERAL ADVICE ON THE USE
OF THE APPLIANCE
The shelves in the refrigerator section can be
moved, fig. (4) page 21.
The door rack and the butter- and cheeseboxes are also movable, fig. (2) page 21.
If the cabinet is not to be used for more than
48 hours the doors should be left open to
avoid ill smells.
The appliance is equipped with a high-quality
skin condenser.
Therefore, a slight heating of the sidewalls is
quite normal.
In order to ensure the correct functioning
of the larder-fridge the glass shelves must
only be placed in shelf grooves with integrated
shelf stops.
Lighting
This appliance is equipped with a device which
causes the light to switch off if the door is open
/ left ajar for abnormally long time.
When the door has been closed for a couple of
minutes, the device is cut off and the light
switches on in normal way again.
itting of an angle brace for fixing
In order to prevent a detached larder-fridge
from tilting forward when a filled fridge door is
opened, an angle brace can be fitted.
Fit the angle brace on the wall behind the
cabinet 80-100 mm from the left or right side
of the cabinet depending on which side the
door is hinged.
The angle brace must always be fitted in the
opposite side of the door hinges.
Important!
In case of damage to the power cord it must
be replaced by a power cord of corresponding type, available from the manufacturer or
his service representative.
4. MAINTENANCE
Only use an unscented detergent when
cleaning the cabinet inside.
Switch off the appliance and pull out the plug
when cleaning the cabinet.
The skirting board can be removed to faciliate
a vacuum cleaning of the floor. See fig. (1)
page 20.
Remember to clean the drain in the refrigerator section also.
5. HAS THE APPLIANCE STOPPED
WORKING?
Before calling a repairman, check that
the plug is properly plugged into the wall
socket.
The fuse is intact.
The power has not been cut off.
All controls are correctly set.
Switch off the cabinet for 15 minutes (for
instance at the thermostat). Switch it on
again and after 5 minutes check whether
frost has formed on the evaporator.
Do not open the cabinet when unnecessary.
If the break appears to stretch over a longer
period (over 12 hours) store the foodstuffs, if
possible, in another appliance.
6. SAFETY
Do not store explosive substances in the
refrigerator section, such as gas, cigarette
lighters, petrol, ether or similar.
Scrapped cabinets may become dangerous
to children at play. Therefore, remove the
doors or place the scrapped cabinet in such a
way that children cannot enter it.
7. TECHNICAL DATA
This appliance meets the provisions of the
following directives:
89/336/EEC (electromagnetic compatibility),
73/23/EEC (electrical equipment designed for
use within certain voltage limits) as amended.
Household appliances sold in the EU also
meet 96/57/EEC (energy efficiency requirements) as amended.
The rating plate, which is placed either at the
back or inside the appliance, see fig. (5) page
21, provides various technical information as
well as type and serial number.
8. INSTALLATION
See drawings (1) and (2) page 20.
Install the cabinet in a dry place and so that it
is not exposed to direct sunlight or any other
source of heat.
Place the cabinet in a level position. This is
easily achieved by adjusting the adjustable
feet at the front edge of the base. The cabinet
should not rest against a wall on its hinged
side. When placing the cabinet on a carpet or
on a wooden floor, the placing should be
checked after a while to see whether the unit
has „subsided“ into the soft flooring.
The cabinets can be built in or put side by
side, see fig. (2) page 20.
For sufficient airflow around the cabinet it is
necessary to have a 50 mm high air duct
right above the appliance, see fig. (2) or an
air duct that leeds the air up over the top
cupboard.
Make sufficient space for door opening, see
fig. (2).
The dimensions for building in are noted on
the drawings.
It is safest to place the earthed wall socket
above the appliance and at least 2.0 m above
the floor.
Any local installation rules for appliances of
this kind must be observed.
5
During a storm the electricity supply might be
cut off.
You should be aware of this when installing
the appliance in weekend cottages or
elsewhere where you would not immediately
observe that the power has been cut off.
Construction and details in the accessories
are subject to alteration without previous
notice.
9. CHANGE OF HINGE SIDE
If the cabinet is to be adjusted:
3) Adjusting the bottom door: Loosen the 3
screws in the bottom hinge and push the
bottom hinge to the required side. Tighten
the screws and mount the kick panel.
See drawings (1) page 20.
Take hold of the front panel with both hands.
Then lift up the front panel and turn out the
bottom part.
Adjust the tilt of the unit
See drawings page 22.
1) Dismantle the top hinge. This one is to be
used later as top hinge at the opposite
side. Lift off the top door.
2) Remove the kick panel.
The bottom hinge is dismounted at the 3
screws. The hinge is turned 180° and
mounted
on the opposite side.
4) The kick panel is mounted and the hole
plugs are mounted on the opposite side.
See drawings (1) page 20.
by turning the adjustable feet with a 13 mm
spanner.
5) Ajustment of the top door: loosen the
screws in the hinge above the door,
loosen the hinge above the door and turn
the hinge to the wanted side. Tighten the
screws.
Adjusting the door
6) Move the handle.
See drawings (1) page 20.
If the door bumps against the bottom panel,
this can be remedied by adjusting the feet as
shown on the drawing.
Side by side
See drawings (2) page 20.
The distance to other sources of heat must
also be at least 30 mm.
DISPOSAL OF THE
APPLIANCE
The appliance contains recyclable
materials. When disposing of the
appliance, please contact the technical
administration or other appropriate
authority in your municipality. They
can inform you of the collection and
recycling measures used in the
municipality.
6
CONTENU
1.
2.
3.
4.
5.
6.
7.
8.
9.
Avant la mise en service.
Comment utiliser votre appareil.
Conseils.
Entretien.
En cas de panne.
Sécurité.
Informations techniques.
Instructions d’installation.
Changement du sens d’ouverture des
portes.
Régulation de température du
compartiment de rafraîchissement :
Le compartiment de réfrigération et le
compartiment de rafraîchissement sont
séparés par une tablette en verre avec
registre à coulisse, qui se trouve au milieu de
l’armoire.
l Registre à coulisse ouvert = température
plus basse.
l Registre à coulisse fermé = température
plus élevée.
1. AVANT LA MISE EN SERVICE
Avant la mise en service de votre appareil il
est conseillé de vérifier s’il n’a subi aucun
dommage pendant le transport. En cas de
dommage, avertissez immédiatement votre
revendeur.
Nettoyez les parois intérieures et extérieures
avec de l’eau et un détergent neutre et
inodore, séchez-les ensuite. N’employez
jamais de produits abrasifs ou de la laine de
fer.
Nous référons aux chapitres (7) et (8) pour la
connexion au réseau électrique.
2. COMMENT UTILISER VOTRE
APPAREIL
Panneau de commande : voir fig. (1) page 21
1. lampe
2. thermostat
3. voyant vert : appareil sous tension
Le thermostat est réglable de la position 0
(stop) à 7 (position la plus froide). Réglez la
température désirée à l’aide du thermostat en
commençant à partir de la position 4.
Laissez refroidir les aliments chauds avant de
les conserver dans votre réfrigérateur. Veillez
à bien emballer ou couvrir les aliments.
Le dégivrage de votre réfrigérateur se fait
automatiquement. L’eau de dégivrage est
collecté dans un récipient de collecte situé
au-dessus du compresseur où elle s’évapore.
Compartiment de rafraîchissement
Le compartiment de rafraîchissement de
l’appareil correspond au garde-manger du
temps jadis.
La température oscille entre +8°C et +12°C.
Régulation de température au-dessus du
bac à légumes :
Le registre à coulisse au-dessus du bac à
légumes permet de régulariser tant la
température que l’humidité dans les bacs à
légumes.
l Registre à coulisse ouvert réduit la
température et l’humidité.
l Registre à coulisse fermé augmente la
température et l’humidité.
3. CONSEILS
Les clayettes du réfrigérateur sont amovibles
fig. (4) page 21.
Le rangement de la contre-porte ainsi que le
compartiment beurre et fromage sont
également amovibles fig. (2) page 21.
Si vous n’utilisez pas votre appareil pendant
plus de 48 heures il est conseillé de laisser la
porte entrouverte afin d’éviter les mauvaises
odeurs.
L’appareil est équipé d’un condensateur
intégré.
Un léger réchauffement des parois latérales
est tout à fait normal.
Afin d’assurer un bon fonctionnement du
garde manger, il est impératif de placer les
clayettes en verre dans les cannelures
pourvues d’un arrêt intégré.
7
L’éclairage intérieur
Cet appareil est équipé d’un système qui
éteint la lumière dès que la porte reste
ouverte pour une durée anormalement
longue. Lorsque vous refermez la porte pour
quelques minutes, le système est débranché
et la lumière s’allume à nouveau
normalement.
Fixer une équerre
Afin d’éviter que le réfrigérateur ne bascule
en avant au cas où la porte du réfrigérateur
serait trop chargée, vous pouvez fixer une
équerre. Placez-la au dos à 80-100 mm de
la gauche ou de la droite de l’appareil selon
le côté où les charnières sont placées.
L’équerre doit toujours être fixée au côté
opposé des charnières.
Important !
Si le câble d’alimentation est endommagé, il
faut le remplacer par un câble du même
type. Ce câble est disponible chez votre
revendeur.
4. ENTRETIEN
Utilisez seulement un détergent inodore pour
nettoyer les parois intérieures de votre
appareil. Avant de procéder au nettoyage
nous vous recommandons d’éteindre votre
appareil et de retirer la fiche d’alimentation
de la prise de courant. La plinthe peut être
retirée afin de faciliter le nettoyage du sol.
Voir fig. (1) page 20. N’oubliez pas de
nettoyer le tube d’écoulement du
réfrigérateur.
5. EN CAS DE PANNE
Avant de faire appel à un technicien,
vérifiez :
- si la fiche est bien branchée dans la prise
- si le fusible n’a pas sauté
- si la température a été réglée correctement
Débranchez l’appareil pendant 15 minutes
(par exemple à l’aide du thermostat).
Remettez l’appareil en marche et vérifiez
après 5 minutes s’il y a formation de givre
sur l’évaporateur. N’ouvrez pas la porte de
votre appareil si ce n’est pas nécessaire. Si
la panne dure plus de 12 heures il faut
ranger les aliments si possible dans un autre
appareil.
8
6. SECURITE
Ne conservez pas de produits explosifs dans
votre réfrigérateur, comme du gaz, des
allumeurs, du pétrol, de l’éther ou autres.
Si vous mettez au rebut votre ancien
appareil, nous vous conseillons d’enlever la
porte ou de placer l’appareil de manière à ce
que les enfants ne puissent s’y enfermer.
7. SPECIFICATIONS TECHNIQUES
Cet appareil correspond aux normes des
directives suivantes : 89/336/EEC, 73/23/
EEC
Les appareils vendus en Union Européenne
correspondent aux normes :96/57 EEC
La plaquette signalétique, qui est située au
dos ainsi qu’à l’intérieur de l’appareil fig.(5)
page 21 vous donne différentes informations
techniques, ainsi que le type et le numéro de
série de l’appareil.
8. INSTRUCTIONS D’INSTALLATION
Voir dessins (1) et (2) page 20
Installez votre appareil dans un endroit sec à
l’abri des rayons de soleil ou autre source de
chaleur.
Placez votre appareil à niveau en réglant les
pieds avant de l’appareil. Ne pas placer le
côté des charnières contre un mur.
Si vous installez votre appareil sur un tapis
ou une surface en bois, nous vous
conseillons de vérifier si l’appareil ne
s’enfonce pas dans le revêtement.
Votre appareil peut être encastré ou placé
côte à côte. Voir fig. (2) page 20.
Afin d’avoir une circulation d’air suffisante
autour de l’appareil il est nécessaire de
garder un espace de 50 mm au-dessus de
l’appareil. Voir fig. (2) Ou d’avoir un espace
au-dessus de l’armoire du dessus afin que
l’air puisse circuler librement. Voir fig . (2)
Nous référons aux dessins pour les dimensions d’encastrement.
Pour votre sécurité nous vous conseillons de
placer une prise de courant muni d’une terre
à 2 m du sol.
Il est nécessaire de tenir compte des
règlementations locales de sécurité.
Pendant un orage ou une tempête il peut y
avoir une rupture de courant. Il est
nécessaire d’en tenir compte lorsque
l’appareil est placé dans une maison de
vacances ou tout autre endroit où l’on ne
remarquerait pas directement qu’il y a eu une
rupture de courant.
Toutes les spécifications peuvent être
soumises à des modifications sans avis au
préalable.
Placez votre appareil à niveau:
Voir dessin (1) page 20
Tirez la plinthe avec vos deux mains vers le
haut et rabattez-la .
Réglez les pieds
Voir dessin (1) page 20
Placez votre appareil à niveau en tournant
les pieds réglables à l’avant de l’appareil à
l’aide d’une clé de 13 mm.
Ajustage de la porte
Voir dessin (1) page 20
Si la porte se cogne sur la cache-socle, ceci
peut être remédié en ajustant les pieds
comme illustré sur le dessin.
9. CHANGEMENT DU SENS
D’OUVERTURE DES PORTES
1) Enlevez la charnière du dessus. Celle-ci
devra servir au côté opposé. Soulevez la
porte supérieure.
2) Retirez la plinthe.
Dévissez les trois vis de la charnière
inférieure. Tournez la charnière à 180 °
et placez-la au côté opposé.
3) Ajustez la porte inférieure : dévissez les
3 vis de la charnière inférieure et
poussez la charnière du côté opposé.
Serrez les vis.
4) Placez les plugs de la plinthe au côté
opposé et replacez la pinthe.
5) Ajustez la porte supérieure : dévissez les
vis de la charnière au-dessus de la porte
et tournez la charnière dans le sens
désiré. Serrez les vis.
6) Déplacez la poignée.
Côte à côte
Voir dessin (2) page 20
La distance doit également être 30 mm au.
Votre appareil contient des
matériaux recyclables.
Nous vous recommandons de
prendre contact avec les autorités
locales pour obtenir des informations
et la listes des centres de collecte de
déchets.
9
INDICE
1.
2.
3.
4.
5.
6.
7.
8.
9.
Instalación.
Panel de mandos y su utilización.
Algunos consejos para el uso diario.
Entretenimiento.
Lista de chequeo en caso de malfunción.
Consejos de seguridad.
Datos técnicos.
Instalación eléctrica y alineamiento.
Cambio del sentido de apertura de las
puertas.
1. INSTALACION E INSPECCION
Examinar cuidadosamente el aparato de
posibles daños de transporte. En caso de
daño, informar inmediatamente al distribuidor.
Limpiar todo el aparato por dentro y fuera en
agua tibia con un poco de detergente suave
y no perfumado. Evitar el uso de detergentes
abrasivos, lana de acero etc.
lnstalación eléctrica: Ver los puntos 7 y 8.
2. PANEL DE MANDOS Y SU
UTILIZACION
Cuadro de mandos, fig. (1), pág. 21:
1. Iluminación de refrigerador.
2. Mando de temperatura.
3. Piloto de conexión a la red eléctrica
(verde).
El mando de temperatura puede regularse
desde 0 (paro) a 7 (frío máximo). Elije la
posición más adecuada de mando para
obtener la temperatura deseada, empezando
con “4”.
El compartimento conservador:
El compartimento conservador del armario
corresponde a la despensa de los tiempos
pasados. La temperatura se mueve entre
+8°C y +12°C.
Regulación de la temperatura en el
compartimento conservador:
Los compartimentos frigorífico y conservador
son separados por un estante con registro
corredizo colocado en el medio del armario.
l Registro abierto = temperatura más baja.
l Registro cerrado = temperatura más
elevada.
10
Regulación de la temperatura:
El registro corredizo sobre la caja de
verduras da la posibilidad de regular tanto la
temperatura como la humedad en las cajas.
l Registro abierto reduce la temperatura y
la humedad.
l Registro cerrado aumenta la temperatura
y la humedad
3. ALGUNOS CONSEJOS PARA EL
USO DIARIO
Los estantes de la sección frigorífica son
móviles, fig. (4), pág 21.
También las contenedores para mantequilla y
queso y los balcones portabotellas pueden
colocarse individualmente, fig. (2), pág. 21.
Durante un periodo de parada de más de 48
horas debe abrirse un poco las puertas para
evitar la formación de malos olores.
El aparato lleva incorporado en las paredes
un condensador de caparazón de gran
calidad. Por lo tanto, el calor que se saque de
compartimento interior y los productos
almacenados pasa a radiarse a través de las
paredes laterales del aparato, las cuales
deben encontrarse algo calientes.
Iluminación
Este aparato esta equipado con un dispositivo que hace que se apague la luz si la puerta
está abierta/entreabierta durante mucho
tiempo.
Cuando la puerta ha sido cerrada unos
minutos el dispositivo se desconecta y la luz
se enciende de modo normal nuevamente.
¡Importante!
En caso de dañar la línea de conexión a la
red, ésta debe cambiarse con un tipo
parecido suministrado por el fabricante o el
representante de servicio.
4. ENTRETENIMIENTO
La limpieza del interior del aparato debe
hacerse con agua y un detergente suave.
Durante la limpieza debe desconectarse el
aparato.
Para facilitar la limpieza por debajo del
aparato puede desmontarse el zócalo, fig.
(1), pág. 20.
No olvide limpiar el canal de desagüe de
escarcha en la sección frigorífica
5. LISTA DE COMPROVACIONES O
VERIFICACIONES EN CASO DE
MALFUNCION
Antes de llamar el Servicio Técnico, verificar
los puntos siguientes:
1. Que la clavija esté bien enchufada.
2. Que el fusible no se haya quemado.
3. Que haya corriente eléctrica en su casa.
4. Que el panel de mandos esté ajustado
correctamente.
5. Desconectar el aparato (en el mando de
temperatura) durante 15 min. Conectar el
aparato de nuevo y verificar después de 5
min. si se haya formado escarcha en el
evaporador.
6. No abrir las puertas del aparato salvo en
casos realmente necesarios. Si es
probable que el periodo de malfunclón
será superior a 12 h., intentar (si es
posible) transferir los productos a otro
aparato.
.
6. CONSEJOS DE SEGURIDAD
No colocar nunca productos explosivos en la
sección frigorífica, como por ejemplo gas,
encendedores, gasolina, éter etc.
Los aparatos desechados pueden ser
peligrosos para los niños. Elimina el peligro
quitando las puertas o colocando el aparato
fuera del alcance de los ninos.
7. DATOS TECNICOS
Este aparato cumple las disposiciones de las
directivas siguientes:
la directiva EMC (89/336) y la directiva de
tensión baja (73/23) y sus suplementos
siguientes.
Los aparatos domésticos vendidos dentro de
la UE cumplen también la directiva de
eficacia de energía (96/57) y sus suplementos siguientes.
La etiqueta de características situada en el
posterior del aparto o en su interior (ver fig.
(5), pág. 21), contiene varias informaciones
técnicas además de los números de
identificación de serie y tipo.
8. INSTALACION ELECTRICA Y
ALINEAMIENTO
Ver los dibujos (1) y (2), pág. 20.
El aparato debe colocarse en un sitio seco y
de manera que no esté expuesto
directamente a la luz solar u otra fuente de
calor.
El aparato debe instalarse en posición
absolutamente vertical mediante las patas
ajustables por debajo de las puertas. En el
lado de las bisagras no debe rozar el muro.
En el caso de instalar el aparato en suelo
moquetado o de madera, debe efectuarse un
reajuste después de cierto tiempo para
compensar para el hundimiento.
El aparato puede empotrarse o combinarse
con otro aparoto, ver fig. (2), pág. 20.
Para asegurar una circulación del aire
alrededor del aparato hace falta tener un
canal de ventilación de 50 mm de altura
sobre el aparato, ver fig. (2) o un canal de
ventilación dirigiendo el aire sobre el armario
superior
Dar lugar suficiente a la abertura de la puerta
ver. fig. (2).
De los dibujos puede verse las medidas
correctas para empotrar el aparato.
El enchufe se coloca más fácilmente por
arriba del aparato, a 2 metros del suelo.
Respete siempre la legislación local para la
instalación del aparato.
El corriente eléctrico puede cortarse durante
las tormentas.
Debe notarse bien ésto cuando el aparato se
instale en casas de campo u otros lugares
donde no se puede vigilar diariamente.
Se reserva el derecho de cambiar la
construcción y detalles de acabado sin previo
aviso.
11
Ajuste el armario si es necesario
Fig. (1), pág. 20.
Oprime el panel debajo de la puerta para
sacarlo. Ahora pueden ajustarse las patas.
Ajuste la inclinación del armario
Fig. (1), pág. 20.
Por medio de girar las patas ajustables con
una llave fija de 13 mm.
Ajuste de la puerta
9. CAMBIO DEL SENTIDO DE
APERTURA DE LAS PUERTAS
Pág. 22.
1) Desmontar la bisagra superior, la cual se
utilizará posteriormente como bisagra
superior en el lado opuesto. Levantar la
puerta superior.
2) Saque el rodapié.
Desmonte la bisagra inferior con los 3
tornillos, gire la bisagra 180º y montela
en el lado opuesto.
Fig. (1), pág. 20.
Si la puerta topa con el zócalo esto puede
ser remediado regulando las patas como
presentado en el dibujo.
3) Ajuste de la puerta inferior. Afloje los tres
tornillos de la bisagra inferior y empuje la
bisagra inferior al lado deseado. Fijen los
tornillos y monte la rodapié.
Lado a lado
4) Monte la rodapié y los tapones ciegos en
el lado opuesto.
Fig. (2), pág. 20.
La distancia a otras fuentes de calor también
debe ser por lo menos de 30 mm.
5) Ajuste de la puerta superior. Afloje los
tornillos de la bisagra sobre la puerta y
gire la bisagra al lado deseado. Tiense
los tornillos.
6) Mueva la manija. Monte los tapones de
cubierta de los hoyos de manija.
REMOCIÓN DEL APARATO
El aparato contiene materiales que
pueden reciclarse. Contacte con la
administración técnica del municipio al
remover el aparato. La administración le
informa sobre la recogida y el reciclaje
de aparatos en el municipio.
12
INDICE
Parte refrigerata:
1. Prima di collegare il frigorifero.
2. Utilizzo del frigorifero.
3. Consigli generali per l’utilizzo del
frigorifero.
4. Pulizia e manutenzione
5. In caso di guasto.
6. Sicurezza.
7. Caratteristiche tecniche.
8. Installazione.
9. Reversibilità Incernieramento porta.
La parte refrigerata dell’impianto
corrisponde approssimativamente alle
condizioni climatiche di una cantina.
La temperatura varia tra + 8°C e + 12°C.
1. PRIMA DI COLLEGARE IL
FRIGORIFERO.
Verificate che l’apparecchio sia in buono
stato. Gli eventuali danni causati dal trasporto
dovranno essere immediatamente segnalati
al rivenditore. Lavare le pareti esterne ed
interne dell’apparecchio con un prodotto per i
piatti delicato e non profumato, poi asciugare.
Non utilizzate dei prodotti abrasivi come ad
es. pagliette o altro che potrebbero rigare le
superfici.
Per quanto riguarda il collegamento elettrico,
vedere i punti (7) e (8).
2. UTILIZZO DEL FRIGORIFERO
Frontalino comandi fig. (1) pag. 21.
1. Illuminazione interna.
2. Manopola termostato.
3. Spia luminosa del collegamento elettrico
(verde).
La manopola del termostato è regolabile da 0
(spegnimento) a 7 (freddo max.)
Procedere per tentativi al fine di trovare la
posizione del termostato alla temperatura
voluta.
Partire in posizione 4, che in genere è
sufficiente per far funzionare il frigorifero in
condizioni normali. Regolate anche la
temperatura in base alla frequenza di
apertura delle porte e dell’ubicazione
dell’apparecchio.
Scomparto frigorifero.
Non introdurre mai alimenti caldi. Avvolgere
sempre gli alimenti usando gli appositi
involucri. L’evaporatore del frigorifero si
sbrina automaticamente. L’acqua sbrinata
viene raccolta e fatta evaporare in un
recipiente posto sopra al compressore sul
retro del frigorifero.
Regolazione della temperatura nella parte
refrigerata:
La parte fredda e quella refrigerata sono
separate da un ripiano munito di un
diaframma a scorrimento che si trova nel
mezzo dell’impianto:
l Diaframma aperto: temperatura più bassa
l Diaframma chiuso: temperatura più alta
Regolazione della temperatura:
Il diaframma sopra allo scomparto verdure
offre la possibilità di regolare sia la temperatura che
il grado di umidità degli scomparti.
l Con il diaframma aperto si abbassano sia
la temperatura che il grado di umidità
l Con il diaframma chiuso si alzano sia la
temperatura che il grado di umidità.
3. CONSIGLI GENERALI PER
L’UTILIZZO DEL FRIGERIFERO
I ripiani del frigorifero possono essere tolti fig.
(4) pag. 21.
I balconcini portaoggetti della controporta
sono ugualmente removibili. fig. (2) pag. 21.
Sostituzione della lampadina del pannello
superiore: scollegare la presa di corrente.
Sostituite la lampadina con una uguale (ossia
da 10 Watt).
Se l’apparecchio spento non viene utilizzato
per più di 48 ore le porte devono restare
aperte per evitare cattivi odori.
L’apparecchio è dotato di un condensatore di
alta qualità integrato nelle pareti laterali del
mobile. E’ quindi normale che le pareti laterali
si riscaldino.
13
Importante!
Se il cavo di alimentazione viene danneggiato, esso deve essere sostituito con un cavo di
tipo corrispondente, fornito dal fabbricante o
dal suo rappresentante incaricato del
servizio.
4. PULIZIA E MANUTENZIONE
La pulizia delle pareti interne deve essere
fatta utilizzando un prodotto per i piatti non
profumato. Scollegare dalla rete elettrica
l’apparecchio durante la pulizia.
Il copri-zoccolo può essere tolto per
permettere di passare sotto al frigorifero con
l’aspirapolvere. Vedere fig. (1) pag. 20.
Non dimenticare di pulire il condotto di scolo
del frigorifero, posto sul retro della macchina
sopra al compressore.
5. IN CASO DI GUASTO
Prima di rivolgersi all’assistenza, verificate:
1. che la presa di corrente sia ben collegata.
2. che il fusibile sia intatto.
3. che ci sia corrente.
4. che il pannello comandi sia opportunamente regolato
5. Spegnere l’apparecchio tramite il termostato per 15 min. Riaccenderlo e dopo 5
min. controllare se c’è formazione di brina
sull’evaporatore.
6. Non aprite le porte troppo spesso. Se la
mancanza di corrente dovesse prolungarsi (oltre le 12 ore), spostare, se possibile
gli alimenti in un altro apparecchio.
6. SICUREZZA
Non introdurre nel frigorifero o nel congelatore dei prodotti contenenti gas, benzina, etere
ecc. che potrebbero dare luogo a delle
esplosioni.
Il frigorifero non più utilizzato può essere
pericoloso per i bambini. Conviene infatti
smontare le porte o sistemare l’apparecchio
in posti inacessibili ai bambini.
14
7. CARATTERISTICHE TECNICHE
Questo apparecchio è conforme alle
disposizioni secondo le seguenti direttive,
direttiva CEE (89/336) e direttiva bassa
tensione (73/23) e loro seguenti aggiunte.
Gli apparecchi domestici che sono venduti
nella UE rispettano inoltre la direttiva per
l’efficienza dell’energia (96/57) e le sue
successive aggiunte.
La targhetta caratteristiche posta sia dietro
che all’interno dell’apparecchio, vedere fig.
(5) pag. 21, riporta diverse informazioni
tecniche ed anche il modello e il numero di
serie.
8. INSTALLAZIONE
Vedere i disegni - fig. (1), (2) pag. 20.
L’apparecchio deve essere sistemato in un
luogo asciutto e in modo da non essere
esposto ai raggi solari o a qualsiasi altra
fonte di calore.
Al momento del posizionamento, l’apparecchio deve risultare stabile e ciò si ottiene
facilmente grazie ai piedini regolabili posti
sulla parte anteriore dello zoccolo.
L’apparecchio non deve essere appoggiato
contro un muro dal lato delle cerniere.
Se installato sopra un tappeto o un pavimento in legno, conviene dopo qualche tempo,
accertarsi che l’apparecchio sia sempre a
livello, in quanto su di una base morbida c’è il
rischio di uno sprofondamento.
L’apparecchio può essere incassato o
combinato con un altro mobile, vedere fig. (2)
pag. 20.
Le dimensioni di incasso sono riportare nel
disegno.
La presa murale con messa a terra deve
essere posta al di sopra o sul lato rispetto
all’apparecchio.
Le eventuali prescrizioni locali relative
all’installazione dell’apparecchio devono
essere osservate.
In caso di temporale, si possono verificare
interruzioni di corrente. Fare attenzione agli
apparecchi posti in seconde case o altrove
dove un’interruzione di corrente non può
essere constatata immediatamente.
Il fabbricante si riserva il diritto di cambiare o
modificare le estetiche e le caratteristiche
tecniche in qualsiasi momento e senza
preavviso.
Se il frigorifero deve essere
livellato:
9. Reversibilità Incernieramento
porta.
Fig. (1) pag. 20.
Prendere lo zoccolo con entrambe le mani;
sollevarlo ed estrarlo ruotando la
parte inferiore.
Pag. 22.
1) Smontare la cerniera superiore che
servirà sempre da cerniera superiore dal
lato opposto. Smontare la porta
superiore.
Regolare l’inclinazione del
frigorifero
2) Rimuovere lo zoccolo.
Fig. (1) pag. 20.
girando il piedino regolabile con una chiave
da 13 mm.
Regolazione della porta
Fig. (1) pag. 20.
Se la porta sbatte contro il pannello di fondo,
questo si può rimediare regolando i piedini
nel modo illustrato nel disegno.
Posizionamento affiancato
Fig. (2) pag. 20.
Vale per tutti i modelli.
In modo analogo, la distanza minima da altre
fonti di calore deve essere anch’essa di
almeno 30 mm.
Svitare le 3 viti che fissano la cerniera
inferiore. La cerniera, girata di 1800, va
rimontata nella parte opposta del fondo.
3) Svitare le viti nel mezzo. Montare la porta
inferiore e dopo la cerniera nel mezzo.
4) Prima di rimontare lo zoccolo invertire gli
inserti posti ai suoi estremi e che
servono a coprire i fori.
5) Allineamento della porta superiore.
Svitare le viti dalla cerniera superiore e
regolare il lato.
6) Cambiare il lato delle maniglie.
ELIMINAZIONE
DELL’APPARECCHIO
L’apparecchio contiene materiali che
possono essere riciclati. Quando sarà
venuto il momento di disfarsi dell’apparecchio potete pendere contatto con il
vostro comune, che vi informerà come è
prevista la raccolta e il riciclaggio di
questo apparecchio.
15
INHOUD
1.
2.
3.
4.
5.
6.
7.
8.
9.
Alvorens uw toestel in werking te stellen.
Het gebruik.
Algemene raadgeving.
Onderhoud.
Indien uw toestel niet werkt.
Veiligheid.
Technische gegevens.
Installatie.
De draairichting van de deuren wijzigen.
1. ALVORENS UW TOESTEL IN
WERKING TE STELLEN
Alvorens u uw toestel voor de eerste keer in
gebruik neemt, dient u eerst goed na te
kijken of het geen transportschade heeft
opgelopen. Bij eventuele schade verwittigt u
onmiddellijk de winkelier, waar u het toestel
gekocht heeft. Maak de buiten en
binnenkant van uw toestel schoon met water
en een zacht, reukloos reinigingsmiddel en
wrijf droog. Gebruik nooit schurende
middelen, staalwol of gelijkaardige
producten.
Voor de elektrische aansluiting, verwijzen wij
naar de hoofdstukken (7) en (8).
2. GEBRUIK
Zie fig. (1) pagina 21 voor het
bedieningspaneel
1. lamp
2. thermostaatknop
3. groen controlelampe toeskel onder
spanning
De thermostaatknop is regelbaar van 0
(stop) tot 7 (koudste stand). Regel de
thermostaatknop om de gewenste
temperatuur te bekomen te beginnen van
stand 4.
1. Dit apparaat wordt geleverd als een
vrijstaand apparaat en is niet geschikt
voor inbouw of tussenbouw indien de
wanden van het apparaat te dicht tegen
de muren of kasten staan.
Nadat het apparaat is geplaatst door uw
leverancier de stekker er tenminste 24uur
niet in doen. Dit in verband met het tot
rust komen van de gebruikte
koelvloeistoffen. Het wel eerder aansluiten
zal in veel gevallen direct schade tot
16
gevolg hebben voor het syteem en valt
niet onder de garantie bepalingen.
Geconstateerde defecten aan kunstof en
glas onderdelen en vervoersschade
dienen dezelfde dag van bezorging door u
aan uw leverancier te worden gemeld. De
normale fabrieksgarantie is geldig voor
alle electrische en koeltechnische
onderdelen. Kunstof en glas en
gloeilampjes vallen derhalve nimmer
onder de garantie bepalingen van dit
apparaat mits dat bij bezorging is
vastgesteld. Breuk door/tijdens gebruik en
onjuist handelen met het apparaat vallen
nimmer onder de garantie.
Plaats koelkasten altijd waterpas met de
neiging tot licht achterover hellend. Dit is
beter voor de afwatering van het
condenswater naar de compressor.
Maak het apparaat eerst schoon alvorens
de stekker er in te doen met een
handwarme doek en niet agresief
reinigingsmiddel.
Zet de thermostaten op stand 4-5 en stel
deze 48 uur later naar boven of beneden
bij indien nodig. Stand 1 is de minder
koude en stand 7 de meest koude stand.
Apparaten nooit te strak inbouwen of
tussenplaatsen. Houdt rondom het
apparaat tenmimste 10cm ruimte vrij om
de verdamperwarmte goed te laten
ventileren. Te strak tussengeplaatste
apparaten kunnen storingen in het
koelsysteem veroorzaken.
2. Deuren nooit te zwaar belasten. Gebruik
de liggende zijden zoveel als mogelijk voor
zware artikelen en producten.
De metalen oppervlakten nooit
schoonmaken met een schuurmiddel.
Gebruik hiervoor een zachte doek met
een niet agressief reinigingsmiddel.
Oppervlakten met droge doek navrijven.
Het meten en controleren van koel en vries
temperaturen dient te geschieden met geijkte
gereedschappen.
stap 1: leg de thermometer in het midden van
het apparaat bijna tegen de achterwand
stap 2: laat het apparaat vervolgens minimaal
een nacht gesloten
stap 3: na openen van het apparaat direct de
thermometer raadplegen
stap 4: de thermostaat hoger instellen indien
u een koudere temperatuur
wilt. stad 1=minder koud en stand 7 = het
koudst. De ingestelde stand van de
thermostaat is afhankelijk van hoeveel er in
het apparaat zit en hoeveel deze per dag
geopend wordt. Adviesstand voor normaal
gebruik is stand 4-5.
Het koelkastgedeelte
Laat warme levensmiddelen eerst afkoelen
alvorens ze in de koelkast te plaatsen. Alle
voedingswaren dienen verpakt of afgedekt te
worden. De ontdooiing gebeurt automatisch.
Het ontdooiwater stroomt naar een
opvangbakje dat zich boven de compressor
bevindt, waar het verdampt..
Het voorraadgedeelte
Het voorraadgedeelte van de koelkast is te
vergelijken met de vroegere provisiekast.
Dankzij de glazen scheidingsplaat ligt de
temperatuur in dit gedeelte hoger dan in de
koelkast : tussen +8°C en +12°C.
Kelderruimte:
De kelderruimte van de kast werkt als
ouderwetse provisiekamer.
De temperatuur varieert tussen +8°C en
+12°C.
Temperatuurregulatie kelderruimte:
Koel- en kelderruimte worden van elkaar
gescheiden door een glasplaat. De glasplaat
is middenin de kast geplaatst.
l Luchtschuif open = lagere temperatuur.
l Luchtschuif dicht = hogere temperatuur.
3. ALGEMENE RAADGEVING
De rekjes in de koelkast zijn verstelbaar fig.
(4) pagina 21.
De deurvakjes evenals, het boter- en
kaasvakje zijn uitneembaar fig. (2) pagina 21.
Indien u de koelkast voor meer dan 48 uren
niet gebruikt laat u de deur op een kier staan
om muffe geuren te vermijden.
Het toestel is voorzien van een ingebouwde
condensor van hoogstaande kwaliteit.
Daarom voelen de zijpanelen warm aan. Dit
is volledig normaal.
Voor een goede werking van het
voorraadgedeelte dienen de glazen
rekken enkel geplaatst te worden in de
gleuven die voorzien zijn van een
ingebouwde stop.
Binnenverlichting
Het toestel is voorzien van een systeem dat
de binnenverlichting van de koelkast uitschakelt wanneer de deur voor een abnormaal
lange tijd openstaat. Als u de deur enkele
minuten sluit, wordt het systeem
uitgeschakeld en gaat het licht weer normaal
branden.
Een haak plaatsen
Om te vermijden dat de koelkast, naar voren
zou kantelen, wanneer de deur van de
koelkast te zwaar geladen is, kunt u een haak
plaatsen. Bevestig ze aan de achterzijde op
80-100 mm van de linker of rechterkant van
het toestel, afhankelijk van de zijde waar de
scharnieren bevestigd zijn. De haak dient
altijd aan de tegenovergestelde zijde van de
scharnieren geplaatst te worden.
Belangrijk !
Indien het snoer beschadigd is, dient deze
vervangen te worden door een snoer van
hetzelfde type, beschikbaar bij de verdeler.
Temperatuurregulatie:
Met de luchtschuif boven de groentelade
kunnen de temperatuur en de vochtigheid in
de groenteladen worden geregeld.
l Luchtschuif open: temperatuur en
vochtigheid worden verlaagd.
l Luchtschuif dicht: temperatuur en
vochtigheid worden verhoogd.
17
4. ONDERHOUD
8. INSTALLATIE
Gebruik enkel een reukloos reinigingsmiddel
om de binnenwanden van uw toestel te
reinigen. Alvorens u uw toestel reinigt,
schakelt u het uit en trekt u de stekker uit het
stopcontact. De plint kan verwijderd worden
om de vloer schoon te maken fig. (1) pagina
20. Vergeet niet het afvoerbuisje in de
diepvriezer eveneens schoon te maken.
Zie tekeningen (1) en (2) pagina 20.
Plaats uw toestel in een droge ruimte waar
het niet blootgesteld is aan rechtstreeks
zonlicht of een andere warmtebron. U kan
uw toestel gemakkelijk waterpas plaatsen
met behulp van de regelbare voetjes aan de
voorkant. Het toestel mag niet met de kant
van de scharnieren tegen een wand staan.
Wanneer u het toestel op een tapijt of een
houten vloer plaatst, is het aangeraden na
een tijdje na te gaan of het toestel niet zakt in
de zachte vloerbekleding.
U mag uw toestel inbouwen of als “side by
side” plaatsen fig. (2) pagina 20.
Voor een voldoende luchtcirculatie rond het
toestel is het nodig een ruimte van 50 mm te
voorzien boven het toestel fig. (2) of een
ruimte boven de bovenste kast.
Op de tekening vindt u de inbouwafmetingen.
Om veiligheidsredenen is het aangeraden
een geaard contactdoos op minstens 2 meter
hoogte te plaatsen. De plaatselijke
veiligheidsregels dienen ook in acht genomen
te worden.
Tijdens een onweer is het mogelijk dat de
stroom uitvalt. Hiermee dient rekening
gehouden te worden wanneer het toestel in
een weekendhuis geplaatst is of daar waar
men niet onmiddellijk merkt dat de stroom
uitgevallen is.
5. INDIEN UW TOESTEL NIET
WERKT
Alvorens een vakman te raadplegen, moet u
eerst controleren of
-
de stekker goed in het stopcontact zit
de zekering niet gesprongen is
er geen stroomuitval is
de temperatuurregeling correct is ingesteld
Zet uw toestel ongeveer 15 minuten af (bvb
door regeling van de thermostaatknop).
Schakel het terug aan en controleer na 5
min. of er ijsvorming is op de verdamper.
Open de deur enkel indien nodig. Indien de
panne meer dan 12 uren duurt, is het
aangeraden de voedingswaren (indien
mogelijk) in een andere toestel te bewaren.
6. VEILIGHEID
Bewaar geen ontplofbare stoffen in de
koelkast, zoals gas, aanstekers, petroleum,
ether of gelijkaardige producten.
Afgedankte koelkasten kunnen een gevaar
betekenen voor spelende kinderen.
Verwijder daarom de deur of plaats uw
koelkast zo, dat kinderen er niet in
opgesloten kunnen raken.
7. TECHNISCHE GEGEVENS
Dit toestel beantwoordt aan volgende
normen:
89/336/EEC, 73/23/EEC. Huishoudelijke
toestellen verkocht in de Europese Unie
beantwoorden aan de normen 96/57/EEC
Het typeplaatje dat zich op de achterzijde en
aan de binnenkant van het toestel bevindt fig.
(5) pagina 21 geeft belangrijke technische
informatie evenals het type en het
serienummer van het toestel.
18
Constructie en toebehoren kunnen gewijzigd
worden zonder voorafgaande verwittiging.
Het toestel waterpas plaatsen
Zie tekening (1) pagina 20
Neem de plint met beide handen vast, til het
op en kantel het naar beneden. Met behulp
van een moersleutel van 13 mm draait u de
regelbare voetjes totdat uw toestel loodrecht
staat.
Deur afstellen
Zie tekening (1) pagina 20
Als de deur tegen het voetpaneel aankomt,
kan dit worden verholpen door de pootjes af
te stellen (zie tekening).
Als 2 apparaten naast
elkaar worden gezet
(Zie tekening (2) pagina 20)
De afstand tot andere warmteafgevende
apparatuur moet ook minimaal 30 mm zijn.
9. HET WIJZEGEN VAN
DEUROPHANG
Pagina 22
1) Bovenste scharnier demonteren. Wordt
later aan de andere zijde gemonteerd.
Nu kunt u de bovenste deur uitnemen
door deze omhoog te bewegen.
2) Verwijder het voetpaneel.
Monteer het onderscharnier met de 3
schroeven. Draai het onderscharnier 180º
en monteer op de andere kant.drehen
und auf der entgegengesetzten Seite
montieren.
3) Afstellen van de onderste deur: Draai de 3
schroeven van het onderscharnier los en
verschuif het onderscharnier naar de
gewenste kant Haal de schroef aan en
monteer het voetpaneel.
4) Monteer het voetpaneel. Monteer de
Afdekplaatjes aan de andere kant.
5) Bovendeur kan in lijn afgesteld worden
door het scharnier lets los te draaien
waardoor de deur als gewenst kan
worden afgesteld.
6 Handgrepen aan de deuren overzetten.
Het toestel bestaat uit
recycleerbaar materiaal.
Wij adviseren u contact op te nemen
met de plaatselijke autoriteiten voor
inlichtingen voor afvalverwerking en de
beschikbare voorzieningen.
19
Fig 1.
600
600
50
50
50
Fig 2.
20
1560
1560
600
610
3
1
2
0
1
7
2
6
5
3
4
Fig 1.
Fig 2.
Fig 3.
Fig 4.
Fig 5.
21
CHANGE OF HINGE SIDE
CHANGEMENT DU SENS D’OUVERTURE DES PORTES
CAMBIO DEL SENTIDO DE APERTURA DE LAS PUERTAS
REVERSIBILITÀ INCERNIERAMENTO PORTA.
HET WIJZEGEN VAN DEUROPHANG
22
¿
√
¡
ƒ
¬
≈
ƒ
¿
≈
¡
¬
√
23