1
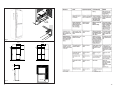
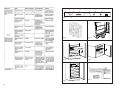
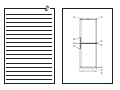
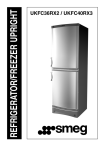
Full One-year Warranty
Equator undertakes to the consumer-owner to repair or, at Equator Corporation’s
discretion, to replace any part of this product that proves to be defective in
workmanship or material under normal personal, family or household use, in the
USA or Canada for a period of one year from the date of original purchase.
General
Since it is the responsibility of the consumer-owner to establish the warranty
period by verifying the original purchase date, Equator Corporation recommends
that a bill of sale, delivery slip or some other appropriate payment record be kept
for that purpose. This warranty gives you specific legal rights, and you may also
have rights, which vary from state to state.
Exclusions
In no event shall Equator be liable for incidental or consequential damages or for
damages resulting from external causes such as abuse, misuse, incorrect
voltage or acts of God, or improper installation, neglect, including damage due to
improper cleaning and/or maintenance or improper handling damage.
This warranty does not cover service calls, which do not involve defective
workmanship or materials covered by this warranty. Accordingly, diagnosis and
repair costs for a service call, which does not involve defective workmanship or
materials will be the responsibility of the consumer-owner.
Equator will repair or replace at our discretion products that malfunction due to
defective workmanship or materials. Most work is covered. The defining factor is,
has the machine malfunctioned (Equator is responsible) or has the customer
omitted or done something to cause machine to malfunction (customer is
responsible.) Some states do not allow the exclusion or limitation of incidental or
consequential damages, so the above limitation or exclusion may not apply to
you.
Contact Information
EQUATOR APPLIANCES
Equator Plaza
10067 Timber Oak Drive
Houston, TX 77080-7045
Phone:
(713) 464-3422
Toll Free:
(800) 935-1955
Fax:
(713) 464-2151
E-Mail
[email protected]
[email protected]
Web Site
www.equatorappliances.com
95.63.400.01
REFRIGERATOR/UPRIGHT FREEZER
WARRANTY
INSTRUCTIONS FOR USE
Model numbers:
CRF 1200 W - CRF 1200 S - CRF 1200 B
COMMERCIEL
Please read these brief instructions carefully before using
appliance. This manual contains important information that will
help you obtain the best performance from your appliance.
Save all accessories supplied with the appliance.
Contents
1.
2.
3.
4.
5.
6.
7.
8.
9.
2
Before installing the refrigerator/freezer.
How to use the appliance.
General Information on the use of the appliance.
Maintenance.
Troubleshooting
Safety
Technical data.
Installation.
Moving the door hinge
19
1. Before installing the
refrigerator/freezer
Be sure that the appliance is undamaged.
Report any shipping damage to your
dealer immediately.
Wash the cabinet and interior with a mild
unscented detergent and wipe dry. Do not
use abrasive scouring powder, still wool or
similar cleaning agents.
Connecting the electrical supply: see
section (7) and (8).
2. How to use the appliance
Control panel: See fig. (1) page 7.
1. Refrigerator light
2. Thermostat knob for refrigerator section
3. Thermostat knob for freezer section
4. The control lamp emits a green light,
when the power is on
5. The control lamp emits a yellow light,
when the fast-freeze switch is activated
6. Deep-Freeze button
7. Thermometer for freezer section
8. The control lamp emits a red light/
flashes red, when the temperature is
too high. The control lamp might emit a
red light or flash during the freezing
process - this is normal
The thermostat is adjustable from 0 (off) to
7 (coldest). It is recommended that you set
the thermostat to position 4 when you first
use it, then adjust the temperature as
needed until the desired temperature is
achieved.
The refrigerator section
Never store hot food in the cabinet.
Remember to always wrap or place food in
sealed containers before placing into
refrigerator.
The evaporator section of the refrigerator
defrosts automatically. The melted ice
flows into a tray on top of the compressor
where it evaporates.
The freezer section
Control Panel. See fig. (1) page 7.
Deep-Freeze: Push the button (6). The
18
yellow light will turn on and the deepfreezing process begins. Push the button
(6) again when the food is frozen solid, and
the yellow light will turn off. Deep-freezing
more than 6 1/2 pounds of food will require
approximately 24 hours.
It is important that the deep-freezing takes
place as quickly as possible. Therefore,
food should be at room temperature when
placed in freezer.
Consult a manual or handbook to find out
the best procedures and packaging materials for deep-freezing.
Food should be arranged to allow maximum
contact with the freezing shelf. Open the
door only when necessary. The alarm light,
fig. (1) page 7 indicates when the alarm is
on. If the light is on, the alarm will sound if
the temperature is too high.
Please note that the ice cubes, if consumed
immediately after removal from the freezer,
may result in freezer-burn. Ice cubes should
be allowed to warm slightly before consumption.
Defrosting
Items in the freezer will cause frost to form.
A thin layer of frost does not affect the
performance of the freezer.
Loose frost may be removed carefully with
a plastic or wooden scraper. Never use a
knife or other sharp tools. When the layer of
frost on the shelves is 1/4" - 1/2" thick, the
freezer should be defrosted.
Note: The layer of frost on the front edge of
the top-freezing shelf may grow slightly
thicker.
To Defrost:
Turn off the freezer.
Remove food and wrap in newspaper, a
blanket or similar insulating material and
store them in as cold a place as possible.
Place a bowl of hot, but not boiling, water in
the freezer.
Unfold the drain spout, attach the enclosed
extension and place a bowl under it, fig. (3)
page7.
Wipe out the cabinet with a towel or dry
cloth when the frost has melted.
3
3. General Use of the appliance
The shelves of the refrigerator section are
adjustable, fig. (5) page 7.
The door rack and the butter- and cheeseboxes are also adjustable, fig. (2) page 7.
Pull to open freezer shelf door.
To remove the drawers, lift them over the
stop pins, fig. (4) page 7.
If the appliance is not going to be used for
more than 48 hours the doors should be
left open to avoid odors.
The appliance is equipped with a high
quality condenser, which under normal
circumstances may cause the exterior
sidewalls of the appliance to be slightly
warm.
Lighting
Under normal circumstances, the interior
light of the refrigerator comes on when the
door is opened and turns off when closed.
As an energy saving feature, the appliance
is equipped with a switch that turns off the
light if the door is left open or ajar for an
unusually long period. After the door has
been closed for a few minutes, the switch
turns off and the interior light will operate
normally.
Important
If the power cord is damaged it must be
replaced with a cord of the same type by
an authorized service technician.
4. Maintenance
Use only unscented detergents when
cleaning the interior of the refrigerator/
freezer.
When cleaning the interior, turn off and
unplug the appliance.
The trim skirt at the foot of the appliance
can be removed to facilitate cleaning of the
floor under the appliance. See fig. (1) page
6.
The drain in the refrigerator must be
cleaned periodically.
4
DISPOSAL OF THE
APPLIANCE
The appliance contains recyclable
materials. When disposing of the
appliance, please contact the service
agent or other appropriate authority in
your municipality. They can inform you
of the collection and recycling measures used in your community.
If your old refrigerator is still around
the house but not in use, be sure to
remove the doors. This will reduce the
possibility of danger to children.
Do not allow children to climb, stand
or hang on the shelves in the refrigerator. They could damage the
refrigerator and seriously injure
themselves.
5. Troubleshooting
Before calling a service agent, make sure:
the appliance is properly plugged in
the fuse is intact
the power has not been turned off
all controls are correctly set
the freezer is not over-filled with food.
Set the thermostat to 0 and leave appliance
turned off for 15 minutes. Turn the thermostat back down to begin cooling again.
After five minutes check for frost on the
evaporator.
Do not open the refrigerator unless necessary. If the break lasts a long time (more
than 12 hours) store food in another
freezer. Most food, if thawed on the outside
but otherwise solid, can be re-frozen.
17
6. Safety
Do not store gas, cigarette lighters, ether
or other explosive substances in the
refrigerator.
Discarded refrigerators may become
dangerous to children at play. Doors must
be removed so that children cannot
become trapped in the cabinet.
Never store liquids containing carbon
dioxide in the freezer section.
7. Technical Data
This appliance meets the provisions of the
following directives:
89/336/EEC (electromagnetic compatibility),
73/23/EEC (electrical equipment designed
for use within certain voltage limits) as
amended.
Household appliances sold in the EU also
meet 96/57/EEC (energy efficiency requirements) as amended.
The rating plate, which is placed either at
the back or inside the appliance, see fig. (7)
page 7, provides various technical information as well as type and serial number.
8. Installation
See illustrations (1) and (2) page 5. Install
the appliance in a cool, dry place. The
appliance should not be exposed to direct
sunlight or any other heat source.
Leveling
Level the appliance by adjusting the feet at
the front edge of the base. If installing the
unit on a carpeted or wooden floor you
should re-adjust the legs after a few days
to allow for any settling.
The refrigerator should not be rest against
a wall on its hinged side
The refrigerators can be built in or placed
side-by-side with other appliances as long
as there are 2 inches between each unit.
There must be 4 inches of open space
above the unit to allow for proper airflow.
See fig. (2a) and (2b) or an air duct that
leads the air up over the top of the cupboard, see fig. (2c).
16
Ensure that the refrigerator door can be
opened far enough so that all drawers can
be opened and/or removed from the
appliance. See fig (2e).
Dimensions for installing a built-in unit are
not included in this manual.
For safety reasons, grounded wall sockets
should be installed at least six feet from the
floor.
Any local installation rules for large appliances must be observed.
The power supply to the unit can be
interrupted due to storms or other events.
You should be aware of this when installing
the appliance in a location where a power
outage will not be immediately noticed.
Construction and details, accessories and
specifications in this manual are subject to
change without notice.
If the cabinet is to be adjusted:
See drawings (1) page 6
Take hold of the front panel with both
hands. Then lift up the front panel and turn
out the bottom part.
Adjust the tilt of the unit
See drawings (1) page 6
by turning the adjustable feet with a 13 mm
spanner.
5
Fig 1.
23,6
4
4
4
23,6
0,4
2
Fig 2.
6
min. 25
15
4
8
6
!
S
7
1
0
0
Fig 2.
Fig 4.
Fig 6.
14
0
1
7
2
6
2
6
5
Fig 1.
2
1
7
..-10.....-20.....-30..
S
3
3
4
5
3
4
5
Fig 3.
Fig 5.
Fig 7.
7
9. CHANGE OF HINGE SIDE
1) Remove top hinge and set
aside. Lift upper door off of
mounting peg and
remove.
4) Remove the screws in the
middle of the new side.
Mount the bottom door
and attach the hinge.
5)
2) Remove the middle
hinge. Lift off the bottom
door. Re-attach the
hinge screws.
Adjusting the bottom door: Loosen the
3 screws in the bottom hinge and push
the bottom hinge
to the required
side. Tighten the
screws and mount
the kick panel.
6) Bottom door adjustment: Move the
4 screws in the bottom angle iron
to the desired side. Tighten
screws and mount the
skirting board.
3) Remove the kick panel.
a) Only for appliances
with a door closer on
the bottom door. The
door closer is moved
to the second hole.
b) The bottom hinge is
dismounted at the 3
screws. The hinge is
turned 90° and
mounted
on the opposite side.
8
7) Top door adjustment:
Loosen the screws in
the door hinge on top
of the door. Loosen the
hinge above the door
and turn the hinge to
the desired position.
Tighten the screws.
8) Move the handle.
13
➆
➀
➇
➃
➇
➁
➃
➂
➄
➅
12
9
10
11