1
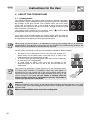
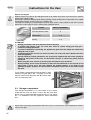
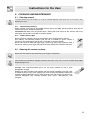
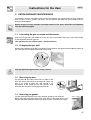
Table of Contents
1.
PRECAUTIONS FOR SAFETY AND USE______________________________________4
2.
INSTALLING THE APPLIANCE______________________________________________6
3.
DESCRIPTION OF FRONT PANEL CONTROLS ________________________________8
4.
USE OF THE COOKING HOB______________________________________________10
5.
USING THE OVEN ______________________________________________________11
6.
CLEANING AND MAINTENANCE ___________________________________________13
7.
EXTRAORDINARY MAINTENANCE _________________________________________15
THESE INSTRUCTIONS ONLY APPLY TO THE COUNTRIES OF DESTINATION WHOSE
IDENTIFICATION SYMBOLS ARE LISTED ON THE COVER OF THIS MANUAL.
INSTRUCTIONS FOR THE INSTALLER: these are intended for the qualified engineer who is to check
the gas supply system and install, commission and test the appliance.
INSTRUCTIONS FOR THE USER: these provide recommendations for use, a description of the controls
and the correct procedures for cleaning and maintaining the appliance.
3
Presentation
1. PRECAUTIONS FOR SAFETY AND USE
THIS MANUAL IS AN INTEGRAL PART OF THE APPLIANCE. TAKE GOOD CARE OF IT AND
KEEP IT TO HAND THROUGHOUT THE COOKER'S LIFE CYCLE. WE URGE YOU TO READ THIS
MANUAL AND ALL THE INFORMATION IT CONTAINS CAREFULLY BEFORE USING THE
COOKER. ALSO KEEP THE SET OF NOZZLES PROVIDED IN A SAFE PLACE. INSTALLATION
MUST BE CARRIED OUT BY QUALIFIED STAFF IN COMPLIANCE WITH THE RELEVANT
REGULATIONS. THIS APPLIANCE IS INTENDED FOR HOUSEHOLD USE AND COMPLIES WITH
THE EEC DIRECTIVES CURRENTLY IN FORCE. THE APPLIANCE IS BUILT TO PROVIDE THE
FOLLOWING FUNCTION: COOKING AND HEATING FOODS; ALL OTHER USES ARE TO BE
CONSIDERED IMPROPER.
THE MANUFACTURER DECLINES ALL LIABILITY FOR USES OTHER THAN THOSE STATED
ABOVE.
NEVER LEAVE PACKAGING RESIDUES UNATTENDED IN THE HOME.
SEPARATE WASTE PACKAGING MATERIALS BY TYPE AND CONSIGN THEM TO THE
NEAREST SEPARATE DISPOSAL CENTRE.
THE APPLIANCE MUST BE CONNECTED TO EARTH IN COMPLIANCE WITH ELECTRICAL
SYSTEM SAFETY REGULATIONS.
THE PLUG TO BE CONNECTED TO THE POWER SUPPLY LEAD AND THE RELATIVE SOCKET
MUST BE OF THE SAME TYPE AND COMPLY WITH THE RELEVANT REGULATIONS.
THE POWER SUPPLY SOCKET MUST BE ACCESSIBLE EVEN AFTER THE APPLIANCE HAS
BEEN BUILT-IN.
NEVER DISCONNECT THE PLUG BY PULLING ON THE POWER SUPPLY LEAD.
IMMEDIATELY AFTER INSTALLATION, CARRY OUT A QUICK TEST ON THE APPLIANCE
FOLLOWING THE INSTRUCTIONS PROVIDED LATER IN THIS MANUAL. IF THE APPLIANCE
FAILS TO OPERATE, DISCONNECT IT FROM THE ELECTRICAL MAINS AND CONTACT YOUR
NEAREST SERVICE CENTRE.
NEVER ATTEMPT TO REPAIR THE APPLIANCE.
AFTER EACH USE, ALWAYS CHECK THAT THE CONTROL KNOBS ARE TURNED TO THE
(OFF) POSITION.
NEVER PLACE INFLAMMABLE OBJECTS IN THE OVEN: IF IT SHOULD ACCIDENTALLY BE
SWITCHED ON, THIS MIGHT CAUSE A FIRE.
THE NAMEPLATE WITH THE TECHNICAL DATA, SERIAL NUMBER AND MARK IS IN A VISIBLE
POSITION INSIDE THE STORAGE COMPARTMENT.
THE NAMEPLATE MUST NEVER BE REMOVED.
NEVER PLACE PANS WITH BOTTOMS WHICH ARE NOT PERFECTLY FLAT AND SMOOTH ON
THE HOB PAN STANDS
THE APPLIANCE BECOMES VERY HOT DURING USE. TAKE CARE NOT TO TOUCH THE
HEATING ELEMENTS INSIDE THE OVEN.
4
Presentation
THE APPLIANCE IS INTENDED FOR USE BY ADULTS. KEEP CHILDREN AT A SAFE DISTANCE
AND NEVER ALLOW THEM TO PLAY WITH IT.
WHEN THE GRILL IS IN OPERATION, ACCESSIBLE PARTS MAY BECOME VERY HOT: KEEP
CHILDREN AT A SAFE DISTANCE.
IF THE APPLIANCE IS MOUNTED ON A STAND, IT MUST BE INSTALLED IN SUCH A WAY THAT
IT CANNOT SLIP OFF.
ATTENTION: IF THE SURFACE OF THE CERAMIC COOKTOP IS CRACKED. SWITCH OFF THE
APPLIANCE, IMMEDIATELY DISCONNECT FROM MAINS AND CONTACT THE NEAREST
SERVICING CENTRE.
THIS APPLIANCE IS TAGGED UNDER EUROPEAN DIRECTIVE 2002/96/EC ON WASTE
ELECTRICAL AND ELECTRONIC EQUIPMENT (WEEE).
THIS DIRECTIVE CONTAINS THE REGULATIONS GOVERNING THE COLLECTION AND
RECYCLING OF DECOMMISSIONED APPLIANCES THROUGHOUT THE EUROPEAN UNION.
BEFORE THE APPLIANCE IS PUT INTO OPERATION, ALL THE LABELS AND PROTECTIVE
FILMS APPLIED INSIDE OR OUTSIDE MUST BE REMOVED.
The manufacturer declines all responsibility for injury or damage caused by failure to comply with
the above regulations or deriving from tampering with even just one part of the appliance and the use
of non-original spare parts.
5
Instructions for the installer
2. INSTALLING THE APPLIANCE
The appliance must be installed by a qualified engineer in compliance with the relevant regulations.
Depending on the type of installation, it is in class 1 (Fig. A) or class 2 - sub-class 1 (Fig.B-C).
It may be installed against walls one of which is higher than the worktop surface, at least 50 mm from
the side of the appliance, as shown in the installation class drawings A and B. Wall units or extractor
hoods installed above the appliance's work-top must be at least 750 mm above it.
A
Built-in Appliance
B
Free-Standing Installation
C
Appliances with gas cylinder compartment and electric oven may only be installed in freestanding mode (see fig. B).
2.1 Wall fixing (on some models only)
•
•
•
•
6
Stretch out the chain attached to the cooker
horizontally so that the other end touches the
wall.
Mark the wall in the position where the hole is to
be drilled.
Drill the hole, insert a wall plug and attach the
chain.
Move the cooker up against the wall.
Instructions for the installer
2.2 Electrical connection
Check that the voltage and size of the power supply line are as specified on the nameplate inside the
storage compartment.
This nameplate must never be removed.
If a permanent connection to the electrical mains is used, the appliance's power supply line must be
fitted with an omnipolar breaking device with contact breaking gap of at least 3 mm located in an
easily accessible position close to the appliance itself.
Complete wiring up to power supply with an appropriately rated five-core plug (see data plate) or, in
case of operation from a 230-240V∼ power supply, with a three-core plug. Make sure that plug and
wall socket are of the same type and are in conformity with regulations in force. Make sure that the
appliance is properly earthed. Before powering, check that the power line is properly earthed. Avoid
using adapters or shunters.
For operation on 400/415V3N∼: use an H05RR-F / H05RN-F /
H05V2V2-F type five-core cable (5 x 2.5 mm2).
For operation on 400/415V2N∼: use an H05RR-F
H05V2V2-F type five-core cable (cavo di 4 x 2.5 mm2).
/ H05RN-F /
For operation on 230/240V∼: use an H05RR-F
H05V2V2-F (cavo di 3 x 4 mm2).
/ H05RN-F /
The cable end to be connected to the appliance must be provided with
an ground wire (yellow-green) at least 20 mm longer.
The manufacturer declines all responsibility for damage to persons or things caused by
non-observance of the above prescriptions or by interference with any part of the appliance.
7
Instructions for the User
3. DESCRIPTION OF FRONT PANEL CONTROLS
All the cooker's control and monitoring devices are placed together on the front panel. The table
below provides the key to the symbols used.
FRONT RIGHT-HAND
COOKING ZONE
ELECTRIC OVEN THERMOSTAT
REAR RIGHT-HAND COOKING
ZONE
OVEN FUNCTIONS
REAR LEFT-HAND COOKING
ZONE
FRONT LEFT-HAND COOKING
ZONE
If the cooker is equipped with an electronic programmer, before using the oven check that the
symbol appears on the display; see point “8.1 Setting the time".
COOKING HOB CONTROL KNOB
Standard heating
The circle next to each knob indicates the hob cooking position that will be
activated. To adjust the heat, press and turn the knob to the desired position.
Adjustment is continuous so that the appliance also operates at any intermediate
value. To turn off, return the knob to 0.
Double heating
The circle next to each knob indicates the cooking zone it controls. To heat the
inner cooking zone, press and turn the knob to the desired position.
To heat both the inner and outer cooking zones, turn the knob to
; and then
release. The knob will thus return to 12. To adjust heating intensity, rotate the
knob anticlockwise to the desired position. To return to heating of the inner
and then turn to the desired position.
cooking zone only, set the knob back to
To switch off, return knob to .
8
Instructions for the User
ELECTRIC OVEN THERMOSTAT KNOB
(ON SOME MODELS ONLY)
The cooking temperature is selected by turning the knob clockwise to the
required setting, between 50° and 260°C.
The orange light comes on to indicate that the oven is heating up. This light goes
out when the set temperature is reached. When it flashes at regular intervals, the
temperature inside the oven is being kept constantly at the set level.
STATIC ELECTRIC OVEN FUNCTION KNOB
The electric oven's various functions are suitable for different cooking modes.
After selecting the function required, set the cooking temperature using the
thermostat knob.
OVEN LIGHT
WIDE GRILL FUNCTION
STATIC OVEN FUNCTION
GRILL FUNCTION
BOTTOM HEATING ELEMENT
FUNCTION
GRILL + ROTISSERIE FUNCTION (ON
MODELS WITH ROTISSERIE)
TIMER KNOB
(ON SOME MODELS ONLY)
To use the timer, set the buzzer by turning the knob clockwise.
The numbers correspond to minutes (maximum 55 minutes).
Setting is on a gradual scale and intermediate positions between the numbers
can be used. The end of cooking buzzer does not turn off the oven.
9
Instructions for the User
4. USE OF THE COOKING HOB
4.1 Cooking zones
The appliance features 4/5 cooking zones of different diameter and power.
Their position is clearly indicated by circles and the heat given off is defined by
the markings on the glass surface. The 5 cooking zones are of the HIGHLIGHT type and come on after a few seconds of being activated. Heating
intensity can be adjusted by means of the knobs located on the front panel
from a minimum to a maximum.
The cooking zones marked by two concentric circles ( ) feature double
heating either within the inner circle or both circles.
The 4 signal lamps located between the cooking zones come on when the
temperature of one or more of the heating zones exceeds 60°C. The lamps go
off upon temperature dropping to below approximately 60°C.
When using for the first time, it is advisable to heat up the cooking hob to its maximum
temperature for enough time so as to burn off any possible oily manufacturing residues, the
smell of which could otherwise be absorbed by the food.
For best results and energy saving, only use receptacles suitable for electric cooking:
•
•
•
The bottom of the receptacles must be very thick and perfectly flat;
before placing on the cooking hob, make sure that it, as well as the
cooking hob itself, are perfectly clean and dry.
To avoid scratching of the cooking hob, never use cast-iron receptacles
or receptacles with a rough bottom.
To avoid waste of energy, make sure that the diameter of the
receptacle bottom is the same as that of the circle marked on the
cooking hob.
Take care not to spill sugar or sweet mixtures on to the cooking hob when
hot. Never place materials or substances which may melt (plastic or
aluminium foil) on to the cooking hob. In the event, promptly switch off and
remove the molten material with the scraper provided while the top is still
warm to prevent it from being damaged. Failure to instantly clean the
ceramic cooktop could lead to encrustations which are impossible to
remove once the hob has cooled down.
Important.
Beware of children in the vicinity as the signal lamps indicating residual heat are out of sight
to them. In fact, even after having been turned off, the cooking hob remains hot for a certain
period of time.
Make sure that children never touch the cooking hob.
10
Instructions for the User
5. USING THE OVEN
In models with electronic programmer, before using the oven, check that the display is showing the
symbol.
In models with analogue clock and timer knob, locate on the
symbol.
5.1 Precautions and General Advice
When the oven and grill are used for the first time, they should be heated to the maximum
temperature for long enough to burn off any oily residues left by the manufacturing process, which
might contaminate foods with unpleasant smells. After an interruption in the electricity supply, the
programmer display flashes at regular intervals, showing
ELECTRONIC PROGRAMMER”.
. For setting instructions, see point "8.
Oven accessories which may come into contact with foods are made from materials compliant with
directive 89/109/EEC of 21/12/88 and relevant national regulations.
WARNING: the gas oven's door must be open when lit. The oven is fitted
with a safety system which cuts out burner ignition if the door is closed. If
you mistakenly attempt to light the burner with the door closed, open the
door and wait a few moments before trying again.
To avoid unpleasant contact with any steam inside the oven, open the door in
two stages: hold it half-open (about 5 cm) for 4-5 seconds, then open it
completely. If you have to carry out any procedures on foods, leave the door
open for as short a time as possible to prevent a drop in the oven temperature
which will impair the cooking results.
5.2 Ventilated system
The oven is equipped with a cooling system which automatically comes on upon the oven being
turned on.
Fans cause a steady outflow of air from above the door which may continue for a brief period of time
even after the oven has been turned off.
5.3 Using the grill
For short cooking procedures, such as the final crisping of meat which is already cooked, select the
static grill function
/
and turn the thermostat knob to the maximum temperature.
5.3.1 Operation of the grill + rotisserie
The static grill functions allow cooking in combination with the rotisserie. Fit the spit rod into the
rotisserie bushing, select the
grill function and turn the thermostat knob to the temperature
required. (never exceed 200° C).
5.3.2
Using the rotisserie in cookers with normal oven
Place the rotisserie shelf "B" on the second
pair of runners from the bottom and fit the rod
"A" into the hole in the back of the oven.
On some models the rotisserie is an optional and is not supplied as standard. It is available on
request from an Authorised Service Centre.
11
Instructions for the User
How to use the grill
When the oven has come on (the red light comes on to confirm this), leave it to heat up for 5 minutes
before placing foods inside.
Seasonings should be added to foods before cooking. Foods should also be coated with oil or melted
butter before cooking. Use the oven tray to collect juice.
The foods for cooking must be placed on the oven shelf, which is then placed on one of the runners
fitted in the various types of ovens, following the guidelines below:
FOODS
SHELF ON RUNNER
Flat, thin pieces of meat
3
Rolled roasts
2–3
Poultry
2–3
ATTENTION
•
•
•
•
•
•
•
Grilling processes must never last more than 60 minutes.
In models with electric oven, the oven door must be closed during grill and grill +
rotisserie cooking operations.
To prevent hazardous overheating, the appliance's glass lid must always be raised when
using the oven or grill.
Accessible parts may be very hot during and after use of the grill; keep children well away
from the appliance.
During rotisserie cooking operations, one of the pans supplied with the cooker should be
placed on the bottom of the oven, on the bottom runners, to collect any grease and fat
produced.
When using the oven, remove all unused pans and shelves from its interior.
During cooking, do not cover the bottom of the oven with aluminium or tin foil, and do not
place pans or trays on it; this may damage the enamel coating. If you wish to use
greaseproof paper, position it so that it does not interfere with the hot air circulation inside
the oven.
If your cooker is equipped with knob guard bar, when
cooking using the grill or grill + rotisserie it must be
fitted as shown here, fitting the rods “B” into the slots
“A” in the top of the oven.
5.4 Storage compartment
The storage compartment is in the bottom of
underneath the oven. To open it, pull on the top
Never use it to store flammable materials such as
etc.; it is intended to take the appliance's metal
only.
the cooker,
of the door.
rags, paper,
accessories
Never open the storage compartment when the oven is on and still hot. The temperatures inside it
may be very high.
12
Instructions for the User
6. CLEANING AND MAINTENANCE
6.1 Cleaning enamel
To keep enamel in good condition, it must be cleaned regularly, after each use of the cooker, after
allowing it to cool.
6.1.1
Routine daily cleaning
When cleaning and caring for enamelled surfaces always use only specific products which do not
contain abrasives or chlorine-based acids.
Instructions for use: pour the product onto a damp cloth and wipe over the surface, then rinse
thoroughly and dry with a soft cloth or chamois leather.
6.1.2 Food stains or spills
Never use metal scouring pads or sharp scrapers which will damage the surface.
Use ordinary non-abrasive products with the aid of wooden or plastic utensils if
necessary. Rinse thoroughly and dry with a soft cloth or chamois leather.
Do not allow spills of foods with high sugar content (e.g. jam) to dry inside the oven. If
they dry for too long, they might damage the enamel coating of the inside of the oven.
6.2 Cleaning the ceramic cooktop
Before any intervention, disconnect the power supply of the device
The cooking hob should be regularly cleaned; best after every use, once the residual heat signal
lamps have gone off.
Smudges from aluminium-bottom pans can be easily cleaned off with a cloth
dampened in vinegar.
Remove any burnt residues after cooking with the scraper provided; rinse with water
and wipe dry with a clean cloth. Regular use of the scraper considerably reduces the
need for chemical detergents for the daily cleaning of the hob. Never use abrasive or
corrosive detergents (e.g. cleaning powders, oven sprays, spot-removers, wire
sponges).
13
Instructions for the User
6.3 Cleaning the oven
To keep the oven in good condition, it must be cleaned regularly, after allowing it to cool down.
Remove all removable parts.
Clean the oven shelves with hot water and non-abrasive detergents, rinse and dry.
6.4 Door glazing
The glass in the door should always be kept thoroughly clean. Use absorbent kitchen roll; remove
stubborn dirt with a damp sponge and ordinary detergent.
14
Instructions for the User
7. EXTRAORDINARY MAINTENANCE
Occasionally, the oven will require minor servicing procedures or the replacement of parts subject to
wear and tear, such as gaskets, light bulbs, etc. The specific operations for each procedure of this
kind are provided below.
Before carrying out any operation involving access to live parts, disconnect the appliance
from the electricity supply.
7.1 Lubricating the gas oven taps and thermostat
Over time, the gas taps and thermostat of the gas oven may become stiff or jam. Clean their insides
and change their lubricating grease.
This operation must be carried out by a skilled technician.
7.2 Changing the light bulb
Remove the protective cover A by unscrewing it anti-clockwise and replace the bulb B with another of
the same type (25 W). Replace the protective cover A.
Use only light bulbs approved for ovens (T 300°C).
7.3 Removing the door
Lift the levers B and take hold of the two sides of the
door with both hands close to the hinges A. Raise the
door to an angle of about 45° and remove it. To
reassemble, fit the hinges A into their grooves, then
lower the door into place and engage the levers B.
7.4 Removing the gasket
To allow thorough cleaning of the oven, the door gasket can be removed.
Before removing the gasket, remove the oven door as described above. Once
the door has been removed, lift the tangs at the corners as shown on the right.
15