1
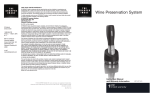
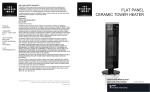
SI Products
Service Center
1.888.856.6781
8:30a.m. – 7:00p.m. (EST)
M–F
Mail To: SI Products
Consumer Relations
Service Center Dept. 168
3000 Pontiac Trail
Commerce Township, MI
48390
e-mail:
[email protected]
ONE YEAR LIMITED WARRANTY
SI PRODUCTS sells its products with the intent that they are free of defects in manufacture and
workmanship for the life of the original purchaser from the date of original purchase, except as noted
below. SI PRODUCTS warrants that its products will be free of defects in material and workmanship
under normal use and service. This warranty extends only to consumers and does not extend to
Retailers.
To obtain warranty service on your SI PRODUCTS product, mail the product and your dated sales
receipt (as proof of purchase), postpaid, to the following address:
SI PRODUCTS Consumer Relations
Service Center Dept. 168
3000 Pontiac Trail
Commerce Township, MI 48390
No COD's will be accepted.
SI PRODUCTS does not authorize anyone, including, but not limited to, Retailers, the subsequent
consumer purchaser of the product from a Retailer or remote purchasers, to obligate SI PRODUCTS
in any way beyond the terms set forth herein. This warranty does not cover damage caused by
misuse or abuse; accident; the attachment of any unauthorized accessory; alteration to the product;
improper installation; unauthorized repairs or modifications; improper use of electrical/power supply;
loss of power; dropped product; malfunction or damage of an operating part from failure to provide
manufacturer’s recommended maintenance; transportation damage; theft; neglect; vandalism; or
environmental conditions; loss of use during the period the product is at a repair facility or otherwise
awaiting parts or repair; or any other conditions whatsoever that are beyond the control of SI
PRODUCTS.
This warranty is effective only if the product is purchased and operated in the country in which the
product is purchased. A product that requires modifications or adoption to enable it to operate in any
other country than the country for which it was designed, manufactured, approved and/or authorized,
or repair of products damaged by these modifications is not covered under this warranty.
THE WARRANTY PROVIDED HEREIN SHALL BE THE SOLE AND EXCLUSIVE WARRANTY. THERE
SHALL BE NO OTHER WARRANTIES EXPRESS OR IMPLIED INCLUDING ANY IMPLIED WARRANTY OF
MERCHANTABILITY OR FITNESS OR ANY OTHER OBLIGATION ON THE PART OF THE COMPANY WITH
RESPECT TO PRODUCTS COVERED BY THIS WARRANTY. SI PRODUCTS SHALL HAVE NO LIABILITY FOR
ANY INCIDENTAL, CONSEQUENTIAL OR SPECIAL DAMAGES. IN NO EVENT SHALL THIS WARRANTY
REQUIRE MORE THAN THE REPAIR OR REPLACEMENT OF ANY PART OR PARTS WHICH ARE FOUND TO
BE DEFECTIVE WITHIN THE EFFECTIVE PERIOD OF THE WARRANTY.
NO REFUNDS WILL BE GIVEN. IF REPLACEMENT PARTS FOR DEFECTIVE MATERIALS ARE NOT
AVAILABLE, SI PRODUCTS RESERVES THE RIGHT TO MAKE PRODUCT SUBSTITUTIONS IN LIEU OF
REPAIR OR REPLACEMENT.
This warranty does not extend to the purchase of opened, used, repaired, repackaged and/or resealed
products, including but not limited to sale of such products on Internet auction sites and/or sales of
such products by surplus or bulk resellers. Any and all warranties or guarantees shall immediately
cease and terminate as to any products or parts thereof which are repaired, replaced, altered, or
modified, without the prior express and written consent of SI PRODUCTS.
This warranty provides you with specific legal rights. You may have additional rights which may vary
from state to state. Because of individual regulations, some of the above limitations and exclusions
may not apply to you.
For more information regarding our product line in the USA, please visit: www.siproducts.com
For service or repair - do not return this unit to the retailer.
Contact SI PRODUCTS Consumer Relations at 1-888-856-6781.
©The Sharper Image. All rights reserved. THE SHARPER IMAGE name and logo are registered
trademarks.
©2009 THE SHARPER IMAGE and its affiliated companies, all rights reserved. THE SHARPER IMAGE is a
registered trademark of THE SHARPER IMAGE and its affiliated companies. All rights reserved.
IB-KPW400
Adjustable Temperature
Control Wine Chiller
Instruction Manual and
Warranty Information
KP-W400
Enjoy your wine at the perfect temperature every time.
Thank you for purchasing The Sharper Image® Adjustable Temperature Control Wine
Chiller. This product, along with the entire The Sharper Image collection, connects
innovation with cutting-edge design to provide you with years of dependability and
enjoyment. Now you can spend less time waiting for wine to chill and more time entertaining
and enjoying your favorite bottle with family and friends. .
IMPORTANT SAFEGUARDS
WHEN USING ELECTRICAL PRODUCTS, ESPECIALLY WHEN CHILDREN ARE
PRESENT, BASIC SAFETY PRECAUTIONS SHOULD ALWAYS BE FOLLOWED,
INCLUDING THE FOLLOWING:
READ ALL INSTRUCTIONS BEFORE USING
DANGER - TO REDUCE THE RISK OF ELECTRIC SHOCK:
• Always unplug the appliance from the electrical outlet immediately after using and
before cleaning.
• DO NOT reach for an appliance that has fallen into water. Unplug it immediately.
• DO NOT use while bathing or in the shower.
• DO NOT place or store appliance where it can fall or be pulled into a tub or sink.
• DO NOT place in or drop into water or other liquid.
• NEVER use pins or other metallic fasteners with this appliance.
• Keep dry - DO NOT operate in a wet or moist condition.
Caution: All
servicing of
this product
must be
performed
by
authorized
SI Products
Service
Personnel
only.
• Close supervision is necessary when this appliance is used by or
near children, invalids or disabled persons.
• Use this appliance only for its intended use as described in this
manual. Do not use attachments not recommended by The
Sharper Image; specifically any attachments not provided with the
unit.
• NEVER operate this appliance if it has a damaged cord or plug,
if it is not working properly, if it has been dropped or damaged,
or dropped into water. Return it to SI Products Service Center for
examination and repair.
• Keep cord away from heated surfaces.
• NEVER drop or insert any object into any opening.
• DO NOT operate where aerosol (spray) products are being used or
where oxygen is being administered.
• DO NOT operate under a blanket or pillow. Excessive heating can
occur and cause fire, electrocution or injury to persons.
• DO NOT carry this appliance by the power cord or use cord as
handle.
• To disconnect, turn all controls to the “off” position, then remove
plug from outlet.
• This appliance is designed for personal, non-professional use only.
• DO NOT use outdoors.
SAVE THESE INSTRUCTIONS
WARNING - TO REDUCE THE RISK OF BURNS, ELECTRIC SHOCK, FIRE
OR INJURY TO PERSONS:
• An appliance should never be left unattended when plugged in. Unplug from outlet
when not in use and before putting on or taking off parts or attachments.
2
3
Adjustable Temperature Control Wine Chiller –
Operation Instruction
Fig. 1
Removable Bottle
Top Cover
LCD Panel
Display
Function Buttons
SELECT
Power Button
AC Adaptor
LCD layout
Wine Preset
Temperature
Chilling
1) Preparation for First Time Use
Unpack and locate the following items:
– Wine bottle chiller unit
– AC / DC power supply adaptor (Fig.1)
2) Setting ºF and ºC Temperature
• Plug the DC power jack of the AC/DC power adaptor to the DC socket of the
wine chiller; then connect the AC plug of the power supply adaptor to a main
outlet.
• Press both power button and SELECT button
simultaneously and hold for two seconds; the LCD will
display the default in Fahrenheit ‘F ‘ (flashing) and
‘ C’ (solid). Use the left symbol and right symbol
buttons to change between the ‘ F’ and ‘ C‘ (Fig. 2).
• Press SELECT button to accept the flashing option
and set for ‘F’ or’ C’. The wine chiller will restart
Fig. 2
automatically.
3) Using the Wine Chiller
• Plug the DC power jack of the AC/DC power adaptor to the DC socket of
the wine chiller; then connect the AC plug of the power supply adaptor into a
main outlet (Fig1).
• Place a bottle of wine into the wine chiller and cover with the top cover (Fig.3).
Current Wine
Temperature
Remaining
Chilling Time
Menu Text Area
4
Fig. 3
5
• Press power button once to switch the chiller on. When power is on, the
LCD displays ‘ WELCOME’ in blue back light for 3 seconds (Fig. 4).
Fig. 4
• Next, the screen displays ‘LAST – TYPE – LIB’ and ‘LAST’ will now start
flashing (Fig.5). The screen menu gives you three options for finding and
selecting your wine and proper preset temperature.
1) The ‘LAST‘ selection recalls the last wine setting previously used.
2) TYPE’ allows you to select by grape type; red, white or champagne. 3) ‘LIB’ selection is the wine library for selecting wine by country first and the grape type.
Note: To make a choice select an option at any time in the menu, push ‘SELECT’
button when that option is flashing on the screen.
3.1) Selecting Last Temperature Setting
To repeat the same chilling temperature as the previous use, simply select ‘LAST’
when it is flashing and press SELECT button and the chiller will recall the previous
setting and start chilling the wine immediately.
3.2) Selecting by Type
• To select by the wine type press arrows until ‘TYPE’ option is flashing
on the screen and press SELECT. Screen will display ‘RED- WHT- CHAMP’
(Fig.5). ‘RED’ will start flashing first. Press right symbol button or left
symbol button to move between options. Press SELECT to accept the
option you want when it is flashing. When the flashing selection is accepted
the ice icon will flash and unit will start to chill bottle. (refer to Fig.6 showing
Champagne as example)
Fig. 6
Fig. 7
NOTE: Each type of wine has a general preset temperature based on wine type,
45ºF / 7ºC for Champagne, 48ºF / 9ºC for white wine and 64ºF / 18ºC for red
wine.
Fig. 5
6
3.3) Selecting Wine by Country
• Use arrows to scroll between options
on opening screen (Fig.5) until ‘LIBRARY’ is
flashing. Press ‘SELECT’ button. The screen
will display ‘COUNTRY-TYPE’ (Fig.8) The
‘COUNTRY’ icon will flash. Press right
symbol button once and the ‘TYPE’ will start
flashing. Press SELECT button to accept the
flashing option you want.
7
Fig. 8
• To select wine by ‘COUNTRY’, press SELECT when the option is flashing and
the screen will display countries in alphabetical order.
• Press or left/right symbol button to scroll through the ‘COUNTRY’ menu
list. Press SELECT button to accept the appropriate country name as it
appears.
COUNTRY LIST
ARGENTINA
AUSTRALIA
CHILE
FRANCE
GERMANY
ITALY
NEW ZEALAND
SOUTH AFRICA
SPAIN
USA
• Press the or left / right symbol button once to select the next or previous
wine in the library.
• Press and hold the or left/right symbol button to move forward or
backward through selections. At the end of the list, there is an “EXIT” option
so that you can select it to return to the wine library menu or press the arrow
button to return to the top of the wine list of the same country.
• At the end of every list, there is an “EXIT” option so that you can select it to
return to the wine library menu or press the arrow button to return to the top of
the wine list of the same country.
4) When the correct wine is found in the menu, press SELECT to accept that
selection. The wine name and pre-set temperature will stop flashing. Then, the
wine chiller will begin to operate.
Once the country is selected, the screen display will show red or white for
selection. Once red or white has been selected the wine names will be displayed
on the screen. Wines and preset temperatures are stored in the wine chiller
memory for each country.
For example: Select ‘ITALY’; then ‘RED’; then “AMARONE’ and its preset
temperature will display on the LCD by flashing (Fig.9).
Fig. 9
NOTE: User can amend the preset temperature in mid-process before the chiller
begins to operate with the or left and right symbol button. While the wine
name and preset temperature are still flashing, press the right arrow button
once, to increase the preset temperature by one degree, and press the left
symbol button once to reduce the preset temperature by one degree. Then press
‘SELECT’.
5) Start COOLING/WARMING
The cooling fan runs at its highest speed with ice icon flashing. The wine chiller will
show the wine temperature after 4 minutes. The estimate remaining chilling time is
represented by the status bar underneath the current temperature (Fig.10).
Fig. 10
– Four bars, “60+ MIN”, “30 MIN” and “0 MIN” icons are on if the estimate
remaining chilling time is 60 minutes.
– Three bars, “30 MIN” and “0 MIN” icons are on if the estimate remaining
chilling time is less than one hour and more than 45 minutes.
– Two bars, “30 MIN” and “0 MIN” icons are on if the estimate remaining chilling
time is less than 30 minutes and more than 15 minutes.
– Single bar and “0 MIN” icons are on if the estimate remaining chilling time is
less than 15 minutes.
6) Ready to serve
When the actual temperature reaches the pre-set temperature, "READY" will
display on the lower LCD screen (Fig.11 and the ice icon will stop flashing. The
wine chiller will then sound 3 beeps.
Fig. 11
The temperature will be maintained at pre-set temperature automatically. The
cooling fan will switch to a lower speed automatically to minimize the fan noise.
• Press SELECT button once at any time after the unit is powered on and the
wine chiller will return to the wine library menu.
• To turn chiller off, press power button and hold for 1 second. Chiller will
beep once and turn off automatically.
MAINTENANCE
To Store
You may leave the unit on display or you can store it in its box in a cool, dry place.
To Clean
Use only a soft dry cloth to clean the enclosure of the unit. NEVER use liquids or
abrasive cleaner to clean.