1
Address Utility - Data Input Tools
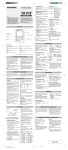
Click [Address Utility] on the Main Screen to open the Address Utility window.
Entering Address
Command Buttons
New button
Save button
Clears existing entries in Address Entry
fields in preparation for a new entry. (Cursor
will be located in the Last Name field.)
1.
Pressing [New] opens a blank form for creating a new
entry.
2.
Enter the following new Address entry:
Last Name
First Name
Company
Title
Work#
FAX#
E-mail1
Places the data you have entered into the
Waiting field.
3.
When you have finished entering the information, click
[Save].
The data you have entered will appear in the Waiting field.
Jones
Pat
SHARP CORPORATION
Supervisor
201-654-6546
201-654-6547
[email protected]
Address Entry fields
Waiting field
Queues data waiting to be
transferred to your TM-20.
Note:
The [Save] function cannot be used if both Last Name and
First Name fields are blank.
Scroll bar
Scrolls the Waiting field from right to left
(top to bottom) for easier viewing.
Done button Closes this window.
Option button
Opens the Communication Port
(COM Port) options window.
Send button
Delete button
Transfers the data in the Waiting field to your TM-20.
Deletes selected data from the Waiting field.
Appendix
Address Utility - Data Input Tools
Editing Waiting Data
You can edit Waiting items before you send them to the TM-20.
1.
2.
3.
First make sure that no entry is in any of the Address
Entry fields. These fields should all be blank.
In the Waiting field, select the item you want to edit and
then double-click. The item you have selected will return
to the Address Entry field.
After you are finished making changes, click [Save] to
update the Waiting item.
Note:
• If you double-click on a piece of data in the Waiting
field while data is in any of the Address Entry fields,
the data in the Address Entry fields will disappear.
Deleting Waiting Data
You can delete items from the Waiting field.
To delete single items,select the item from the Waiting field and
click [Delete].
To delete multiple items, press Control while clicking each item in
the Waiting field, then click [Delete].
To delete a contiguous block of items, select the first item, press
and hold the Shift key while selecting the last item to delete in the
list. Then click [Delete].
Click
Transferring Waiting Data
1.
2.
3.
4.
Connect your TM-20 to your PC and place the TM-20 in
PC Link mode. Refer to “Placing the TM-20 in PC Link
Mode” in this Guide.
On your PC, open the Address Utility window.
Make sure that the TM-20 is in PC Link mode, then click
[Send] to start the data transfer.
When the data transfer is complete, a Transfer Complete
message will appear on your PC. Items which have
been transferred will be deleted from the Waiting field.
Q&A
Q: Can I make entries on my TM-20 and send them to my PC
and then edit them using the Address Utility?
A: No. You can only send data from your PC to your TM-20.
Q: If I turn off my PC with data remaining in the Waiting field,
will the data be kept?
A: Yes. Data remaining in the Waiting field will not be lost if
you turn off your PC. When you restart your PC, you will
see the data remaining in the Waiting field, and you can
continue data entry or data transfer.
Any entries in the Address Entry fields will, however, be
lost if you turn off your PC.
Q: Even when I select [Auto Detect] on the COM Port setting
window, an error message appears and no COM Port is
selected. What should I do?
A: If you are using a notebook PC, check BIOS and set the
port to the serial port. There are cases when a port cannot
be selected automatically even if BIOS is set correctly. In
such a case, you must select an available port manually.
Customer Support
www.sharp-usa.com Sharp Web Site
Information and FAQs
1-630-378-3590
Sharp Customer Assistance
Center (7am to 7pm CST M-F)