1
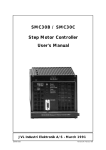
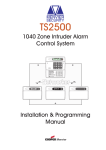
TS2000
Installation & User Guide
Compatible Equipment
CPA6 OM - Output Module
9040 - Loudspeaker
DC54/58 - Digital Communicators
496529 Issue A
1 of 20
TS2000
TS2000
OVERVIEW
Introduction
and a 40 character display to allow operators to
control the system.
The Intruder Alarm Control System TS2000 is provided for
large domestic and general commercial intruder
systems conforming to BS 4737 part 1 1986. It is an
extremely versatile system with the following facilities:
1. Will monitor up to 128 zones using various types of
detector device;
2. Will provide up to 136 output signals whose
The system will consist of a CP connected, via the
Control Network, to up to 32 NU’s and or REM’s so
providing up to 128 circuits and programmable outputs
each of wh o s e f u n c t i o n i n g an d u s e ar e
pre-programmed. At least one REM is required to control
the system.
CP Options
response may be programmed;
3. May be programmed to provide a large number
Additional boards may be fitted to the CP as follows:
of operational options and facilities.
As the system is microprocessor controlled it must be 1. Serial Interface Board (SlB): Provides a serial output:
programmed initially to select the required user options
(a) RS232 format for a serial printer;
such as number of zones, type of alarm and time of
(b) RS232 format to any suitable equipment;
operation. The general principle of operation is to
monitor protected zones, each having a detection 2. Parallel Interface Board (PIB): Provides up to eight
circuit, to detect the circuit status, then to respond
output ports which may be programmed to respond
accordingly. As each zone has a circuit the terms Zone
to system activity and which can also be used to
and Circuit may be considered as being synonymous
provide o u t pu t s t o a s e par at e Di g i t al
but the term Circuit is generally used. Circuits may also
Communicator. It also has a (telephone) Line Fault
be grouped into wards.
input port.
3. Digital Communicator type DC3 (Digicom): Will
Equipment
The system consists of a number of units that are
interconnected by a Control Network:
1. Control Panel (CP): This is the controlling panel for the
system which:
transfer status information from the CP to a
dedicated Central Station via PSTN lines. When
activated via any of its eight logic input channels it
will:
(a) Dial one or two telephone numbers;
(b) Transfer an account (identity) number to the
dialled station;
(a) provides power to the system;
(b) communicates with and monitors the state of
(c) Transfer channel status information.
the units connected to the Control Network and Modem type DC3M (Digimodem): Will transfer data over
responds to alarm conditions according to the PSTN lines to any suitable equipment such as a modem
pre-programmed instructions;
for a computer terminal. When activated the system will
(c) provides special outputs to a printer, a Digital dial one or two telephone numbers and will be capable
Communicator, a Modem and other devices if of transferring all commissioning information, event log
data etc., to a remote maintenance centre. The
required.
It has no front panel controls and may be sited at any remote maintenance centre may also call the DC3M
and transfer data to it.
convenient internal location.
2. Node Unit (NU): a unit that is remote from the CP and
is connected to it via the Control Network. It will
monitor the status of up to four circuits and will also
provide up to four programmable outputs which are
controlled by the CP;
3. Remote Keypad Node Unit (REM): has the same
functions as the NU and in addition has a Keyboard
TS2000
2 of 20
496529 Issue A
TS2000
Additional Equipments
Remote Data Transfer
Ward Control Unit (WCU): When fitted the WCU will allow
a group of circuits, which are designated a Ward, to be
Set and Unset using Exit and Entry routes separate from
the system. The WCU is connected to the outputs and
circuits of a REM or a NU and will require a separate 12V
supply.
When fitted with a Digimodem type DC3M the system
may be programmed from a remote location, and log
data transferred to it, using a dedicated program
installed in a Personal Computer at that location. The
use of this facility is protected by a series of passcodes
and user menus.
Printer: An Epson printer P40-S may be connected
temporarily to the CP or to the SlB to provide printout
records. Other printers that accept RS232 serial data
may be permanently connected to the SIB if permanent
records are required.
Power Supply Unit: All power can be supplied from the
TS2000 CP internal Power Supply Unit but in large systems
it may be necessary to fit additional power supply units.
The PSU150 has been designed for use with the TS2000
system and consists of a PSU and battery (supplied
separately) and it may also have a Node Unit and a
Relay Unit fitted in its enclosure.
Output Modules (OM): If remote indicators or Mimic
Panels containing LEDs are required then Output
Modules type CPA6.OM may be connected to the CP.
Each OM unit will drive up to eight LEDs and the units may
be interconnected for large displays. The system may
be programmed so that the LEDs indicate circuit
condition or alarms and ward status if wards are
programmed.
Extension loudspeakers: The REM contain a small
sounder unit to provide an indication of the system
status. If the volume of the sounder is insufficient (e.g. a
louder exit sound is required) then an extension speaker
may be fitted to the NU and this will require a
Loudspeaker Drive Unit type LSD1 to be connected
between the NU and the loudspeaker. A separate 12V
power supply will also be required.
Relay Unit: The NU and REM programmable outputs will
provide current limited drive for various facilities but in
many cases it will be necessary to isolate the system
from the external equipment by driving via relays. Relay
Units type RM3A provide two relays, which may be
energised by NU or REM programmable outputs, and
which provide two sets of ’clean’ change over contacts.
The unit may be fitted separately or in a PSU150 case.
496529 Issue A
3 of 20
TS2000
TS2000
Schematic Block Diagram
PSTN Lines*
Mains input
240V 50Hz
CONTROL
PANEL
Other Option Outputs
Programmable
Option Outputs
Control Network Cable
Programmable
Outputs
S001 - S004
NODE OR
REMOTE KEYPAD
No 1
Detection
Circuits
C001 - C004
Control Network cable
Cable: 6 or 8 core 7/0.2mm2 min.
Max length 100m between units
Programmable
Outputs
S005 -S008
NODE OR
REMOTE KEYPAD
No 2
4 Output Circuits
for WCU
NODE OR
REMOTE KEYPAD
No X
Mains Input
REMOTE
POWER
SUPPLY
UNIT*
3 Detection
Circuits
for WCU
Detection Circuits
C005 - C008
Control Network Cable
Exit/Entry
Circuits
12V l/p
WARD
CONTROL
UNIT*
Control Network Cable
12V Supply
Programmable
Outputs
S125 - S128
NODE OR
REMOTE KEYPAD
No 32 (MAX)
Detection Circuits
C125 - C128
*= Option
Distance between Nodes/Keypads must be less than 100m.
Distance between Control Panel and last Node/Keypad must be less than 1km
Figure 1. TS2000 Schematic Block Diagram
TS2000
4 of 20
496529 Issue A
TS2000
TS2000 System Options - Schematic
P.C.
TS2000
CONTROL
PANEL
C P MAIN BOARD
SIB*
PIB*
Approved
Modem
To PSTN
DC3(M)*
OR DC 3*
To PSTN
PSU
Central
Station
Mains Input
To Epson*
Printer
8 Programmable
outputs
Network
Cable
12V supply
Four Circuits
NODE
UNIT
DC 28
Digicom
PSTN Line
To Serial Printer*
CPA6.OM Unit*
8 Outputs*
CPA6.OM Unit*
8 Outputs*
Other outputs:
Wlk Test, Tamp, Aux, Relay,
Sw12, Strobe
Loudspeaker
Drive LSD1*
Bell (SAB1)
Sounder (ES1)
Loudspeaker*
(Min impedance 8R)
Three Outputs
Network
Cable
PSU Type 150*
One Circuit**
Two Outputs**
*NODE
UNIT
*Relay Unit
RM.3A
Network
Cable
Four Circuits
REM
Four Outputs
PSU
Mains Input
Battery
Two sets relay
clean contact
* = Option
** = Other Circuits & Outputs
used for PSU monitoring
and relay drive.
Ward Control Unit option not shown
Figure 2. TS2000 System Options - Schematic
496529 Issue A
5 of 20
TS2000
TS2000
Equipment
Power Supply
System Specification
Supply Voltage:
Battery:
Zones:
Outputs:
Unit Dimensions: CP
(boxed)
NU/WCU
REM
Unit Weights:
CP
NU/WCU
REM
Environment:
240V + or - 10% 30W 50 Hz
12V 6Ah
128 maximum
128 remote 8 local maximum
L 395 x W 280 x D 100mm
L 145 x W 85 x D 50mm
L 220 x W 145 x D 40mm
4 kg
220 g
430 g
0 - 40°C 95% RH n.c.
The CP is fitted with the system combined Power Supply
and Battery Charger Unit and a battery which will provide
power during a mains failure. Power arrangements are
as follows:
1
Mains input 240V +/- 10%
2 Battery 12V 6Ah Sealed Lead Acid rechargeable
type which is normally float charged at about 13.6V;
3. System regulated supply 12V with a maximum
output of 1.5A. The internal supply is load
protected and the external supply fused;
4. System internal 5V supply;
5. Standby operation during a mains failure depends
upon battery size and the size of the system.
Current consumption may be calculated as
follows:
The CP comprises electronic units inside a white
polycarbonate lid and a steel base which are factory
(a) CP: normal 150mA; alarm 500mA;
assembled to hinge on the left but which may be
(b) Each NU (with 4 circuits connected): normal
reversed if required.
33mA;
The Base Unit contains the mains input terminals and a
(c) Each REM (with 4 circuits connected): normal
mains transformer. Space is provided for a battery and
33mA;
also for a Digital Communicator. Cable entry points are
provided as follows:
(d) Each NU/REM in alarm - load depends upon
Control Panel (CP)
1. Four 20mm knockouts top and bottom;
outputs used;
2. Two Holes for plastic trunking fitted with plastic inserts
top and bottom;
6
3. 13mm round knockouts fitted in the plastic inserts;
4. Four 20 mm round holes in the back.
7
The lid unit contains the Main Control printed circuit
board (pcb) and the Power Supply pcb which are
secured on posts and on which are fitted terminals for
external connections. Option Boards (SIB and PIB) may
8
also be fitted to the main board.
Under normal conditions the unit can be positioned at 9
any location as access will only be required for
maintenance.
TS2000
Power supply fault monitoring is for loss of mains
supply, low system supply voltage and low battery
voltage;
Fuses are fitted on the PSU as follows:
(a) F1: 1A QB for low voltage a.c. input;
(b) F2: 2A QB for 12V dc external output;
In-line Fuseholder: 1A QB for Network 12V supply;
A 1A fused terminal block is fitted for the mains
input.
6 of 20
496529 Issue A
TS2000
Node Unit (NU)
The NU comprises a small two part polycarbonate case
containing a single pcb on which are terminal blocks.
The unit is connected to the control network and is a
control and connecting device for four circuits and four
programmable outputs. It also contains a sounder
output and a sounder mute output. It has no external
controls hence it may be positioned at any convenient
location as access is normally only required for
maintenance. The unit is surface mounted and has
cable entry points in the base top and bottom.
The REM’s are used to control and programme the
system hence they must be positioned at suitable
control positions with easy access.
Ward Control Unit (WCU)
The WCU comprises the same case as the NU and
contains a single pcb on which are terminal blocks. If
fitted the unit acts as a control and interface device to
allow a designated Ward to be Set and Unset using its
own dedicated Exit and Entry route and units. The WCU
may be positioned at any location normally adjacent to
its Exit/Entry devices and to its controlling REM or NU. The
unit is surface mounted and has cable entry points in the
Remote Keypad Node Unit (REM)
base top and bottom. It contains controls for its Ward for
setting the entry time, exit time and settling time and links
The REM comprises a small two part polycarbonate to select the type of exit procedure.
case containing a pcb and the system controls
consisting of:
1. A 15 key tactile keypad for entering data and
System Control Network
programming the system. When in use the keypad is
illuminated;
The CP supplies power to and monitors all the
2. A liquid crystal display (LCD) of two lines of 20 connected NU and REM via a six or eight wire Control
characters each which provides system status Network. Each connected unit is ’daisy chained’ to the
i n f o r m a ti on a nd gi ves direct ions when Network and the maximum permitted distance
between units is 100m but the furthest unit in a full system
programming the system.
is limited to a total cable length of 1 km from the CP.
The unit is connected to the control network and is a
control and connecting device for four circuits and four
programmable outputs. The base contains a terminal
block for all external connections and the unit is fitted
with an internal sounder which provides local alarms
and system status sounds. The unit is surface mounted
and has cable entry points in the base on all four sides.
Network
REM
or
NU
Ward Control Circuits
Ward Control (A)
Last Exit Out (B)
Access Out ( C)
Loudspeaker
12V Supply
Network
Ward Control Outputs:
Ward Set Fail (A)
Ward Exit (B)
Ward Set (C)
Ward Alarm (D)
Ward
Control
Unit
Last Exit/Entry(LX Con)
Access (Acc Con)
Exit Terminate (ET Con)
Figure 3. Ward Control Unit Schematic
496529 Issue A
7 of 20
TS2000
TS2000
8 of 20
DIR
CLK
DAT
For Mimic. Connect to
CPA6.OM module.
LAT
For SAB Tamper.
Link to 0V if not used
TAMP
C
RELAY
INT
0V
INT
+12V
EXT
12V
Fused (F2)
Auxiliary Output
EXT
0V
WLK TST SW 12
BAT
+ve
From Internal
SLA Battery
BAT
-ve
(to the right of the main panel terminals)
Figure 5. Control Panel Power Supply Unit - Connections
Do not use
INT
+5V
NC
STRB
+12V
POWER
INPUT
0V
Connect J3 to JP6 on
Main Board
Connect to 3W strobe.
Output will sink up to 250mA
Connect other side to +12V
12V supply
present when
system is set
Relay contacts are
shown in the
de-energised state.
Connect
Alarm relay is normally
to PIR if
energised and is
required.
de-energised at alarm.
NO
Figure 4. Control Panel Main Board - Connections
+12V OV
Fuseholder fitted with
1A QB fuse for Network
Power
Fuse F1 on the main board
is not fitted.
Power Supply to
Network ONLY
+12V
0V
DIR
+
Connect to Control Network
See Fig 6
.
DOWN DOWN
+
-
TS2000
496529 Issue A
496529 Issue A
9 of 20
Use for Network
power to NU and
REM only
UP -
+12V
0V
NOTE
It is essential that the connectors shown are
correct and that no cross-overs occur.
Incorrect connections may damage the equipment
and or cause intermittent malfunctions.
NOTE: All PSUs must have the same size battery
Power Supply Unit
with standby battery.
12V 1.5A o/p
0V
0V
0V
0v
MAINS
+12V
+12V
+12V
+12V
Dir +
Dir-
Dir +
Dir -
Dir +
Up+
UP -
Dn +
Dn -
0V
+12V
If required extra PSU should
be connected like this to
ensure that the supplies are
not paralleled
Dn -
Dn +
Node or REM
Dir-
UP Dir +
Down -
Up+
Dn +
Dn -
Node or REM
Continue to next unit
Connect PSU where
required
Dir-
Up+
Node or REM
Down +
0V
+12V
Cable 6 or 8 core 7/0.2mm
Maximum length 100m between each unit.
Using 8 core cable will allow the Network
power supplies to be kept separate.
Control
Panel
MAINS
When using 8 core cable use
the two spare cores for non
network power supplies
TS2000
Figure 6. TS2000 Network Connections
TS2000
TS2000
B+
CIRCUIT B
I/P B
CIRCUIT A
MUTE
SOUND
A+
C+
I/P A
I/P C
OUTPUT D SINK 100mA
O/P D
D+
OUTPUT C SINK 100mA
O/P C
I/P D
TO LSD1 FOR SPEAKER DEVICE
CIRCUIT C
CIRCUIT D
+ DIR
O/P A
OUTPUT A
SOURCE
- DIR
O/P B
OUTPUT B
12V 100mA
0v
UP -
+12V
CONNECT TO CP (FIG 4)
OR PREVIOUS UNIT AND TO NEXT UNIT
NOT USED
UP +
SPARE 1
DOWN -
SPARE 2
DOWN +
SPARES ARE NOT CONNECTED INTERNALLY
CONNECT TO
NEXT UNIT (Up)
CONNECT TO CP (FIG 4)
OR TO PREVIOUS UNIT (DOWN)
Figure 7 TS2000 Node Unit - Connections
OUT D
OUT C
OUT B
OUT A
I/P C
+
I/P A
+
I/P B
+
I/P D
+
Connector JP1
Ribbon cable to
REM pcb
Connect to CP (Fig 4)
or to previous unit (Down)
0V
+12V
DIRECTION DIRECTION +
DATA UP DATA UP +
Connect to next unit (Up)
DATA DOWN DATA DOWN +
Connect to CP (Fig 4)
or previous unit and to
next unit
Outputs D & C sink 100mA
Outputs A & B source 100 mA
Circuit C
Circuit A
Circuit B
Circuit D
Figure 8. TS2000 Remote Keypad Node - Connections
TS2000
10 of 20
496529 Issue A
TS2000
W.C.U
To nc contacts of
Access device*
ACCESS
To nc contacts of
Last Exit device
LAST
EXIT
To nc contacts of
Exit Terminator*
ACCESS
To NU/REM Cct C.
C+ and I/P C
OUT
LX
EXIT
TERMINATE
To NU/REM Cct B.
B+ and I/P B
OUT
To NU/REM o/p C
WARD SET
WARD
To NU/REM o/p B
WARD EXIT
CONTROL
To NU/REM o/p A
SET FAIL
To NU/REM o/p D
WARD ALARM
To NU/REM Cct A.
A+ and I/P A
0V
12V power
supply input
+12V
* = options
Programme Outputs as Ward X Outputs:
A = Set Fail
C = Set
B = Exit
D = Alarm
To Loudspeaker
Connect other side to 0V
SPKR
Power supply must be sufficient
to power the Loudspeaker (1A).
Do not use Network power.
Connect 0V to Network 0V.
Programme circuits in ward X
A = Ward Control
B & C = Night
Figure 9 TS2000 Ward Control Unit - Connections
WCU
LK 2
LK1
Exit Mode
Link 1
Link 2
Terminals
Settle Exit
RV3 RV 2
Open
Closed
Timed Set
Last Exit Set*
Last Exit Set
Exit Terminator Set*
Entry
RV 1
Timers:
RV 1 = Entry Time 0 - 255 secs
RV 2 = Exit Time 0 - 255 secs
RV 3 = Exit Settling Time 0 - 40 secs
* Only if link 1 is closed
Figure 10. Ward Control Unit - Layout and Settings
496529 Issue A
11 of 20
TS2000
TS2000
12 of 20
Passive Infra Red
(PIR) Detector
Tamper Sw
4k7
Detector Sw
Switched positive
Output Device
Maximum load
100mA
Output Device
Maximum load
100mA
Tamper Sw
4k7
Detector No2
Detector Sw
Resistor Colours
Yellow Violet Red
4k7 Resistor
Red Red Red
2k2 Resistor
EOL Res
2k2
I/P X
X+
To Node/REM
For PSU monitor circuits connect monitor
lines directly to I/P A or B or C or D and leave
the relevant +ve connection open
Next PIR or Det
Programmable Outputs Connections
0V
Tamper Sw
4k7
Detector Sw
Detection Circuit Connections
Switched negative
To Node/REM
Source O/P
A or B
Sink O/P
C or D
To Node/REM
+12V
I/P X
To Node/REM
X+
I/P
To Node/REM
+
Detector No 1
Box Tamper Connections
0V
Tamper
Switch (nc)
For n.o contacts set
Inverted Attribute
4k7
Tamp
EOL
Res
2k2
Exit Terminator
n.c. (Or n.o.) Contacts
E.O.L. Res
2k2
Tamper Sw
4k7
Detector No n (<11)
Detector Sw
TS2000
Figure 11. TS2000 Circuit and Output Connections
496529 Issue A
TS2000
Key Functions
Engineer Reset
Control Panel Links
1. Enter your engineer’s code default 1234, you are
now in Engineer’s Mode
2. Press 0 in quit to unset.
Link
LK1
Functions
Open: Printer to monitor Network
activity
Closed: Normal; Printer normal
and responds to keypad
commands
LK2
Open: Normal; On-site restart at
power up
Closed:Factory restart at power
up
LK3
DC3 Monitor; Leave closed
JP5
Normally fitted with links
Remove and fit Engineer’s REM if
required.
JP9
Open: Novram battery isolated
Closed: Normal; Novram battery
connected
JP13
Open: Normal
Closed: Soft reset
Loading Defaults
1. Power down panel battery and mains, close LK2
2. Power up panel battery and mains
3. Enter 1234 and open LK2
4. The panel is back to Factory Default Programming.
Bell Test/Walk Test
Please refer to page 19
Memory Default Values
When a CP is shipped from the factory the memory data
default parameters are set to:
1. Circuits: The Type and Attributes Parameters set will
depend upon the number of circuits detected;
2. Passcodes: Engineer 1234: Master 5678: Others
unspecified;
3. Timers: Exit 25 secs: Exit Settling 5 secs: First Entry 30
Fuses
secs: Second entry 30 seconds: Bell delay 5 mins:
Bell Duration 20 mins: Comms Delay 1.5 mins: Lights
Off 5 secs: Mains Off 10 secs: Menu Timeout 30 secs:
Double Knock 10 secs.
Fuse
PSU F1
Value
1AQB
Use
Low voltage
ac input
These values will also be restored if a Factory Restart
occurs.
PSU F2
2A QB
12V external
(auxiliary)
supply
Fuseholder
1A QB
Network 12V
supply
Fused terminal
Block
1A
Mains input
496529 Issue A
13 of 20
TS2000
TS2000
Define Circuit Text
STEP
ACTION
DISPLAY
1
NO*
Press < YES > to
DEFINE CIRCUIT TEXT
REMARKS
Press YES to Define Circuit Text from the dictionary. Press
NO to go to to Install DC3 menu. Press 0 to quit
2
YES
CCT > 001 000 000 000 Press YES to accept displayed data. Press NO to change
it. Enter figures or use arrow keys to enter a new circuit
3
NO
CCT 001 > 000 000 000 Text is to be changed. Enter number of the first word of
text (see dictionary) then press YES to accept it
4
123
CCT 001>123 000 000 First word of text entered. Press YES to accept it
TEXT
5
YES
CCT 001 123 > 000 000 First word accepted and displayed. Repeat the
TEXT
procedure tor the other two words
6
YES
CCT >001 123 456 789 All words entered and accepted. Press YES to go to next
TEXT TEXT TEXT
circuit or use figures or arrows to select another circuit.
Enter 000 to quit
7
000
CCT > 000 NOT VALID
YES to continue
Press YES to go to step 1
8
YES
Press YES to
DEFINE CIRCUIT TEXT
Press NO to go to Install DC3 menu. Press YES to repeat
this menu. Use arrow keys to step through menus. Press 0
to quit
* from last step of previous Menu
TS2000
14 of 20
496529 Issue A
TS2000
TS2000 Dictionary
001
002
003
004
005
006
007
008
009
010
011
012
013
014
015
016
017
A
ABOVE
ACCESS
ACCOUNTS
ADMIN
ALARM
ALERT
ANNEXE
AREA
ART
ASSEMBLY
ASSISTANT
AT
ATTACK
ATTIC
AUTOMATIC
AUXILIARY
018
019
020
021
022
023
024
025
026
027
028
029
030
031
032
033
034
035
036
037
038
039
040
041
042
043
044
045
046
047
B
BACK
BAGGAGE
BAKERY
BALCONY
BALLROOM
BANKING
BAR
BARN
BASEMENT
BATHROOM
BAY
BEAM
BEDROOM
BELL
BELOW
BESIDE
BLOCK
BLUE
BOARD
BODY
BOILER
BOTTOM
BOX
BOYS
BRANCH
BROWN
BUILDING
BUNKER
BY
048
049
050
051
052
053
054
055
C
CABINET
CALL
CANTEEN
CAR
CARGO
CASH
CASHIER
496529 Issue A
056
057
058
059
060
061
062
063
064
065
066
067
068
069
070
071
072
073
074
075
076
077
078
079
CEILING
CELL
CELLAR
CENTRAL
CENTRE
CHAIR
CHANGING
CLASSROOM
CLEANERS
CLERK
CLERKS
COIN
COLD
COLLECTION
COMMUNICATOR
COMPUTER
CONFERENCE
CONTAINER
CONTACT
CONSERVATORY
CORNER
CORRIDOR
COUNTER
CUPBOARD
080
081
082
083
084
085
086
087
088
089
090
091
092
093
094
095
096
097
098
099
100
101
102
D
DARK-ROOM
DATA
DAY
DEPARTURE
DEPUTY
DEPT.
DESIGN
DESK
DETECTOR
DEVELOPMENT
DEVICE
DINING
DIRECTOR
DISPATCH
DOOR
DOUBLE
DOWNSTAIRS
DRAWER
DRAWING
DRINKS
DRIVE
DRUGS
103
104
105
106
107
108
109
110
E
EAST
ELECTRIC
ELECTRONICS
EMERGENCY
END
ENGINE
ENGINEERS
15 of 20
111
112
113
114
115
116
117
ENTRANCE
ENTRY
EQUIPMENT
ESCAPE
EXIT
EXPORT
EXTERNAL
118
119
120
121
122
123
124
125
126
127
128
129
130
131
132
133
134
F
FACTORY
FAILURE
FAR
FEMALE
FENCE
FILING
FIRE
FIRST
FIRST-AID
FLAT
FLOOR
FOR
FOREIGN
FREEZER
FROM
FRONT
135
136
137
138
139
140
141
142
143
144
145
146
147
148
149
150
G
GAMES
GARAGE
GARDEN
GATE
GENTS
GIRLS
GLASS
GOLD
GOODS
GREEN
GROUND
GROUP
GUARD
GUN
GYM
151
152
153
154
155
156
157
158
159
H
HALL
HANGER
HEAD
HEAT
HIGH
HOME
HOT
HOUSE
160
161
162
163
I
IN
INDUSTRIAL
INFORMATION
TS2000
TS2000
TS2000 Dictionary Cont’d
164
165
166
167
168
169
170
INFRA-RED
INSIDE
INSTRUCTORS
INTERIOR
INTO
IRON
IT
171
172
173
J
JANITOR
JUNIOR
174
175
176
177
K
KEEP
KEYPAD
KITCHEN
178
179
180
181
182
183
184
185
186
187
188
189
190
191
192
193
194
195
196
197
198
199
200
201
L
LAB
LADIES
LANDING
LAST
LAUNDRY
LAVATORY
LAWN
LECTURE
LEFT
LEVEL
L.H.S.
LIBRARY
LIFT
LIGHT
LINE
LITTLE
LOADING
LOBBY
LOCK
LOFT
LORRY
LOUNGE
LOW
202
203
204
205
206
207
208
209
210
211
212
213
214
215
216
M
MACHINE
MAGNETIC
MAIN
MAJOR
MALE
MAN
MANAGER
MANAGERS
MASTER
MAT
MEDICAL
MEN
MESS
METAL
TS2000
217
218
219
220
221
222
223
224
225
226
227
METER
MEZZANINE
MICROWAVE
MIDDLE
MILK
MINOR
MOBILE
MODEL
MONITOR
MOULDING
MOVEMENT
228
229
230
231
232
233
234
235
236
N
NEAR
NEW
NEXT
NIGHT
NODE
NURSE
NURSERY
NORTH
237
238
239
240
241
242
243
244
245
246
247
O
OF
OFFICE
OFFICER
OIL
ON
OPEN
ORANGE
OUT
OUTER
OUTSIDE
248
249
250
251
252
253
254
255
256
257
258
259
260
261
262
263
264
265
266
267
268
269
270
P
P.A. BUTTON
PACKING
PAINT
PANEL
PANIC
PARCEL
PARK
PARTITION
PASSIVE
PATH
PATIO
PENTHOUSE
PERIMETER
PERSONNEL
PIR
PIR BY
PIR IN
PIR ON
PLANT
PLAY
POINT
POOL
16 of 20
271
272
273
274
275
276
277
278
279
280
281
282
PORCH
POST
POWER
PRESSURE
PRIMARY
PRIME
PRINT
PROCESSING
PRODUCTION
PUBLIC
PURCHASING
PURPLE
283
284
285
Q
QUALITY
QUIET
286
287
288
289
290
291
292
293
294
295
296
297
298
299
300
301
302
303
304
R
RANGE
READING
REAR
RECEPTION
RECORDS
RED
REFECTORY
REPAIR
RESEARCH
REST
RESTAURANT
REVOLVING
RIGHT
R.H.S.
ROLLER
ROOF
ROOM
ROUND
305
306
307
308
309
310
311
312
313
314
315
316
317
318
319
320
321
322
323
324
S
SAFE
SALES
SCREEN
SEA
SECURE
SECRETARIES
SECRETARY
SECTION
SECURITY
SENSOR
SHAFT
SHED
SHOP
SHOW-ROOM
SHORT
SHUTTER
SIDE
SILENT
SILVER
496529 Issue A
TS2000
TS2000 Dictionary Cont’d
325
326
327
328
329
330
331
332
333
334
335
336
337
338
339
340
341
342
343
344
345
346
347
348
349
350
351
352
353
354
355
356
357
SITE
SITTING
SLIDING
SMOKE
SOFTWARE
SOUND
SOUTH
SPRAY
SPRING
SQUARE
SQUASH
STABLE
STAFF
STAIRS
STAIRWELL
STALLS
STAND
START
STATION
STOP
STORE
STORES
STROBE
STRONG
STUDY
SUITE
SUMMER
SUNDAY
SUPPLY
SURGERY
SWIMMING
SWITCH
SYSTEM
358
359
360
361
362
363
364
365
366
367
368
369
370
371
372
373
374
375
376
377
378
379
380
T
TABLE
TALL
TAMPER
TEA
TEACHER
TECHNICAL
TECHNICIAN
TELLER
TEN
TEST
THE
THEATRE
TICKET
TILL
TO
TOILET
TOOL
TOP
TRACK
TRADE
TRAINING
TRANSPORT
496529 Issue A
381
382
383
384
385
386
TRAP
T.V.
TWIN
TYPE
TYPING
TYRE
387
388
389
390
391
392
393
394
395
U
ULTRA-SONIC
UNDER
UNIT
UP
UPPER
UPSTAIRS
USER
UTILITY
396
397
398
399
400
V
VAN
VAULT
VISUAL
VOLTAGE
401
402
403
404
405
406
407
408
409
410
411
412
413
414
415
416
417
418
419
420
W
WAITING
WALK
WALL
WARD
WAREHOUSE
WASH
WATER
WAY
W.C.
WEAPON
WEEKEND
WEST
WINDOW
WINTER
WITH
WOOD
WORK
WORKS
WORKSHOP
421
X
422
423
424
425
Y
YARD
YEAR
YELLOW
426
427
Z
ZONE
428
429
430
1
IST
10
17 of 20
431
432
433
434
435
436
437
438
439
440
441
442
443
444
445
446
447
448
449
450
451
452
453
454
455
456
457
458
459
460
11
12
13
14
15
16
17
18
19
2
2ND
20
3
3RD
4
4TH
5
5TH
6
6TH
7
7TH
8
8TH
9
9TH
0
!
&
.
TS2000
TS2000
(26)
(27)
Programmable Ouputs
The programmable outputs from the NU and the REM, (28)
are referred to as the Node Outputs and are activated in
response to various conditions or events. They are (29)
programmed to respond to System, Ward or Circuit
activation.
Panel outputs are from the CP and are programmed in
the same way as the Node outputs. Outputs 1 to 8 are
from the Parallel Interface Board, if fitted, and 9 to 16
(30)
are for the DC3 or DC3M Digicom if fitted.
Exit Setting: Final Exit setting is in progress
Exit Error: An error occurred during the exit
procedure and the system cannot set
Lock Alert: The programmed Time Lock period is
about to start;
Fire/Viper: Will provide 12V (100mA source) to
devices which latch when activated and which
are unlatched when power is removed. The
output is removed for about 3 seconds when
unsetting the system after an alarm at the
second passcode entry;
PSU Test: Connected to remote PSU to initiate a
battery test;
The System activated outputs may be allocated to any
CAUTION: It is essential to ensure that the correct
Node (NU or REM) output or the Panel (CP) outputs. They
outputs that will source (supply) or sink (accept) current
are designated by their function and may be
are selected to match the function required.
programmed to be active if required. The following are
available:
(1)
(2)
(3)
(4)
(5)
(6)
(7)
(8)
(9)
(10)
(11)
(12)
(13)
(14)
(15)
(16)
(17)
(18)
(19)
(20)
(21)
(22)
(23)
(24)
(25)
Alarm: A system alarm is present;
P. A.: A Personal Attack circuit or a Duress Alarm
has been activated;
Set: The system is Set;
Fire: A Fire circuit has been activated;
Medical: A Medical circuit has been activated;
Tamper: A Tamper alarm is present;
Aux: An Auxiliary circuit has been activated;
Set Fail: An attempt to set the system has failed;
Site Engr: The Engineer’s passcode has been
entered. The output will remain active until a
User passcode is entered;
Lock-Alarm: The system has not been Set before
the start of the Time Lock period;
Test-Fail: A test failure has occurred;
AC Alarm: The mains supply to the PSU has not
been present for the mains fail time period;
AC Off: The mains supply to the PSU is not
present or there is no 12V output;
Batt Fault: During the PSU test or while the mains
is off the PSU Battery voltage is low.
Bell: The CP bell output is activated;
Strobe: The CP strobe output is activated;
Switch +12: The system is Set and is not in
alarm;
Walk Test +: A Walk Test is in progress (use output
A or B);
Walk Test –: A Walk Test is in progress (use output
C or D);
Line Fault: A Digicom telephone line fault is
present;
Time Switch: The programmed Time Switch is
active;
Time Locked: The system has been Time Locked
and cannot be unset;
Entry Mode: Entry mode has been initiated;
2nd Entry: The first Entry time has timed out
before a passcode entry
Exit Mode: System Exit procedure has been
initiated;
TS2000
Menus Listing in Sequence
18 of 20
NOTES:
Users will enter menus at Menu 1
Engineer will enter menus at Menu 15
User Level 5 (Standard W) can only set and unset
designated wards
Instant access to Menus from a keyboard number
entry applies to Menus 1 to 9 only
Menu 2 is only available if a Ward is Set;
Menu 7 is only available if there are circuits with
attribute omit
Menu 9 is only available if a printer is connected
or the SIB is fitted
Menu 17 is only available if a Ward is defined
Menu 24 is only available if a DC3(M) is fitted
Menu 25 is only available if Engineer Reset is
programmed and a reset is required
(Passcode) Levels:
1 Engineer
2 Master
3 Manager
4 Standard S
5 Standard W
6 Restricted
496529 Issue A
TS2000
Menus Listing in Sequence
User
Eng’r
Menu No
1
Menu
Start Set Sequence
2
Unset Wards
1, 2, 3, 4, 5, 6
3
View Circuits
1, 2, 3, 4, 5, 6
4
View Event Log
1, 2, 3
5
Select Walk Test
1, 2, 3, 4, 5
6
Select Bell Test
1, 2, 3, 4, 5
7
Omit/Enable Circuit
1, 2, 3
8
Use Chime Facility
1, 2, 3
9
Use the Printer
1, 2, 3,
10
Alter Clock
1, 2
11
Alter Passcode
1, 3, 4, 5, 6
12
Define Users
2
13
Alter Time Switch
1, 2
14
Alter Time Lock
1, 2
15
Define Circuits
1
16
Define Outputs
1
17
Review Wards
1
18
Define Ward Alarms
1
19
Define Timers
1
20
Define Panel Modes
1
21
Use Test Options
1
22
User Network Options
1
23
Define Circuit Text
1, 2
24
Install DC3
1,
25
Reset by Remote
2
496529 Issue A
19 of 20
Passcode Level
1, 2, 3, 4, 5, 6
TS2000
TS2000
This page intentionally left blank
TS2000
20 of 20
496529 Issue A