1
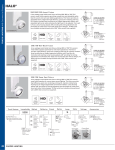
Special Assembly Instructions for StingRay Chopper Fork
Please read these instructions before assembling your StingRay chopper.
Step #1:
Insert one fork leg through the lower crown, and slide it up until it contacts the bolt in the upper crown. Push
the leg up to remove the red stop sign decal from the fork leg. Using a 5mm hex (Allen) wrench align the upper
crown bolt with the fork leg, and tighten upper crown bolt completely into the fork leg. Repeat for other fork leg.
upper fork
crown
remove decal
lower fork
crown
fork
leg
Step #2:
Align the fork legs so that the axle dropouts face
forward. Install front wheel making sure that the
brake arm slot is aligned with the pin on left fork
leg. Be sure that pin slides into slot in brake arm.
Tighten front axle nuts completely.
Step #3:
Using 5mm hex (Allen) wrench, tighten the two
lower fork crown pinch bolts completely. Please
note that these bolts should be tightened until the
fork is secure only, DO NOT OVER TIGHTEN, or
damage to the lower fork crown may occur.
Schwinn® StingRay front and rear reflector assembly:
1) Locate front reflector brackets and screws in the parts box.
2) Assemble clear front reflector to lower fork crown using (2) screws provided. Face reflector forwardand
tighten (2) screws securely. Reflector bracket should be -/+ 3 degrees from vertical (90 degrees).
3) Assemble red rear reflector bracket to rear fender using (2) screws provided. Face rear reflector towards
back of bike, and tighten (2) screws securely.
If you have any questions, please consult your Owner’s Manual or call Pacific Cycle Service Line at 1.800.626.2811
or email Pacific Cycle Service at: service@pacific-cycle.com.
StingRay 3 Speed Band Brake Assembly Instructions
Please read these instructions before assembling your StingRay chopper.
Step #1:
After ffork, front wheel and handlebar are assembled, locate the brake cables. Route rear brake cable between
left fork leg and frame (see photo), and hook the barrel end of the brake cable into the right brake lever as
shown. Align the slots in the adjustment barrel and locking ring in brake lever to insert cable wire into brake
completely. Once cable is installed, rotate the adjustment barrel and locking ring so that they are out of
alignment. (This will keep the brake cable in.)
Step #2:
Repeat for front brake cable by
routing it through the hole in the
lower fork crown, and attach to
the left brake lever.
Step #3:
To attach brake cable to brake; locate the brake cable end barrel
adjuster. Slide the cable wire through the slot in the brake arm, and
seat the barrel adjuster into the brake arm. (see photo)
Step #4:
Locate cable “hook” and pull the cable towards the brake anchor bolt.
Push the brake anchor bolt towards the hook. Attach the hook around
the brake anchor bolt. Check that hook is seated on brake anchor bolt by
squeezing brake lever and watching brake function. Repeat for rear brake.
4
Step #5:
Check brake function. Squeeze each brake lever. Note how far the brake
lever travels before the brake engages. Brake lever should travel less
than distance to handlebar before brake engages. If the brake lever needs
adjustment, rotate the brake barrel adjuster away from brake lever until
brake function is correct. Tighten locking ring against brake lever. Repeat
for other brake.
If you have any questions, please consult your Owner’s Manual or call Pacific Cycle Service Line at 1.800.626.2811
or email Pacific Cycle Service at: service@pacific-cycle.com.
StingRay 3 Speed Shifter Assembly Instructions
Please read these instructions before assembling your StingRay chopper.
Step #1:
1) Carefully remove the packing from right rear axle.
2
Step #2:
Locate the plastic chain guide (with steel roller) and
chain on rear dropout. Remove the plastic chain
guide from dropout and align chain through the
guide per photo. (Note: Chain runs through the
plastic guide same as it is packed.)
Step #3:
Press the plastic guide onto axle aligning the slot in
plastic guide with tab on axle. Make sure chain runs
freely over steel roller.
3
Step #4:
Check that the shifter arm is pushed forward to 3rd
gear (shifter arm has 3 shift locations, forward = 3rd
gear).
Step #5:
Locate shifter cable near rear dropout. Thread the
shifter cable end over the chain until the barrel
bottoms out.
4
Step #6:
Push shifter from 3rd to 2nd to 1st gear to check
cable is properly functioning.
Step #7:
When riding, if shifting hesitates between gears, or
mis-shifts, rotate cable barrel adjuster on frame in or
out to fine tune gears.
5
If you have any questions, please consult your Owner’s Manual or call Pacific Cycle Service Line at 1.800.626.2811
or email Pacific Cycle Service at: service@pacific-cycle.com.