1
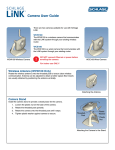
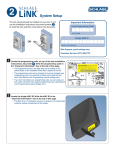
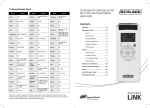
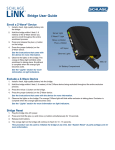
Camera User Guide
There are two cameras available for use with the Schlage
LiNK system.
WCW100
The WCW100 is a wireless camera that communicates
with the Schlage LiNK system through your existing
wireless router.
R
WE
PO
K
OR
TW
NE
WCW100 Wireless Camera
WCE100
R
WE
PO
K
OR
TW
NE
The WCE100 is a wired camera that communicates with
the Schlage LiNK system through your existing router.
!
DO NOT connect Ethernet or power before
enrolling the camera.
WCE100 Wired Camera
For indoor use ONLY!
Wireless Antenna (WCW100 Only)
Rotate the wireless antenna onto the threaded post to ensure clear wireless
communication. Antenna can be adjusted to obtain a better signal. Best results
are usually obtained by positioning the antenna vertically.
Attaching the Antenna
Camera Stand
Install the camera stand to provide a steady base for the camera.
1. Loosen the plastic nut on the back of the camera.
2. Rotate the threaded post upwards.
3. Rotate the camera onto the threaded post until it stops.
4. Tighten plastic washer against camera to secure.
Threaded
Post
Plastic
Washer
Plastic
Nut
Attaching the Camera to the Stand
Power, Ethernet and MAC ID
DO NOT connect power and Ethernet until instructed to do so by the web
site, during the enrollment process.
WCW100
XXXXXXXXXX
XXXXXXXXXX
MAC ID is located on the label on the back of the camera.
IC ID: 7954A
WPS
LAN
Speaker
OUT
POWER
5V/1A
Power and Ethernet
Privacy Button
The privacy button can be used to temporarily suspend video transmission.
Enable Privacy
Press the privacy button. Button will light green when activated.
Privacy
Button
Disable Privacy
Press the privacy button. Green light will go out when video transmission
resumes.
R
WE
PO
NE
OR
TW
K
Privacy Button
WPS Button
WCW100
XXXXXXXXXX
XXXXXXXXXX
DO NOT use the WPS button. Pushing this button may prevent the camera from
enrolling to the LiNK system properly.
IC ID: 7954A
Do Not
Use
If the button is accidentally pushed, power must be disconnected and then
reconnected to the camera before enrolling the camera.
WPS
LAN
Speaker
OUT
POWER
5V/1A
WPS Button
Reset Button
Do Not
Use
ÎÎ Using the reset button is not recommended.
To change camera setup, follow the steps under Moving the Camera to a
Different Account.
ÎÎ Pressing the reset button will restore factory default camera settings.
In most cases, this WILL NOT correct issues with connecting or
viewing the camera.
R
POWE
ORK
NETW
1. Connect power to camera.
2. Using a small pin, press and hold the reset button for 15 seconds. Then
release the button.
3. LEDs will turn off and then on.
Reset Button
Enrolling the Camera
Camera enrollment is done using the www.schlagelink.com web site. You must have an active account before enrolling the
camera.
1. Make sure Ethernet and power are not plugged in to the camera.
2. Log on to your account at www.schlagelink.com.
3. Click the Cameras tab.
4. Click the Add Cameras link.
5. Follow the on-screen instructions.
ÎÎ When enrolling a wireless camera, DO NOT disconnect the Ethernet cable until instructed to do so on
the web site.
Modifying the Camera Settings
1. Log on to your account at www.schlagelink.com.
2. Click on the Cameras tab.
3. Click the Edit Settings button next to the camera you want to edit.
4. To modify the wireless settings, click the Setup Wireless button.
Rebooting the Camera
1. Unplug A/C power.
2. Unplug Ethernet (if necessary).
3. Reconnect A/C power.
4. Connect Ethernet cable (do this for both wired and wireless cameras).
5. For wireless camera, log on to your account at www.schlagelink.com and click the Cameras tab, then click
Reconnect Wireless.
Moving the Camera to a Different Account
The camera cannot be enrolled in two accounts at the same time. To move the camera to a different account, you must
first remove the camera from one account, and then enroll it into the new account.
1. Login to your account at www.schlagelink.com.
2. Click Cameras.
3. Click Edit Cameras.
4. Click Remove next to the camera you want to move.
5. Follow the on-screen instructions for removal.
6. Once the camera is removed from the account, it can be added to a different account. See Enrolling the Camera
for more information.
Lights
Light
Light Behavior
Description
Power
Green Steady
Power On
Off
Power Off
Green Blinking
Start Up
Green Steady
Power On
Off
Wireless or LAN not connected, or
camera is not sending/receiving data
Green Blinking
Sending/receiving data
Network
POWER
NETWORK
Troubleshooting and FAQ
I am having trouble entering my SSID into the web interface (www.schlagelink.com).
1. The SSID is case-sensitive.
2. If there is a space in your SSID, change the SSID so there is no space and try again.
3. If your SSID is not showing up on the web interface, it may not be broadcast. Reference the instructions that came
with your router for more information.
I don’t have my router instructions and I don’t know how to change a setting.
1. Search on your exact make and model using an online search engine. Most manufacturers maintain their
instructions online.
2. Try browsing to http://192.168.0.1. Many routers use this address for the administration screen. A user name and
password will be required. This information should be available in the manufacturer’s instructions.
I cannot remember my router SSID/password.
1. Most routers can be reset using a physical button on the router. Refer to the router instructions for more information.
Resetting your router will restore factory settings. This could cause other computers or devices to stop
communicating with your router. Refer to the router instructions and/or the person who set up your router
for more information.
2. Once you have reset your router, the default settings can be used. Refer to the router instructions for more
information.
The camera was working, but has stopped working.
1. Ensure that power is connected.
2. Ensure that the Ethernet cable is connected (WCE100).
3. Check LED indicators. See LED Indicators for more information.
4. Ensure the settings on your router match the settings for the camera. If you have recently changed your SSID,
password or security type, the camera’s information will also need to be changed.
5. Try rebooting the camera. See Rebooting the Camera for more information.
I cannot see the camera video on my phone.
1. Log into your account at www.schlagelink.com.
2. Click My Phones.
3. Click Edit Phone.
4. Click to check the check box next to the camera you want to be displayed on the phone.
5. If your phone application is currently open, then close the phone application and re-open it for the new setting to
take effect.
I installed the camera, but the video is not displayed on the Cameras tab, and the text “Viewer here” is displayed.
Download and install the Adobe Shockwave™ player. The player can be downloaded from get.adobe.com/shockwave.
Why does video turn off after 2 minutes?
The camera is intended to provide visual verification of current or triggered events, which generally are accomplished in
2 minutes or less. Video can be continued for additional 2 minute segments by selecting the PLAY icon.
Can a camera be connected to more than one LiNK account simultaneously?
No. See Moving the Camera to a Different Account for more information.
Is video storage available?
Not at this time. Video storage may be available in the future. Check link.schlage.com for updates.
Is pan/tilt/zoom available?
Not at this time. Check link.schlage.com for updates.
Can the camera be mounted outside?
No, the camera is not designed for outdoor use.
Can I install more than one camera onto my LiNK account?
Yes. Follow the instructions for Enrolling the Camera for each additional camera.
Is video secure?
Yes, the camera creates a secure connection directly to the video server so that video is not accessible outside that
connection.
Can I use cameras from other manufacturers?
Not at this time. The Schlage LiNK camera is designed to provide a secure video connection, along with easy plug and
play installation, not currently available with other cameras. Check link.schlage.com for updates.
©2009 Schlage Lock Company
camera user guide Rev. 08/09-b