1
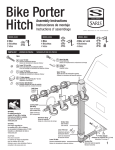
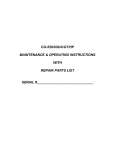
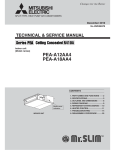
Step 7Close and lock track.
• Turn knob, at end of each load
bar, in direction of orange arrow
until the word "LOCK" appears.
• Lock load bar with key.
Step 8Check your installation. Be certain:
• Daisy dials are tightened completely against wheel tray and upright bracket.
Retighten daisy dial against upright bracket after first two hours of initial use.
• Upright clamp is firmly grasping each bike and is in the closed position.
• Wheel straps are used on both front and rear tires.
• Accessory tracks are closed and locked.
• Load is evenly distributed on load bars. For maximum weight limitations,
follow recommendations of vehicle manufacturer.
• The entire system including attachment of load bars to the vehicle is
stable and secure. Walk around vehicle to check each attachment clip.
Refer to attachment clip instructions for correct clip positioning and
proper installation.
Cautions
1) All requirements for compatibility/ fit as stated in the current Saris
Vehicle/ Carrier Compatibility Guide must be followed.
2) Check your installation as recommended. Because vehicles and
conditions vary, it is your responsibility to insure the safe and proper
use of this product. Improper attachment or misuse may result in
damage to your carrier, bicycles, vehicle, or vehicles traveling behind
you.
3) Use only Saris clips and accessories.
4) When in use, remember carrier is installed!
a) Be aware of low overhead clearances.
b) Do not go through automatic car wash with carrier installed.
c) Occasionally check attachment of carrier and load.
5) Open vehicle doors before removing carrier; failure to do so could
damage doors.
6) Replace any part at first sign of fatigue or wear.
Warning and Disclaimer
This carrier has been designed to carry accessories on
specific vehicles. Before installation, user must read and
follow current Vehicle/ Carrier Compatibility Guide (available
through Saris dealer) recommendations and enclosed
instructions. Fit recommendations are based on vehicle's
standard features; optional features may affect the fit
recommendations. User must attach carrier correctly to the
vehicle, check its attachment before each use, and inspect
carrier parts for wear. Carrier's attachment to the vehicle is
critical and beyond the control of the manufacturer.
Manufacturer and seller expressly disclaim any and all
liability for personal injury, property damage or loss, whether
direct, indirect, or incidental, resulting from the incorrect
attachment, improper use, inadequate maintenance, or
neglect of this carrier.
Warranty
We warrant this product to the first consumer to be free from
defect in material and workmanship for a period of two years
from date of purchase. (Please retain your sales slip for
your records.) Any product or part thereof found to be
defective within that period will be replaced without charge
provided that: (1) the product was not misused; (2) no
alterations or modifications were made; (3) its failure
resulted from a defect in material or workmanship and not
from normal wear expected in the use of the product; (4) the
product or part is delivered, freight prepaid, to Graber
Products. Manufacturers only obligation shall be to replace
such products or parts proved to be defective.
UPRIGHT MOUNT
Bicycle Carrier
Model #911
Please READ and FOLLOW all instructions carefully!
wheel straps
upright arm
clamp
handle
upright bracket
wheel tray
lever
tension
screw
attachment block
channel
daisy dials
(tightens to load bar)
(tightens to wheel tray)
The Saris Upright Mount Accessory can support bikes
with a tire size between 12-1/2 and 27 inches.
Step 1Check load bar placement.
Use of the upright mount requires that your load bar spacing be between
16" (minimum) and 36" (maximum).
a special products division of
Made in U.S.A.
911-IS 11/99 Revison B
5253 Verona Rd.
Madison, WI 53711
800-783-7257
www.sarisproducts.com
Worldwide patents
issued and pending.
Refer to available load bar spacing in clip set instructions.
If your available load bar spacing is:
- less than or equal to 36 inches, place load bars following all
recommendations in your clip set instructions.
- greater than 36 inches,
place load bars 36" apart
anywhere along the
length of your
vehicle.
Step 2-
C) Wheel Tray
• Loosen daisy dial attached to upright bracket.
• Align attachment block and upright bracket.
• Slide tray channel from back to front (along block to upright bracket).
Note: Slide tray forward enough to overhang load bar approximately
12-14 inches.
• Tighten upright bracket daisy dial against wheel tray. Note: Retighten
daisy dial after the first two hours of initial use.
Open accessory tracks.
Turn knob 1/2 turn toward gray arrow
(loosening rack slightly) until the word
"LOCK" is upside down.
Note:
For upright clamp locking capabilities, Lock Plug Kits are available through
your local Saris dealer. To complete a single key locking system,
purchase the Lock Plug item number identical to the number on your Saris
load bar key.
Insert Lock Plug per instructions before mounting upright arm to load bar.
Mount additional accessories.
• Distribute bikes evenly along load bars.
• To carry 3 or more bikes, it may be
necessary to alternate direction bikes
face. To do so, reverse entire setup
such that bikes face the opposite
direction.
• Balance load evenly.
Step 6Load bikes.
Step 3-
Step 4-
Slide components into tracks.
Tighten all parts.
A) Upright Arm
• Lift levers of upright arm.
• Align tabs with load bar
accessory track.
• Slide component into
track.
• Close levers.
Note: Adjustment of
lever tension is preset. If
component will not slide into
track, loosen tension screw between tabs. If component still
slides when lever is closed, tighten tension screw.
B) Attachment Block
• Position curved side of block down
against load bar with wheel tray
dial toward opposite load bar.
• Align bolt head with
accessory track.
• Slide block into track.
Step 5-
Direction of opposite
load bar
• Adjust and straighten all components.
• Close levers to hold upright arm in place.
• Secure attachment block to load bar and attachment block to wheel tray
by turning daisy dials in direction of arrows.
down
tube
seat tube
arrows
Note: Upright arm can
be mounted to front or
rear load bar.
• Lift bike and place tires in wheel tray.
(Bikes can face either direction.)
• Open upright clamp, fasten around
seat tube with arm next to rear tire or
down tube with arm next to front tire
(avoiding cables).
• Rotate clamp handle enclosing
clamp around bike tube (A) and
close handle (B). Clamp should
firmly grasp bike tube.
• Align tab of wheel straps with wheel
tray channel and slide into place.
Secure both tires. Center shim
over narrow tires and remove shim
for wide tires. Thread strap through
buckle and snap buckle down to
secure .
Note: When not in use, buckle
straps firmly or remove to prevent
loss.
Instructions continued on back...
B
A