1
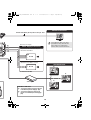
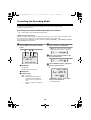
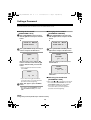
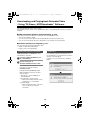
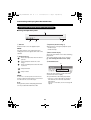
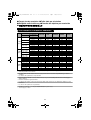
L5CL2_XE_US(INSTRUCTION).book 0 ページ
2008年8月25日 月曜日 午後3時43分
INSTRUCTION MANUAL
Megapixel Camera
THIS INSTALLATION SHOULD BE MADE BY A QUALIFIED
SERVICE PERSON AND SHOULD CONFORM TO ALL LOCAL
CODES.
VCC-HD4000P
VCC-HD4000
VCC-HDN4000PC
Please read this instruction manual carefully in order to ensure correct installation. In addition,
be sure to read carefully the electronic manual contained in the supplied CD-ROM to ensure
correct operation of the camera.
MEMO: This manual covers three models. Any difference among the three models is indicated when
necessary.
Installing Camera
1
1/4”-20 UNC
Install the camera in a correct location so
that the intended object can be monitored
properly.
You should also adjust on the monitor
side.
Lens cap
1Transportation screw and treaded holes
for mounting (Top and Bottom)
When using a camera mount base (sold
separately) etc., use an attachment screw
shorter than 10 mm / 0.4 in.
• If you want to use a commercially available
platform for the camera, select an
appropriate type, taking into consideration
the gross weight of the camera and
platform, and secure it on a firm place.
• Images may blur under extremely bright
lighting; adjust the lighting angle to get
clear images.
Français
Español
Deutsch
Recording times and target sizes (Insert at the end
of this manual)
中文简体
Information To User . . . . . . . . . . . . . . . . . . . . . . . . . 1
Parts Names and Functions. . . . . . . . . . . . . . . . . . . 3
What You Can Do . . . . . . . . . . . . . . . . . . . . . . . . . . . 5
Network Settings Procedure . . . . . . . . . . . . . . . . . . 7
Connections . . . . . . . . . . . . . . . . . . . . . . . . . . . . . . . 8
Viewing Live Video . . . . . . . . . . . . . . . . . . . . . . . . . 13
Menu Screen List . . . . . . . . . . . . . . . . . . . . . . . . . . 14
Setting up the network information of the camera. . . . 15
Formatting the Recording Media. . . . . . . . . . . . . . 16
Setting a Password . . . . . . . . . . . . . . . . . . . . . . . . . 17
Using the Supplied CD-ROM . . . . . . . . . . . . . . . . . 18
Downloading and Playing back Recorded Video
- Using "DLViewer_HDCDownloader" Software - . . . 19
Main specifications. . . . . . . . . . . . . . . . . . . . . . . . . 29
English
Contents
L5CL2_XE_US(INSTRUCTION).book 1 ページ
2008年8月25日 月曜日 午後3時43分
Information To User
For US and Canadaian Users
This equipment has been tested and found to
comply with the limits for a Class B digital device,
pursuant to Part 15 of the FCC Rules.
These limits are designed to provide reasonable
protection against harmful interference in a
residential installation. This equipment
generates, uses and can radiate radio frequency
energy and, if not installed and used in
accordance with the instructions, may cause
harmful interference to radio communications.
However, there is no guarantee that interference
will not occur in a particular installation.
If this equipment does cause harmful
interference to radio or television reception,
which can be determined by turning the
equipment off and on, the user is encouraged to
try to correct the interference by one or more of
the following measures.
• Reorient or relocate the receiving antenna.
• Increase the separation between the
equipment and receiver.
• Connect the equipment into an outlet on a
circuit different from that to which the receiver
is connected.
• Consult the dealer or an experienced radio/
TV technician for help.
Safety Guard
CAUTION
RISK OF ELECTRIC SHOCK
DO NOT OPEN
CAUTION: TO REDUCE THE RISK OF
ELECTRIC SHOCK, DO NOT REMOVE
COVER (OR BACK).
NO USER-SERVICEABLE PARTS INSIDE.
REFER SERVICING TO QUALIFIED
SERVICE PERSONNEL.
The lightning flash with arrowhead
symbol, within an equilateral triangle, is
intended to alert the user to the presence
of uninsulated “dangerous voltage”
within the product’s enclosure that may
be of sufficient magnitude to constitute a
risk of electric shock to persons.
The exclamation point within an
equilateral triangle is intended to alert the
user to the presence of important
operating and maintenance (servicing)
instructions in the literature
accompanying the product.
WARNING: To reduce a risk of fire or electric
shock, do not expose this appliance to rain or
moisture.
For the customers in Canada
This class B digital apparatus complies with
Canadian ICES/NMB-003.
CAUTION: Changes or modifications not
expressly approved by the manufacturer may
void the user’s authority to operate this
equipment.
Precautions
■ In case of a problem
Do not use the unit if smoke or a strange odor
comes from the unit, or if it seems not to function
correctly. Turn off the power immediately and
disconnect the power cord, and then consult your
dealer or an Authorized Sanyo Service Center.
■ Do not put objects inside the unit
Make sure that no metal objects or flammable
substance get inside the unit. If used with a
foreign object inside, it could cause a fire, a
short-circuit or damage. Be careful to protect the
unit from rain, sea water, etc. If water or liquid
gets inside the unit, turn off the power
immediately and disconnect the power cord, and
then consult your dealer or an Authorized Sanyo
Service Center.
■ Do not open or modify
Do not open the cabinet, as it may be dangerous
and cause damage to the unit. For repairs,
consult your dealer or an Authorized Sanyo
Service Center.
■ Do not install this unit close to magnetic
fields
The magnetic fields may result in unstable
operation.
■ Be careful when handling the unit
To prevent damage, do not drop the unit or
subject it to strong shock or vibration.
1
L5CL2_XE_US(INSTRUCTION).book 2 ページ
2008年8月25日 月曜日 午後3時43分
For EU Users
For Russian Users
This product certified by official
certification company which is
authorized by Russian Federation.
Please note:
Your SANYO product is designed and
manufactured with high quality
materials and components which can
be recycled and reused.
This symbol means that electrical and
electronic equipment, at their
end-of-life, should be disposed of
separately from your household waste.
Please dispose of this equipment at
your local community waste collection/
recycling centre.
In the European Union there are
separate collection systems for used
electrical and electronic products.
Please help us to conserve the
environment we live in!
ДЛЯ ПОЛЬЗОВАТЕЛЕЙ
РОССИЯ
Данная продукция
сертифицирована официальным
органом по сертификации
Российской Федерации.
This symbol mark and recycle
system are applied only to EU
countries and not applied to the
countries in the other area of the
world.
SANYO FISHER Sales (Europe) GmbH
Stahlgruberring 4, D-81829 München,
Germany
SANYO Electric Co., Ltd.
1-1, Sanyo-cho, Daito City, Osaka 574-8534,
Japan
■ Protect from humidity and dust
To prevent damage, do not install the unit where
there is greasy smoke or steam, where the
humidity may get too high, or where there is a lot
of dust.
■ Cleaning
• Dirt can be removed from the cabinet by wiping
it with a soft cloth. To remove stains, wipe with
a soft cloth moistened with a soft detergent
solution and wrung dry, then dry by wiping with
a soft cloth.
• Do not use benzine, thinner or other chemical
products on the cabinet, as this may cause
deformation and paint peeling. Before using a
chemical cloth, make sure to read all
accompanying instructions. Make sure that no
plastic or rubber material comes into contact
with the cabinet for a long period of time, as
this may cause damage or paint peeling.
■ Protect from high temperatures
Do not install close to stoves, or other heat
sources, such as spotlights, etc., or where it could
be subject to direct sunlight, as this could cause
deformation, discoloration or other damage.
Be careful when installing close to the ceiling, in
a kitchen or boiler room, as the temperature may
rise to high levels.
2
L5CL2_XE_US(INSTRUCTION).book 3 ページ
2008年8月25日 月曜日 午後3時43分
Parts Names and Functions
■Power/Error indicator
• Power ON
: Lit (Startup time: 30 sec)
• Power OFF
: Off
• Error (failure) : Blinks
MEMO:
To enable the power indicator, via the network, set [POWER LED
(FRONT)] to "ON" on the OPTION SETTINGS screen.
■Side Face
SD card
SD card slot
Side cover
After configuring settings, close the cover.
Be sure to secure the cover with the
supplied screw.
Operation Buttons
MENU
SET
RESET
A
B
A MENU button
C D E
D RESET button
Displays the main menu.
Press with a pen or other pointed object.
• Restarts the camera.
• Resets the settings.
To return all settings to defaults (factory
settings), press the RESET button while
holding down the MENU button.
B jl button
Moves the cursor upward/downward.
C dc button
Changes the setting value or moves the
cursor to the right/left.
E SET button
Selects the menu and confirms settings.
MEMO:The focus and zoom of live video can be adjusted. &P13
3
L5CL2_XE_US(INSTRUCTION).book 4 ページ
2008年8月25日 月曜日 午後3時43分
■Rear Face
& For connections, see pages 11 and 12.
1
ALARM IN 1
ALARM OUT
ALARM
IN 2
POWER
lamp
2
ALARM IN 1
ALARM OUT
ALARM
SD
IN 2
OUT
POWER
A BCD E
GND
ZOOM COM
FOCUS
DC
12V
AC24V
LAN
EX-HDD
ZOOM COM
FOCUS
3
6 5 4
1Control terminals
2SD OUT connector (BNC type)
When connecting the cable, press and hold
down the protrusion of the terminal, insert the
cable into the terminal, and then release the
protrusion.
Outputs SD (Standard Definition) video.
3AC24V / DC12V terminals
Connect this terminal to the power supply.
• When the camera is turned on, the
POWER lamp lights.
A ZOOM terminal
Used to zoom in/out by connecting an
external switch.
• DC ±(6-12V), +: WIDE, –: TELE
4LAN connector (RJ-45)
Used to connect the camera to your network.
B FOCUS terminal
5EX-HDD connector
Used to perform the focus adjustment
remotely by connecting an external switch.
• DC ±(6-12V), +: FAR, –: NEAR
Connects this connector to the external hard
disk case (VA-HDC4000) dedicated to use
with this camera.
For details, see the manual for the hard disk
case.
C COM terminal (Earth terminal)
D ALARM OUT terminal
6HDMI connector
Used to connect to an external buzzer or
lamp.
When an alarm is detected, the device
connected to the terminal notifies that an
alarm is detected.
Outputs HD (High Definition) video. Connect
this connector to an HD video device.
MEMO:
Select the SD OUT or HDMI terminal in on the
TV OUT SETTING screen via the network.
E ALARM IN 1/2 terminal
Used to connect an external alarm switch,
infrared sensor, or other device.
It can also be used as a switching terminal
for color and black/white video modes.
4
L5CL2_XE_US(INSTRUCTION).book 5 ページ
2008年8月25日 月曜日 午後3時43分
You can display the menu screen on your PC and
configure settings.
What You Can Do
Network Monitoring System
Recording and Playing back
Live Video
By connecting the camera to your PC via
LAN cable, you can operate various
functions required for monitoring from
your PC’s Web browser (Internet
Explorer) via the network.
b Recording
• Media (an SD card or external hard disk)
can be installed on the camera to enable
recording of live video when an alarm is
detected.
Still image and video are recorded.
• Recording can be programmed using
timer and/or schedule functions.
• Optional software can be used to record
(JPEG) live video on a PC.
Security Measures
b Downloading and Playing
back
b Authentication by user ID and
password is required when an access
is attempted.
• The supplied software
"DLViewer_HDCDownloader" can be
used to download live video recorded
through the camera to your PC for
playback.
• Immediate playback is possible by
installing the SD card or external hard
disk directly to a PC.
b Number of PC’s that can access the
camera can be restricted.
b SSL can be used to encrypt the
content of communication.
Full High Definition
A high definition monitor can be
connected to enable monitoring with HD
video device.
5
L5CL2_XE_US(INSTRUCTION).book 6 ページ
2008年8月25日 月曜日 午後3時43分
Alarm Functions
b Detection
b Notification
• The camera has a built-in motion sensor.
The face detection function works in
conjunction with the motion sensor to
detect presence of human.
• When an alarm is detected, you can
receive the image data as e-mail
attachment.
Not detected
Detected
• A buzzer or lamp can be used to notify you
of detection of alarm when you are in a
distant place from the monitor.
• Two types of alarm input, such as door
open and close, can be set.
• When the alarm condition is detected, the
object on the screen is zoomed in.
Clipping Function
Privacy Masks
You can clip a part of the live video for
intensive monitoring and display it on
the monitor.
The privacy masks can be used to
protect privacy by hiding certain part of
the monitored image.
(Maximum 5 masks)
6
L5CL2_XE_US(INSTRUCTION).book 7 ページ
2008年8月25日 月曜日 午後3時43分
Network Settings Procedure
■Checking the Operating Environment
•
•
•
•
PC
OS
CPU
Memory
:
:
:
:
• Network interface :
• Graphics processor :
• Display card
• Web browser
:
:
IBM PC/AT and compatibles
Windows XP Professional/Windows Vista
Core2Duo E6700 2.66 GHz or higher
Windows XP : 1GB or more
Windows Vista : 2GB or more
100Base-TX /1000Base-T (RJ-45 connector)
ATI RADEON HD2600 series or higher
nVIDIA GeForce 8600 series or higher
nVIDIA Quadro FX550 series or higher
1920 x 1200 pixels or higher
Internet Explorer Ver.6.0 or higher
■Connecting the Camera to Your PC &P8 - P12
To set the network information below, see "Quick Reference".
1
Setting up the network information of
the camera
2
Setting up the network information of
the computer
3
Viewing live video from the camera
7
L5CL2_XE_US(INSTRUCTION).book 8 ページ
2008年8月25日 月曜日 午後3時43分
Connections
Connection when Using PoE (Power over Ethernet) Power Supply
This camera provides simultaneous delivery of video in the JPEG and H.264 formats and also
bi-directional video between the camera and PC.
● Do not use the power supply of the camera.
● Do not supply power to the PoE hub or PoE power adapter until the camera installation
is finished.
A Connect the camera to the LAN through a switching hub using
shielded LAN cables.
You may extend the transmission distance by using multiple switching hubs with PoE support.
For details on the extendable distance, please refer to the hub performance in the specifications,
etc.
PC
Switching hub
with PoE support
✱1
✱1
✱1: LAN cable: CAT5 or higher, straight type, Max. 100 m / 109 yds
HDMI
SD OUT
HD Monitor
Camera Control Unit
Monitor
B Connect the camera to the LAN through a power adapter and a
switching hub using shielded LAN cables.
Power adapter
✱1
Switching hub
✱1
8
PC
L5CL2_XE_US(INSTRUCTION).book 9 ページ
2008年8月25日 月曜日 午後3時43分
Connections
Connection when Not Using PoE (Power over Ethernet) Power Supply
PC
A Internet
C LAN connection
connection (&P10)
Switching hub
Router or ADSL modem
✱1
✱1
B Direct connection
LAN cable
(straight type)
Power Supply
(AC24V/DC12V)
LAN cable
(crossover type)
LAN cable
(straight type)
✱1
HDMI
SD OUT
HD Monitor
✱1: LAN cable: CAT5 or higher, straight type,
100 m / 109 yds max.
Camera Control Unit
Monitor
9
L5CL2_XE_US(INSTRUCTION).book 10 ページ
2008年8月25日 月曜日 午後3時43分
About the “A Internet connection”
Port forwarding for the video port (HTTP/UDP) must be enabled on the broadband router.
For details on how to set port forwarding, please refer to your router's Instruction manual.
b Port 1: JPEG/H.264 HTTP
Port number (default): 80 (TCP)
Port number (default): 80 (TCP)
IP address (default): 192.168.0.2
• Set to same value as on LAN
To LAN port
To WAN port
Router
b Port 2: H.264 UDP Unicast
Port number (default): 3939 (UDP)
Port number (default): 3939 (UDP)
IP address (default): 192.168.0.2
• Set to same value as on LAN
To LAN port
To WAN port
Router
To view H.264 video over the Internet, set port forwarding for UDP to enable communication
using UDP protocol. However, it may not be possible depending on your network environment.
Consult your network administrator.
MEMO:
If you install multiple cameras, for second and later cameras, specify different numbers for ports 1 and 2
than those for the first camera via the network.
• Port 1: [NETWORK] → "PORT NUMBER"
• Port 2: [CODEC/STREAMING] → "UDP (Unicast) PORT"
10
L5CL2_XE_US(INSTRUCTION).book 11 ページ
2008年8月25日 月曜日 午後3時43分
Connections
Do not connect the power cord until all other connections have been completed.
Camera Control Unit
(Options:VAC-70)
Connection for Zoom/Focus
+6V/12V (FAR)
-6V/12V (NEAR)
(FOCUS)
BNC type
✱1
+6V/12V (WIDE)
-6V/12V (TELE)
ALARM IN 1
ALARM OUT
ALARM
SD
IN 2
OUT
POWER
(ZOOM)
GND
ZOOM COM
FOCUS
AC24V
EX-HDD
LAN
Alarm Signal Input
b ALARM IN 1 (“1” is selected)
Alarm
input signal
(IN1)
(COM)
b ALARM IN 2 (“2” is selected)
Alarm
input signal
(IN2)
(COM)
For switching between color and black/
white video modes using an external
switch, the alarm input terminals can also
be used.
HD Monitor
Alarm Signal Output
External hard disk
If a lamp is connected to this cable, it will
light up when an alarm signal is received
or when the built-in motion sensor detects
movement.
External
peripheral device
(AL OUT)
(COM)
EX-HDD
✱1 Thicker than 24 AWG, 600 m / 656 yds. max.
11
DC
12V
✱2
L5CL2_XE_US(INSTRUCTION).book 12 ページ
2008年8月25日 月曜日 午後3時43分
Monitor Connection
Thicker than RG-6U (5C-2V): 500 m / 547 yds. max.
POWER
DC
12V
✱2
Using different cables from those
specified here may attenuate the
video and/or sync signals and
interfere with correct transmission.
(Non-PoE power supply)
Power Supply Connection
To prevent a fire hazard use any UL
listed wire rated VW-1.
GND
~
~
AC 24V
Check that +/- polarity is correct.
LAN Connection
–
+
DC 12V
PC
✱2 Thicker than 18 AWG
PC
PC
Switching hub
Shielded LAN cable
& “Connection when Using PoE (Power
over Ethernet) Power Supply” (P8).
& “Connection when Not Using PoE
(Power over Ethernet) Power Supply”
(P9).
12
L5CL2_XE_US(INSTRUCTION).book 13 ページ
2008年8月25日 月曜日 午後3時43分
Viewing Live Video
When the camera is turned on, live video is displayed on the monitor.
The following information also appears. The display position can be selected from 12 positions on the
TV OUT SETTINGS screen via the network.
Camera title
Recording/downloading status
• Set on NETWORK SETTING screen via
the network.
Network Camera
x1.0
E01
REC ALM1
✱ Insert at the end of this
manual
Zoom magnification
Alarm status
Zoom and Focus
The zoom and focus of live video can be adjusted with the buttons under the side cover.
Focus Zoom
MENU
Optical zoom: Up to 10x
Electronic zoom: Up to 160x
SET
Auto-Focus (One-push)
RESET
13
L5CL2_XE_US(INSTRUCTION).book 14 ページ
2008年8月25日 月曜日 午後3時43分
Menu Screen List
The settings below can be configured on the menu of the camera unit.
• Configure other settings on the Web-version menu screen.
Network Settings
DHCP
OFF
IP ADDRESS
SET
y
SUBNETMASK
SET
y
GATEWAY
SET
y
NETWORK SPEED NO LIMIT
PORT
00080
DEFAULT
OFF
[MENU]_(MAIN MENU)
MENU
Recording Media Settings
CAPACITY
Main Menu
NETWORK SET
SD/HDD SET
PASSWORD
FIRMWARE VERSION
&P15
SET
SET
SET
SET
&P16
FORMAT
SD
: 2GB NEW ON
EX-HDD : 500GB FMT OFF
y
y
y
y
FORMAT SET
y
[MENU]_(MAIN MENU)
Password Settings
[MENU]_(MENU END)
PASSWORD LOCK
Press the MENU button to return
to the previous screen.
"(MENU END)" indicates "exit the
menu screen".
OFF
y
PASSWORD CHANGE SET
y
[MENU]_(MAIN MENU)
Firmware Version
FIRMWARE VERSION
MAIN VER:
0.00-00 (XXXXXX-XX)
SUB VER:
0.00-00 (XXXXXX-XX)
MAC ADDRESS
XX-XX-XX-XX-XX-XX
[MENU]_(MAIN MENU)
14
&P17
L5CL2_XE_US(INSTRUCTION).book 15 ページ
2008年8月25日 月曜日 午後3時43分
Setting up the network information of the camera
<Default Settings>
• DHCP
: OFF
• IP Address
: 192.168.0.2
• Subnet Mask : 255.255.255.0
• Gateway
: 192.168.0.1
• Network Speed
(bandwidth limitation) : NO LIMIT
• Port Number
: 80
If you wish to use the default settings, the settings below are not necessary.
1 Select [NETWORK SET] with the jl
5 Select [NETWORK SPEED] with the jl
buttons and press the SET button.
buttons and press the SET button.
•
DHCP
OFF
IP ADDRESS
SET
y
SUBNETMASK
SET
y
GATEWAY
SET
y
NETWORK SPEED NO LIMIT
PORT
00080
DEFAULT
OFF
[MENU]_(MAIN MENU)
appears next to the selection "NO
LIMIT" indicating that you can change the
setting.
DHCP
OFF
IP ADDRESS
SET
y
SUBNETMASK
SET
y
GATEWAY
SET
y
NETWORK SPEED NO LIMIT
PORT
00080
DEFAULT
OFF
[MENU]_(MAIN MENU)
2 Select [DHCP] with the jl buttons and
press the SET button.
•
Select the network speed (bandwidth
limitation) with the jl buttons and
press the SET button.
NO LIMIT, 128, 256, 512 (Kbps), 1, 2, 3, 4,
5, 6 (Mbps)
appears next to the selection "OFF"
indicating that you can change the
setting.
DHCP
IP ADDRESS
SUBNETMASK
GATEWAY
OFF
SET
SET
SET
y
y
y
6 Select [PORT] with the jl buttons and
press the SET button.
Select "OFF" or "ON" with the jl
buttons and press the SET button.
OFF: Manual setting (go to step 3)
ON: Automatic setting (go to step 5)
PORT
3 Select [IP ADDRESS] with the jl
PORT
00080
x
[MENU]_(NETWORK)
buttons and press the SET button.
IP ADDRESS
IP ADDRESS
192.168.000.002
x
Select the input position with the dc
buttons, select a value with the jl
buttons, and press the SET button.
7 Press the MENU button to exit the
Select the input position with the dc
buttons, select a value with the jl
buttons, and press the SET button.
settings.
4 Use the same procedure as in step 2 to
set up [SUBNETMASK] and [GATEWAY].
15
L5CL2_XE_US(INSTRUCTION).book 16 ページ
2008年8月25日 月曜日 午後3時43分
Formatting the Recording Media
An SD card or external hard disk can be installed on the camera to record live video.
Format the media before use.
● Installing an SD Card or External Hard Disk in the Camera
&
Please refer to your media’s Instruction manual.
<Media recording area setting>
When the media is formatted on the camera menu screen, the size of the normal recording area and
that of the alarm recording area are automatically allocated in the ratio "80 : 20".
If you wish to specify a different size ratio, format the media in [RECORD] → [SD MEMORY CARD/EX
HDD SETTINGS] via the network.
1 Select [SD/HDD SET] on the main menu
2 Select the media to format with the jl
with the jl buttons and press the SET
button.
A
buttons and press the SET button.
•
B C
appears next to the selection "OFF"
indicating that initialization is possible.
SD
CAPACITY
2GB NEW OFF
3 Select "ON" with the jl buttons and
SD
: 2GB NEW ON
EX-HDD : 500GB FMT OFF
FORMAT SET
:
FORMAT
press the SET button.
y
SD
:
2GB NEW ON
[MENU]_(MAIN MENU)
4 Select "FORMAT" with the jl buttons
and press the SET button.
A Media type
SD: SD card
EX-HDD: External hard disk
CAPACITY
B Media size
FORMAT
SD
: 2GB NEW ON
EX-HDD : 500GB FMT OFF
C Format status
FMT : Formatted
NEW : New (unformatted) media, or
media that needs formatting
because files in it could not be
read.
---- : Camera could not recognize the
media
FORMAT SET
y
"CONTINUE?" appears. Select "YES"
and press the SET button.
• Formatting begins.
16
L5CL2_XE_US(INSTRUCTION).book 17 ページ
2008年8月25日 月曜日 午後3時43分
Setting a Password
A password can be set to restrict access to the camera menu screen.
■ Setting the Password
[PASSWORD LOCK]
■ Changing the Password
[PASSWORD CHANGE]
1 Select [PASSWORD] in the main menu
1 Select [PASSWORD] in the main menu
with the jl buttons and press the SET
button.
PASSWORD LOCK
with the jl buttons and press the SET
button.
OFF
y
PASSWORD LOCK
PASSWORD CHANGE SET
y
PASSWORD CHANGE SET
2 Select [PASSWORD LOCK] with the jl
y
jl buttons and press the SET button.
PASSWORD
PASSWORD
SET
NOW PASSWORD
****
SET
x
y
Move the input position with the dc
buttons and select values with the jl
buttons. When finished, press the SET
button.
• If you set a password for the first time,
enter "1234".
SET
y
Enter the current password and press
the SET button.
PASSWORD
NEW PASSWORD
****
SET
x
PASSWORD
1234
x
y
2 Select [PASSWORD CHANGE] with the
buttons and press the SET button.
****
x
ON
y
Enter a new password and press the
SET button.
y
■ Releasing Password Lock
[PASSWORD LOCK]
• If you enter a wrong password three
consecutive times, you must repeat the
procedure from the beginning.
Follow steps 1 to 3 of "Setting the Password".
• You return to the PASSWORD screen and
[PASSWORD LOCK] now shows "OFF".
• If you enter a wrong password three
consecutive times, you must repeat the
procedure from the beginning.
3 When "OK" appears, press the MENU
button.
• You return to the PASSWORD screen
and [PASSWORD LOCK] now shows
"ON".
MEMO:
Change the password periodically to maintain security.
17
L5CL2_XE_US(INSTRUCTION).book 18 ページ
2008年8月25日 月曜日 午後3時43分
Using the Supplied CD-ROM
■ Software
The supplied CD-ROM contains the application software shown below.
These applications can be installed to expand the scope of use of the data recorded through the
camera.
● DLViewer_HDCDownloader
This is software for downloading and playing back video data (JPEG/H.264) recorded through the
camera.
& Page 19 of this manual.
● VA-SW3050Lite
This is monitoring software for use with Sanyo’s cameras.
This software allows monitoring of live video from multiple cameras (up to 128 cameras).
& "VA-SW3050LITE" folder: Instruction Manual (PDF)
● H.264 Plug-in
This is software for playing back high-quality video.
This software is necessary for viewing H.264 live video on the screen via the network.
MEMO:
The separately available VA-SW3050 Server/Client can be purchased to record (JPEG) and play back
live video on a PC.
■ Electronic manual
By using the electronic manual which is contained in the supplied CD-ROM, you can access
extensive information from basic operation to advanced settings and functions, as well as
troubleshooting.
● Requirements for viewing the electronic manual
Browser: Internet Explorer 6.0 or higher
• Make sure that JavaScript and Cookie are enabled.
1 Insert the CD-ROM into the CD drive of your computer and then double-click the “
”
icon.
2 Select the preferred language.
The electronic manual opens.
& You can also refer to “How to use this manual” to better understand the structure of the
electronic manual and the description of individual screens.
● To open and view the instruction manual for the application software
You need Adobe Reader installed on your PC.
If it has not been installed on your PC, visit the Adobe website at http://www.adobe.com to download
and install the free software program.
18
L5CL2_XE_US(INSTRUCTION).book 19 ページ
2008年8月25日 月曜日 午後3時43分
Downloading and Playing back Recorded Video
- Using "DLViewer_HDCDownloader" Software This camera allows live video to be recorded.
The supplied software can be used to download live video recorded through the camera to your PC for
playback.
■ HDC Downloader (Software for Downloading) &P20
Video data recorded on an SD card or hard disk can be downloaded to a PC.
• You can select JPEG or H.264.
• You can search for video data to be downloaded by date and time or by alarm event.
• You can connect media (an SD card or hard disk) to your computer to copy video data.
■ DLViewer (Software for Playback) &P21
This is used to play back downloaded video data.
• JPEG or H.264 can be played back.
• Images can be saved and printed.
Installing HDC Downloader and DLViewer
"H.264 Plug In"
If you attempt to play back H.264 video when
the "H.264 Plug In" is not installed on your PC, a
warning screen will appear.
"HDC Downloader" and "DLViewer" can be
installed at the same time.
1 Insert the supplied CD-ROM into your
Follow the on-screen instructions to install the
plug-in.
PC’s CD-ROM drive.
2 Execute "Setup.exe" in
"DLViewer_HDCDownloader" folder.
The installer will start. Follow the on-screen
instructions to install the software.
Installation folder:
C:\Program Files\SANYO\HDC Utilites
When installation is finished, check the
Internet options.
• Click [Tools] → [Internet Options] in
Internet Explorer.
1 [Security] tab → [Custom level]
• Make sure that "Run ActiveX controls
and plug-ins" is set to "Enable".
2 [Advanced] tab
• Make sure that [Security] → [Check for
server certificate revocation] is
unchecked.
19
L5CL2_XE_US(INSTRUCTION).book 20 ページ
2008年8月25日 月曜日 午後3時43分
HDC Downloader Operation Flow
1
The HDC Downloader screen appears.
A Download video data recorded on an
B Connect the SD card or external hard
SD card or external hard disk to your
PC. &P22
disk to your PC and copy the required
image/video data from it. &P26
2 Click "Download from Camera" and
2 Click "Copy from SD/HDD" and
enter the network information.
specify the drive and folder of the
SD card or hard disk.
• Password: download
3 Select the type of image/video to be
3 Select the type of image/video to be
downloaded (JPEG or H.264).
downloaded (JPEG or H.264).
4 Click the
4 Select the search method.
button.
5 Specify the folder that contains the data you want to download and the folder to
which the data will be downloaded.
6 Click the
button.
20
L5CL2_XE_US(INSTRUCTION).book 21 ページ
2008年8月25日 月曜日 午後3時43分
Downloading and Playing back Recorded Video
DLViewer Operation Flow
1
The DLViewer screen appears.
2 Select the language.
Click
3 Select the type of image/video to play back (JPEG or H.264) and
specify the folder.
[Example]
Operation panel
&P27
21
L5CL2_XE_US(INSTRUCTION).book 22 ページ
2008年8月25日 月曜日 午後3時43分
Downloading Recorded Video (HDC Downloader)
A Download video data recorded on an SD card or external hard disk
to your PC.
4Proxy
1
If you will use a proxy server, select this
checkbox and enter the server address (or
URL) and port number.
2
3
5Password
Enter the password of the download user
set in the camera.
4
5
• If you are entering the password for the
first time, enter "download".
6Connection status display
The status of the connection with the
camera is displayed.
2 Select the display language.
5 Select the type of image/video to be
downloaded (JPEG or H.264).
3 Click the "Download from Camera" radio
To download both JPEG and H.264, select
both types.
button.
6 Select the search method.
4 Configure the network settings that are
required for connection to the camera.
See the following for detailed explanations
of the search methods.
1IP address or URL
• Time/Date Search:
Enter the IP address (or URL) of the
camera.
Open the Time/Date Search screen.
& Carry out the procedure
explained in "Download by Time/
Date". (P23)
Default setting: 192.168.0.2
2Port
Enter the port number of the camera.
• Alarm Search:
Default setting: 80
Open the Alarm Search screen.
3SSL
& Carry out the procedure
explained in "Download by Alarm
Event✱1". (P23)
If you wish to transmit image/video using
SSL encryption, select this check box.
• The port number will change to "443".
22
L5CL2_XE_US(INSTRUCTION).book 23 ページ
2008年8月25日 月曜日 午後3時43分
Downloading and Playing back Recorded Video
■ Download by Alarm Event✱1
■ Download by Time/Date
1
1
2
2
3
3
4
4
The [Alarm list] does not contain any alarm
when you switch to the [Alarm Search] screen.
1 The start point [Top] and end point [End]
1 Specify the date of the alarm event that
are automatically displayed.
you are searching for in [Date] and click
[Search].
2 Set the [Start time] and [End time].
Alarm events will appear in the [Alarm list].
3 Click the [...] button and specify the
2 Click the alarm event that you wish to
download in [Alarm list].
folder in which the video data will be
saved on your PC.
Multiple alarm events can be selected.
3 Click the [...] button and specify the
If you will play back the video data on a
PC that does not have DLViewer
installed, select the [with DLViewer]
checkbox.
folder in which the video data will be
saved on your PC.
If you will play back the video data on a
PC that does not have DLViewer
installed, select the [with DLViewer]
checkbox.
The DLViewer playback software will be
copied to the destination folder together
with the necessary files.
& Go to step 4. (&P24)
The DLViewer playback software will be
copied to the destination folder together
with the necessary files.
& Go to step 4. (&P24)
✱1 An alarm event is the data that was
recorded when an alarm occurred.
23
L5CL2_XE_US(INSTRUCTION).book 24 ページ
2008年8月25日 月曜日 午後3時43分
4 Click [Download].
Click [Play].
The size of the download data is calculated
and a confirmation dialog box appears.
"DLViewer" automatically starts and the
video data is displayed.
MEMO:
Click [...] button and specify the folder that
you wish to play back when you
downloaded multiple video data.
[Example]
& See "Playing back Downloaded
Video Data (DLViewer)". (P27)
5 Click [Yes].
Downloading starts.
When the download is finished, "Finished."
appears.
The folder below is automatically created in
the destination folder.
(Explanation of the folder)
JPEG AL 20080922 1030 001
1
2
3
4
5
1Image format (JPEG/H264)
2Search method
• TD (Time/Date Search)
• AL (Alarm Search)
3Year-month-day (example: September
22, 2008)
4Hour-minute (example: 10:30)
5File number
MEMO:
To cancel the download, click the [Cancel]
button.
The download is cancelled; however, any
data downloaded before the [Cancel] button
is clicked is saved.
24
L5CL2_XE_US(INSTRUCTION).book 25 ページ
2008年8月25日 月曜日 午後3時43分
Downloading and Playing back Recorded Video
(Explanation of the alarm list)
A
B
C
D
E F
G
H
ANo.:
GResult:
Alarm number
• Pass: Download succeeded
BPre Alarm:
• Fail: Download failed
• No display:
Start date and time of Pre Alarm recording.
CPost Alarm:
Download not yet executed
HPrevious/Next button:
Start date and time of Post Alarm recording.
DDuration:
Click this button to show the hidden alarms
when the number of alarm events exceeds
1000.
Approximate duration of recording (unit:
minutes)
Maximum error: Approximately 2 minutes
ESize (KB):
Size of recorded data
FType:
Alarm type
• Alarm 1/2:
Data detected on alarm input terminal 1/2.
• Motion:
Data detected by the motion sensor.
• Network Failure:
Data recorded that was triggered by
communication error.
• ALM1/2+M:
Data simultaneously detected by alarm
input terminal 1/2 and the motion sensor.
• Rec button:
Data recorded with REC button.
25
L5CL2_XE_US(INSTRUCTION).book 26 ページ
2008年8月25日 月曜日 午後3時43分
B Connect the SD card or external hard disk to your PC and copy the
required image/video data from it.
1
2
3
4
5
1 Select the display language.
5 Click [Time/Date Search].
[Alarm Search] cannot be used.
2 Click the "Copy from SD/HDD" radio
button.
3 Click the [...] button and specify the
drive and folder of the SD card or hard
disk.
4 Select the type of image/video to be
downloaded (JPEG or H.264).
To download both JPEG and H.264, select
both types.
MEMO:
[Alarm Search] (specifying an image in the
alarm list) cannot be used when copying
image/video data from an SD card or hard
disk.
& Carry out the procedure explained
in "Download by Time/Date". (P23)
26
L5CL2_XE_US(INSTRUCTION).book 27 ページ
2008年8月25日 月曜日 午後3時43分
Downloading and Playing back Recorded Video
Playing back Downloaded Video Data (DLViewer)
■ Using the operation panel
1
2
4
3
1Slide bar
3Speed bar (default setting: 3)
Slide the knob to move the playback point.
Slide the knob to change the playback speed.
MEMO:
• H.264: 5 steps
• JPEG: 10 steps
The date and time of the starting point and
ending point of the file appear at the ends of the
slide bar.
4Date and time display
Shows the date and time of the video data being
played back.
2Playback buttons
The year/month/day format can be changed.
: Moves back by frames when the video is
paused.
& See "Setting the Date Format". (P28)
: Pauses playback and shows a still
image.
5Time/Date Search
5
: Moves forward by frames when the video
is paused.
: Plays backward.
: Plays forward.
Specify the date and time of video data in the
selected folder and click [GO].
MEMO:
The specified video data will be played back.
To zoom in or out at a point, move the mouse
pointer to that point and rotate the mouse wheel.
You will zoom in or out in five steps.
• If there is no video data with the specified
date and time, the next video data will be
played back.
If there is no next data, an error message will
appear.
Note:
Moving back by frames and playing backward
are not possible with H.264 video data.
27
L5CL2_XE_US(INSTRUCTION).book 28 ページ
2008年8月25日 月曜日 午後3時43分
■ Saving and Printing Images
■ Date and Time Display Settings
Saving an Image
1 Click
Setting the Date Format
1 Select [View] → [Date Display Format]
on the toolbar.
on the menu bar.
2 Specify the folder, filename, and file
type, and click [Save].
Image data is saved as a still image.
File type:
Bitmap or JPEG can be selected.
Printing an Image
1 Click
2 Select the display format and delimiter,
and click [OK].
on the toolbar.
Setting the Time Display Position
Select [View] → [Time Display Position] on
the menu bar and click the desired display
position.
2 Check the print conditions and click
[OK].
b Displaying a title on the printed image
1Click [File] → [Title Input] on the menu bar.
• Up to 10 set titles are stored. Stored titles
can be selected from the pull-down menu.
2Enter a title in the [Title Input] screen and
click [OK].
28
L5CL2_XE_US(INSTRUCTION).book 29 ページ
2008年8月25日 月曜日 午後3時43分
Main specifications
Television system
Lens
Image pickup device
Effective pixels
Recording pixels
Lens
Camera
Video size (H.264)
Video size (JPEG)
Synchronization method
Lowest image illumination
Recording Picture quality
and
Recording rate
playback
Recording mode
I/O
Video output
Network
Image/video compression
Picture quality
Bandwidth
Interface
Protocol
Simultaneous access
Security
Operating ambient
temperature/humidity
Power source
Others
Power consumption
Weight
VCC-HD4000P/VCC-HDN4000PC: PAL color standards
VCC-HD4000: NTSC color standards
1/2.5” CMOS sensor
2,320 (H) × 1,728 (V), approx. 4.00 million pixels
2,288 (H) × 1,712 (V), approx. 3.92 million pixels
Focal length: f = 6.3 - 63.0 mm (Optical 10×)
F-number: F1.8 - 2.5
Electronic zoom: Max. ×16 (max. ×160 when combined with optical zoom)
VCC-HD4000P/VCC-HDN4000PC:
(16:9) HD 1920×1080p, HD 1280×720p, 960×540p, 640×360p, 320×180p
(4:3) 1080×864p, 720×576p, 360×288p
VCC-HD4000:
(16:9) HD 1920×1080p, HD 1280×720p, 960×540p, 640×360p, 320×180p
(4:3) 1080×720p, 720×480p, 360×240p
(16:9) HD 1920×1080, HD 1280×720, 1024×576, 640×360
(4:3) 4M 2288×1712, 4M 1600×1200, 1280×960, 1024×768, 800×600,
640×480, 320×240
Internal synchronization
2.0 lx (at F1.8, color, high gain, VGA)
0.1 lx (at F1.8, black-and-white, high gain, VGA)
BASIC, NORMAL, ENHANCED, FINE, SUPER FINE
JPEG/H.264 selectable
NORMAL/ALARM RECORDING: Timer recording
REC BUTTON RECORDING: Emergency recording
Backup recording in the event of a network recording failure: NORMAL (at
failure detection), ALARM (timer recording)
HD output: HDMI connector
SD output: BNC connector
LAN: 10BASE-T/100BASE-TX/1000BASE-TX (RJ-45 connector)
USB port: External hard disk case (2.5" HDD) supported
SD card slot: 1 (SDHC, max. 32 GB)
Alarm input: Control terminal 1/2 (NO (Normally Open) or NC (Normally
Closed)), also used for day/night switching input
Alarm output: Control terminal (NO/NC switching, 16V, 150mA, open
collector)
External lens control: Zoom, Focus, Common (Voltage control: ±6 to ±12V)
Operation buttons: MENU, SET, RESET, cursor buttons (4)
H.264/JPEG
BASIC, NORMAL, ENHANCED, FINE, SUPER FINE
NO LIMIT or selectable
10BASE-T/100BASE-TX/1000BASE-TX (PoE)
TCP/IP, UDP, HTTP, HTTPS, SMTP, NTP, DHCP, FTP, UPnP, DDNS
16
BASIC authentication (ID/password), SSL supported
–10 to +50°C, 90% RH or less (no condensation)
DC12V-15V
AC24V ±10%, 50/60Hz
12.3 W
710 g
Appearance and specifications are subject to change without prior notice or obligations.
29
L5CL2_XE_US(INSTRUCTION).book 30 ページ
2008年8月25日 月曜日 午後3時43分
b Service
The camera is a precision instrument. Handle it carefully and always follow the safety precautions.
If the camera requires service, never try to repair it yourself or open the casing.
For servicing, maintenance, or repairs, consult your dealer or an Authorized Sanyo Service Center.
b Notes on data storage
• It is recommended that important data be copied to a separate medium.
• In the following situations, it is possible that recorded data may be lost (destroyed). Our company
bears absolutely no responsibility for damages or profits loss due to the loss of data.
- The medium (SD card or external hard disk) is not used correctly.
- The medium is not installed on the device correctly.
- The medium is subjected to electrical or mechanical shock.
- The card is removed or the power is turned off while the card is being accessed.
- The medium has reached the end of its service life.
b Options
• Recording/Playback Software: VA-SW3050 Server/Client
• Camera Control Unit: VAC-70
• SANYO-specified external hard disk case: VA-HDC4000
For more information on the recommended hard disks, check the SANYO website:
• SD card (2 GB to 32 GB)
For more information on recommended SD cards, check the SANYO website:
www.sanyosecurity.com/
30
L5CL2_XE_US(INSTRUCTION).book 0 ページ
2008年8月25日 月曜日 午後3時43分
Recording times and target sizes
<CONTENTS>
b Recording time by resolution
VCC-HD4000P/VCC-HDN4000PC
1 Hard disk recording time ....................................... P1
2 SD memory card recording time ........................... P3
VCC-HD4000
1 Hard disk recording time ....................................... P5
2 SD memory card recording time ........................... P7
b Target size by resolution.........................P9
L5CL2_XE_US(INSTRUCTION).book 1 ページ
2008年8月25日 月曜日 午後3時43分
■ Recording time by resolution ■ Durée d'enregistrement par résolution
■ Aufnahmezeit nach Auflösung ■ Tiempo de grabación por resolución
■ 根据分辨率设置的录像时间
VCC-HD4000P/VCC-HDN4000PC
1 Hard disk recording time 1 Durée d'enregistrement du disque dur
1 Festplatte Aufnahmezeit 1 Tiempo de grabación de disco duro
1 硬盘录像时间
80GB
Picture quality
Recording rate
Resolution
(ips)
1920 × 1080p
1280 × 720p
H.264
(16:9)
960 × 540p
640 × 360p
320 × 180p
1080 × 864p
H.264
(4:3)
720 × 576p
360 × 288p
1920 × 1080
1280 × 720
JPEG
(16:9)
1024 × 576
640 × 360
25
12.5
25
12.5
25
12.5
25
12.5
25
12.5
25
12.5
25
12.5
25
12.5
5
2.5
1
0.5
0.2
0.1
8
5
2.5
1
0.5
0.2
0.1
12.5
8
5
2.5
1
0.5
0.2
0.1
25
12.5
8
5
2.5
1
0.5
0.2
0.1
SUPER FINE
FINE
ENHANCED
NORMAL
BASIC
14.4
15.9
17.4
19.5
23.0
28.8
63.7
71.6
225.6
250.1
17.4
19.5
32.9
35.9
114.1
126.6
14.0
27.9
69.8
139.5
348.8
697.6
18.0
28.8
57.7
144.2
288.3
720.8
1441.5
19.7
30.7
49.1
98.3
245.7
491.3
1228.3
2456.6
15.4
30.9
48.2
77.2
154.4
385.9
771.9
1929.6
3859.3
16.5
18.4
20.6
23.0
28.1
35.1
77.4
86.0
267.5
294.8
20.6
23.0
40.0
43.8
137.1
153.6
16.1
32.3
80.7
161.4
403.5
806.9
20.2
32.3
64.5
161.4
322.7
806.8
1613.6
22.2
34.6
55.4
110.9
277.1
554.3
1385.7
2771.4
17.3
34.6
54.0
86.4
172.9
432.2
864.4
2161.0
4321.9
19.2
21.9
25.0
28.1
35.9
45.0
97.7
108.7
319.3
348.3
25.0
28.1
51.2
56.0
174.5
191.9
19.3
38.6
96.5
193.1
482.7
965.4
23.1
37.0
73.9
184.8
369.6
924.0
1848.0
28.3
44.3
70.9
141.7
354.3
708.6
1771.6
3543.2
22.2
44.3
69.2
110.8
221.6
553.9
1107.9
2769.7
5539.5
23.0
27.1
31.9
35.9
49.9
62.7
132.4
145.8
396.1
441.6
31.9
35.9
71.6
78.4
234.8
261.4
24.0
48.1
120.1
240.3
600.7
1201.4
30.0
48.0
96.1
240.2
480.4
1201.0
2402.1
36.8
57.5
92.0
183.9
459.8
919.5
2298.8
4597.5
28.8
57.6
90.0
144.0
287.9
719.9
1439.7
3599.4
7198.7
28.8
38.3
45.9
52.2
88.0
103.8
205.5
225.6
546.1
603.2
45.9
52.2
116.4
129.4
370.6
410.2
32.0
64.1
160.2
320.3
800.8
1601.7
45.0
72.0
144.1
360.2
720.4
1801.1
3602.2
55.7
87.1
139.3
278.7
696.7
1393.4
3483.4
6966.9
43.2
86.3
134.9
215.8
431.6
1079.0
2157.9
5394.9
10789.7
• This table shows the total values for the normal area and the alarm area.
• Ce tableau indique les valeurs totales pour la zone normale et la zone d'alarme.
• In dieser Tabelle werden die Gesamtwerte des normalen Aufnahmebereichs und der Alarmaufnahmebereichs aufgeführt.
• Este cuadro muestra los valores totales para el área normal y el área de alarma.
• 本表显示正常区域和警报区域的总值。
1
L5CL2_XE_US(INSTRUCTION).book 2 ページ
80GB
Picture quality
Recording rate
(ips)
Resolution
2008年8月25日 月曜日 午後3時43分
SUPER FINE
FINE
ENHANCED
NORMAL
BASIC
2.5
16.0
19.0
23.4
30.4
43.2
1
40.1
47.5
58.5
75.9
108.1
2288 × 1712
0.5
80.1
95.1
116.9
151.8
216.2
0.2
200.3
237.7
292.3
379.4
540.6
0.1
400.5
475.3
584.5
758.8
1081.2
5
16.0
18.8
22.8
28.8
39.3
2.5
32.0
37.6
45.5
57.7
78.6
1
80.1
94.0
113.8
144.2
196.6
1600 × 1200
0.5
160.2
188.0
227.6
288.3
393.1
0.2
400.5
470.1
569.1
720.8
982.8
0.1
801.0
940.2
1138.1
1441.5
1965.5
8
13.5
15.2
17.3
22.5
33.8
5
21.6
24.3
27.7
36.0
54.0
2.5
43.2
48.6
55.4
72.1
108.1
1
108.1
121.5
138.6
180.2
270.2
1280 × 960
0.5
216.2
243.0
277.2
360.4
540.4
0.2
540.6
607.4
693.1
900.9
1351.1
0.1
1081.2
1214.8
1386.1
1801.8
2702.2
12.5
12.1
13.5
17.3
22.5
33.9
8
18.9
21.1
27.0
35.1
53.0
5
30.2
33.8
43.2
56.1
84.7
2.5
60.5
67.6
86.5
112.3
169.5
1024 × 768
1
151.2
168.9
216.2
280.7
423.7
0.5
302.4
337.8
432.4
561.5
847.5
0.2
756.0
844.6
1081.0
1403.7
2118.6
JPEG
0.1
1512.1
1689.2
2162.0
2807.4
4237.3
12.5
19.7
22.2
28.3
36.8
55.7
(4:3)
8
30.7
34.6
44.3
57.5
87.1
5
49.1
55.4
70.9
92.0
139.3
2.5
98.3
110.9
141.7
183.9
278.7
800 × 600
1
245.7
277.1
354.3
459.8
696.7
0.5
491.3
554.3
708.6
919.5
1393.4
0.2
1228.3
1385.7
1771.6
2298.8
3483.4
0.1
2456.6
2771.4
3543.2
4597.5
6966.9
25
15.4
17.3
22.2
28.8
43.2
12.5
30.9
34.6
44.3
57.6
86.3
8
48.2
54.0
69.2
90.0
134.9
5
77.2
86.4
110.8
144.0
215.8
2.5
154.4
172.9
221.6
287.9
431.6
640 × 480
1
385.9
432.2
553.9
719.9
1079.0
0.5
771.9
864.4
1107.9
1439.7
2157.9
0.2
1929.6
2161.0
2769.7
3599.4
5394.9
0.1
3859.3
4321.9
5539.5
7198.7
10789.7
25
24.7
33.2
41.1
57.5
78.3
12.5
49.4
66.4
82.2
115.0
156.6
8
77.1
103.8
128.5
179.7
244.8
5
123.4
166.1
205.5
287.5
391.6
2.5
246.9
332.2
411.1
575.0
783.2
320 × 240
1
617.2
830.4
1027.7
1437.5
1958.0
0.5
1234.3
1660.9
2055.4
2875.0
3916.0
0.2
3085.9
4152.1
5138.5
7187.5
9790.1
0.1
6171.7
8304.3
10277.1
14375.1
19580.2
• Recording time varies depending on the recording rate and recording image quality. The recording times indicated in the
table are reference values when an external hard disk is installed on this camera that may vary depending on the video
image quality and other conditions.
• La durée d'enregistrement varie en fonction du taux d'enregistrement et de la qualité de l'image enregistrée. Les durées
d'enregistrement indiquées dans le tableau sont des valeurs de référence quand un disque dur externe est installé sur cette
caméra ; elles peuvent varier en fonction de la qualité de l'image vidéo et d'autres conditions.
• Die Aufnahmezeit variiert je nach Aufnahmegeschwindigkeit und Qualität des aufgenommenen Bildes. Die in der Tabelle
angeführten Aufnahmezeiten dienen als Referenzwerte, wenn für diese Kamera eine externe Festplatte installiert wurde, und
können je nach Videobildqualität und anderen Bedingungen variieren.
• El tiempo de grabación varía en función de la tasa de grabación y de la calidad de las imágenes de grabación. Los tiempos
de grabación que se indican en la anterior son valores de referencia cuando un disco duro externo está instalado en esta
cámara los mismos que podrían variar en función de la calidad de imágenes y otras condiciones.
• 录像时间会根据录像速率和录像图像质量而变化。表中表示的录像时间为该摄像头安装外置硬盘之后的参考值,它
们可能会根据视频图像质量及其它条件而变化。
2
L5CL2_XE_US(INSTRUCTION).book 3 ページ
2008年8月25日 月曜日 午後3時43分
VCC-HD4000P
2SD memory card recording time
2Durée d'enregistrement de la carte mémoire SD
2SD-Speicherkarte Aufnahmezeit
2Tiempo de grabación de la tarjeta de memoria SD
2SD 记忆卡录像时间
2GB
Picture quality
Recording rate
(ips)
Resolution
1920 × 1080p
1280 × 720p
H.264
(16:9)
960 × 540p
640 × 360p
320 × 180p
1080 × 864p
H.264
(4:3)
720 × 576p
360 × 288p
1920 × 1080
1280 × 720
JPEG
(16:9)
1024 × 576
640 × 360
25
12.5
25
12.5
25
12.5
25
12.5
25
12.5
25
12.5
25
12.5
25
12.5
5
2.5
1
0.5
0.2
0.1
8
5
2.5
1
0.5
0.2
0.1
12.5
8
5
2.5
1
0.5
0.2
0.1
25
12.5
8
5
2.5
1
0.5
0.2
0.1
SUPER FINE
FINE
ENHANCED
NORMAL
BASIC
0.3
0.3
0.4
0.4
0.5
0.6
1.4
1.6
4.9
5.4
0.4
0.4
0.7
0.8
2.5
2.8
0.3
0.6
1.5
3.0
7.6
15.2
0.4
0.6
1.3
3.1
6.3
15.7
31.4
0.4
0.7
1.1
2.1
5.4
10.7
26.8
53.5
0.3
0.7
1.1
1.7
3.4
8.4
16.8
42.0
84.1
0.4
0.4
0.4
0.5
0.6
0.8
1.7
1.9
5.8
6.4
0.4
0.5
0.9
1.0
3.0
3.3
0.4
0.7
1.8
3.5
8.8
17.6
0.4
0.7
1.4
3.5
7.0
17.6
35.1
0.5
0.8
1.2
2.4
6.0
12.1
30.2
60.4
0.4
0.8
1.2
1.9
3.8
9.4
18.8
47.1
94.1
0.4
0.5
0.5
0.6
0.8
1.0
2.1
2.4
7.0
7.6
0.5
0.6
1.1
1.2
3.8
4.2
0.4
0.8
2.1
4.2
10.5
21.0
0.5
0.8
1.6
4.0
8.1
20.1
40.3
0.6
1.0
1.5
3.1
7.7
15.4
38.6
77.2
0.5
1.0
1.5
2.4
4.8
12.1
24.1
60.3
120.7
0.5
0.6
0.7
0.8
1.1
1.4
2.9
3.2
8.6
9.6
0.7
0.8
1.6
1.7
5.1
5.7
0.5
1.0
2.6
5.2
13.1
26.2
0.7
1.0
2.1
5.2
10.5
26.2
52.3
0.8
1.3
2.0
4.0
10.0
20.0
50.1
100.1
0.6
1.3
2.0
3.1
6.3
15.7
31.4
78.4
156.8
0.6
0.8
1.0
1.1
1.9
2.3
4.5
4.9
11.9
13.1
1.0
1.1
2.5
2.8
8.1
8.9
0.7
1.4
3.5
7.0
17.4
34.9
1.0
1.6
3.1
7.8
15.7
39.2
78.5
1.2
1.9
3.0
6.1
15.2
30.4
75.9
151.8
0.9
1.9
2.9
4.7
9.4
23.5
47.0
117.5
235.0
• This table shows the total values for the normal area and the alarm area.
• Ce tableau indique les valeurs totales pour la zone normale et la zone d'alarme.
• In dieser Tabelle werden die Gesamtwerte des normalen Aufnahmebereichs und der Alarmaufnahmebereichs aufgeführt.
• Este cuadro muestra los valores totales para el área normal y el área de alarma.
• 本表显示正常区域和警报区域的总值。
3
L5CL2_XE_US(INSTRUCTION).book 4 ページ
2GB
Picture quality
Recording rate
(ips)
Resolution
2008年8月25日 月曜日 午後3時43分
SUPER FINE
FINE
ENHANCED
NORMAL
BASIC
2.5
0.3
0.4
0.5
0.7
0.9
1
0.9
1.0
1.3
1.7
2.4
2288 × 1712
0.5
1.7
2.1
2.5
3.3
4.7
0.2
4.4
5.2
6.4
8.3
11.8
0.1
8.7
10.4
12.7
16.5
23.6
5
0.3
0.4
0.5
0.6
0.9
2.5
0.7
0.8
1.0
1.3
1.7
1
1.7
2.0
2.5
3.1
4.3
1600 × 1200
0.5
3.5
4.1
5.0
6.3
8.6
0.2
8.7
10.2
12.4
15.7
21.4
0.1
17.4
20.5
24.8
31.4
42.8
8
0.3
0.3
0.4
0.5
0.7
5
0.5
0.5
0.6
0.8
1.2
2.5
0.9
1.1
1.2
1.6
2.4
1
2.4
2.6
3.0
3.9
5.9
1280 × 960
0.5
4.7
5.3
6.0
7.8
11.8
0.2
11.8
13.2
15.1
19.6
29.4
0.1
23.6
26.5
30.2
39.2
58.9
12.5
0.3
0.3
0.4
0.5
0.7
8
0.4
0.5
0.6
0.8
1.2
5
0.7
0.7
0.9
1.2
1.8
2.5
1.3
1.5
1.9
2.4
3.7
1024 × 768
1
3.3
3.7
4.7
6.1
9.2
0.5
6.6
7.4
9.4
12.2
18.5
0.2
16.5
18.4
23.5
30.6
46.1
JPEG
0.1
32.9
36.8
47.1
61.1
92.3
12.5
0.4
0.5
0.6
0.8
1.2
(4:3)
8
0.7
0.8
1.0
1.3
1.9
5
1.1
1.2
1.5
2.0
3.0
2.5
2.1
2.4
3.1
4.0
6.1
800 × 600
1
5.4
6.0
7.7
10.0
15.2
0.5
10.7
12.1
15.4
20.0
30.4
0.2
26.8
30.2
38.6
50.1
75.9
0.1
53.5
60.4
77.2
100.1
151.8
25
0.3
0.4
0.5
0.6
0.9
12.5
0.7
0.8
1.0
1.3
1.9
8
1.1
1.2
1.5
2.0
2.9
5
1.7
1.9
2.4
3.1
4.7
2.5
3.4
3.8
4.8
6.3
9.4
640 × 480
1
8.4
9.4
12.1
15.7
23.5
0.5
16.8
18.8
24.1
31.4
47.0
0.2
42.0
47.1
60.3
78.4
117.5
0.1
84.1
94.1
120.7
156.8
235.0
25
0.5
0.7
0.9
1.3
1.7
12.5
1.1
1.4
1.8
2.5
3.4
8
1.7
2.3
2.8
3.9
5.3
5
2.7
3.6
4.5
6.3
8.5
2.5
5.4
7.2
9.0
12.5
17.1
320 × 240
1
13.4
18.1
22.4
31.3
42.6
0.5
26.9
36.2
44.8
62.6
85.3
0.2
67.2
90.4
111.9
156.6
213.2
0.1
134.4
180.9
223.9
313.1
426.5
• Recording time varies depending on the recording rate and recording image quality. The recording times indicated in the
table are reference values when an SD memory card is installed in this camera that may vary depending on the video image
quality and other conditions.
• La durée d'enregistrement varie en fonction du taux d'enregistrement et de la qualité de l'image enregistrée. Les durées
d'enregistrement indiquées dans le tableau sont des valeurs de référence quand une carte mémoire SD est installée sur
cette caméra ; elles peuvent varier en fonction de la qualité de l'image vidéo et d'autres conditions.
• Die Aufnahmezeit variiert je nach Aufnahmegeschwindigkeit und Qualität des aufgenommenen Bildes. Die in der Tabelle
angeführten Aufnahmezeiten dienen als Referenzwerte, wenn für diese Kamera eine SD-Speicherkarte installiert wurde, und
können je nach Videobildqualität und anderen Bedingungen variieren.
• El tiempo de grabación varía en función de la tasa de grabación y de la calidad de las imágenes de grabación. Los tiempos
de grabación que se indican en la tabla son valores de referencia cuando una tarjeta de memoria SD está instalada en esta
cámara los mismos que podrían variar en función de la calidad de imágenes y otras condiciones.
• 录像时间会根据录像速率和录像图像质量而变化。表中表示的录像时间为该摄像头安装 SD 记忆卡之后的参考值,它
们可能会根据视频图像质量及其它条件而变化。
4
L5CL2_XE_US(INSTRUCTION).book 5 ページ
2008年8月25日 月曜日 午後3時43分
VCC-HD4000
1 Hard disk recording time 1 Durée d'enregistrement du disque dur
1 Festplatte Aufnahmezeit 1 Tiempo de grabación de disco duro
1 硬盘录像时间
80GB
Picture quality
Recording rate
(ips)
Resolution
1920 × 1080p
1280 × 720p
H.264
(16:9)
960 × 540p
640 × 360p
320 × 180p
1080 × 720p
H.264
(4:3)
720 × 480p
360 × 240p
1920 × 1080
1280 × 720
JPEG
(16:9)
1024 × 576
640 × 360
30
15
30
15
30
15
30
15
30
15
30
15
30
15
30
15
5
3
1
0.5
0.2
0.1
10
5
3
1
0.5
0.2
0.1
15
10
5
3
1
0.5
0.2
0.1
30
15
10
5
3
1
0.5
0.2
0.1
SUPER FINE
FINE
ENHANCED
NORMAL
BASIC
14.4
15.9
17.4
19.5
23.0
28.8
63.7
71.6
225.6
250.1
17.4
19.5
32.9
35.9
114.1
126.6
14.0
23.3
69.8
139.5
348.8
697.6
14.4
28.8
48.1
144.2
288.3
720.8
1441.5
16.4
24.6
49.1
81.9
245.7
491.3
1228.3
2456.6
12.9
25.7
38.6
77.2
128.6
385.9
771.9
1929.6
3859.3
16.5
18.4
20.6
23.0
28.1
35.1
77.4
86.0
267.5
294.8
20.6
23.0
40.0
43.8
137.1
153.6
16.1
26.9
80.7
161.4
403.5
806.9
16.1
32.3
53.8
161.4
322.7
806.8
1613.6
18.5
27.7
55.4
92.4
277.1
554.3
1385.7
2771.4
14.4
28.8
43.2
86.4
144.1
432.2
864.4
2161.0
4321.9
19.2
21.9
25.0
28.1
35.9
45.0
97.7
108.7
319.3
348.3
25.0
28.1
51.2
56.0
174.5
191.9
19.3
32.2
96.5
193.1
482.7
965.4
18.5
37.0
61.6
184.8
369.6
924.0
1848.0
23.6
35.4
70.9
118.1
354.3
708.6
1771.6
3543.2
18.5
36.9
55.4
110.8
184.6
553.9
1107.9
2769.7
5539.5
23.0
27.1
31.9
35.9
49.9
62.7
132.4
145.8
396.1
441.6
31.9
35.9
71.6
78.4
234.8
261.4
24.0
40.0
120.1
240.3
600.7
1201.4
24.0
48.0
80.1
240.2
480.4
1201.0
2402.1
30.7
46.0
92.0
153.3
459.8
919.5
2298.8
4597.5
24.0
48.0
72.0
144.0
240.0
719.9
1439.7
3599.4
7198.7
28.8
38.3
45.9
52.2
88.0
103.8
205.5
225.6
546.1
603.2
45.9
52.2
116.4
129.4
370.6
410.2
32.0
53.4
160.2
320.3
800.8
1601.7
36.0
72.0
120.1
360.2
720.4
1801.1
3602.2
46.4
69.7
139.3
232.2
696.7
1393.4
3483.4
6966.9
36.0
71.9
107.9
215.8
359.7
1079.0
2157.9
5394.9
10789.7
• This table shows the total values for the normal area and the alarm area.
• Ce tableau indique les valeurs totales pour la zone normale et la zone d'alarme.
• In dieser Tabelle werden die Gesamtwerte des normalen Aufnahmebereichs und der Alarmaufnahmebereichs aufgeführt.
• Este cuadro muestra los valores totales para el área normal y el área de alarma.
• 本表显示正常区域和警报区域的总值。
5
L5CL2_XE_US(INSTRUCTION).book 6 ページ
80GB
Picture quality
Recording rate
(ips)
Resolution
2008年8月25日 月曜日 午後3時43分
SUPER FINE
FINE
ENHANCED
NORMAL
BASIC
3
13.4
15.8
19.5
25.3
36.0
1
40.1
47.5
58.5
75.9
108.1
2288 × 1712
0.5
80.1
95.1
116.9
151.8
216.2
0.2
200.3
237.7
292.3
379.4
540.6
0.1
400.5
475.3
584.5
758.8
1081.2
5
16.0
18.8
22.8
28.8
39.3
3
26.7
31.3
37.9
48.1
65.5
1
80.1
94.0
113.8
144.2
196.6
1600 × 1200
0.5
160.2
188.0
227.6
288.3
393.1
0.2
400.5
470.1
569.1
720.8
982.8
0.1
801.0
940.2
1138.1
1441.5
1965.5
10
10.8
12.1
13.9
18.0
27.0
5
21.6
24.3
27.7
36.0
54.0
3
36.0
40.5
46.2
60.1
90.1
1
108.1
121.5
138.6
180.2
270.2
1280 × 960
0.5
216.2
243.0
277.2
360.4
540.4
0.2
540.6
607.4
693.1
900.9
1351.1
0.1
1081.2
1214.8
1386.1
1801.8
2702.2
15
10.1
11.3
14.4
18.7
28.2
10
15.1
16.9
21.6
28.1
42.4
5
30.2
33.8
43.2
56.1
84.7
3
50.4
56.3
72.1
93.6
141.2
1024 × 768
1
151.2
168.9
216.2
280.7
423.7
0.5
302.4
337.8
432.4
561.5
847.5
0.2
756.0
844.6
1081.0
1403.7
2118.6
JPEG
0.1
1512.1
1689.2
2162.0
2807.4
4237.3
15
16.4
18.5
23.6
30.7
46.4
(4:3)
10
24.6
27.7
35.4
46.0
69.7
5
49.1
55.4
70.9
92.0
139.3
3
81.9
92.4
118.1
153.3
232.2
800 × 600
1
245.7
277.1
354.3
459.8
696.7
0.5
491.3
554.3
708.6
919.5
1393.4
0.2
1228.3
1385.7
1771.6
2298.8
3483.4
0.1
2456.6
2771.4
3543.2
4597.5
6966.9
30
12.9
14.4
18.5
24.0
36.0
15
25.7
28.8
36.9
48.0
71.9
10
38.6
43.2
55.4
72.0
107.9
5
77.2
86.4
110.8
144.0
215.8
3
128.6
144.1
184.6
240.0
359.7
640 × 480
1
385.9
432.2
553.9
719.9
1079.0
0.5
771.9
864.4
1107.9
1439.7
2157.9
0.2
1929.6
2161.0
2769.7
3599.4
5394.9
0.1
3859.3
4321.9
5539.5
7198.7
10789.7
30
20.6
27.7
34.3
47.9
65.3
15
41.1
55.4
68.5
95.8
130.5
10
61.7
83.0
102.8
143.8
195.8
5
123.4
166.1
205.5
287.5
391.6
3
205.7
276.8
342.6
479.2
652.7
320 × 240
1
617.2
830.4
1027.7
1437.5
1958.0
0.5
1234.3
1660.9
2055.4
2875.0
3916.0
0.2
3085.9
4152.1
5138.5
7187.5
9790.1
0.1
6171.7
8304.3
10277.1
14375.1
19580.2
• Recording time varies depending on the recording rate and recording image quality. The recording times indicated in the
table are reference values when an external hard disk is installed on this camera that may vary depending on the video
image quality and other conditions.
• La durée d'enregistrement varie en fonction du taux d'enregistrement et de la qualité de l'image enregistrée. Les durées
d'enregistrement indiquées dans le tableau sont des valeurs de référence quand un disque dur externe est installé sur cette
caméra ; elles peuvent varier en fonction de la qualité de l'image vidéo et d'autres conditions.
• Die Aufnahmezeit variiert je nach Aufnahmegeschwindigkeit und Qualität des aufgenommenen Bildes. Die in der Tabelle
angeführten Aufnahmezeiten dienen als Referenzwerte, wenn für diese Kamera eine externe Festplatte installiert wurde, und
können je nach Videobildqualität und anderen Bedingungen variieren.
• El tiempo de grabación varía en función de la tasa de grabación y de la calidad de las imágenes de grabación. Los tiempos
de grabación que se indican en la anterior son valores de referencia cuando un disco duro externo está instalado en esta
cámara los mismos que podrían variar en función de la calidad de imágenes y otras condiciones.
• 录像时间会根据录像速率和录像图像质量而变化。表中表示的录像时间为该摄像头安装外置硬盘之后的参考值,它
们可能会根据视频图像质量及其它条件而变化。
6
L5CL2_XE_US(INSTRUCTION).book 7 ページ
2008年8月25日 月曜日 午後3時43分
VCC-HD4000
2SD memory card recording time
2Durée d'enregistrement de la carte mémoire SD
2SD-Speicherkarte Aufnahmezeit
2Tiempo de grabación de la tarjeta de memoria SD
2SD 记忆卡录像时间
2GB
Picture quality
Recording rate
(ips)
Resolution
1920 × 1080p
1280 × 720p
H.264
(16:9)
960 × 540p
640 × 360p
320 × 180p
1080 × 720p
H.264
(4:3)
720 × 480p
360 × 240p
1920 × 1080
1280 × 720
JPEG
(16:9)
1024 × 576
640 × 360
30
15
25
12.5
25
12.5
25
12.5
25
12.5
25
12.5
25
12.5
25
12.5
5
2.5
1
0.5
0.2
0.1
8
5
2.5
1
0.5
0.2
0.1
12.5
8
5
2.5
1
0.5
0.2
0.1
25
12.5
8
5
2.5
1
0.5
0.2
0.1
SUPER FINE
FINE
ENHANCED
NORMAL
BASIC
0.3
0.3
0.4
0.4
0.5
0.6
1.4
1.6
4.9
5.4
0.4
0.4
0.7
0.8
2.5
2.8
0.3
0.5
1.5
3.0
7.6
15.2
0.3
0.6
1.0
3.1
6.3
15.7
31.4
0.4
0.5
1.1
1.8
5.4
10.7
26.8
53.5
0.3
0.6
0.8
1.7
2.8
8.4
16.8
42.0
84.1
0.4
0.4
0.4
0.5
0.6
0.8
1.7
1.9
5.8
6.4
0.4
0.5
0.9
1.0
3.0
3.3
0.4
0.6
1.8
3.5
8.8
17.6
0.4
0.7
1.2
3.5
7.0
17.6
35.1
0.4
0.6
1.2
2.0
6.0
12.1
30.2
60.4
0.3
0.6
0.9
1.9
3.1
9.4
18.8
47.1
94.1
0.4
0.5
0.5
0.6
0.8
1.0
2.1
2.4
7.0
7.6
0.5
0.6
1.1
1.2
3.8
4.2
0.4
0.7
2.1
4.2
10.5
21.0
0.4
0.8
1.3
4.0
8.1
20.1
40.3
0.5
0.8
1.5
2.6
7.7
15.4
38.6
77.2
0.4
0.8
1.2
2.4
4.0
12.1
24.1
60.3
120.7
0.5
0.6
0.7
0.8
1.1
1.4
2.9
3.2
8.6
9.6
0.7
0.8
1.6
1.7
5.1
5.7
0.5
0.9
2.6
5.2
13.1
26.2
0.5
1.0
1.7
5.2
10.5
26.2
52.3
0.7
1.0
2.0
3.3
10.0
20.0
50.1
100.1
0.5
1.0
1.6
3.1
5.2
15.7
31.4
78.4
156.8
0.6
0.8
1.0
1.1
1.9
2.3
4.5
4.9
11.9
13.1
1.0
1.1
2.5
2.8
8.1
8.9
0.7
1.2
3.5
7.0
17.4
34.9
0.8
1.6
2.6
7.8
15.7
39.2
78.5
1.0
1.5
3.0
5.1
15.2
30.4
75.9
151.8
0.8
1.6
2.4
4.7
7.8
23.5
47.0
117.5
235.0
• This table shows the total values for the normal area and the alarm area.
• Ce tableau indique les valeurs totales pour la zone normale et la zone d'alarme.
• In dieser Tabelle werden die Gesamtwerte des normalen Aufnahmebereichs und der Alarmaufnahmebereichs aufgeführt.
• Este cuadro muestra los valores totales para el área normal y el área de alarma.
• 本表显示正常区域和警报区域的总值。
7
L5CL2_XE_US(INSTRUCTION).book 8 ページ
2GB
Picture quality
Recording rate
(ips)
Resolution
2008年8月25日 月曜日 午後3時43分
SUPER FINE
FINE
ENHANCED
NORMAL
BASIC
3
0.3
0.3
0.4
0.6
0.8
1
0.9
1.0
1.3
1.7
2.4
2288 × 1712
0.5
1.7
2.1
2.5
3.3
4.7
0.2
4.4
5.2
6.4
8.3
11.8
0.1
8.7
10.4
12.7
16.5
23.6
5
0.3
0.4
0.5
0.6
0.9
3
0.6
0.7
0.8
1.0
1.4
1
1.7
2.0
2.5
3.1
4.3
1600 × 1200
0.5
3.5
4.1
5.0
6.3
8.6
0.2
8.7
10.2
12.4
15.7
21.4
0.1
17.4
20.5
24.8
31.4
42.8
10
0.2
0.3
0.3
0.4
0.6
5
0.5
0.5
0.6
0.8
1.2
3
0.8
0.9
1.0
1.3
2.0
1
2.4
2.6
3.0
3.9
5.9
1280 × 960
0.5
4.7
5.3
6.0
7.8
11.8
0.2
11.8
13.2
15.1
19.6
29.4
0.1
23.6
26.5
30.2
39.2
58.9
15
0.2
0.2
0.3
0.4
0.6
10
0.3
0.4
0.5
0.6
0.9
5
0.7
0.7
0.9
1.2
1.8
3
1.1
1.2
1.6
2.0
3.1
1024 × 768
1
3.3
3.7
4.7
6.1
9.2
0.5
6.6
7.4
9.4
12.2
18.5
0.2
16.5
18.4
23.5
30.6
46.1
JPEG
0.1
32.9
36.8
47.1
61.1
92.3
15
0.4
0.4
0.5
0.7
1.0
(4:3)
10
0.5
0.6
0.8
1.0
1.5
5
1.1
1.2
1.5
2.0
3.0
3
1.8
2.0
2.6
3.3
5.1
800 × 600
1
5.4
6.0
7.7
10.0
15.2
0.5
10.7
12.1
15.4
20.0
30.4
0.2
26.8
30.2
38.6
50.1
75.9
0.1
53.5
60.4
77.2
100.1
151.8
30
0.3
0.3
0.4
0.5
0.8
15
0.6
0.6
0.8
1.0
1.6
10
0.8
0.9
1.2
1.6
2.4
5
1.7
1.9
2.4
3.1
4.7
3
2.8
3.1
4.0
5.2
7.8
640 × 480
1
8.4
9.4
12.1
15.7
23.5
0.5
16.8
18.8
24.1
31.4
47.0
0.2
42.0
47.1
60.3
78.4
117.5
0.1
84.1
94.1
120.7
156.8
235.0
30
0.4
0.6
0.7
1.0
1.4
15
0.9
1.2
1.5
2.1
2.8
10
1.3
1.8
2.2
3.1
4.3
5
2.7
3.6
4.5
6.3
8.5
3
4.5
6.0
7.5
10.4
14.2
320 × 240
1
13.4
18.1
22.4
31.3
42.6
0.5
26.9
36.2
44.8
62.6
85.3
0.2
67.2
90.4
111.9
156.6
213.2
0.1
134.4
180.9
223.9
313.1
426.5
• Recording time varies depending on the recording rate and recording image quality. The recording times indicated in the
table are reference values when an SD memory card is installed in this camera that may vary depending on the video image
quality and other conditions.
• La durée d'enregistrement varie en fonction du taux d'enregistrement et de la qualité de l'image enregistrée. Les durées
d'enregistrement indiquées dans le tableau sont des valeurs de référence quand une carte mémoire SD est installée sur
cette caméra ; elles peuvent varier en fonction de la qualité de l'image vidéo et d'autres conditions.
• Die Aufnahmezeit variiert je nach Aufnahmegeschwindigkeit und Qualität des aufgenommenen Bildes. Die in der Tabelle
angeführten Aufnahmezeiten dienen als Referenzwerte, wenn für diese Kamera eine SD-Speicherkarte installiert wurde, und
können je nach Videobildqualität und anderen Bedingungen variieren.
• El tiempo de grabación varía en función de la tasa de grabación y de la calidad de las imágenes de grabación. Los tiempos
de grabación que se indican en la tabla son valores de referencia cuando una tarjeta de memoria SD está instalada en esta
cámara los mismos que podrían variar en función de la calidad de imágenes y otras condiciones.
• 录像时间会根据录像速率和录像图像质量而变化。表中表示的录像时间为该摄像头安装 SD 记忆卡之后的参考值,它
们可能会根据视频图像质量及其它条件而变化。
8
L5CL2_XE_US(INSTRUCTION).book 9 ページ
2008年8月25日 月曜日 午後3時43分
■ Target size by resolution ■ Taille cible par résolution
■ Zielgröße nach Auflösung ■ Tamaño del objetivo por resolución
■ 根据分辨率设置的目标物体大小
VCC-HD4000P/VCC-HD4000/VCC-HDN4000PC
Picture quality
Recording rate
(ips)
Resolution
1920 × 1080p
1280 × 720p
H.264
(16:9)
960 × 540p
640 × 360p
320 × 180p
H.264
(4:3)
JPEG
(16:9)
JPEG
(4:3)
1080 × 720p
(1080 × 864p)
720 × 480p
(720 × 576p)
360 × 240p
(360 × 288p)
1920 × 1080
1280 × 720
1024 × 576
640 × 360
2288 × 1712
1600 × 1200
1280 × 960
1024 × 768
800 × 600
640 × 480
320 × 240
25 (30)
12.5 (15)
25 (30)
12.5 (15)
25 (30)
12.5 (15)
25 (30)
12.5 (15)
25 (30)
12.5 (15)
25 (30)
12.5 (15)
25 (30)
12.5 (15)
25 (30)
12.5 (15)
–
–
–
–
–
–
–
–
–
–
–
SUPER FINE
FINE
ENHANCED
NORMAL
BASIC
8000
7250
6600
5900
5000
4000
1800
1600
500
450
6600
5900
3500
3200
1000
900
310
150
88
56
540
270
200
143
88
56
35
7000
6250
5600
5000
4100
3280
1480
1330
420
380
5600
5000
2870
2620
830
740
268
134
78
50
455
230
178
128
78
50
26
6000
5250
4600
4100
3200
2550
1170
1050
350
320
4600
4100
2240
2050
650
590
224
117
61
39
370
190
156
100
61
39
21
5000
4250
3600
3200
2300
1830
860
780
280
250
3600
3200
1600
1460
480
430
180
90
47
30
285
150
120
77
47
30
15
4000
3000
2500
2200
1300
1100
550
500
200
180
2500
2200
980
880
300
270
135
60
31
20
200
110
80
51
31
20
11
• The target sizes are reference values that may vary depending on the video image quality and other conditions.
• Values in parenthesis are for NTSC.
• Les tailles cibles sont des valeurs référencées qui peuvent varier en fonction de la qualité d'image et d'autres
conditions.
• Les valeurs entre parenthèses sont pour NTSC.
• Bei den Zielgrößen handelt es sich um Referenzwerte, die je nach Videobildqualität und anderen Bedingungen
variieren können.
• Die Werte in Klammern gelten für NTSC.
• Los tamaños del objetivo y valores de referencia podrían variar en función de la calidad de las imágenes y otras
condiciones.
• Los valores entre paréntesis son para NTSC.
• 目标物体大小为参考值,它们可能会根据视频图像质量及其它条件而变化。
• 括号中的值适用于 NTSC。
9
L5CL2_XE_US(INSTRUCTION).book 10 ページ
2008年8月25日 月曜日 午後3時43分
Display Information
● Error message
E01: HDD ERROR
E02: SD CARD ERROR
E03: TEMPERATURE ERROR
● Warning message
W01: FAN WARNING
W02: POWER RECOVER/POWER LOSS
W03: USB CURRENT WARNING
W04: NORMAL RECORDING AREA FULL
W05: ALARM RECORDING AREA FULL
W10: HDD TEMPERATURE
W11: NO MEDIA
● System information
S01: RESTORE FACTORY SETTINGS
S02: FIRMWARE UPDATE:MAIN
S03: FIRMWARE UPDATE:SUB
S04: HDD FORMAT
S05: SD CARD FORMAT
S06: RESTORE SETTINGS/COPY RECORDING AREA SETTINGS: ON
S07: RESTORE SETTINGS/COPY RECORDING AREA SETTINGS: OFF
L5CL2_XE_US(INSTRUCTION).book 0 ページ
2008年8月25日 月曜日 午後3時43分
Dimensions
161 (6.3)
159 (6.2)
67 (2.6)
69 (2.7)
95 (3.7)
Unit: mm (inch)
Accessories
*1
1
2
(VCC-HD4000)
*1 VCC-HD4000P
: English/Français/Deutsch/中文简体
VCC-HD4000
: English/Français/Español
VCC-HDN4000PC : 中文简体
1AC6P1P3313-L5CL2/XE, US, C (0808KP-HS)
SANYO Electric Co., Ltd.