1
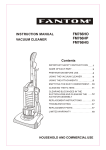
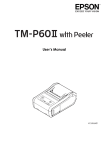
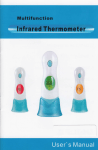
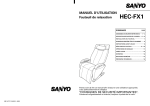
INSTRUCTION MANUAL
VACUUM CLEANER
SC-X80
SC-X90
Contents
IMPORTANT SAFETY INSTRUCTIONS
1
NAMES OF EACH PART
3
PREPARATIONS BEFORE USE
4
USING THE VACUUM CLEANER
6
USING THE ATTACHMENTS
7
EMPTYING THE DUST COMPARTMENT
8
CLEANING THE FILTERS
9
CLEANING THE SECONDARY FILTERS
10
CLEARING BLOCKAGES AND
CLEANING THE AGITATOR ASSEMBLY
11
REPLACEMENT INSTRUCTIONS
12
TROUBLESHOOTING
15
15
REPLACEMENT PARTS
HOUSEHOLD USE ONLY
IMPORTANT SAFETY INSTRUCTIONS
When using an electrical appliance, basic precautions should always be
followed, including the following.
READ ALL INSTRUCTIONS
BEFORE USING THIS VACUUM CLEANER
WARNING - To reduce the risk of fire, electric shock or injury:
1. Do not leave the vacuum cleaner when plugged in. Unplug it from the outlet
when not in use and before servicing.
2. Do not use outdoors or on wet surfaces.
3. Do not allow it to be used as a toy. Close attention is necessary when used
by or near children or infirmed persons.
4. Use only as described in this manual. Use only the manufacturer's
recommended attachments.
5. Do not use with a damaged cord or plug. If the vacuum cleaner is not
working as it should, or if it has been dropped, damaged, left outdoors or
dropped into water, return it to a service center.
6. Do not pull or carry by the cord, use the cord as a handle, close a door on the
cord, or pull the cord around sharp edges or corners. Do not run the vacuum
cleaner over the cord. Keep the cord away from heated surfaces.
7. Do not unplug by pulling on the cord. To unplug, grasp the plug, not the cord.
8. Do not handle the plug or the vacuum cleaner with wet hands.
9. Do not put any objects into the openings. Do not use with any opening
blocked: keep free of dust, lint, hair and anything that may reduce air flow.
10. Keep hair, loose clothing, fingers and all the parts of your body away from
openings and moving parts.
11. Do not pick up anything that is burning or smoking, such as cigarettes,
matches or hot ashes.
12. Do not use without dust compartment and/or filters in place.
13. Turn off all controls before unplugging.
14. Use extra care when cleaning on stairs.
15. Do not use to pick up flammable or combustible liquids such as gasoline, or
use in areas where they may be present.
1
16. Do not touch the agitator while it is spinning.
17. Do not place any heavy items on top of the vacuum cleaner.
18. Do not step on the hose or pull it too strongly.
19. Do not pick up items such as pieces of waste paper or cloth which look as
though they may cause the hose to become blocked.
20. Do not clean or store the vacuum cleaner in places where there are high
temperatures.
21. Store the vacuum cleaner away from excessive humidity.
22. When carrying the vacuum cleaner, hold it by the carrying handle.
23. Before servicing the vacuum cleaner, allow all metal parts to cool first.
24. Always place foot on handle release when adjusting the handle position
of the vacuum cleaner.
25. If the supply cord of this appliance is damaged, it must only be replaced by
a repair shop appointed by the manufacturer, because special purpose
tools are required.
SAVE THESE INSTRUCTIONS
This vacuum cleaner is intended for household use only.
2
NAMES OF EACH PART
FRONT
REAR
Handle
Cord Storage
Hooks
Suction Hose
Hose
Holder
Release Button
Carrying Handle
Dust
Compartment
ON/OFF Switch
Power Cord
Power Cord Plug
Plug shown in
figure may differ
from actual plug
attached to unit
for your area.
Crevice Tool
Wand
Filter Cover
Upholstery Tool &
Dusting Brush
Handle Release
Holder
Mount
Fork
WARNING:
Operate vacuum cleaner only at the voltage specified on name plate.
3
PREPARATIONS BEFORE USE
Caution: Do not connect the power cord plug to the wall outlet until assembly
is completed.
Attaching the handle
vacuum cleaner
The handle screw has
1 toSetthetheupright
2 been
position.
installed for
shipping purposes.
Remove the screw
before inserting
handle. Insert the
handle as shown
in the illustration.
the screw that you
3 Insert
removed.Be sure screw
is tightened,but not
over tightened.
Handle Screw
Handle Screw
Attaching the suction hose & attachments
TURN
Hose
Holder
Crevice Tool
TURN
Wands
TURN
Upholstery Tool &
Dusting Brush
4
PREPARATIONS BEFORE USE
WINDING THE POWER CORD
Hook the power cord over
1 the
clip which is located on
Wind the power cord around the cord
2 storage
hooks.
the upper cord storage hook
as shown.
Cord Storage
Hooks
Plug
Side
Clip
Hose
Holder
Plug shown in figure may
differ from actual plug
attached to unit for
your area.
Holder
Mount
RELEASING THE POWER CORD
Rotate the upper cord storage hook
1 downward.
Return the hook to the
2 upright
position before
attempting to rewind the
power cord.
Upper Cord
Storage Hook
INSERTING THE POWER CORD PLUG
Insert the power cord plug into the
wall outlet.
Plug shown in figure may
differ from actual plug
attached to unit for
your area.
5
USING THE VACUUM CLEANER
ON/OFF SWITCH
Start or stop vacuum cleaner
by pushing on the switch.
OFF
ON/OFF Switch
ON
ADJUSTING THE HANDLE
The handle of this vacuum cleaner can be set to one of
three positions-Upright,Normal,Parallel.Place your foot
on either one of the handle release points as shown and pull
back on the handle until it releases from its upright position.
Handle Release
Upright position
Normal position
The handle is normally locked in this
position for storage or when using the
attachments.
Push the handle forward
until it locks.
This position is used for normal cleaning.
Parallel position
This position is used for cleaning under
furniture.
EDGE CLEANING
This vacuum cleaner is equipped with an "edge cleaning" function for cleaning carpet edges
near baseboards and stationary furniture.
6
USING THE ATTACHMENTS
Caution: When using the attachments during cleaning, set the vacuum
cleaner to the upright position.
1
2
Disconnect the hose from the vacuum
cleaner.
Hose
Pull the hose gently in the direction of
the arrow to disconnect it.
Hook the hose holder onto the
holder mount.
Caution:
Before using the attachments,
please make sure the hose is
hooked on the holder mount.
Hose
Holder
2
3
Remove the wands from the
vacuum cleaner.
Holder
Mount
1
Two wands are contained together.
Pull out the second wand as shown.
Caution:
When removing the attachments,pull
them in the directions shown in the
illustration.Pulling them in the wrong
direction or pulling them forcefully may
cause damage to the attachment ribs.
4
Wands
Crevice
Tool
Second
Wand
Install the wand to the hose.
To achieve maximum reach with the attachments,attach the crevice tool to the end of the wand.
Securely and firmly connect the wand to the hose while twisting the wand, as shown in the
illustration below.
The end of the wand which has the marking of
should be connected to the hose.
The upholstery tool & dusting brush can be attached directly to the wand, hose or the end of the
crevice tool. Refer to the illustration for the correct way to position the upholstery tool &
dusting brush.
Wands
Crevice Tool
Crevice Tool
Wand
Hose
Upholstery
Tool
Dusting Brush
Hose
Crevice Tool
Upholstery tool & Dusting brush
To detach the dusting brush from the upholstery tool: Press the
tabs on the brush downward to remove it.
To reattach the dusting brush to the upholstery tool: Insert
the front of the upholstery tool under the hook on the front of the
dusting brush. Press down on the back of the upholstery tool to
snap it into place under the dusting brush tabs.
7
Tabs
EMPTYING THE DUST COMPARTMENT
Caution: Be sure to turn the ON/OFF switch to the "OFF" position and disconnect the
power cord from the wall outlet before cleaning.
1
Empty the dust compartment when
contents reach the MAX mark.
2
Push the release button to remove the
dust compartment.
Release Button
MAX mark
3
Press the release lever to open the
trapdoor.
Turn the duster handle several times in the
4 direction
shown to empty the dust
compartment.
Duster Handle
Release Lever
Trapdoor
Reattaching the Dust Compartment
Close the trapdoor and insert the projection on the
the dust compartment into
2 Push
1 dust
compartment into the groove on the main body.
the main body as shown to
reattach.
Projection
Groove
8
CLEANING THE FILTERS
1 Remove the dust compartment.(refer to page 8)
the dust compartment to the
2 Set
parallel position. Open the trapdoor,
Release
Button B
then push the release button B and
pull out the main filter.
The main filter and prefilter will be
removed at the same time.
Caution: Do not push the release
button B at the upright position.
As this may drop or damage the
main filter and prefilter.
3
the main filter and prefilter with a soft-bristled brush and rinse with cold water.
3 Clean
Allow both items to dry completely.
Caution:
Do not use a hard-bristled brush to clean filters.
This may result in damage to the filters.
Do not attempt to dry with a hair dryer or by
placing in a clothes dryer. Hot air may cause the
filters to warp.
Cleaning utensil
To maintain optimum suction power, the dust filter fins should be kept clean of dirt.
Clean the filter fins free of dirt with the end of fork as shown.
Fork
Reattaching the filters
the main filter into the
1 Insert
prefilter as shown.
onto the main filter and insert into
2 Hold
the dust compartment.
Align the ribs of the main filter to match
the shape of the hole in the dust
compartment and press firmly to insert.
Prefilter
Dust Compartment
Main Filter
3
9
Close the trapdoor.
Ribs
CLEANING THE SECONDARY FILTERS
Caution: Be sure to turn the ON/OFF switch to the "OFF" position and disconnect
the power cord from the wall outlet before cleaning the filters.
CLEANING THE AIR OUTLET FILTER
The secondary filters consist of a general filter and a sub-filter.
Only use genuine Sanyo replacement filters.
1
2
Remove the filter cover.
3
Gently clean the air outlet filter with water.
4
Make sure that it is completely dry and then
re-install it into the filter cover.
5
Replace the filter cover.
Filter Cover
1
Remove the air outlet filter from the filter cover.
1
2
Air Outlet Filter
CLEANING THE SUB-FILTER
Clean the sub-filter when it becomes dirty.
1
Remove the dust compartment
(refer to page 8).
Remove the air inlet cover.
2
3
4
Remove the sub-filter from the vacuum
cleaner.
2
Gently clean the sub-filter with water.
1
Air inlet
Cover
Sub-Filter
Make sure that it is completely dry and
then re-install it into the vacuum cleaner.
Replace the air inlet cover and the dust
compartment.
Caution: Do not wash the air outlet filter and sub-filter in a washing machine, and do not
use any other equipment such as a hair dryer to dry it. Do not operate the vacuum
without the sub-filter. Be sure the filter is dry and properly installed. Failure to do
so could result in electrical shock, personal injury, or motor failure.
10
CLEARING BLOCKAGES IN THE SUCTION HOSE
AND CLEANING THE AGITATOR ASSEMBLY
Caution: Be sure to turn the ON/OFF switch to the" OFF " position and disconnect
the power cord from the wall outlet before clearing any blockages in the
suction hose and cleaning the agitator assembly.
Clearing blockages in the suction hose
1 Set the vacuum cleaner to the upright position.
Remove the hose cuff from the suction inlet and
2 then
remove any blockages from the hose.
2
Hose Cuff
Reattach the hose cuff to the suction inlet,and
3 then
operate the vacuum cleaner to check that
1
Suction lnlet
the blockage has been properly cleared.If the hose
is still blocked,the suction force will be weak.
If the hose still appears to be blocked:
1 Set the vacuum cleaner to the parallel position and turn it over.
the lower hose joint from the lower
suction inlet as shown above.
2 Remove
the bottom plate.
3 Remove
(refer to page14)
any blockages in the nozzle pipe,
4 Remove
while being extremely careful not to damage it .
-install all the parts in the reverse order of removal.
5 Re
(For the procedure for reattaching the bottom plate,
refer to page14)
Hose
Joint
Nozzle
Pipe
Caution:
Check that all parts have been installed correctly before reattaching the bottom plate.
Firmly and securely insert the lower hose cuff.
Cleaning the agitator assembly
When threads get caught in the agitator assembly,clean the assembly.
Remove threads caught in the assembly by cutting them
with scissors.
Scissors
Threads
11
REPLACEMENT INSTRUCTIONS
Caution: Be sure to turn the ON/OFF switch to the "OFF " position and disconnect the
power cord from the wall outlet before replacing any of the parts below.
REPLACING THE FLAT BELT
1
2
Remove the bottom plate.
(refer to page 14)
Lift out the agitator assembly,and then remove the flat belt from the motor shaft and
the agitator pulley.
Motor Shaft
Flat Belt
Agitator Assembly
3
Place a new flat belt onto the motor shaft and pulley.
Motor Shaft
Flat Belt
Flat Belt
Pulley
4
Holding two ends of the agitator to place the agitator assembly into the grooves by in the
nozzle head, making sure that the new flat belt slides securely into the guide.
Brush Holder
Groove
5
Caution:
Install the flat belt so that it has
no twists in it, and so that all
components turn smoothly.
Reattach the bottom plate
(refer to page 14)
12
REPLACEMENT INSTRUCTIONS
Caution: Be sure to turn the ON/OFF switch to the "OFF" position and disconnect the
power cord from the wall outlet before replacing any of the parts below.
REPLACING THE AGITATOR
1
2
Remove the bottom plate.
(refer to page 14)
Lift out the agitator assembly,and then remove the agitator assembly as shown.
Motor Shaft
Flat Belt
Agitator Assembly
3
Place the flat belt onto the pulley of the new agitator assembly.
Flat Belt
Pulley
4
Place the agitator assembly into the grooves in the nozzle head, making sure that the new
agitator assembly operate smoothly.
Brush Holder
Groove
5
13
Reattach the bottom plate
(refer to page 14)
Caution:
Install the flat belt so that it has
no twists in it, and so that all
components turn smoothly.
REPLACEMENT INSTRUCTIONS
REMOVING THE BOTTOM PLATE
the vacuum cleaner to the
1 Set
parallel position and turn it over.
Pull here
Latch
2
PULL
Slide the latch in the direction
shown.
Bottom Plate
the bottom plate by pulling
3 Remove
the tabs as illustrated.
REATTACHING THE BOTTOM PLATE
the projection on the
1 Insert
bottom place into the groove
plate as shown.
2 Push the bottom
Press
Press
on the nozzle head and set
the bottom plate in place.
Bottom Plate
Projection
Groove
3 Slide the latch in the direction shown.
the vacuum over and place in the
4 Turn
upright position.
Latch
14
TROUBLESHOOTING
If there is a problem with the vacuum cleaner, carry out the following checks
to find the cause. If the problem still persists after the checks have been made,
do not use the vacuum cleaner to prevent the possibility of an accident occurring.
Turn the ON/OFF switch to the "OFF" position, disconnect the power cord from the
wall outlet, and contact the place of purchase or your nearest Sanyo Service
Center.
Problem
Cause
Remedy
The motor does not operate
when the ON/OFF switch is
set to the "ON" position.
The power cord plug is not
securely inserted into the
wall outlet.
Insert the power cord plug
securely into the wall
outlet.(refer to page 5 )
Suction force is weak.
The dust compartment is full.
Empty the dust compartment.
(refer to page 9)
Remove the blockage.
(refer to page 11)
Remove the blockage
(refer to page 11)
Clean the filters.
(refer to page 10)
The suction hose is blocked.
The nozzle head is blocked.
The filters (main filter, prefilter and the secondary
filters) are dirty.
The noise is loud.
The agitator is dirty.
Clean the agitator.
(refer to page 11 )
The agitator does not
operate.
The flat belt is worn or
broken.
The agitator is worn or
broken.
Replace the flat belt.
(refer to page 12 )
Replace the agitator.
(refer to page 13 )
REPLACEMENT PARTS
Be sure to use only Sanyo specified parts.
Replacement parts can be obtained from your nearest Sanyo dealer
or from nearest sanyo service center.
If you want to replace any parts, do please contact the place of purchase
or your nearest sanyo service center.
Part Name & lllustration
6630054550
SC-BL3
Agitator Assembly
Flat Belt
9BF-D-P111-00610 0204- 0
E
15
This replacement can be obtained
from nearest sanyo service center.
SANYO Electric Co., Ltd.
OSAKA, JAPAN