1
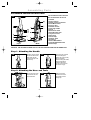
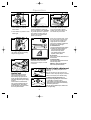
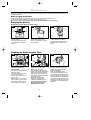
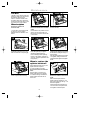
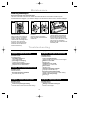
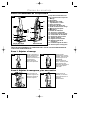
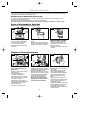
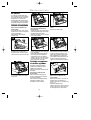
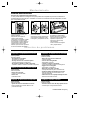
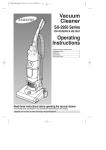
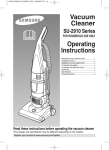
DJ68-00294B(EN)(0
2
.
0
0
0
)
5.3.1
35
페이지1
:4
P7
M
Vacuum
Cleaner
SU-2900 Series
FOR HOUSEHOLD USE ONLY
Operating
Instructions
IMPORTANT SAFETY INSTRUCTIONS................................1
ASSEMBLING PARTS .............................................................2
ASSEMBLED VACUUM CLEANER PARTS ........2
ATTACHING THE HANDLE ..........................2
ATTACHING THE HOSE AND TOOLS.......2
OPERATION ........................................................................3
MAINTENANCE ..................................................................4
TROUBLESHOOTING .....................................................6
Read these instructions before operating the vacuum cleaner
※The design and specification may be different depending on the models.
Register your product at www.samsung.com/global/register
DJ68-00294B(EN)(0
2
.
0
0
0
)
5.3.1
35
페이지2
:4
P7
M
IMPORTANT SAFETY INSTRUCTIONS
Thank you for purchasing a Samsung vacuum cleaner. When using an electrical
appliance, basic precautions should always be followed, including the following:
PLEASE READ ALL INSTRUCTIONS
BEFORE USING THIS VACUUM CLEANER.
WARNING:
To reduce the risk of fire, electric shock, or injury:
• Do not leave vacuum cleaner unattended when it is plugged in.
• Unplug from outlet when not in use and before servicing.
• Do not use outdoors or on wet surfaces.
• Do not allow children to operate vacuum cleaner or use as a toy.
• Close attention is necessary when used by or near children.
• Use only as described in this manual. Use only manufacturer’s recommended attachments.
• Do not use with damaged cord or plug.
• If vacuum cleaner is not working as it should, or has been dropped, damaged, left outdoors or
dropped in water, take it to a service center.
• Do not pull or carry by cord, use cord as a handle, close a door on cord, or pull the cord
around sharp edges or corners. Keep cord away from heated surface.
• Do not unplug by pulling on the cord. To unplug, grasp the plug, not the cord.
• Do not handle vacuum cleaner or plug with wet hands.
• Do not put any object into openings. Do not use with any opening blocked; keep openings free
of dust, lint, hair and anything that may reduce air flow.
• Keep hair, loose clothing, fingers and all parts of body away from openings and moving parts.
• Do not pick up anything that is burning or smoking, such as cigarettes, matches or hot ashes.
• Do not use without dirt cup or filters in place. Empty cup and clean filter frequently when
picking up very fine materials such as powder.
• Turn off all controls before unplugging vacuum cleaner.
• Use extra care when cleaning on stairs.
• Do not use to pick up flammable or combustible materials such as gasoline or fine wood
standings or use in areas where they may be present.
• Store your vacuum cleaner indoors in a cool, dry area.
• Avoid picking up hard, sharp objects with the cleaner, they may damage the cleaner.
• Always turn off this appliance before connecting or disconnecting the hose, removing the
bottom plate for maintenance.
• Use only on dry, indoor surfaces, never change the plug in any way.
• Do not modify the polarized plug to fit a non-polarized outlet or extension cord.
• Do not touch the brush roller when it is rotating.
• Keep suction away from your face when using nozzles and pipe.
• Do not pull the power cord around sharp corners and do not allow it to become trapped.
• Unplug before connecting turbine nozzle.(only using turbine-brush model)
SAVE THESE INSTRUCTIONS FOR FUTURE USE.
THIS
VACUUM CLEANER HAS A POLARIZED PLUG.
To reduce the risk of electrical shock, this appliance has a polarized plug (one blade wider than
the other.) This plug will fit in a polarized outlet only one way. If the plug does not fit fully in the
outlet, reverse the plug. If it still does not fit, contact a qualified electrician to install a proper outlet.
1
DJ68-00294B(EN)(0
2
.
0
0
0
)
5.3.1
35
페이지3
:4
P7
M
A s s e m b l i n g Pa r t s
Assembled Vacuum Cleaner Parts
The assembled cleaner will look
like the illustration to the left.
1-1
Front
1.Handle
2.Power switch
3.Quick release cord hook
4.Post-Motor Filter
5.Crevice tool
6.Handle release
7.Carrying handle
8.Hose
9.Extension wand
10.Combination tool
11.Cyclone-Lever
12.Dirt Cup
13.Filter Cup
14.Upper Tank
15.Louvers
16.Hose Wand Base
17.Height Adjustment Dial
18.Hose Clip
Back
WARNING!
OPERATE THE VACUUM CLEANER ONLY AT THE VOLTAGE SPECIFIED ON THE NAMEPLATE.
Step 1. Attaching the Handle
1-2
Stand the vacuum upright
and slide the base of the
handle firmly into the
grooves at the top of the
vacuum body.
1-3
Insert the screw provided
into the existing hole.
Tighten the screw securely
with a screwdriver.
Before securing the handle,
please check that the
handle is fitted to the
vacuum body and make
sure there’s no gap.
Step 2. Attaching the Hose and Tools
1-4
1-5
Slide the end of the hose
wand with tabs into the
Hose Wand Base.
2
Slide the extension
wand and the crevice
tool together into the
storage clip.
DJ68-00294B(EN)(0
2
.
0
0
0
)
5.3.1
35
페이지4
:4
P7
M
Operation
2-1
2-2
2-3
ON-OFF Switch
Handle positions
Transporting cleaner
1.To turn cleaner on, press the
Power switch.
The handle of your cleaner has three
positions; upright for storage and
when using cleaning tools; operating
for general operation on carpet and
floors; low for reaching under low
furniture. Step on handle release
pedal to lower handle.
To move your cleaner from room to
room, put the handle in upright
position, tilt the cleaner back on its
rear wheels and push forward.
2-5
When using the attachments, ensure
the vacuum cleaner is placed firmly
on the floor with the handle in the
upright position. Do not place the
vacuum on top of furniture or steps as the
brushroller may cause damage.
A. Combination tool:
Two types of cleaning tools are included in
one attachment: rotate for desired tool.
∙Use brush side to dust furniture,
blinds, books, lamps, shelves.
∙Use upholstery side for curtains,
draperies, cushions, fabrics.
B. Crevice tool:
Use in corners, on stairs, baseboards, and
behind furniture.
C. Extension Wand:
Use with desired attachments and narrow
wand for a longer reach.
�option : Mini Turbo Brush
Refer to the separated instruction.
2.To the cleaner off, press the Power
switch again .
2-4
A
B
C
�option
Carrying handle
The cleaner can also be moved by
using the carrying handle.
2-6
Cleaning Tool attachments
Attachment tools can be used to
clean furniture or drapes, on stairs
or in corners.
2-7
Carpet height adjustment
2-8
For maximum cleaning performance, The
following carpet height settings are recommended:
∙Lowest setting: for all types of carpet
∙Higher settings: for very deep pile carpet where
easier pushing effort is desired, while maintaining
good cleaning performance.
Note: If the cleaner is difficult to push, rotate knob to
the next higher setting.
Carpet and rug cleaning takes place at the
nozzle (A).
When it is necessary to raise and lower the
nozzle for various carpet pile heights, rotate the
nozzle control dial (B) to the desired setting.
Cleaning lightweight
flexible rugs
Stand on one end of rug and move
cleaner toward other end or edge.
Before reaching edge, push down on
handle. This will lift up the nozzle(front of
cleaner)and will prevent rug from clinging
to cleaner.
Continue to lift front of cleaner so that
when you have reached the edge, it is
completely off the rug. Move cleaner
back to start again, lower front of cleaner,
and use only forward strokes.
3
DJ68-00294B(EN)(0
2
.
0
0
0
)
5.3.1
35
페이지5
:4
P7
M
Maintenance
Familiarize yourself with these home maintenance tasks as proper use and care of your cleaner will ensure continued
cleaning effectiveness.
When to empty the Dirt Cup
The dirt cup needs to be emptied when the dirt reaches the "Full" line on the side of the Cup.
If more dirt than this accumulates, your cleaner will not operate effectively.
Note: All new carpet has loose fibers which can fill the Dirt Cup quickly while vacuuming.
Emptying the Dirt Cup
Disconnect cleaner from electrical outlet.
3-1
Unlock
Position
Full Line
3-2
3-3
Empty dirt into garbage container.
Put the Dirt Cup back in the
vacuum and slide the lever to the
"Lock" position.
Cleaning The Circular Filters.
Lock
Position
Slide the Cyclone-Lever to the
"Unlock" position.
Grasp handle and pull the Dirt
Cup straight out to remove from
Vacuum.
Grasp the Filter Cup located at
the bottom of the Dirt Cup and twist
counterclockwise to unlock and
remove.
Cleaning the Pre/Post-motor Filter
3-4
Pre-Motor
Filter
How to clean
Disconnect cleaner from
electrical outlet.
The Pre-Motor Filter protects the
Motor from debris.
It is located underneath the Dirt
Cup and Filter Cup in the
Center of the round part of the
Cyclone-Lever.
Remove the small round Filter
and any debris on top of it. Rinse
well under warm water, then air
dry thoroughly before replacing.
3-5
3-6
Post-Motor
Filter
The Post-Motor Filter assists in the
filtation process to return clean
air to the room. It is located
behind the door on the front of the
Cleaner. When the filter becomes dirty,
open the door, remove the filter and
shake the dust off the filter.The PostMotor Filter is non-washable therefore
do not wash it in water.
Replace the door by inserting
the tabs on the left side and
snapping the right side into place.
Do not operate cleaner without
Either the Pre-Motor Filter or
Post-Motor Filter in place.
4
Grasp the Circular Filters and twist
to unlock Pull straight up to remove.
Separate the Outer foam and Inner
pleated Circular Filters.
Wash each individually by hand
in warm water. Mild detergent may be
used if desired. Rinse well, then air dry
Thoroughly dry before putting them back
together and replacing in the Filter Cup
The Filter Cup may be washed In warm
water with a mild detergent. Make sure it
is completely dry before reassembling
with fliters.
DJ68-00294B(EN)(0
2
.
0
0
0
)
5.3.1
35
페이지6
:4
P7
M
Maintenance
The belt
The belt on your cleaner causes the
agitator to rotate and is important for
the effective operation of the
cleaner. The belt is located under
the bottom plate of the cleaner and
should be checked from time to time
to be sure it is in good condition.
3-7
3-8
How to replace
Remove agitator and used belt.
Discard used belt.
When to replace
Disconnect cleaner from
electrical outlet.
To check belt, remove bottom plate
as shown in “How to replace.”
Replace belt if it is stretched, cut or
broken.
Disconnect cleaner from electrical
outlet.
Place handle in low position and turn
cleaner over so bottom side is up.
Remove the 4 screws as shown with
a screw driver.
3-9
3-10
3-11
With lettering on outside of belt and
positioned as shown in box on (D),
slide new belt over motor pulley (B).
Insert agitator through belt and place
belt in belt guide (C) on agitator.
Grasp agitator firmly and fit it into
position by first sliding the end opposite
the belt into the rectangular slot (F) on
side of cleaner.
Pull other side of agitator (G) into place.
Turn agitator, making sure belt is not
pinched between agitator and agitator
shield.
3-12
Reposition bottom plate and 4
screws. Tighten screws securely.
Should the agitator shield (D)
become dislodged while replacing
the belt or the agitator, reposition it
as shown, noting the placement of its
belt guide (D)
When to replace the
agitator brush roll
When agitator brushes are worn, the
agitator should be replaced.
To check condition of brushes,
disconnect cleaner from electrical
outlet.
Move the edge of a card across
bottom plate while turning agitator.
To maintain cleaning effectiveness,
replace agitator if brushes do not
touch card.
5
3-13
How to replace
Disconnect cleaner from electrical
outlet.
Remove bottom plate, belt and
agitator following directions in “The
belt” section beginning with Fig. 3-10.
Discard old agitator.
Continue following the directions in
“The belt” section to reposition belt,
new agitator and bottom plate.
DJ68-00294B(EN)(0
2
.
0
0
0
)
5.3.1
35
페이지7
:4
P7
M
Maintenance
Clearing Blockages
Disconnect cleaner from electrical outlet.
The hose on the back of the vacuum cleaner that carries the dirt from the nozzle to the Dirt Cup can
sometimes become clogged. If you notice a change in the sound of the vacuum motor, check for blockages.
3-14
3-15
3-16
Remove Dirt Cup and check Upper
Tank and Louvers.
Check to make sure Louvers are
Installed correctly. To unlock the
Louvers, grasp the rim and turn
Toward the left. Pull straight down
to remove. If the Louvers are
missing or not locked into place,
check and clear the tube in the
center of the Dirt Cup.
Remove the Hose and disconnect
the Wand.
Check for clogs in the vacuum
base, the wand, the hose and the
suction inlet.
If the blockage persists, turn the
vacuum cleaner off and unplug it.
Remove the bottom plate. Lift up
the short hose in the base of the
vacuum. Inspect the hose for clogs
and remove any obstructions.
Replace the short nozzle hose and
the bottom plate.
Tro u b l e s h o o t i n g
Check this list of possible problems and solutions before bringing your vacuum to a service center.
Problem : Poor job of dirt pickup
Problem: Cleaner won’t run
Possible Cause
Possible Solution
∙Full or clogged Dirt Cup
∙Empty the Dirt Cup and check for blockages.
∙Broken or worn belt
∙Replace belt.
∙Clogged hose or nozzle
∙Clean hose or nozzle area.
∙Hole in hose
∙Replace hose.
∙Dirt Cup improperly installed
∙Properly install the Dirt Cup
∙Incorrect carpet height setting
∙Rotate nozzle control knob to lower setting
∙Clogs in air flow passage
∙Clear clogs.
Possible Cause
Possible Solution
∙Not firmly plugged in
∙Plug unit in firmly
∙No voltage in wall plug
∙Check fuse or breaker
∙Blown fuse or tripped breaker
∙Replace fuse or reset breaker
Problem : Dust escapes the Dirt Cup
Possible Cause
Possible Solution
∙Dirt Cup improperly installed
∙Re-install the Dirt Cup.
Problem : Cleaner hard to push
Problem : Abnormal sound
Possible Cause
Possible Solution
∙Incorrect carpet height setting
∙Rotate nozzle control knob to lower setting
Possible Cause
Possible Solution
∙Strange sound like rushing air
∙Check for blockages
6
DJ68-00294B(EN)(0
2
.
0
0
0
)
5.3.1
35
페이지8
:4
P8
M
DJ68-00294C(ES)(0
2
.
0
0
0
)
5.3.2
12
0페이지1
:2
A8
M
Aspiradora
SU-2900 Series
PARA USO DOMÉSTICO
SOLAMENTE
Instrucciones
de uso
INSTRUCCIONES DE SEGURIDAD ......................................1
PIEZAS DE MONTAJE.............................................................3
PIEZAS ENSAMBLADAS DE LA ASPIRADORA ......3
SUJETAR EL MANGO ...................................3
SUJETAR LA MANGUERA Y LOS ACCESORIOS ..3
FUNCIONAMIENTO .........................................................4
MANTENIMIENTO ............................................................5
SOLUCIÓN DE PROBLEMAS .....................................7
Lea estas instrucciones antes de poner en funcionamie nto la aspiradora
※ El diseño y las especificaciones pueden variar dependiendo de los modelos.
Gane premios cuando registre su producto en www.samsung.com/global/register
DJ68-00294C(ES)(0
2
.
0
0
0
)
5.3.2
12
0페이지2
:2
A8
M
INSTRUCCIONES DE SEGURIDAD
Gracias por comprar una aspiradora Samsung. Cuando se utiliza un artefacto
eléctrico, se debe n tomar precauciones básicas, incluyendo las siguientes:
LEA TODAS LAS ADVERTENCIAS E
INSTRUCCIONES ANTES DE USAR ESTE
ARTEFACT O
Para reducir el riesgo de incendio, descarga eléctrica o lesión:
Advertencia:
• Preste atención al aparato cuando esté enchufado. Desenchufe la aspiradora del
tomacorrient e cuando no se utilice o cuando la esté limpiando.
• No la utilice al aire libre o sobre superficies mojadas.
• No permita que se utilice como un juguete. Debe prestarse mucha atención cuando la spirad
ora es utilizada por niños o cerca de los niños.
• Utilícela sólo del modo que se describe en este manual. Utilice sólo los accesorios
recomenda dos por el fabricante.
• No haga funcionar la aspiradora con el enchufe o el cable dañado. Si no funciona como deber ía,
o si se cayó, se dañó, se dejó a la intemperie o se hundió en el agua, llévela a un servicio té cnico.
• No arrastre la aspiradora tirando del cable, ni utilice el cable como manija. Evite cerrar las pue
rtas sobre el cable o tirar del cable si rodea esquinas o bordes filosos. No pase la aspiradora
so bre su cable. Mantenga el cable alejado de superficies calientes.
• No desenchufe la aspiradora tirando del cable. Para desenchufarla, tome el enchufe, no el ca ble.
• No toque el enchufe ni la aspiradora con las manos mojadas.
• No introduzca ningún objeto en las aberturas de la aspiradora. No la ponga en
funcionamiento si tiene alguna abertura bloqueada: Manténgala libre de polvo, pelusas,
cabellos y cualquier otro elemento que pudiera reducir el flu jo de aire.
• Mantenga el cabello, la ropa holgada, los dedos y cualquier parte del cuerpo alejados de las a
berturas y piezas móviles.
• No la utilice para recoger elementos encendidos o que emitan humo, tales como cigarrillos, fó
sforos o cenizas calientes.
• No la utilice sin un Contenedor de Suciedad y los filtros.
• Apague todos los controles antes de desenchufar la aspiradora.
• Preste especial atención cuando limpie escaleras.
• No utilice la aspiradora para limpiar líquidos inflamables o combustibles tales como gasolina.
No la utilice en áreas en las que puedan estar presente dichos líquidos.
• Guarde su aspiradora bajo techo en un lugar fresco y seco.
• No utilice cables alargadores ni la enchufe a un tomacorriente con la capacidad de
conducción de corriente inadecuada.
• Evite aspirar objetos punzantes.
• Apague siempre este aparato antes de conectar o desconectar la manguera, cambiar el
Conte nedor de Suciedad, o extraer la placa inferior para su mantenimiento.
• Desenchufe los artefactos eléctricos antes de aspirarlos.
• Este artefacto no está destinado para ser utilizado por niños o ansianos sin supervisión, a me
nos que hayan sido entrenadas adecuadamente por una persona responsable para asegurar
q ue pueden utilizarlo en forma segura.
1
DJ68-00294C(ES)(0
2
.
0
0
0
)
5.3.2
12
0페이지3
:2
A8
M
INSTRUCCIONES DE SEGURIDAD
• Se debe quitar el enchufe del tomacorriente antes de limpiar o efectuar el mantenimiento del
a rtefacto.
• Si el cable de alimentación está dañado, debe ser reemplazado por el fabricante o su represe
ntante de servicio técnico o una persona con calificación similar para evitar un riesgo.
• No use el aparato si se cayó, se dañó o se hundió en agua.
• No utilice el aparato en un espacio cerrado lleno de vapores emitidos por una pintura a base
d e aceite, un disolvente de pintura, algunas sustancias a prueba de polillas, polvo inflamable
u ot ros vapores explosivos o tóxicos.
GUARDE
ESTAS INSTRUCCIONES:
Esta aspiradora es para uso doméstico solamente.
2
DJ68-00294C(ES)(0
2
.
0
0
0
)
5.3.2
12
0페이지4
:2
A8
M
Piezas de montaje
Piezas ensambladas de la aspiradora
1-1
Parte delantera
Parte trasera
La aspiradora ensamblada lucirá
como la ilustración de la izquierda.
1. Mango
2. Interruptor
3. Gancho para soltar
rápidamente el cable
4. Filtro post-motor
5. Accesorio de boca fina
6. Pedal de liberación del mango
7. Manija de transporte
8. Manguera
9. Tubos de extensión
10. Accesorio combinado
11. Palanca del extractor de polvo
12. Contenedor de Suciedad
13. Recipiente para el filtro
14. Tanque superior
15. Rejillas de ventilación
16. Base del tubo de la
manguera
17. Perilla de ajuste de altura
18. Gancho para la manguera
¡ADVERTENCIA!
PONGA EN FUNCIONAMIENTO LA ASPIRADORA SÓLO CON EL VOLTAJE ESPECIFICADO EN
LA PLACA DE CARACTERÍSTICAS
Paso 1. Sujetar el mango
1-2
Coloque la aspiradora en
posición vertical e inserte
la base del mango con
firmeza en las ranuras que
se encuentran en
la parte superior del
cuerpo de la aspiradora.
1-3
Inserte el tornillo
suministrado en el orificio
existente. Ajuste el tornillo
en forma segura con un
destornillador.
Antes de asegurar el
mango, controle que esté
sujeto al cuerpo de la
aspiradora y asegúrese de
que no quede espacio
entre medio.
Paso 2. Sujetar la manguera y los accesorios
1-4
1-5
Inserte el extremo del
tubo de la manguera con
pestañas en la base del
tubo de la manguera.
3
Coloque el tubo de
extensión y el accesorio
de boca fina juntos en el
gancho de
almacenamiento.
DJ68-00294C(ES)(0
2
.
0
0
0
)
5.3.2
12
0페이지5
:2
A8
M
Funcionamiento
2-1
2-2
2-3
Interruptor de
encendido/apagado
Posiciones del mango
Transportar la aspiradora
El mango de su aspiradora tiene tres
posiciones; vertical para el
1. Para encender la aspiradora,
almacenamiento y cuando utiliza
presione el Interruptor.
accesorios de limpie za; operativa para
su uso general sobre alfombras y pisos;
2. Para apagar la aspiradora, presione baja para llegar debajo de los muebles
nuevamente el Interruptor.
bajos. Pise el pedal de liberación del
mango para bajarlo.
Para mover su aspiradora de
habitación en habitación, coloque el
mango en posición vertical, incline
la aspiradora haci a atrás
apoyándola sobre sus rueditas
traseras y empújela.
2-4
2-5
Coloque la aspiradora sobre el piso
con el mango en posición vertical,
mientras utiliza los accesorios. No
coloque la as piradora sobre muebles
o escalones ya que el cepillo giratorio
puede causar daños.
A. Accesorio combinado:
Se incluyen dos tipos de elementos de
limpieza en un solo accesorio: rotar para
obtener el accesorio deseado.
∙Utilice el lado del cepillo para quitarle el
polvo a muebles, persianas, libros,
lámparas y estantes.
∙Utilice el lado de tapicería para cortinas,
fundas, almohadones, telas.
B. Accesorio de boca fina:
Utilícelo en rincones, escaleras, zócalos y
detrás de los muebles.
C. Tubo de extensión:
Utilícelo con los accesorios deseados y un
tubo angosto para un mayor alcance.
�opción : Cepillo con turbina
Consulte las instrucciones separadas.
Interruptor de
ncendido/apagado
A
B
C
�opción
Manija de transporte
La aspiradora también puede
moverse utilizando la manija de
transporte.
2-6
Accesorios de limpieza
Los accesorios se pueden utilizar
para limpiar muebles o cortinas,
escaleras o rincones.
2-7
Ajuste de la altura de la alfombra
2-8
Para obtener el máximo desempeño de limpieza
∙Posición más baja: para todo tipo de alfombras
∙Posiciones más altas: para alfombras de pelo
largo cuando se desea disminuir el esfuerzo de
empuje en tanto que se mantiene un buen
desempeño de limpieza.
Nota: Si le cuesta mucho empujar la aspiradora,
rote la perilla a la posición más alta que sigue.
La limpieza de las alfombras y tapetes se
realiza en el frente de la aspiradora (A).
En caso de ser necesario elevar y bajar el
frente de la aspiradora para las distintas
alturas de pelo de la alfombra, rote l a perilla
de control de altura (B) a la posición deseada.
Limpiar los tapetes
flexibles livianos
Párese sobre un extremo del tapete y
mueva la aspiradora hacia el otro
extremo o borde. Antes de llegar al
borde, tire hacia abajo el mango. Esto
levantará la tobera (parte delantera de la
aspiradora) y evitará que el tapete quede
aferrado a la aspiradora. Mantenga
elevada la parte delantera de la
aspiradora para que cuando llegue al
borde, quede completamente fuera del
tapete. Mueva la aspiradora hacia atrás
para volver a comenzar, baje el frente de
la aspiradora y haga sólo movimiento
s hacia delante.
4
DJ68-00294C(ES)(0
2
.
0
0
0
)
5.3.2
12
0페이지6
:2
A8
M
Mantenimiento
Familiarícese con estas tareas de mantenimiento del hogar ya que el uso adecuado y el cuidado de su aspiradora
aseg urarán una constante efectividad de limpieza.
Cuándo vaciar el Contenedor de Suciedad
El contenedor de suciedad debe vaciarse cuando la suciedad llega a la altura de la línea “Completo” que se
encuentra a un lado del Contenedor.
Si se acumula más suciedad, su aspiradora no funcionará correctamente.
Nota: Una alfombra nueva tiene fibras sueltas que pueden llenar la bolsa rápidamente cuando la aspira.
Vaciar el Contenedor de Suciedad
Desconecte la aspiradora del tomacorriente.
3-1
Línea
“Completo”
Posición
destrabada
3-2
3-3
Vierta la suciedad en un tacho de
basura.
Vuelva a colocar el Contenedor de
Suciedad en la aspiradora y deslice
la palanca a la posición “Trabada”.
Limpiar los filtros circulares.
Posición
trabada
Deslice la palanca del extractor de
polvo a la posición “Destrabada”.
Tome la manija y extraiga el
Contenedor de Suciedad
directamente para sacarlo de la
aspiradora.
Tome el recipiente para el filtro
ubicado en la parte inferior del
Contenedor de Suciedad y gírelo en
sentido contrario a l
as agujas del reloj para destrabarlo
y sacarlo.
Limpiar el filtro pre/post-motor
3-4
Filtro premotor
Cómo limpiarlo
Desconecte la aspiradora del
tomacorriente.
El filtro pre-motor protege el motor
de los desechos.
Está ubicado debajo del
Contenedor de Suciedad y el
recipiente para el filtro en el centro
de la parte circular de la palan ca
del extractor de polvo.
Quite el filtro circular pequeño y
cualquier desecho que quede sobre
él. Enjuáguelo bien con agua
caliente y séquelo bi
en antes de volver a colocarlo.
3-5
3-6
Filtro postmotor
El filtro post-motor ayuda en el proceso
de filtración para devolver aire limpio a
la habitación. Está ubicado detrás de la
puerta en parte delantera de la
aspiradora. Cuando el filtro se ensucie,
abra la puerta, saque el filtro y límpielo.
Vuelva a colocar la puerta insertando
las pestañas del lado izquierdo y
fijando a presión el lado derecho.
No ponga en funcionamiento la
aspiradora sin el filtro pre-motor o
el filtro post-motor instalados.
5
Tome los filtros circulares y gírelos
para destrabarlos. Tire hacia arriba
para sacarlos.
Separe el filtro circular de espuma
externo del filtro plisado interno.
Lave cada filtro en forma individual a
mano con agua caliente. Puede
utilizar un detergente suave si lo
desea.
Enjuáguelos bien y déjelos que se
sequen al aire por completo antes de
volver a unirlos y colocarlos en el
recipiente pa ra filtros.
El recipiente para filtros puede lavarse
en agua caliente con un detergente
suave. Asegúrese de que esté
completamen te seco antes de volver
a colocar los filtros.
DJ68-00294C(ES)(0
2
.
0
0
0
)
5.3.2
12
0페이지7
:2
A8
M
Mantenimiento
La correa
La correa de su aspiradora hace
que el agitador rote y es importante
para el funcionamiento efectivo de
la aspiradora. L a correa está
ubicada debajo de la placa inferior
de la aspiradora y debe controlarse
ocasionalmente para asegurarse d
e que esté en buenas condiciones.
Cuándo reemplazarla
Desconecte la aspiradora del
tomacorriente.
Para inspeccionar la correa, saque
la placa inferior como se muestra en
“Cómo reemplazarla”.
Reemplácela si está estirada,
cortada o rota.
3-7
3-8
Cómo reemplazarla
Extraiga el agitador y la correa
usada.
Deseche la correa usada.
Desconecte la aspiradora del
tomacorriente.
Coloque el mango en posición baja y
voltee la aspiradora para que el lado
de abajo quede hacia arriba.
Quite los 4 tornillos como se muestra
con un destornillador.
3-9
3-10
3-11
Con las inscripciones hacia fuera y
ubicada como se muestra en el
recuadro en (D), coloque la nueva
correa sobre la p olea del motor (B).
Deslice el agitador a través de la
correa y coloque la correa en la guía
(C) en el agitador.
Si el escudo protector del agitador
(D) se llegara a salir mientras se
reemplaza la correa o el agitador,
vuelva a colocarl o como se muestra,
prestando atención a la colocación
de la guía para la correa (D).
Tome el agitador con firmeza y colóquelo
insertando primero el extremo opuesto a la
correa en la ranura rectangular (F) en el
costado de la aspiradora. Coloque el otro
lado del agitador (G) en su lugar. Haga
girar el agitador para asegurarse de que la
correa no quede enganchada entre el
agitador y el escudo protector d el agitador.
3-12
Vuelva a colocar la placa inferior y
los 4 tornillos. Apriete los tornillos
con firmeza.
Cuándo reemplazar
el rodillo agitador
El agitador se debe reemplazar
cuando las escobillas del rodillo
agitador estén gastadas.
Para inspeccionar la condición de las
escobillas,
desconecte la aspiradora del
tomacorriente.
Pase el borde de una tarjeta a lo
ancho de la placa inferior mientras
hace girar el agitador.
Para mantener una limpieza eficaz,
reemplace el agitador si las
escobillas no tocan la tarjeta.
6
3-13
jeta
tar
Cómo reemplazarlo
Desconecte la aspiradora del
tomacorriente.
Saque la placa inferior, la correa y el
agitador según lo indicado en la
sección “La correa” que comienza con
la Fig. 3-10.
Descarte el agitador viejo.
Siga las instrucciones de la sección “La
correa” para volver a colocar la correa,
el nuevo agitador y la placa inferior.
DJ68-00294C(ES)(0
2
.
0
0
0
)
5.3.2
12
0페이지8
:2
A8
M
Mantenimiento
Eliminar obstrucciones
Desconecte la aspiradora del tomacorriente.
A veces puede obstruirse la manguera de la parte posterior de la aspiradora que lleva la suciedad de la
parte delantera a la bolsa de polvo. Si advierte un cambio en el sonido del motor de la aspiradora, controle
que no haya obstrucciones.
3-14
3-15
3-16
Quite el Contenedor de Suciedad e
inspeccione el tanque superior y las
rejillas de ventilación.
Asegúrese de que las rejillas de
ventilación estén instaladas
correctamente. Para destrabar las rejillas
de ventilación to me el borde y gírelo
hacia la izquierda. Tire hacia abajo para
sacar las rejillas. Si faltan las rejillas de
ventilación o las m ismas no están
trabadas, inspeccione el tubo que está en
el centro del Contenedor de Suciedad.
Quite la manguera Twist’n Snap y
desconecte el tubo.
Controle que no haya obstrucciones
en la base de la aspiradora, el tubo,
la manguera y la boquilla de succión.
Si la obstrucción persiste, apague
la aspiradora y desenchúfela.
Quite la placa inferior. Levante la
manguera corta de la base de la
aspiradora. Inspeccione la
manguera y elimine cualq
uier obstrucción.
Vuelva a colocar la manguera
corta y la placa inferior.
S o l u c i ó n d e p ro b l e m a s
Verifique esta lista de posibles problemas y soluciones antes de llevar su aspiradora a un servicio técnico.
Problema: La aspiradora no funciona
Problema: No aspira bien la suciedad
Causa posible
Solución posible
- No está bien enchufada
- Enchúfela con firmeza
- No hay corriente en el toma de pared
- Controle los fusibles o el disyuntor
- Se quemó un fusible o saltó el disyuntor
- Cambie el fusible o vuelva a conectar el disyuntor
Causa posible
Solución posible
- Bolsa mal colocada
- Vuelva a colocar la bolsa.
- Bolsa rota
- Cambie la bolsa
Causa posible
Solución posible
- Bolsa de polvo llena u obstruida
- Cambie la bolsa.
- Correa rota o desgastada
- Reemplace la correa.
- Tobera o manguera obstruida
- Limpie el área de la tobera o la manguera.
- Agujero en la manguera
- Reemplace la manguera.
- Bolsa de polvo mal colocada
- Coloque la bolsa de polvo correctamente
- Ajuste de altura de alfombra incorrecto
- Rote la perilla de control de altura a una
posición más baja
- Obstrucciones en el pasaje del flujo de aire
- Remueva las obstrucciones.
Problema: Es difícil mover la aspiradora
Problema: Sonido anormal
Causa posible
Solución posible
- Ajuste de altura de alfombra incorrecto
- Rote la perilla de control de altura a una
posición más baja
Causa posible
Solución posible
- Sonido extraño como de flujo rápido de aire
- Controle que no haya obstrucciones
Problema: El polvo sale de la bolsa de polvo
7
DJ68-00294B REV(0.0)