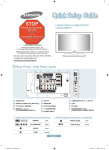
1
Contact SAMSUNG WORLDWIDE If you have any questions or comments relating to Samsung products, please contact the SAMSUNG customer care center. Comment contacter Samsung dans le monde Si vous avez des suggestions ou des questions concernant les produits Samsung, veuillez contacter le Service Consommateurs Samsung. Country CANADA U.S.A Customer Care Center 1-800-SAMSUNG(726-7864) 1-800-SAMSUNG(726-7864) Web Site www.samsung.com/ca www.samsung.com/us Address Samsung Electronics Canada Inc., Customer Service 55 Standish Court Mississauga, Ontario L5R 4B2 Canada Samsung Electronique Canada Inc., Service à la Clientèle 55 Standish Court Mississauga, Ontario L5R 4B2 Canada Samsung Electronics America, Inc. 105 Challenger Road Ridgefield Park, NJ 07660-0511 LCD TV user manual imagine the possibilities Thank you for purchasing this Samsung product. To receive more complete service, please register your product at www.samsung.com/global/register Model Serial No. BN68-01470D-03 BN68-01470D-Cover.indd 1 2008-08-05 �� 6:50:38 Important Warranty Information Regarding Television Format Viewing Wide screen format LCD Displays (16:9, the aspect ratio of the screen width to height) are primarily designed to view wide screen format full-motion video. The images displayed on them should primarily be in the wide screen 16:9 ratio format, or expanded to fill the screen if your model offers this feature and the images are constantly moving. Displaying stationary graphics and images on screen, such as the dark sidebars on nonexpanded standard format television video and programming, should be limited to no more than 5% of the total television viewing per week. Additionally, viewing other stationary images and text such as stock market reports, video game displays, station logos, web sites or computer graphics and patterns, should be limited as described above for all televisions. Displaying stationary images that exceed the above guidelines can cause uneven aging of LCD Displays that leave subtle, but permanent burned-in ghost images in the LCD picture. To avoid this, vary the programming and images, and primarily display full screen moving images, not stationary patterns or dark bars. On LCD models that offer picture sizing features, use these controls to view different formats as a full screen picture. Be careful in the selection and duration of television formats used for viewing. Uneven LCD aging as a result of format selection and use, as well as burned-in images, are not covered by your Samsung limited warranty. U.S.A Only The product unit accompanying this user manual is licensed under certain intellectual property rights of certain third parties. In particular, this product is licensed under the following US patents: 5,991,715, 5,740,317, 4,972,484, 5,214,678, 5,323,396, 5,539,829, 5,606,618, 5,530,655, 5,777,992, 6,289,308, 5,610,985, 5,481,643, 5,544,247, 5,960,037, 6,023,490, 5,878,080, and under US Published Patent Application No. 2001-44713-A1. This license is limited to private non-commercial use by end-user consumers for licensed contents. No rights are granted for commercial use. The license does not cover any product unit other than this product unit and the license does not extend to any unlicensed product unit or process conforming to ISO/IEC 11172-3 or ISO/IEC 13818-3 used or sold in combination with this product unit. The license only covers the use of this product unit to encode and/or decode audio files conforming to the ISO/IEC 11172-3 or ISO/IEC 13818-3. No rights are granted under this license for product features or functions that do not conform to the ISO/IEC 11172-3 or ISO/IEC 13818-3. Other countries The product unit accompanying this user manual is licensed under certain intellectual property rights of certain third parties. This license is limited to private non-commercial use by end-user consumers for licensed contents. No rights are granted for commercial use. The license does not cover any product unit other than this product unit and the license does not extend to any unlicensed product unit or process conforming to ISO/IEC 11172-3 or ISO/IEC 13818-3 used or sold in combination with this product unit. The license only covers the use of this product unit to encode and/or decode audio files conforming to the ISO/IEC 11172-3 or ISO/IEC 13818-3. No rights are granted under this license for product features or functions that do not conform to the ISO/IEC 11172-3 or ISO/IEC 13818-3. SAMSUNG ELECTRONICS NORTH AMERICAN LIMITED WARRANTY STATEMENT Subject to the requirements, conditions, exclusions and limitations of the original Limited Warranty supplied with Samsung Electronics (SAMSUNG) products, and the requirements, conditions, exclusions and limitations contained herein, SAMSUNG will additionally provide Warranty Repair Service in the United States on SAMSUNG products purchased in Canada, and in Canada on SAMSUNG products purchased in the United States, for the warranty period originally specified, and to the Original Purchaser only. The above described warranty repairs must be performed by a SAMSUNG Authorized Service Center. Along with this Statement, the Original Limited Warranty Statement and a dated Bill of Sale as Proof of Purchase must be presented to the Service Center. Transportation to and from the Service Center is the responsibility of the purchaser. Conditions covered are limited only to manufacturing defects in material or workmanship, and only those encountered in normal use of the product. Excluded, but not limited to, are any originally specified provisions for, in-home or on-site services, minimum or maximum repair times, exchanges or replacements, accessories, options, upgrades, or consumables. For the location of a SAMSUNG Authorized Service Center, please call toll-free: In the United States : 1-800-SAMSUNG (1-800-726-7864) In Canada : 1-800-SAMSUNG ➣ See the warranty card for more information on warranty terms. Precautions When Displaying a Still Image A still image may cause permanent damage to the TV screen • Do not display a still image on the LCD panel for more than 2 hours as it can cause screen image retention. This image retention is also known as “screen burn”. To avoid such image retention, reduce the degree of brightness and contrast of the screen when displaying a still image. • Watching the LCD TV in 4:3 format for a long period of time may leave traces of borders displayed on the left, right and center of the screen caused by the difference of light emission on the screen. Playing a DVD or a game console may cause a similar effect to the screen. Damages caused by the above effect are not covered by the Warranty. • Displaying still images from Video games and PC for longer than a certain period of time may produce partial after-images. To prevent this effect, reduce the ‘brightness’ and ‘contrast’ when displaying still images. © 2008 Samsung Electronics Co., Ltd. All rights reserved. 1470A-03Eng.indb 1 2008-08-11 �� 2:21:06 English Contents General Information Function Description ■ ■ ■ ■ ■ ■ ■ ■ Selecting a Menu Language.............................................52 ■ Using the V-Chip...............................................................52 ■ Viewing Closed Captions (On-Screen Text Messages) - Analog............................................................................59 ■ Viewing Closed Captions (On-Screen Text Messages) - Digital.............................................................................60 ■ Adjusting the TV On/Off Melody Sound............................61 ■ Setting the Entertainment mode.......................................62 ■ Using the Energy Saving Feature.....................................62 ■ Upgrading the Software....................................................63 List of Features...................................................................2 Accessories........................................................................2 Viewing the Control Panel..................................................3 Viewing the Connection Panel............................................4 Remote Control..................................................................5 Installing Batteries in the Remote Control..........................6 Using the Remote Control Backlight Buttons.....................6 Connections ■ Connecting VHF and UHF Antennas..................................7 ■ Connecting Cable TV.........................................................7 ■ Connecting a DVD Player or Cable Box/Satellite receiver (Set-Top Box) via HDMI......................................................9 ■ Connecting a DVD Player or Cable Box/Satellite receiver (Set-Top Box) via DVI.........................................................9 ■ Connecting a DVD Player or Cable Box/Satellite receiver (Set-Top Box) via Component cables...............................10 ■ Connecting a Camcorder..................................................10 ■ Connecting a VCR............................................................11 ■ Connecting a Digital Audio System..................................12 ■ Connecting an Amplifier/DVD Home Theater...................12 ■ Connecting a PC..............................................................13 Operation ■ ■ ■ ■ ■ ■ ■ ■ ■ ■ Turning the TV On and Off...............................................14 Plug & Play Feature..........................................................14 Changing Channels..........................................................16 Adjusting the Volume........................................................16 Viewing the Display..........................................................17 Viewing the Menus...........................................................17 Using the TOOLS Button..................................................18 Memorizing the Channels.................................................18 To Select the Source........................................................20 To Edit the Input Source Name.........................................20 Picture Control ■ ■ ■ ■ ■ ■ Changing the Picture Standard........................................21 Customizing the Picture Settings......................................21 Adjusting the Detailed Settings.........................................22 Resetting the Picture Settings to the Factory Defaults.....25 Configuring Picture Options..............................................26 Viewing Picture-in-Picture................................................30 Sound Control ■ ■ ■ ■ ■ ■ ■ ■ ■ ■ Changing the Sound Standard.........................................32 Customizing the Sound....................................................32 Setting the TruSurround XT..............................................33 Choosing Preferred Language.........................................34 Choosing a Multi-Channel Sound (MTS) track.................34 Automatic Volume Control................................................35 Setting the TV Speakers On/Off.......................................35 Listening to the Sound of the Sub (PIP) Picture...............36 Resetting the Sound Settings to the Factory Defaults......36 Connecting Headphones (Sold separately)......................36 Channel Control ■ ■ ■ ■ Managing Channels..........................................................37 Clearing Scrambled Channels - Digital.............................43 Fine Tuning Analog Channels...........................................43 Checking the Digital-Signal Strength................................44 PC Display ■ Using Your TV as a Computer (PC) Display.....................45 ■ Display Modes..................................................................45 ■ Setting up the TV with your PC........................................46 WISELINK Pro ■ ■ ■ ■ ■ ■ ■ ■ ■ ■ ■ Using the WISELINK Pro Function...................................64 Using the Photo List.........................................................65 Sorting Photo List.............................................................67 Viewing a Photo or Slide Show .......................................71 Using the Music List.........................................................75 Sorting Music List.............................................................76 Playing a Music File..........................................................80 Using the Movie List.........................................................82 Sorting Movie List.............................................................83 Playing a Movie File.........................................................86 Using the Setup Menu......................................................88 WISELINK Pro-DLNA ■ ■ ■ ■ Setting the DLNA Network................................................89 Installing the DLNA Application.........................................90 Using the DLNA Application..............................................91 Using the DLNA Function.................................................96 Contents Library ■ Using the Contents Library...............................................98 ■ Using the TV Memory Contents.......................................99 ■ Using Additional Content Using External USB Memory Storage...........................................................................104 Network Settings and InfoLink ■ ■ ■ ■ ■ ■ ■ ■ ■ ■ Network Connection - Cable...........................................105 Network Connection - Wireless......................................107 Network selection...........................................................107 Cable Network Setup......................................................108 Wireless Network Setup.................................................110 Activating InfoLink..........................................................113 Using InfoLink - United State..........................................114 Using InfoLink - Canada.................................................116 InfoLink Setup.................................................................117 Product Guide.................................................................118 ■ ■ ■ ■ ■ ■ ■ What is Anynet+?...........................................................119 Connecting Anynet+ Devices.........................................119 Setting Up Anynet+ . ......................................................120 Scanning and Switching between Anynet+ Devices.......120 Recording.......................................................................121 Listening through a Receiver (Home theater).................122 Troubleshooting for Anynet+ .........................................122 About Anynet+ Appendix ■ ■ ■ ■ ■ ■ Troubleshooting..............................................................123 Installing the Stand.........................................................125 Disconnecting the Stand.................................................125 Auto Wall-Mount Adjustment (Sold separately) .............126 Wall Mount Kit Specifications (VESA)............................127 Using the Anti-Theft Kensington Lock (LN40A750R1F, LN46A750R1F)...............................................................128 ■ Specifications.................................................................129 ■ Dimensions.....................................................................130 Time Setting ■ Setting the Clock..............................................................48 Symbol Press Note One-Touch Button English - 1470A-03Eng.indb 1 2008-08-11 �� 2:21:07 General Information List of Features • • • • • • • • • Adjustable picture settings that can be stored in the TV’s memory. Automatic timer to turn the TV on and off. A special sleep timer. Excellent Digital Interface & Networking : With a built-in HD digital tuner, non-subscription HD broadcasts can be viewed with no Cable Box/Satellite receiver (Set-Top Box) needed. You can view News, Weather, and Stock information over the network (SAMSUNG InfoLink’s Service). You can listen to music files and view pictures on USB Mass Storage Class (MSC) devices. HDMI/DVI connection of your PC to this TV. Excellent Picture Quality - DNIe technology provides life-like clear images. SRS TruSurround XT - SRS TruSurround XT provides a virtual surround system. Accessories Please make sure the following items are included with your LCD TV. If any items are missing, contact your dealer. Remote Control & Batteries (AAA x 2) (BN59-00696A) Power Cord (3903-000144) Warranty Card / Registration Card / Safety Guide Manual (Not available in all locations) Cleaning Cloth (BN63-01798A) Program CD (BN59-00726A) Owner’s Instructions Cover-Bottom (LN40A750R1F: BN63-04343A) (LN46A750R1F: BN63-04336A) (LN52A750R1F: BN63-04340A) Ferrite Core for HDMI X 2 (HDMI4, DVI to HDMI Cable) (3301-001110) ➣ The items color and shape may vary depending on the model. ➣ Ferrite Core (HDMI4, DVI to HDMI Cable) The ferrite cores are used to shield the cables from interference. When connecting a cable, open the ferrite core and clip it around the cable near the plug. English - 1470A-03Eng.indb 2 2008-08-11 �� 2:21:10 Viewing the Control Panel Buttons on the Lower-Right Part of the Panel The buttons on the lower-right panel control your TV’s basic features, including the on-screen menu. To use the more advanced features, you must use the remote control. 1 2 3 4 8 5 6 78 ➣ The product color and shape may vary depending on the model. Front Panel buttons Touch each button to operate. 1 SOURCE Toggles between all the available input sources (TV, AV1, AV2, S-Video, Component1, Component2, PC, HDMI1, HDMI2/DVI, HDMI3, HDMI4, USB). In the on-screen menu, use this button as you would use the ENTER button on the remote control. 5 POWER INDICATOR Blinks and turns off when the power is on and lights up in stand-by mode. 2 MENU Press to see an on-screen menu of your TV’s features. 7 REMOTE CONTROL SENSOR Aim the remote control towards this spot on the TV. 3 – VOL + Press to increase or decrease the volume. In the on-screen menu, use the – VOL + buttons as you would use the ◄ and ► buttons on the remote control. 8SPEAKERS 4 6 (Power) Press to turn the TV on and off. CH Press to change channels. In the on-screen menu, use the CH buttons as you would use the ▼ and ▲ buttons on the remote control. English - 1470A-03Eng.indb 3 2008-08-11 �� 2:21:10 Viewing the Connection Panel Use the connection panel jacks to connect A/V components that will be connected continuously, such as DVD players or a VCR. For more information on connecting equipment, see pages 7~13. [TV Side Panel] HDMI IN4 [TV Rear Panel] ➣ The product color and shape may vary depending on the model. 1 AUDIO OUT Connects to the audio input jacks on your Amplifier/ Home theater. 8 2 DIGITAL AUDIO OUT (OPTICAL) Connects to a Digital Audio component. 9 POWER INPUT Connects the supplied power cord. 3 PC IN [PC] / [AUDIO] Connects to the video and audio output jacks on your PC. 0 COMPONENT IN 1, 2 / AV IN 1 Connects Component video/audio. The COMPONENT IN 1 jack is also used as the AV IN 1 jack. - Connect the video cable to the COMPONENT IN 1 [Y/VIDEO] jack and the audio cable to the COMPONENT IN 1 [R-AUDIO-L] jacks. 4 HDMI IN 1, 2, 3, 4 / DVI IN(HDMI2)[R-AUDIO-L] Connects to the HDMI jack of a device with an HDMI output. - No sound connection is needed for an HDMI to HDMI connection. Use the HDMI IN 2 jack for DVI connection to an external device. Use a DVI to HDMI cable or DVI-HDMI adapter (DVI to HDMI) for video connection and the DVI IN (HDMI2) [R-AUDIO-L] jacks for audio. - When using an HDMI/DVI cable connection, you must use the HDMI IN 2 jack. 5 ANT IN Connects to an antenna or cable TV system. 6 WISELINK Connect a USB mass storage device to view movies and photos and listen to music files. You can connect to the network wirelessly using the Wireless Infolink adapter (Sold separately). (HEADPHONE) Connects a set of external headphones for private listening. ! LAN Connect a LAN cable to this port to connect to the Network (SAMSUNG InfoLink’s Service). (See pages 105~106) @ EX-LINK Connect this to the jack on the optional wall mount bracket. This will allow you to adjust the TV viewing angle using your remote control. # KENSINGTON LOCK (LN40A750R1F, LN46A750R1F) The Kensington Lock (optional) is a device used to physically fix the system when used in a public place. If you want to use a locking device, contact the dealer where you purchased the TV. 7 AV IN 2 Video and audio inputs for external devices, such as a camcorder or VCR. ➣ The location of the Kensington Lock may be different depending on its model. S-VIDEO Connects an S-Video signal from a camcorder or VCR. English - 1470A-03Eng.indb 4 2008-08-11 �� 2:21:11 Remote Control You can use the remote control up to a distance of about 23 feet from the TV. 1 POWER Turns the TV on and off. ^ CH / CH Press to change channels. 2TV Selects the TV mode directly. & SOURCE Press to display and select the available video sources. 3 NUMERIC BUTTONS Press to change the channel. 4 5 6 7 8 9 0 ! @ # $ % * W.LINK (WISELINK Pro) This function enables you to view and play photo, music Press to select additional and movie files from an channels (digital and analog) external device. (Refer to being broadcast by the same station. For example, to select pages 65 (Photo), 75 (Music) channel “54-3”, press “54”, then and 82 (Movie)) press “ ” and “3”. ( MENU (MUTE) Displays the main on-screen Press to temporarily cut off the menu. sound. ) RETURN VOL – / VOL + Returns to the previous menu. Press to increase or decrease the volume. a UP▲ / DOWN▼ / LEFT◄ / RIGHT► / ENTER CH LIST Press the Up/Down/Left/Right Used to display Channel Lists on the screen. sections of the wheel button and Enter to select on-screen TOOLS menu items and change menu Use to quickly select frequently values. used functions. You can navigate up and down the menu, switch channels and INFO adjust the volume by turning Press to display information on the wheel button. (See pages the TV screen. 16~17) COLOR BUTTONS b EXIT Use these buttons in the Channel list, WISELINK Pro, Press to exit the menu. etc. c DMA (Digital Media Adapter) CC Use this when connecting Controls the caption decoder. a SAMSUNG DMA device through an HDMI interface and E.MODE switching to DMA mode. Press to select the preset For more information on the display and sound modes for operating procedures, refer to sports, cinema and games. the user manual of the DMA. Use these buttons in the DMA, This button is available when WISELINK Pro and Anynet+ “Anynet+(HDMI-CEC)” is “On”. modes. (see page 120) ( : This remote can be used to control recording on d INFO.L Samsung recorders with the Press to use the News, Stock + Anynet feature) Market and Weather Forecast information services available ON/OFF over the network.(see page Press to backlight the buttons 113) on the remote. This function is convenient for using at night or when the room is dark. (Using e FAV.CH Press to switch to your favorite the remote control with the channels. ON/OFF light button set to On will reduce the battery usage f CONTENT time.) (See page 6) This function enables you to PRE-CH view “Contents Library”. Tunes to the previous channel. ➣ The performance of the remote control may be affected by bright light. English - 1470A-03Eng.indb 5 2008-08-11 �� 2:21:12 Installing Batteries in the Remote Control 1. 2. 3. Lift the cover at the back of the remote control upward as shown in the figure. Install two AAA size batteries. ➣ Make sure to match the “+” and “–” ends of the batteries with the diagram inside the compartment. Replace the cover. ➣ Remove the batteries and store them in a cool, dry place if you won’t be using the remote control for a long time. The remote control can be used up to about 23 feet from the TV. (Assuming typical TV usage, the batteries should last for about one year.) light button set to On will reduce the ➣ Using the remote control with the ON/OFF battery usage time. ➣ If the remote control doesn’t work, check the following: 1. Is the TV power on? 2. Are the plus and minus ends of the batteries reversed? 3. Are the batteries drained? 4. Is there a power outage or is the power cord unplugged? 5. Is there a special fluorescent light or neon sign nearby? Using the Remote Control Backlight Buttons Use this feature in dark surroundings and when you are unable to see the remote control buttons clearly. 1. Press the ON/OFF light button. ➣ Pressing the ON/OFF light button toggles between ON and OFF. ➣ When ON, the button backlight is turned on for a moment. ➣ Pressing a remote control button when the remote control is on turns the button backlight on for a moment. If you touch or move the remote control and the motion is detected by the sensor of the remote control, the button backlight will be turned on for a moment. ➣ Since there is a vibrating device inside the remote control, shaking the remote control will result in a sound generated by the device. ➣ The button backlight will not be turned on when the remote control is turned off. English - 1470A-03Eng.indb 6 2008-08-11 �� 2:21:13 Connections Connecting VHF and UHF Antennas If your antenna has a set of leads that look like the diagram to the right, see “Antennas with 300 Ω Flat Twin Leads” below. If your antenna has one lead that looks like the diagram to the right, see “Antennas with 75 Ω Round Leads”. If you have two antennas, see “Separate VHF and UHF Antennas”. Antennas with 300 Ω Flat Twin Leads If you are using an off-air antenna (such as a roof antenna or “rabbit ears”) that has 300 Ω twin flat leads, follow the directions below. 1.Place the wires from the twin leads under the screws on a 300-75 Ω adapter (not supplied). Use a screwdriver to tighten the screws. ANT IN 2. Plug the adaptor into the ANT IN terminal on the back of the TV. Antennas with 75 Ω Round Leads 1. ANT IN Plug the antenna lead into the ANT IN terminal on the back of the TV. Separate VHF and UHF Antennas If you have two separate antennas for your TV (one VHF and one UHF), you must combine the two antenna signals before connecting the antennas to the TV. This procedure requires an optional combiner-adaptor (available at most electronics shops). 1. Connect both antenna leads to the combiner. UHF VHF 2. Plug the combiner into the ANT IN terminal on the bottom of the rear panel. ANT IN UHF VHF Connecting Cable TV To connect to a cable TV system, follow the instructions below. Cable without a Cable Box 1. Plug the incoming cable into the ANT IN terminal on the back of the TV. ➣ Because this TV is cable-ready, you do not need a cable box to view unscrambled cable channels. ANT IN Connecting to a Cable Box that Descrambles All Channels 1. 2. Find the cable that is connected to the ANT OUT terminal on your cable box. ➣ This terminal might be labeled “ANT OUT”, “VHF OUT” or simply, “OUT”. Connect the other end of this cable to the ANT IN terminal on the back of the TV. ANT IN ANT OUT ANT IN English - 1470A-03Eng.indb 7 2008-08-11 �� 2:21:14 Connecting to a Cable Box that Descrambles Some Channels If your cable box descrambles only some channels (such as premium channels), follow the instructions below. You will need a two-way splitter, an RF (A/B) switch and four lengths of RF cable. (These items are available at most electronics stores.) 1.Find and disconnect the cable that is connected to the ANT IN terminal on your cable box. ➣ This terminal might be labeled “ANT IN”, “VHF IN” or simply, “IN”. ANT IN Incoming cable 2.Connect this cable to a two-way splitter. Incoming cable Splitter Splitter Cable Box 3.Connect an RF cable between the OUTPUT terminal on the splitter and the IN terminal on the cable box. 4.Connect an RF cable between the ANT OUT terminal on the cable box and the B–IN terminal on the RF(A/B) switch. Incoming cable Splitter RF (A/B) Switch Cable Box Incoming cable Splitter Cable Box 5.Connect another cable between the other OUT terminal on the splitter and the A–IN terminal on the RF (A/B) switch. RF (A/B) Switch ANT IN Incoming cable TV Rear Splitter Cable Box RF (A/B) Switch 6.Connect the last RF cable between the OUT terminal on the RF (A/B) switch and the ANT IN terminal on the rear of the TV. After you have made this connection, set the A/B switch to the “A” position for normal viewing. Set the A/B switch to the “B” position to view scrambled channels. (When you set the A/B switch to “B”, you will need to tune your TV to the cable box’s output channel, which is usually channel 3 or 4.) English - 1470A-03Eng.indb 8 2008-08-11 �� 2:21:16 Connecting a DVD Player or Cable Box/Satellite receiver (Set-Top Box) via HDMI This connection can only be made if there is an HDMI Output connector on the external device. 1.Connect an HDMI Cable between the HDMI IN (1, 2, 3 or 4) jack on the TV and the HDMI jack on the DVD Player or Cable Box/Satellite receiver (Set-Top Box). TV Side Panel DVD Player or Cable Box/Satellite receiver (Set-Top Box) Rear Panel TV Rear Panel HDMI Cable (Not supplied) or ➣ What is HDMI? • HDMI(High-Definition Multimedia Interface), is an interface that enables the transmission of digital audio and video signals using a single cable. • The difference between HDMI and DVI is that the HDMI device is smaller in size and has the HDCP (High Bandwidth Digital Copy Protection) coding feature installed. ➣ Each DVD Player or Cable Box/Satellite receiver (Set-Top Box) has a different back panel configuration. ➣ The TV may not output sound and pictures may be displayed with abnormal color when DVD players/Cable Boxes/Satellite receivers supporting HDMI versions older than 1.3 are connected. When connecting an older HDMI cable and there is no sound, connect the HDMI cable to the HDMI IN 2 jack and the audio cables to the DVI IN (HDMI2) [R-AUDIO-L] jacks on the back of the TV. If this happens, contact the company that provided the DVD player/Cable Box/Satellite receiver to confirm the HDMI version, then request an upgrade. ➣ HDMI cables that are not 1.3 may cause annoying flicker or no screen display. Connecting a DVD Player or Cable Box/Satellite receiver (Set-Top Box) via DVI This connection can only be made if there is a DVI Output connector on the external device. 1.Connect a DVI to HDMI Cable or DVI-HDMI Adapter between the HDMI IN 2 jack on the TV and the DVI jack on the DVD Player or Cable Box/Satellite receiver (Set-Top Box). 2.Connect Audio Cables between the DVI IN (HDMI 2) [R-AUDIO-L] jack on the TV and the DVD Player or Cable Box/Satellite receiver (Set-Top Box). TV Rear Panel DVD Player or Cable Box/ Satellite receiver (Set-Top Box) 2 Audio Cable (Not supplied) 1 DVI to HDMI Cable (Not supplied) ➣ Each DVD Player or Cable Box/Satellite receiver (Set-Top Box) has a different back panel configuration. ➣ When connecting a DVD Player or Cable Box/Satellite receiver (Set-Top Box), match the color of the connection terminal to the cable. ➣ When using an HDMI/DVI cable connection, you must use the HDMI IN 2 jack. English - 1470A-03Eng.indb 9 2008-08-11 �� 2:21:17 Connecting a DVD Player or Cable Box/Satellite receiver (Set-Top Box) via Component cables The rear panel jacks on your TV make it easy to connect a DVD Player or Cable Box/Satellite receiver (Set-Top Box) to your TV. 1.Connect a Component Cable between the COMPONENT IN (1 or 2) [Y, PB, PR] jacks on the TV and the COMPONENT [Y, PB, PR] jacks on the DVD Player or Cable Box/Satellite receiver (Set-Top Box). 2.Connect Audio Cables between the COMPONENT IN(1 or 2) [R-AUDIO-L] jacks on the TV and the AUDIO OUT jacks on the DVD Player or Cable Box/Satellite receiver (Set-Top Box). TV Rear Panel DVD Player or Cable Box / Satellite receiver (Set-Top Box) 2 1 Audio Cable (Not supplied) Component Cable (Not supplied) ➣ Component video separates the video into Y (Luminance (brightness)), Pb (Blue) and Pr (Red) for enhanced video quality. Be sure to match the component video and audio connections. For example, if connecting a Component video cable to COMPONENT IN 1, connect the audio cable to COMPONENT IN 1 also. ➣ Each DVD Player or Cable Box/Satellite receiver (Set-Top Box) has a different back panel configuration. ➣ When connecting a DVD Player or Cable Box/Satellite receiver (Set-Top Box), match the color of the connection terminal to the cable. Connecting a Camcorder The side panel jacks on your TV make it easy to connect a camcorder to your TV. They allow you to view the camcorder tapes without using a VCR. 1.Connect a Video Cable (or S-Video Cable) between the AV IN 2 [VIDEO] (or S-VIDEO) jack on the TV and the VIDEO OUT jack on the camcorder. 2.Connect Audio Cables between the AV IN 2 [R-AUDIO-L] jacks on the TV and the AUDIO OUT jacks on the camcorder. TV Side Panel or Camcorder 1 S-Video Cable (Not supplied) 1 Video Cable (Not supplied) 2 Audio Cable (Not supplied) ➣ Each Camcorder has a different back panel configuration. ➣ When connecting a Camcorder, match the color of the connection terminal to the cable. English - 10 1470A-03Eng.indb 10 2008-08-11 �� 2:21:18 Connecting a VCR Video Connection These instructions assume that you have already connected your TV to an antenna or a cable TV system (according to the instructions on pages 7~8). Skip step 1 if you have not yet connected to an antenna or a cable system. 1.Unplug the cable or antenna from the back ANT IN of the TV. 2.Connect the cable or antenna to the ANT IN terminal on the back of the VCR. 3.Connect an RF Cable between the ANT OUT TV Side Panel TV Rear Panel terminal on the VCR and the ANT IN terminal on the TV. VCR Rear Panel 4.Connect a Video Cable between the VIDEO OUT jack on the VCR and the AV IN 1 [Y/VIDEO] or AV IN 2 [VIDEO] jack on the TV. 5.Connect Audio Cables 5 Audio Cable (Not supplied) between the AUDIO OUT jacks on the VCR 4 Video Cable (Not supplied) and the AV IN 1 (or AV 3 RF Cable (Not supplied) IN 2) [R-AUDIO-L] jacks on the TV. ➣ If you have a “mono” Follow the instructions in “Viewing a VCR or Camcorder Tape” to view your VCR tape. (non-stereo) VCR, ➣ Each VCR has a different back panel configuration. use a Y-connector (not supplied) to ➣ When connecting a VCR, match the color of the connection terminal to the cable. connect to the ➣ When connecting to AV IN 1, the color of the AV IN 1 [Y/VIDEO] jack (Green) does not right and left audio match the color of the video cable (Yellow). input jacks of the TV. Alternatively, connect the cable to the “R” jack. If your VCR is stereo, you must connect two cables. S-Video Connection Your Samsung TV can be connected to an S-Video jack on a VCR. (This connection delivers a better picture as compared to a standard VCR.) 1.To begin, follow steps TV Rear Panel 1–3 in the previous TV Side Panel section to connect the antenna or cable to your VCR Rear Panel VCR and your TV. 2.Connect an S-Video Cable between the S-VIDEO OUT jack on the VCR and the 1 RF Cable (Not supplied) AV IN 2 [S-VIDEO] jack on the TV. 2 S-Video Cable (Not supplied) 3.Connect Audio Cables between the AUDIO 3 Audio Cable (Not supplied) OUT jacks on the VCR and the AV IN 2 [R-AUDIO-L] jacks on An S-Video cable may be included with a VCR. (If not, check your local electronics store.) the TV. ➣ Each VCR has a different back panel configuration. ➣ When connecting a VCR, match the color of the connection terminal to the cable. English - 11 1470A-03Eng.indb 11 2008-08-11 �� 2:21:20 Connecting a Digital Audio System The rear panel jacks on your TV make it easy to connect a Digital Audio System (Home theater/Receiver) to your TV. 1.Connect an Optical Cable between the “DIGITAL AUDIO OUT (OPTICAL)” jacks on the TV and the Digital Audio Input jacks on the Digital Audio System. When a Digital Audio System is connected to the “DIGITAL AUDIO OUT (OPTICAL)” jack: Decrease the volume of the TV and adjust the volume level with the system’s volume control. TV Rear Panel Digital Audio System Optical Cable (Not supplied) ➣ 5.1CH audio is possible when the TV is connected to an external device supporting 5.1CH. ➣ Each Digital Audio System has a different back panel configuration. ➣ When the receiver (home theater) is set to On, you can hear sound output from the TV’s Optical jack. When the TV is displaying a DTV(air) signal, the TV will send out 5.1 channel sound to the Home theater receiver. When the source is a digital component such as a DVD and is connected to the TV via HDMI, only 2 channel sound will be heard from the Home Theater receiver. If you want to hear 5.1 channel audio, connect the DIGITAL AUDIO OUT (OPTICAL) jack on the DVD player or Cable/Satellite Box directly to an Amplifier or Home Theater, not the TV. Connecting an Amplifier/DVD Home Theater 1.Connect Audio Cables between the AUDIO OUT [R-AUDIO-L] jacks on the TV and AUDIO IN [R-AUDIO-L] jacks on the Amplifier/DVD Home Theater. When an audio amplifier is connected to the “AUDIO OUT [R-AUDIO-L]” jacks: Decrease the volume of the TV and adjust the volume level with the Amplifier’s volume control. TV Rear Panel Amplifier/DVD Home Theater Audio Cable (Not supplied) ➣ Each Amplifier/DVD Home Theater has a different back panel configuration. ➣ When connecting an Amplifier/DVD Home Theater, match the color of the connection terminal to the cable. English - 12 1470A-03Eng.indb 12 2008-08-11 �� 2:21:22 Connecting a PC Using the D-Sub Cable 1.Connect a D-Sub Cable between PC IN [PC] connector on the TV and the PC output connector on your computer. 2.Connect a PC Audio Cable between the PC IN [AUDIO] jack on the TV and the Audio Out jack of the sound card on your computer. TV Rear Panel 2 PC Audio Cable (Not supplied) 1 D-Sub Cable (Not supplied) Using the HDMI/DVI Cable 1.Connect an HDMI/DVI cable between the HDMI IN 2 jack on the TV and the PC output jack on your computer. 2.Connect a 3.5 mm Stereo miniplug/2RCA Cable between the DVI IN(HDMI2) [R-AUDIO-L] jack on the TV and the Audio Out jack of the sound card on your computer. TV Rear Panel 2 3.5 mm Stereo mini-plug/2RCA Cable (Not supplied) 1 HDMI/DVI Cable (Not supplied) ➣ Each PC has a different back panel configuration. ➣ When connecting a PC, match the color of the connection terminal to the cable. ➣ When using an HDMI/DVI cable connection, you must use the HDMI IN 2 terminal. English - 13 1470A-03Eng.indb 13 2008-08-11 �� 2:21:23 Operation Turning the TV On and Off Press the POWER button on the remote control. You can also use the POWER button on the TV. Plug & Play Feature When the TV is initially powered on, basic settings proceed automatically and subsequently. 1.Press the POWER button on the remote control. The message “Menu Language, Store Demo, Channels and Time will be set.” is displayed. Press the ENTER button, then “Select language of the OSD.” menu is automatically displayed. Press the ENTER button. Plug & Play Menu Language, Store Demo, Channels and Time will be set. OK Enter Plug & Play 2.Press the ▲ or ▼ button to select language, then press the ENTER button. The message “Select ‘Home Use’ when installing this TV in your home.” is displayed. Select language of the OSD. Menu Language English : English Español Français Move Enter Plug & Play 3.Press the ◄ or ► button to select “Store Demo” or “Home Use”, then press the ENTER button. The message “Select the Antenna source to memorize.” is displayed. ➣ We recommend setting the TV to “Home Use” mode for the best picture in your home environment. ➣ “Store Demo” mode is only intended for use in retail environments. ➣ If the unit is accidentally set to “Store Demo” mode and you want to return to “Home Use” (Standard): Press the Volume button on the TV. When the volume OSD is displayed, press and hold the MENU button on the TV for 5 seconds. Select ‘Home Use’ when installing this TV in your home. Store Demo Home Use Move Plug & Play Select the Antenna source to memorize. Air Start Cable Start Auto Start Move 4.Press the ▲ or ▼ button to memorize the channels of the selected connection. Press the ENTER button to select “Start”. ➣ Air: “Air” antenna signal. Cable: “Cable” antenna signal. Auto: “Air” and “Cable” antenna signals. ➣ In Cable mode, you can select the correct signal source among STD, HRC, and IRC by pressing the ▲,▼,◄ or ► button, then press the ENTER button. If you have Digital cable, select the cable system signal source for both Analog and Digital. Contact your local cable company to identify the type of cable system that exists in your particular area. Enter Enter Skip Auto Program Selects the cable system. Analog STD HRC IRC Digital STD HRC IRC Start Move Enter Skip Plug & Play Auto Program in Progress. DTV Air : 02 DTV Cable : 23 Air : 11 Cable : 21 Cable 38 50% Stop Enter Skip English - 14 1470A-03Eng.indb 14 2008-08-11 �� 2:21:24 5.The TV will begin memorizing all of the available channels. ➣ To stop the search before it has finished, press the ENTER button with “Stop” selected. After all the available channels are stored, it starts to remove scrambled channels (see page 43). And then, the Auto program menu reappears. Press the ENTER button when channel memorization is complete. The message “Set the Clock Mode.” is displayed. Plug & Play Removing scrambled channel. DTV Air : 05 DTV Cable : 25 Air : 12 Cable : 32 DTV Cable 41 77% Stop Enter Skip Enter Skip Plug & Play Auto Program is completed. 119 channels are memorized. DTV Air : 05 Air : 24 DTV Cable : 10 Cable : 80 OK 6.Press the ENTER button. Press the ▲ or ▼ button to select “Auto”, then Press the ENTER The message “Set to daylight saving time.” is displayed. If you select “Manual”, “Set current date and time” is displayed. (See page 48) button. Plug & Play Set the Clock Mode. Clock Mode : Auto Auto Manual Move 7.Press the ▲ or ▼ button to select “Off” or “On”, then press the ENTER button. The message “Select the time zone in which you live.” is displayed. Enter Skip Enter Skip Plug & Play Set to daylight saving time. DST : Auto Off On Move 8.Press the ▲ or ▼ button to highlight the time zone for your local area. Press the ENTER button. If you have received a digital signal, the time will be set automatically. If not, see page 48 to set the clock. Plug & Play Select the time zone in which you live. Newfoundland Atlantic Eastern Central Mountain Pacific Move 9.The message “Enjoy your watching.” is displayed. When you have finished, press the ENTER button. Enter Skip Plug & Play Enjoy your watching. OK button. Setup If you want to reset this feature... 1.Press the MENU button to display the menu. Press the ▲ or ▼ button to select “Setup”, then press the ENTER 2.Press the ENTER button again to select “Plug & Play”. For further details on setting up options, refer to the pages 14~15. ➣ The “Plug & Play” feature is only available in the TV mode. Plug & Play Language ► : English Time Network selection : Cable Cable Network Setup Wireless Network Setup V-Chip Caption English - 15 1470A-03Eng.indb 15 2008-08-11 �� 2:21:26 Changing Channels Using the Channel Buttons 1. Press the CH or CH button to change channels. ➣ When you press the CH or CH button, the TV changes channels in sequence. You will see all the channels that the TV has memorized. (The TV must have memorized at least three channels). You will not see channels that were either erased or not memorized. See page 18 to memorize channels. ➣ To increase the channel number, turn the wheel clockwise when the Channel Display is displayed. To decrease the channel number, turn the wheel counterclockwise. Using the Number Buttons 1.Press the number buttons to go directly to a channel. For example, to select channel 27, press 2, then 7. ➣ For quick channel change, press the number buttons, then press the ENTER button. Using the Button button is used to select stations that broadcast a digital signal. The 1.For example, for Channel 7-1, press 7, then , then 1. ➣ HD indicates the TV is receiving a Digital High Definition signal. SD indicates the TV is receiving a Standard Definition signal. ➣ For quick channel change, press the number buttons, then press the ENTER button. Using the PRE-CH Button to select the Previous Channel 1. Press the PRE-CH button. The TV will switch to the last channel viewed. ➣ To quickly switch between two channels that are far apart, tune to one channel, then use the number button to select the second channel. Then use the PRE-CH button to quickly alternate between them. Adjusting the Volume Using the Volume Button 1. Press the VOL – or VOL+ button to increase or decrease the volume. ➣ To turn the volume up, turn the wheel clockwise when the Volume Control window is displayed. To turn the volume down, turn the wheel counterclockwise. Using the MUTE button At any time, you can cut off the sound using the MUTE button. 1.Press MUTE button and the sound cuts off. “ ” is displayed on the screen. 2.To turn mute off, press the MUTE button again or simply press the VOL – or VOL+ button. English - 16 1470A-03Eng.indb 16 2008-08-11 �� 2:21:27 Viewing the Display The display identifies the current channel and the status of certain audio-video settings. 1.Press the INFO button on the remote control. The TV will display the channel, the type of sound, and the status of certain picture and sound settings. TV #8 ➣ Press the INFO button once more or wait approximately 10 seconds and the display disappears automatically. DTV Air 4-2 Sun, Sep 3 1:45 pm Dolby Digital ♥ Life On Venus Avenue 1080i | 16:9 | English 9:59 am - 10:59 am No Detaild Information Viewing the Menus 1.With the power on, press the MENU button. The main menu appears on the screen. The menu’s left side has icons: Picture, Sound, Channel, Setup, Input, Application. Picture 2.Press the ▲ or ▼ button to select one of the icons. Then press the ENTER button to access the icon’s sub-menu. ➣ To move to a lower menu, turn the wheel clockwise when the menu Display is displayed. To move to a higher menu, turn the wheel counterclockwise. Mode :Standard Backlight :7 Contrast : 95 Brightness : 45 Sharpness : 50 Color : 50 Tint (G/R) : G50/R50 Detailed Settings 3.Press the EXIT button to exit. ➣ The on-screen menus disappear from the screen after about one minute. English - 17 1470A-03Eng.indb 17 2008-08-11 �� 2:21:27 Using the TOOLS Button You can use the TOOLS button to select your frequently used functions quickly and easily. The “TOOLS” menu changes depending on which external input mode you are viewing. 1.Press the TOOLS button. The “TOOLS” menu will appear. 2. Press the ▲ or ▼ button to select a menu. 3.Press the ▲/▼/◄/►/ENTER buttons to display, change, or use the selected items. For a more detailed description of each function, refer to the corresponding page. • • • • • • • • • • TOOLS Device List: see page 120 Multi-Track Sound: see pages 34 Picture Size: see pages 26 Picture Mode: see page 21 Sound Mode: see page 32 Sleep Timer: see page 50 Add to Favorite: see page 39 Switch to Cable (or Switch to Air): see page 18 PIP: see pages 31 Auto Adjustment: see pages 46 Device List Multi-Track Sound : Picture Size : Stereo 16:9 Picture Mode : Standard Sound Mode : Custom Sleep Timer : Off Add to Favorite Switch to Cable Move Enter e Exit Memorizing the Channels Your TV can memorize and store all of the available channels for both “off-air” (Air) and “Cable” channels. After the available channels are memorized, use the CH or CH button to scan through the channels. This eliminates the need to change channels by entering the channel digits. There are three steps for memorizing channels: selecting a broadcast source, memorizing the channels (automatic) and adding or deleting channels (Channel Lists). Selecting the Video Signal-source Channel Before your television can begin memorizing the available channels, you must specify the type of signal source that is connected to the TV (i.e. an Air or a Cable system). 1.Press the MENU button to display the menu. Press the ▲ or ▼ button to select “Channel”, then press the ENTER button. Antenna : Air ► Auto Program Clear Scrambled Channel Channel List Fine Tune Signal Strength Channel button to select “Antenna”. 2.Press the ENTER Press the ▲ or ▼ button to select “Air” or “Cable”, then press the ENTER button. Press the EXIT button to exit. Antenna : Air Air ► Cable Auto Program Clear Scrambled Channel Channel List Fine Tune Signal Strength TOOLS Easy Setting 1.Press the TOOLS button on the remote control. 2. Press the ▲ or ▼ button to select “Switch to Cable (or Switch to Air)”. 3. Press the ENTER button to switch “Cable” (or “Air”). Device List Multi-Track Sound : Picture Size : Stereo 16:9 Picture Mode : Standard Sound Mode : Custom Sleep Timer : Off Add to Favorite Switch to Cable Move Enter e Exit English - 18 1470A-03Eng.indb 18 2008-08-11 �� 2:21:30 Storing Channels in Memory (Automatic Method) Channel 1.Press the MENU button to display the menu. Press the ▲ or ▼ button to select “Channel”, then press the ENTER button. 2.Press the ▲ or ▼ button to select “Auto Program”, then press the ENTER button. Antenna : Air Auto Program ► Clear Scrambled Channel Channel List Fine Tune Signal Strength 3.Press the ▲ or ▼ button to select the antenna connection, then press the ENTER button. ➣ Air: “Air” antenna signal. Cable: “Cable” antenna signal. Auto: “Air” and “Cable” antenna signals. Auto Program Select the Antenna source to memorize. Air Start Cable Start Auto Start Enter Move 4.When selecting the Cable TV system: Press the ENTER button to start the auto program. Press the ▲,▼, ◄ or ► to select the correct analog signal cable system source among “STD”, “HRC”, and “IRC”. Press the ▲ or ▼ button to select “Start”, then press the ENTER button. If you have Digital cable TV, select the cable system signal source for both Analog and Digital. ➣ STD, HRC and IRC identify various types of cable TV systems. Contact your local cable company to identify the type of cable system that exists in your particular area. At this point the signal source has been selected. Return Auto Program Selects the cable system. Analog STD HRC IRC Digital STD HRC IRC Start Enter Move Return Auto Program Auto Program in Progress. DTV Cable : 12 Cable 38 50% Cable : 32 Stop Enter Return Auto Program Removing scrambled channel. 5. The TV begins memorizing all available stations. ➣ After all the available channels are stored, it starts to remove scrambled channels (see page 43). The Auto program menu then reappears. ➣ If you want to stop Auto Programming, press the ENTER button. The “Stop Auto Program?” message will be displayed. Select “Yes” by pressing the ◄ or ► button, then press the ENTER button. Press the EXIT button to exit. DTV Cable : 16 DTV Cable 41 77% Cable : 45 Stop Enter Return Auto Program Stop Auto Program? DTV Cable : 16 Cable : 45 77% No Yes Enter Move Return Auto Program Auto Program is completed. 90 channels are memorized. Air : 10 Cable : 80 OK Enter Return English - 19 1470A-03Eng.indb 19 2008-08-11 �� 2:21:31 To Select the Source Input Use to select TV or other external input sources such as DVD players or Cable Box/Satellite receivers (Set-Top Box) connected to the TV. Use to select the input source of your choice. 1.Press the MENU button to display the menu. Press the ▲ or ▼ button to select “Input”, then press the ENTER button. 2.Press the ENTER button to select “Source List”. Press the ▲ or ▼ button to select signal source, then press the ENTER button. ➣ Available signal sources: TV, AV1, AV2, S-Video, Component1, Component2, PC, HDMI1, HDMI2/DVI, HDMI3, HDMI4, USB. ➣ You can choose only those external devices that are connected to the TV. In the “Source List”, connected inputs will be highlighted and sorted to the top. Inputs that are not connected will be sorted to the bottom. ➣ Using the Color buttons on the remote with the Source list Source List Edit Name TV • Red (Refresh): Refreshes the connecting external devices. • TOOLS (Option): Displays the “Edit Name” and “Information” menus. AV1 ---- AV2 ---- S-Video ---- Component1 ---- Component2 ---- PC ---- Refresh TOOLS Option O Press the SOURCE button on the remote control to view an external signal source. To Edit the Input Source Name Input Name the device connected to the input jacks to make your input source selection easier. 1.Press the MENU button to display the menu. Press the ▲ or ▼ button to select “Input”, then press the ENTER button. Press the ▲ or ▼ button to select “Edit Name”, then press the ENTER button. 2.Press the ▲ or ▼ button to select “AV1”, “AV2”, “S-Video”, “Component1”, “Component2”, “PC”, “HDMI1”, “HDMI2/DVI”, “HDMI3”, “HDMI4” input jack, then press the ENTER button. Source List Edit Name ► Edit Name AV1 : ---- AV2 : ---- S-Video : ---- Component1 : ---- Component2 : ---- PC : ---- HDMI1 : ---- ► ▼ 3.Press the ▲ or ▼ button to select “VCR”, “DVD”, “Cable STB”, “Satellite STB”, “PVR STB”, “AV Receiver”, “Game”, “Camcorder”, “PC”, “TV”, “IPTV”, “Blu-Ray”, “HD DVD”, “Digital Media Adapter” input source, then press the ENTER button. Press the EXIT button to exit. ➣ When a PC with a resolution of 1920 x 1080@60Hz is connected to the HDMI IN 2 port, you should set the “HDMI2/DVI” mode to “PC” in the “Edit Name” of the “Input” mode. Move Enter Return Edit Name AV1 AV2 S-Video Component1 Component2 PC HDMI1 : ------: ---VCR : ---DVD : ---Cable STB : ---Satellite STB : ---PVR STB : ---Move Enter Return English - 20 1470A-03Eng.indb 20 2008-08-11 �� 2:21:32 Picture Control Changing the Picture Standard Picture You can select the type of picture which best corresponds to your viewing requirements. 1.Press the MENU button to display the menu. Press the ENTER button to select “Picture”. Mode :Standard Backlight :7 Contrast : 95 Brightness : 45 Sharpness : 50 Color : 50 Tint (G/R) : G50/R50 Detailed Settings • Dynamic: Selects the picture for high-definition in a bright room. • Standard: Selects the picture for the optimum display in a normal environment. • Movie: Selects the picture for viewing movies in a dark room. Picture 2.Press the ENTER button to select “Mode”. Press the ▲ or ▼ button to select “Dynamic”, “Standard” or “Movie”. Press the ENTER button. 3.Press the EXIT button to exit. Mode :Dynamic Dynamic Backlight Contrast : 7Standard Movie : 95 Brightness : 45 Sharpness : 50 Color : 50 Tint (G/R) : G50/R50 ► Detailed Settings TOOLS Easy Setting 1.Press the TOOLS button on the remote control. 2. Press the ▲ or ▼ button to select “Picture Mode”. 3. Press the ◄ or ► button to select the required option. 4. Press the EXIT or TOOLS button to exit. Device List Multi-Track Sound : Picture Size : Stereo Picture Mode ◄ Standard Sound Mode : Custom Sleep Timer : Off 16:9 ► Add to Favorite Switch to Cable Move Adjust e Exit Customizing the Picture Settings Picture Your television has several setting options that allow you to control the picture quality. 1.To select the desired picture mode, follow the “Changing the Picture Standard” instructions numbers 1 and 2. 2.Press the ▲ or ▼ button to select “Backlight”, “Contrast”, “Brightness”, “Sharpness”, “Color” or “Tint(G/R)”, then press the ENTER button. 3.Press the ◄ or ► button to decrease or increase the value of a particular item. Press the ENTER button. Press the EXIT button to exit. ➣ When you make changes to “Backlight”, “Contrast”, “Brightness”, “Sharpness”, “Color” or “Tint(G/R)”, the OSD will be adjusted accordingly. ➣ In PC mode, you can only make changes to “Backlight”, “Contrast” and “Brightness”. ➣ Settings can be adjusted and stored for each external device you have connected to an input of the TV. ➣ The energy consumed during use can be significantly reduced if the level of brightness of the picture is reduced, and that this will reduce the overall running cost. • • • • • • Mode : Standard Backlight :7 Contrast : 95 Brightness : 45 Sharpness : 50 Color : 50 Tint (G/R) : G50/R50 ► Detailed Settings Picture Options Backlight Move 7 Adjust Enter Return Backlight: Adjusts the brightness of LCD back light. Contrast: Adjusts the contrast level of the picture. Brightness: Adjusts the brightness level of the picture. Sharpness: Adjusts the edge definition of the picture. Color: Adjusts color saturation of the picture. Tint(G/R): Adjusts the color tint of the picture. English - 21 1470A-03Eng.indb 21 2008-08-11 �� 2:21:32 Adjusting the Detailed Settings Samsung’s new TVs allow you to make even more precise picture settings than previous models. See below to adjust detailed picture settings. Activating Detailed Settings Picture 1.Press the MENU button to display the menu. Press the ENTER button to select “Picture”. 2.Press the ENTER button to select “Mode”. Press the ▲ or ▼ button to select “Standard” or “Movie”, then press the ENTER button. ➣ “Detailed Settings” is available in “Standard” or “Movie” mode. Mode :Movie Backlight :5 Contrast : 95 Brightness : 45 Sharpness : 20 Color : 50 Tint (G/R) : G50/R50 ► Detailed Settings Picture 3.Press the ▲ or ▼ button to select “Detailed Settings”, then press the ENTER button. ➣ In PC mode, you can only make changes to “Dynamic Contrast”, “Gamma” and “White Balance” from among the “Detailed Settings” items. Color : 50 Tint (G/R) : G50/R50 Detailed Settings ► Picture Options Picture Reset Detailed Settings Setting the Black adjust You can select the black level on the screen to adjust the screen depth. 4.Press the ▲ or ▼ button to select “Black adjust”, then press the ENTER button. 5.Press the ▲ or ▼ button to select “Off”, “Low”, “Medium” or “High”. Press the ENTER button. • • • • Off: Turns off the black adjustment function. Low: Sets the black color depth to low. Medium: Sets the black color depth to medium. High: Sets the black color depth to high. Black Adjust : Off Dynamic Contrast : Off ► Gamma :0 Color Space : Auto White Balance Flesh Tone :0 Edge Enhancement : Off ▼ Move Enter Return Off Low : Medium Black Adjust High Move Setting the Dynamic Contrast Return Detailed Settings You can adjust the screen contrast so that the optimal contrast is provided. 6.Press the ▲ or ▼ button to select “Dynamic Contrast”, then press the ENTER button. 7.Press the ▲ or ▼ button to select “Off”, “Low”, “Medium” or “High”. Press the ENTER button. • • • • Enter Off: Turns off the dynamic contrast adjustment function. Low: Sets the dynamic contrast to low. Medium: Sets the dynamic contrast to medium. High: Sets the dynamic contrast to high. Black Adjust : Off Dynamic Contrast : Off Gamma :0 Color Space : Auto ► White Balance Flesh Tone :0 Edge Enhancement : Off ▼ Move Enter Return Off Low : Medium Dynamic Contrast High Move Enter Return English - 22 1470A-03Eng.indb 22 2008-08-11 �� 2:21:33 Adjusting the Gamma You can adjust the Primary Color (Red, Green, Blue) Intensity. (-3 ~ +3) 8.Press the ▲ or ▼ button to select “Gamma”, then press the ENTER button. 9.Press the ◄ or ► button to decrease or increase the value. Press the ENTER button. Detailed Settings Black Adjust : Off Dynamic Contrast : Off Gamma :0 Color Space : Auto ► White Balance Flesh Tone :0 Edge Enhancement : Off ▼ Move Enter Return Gamma 0 Adjust Enter Return Setting the Color Space Color space is a color matrix composed of red, green and blue colors. Select your favorite color space to experience the most natural color. 10.Press the ▲ or ▼ button to select “Color Space”, then press the ENTER button. 11. Press the ENTER button again to select “Color Space”. 12. Press the ▲ or ▼ button to select “Auto”, “Native” or “Custom”. Press the ENTER button. • Auto: Auto Color Space automatically adjusts to the most natural color tone based on program sources. • Native: Native Color Space offers deep and rich color tone. • Custom: Adjusts the color range to suit your preference. (see “Customizing the Color Space”) Detailed Settings Black Adjust : Off Dynamic Contrast : Off Gamma :0 Color Space : Auto ► White Balance Flesh Tone :0 Edge Enhancement : Off ▼ Move Enter Return Color Space Color Space : Auto Color : Red Red 50 Green 0 Blue 0 Reset Move Enter Auto Customizing the Color Space button. 13.Press the ▲ or ▼ button to select “Color”, then press the ENTER ➣ “Color” is available when “Color Space” is set to “Custom”. 14.Press the ▲ or ▼ button to select “Red”, “Green”, “Blue”, “Yellow”, “Cyan” or “Magenta”. Press the ENTER button. 15.Press the ▲ or ▼ button to select “Red”, “Green”, or “Blue” to change it. Press the ENTER button. 16.Press the ◄ or ► button to decrease or increase the value of a particular item. Press the ENTER button. ➣ In “Color”, you can adjust the RGB values for the selected color. ➣ To reset the adjusted RGB value, select “Reset”. • • • • Return Color Space : Custom Move Enter Return Color Space Color Space : Custom Color : Red Red 50 Green 0 Blue 0 Reset Red: Adjusts the red saturation level of the selected color. Green: Adjusts the green saturation level of the selected color. Blue: Adjusts the blue saturation level of the selected color. Reset: Resets the color space to the default values. ➣ Changing the adjustment value will refresh the adjusted screen. ➣ Settings can be adjusted and stored for each external device you have connected to an input of the TV. For example, if you have a DVD player connected to HDMI 1 and it is currently selected, settings and adjustments will be saved for the DVD player. Native Move Enter Return Red Green Blue Yellow : Cyan Magenta Color Move Enter Return Color Space Red 50 Move Adjust Enter Return English - 23 1470A-03Eng.indb 23 2008-08-11 �� 2:21:33 Adjusting the White Balance You can adjust the color temperature for more natural picture colors. 17.Press the ▲ or ▼ button to select “White Balance”, then press the ENTER button. 18.Select the required option by pressing the ▲ or ▼ button, then press the ENTER button. 19.Press the ◄ or ► button to decrease or increase the value of a particular item. Press the ENTER button. • • • • • • • R-Offset: Adjusts the red color darkness. G-Offset: Adjusts the green color darkness. B-Offset: Adjusts the blue color darkness. R-Gain: Adjusts the red color brightness. G-Gain: Adjusts the green color brightness. B-Gain: Adjusts the blue color brightness. Reset: The previously adjusted white balance will be reset to the factory defaults. ➣ Changing the adjustment value will refresh the adjusted screen. Detailed Settings Black Adjust : Off Dynamic Contrast : Off Gamma :0 Color Space : Auto White Balance Flesh Tone ► :0 Edge Enhancement : Off ▼ Enter Move Return White Balance R-Offset 25 G-Offset 25 B-Offset 25 R-Gain 25 G-Gain 25 B-Gain 25 Reset Move Enter Return White Balance R-Offset 25 Move Adjusting the Flesh Tone Adjust Enter Return Detailed Settings You can emphasize the pink ‘flesh tone’ in the picture. 20.Press the ▲ or ▼ button to select “Flesh Tone”, then press the ENTER button. 21.Press the ◄ or ► button to decrease or increase the value. Press the ENTER button. ➣ Changing the adjustment value will refresh the adjusted screen. Black Adjust : Off Dynamic Contrast : Off Gamma :0 Color Space : Auto White Balance Flesh Tone :0 Edge Enhancement : Off ► ▼ Enter Move Return Flesh Tone 0 Adjust Enter Return Detailed Settings Setting the Edge Enhancement ▲ You can emphasize object boundaries in the picture. 22.Press the ▲ or ▼ button to select “Edge Enhancement”, then press the ENTER button. 23. Press the ▲ or ▼ button to select “Off” or “On”. Press the ENTER button. Dynamic Contrast : Off Gamma :0 Color Space : Auto White Balance Flesh Tone :0 Edge Enhancement : Off xvYCC : Off ► Move Edge Enhancement : Move Enter Return Enter Return Off On English - 24 1470A-03Eng.indb 24 2008-08-11 �� 2:21:34 Setting the xvYCC Setting the xvYCC mode to “On” increases detail and color space when watching movies from an external device (ie. DVD player) connected to the HDMI or Component IN jacks. 24.Press the ▲ or ▼ button to select “xvYCC”, then press the ENTER button. 25.Press the ▲ or ▼ button to select “Off” or “On”. Press the ENTER button. ➣ “xvYCC” is available when the picture mode is set to “Movie”, and the external input is set to “HDMI” or “Component” mode. Detailed Settings ▲ Dynamic Contrast : Off Gamma :0 Color Space : Auto White Balance Flesh Tone :0 Edge Enhancement : Off xvYCC : Off ► Move xvYCC : Move Enter Return Enter Return Off On Resetting the Picture Settings to the Factory Defaults 1.To select the desired picture mode, follow the “Changing the Picture Standard” instructions numbers 1 and 2. (see page 21) Detailed Settings Picture 2.Press the ▲ or ▼ button to select “Picture Reset”, then press the ENTER button. Picture Reset ► Detailed Settings Picture 3.Press the ▲ or ▼ button to select “OK” or “Cancel”, then press the ENTER button. Press the EXIT button to exit. ➣ Each mode can be reset. Picture Options Picture Options Picture Reset OK ► Cancel English - 25 1470A-03Eng.indb 25 2008-08-11 �� 2:21:34 Configuring Picture Options Activating Picture Options Tint (G/R) : G50/R50 Detailed Settings Picture 1.Press the MENU button to display the menu. Press the ENTER button to select “Picture”. 2.Press the ▲ or ▼ button to select “Picture Options”, then press the ENTER button. ➣ Press the ▲ or ▼ button to select a particular item. Press the ENTER button. ➣ When you are satisfied with your setting, press the ENTER button. ➣ In PC mode, you can only make changes to the “Color Tone” and “Size” from among the items in “Picture Options”. Picture Options ► Picture Reset Picture Options Setting the Color Tone 1.Follow the “Activating Picture Options” instructions numbers 1 and 2. 2.Press the ▲ or ▼ button to select “Color Tone”, then press the ENTER button. Color Tone : Normal Size : 16:9 Digital NR : Auto DNle : Off HDMI Black Level : Normal Film Mode : Off Blue Only Mode ► : Off ▼ Move 3.Press the ▲ or ▼ button to select “Cool2”, “Cool1”, “Normal”, “Warm1” or “Warm2”. Press the ENTER button. ➣ “Warm1” or “Warm2” is only activated when the picture mode is “Movie”. ➣ Settings can be adjusted and stored for each external device you have connected to an input of the TV. Enter Picture Options Color Tone : Normal Cool2 Size Cool1 : 16:9 Digital NR Normal : Auto DNle Warm1 : Off HDMI Black Level : Normal Film Mode : Off Blue Only Mode : Off Warm2 Move Setting the Screen Size Enter Return Picture Options Occasionally, you may want to change the size of the image on your screen. Your TV comes with six screen size options, each designed to work best with specific types of video input. Your cable box or satellite receiver may have its own set of screen sizes as well. In general, though, you should view the TV in 16:9 mode as much as possible. 1.Follow the “Activating Picture Options” instructions numbers 1 and 2. 2. Press the ▲ or ▼ button to select “Size”, then press the ENTER button. 3. Press the ▲ or ▼ button to select the screen format you want. Press the ENTER button. Press the EXIT button to exit. • • • • • • Return 16:9 : Sets the picture to 16:9 wide mode. Zoom1: Magnifies the size of the picture on the screen. Zoom2: Magnifies the size of the picture more than “Zoom1”. Wide Fit: Enlarges the aspect ratio of the picture to fit the entire screen. 4:3 : Sets the picture to 4:3 normal mode. Just Scan: Use the function to see the full image without any cutoff when HDMI (720p/1080i/1080p), Component (1080i/1080p) or DTV (1080i) signals are input. Easy Setting 1.Press the TOOLS button on the remote control. 2. Press the ▲ or ▼ button to select “Picture Size”. 3. Press the ◄ or ► button to select the required option. 4. Press the EXIT or TOOLS button to exit. Color Tone : Normal Size : 16:9 Digital NR : Auto DNle : Off HDMI Black Level : Normal Film Mode : Off Blue Only Mode ► : Off ▼ Move Enter Return Enter Return Size 16:9 Zoom1 Zoom2 Wide Fit 4:3 Just Scan Move TOOLS Device List Multi-Track Sound : Picture Size ◄ Stereo Picture Mode : Standard Sound Mode : Custom Sleep Timer : Off 16:9 ► Add to Favorite Switch to Cable English - 26 1470A-03Eng.indb 26 Move Adjust e Exit 2008-08-11 �� 2:21:35 ➣ When Double ( , ) mode has been set in PIP, the Picture Size cannot be set. ➣ Temporary image retention may occur when viewing a static image on the set for more than two hours. ➣ After selecting “Zoom1”, “Zoom2” or “Wide Fit”: Size Press the ◄ or ► button to select “Position”, then press the ENTER 16:9 button. Press the ▲ or ▼ button to move the picture up and down. Zoom1 Position Reset: Press the ◄ or ► button to select “Reset”, then press the ENTER button. You can initialize the setting. Zoom2 Reset Wide Fit 4:3 Just Scan Adjust ➣ After selecting “Just Scan” in HDMI (1080i/1080p) or Component (1080i/1080p) mode: Press the ◄ or ► button to select “Position”, then press the ENTER button. Press the ▲, ▼, ◄ or ► button to move the picture. Reset: Press the ◄ or ► button to select “Reset”, then press the ENTER button. You can initialize the setting. Enter Return Size 16:9 Zoom1 Zoom2 Wide Fit 4:3 ➣ HD (High Definition) 16:9 - 1080i/1080p (1920x1080), 720p (1280x720) Just Scan Position Adjust Enter Reset Return ➣ Settings can be adjusted and stored for each external device you have connected to an input of the TV. Input Source Picture Size ATV, Video, S-Video, Component (480i, 480p) 16:9, Zoom1, Zoom2, 4:3 DTV(1080i), Component (1080i, 1080p), HDMI (720p, 1080i, 1080P) 16:9, 4:3, Wide Fit, Just Scan PC 16:9, 4:3 16:9 16:9 Sets the picture to 16:9 wide mode. Wide Fit U Move Wide Fit Enlarges the aspect ratio of the picture to fit the entire screen. Zoom1 U Move Zoom1 Magnifies the size of the picture on the screen. Zoom2 U Move Zoom2 Magnifies the size of the picture more than “Zoom1”. 4:3 Just Scan 4:3 Sets the picture to 4:3 normal mode. Just Scan Use the function to see the full image without any cutoff when HDMI (720p/1080i/1080p), Component (1080i/1080p) or DTV (1080i) signals are input. English - 27 1470A-03Eng.indb 27 2008-08-11 �� 2:21:36 Setting the Digital Noise Reduction If the broadcast signal received by your TV is weak, you can activate the Digital Noise Reduction feature to help reduce any static and ghosting that may appear on the screen. 1.Follow the “Activating Picture Options” instructions numbers 1 and 2. (Refer to page 26) 2.Press the ▲ or ▼ button to select “Digital NR”, then press the ENTER button. 3.Press the ▲ or ▼ button to select “Off”, “Low”, “Medium”, “High” or “Auto”. Press the ENTER button. • • • • • Off: Turns the screen noise reduction function off. Low: Reduces screen noise at a low level. Medium: Reduces screen noise at a medium level. High: Reduces screen noise at a high level. Auto: Automatically recognizes and reduces screen noise. Press the EXIT button to exit. Picture Options Color Tone : Normal Size : 16:9 Digital NR : Auto DNle : Off HDMI Black Level : Normal Film Mode : Off Blue Only Mode ► : Off ▼ Move Enter Return Picture Options Color Tone : Normal Size : 16:9 Digital NR : Auto Low Off : Off Medium DNle HDMI Black Level : Normal High Film Mode Auto : Off Blue Only Mode : Off Move Enter Return Setting the DNIe (Digital Natural Image engine) This TV includes the DNIe function to provide high visual quality. If you set DNIe to on, you can view the screen with the DNIe feature activated. 1.Follow the “Activating Picture Options” instructions numbers 1 and 2. (Refer to page 26) 2.Press the ▲ or ▼ button to select “DNIe”, then press the ENTER button. 3.Press the ▲ or ▼ button to select “Off” or “On”, then press the ENTER button. Picture Options Color Tone : Cool1 Size : 16:9 Digital NR : Auto DNle : On HDMI Black Level : Normal Film Mode : Off Blue Only Mode ► : Off ▼ Move • Off: Switches off the DNIe mode. • On: Switches on the DNIe mode. Enter Return Picture Options Press the EXIT button to exit. ➣ DNIe™ (Digital Natural Image engine) This feature brings you a more detailed image with 3D noise reduction and detail, contrast and white enhancement. ➣ “DNIe” is only available in “Dynamic” mode. Color Tone : Cool1 Size : 16:9 Digital NR : Auto DNle : On HDMI Black Level : Normal Film Mode : Off Blue Only Mode : Off Off On Move Setting the HDMI Black Level You can select the black level on the screen to adjust the screen depth. 1.Follow the “Activating Picture Options” instructions numbers 1 and 2. (Refer to page 26) 2.Press the ▲ or ▼ button to select “HDMI Black Level”, then press the ENTER button. 3.Press the ▲ or ▼ button to select “Normal” or “Low”, then press the ENTER button. Return Picture Options Color Tone : Normal Size : 16:9 Digital NR : Auto DNle : Off HDMI Black Level : Normal Film Mode : Off Blue Only Mode • Normal: The screen gets brighter. • Low: The screen gets darker. Enter ► : Off ▼ Move ➣ This function is active only when an external device is connected to the TV via HDMI. “HDMI Black Level” function may not be compatible with all external devices. Press the EXIT button to exit. Enter Return Picture Options Color Tone : Normal Size : 16:9 Digital NR : Auto DNle : Off HDMI Black Level : Normal Low Normal : Off Film Mode Blue Only Mode : Off Move Enter Return English - 28 1470A-03Eng.indb 28 2008-08-11 �� 2:21:37 Setting the Film Mode Picture Options The TV can be set to automatically sense and process film signals from all sources and adjust the picture for optimum quality. 1.Follow the “Activating Picture Options” instructions numbers 1 and 2. (Refer to page 26) 2.Press the ▲ or ▼ button to select “Film Mode”, then press the ENTER button. 3.Press the ▲ or ▼ button to select “Off”, “Auto1” or “Auto2”, then press the ENTER button. • Off: Turn the Film Mode function off. • Auto1: Automatically adjusts the picture for the best quality when watching a film. • Auto2: Automatically optimizes the video text when watching a film Press the EXIT button to exit. ➣ “Film mode” is supported in TV, AV, S-Video, Component (480i / 1080i) and HDMI (480i / 1080i). Color Tone : Normal Size : 16:9 Digital NR : Auto DNle : Off HDMI Black Level : Normal Film Mode : Off Blue Only Mode : Off ► ▼ Move Enter Return Picture Options Color Tone : Normal Size : 16:9 Digital NR : Auto DNle : Off HDMI Black Level : Normal Film Mode : Off Blue Only Mode : Off Auto2 Off Auto1 Move Setting the Blue Only Mode Enter Return Picture Options This function is for AV device measurement experts. This function displays the blue signal only by removing the red and green signals from the video signal so as to provide a Blue Filter effect that is used to adjust the Color and Tint of video equipment such as DVD players, Home Theaters, etc. Using this function, you can adjust the Color and Tint to preferred values appropriate to the signal level of each video device using the Red/Green/Blue/ Cyan/Magenta/Yellow Color Bar Patterns, without using an additional Blue Filter. 1.Follow the “Activating Picture Options” instructions numbers 1 and 2. (Refer to page 26) 2.Press the ▲ or ▼ button to select “Blue Only Mode”, then press the ENTER button. 3.Press the ▲ or ▼ button to select “Off” or “On”, then press the ENTER button. Press the EXIT button to exit. ➣ “Blue Only Mode” is available when the picture mode is set to “Movie” or “Standard”. ▲ Size : 16:9 Digital NR : Auto DNle : Off HDMI Black Level : Normal Film Mode : Off Blue Only Mode : Off ► Auto Motion Plus 120Hz : Low Move Enter Return Picture Options Size : 16:9 Digital NR : Auto DNle : Off HDMI Black Level : Normal Film Mode : Off Blue Only Mode Off : Off On Auto Motion Plus 120Hz : Low Move Enter Return Setting the Auto Motion Plus 120Hz Removes drag from fast scenes with a lot of movement to provide a clearer picture. 1.Follow the “Activating Picture Options” instructions numbers 1 and 2. (Refer to page 26) 2.Press the ▲ or ▼ button to select “Auto Motion Plus 120Hz”, then press the ENTER button. 3.Press the ▲ or ▼ button to select “Off”, “Low”, “Medium”, “High” or “Demo”, then press the ENTER button. • • • • • Off: Switches Auto Motion Plus 120Hz off. Low: Sets Auto Motion Plus 120Hz to minimum. Medium: Sets Auto Motion Plus 120Hz to medium. High: Sets Auto Motion Plus 120Hz to maximum. Demo: Displays the difference between Auto Motion Plus 120Hz on and off modes. The screen after applying “Auto Motion Plus 120Hz” appears on the left. Press the EXIT button to exit. ➣ If you enable “Auto Motion Plus 120Hz”, noise may appear on the screen. If this occurs, set “Auto Motion Plus 120Hz” to “Off”. Picture Options ▲ Size : 16:9 Digital NR : Auto DNle : Off HDMI Black Level : Normal Film Mode : Off Blue Only Mode : Off Auto Motion Plus 120Hz : Low Move ► Enter Return Picture Options Size : 16:9 Digital NR : Auto DNle : On HDMI Black Level : Normal Film Mode : Off Blue Only Mode : Off Off Low Medium High Demo Auto Motion Plus 120Hz : Low Move Enter Return English - 29 1470A-03Eng.indb 29 2008-08-11 �� 2:21:37 Viewing Picture-in-Picture You can use the PIP feature to simultaneously watchthe TV tuner and one external video source. (See page 36 to select the PIP picture sound.) This product has one built-in tuner, which does not allow PIP to function in the same mode. Please see ‘PIP Settings’ below for details. ➣ While V-Chip (See page 52) is in operation, the PIP function cannot be used. Activating Picture-in-Picture Setup 1.Press the MENU button to display the menu. Press the ▲ or ▼ button to select “Setup”, then press the ENTER button. Press the ▲ or ▼ button to select “PIP”, then press the ENTER button. Entertainment : Off Energy Saving : Off PIP ► SW Upgrade 2.Press the ENTER button again. Press the ▲ or ▼ button to select “On”, then press the ENTER button. ➣ If you turn the TV off while watching in PIP mode and turn it on again, the PIP window will disappear. ➣ You can view Analog TV broadcasts on the PIP screen (sub-picture) when the main picture is from an external device connected to HDMI 1, HDMI/DVI 2, HDMI 3, HDMI 4, Component1, 2 or PC. ➣ PIP Settings Main picture Sub picture Component 1, 2 HDMI 1, HDMI/DVI 2, HDMI 3, HDMI 4 PC TV PIP PIP : Off Off Size : On Position : Air/Cable : Air Channel : Air 11 Move Changing the Size of the PIP Window Enter Return Enter Return Enter Return PIP 3.Press the ▲ or ▼ button to select “Size”, then press the ENTER button. Press the ▲ or ▼ button to select the required option, then press the ENTER button. ➣ You may notice that the picture in the PIP window becomes slightly unnatural when you use the main screen to view a game or karaoke. PIP : On Size : Position : Air/Cable : Air Channel : Air 11 Move Changing the Position of the PIP Window 4.Press the ▲ or ▼ button to select “Position”, then press the ENTER button. Press the ▲ or ▼ button to select the required option, then press the ENTER button. ) and Double Wide ( ) modes, “Position” ➣ In Double Window ( cannot be selected. PIP PIP : On Size : Position : Air/Cable : Air Channel : Air 11 Move English - 30 1470A-03Eng.indb 30 2008-08-11 �� 2:21:37 Changing the PIP Channel PIP 5.Press the ▲ or ▼ button to select “Air/Cable”, then press the ENTER button. 6.Press the ▲ or ▼ button to select “Air” or “Cable”, then press the ENTER button. PIP : On Size : Position : Air/Cable Air : Air Channel : Air 11 Cable Move 7.Press the ▲ or ▼ button to select “Channel”, then press the ENTER button. 8.Press the ▲ or ▼ button to select the desired channel in the PIP window. Press the ENTER button. ➣ You can select only analog TV broadcasts on the PIP screen (sub-picture). Press the EXIT button to exit. Enter PIP : On Size : Position : Air/Cable : Air Channel Air1111 : Air Move Easy Setting 1.Press the TOOLS button on the remote control. 2. Press the ▲ or ▼ button to select “PIP”, then press the ENTER 3. Press the ▲ or ▼ button to select a particular item. 4. Press the ◄ or ► button to select the required option. 5. Press the EXIT or TOOLS button to exit. Return PIP ▲ ▼ Enter Return TOOLS Device List button. Picture Mode : Standard Sound Mode : Custom Sleep Timer : Off PIP Move Enter e Exit PIP PIP ◄ Off Size : Posion : Air/Cable : Air Channel : Air 11 Adjust ► Return English - 31 1470A-03Eng.indb 31 2008-08-11 �� 2:21:38 Sound Control Changing the Sound Standard Sound You can select the sound mode to best suit the programming you’re watching. 1.Press the MENU button to display the menu. Press the ▲ or ▼ button to select “Sound”, then press the ENTER button. Mode : Custom ► Equalizer • • • • • Sound 2.Press the ENTER button to select “Mode”. Press the ▲ or ▼ button to select “Standard”, “Music”, “Movie”, “Speech”, or “Custom” sound setting, then press the ENTER button. Press the EXIT button to exit. SRS TruSurround XT : Off Preferred Language : English Multi-Track Sound : Stereo Auto Volume : Off TV Speaker : On Sound Select : Main Mode : Custom Standard Standard: Selects the normal sound mode. Music: Emphasizes music over voices. Movie: Provides the best sound for movies Speech: Emphasizes voice over other sounds. Custom: Recalls your customized sound settings. (see “Customizing the Sound”) ► Music Equalizer Preferred Language Movie : Off Speech : English Multi-Track Sound Custom : Stereo Auto Volume : Off TV Speaker : On Sound Select : Main SRS TruSurround XT TOOLS Easy Setting 1.Press the TOOLS button on the remote control. 2. Press the ▲ or ▼ button to select “Sound Mode”. 3. Press the ◄ or ► button to select the required option. 4. Press the EXIT or TOOLS button to exit. Device List Multi-Track Sound : Picture Size : Stereo 16:9 Picture Mode : Standard Sound Mode ◄ Custom Sleep Timer : ► Off Add to Favorite Switch to Cable Move Adjust e Exit Customizing the Sound Mode Sound The sound settings can be adjusted to suit your personal preference. 1.Press the MENU button to display the menu. Press the ▲ or ▼ button to select “Sound”, then press the ENTER button. 2.Press the ▲ or ▼ button to select “Equalizer”, then press the ENTER button. : Custom Equalizer ► SRS TruSurround XT : Off Preferred Language : English Multi-Track Sound : Stereo Auto Volume : Off TV Speaker : On Sound Select : Main Sound Reset 3.Press the ENTER button to select “Mode”. Press the ▲ or ▼ button to select “Standard”, “Music”, “Movie”, “Speech”, or “Custom” sound setting, then press the ENTER button. Equalizer Mode : Standard Standard Balance L Music R 100Hz - Movie + 300Hz - Speech + 1kHz - Custom + 3kHz - + 10kHz - + Move Enter Return English - 32 1470A-03Eng.indb 32 2008-08-11 �� 2:21:38 4.Press the ▲ or ▼ button to select a particular frequency to adjust. Press the ◄ or ► button to increase or decrease the level of the particular frequency. • Mode: Selects the sound mode among the predefined settings. • Balance L/R: Adjusts the balance between the right and left speaker. • Bandwidth Adjustment (100Hz, 300Hz, 1kHz, 2kHz, 3kHz, 10kHz): To adjust the level of different bandwidth frequencies. Equalizer Mode : Custom Balance L R 100Hz - + 300Hz - + 1kHz - + 3kHz - + 10kHz - + ▼ Move Enter Return Equalizer Resetting the Equalizer Settings to the Factory Defaults 5.Press the ▲ or ▼ button to select “Reset”, then press the ENTER ➣ The equalizer resets to the factory defaults. Press the EXIT button to exit. Adjust ▲ button. Balance L R 100Hz - + 300Hz - + 1kHz - + 3kHz - + 10kHz - + ► Reset Move Enter Return Setting the TruSurround XT Sound TruSurround XT is a patented SRS technology that solves the problem of playing 5.1 multichannel content over two speakers. TruSurround delivers a compelling, virtual surround sound experience through any two-speaker playback system, including internal television speakers. It is fully compatible with all multichannel formats. 1.Press the MENU button to display the menu. Mode : Custom Press the ▲ or ▼ button to select “Sound”, then press the ENTER button. Equalizer 2.Press the ▲ or ▼ button to select “SRS TruSurround XT”, then press the SRS TruSurround XT : Off ► ENTER button. Preferred Language : English Multi-Track Sound : Stereo Auto Volume : Off TV Speaker : On Sound Select : Main Sound Reset Mode : Custom Equalizer Sound 3.Press the ▲ or ▼ button to select “Off” or “On”, then press the ENTER button. Press the EXIT button to exit. SRS TruSurround XT : Off Off Preferred Language On : English Multi-Track Sound : Stereo Auto Volume : Off TV Speaker : On Sound Select : Main ► Sound Reset TruSurround XT, SRS and Symbol are trademarks of SRS Labs, Inc. TruSurround XT technology is incorporated under license from SRS Labs, Inc. English - 33 1470A-03Eng.indb 33 2008-08-11 �� 2:21:43 Choosing Preferred Language The digital-TV transmission system is capable of simultaneous transmission of many audio tracks (for example, simultaneous translations of the program into foreign languages). Select the language you would like to hear the audio track in. 1.Press the MENU button to display the menu. Equalizer Press the ▲ or ▼ button to select “Sound”, then press the ENTER button. SRS TruSurround XT : Off Sound Preferred Language : English Multi-Track Sound : Stereo Auto Volume : Off TV Speaker : On Sound Select : Main ► Sound Reset Equalizer SRS TruSurround XT Sound 2.Press the ▲ or ▼ button to select “Preferred Language”, then press the ENTER button. 3.Press the ▲ or ▼ button to choose the language (English, Spanish or French) you want, then press the ENTER button. Press the EXIT button to exit. Auto Volume Spanish : Stereo French : Off TV Speaker : On Sound Select : Main Multi-Track Sound ➣ “Preferred Language” is available only in Digital TV mode. ➣ You can only select the language from among the actual languages being broadcast. : Off Preferred Language : English English ► Sound Reset Choosing a Multi-Channel Sound (MTS) track Sound 1.Press the MENU button to display the menu. Press the ▲ or ▼ button to select “Sound”, then press the ENTER button. 2.Press the ▲ or ▼ button to select “Multi-Track Sound”, then press the ENTER button. SRS TruSurround XT : Off Preferred Language : English Multi-Track Sound : Stereo Auto Volume : Off TV Speaker : On Sound Select : Main ► Sound Reset 3.Press the ▲ or ▼ button to select a setting you want, then press the ENTER button. Press the EXIT button to exit. Sound • Mono: Choose for channels that are broadcasting in mono or if you are having difficulty receiving a stereo signal. • Stereo: Choose for channels that are broadcasting in stereo. • SAP: Choose to listen to the Separate Audio Program, which is usually a foreign-language translation. SRS TruSurround XT : Off Preferred Language : English Multi-Track Sound : Stereo Mono TV Speaker Stereo : Off SAP : On Sound Select : Main Auto Volume ► Sound Reset ➣ “Multi-Track Sound” is available only in Analog TV mode. ➣ Depending on the particular program being broadcast, you can listen to “Mono”, “Stereo” or “SAP”. TOOLS Easy Setting 1.Press the TOOLS button on the remote control. 2. Press the ▲ or ▼ button to select “Multi-Track Sound”. 3. Press the ◄ or ►button to select the required option. 4. Press the EXIT or TOOLS button to exit. Device List Multi-Track Sound ◄ Picture Size : Stereo 16:9 ► Picture Mode : Standard Sound Mode : Custom Sleep Timer : Off Add to Favorite Switch to Cable Move Adjust e Exit English - 34 1470A-03Eng.indb 34 2008-08-11 �� 2:21:43 Automatic Volume Control Sound Reduces the differences in volume level among broadcasters. 1.Press the MENU button to display the menu. Press the ▲ or ▼ button to select “Sound”, then press the ENTER button. 2.Press the ▲ or ▼ button to select “Auto Volume”, then press the ENTER button. Preferred Language : English Multi-Track Sound : Stereo Auto Volume : Off TV Speaker : On Sound Select : Main ► Sound Reset Sound 3.Press the ▲ or ▼ button to set “Auto Volume” “Off” or “On” then press the ENTER button. Press the EXIT button to exit. Preferred Language : English Multi-Track Sound : Stereo Auto Volume : Off Off TV Speaker On : On Sound Select : Main ► Sound Reset Setting the TV Speakers On/Off Multi-Track Sound Sound Sound output from the TV speakers is muted. 1.Press the MENU button to display the menu. Press the ▲ or ▼ button to select “Sound”, then press the ENTER button. 2.Press the ▲ or ▼ button to select “TV Speaker”, then press the ENTER button. : Stereo Auto Volume : Off TV Speaker : On Sound Select : Main ► Sound Reset 3. TV's Internal Speakers Multi-Track Sound Sound button. Press the ▲ or ▼ button to select “Off”, then press the ENTER Press the EXIT button to exit. ➣ When “TV Speaker” is set to “Off”, you can operate only “Preferred Language” (in digital TV mode), “Multi-Track Sound” (in analog TV mode), “Sound Select” (in PIP mode) and “Sound Reset” in Sound menu. ➣ The VOL –, VOL+ and MUTE buttons do not operate when the “TV Speaker” is set to “Off”. : Stereo Auto Volume : Off TV Speaker : On Off Sound Select On : Main ► Sound Reset Audio Out (Optical, L/R Out) to Sound System RF AV, S-Video Component, PC, HDMI RF AV, S-Video TV Speaker On Speaker Output Speaker Output Speaker Output Sound Output Sound Output Component, PC, HDMI Sound Output TV Speaker Off Mute Mute Mute Sound Output Sound Output Sound Output Video No Signal Mute Mute Mute Mute Mute Mute Manufactured under license from Dolby Laboratories. Dolby and the double-D symbol are trademarks of Dolby Laboratories. English - 35 1470A-03Eng.indb 35 2008-08-11 �� 2:21:44 Listening to the Sound of the Sub (PIP) Picture Sound When the PIP feature is activated, you can listen to the sound of the sub (PIP) picture. 1.Press the MENU button to display the menu. Press the ▲ or ▼ button to select “Sound”, then press the ENTER button. 2.Press the ▲ or ▼ button to select “Sound Select”, then press the ENTER button. • Main: Used to listen to the sound of the main picture. • Sub: Used to listen to the sound of the sub picture. Sound 3.Press the ▲ or ▼ button to select “Main” or “Sub”, then press the ENTER button. Press the EXIT button to exit. Auto Volume : Off TV Speaker : On Sound Select : Main ► Sound Reset Auto Volume : Off TV Speaker : On Sound Select : Main Main Sound Reset ► Sub ➣ You can select this option when “PIP” is set to “On”. (See page 30) Resetting the Sound Settings to the Factory Defaults Sound You can restore the Sound settings to the factory defaults. 1.Press the MENU button to display the menu. Press the ▲ or ▼ button to select “Sound”, then press the ENTER button. 2.Press the ▲ or ▼ button to select “Sound Reset”, then press the ENTER button. Press the EXIT button to exit. 3.Press the ◄ or ► button to select “Reset All”, “Reset Sound Mode” or “Cancel” then press the ENTER button. Press the EXIT button to exit. TV Speaker : On Sound Select : Main Sound Reset • Reset All: All the sound values return to default settings. • Reset Sound Mode: Current sound values return to defalt settings. • Cancel: Select the sound reset options. ► Sound Reset Select the sound reset options. Reset All Reset Sound Mode Move Enter Cancel Return Connecting Headphones (Sold separately) You can connect a set of headphones to your set if you wish to watch a TV program without disturbing other people in the room. TV Side Panel ➣ When you insert the headphone’s plug into the headphone jack, you can operate only “Preferred Language” (in digital TV mode), “Multi-Track Sound” (in analog TV mode), “Auto Volume”, “Sound Select” (in PIP mode) and “Sound Reset” in Sound menu. ➣ Prolonged use of headphones at a high volume may damage your hearing. ➣ You will not hear sound from the speakers when you connect headphones to the TV. ➣ The headphone volume and TV volume are adjusted separately. 15 English - 36 1470A-03Eng.indb 36 2008-08-11 �� 2:21:45 Channel Control Managing Channels Using this menu, you can Add/Delete or set Favorite channels and use the program guide for digital broadcasts. Viewing All Channels 2. Auto Program Clear Scrambled Channel Channel Show all currently available channels. To use the Channel List function, first run “Auto Program” (see page 19). 1.Press the MENU button. Press the ▲ or ▼ button to select “Channel”, then press the ENTER button. Press the ▲ or ▼ button to select “Channel List”, then press the ENTER button. Channel List ► Fine Tune Signal Strength Press the ◄ button to select “Added Channels”. Added Channels 2 Air 4 Air 4-2 8 13 13-1 Air Antenna All Channels 3.Press the ▲ or ▼ button to select “All Channels”. ➣ Shows all currently available channels. Press the ENTER button. Air Air ♥ TV #3 Alice’s Adventures in Wonderland Zoom Select 2 Air 4 Air 4-2 8 4.Press the ▲ or ▼ button to select a channel to view, then press the ENTER button. You can watch the selected channel. ♥ TV #8 13 13-1 Air Antenna TOOLS Option ♥ TV #8 Air Air ♥ TV #3 Alice’s Adventures in Wonderland Zoom Select TOOLS Option O Press the CH LIST button on the remote control to bring up the channel lists. Using the Color buttons on the Remote with the Channel List • • • • Red (Antenna): Switches to Air or Cable. Green (Zoom): Enlarges or shrinks a channel number. Yellow (Select): Selects multiple channel lists. TOOLS (Option): Displays the “Add” (or “Delete”), “Add to Favorite”(or “Delete from Favorite”), “Timer Viewing”, “Channel Name Edit”, and “Auto Program” menus. ➣ A gray-colored channel indicates the channel has been deleted. The “Add” menu only appears for deleted channels. ➣ A channel marked with the “♥” mark means the channel has been set as a Favorite. The “Delete from Favorite” menu only appears for channels with the “♥” mark. English - 37 1470A-03Eng.indb 37 2008-08-11 �� 2:21:46 Erasing and Adding Channels Press the ◄ button to select “Added Channels”. Clear Scrambled Channel Channel List 2 Air 4 Air 4-2 8 13 13-1 Air Antenna All Channels 3.Press the ▲ or ▼ button to select “All Channels”. ➣ Shows all currently available channels. Press the ENTER button. ♥ TV #8 Air Air ♥ TV #3 Alice’s Adventures in Wonderland Zoom Select 2 Air 4 Air 4-2 8 13 13-1 Air Antenna All Channels 4.Press the ▲ or ▼ button to select a channel to delete, then press the TOOLS button. 5.Press the ENTER button to select “Delete”. ➣ All deleted channels will be shown on “All Channels” menu. 6. Press the EXIT button to exit. ➣ You can also add a channel to the “Added Channels” menu in the same manner. ➣ A channel must be deleted before it can be added back to the “Added Channels” list. ➣ To Add (Restore) a channel back to the Added Channel List, follow steps 1-3 above, press the ▲ or ▼ button to select a channel to add, the press the TOOLS button. Press the ENTER button to select Add. ► Fine Tune Signal Strength Added Channels 2. Auto Program Channel You can delete or add a channel to display the channels you want. 1.Press the MENU button. Press the ▲ or ▼ button to select “Channel”, then press the ENTER button. Press the ▲ or ▼ button to select “Channel List”, then press the ENTER button. Air Air ♥ TV #3 Alice’s Adventures in Wonderland Zoom Select Air 4 Air ♥ TV #8 8 Air 13 Air 13-1 Air Antenna Option ♥ TV #8 2 4-2 TOOLS TOOLS Option Delete Add to Favorite Timer Viewing Channel Name Edit Auto Program ♥ TV #3 Alice’s Adventures in Wonderland Zoom Select TOOLS Option O Press the CH LIST button on the remote control to bring up the channel lists. English - 38 1470A-03Eng.indb 38 2008-08-11 �� 2:21:47 Setting Your Favorite Channels Press the ◄ button to select “Added Channels”. Channel List ► Fine Tune Signal Strength 2 Air 4 Air 4-2 ♥ TV #8 8 Air 13 13-1 Air Antenna All Channels Air ♥ TV #3 Alice’s Adventures in Wonderland Zoom Select 2 Air 4 Air 4-2 TOOLS Option ♥ TV #8 8 Air 13 13-1 Air Antenna All Channels 3.Press the ▲ or ▼ button to select “All Channels”. ➣ Shows all currently available channels. Press the ENTER button. 4.Press the ▲ or ▼ button to select a channel as a favorite channel. ➣ Adding multiple channels to Favorites Press the ▲ or ▼ button to select the desired channel in the channel list. Then press the yellow button. Repeat the above operation to select multiple channels. The mark appears to the left of the selected channels. 5. Press the TOOLS button. 6.Press the ▲ or ▼ button to select “Add to Favorite”, then press the ENTER button. The “♥” symbol will be displayed and the channel will be set as a favorite. 7.To cancel your favorite channel selection, press the TOOLS button when a favorite channel is selected. Press the ▲ or ▼ button to select “Delete from Favorite”, then press the ENTER button. The channel is deleted from “Favorites” and the “♥” mark also disappears. Press the EXIT button to exit. ➣ You can also Add or Delete a channel from Favorites in the “Added Channels” menu in the same manner. ➣ All favorite channels will be shown on “Favorite” menu. Clear Scrambled Channel Added Channels 2. Auto Program Channel You can set channels you watch frequently as favorites. 1.Press the MENU button. Press the ▲ or ▼ button to select “Channel”, then press the ENTER button. Press the ▲ or ▼ button to select “Channel List”, then press the ENTER button. Air ♥ TV #3 Alice’s Adventures in Wonderland Zoom Select 2 Air 4 Air 4-2 Air 13 Air 13-1 Air Antenna Option Delete Add to Favorite ♥ TV #8 8 TOOLS Timer Viewing Channel Name Edit Auto Program ♥ TV #3 Alice’s Adventures in Wonderland Zoom Select TOOLS Option O Press the CH LIST button on the remote control to bring up the channel lists. O To select the favorite channels you have set up, press the FAV.CH button on the remote control. TOOLS Easy Setting 1.Press the TOOLS button on the remote control. 2.Press the ▲ or ▼ button to select “Add to Favorite” (or “Delete from Favorite”), then press the ENTER button. ➣ The current channel is added to (or deleted from) Favorites. Device List Multi-Track Sound : Picture Size : Stereo 16:9 Picture Mode : Standard Sound Mode : Custom Sleep Timer : Off Add to Favorite Switch to Cable Move Enter e Exit English - 39 1470A-03Eng.indb 39 2008-08-11 �� 2:21:47 Reserving a Program (Timer Viewing) Channel If you reserve a program you want to watch, the channel is automatically switched to the reserved channel in the Channel List; even when you are watching another channel. To reserve a program, set the current time first. See pages 48~49. Reserved channels can only be set if they are in the “Channel List” (See page 37). 1.Press the MENU button. Auto Program Press the ▲ or ▼ button to select “Channel”, then press the ENTER button. Clear Scrambled Channel Press the ▲ or ▼ button to select “Channel List”, then press the ENTER Channel List button. ► Fine Tune Signal Strength 2.Press the ▲ or ▼ button to select a channel, then press the TOOLS button. Added Channels 3.Press the ▲ or ▼ button to select “Timer Viewing”, then press the ENTER button. The Reserve a Program (Timer Viewing) screen appears. 4.Press the ▲/▼/◄/► buttons to reserve a program and then press the ENTER button. Reserving a program has been completed. Press the EXIT button to exit. ➣ You can also reserve a program in the “All Channels” or “Favorite” menus using the same procedures. ➣ For information on how to confirm a viewing reservation, refer to page 41. Only memorized channels can be reserved. ➣ You can set the channel, month, day, year, hour and minute directly by pressing the number buttons on the remote control. 2 Air 4 Air 4-2 8 Air 13 Air 13-1 Air Antenna Delete Add to Favorite ♥ TV #8 Timer Viewing Channel Name Edit Auto Program ♥ TV #3 Alice’s Adventures in Wonderland Zoom Select TOOLS Option Timer Viewing Antenna Air Repeat Once Channel 4 Date 01 - 01 - 2008 Start Time 10:09 am Adjust Move Enter Return O Press the CH LIST button on the remote control to bring up the channel lists. Added Channels Digital Program Guide and Viewing Reservation When a digital channel is selected, and you press the ► button, the Program Guide for the channel appears. You can reserve a program according to the procedures described above. : A program currently being broadcast. : A reserved program 2 Air 4 Air 4-2 ♥ TV #8 1/1/2008 12:59 pm M.Spillane’s mike Ha... 8 Air 1:59 pm Quincy, M.E 13 Air 3:21 pm The Equalizer 13-1 ♥ TV #3 Air Zoom TOOLS Option Watch English - 40 1470A-03Eng.indb 40 2008-08-11 �� 2:21:48 Confirming a Viewing Reservation Clear Scrambled Channel Channel List 2 Air 4 Air 4-2 ♥ TV #8 8 Air 13 Air 13-1 Air Antenna Programmed 3.Press the ▲ or ▼ button to select “Programmed”. ➣ Shows all current reserved programs. Press the ENTER button. Programmed Canceling a reservation 4.To select a reservation item to be canceled, press the ▲ or ▼ button, and then press the TOOLS button. 5.Press the ▲ or ▼ button to select “Cancel schedules”, then press the ENTER button. 6.Press the ◄ or ► button to select “OK”, then press the ENTER button. The viewing reservation has been canceled. Press the EXIT button to exit. ♥ TV #3 Alice’s Adventures in Wonderland Zoom Select TOOLS Option 1/1/2008 1:59 pm 13-1 TV #3 Quincy, M.E 2:59 pm 13-1 TV #3 The Equalizer 3:59 pm 13-1 TV #3 McMillan & Wife 5:59 pm 13-1 TV #3 M.Spillane’s mike Hammer Air Antenna Modifying a viewing reservation 4.To select a reservation item to be modified, press the ▲ or ▼ button and then press the TOOLS button. 5.Press the ENTER button to select “Change Info”. 6.Press the ▲/▼/◄/► buttons to change a reservation setting and then press the ENTER button. The reservation modification is applied. ► Fine Tune Signal Strength Added Channels 2.Press the ◄ button to select “Added Channels”. Auto Program Channel You can view, modify or delete a reservation. 1.Press the MENU button. Press the ▲ or ▼ button to select “Channel”, then press the ENTER button. Press the ▲ or ▼ button to select “Channel List”, then press the ENTER button. Zoom Select TOOLS Option Information 1/1/2008 1:59 pm 13-1 TV #3 Change Quincy, M.EInfo 2:59 pm 13-1 TV #3 The Equalizer 3:59 pm 13-1 TV #3 McMillan & Wife 5:59 pm 13-1 TV #3 M.Spillane’s mike Hammer Air Antenna Zoom Select Cancel schedules Information TOOLS Option Information Programmed Option • Change Info: Select to change a viewing reservation. • Cancel schedules: Select to cancel a viewing reservation. • Information: Select to view a viewing reservation. O Press the CH LIST button on the remote control to bring up the channel lists. English - 41 1470A-03Eng.indb 41 2008-08-11 �� 2:21:48 Labeling Channels - Analog Channels can labeled so that their call letters appear whenever the channel is selected. 1.Press the MENU button. Press the ▲ or ▼ button to select “Channel”, then press the ENTER button. Press the ▲ or ▼ button to select “Channel List”, then press the ENTER button. Auto Program Clear Scrambled Channel Channel Channel List ► Fine Tune Signal Strength Added Channels 2.Press the ▲ or ▼ button to select the channel to be assigned a new name, then press the TOOLS button. 2 Air 4 Air 4-2 ♥ TV #8 8 Air 13 Air 13-1 Air Antenna Added Channels 3.Press the ▲ or ▼ button to select “Channel Name Edit”, then press the ENTER button. Zoom Select Air 4 Air 4-2 8 Air 13 Air TOOLS Option Delete Add to Favorite ♥ TV #8 Air Antenna • • • • • Alice’s Adventures in Wonderland 2 13-1 4.Press the ▲/▼/◄/► button to select a letter, then press the ENTER button. ♥ TV #3 Timer Viewing Channel Name Edit Auto Program ♥ TV #3 Alice’s Adventures in Wonderland Zoom Select TOOLS Option Channel Name Edit _ 4 Numeric buttons: You can enter numbers. Red button: You can switch between English and Characters. Green button: You can delete an already entered character. Yellow button: You can enter a blank space. Blue button: Press this button to finish renaming a channel. A B C D E F G H I J K L M N O P Q R S T U V W X Y Z Number 0~9 Character Delete Blank Done Move Enter Return 5.When you have finished, press the blue button to assign the new name. Press the EXIT button to exit. ➣ The names of digital broadcasting channels are automatically assigned and cannot be labelled. Storing Channels in Memory (Auto Program) Added Channels 1.Press the MENU button. Press the ▲ or ▼ button to select “Channel”, then press the ENTER button. Press the ▲ or ▼ button to select “Channel List”, then press the ENTER button. 2.Press the ▲ or ▼ button to select the channel to be assigned a new name, then press the TOOLS button. 3.Press the ▲ or ▼ button to select “Auto Program”, then press the ENTER button. ➣ For further details on setting up options, refer to page 19. 2 Air 4 Air 4-2 ♥ TV #8 8 Air 13 Air 13-1 Air Antenna Delete Add to Favorite Timer Viewing Channel Name Edit Auto Program ♥ TV #3 Alice’s Adventures in Wonderland Zoom Select TOOLS Option English - 42 1470A-03Eng.indb 42 2008-08-11 �� 2:21:49 Clearing Scrambled Channels - Digital 2.Press the ▲ or ▼ button to select “Clear Scrambled Channel”, then press the ENTER button. It searches scrambled channels, which are to be removed from the list. ➣ To stop searching scrambled channels; Press the ENTER button to select “Stop”. Press the ◄ button to select “Yes”, then press the ENTER button. 3.When the scrambled channel searching is completed, press the ENTER button. Press the EXIT button to exit. ➣ This function is only available in “Cable” mode. Channel The “Clear Scrambled Channel” function is used to filter out scrambled channels after “Auto Program” is completed. This process may take up to 20~30 minutes. 1.Press the MENU button to display the menu. Antenna : Cable Press the ▲ or ▼ button to select “Channel”, then press the ENTER Auto Program button. Clear Scrambled Channel ► Channel List Fine Tune Signal Strength Clear Scrambled Channel Removing scrambled channel. DTV Cable 10 3% Stop Enter Return Fine Tuning Analog Channels 3.Press the ◄ or ► button to adjust the fine tuning. To store the fine tuning setting in the TV’s memory, press the ENTER button. ➣ If you do not store the fine-tuned channel in memory, adjustments are not saved. 4.To reset the fine tuning setting, press the ▼ button to select “Reset”, then press the ENTER button. Press the EXIT button to exit. ➣ "*” will appear next to the name of fine-tuned channels. ➣ Only analog TV channels can be fine tuned. Clear Scrambled Channel Channel List Channel Use fine tuning to manually adjust a particular channel for optimal reception. 1.Press the MENU button to display the menu. Press the ▲ or ▼ button to select “Channel”, then press the ENTER button. 2.Press the ▲ or ▼ button to select “Fine Tune”, then press the ENTER button. Fine Tune ► Signal Strength Fine Tune Air 6 0 Reset Move Adjust Save Return Fine Tune Air 6* Fine Tuned +3 Reset Move Adjust Save Return Fine Tune Air 6 0 Reset Move Enter Return English - 43 1470A-03Eng.indb 43 2008-08-11 �� 2:21:50 Checking the Digital-Signal Strength Channel Unlike analog channels, which can vary in reception quality from “snowy” to clear, digital (HDTV) channels have either perfect reception quality or you will not receive them at all. So, unlike analog channels, you cannot fine tune a digital channel. You can, however, adjust your antenna to improve the reception of available digital channels. 1.Press the MENU button to display the menu. Press the ▲ or ▼ button to Channel List select “Channel”, then press the ENTER button. Fine Tune 2.Press the ▲ or ▼ button to select “Signal Strength”, then press the Signal Strength ENTER button. If the signal strength meter indicates that the signal is weak, physically adjust your antenna to increase the signal strength. Continue to adjust the antenna until you find the best position with the strongest signal. Press the EXIT button to exit. ► Signal Strength OK Enter Return English - 44 1470A-03Eng.indb 44 2008-08-11 �� 2:21:50 PC Display Using Your TV as a Computer (PC) Display Setting Up Your PC Software (Based on Windows XP) The Windows display-settings for a typical computer are shown below. The actual screens on your PC will probably be different, depending upon your particular version of Windows and your particular video card. However, even if your actual screens look different, the same basic set-up information will apply in almost all cases. (If not, contact your computer manufacturer or Samsung Dealer.) 1. First, click on “Control Panel” on the Windows start menu. 2.When the control panel window appears, click on “Appearance and Themes” and a display dialog-box will appear. 3.When the control panel window appears, click on “Display” and a display dialogbox will appear. 4. Navigate to the “Settings” tab on the display dialog-box. The correct size setting (resolution) Optimum: 1920 X 1080 pixels If a vertical-frequency option exists on your display settings dialog box, the correct value is “60” or “60 Hz”. Otherwise, just click “OK” and exit the dialog box. Display Modes If the signal from the system equals the standard signal mode, the screen is adjusted automatically. If the signal from the system doesn’t equal the standard signal mode, adjust the mode by referring to your videocard user guide; otherwise there may be no video. For the display modes listed below, the screen image has been optimized during manufacturing. D-Sub Input Mode IBM VESA CVT Resolution Horizontal Frequency (kHz) Vertical Frequency (Hz) Pixel Clock Frequency (MHz) Sync Polarity (H/V) 640 x 350 720 x 400 640 x 480 640 x 480 640 x 480 800 x 600 800 x 600 800 x 600 1024 x 768 1024 x 768 1024 x 768 1280 x 1024 1280 x 1024 1360 x 768 1600 x 1200 1920 x 1080RB 31.469 31.469 31.469 37.861 37.500 37.879 48.077 46.875 48.363 56.476 60.023 63.981 79.976 47.712 75.000 66.587 70.086 70.087 59.940 72.809 75.000 60.317 72.188 75.000 60.004 70.069 75.029 60.020 75.025 60.015 60.000 59.934 25.175 28.322 25.175 31.500 31.500 40.000 50.000 49.500 65.000 75.000 78.750 108.000 135.000 85.500 162.000 138.500 +/-/+ -/-/-/+/+ +/+ +/+ -/-/+/+ +/+ +/+ +/+ +/+ +/- Horizontal Frequency (kHz) 31.469 37.879 48.363 63.981 47.712 75.000 67.500 Vertical Frequency (Hz) 59.940 60.317 60.004 60.020 60.015 60.000 60.000 Pixel Clock Frequency (MHz) 25.175 40.000 65.000 108.000 85.500 162.000 148.500 Sync Polarity (H/V) -/+/+ -/+/+ +/+ +/+ +/+ HDMI/DVI Input Mode VESA CEA Resolution 640 x 480 800 x 600 1024 x 768 1280 x 1024 1360 x 768 1600 x 1200 1920 x 1080p English - 45 1470A-03Eng.indb 45 2008-08-11 �� 2:21:50 Setting up the TV with your PC How to Auto Adjust Use the Auto “Adjust function” to have the TV set automatically adjust the video signals it receives. The function also automatically fine-tunes the settings and adjusts the frequency values and positions. ➣ This function does not work in DVI-Digital mode. ➣ Preset: Press the SOURCE button to select PC mode. 1.Press the MENU button to display the menu. Press the ▲ or ▼ button to select “Picture”, then press the ENTER button. TV PC ---- AV1 ---- AV2 ---- S-Video ---- Component1 ---- Component2 Refresh Picture 2.Press the ▲ or ▼ button to select “Auto Adjustment”, then press the ENTER button. Press the EXIT button to exit. ---Option TOOLS Brightness : 45 Sharpness : 50 Auto Adjustment ► Screen Detailed Settings Picture Options Picture Reset Auto Adjustment in progress. Please Wait. Easy Setting 1.Press the TOOLS button on the remote control. 2.Press the ▲ or ▼ button to select “Auto Adjustment”, then press the ENTER button. TOOLS Device List Multi-Track Sound : Picture Size : Stereo 16:9 Picture Mode : Standard Sound Mode : Custom Sleep Timer : Off PIP Auto Adjustment Move Adjusting the Screen Quality Enter Sharpness 3.Press the ▲ or ▼ button to select “Coarse” or “Fine”, then press the ENTER button. Press the ◄ or ► button to adjust the screen quality. ➣ Vertical stripes may appear or the picture may be blurry. Press the ENTER button. Press the EXIT button to exit. : 50 Auto Adjustment Picture The purpose of the picture quality adjustment is to remove or reduce picture noise. If the noise is not removed by fine tuning alone, then make the vertical frequency adjustments on your PC and fine tune again. After the noise has been reduced, re-adjust the picture so that it is aligned on the center of the screen. ➣ Preset: Press the SOURCE button to select PC mode. 1.Press the MENU button to display the menu. Press the ▲ or ▼ button to select “Picture”, then press the ENTER button. 2.Press the ▲ or ▼ button to select “Screen”, then press the ENTER button. e Exit Screen ► Detailed Settings Picture Options Picture Reset Screen Coarse 52 Fine 24 Position Image Reset Move Enter Coarse Return 52 Move Adjust Enter Return English - 46 1470A-03Eng.indb 46 2008-08-11 �� 2:21:51 Changing the Screen Position 2.Press the ▲ or ▼ button to select “Screen”, then press the ENTER button. Sharpness Picture Adjust the PC’s screen positioning if it does not fit the TV screen. ➣ Preset: Press the SOURCE button to select PC mode. 1. Press the MENU button to display the menu. Press the ▲ or ▼ button to select “Picture”, then press the ENTER button. : 50 Auto Adjustment Screen ► Detailed Settings Picture Options Picture Reset Screen Coarse 52 Fine 24 ► Position Image Reset Move 3.Press the ▲ or ▼ button to select “Position”, then press the ENTER button. 4. Press the ▲ or ▼ button to adjust the V-Position. Press the ◄ or ► button to adjust the H-Position. Press the ENTER button. Press the EXIT button to exit. Enter Return Position Adjust Enter Return Initializing the Screen Position, Coarse and Fine Sharpness Picture You can replace all image settings with the factory default values. ➣ Preset: Press the SOURCE button to select PC mode. 1. Press the MENU button to display the menu. Press the ▲ or ▼ button to select “Picture”, then press the ENTER button. : 50 Auto Adjustment Screen ► Detailed Settings Picture Options Picture Reset 2.Press the ▲ or ▼ button to select “Screen”, then press the ENTER button. 3.Press the ▲ or ▼ button to select “Image Reset”, then press the ENTER button. Press the EXIT button to exit. Screen Coarse 52 Fine 24 Position Image Reset Move Enter ► Return Image Reset is completed. English - 47 1470A-03Eng.indb 47 2008-08-11 �� 2:21:52 Time Setting Setting the Clock Setting the clock is necessary in order to use the various timer features of the TV. Also, you can check the time while watching the TV. (Just press the INFO button.) Option 1: Setting the Clock Manually button. button. Plug & Play Language Setup 1.Press the MENU button to display the menu. Press the ▲ or ▼ button to select “Setup”, then press the ENTER Press the ▲ or ▼ button to select “Time”, then press the ENTER : English Time ► Network selection : Cable Cable Network Setup Wireless Network Setup V-Chip Caption External Settings Entertainment 2. Press the ENTER : Off Time button to select “Clock”. Clock : -- : -- -- Sleep Timer : Off Timer 1 : Inactivated Timer 2 : Inactivated Timer 3 : Inactivated Move button to select “Clock Mode”. 3.Press the ENTER Press the ▲ or ▼ button to select “Manual”, then press the ENTER button. Enter ► Return Clock Clock Mode : Auto Auto Clock Set Manual Time Zone : Off DST Move Enter Return Clock Set 4.Press the ▲ or ▼ button to select “Clock Set”, then press the ENTER button. Month -- Day -- Year ---- Hour -- Minute -- am/pm -- Move 5.Press the ◄ or ► button to move to “Month”, “Day”, “Year”, “Hour”, “Minute”, or “am/pm”. Set the date and time you want by pressing the ▲ or ▼ button, then press the ENTER button. Press the EXIT button to exit. ➣ The current time will appear every time you press the INFO button. ➣ You can set the month, day, year, hour and minute directly by pressing the number buttons on the remote control. Adjust Enter Return Clock Set Month 01 Day 01 Year 2008 Hour 12 Minute 00 am/pm am Move Adjust Enter Return English - 48 1470A-03Eng.indb 48 2008-08-11 �� 2:21:52 Option 2: Setting the Clock Automatically Plug & Play button. button. Language Setup The Clock can be set automatically if you are receiving a digital signal. 1.Press the MENU button to display the menu. Press the ▲ or ▼ button to select “Setup”, then press the ENTER Press the ▲ or ▼ button to select “Time”, then press the ENTER : English Time ► Network selection : Cable Cable Network Setup Wireless Network Setup V-Chip Caption External Settings Entertainment 2. Press the ENTER : Off Time button to select “Clock”. Clock : -- : -- -- Sleep Timer : Off Timer 1 : Inactivated Timer 2 : Inactivated Timer 3 : Inactivated Move button to select “Clock Mode”. 3.Press the ENTER Press the ▲ or ▼ button to select “Auto”, then press the ENTER button. Enter ► Return Clock Clock Mode : Auto Clock Set Time Zone DST ► : Off Move 4.Press the ▲ or ▼ button to select “Time Zone”, then press the ENTER button. Enter Return Time Zone Newfoundland Atlantic 5.Press the ▲ or ▼ button to highlight the time zone for your local area, then press the ENTER button. Eastern Central Mountain Pacific Move 6.Press the ▲ or ▼ button to select “DST” (Daylight Saving Time), then press the ENTER button. Press the ▲ or ▼ button to select “Off” or “On”, then press the ENTER button. Press the EXIT button to exit. ➣ Depending on the broadcast station and signal, the auto time may not be set correctly. If this occurs, set the time manually. ➣ The Antenna or cable must be connected in order to set the time automatically. Enter Return Clock Clock Mode : Auto Clock Set Off Time Zone On : Off DST Move Enter Return English - 49 1470A-03Eng.indb 49 2008-08-11 �� 2:21:53 Setting the Sleep Timer Setup The sleep timer automatically shuts off the TV after a preset time (30, 60, 90, 120, 150 and 180 minutes). 1.Press the MENU button to display the menu. Plug & Play Press the ▲ or ▼ button to select “Setup”, then press the ENTER button. Language Press the ▲ or ▼ button to select “Time”, then press the ENTER button. : English Time ► Network selection : Cable Cable Network Setup Wireless Network Setup V-Chip Caption External Settings Entertainment 2.Press the ▲ or ▼ button to select “Sleep Timer”, then press the ENTER button. 3.Press the ▲ or ▼ button to select the minute, then press the ENTER button. To cancel the set sleep timer: Press the ▲ or ▼ button to select “Off”, then press the ENTER button. 4. : Off Time Clock : --Off : -- -- Sleep Timer : Off 30 min. Timer 1 : Inactivated 60 min. Timer 2 : Inactivated 90 min. Timer 3 : Inactivated 120 min. 150 min. 180 min. Press the EXIT button to exit. Move Easy Setting 1.Press the TOOLS button on the remote control. 2.Press the ▲ or ▼ button to select “Sleep Timer”. 3.Press the ◄ or ► button to select the minute. 4.Press the EXIT or TOOLS button to exit. Enter Return TOOLS Device List Multi-Track Sound : Picture Size : 16:9 Picture Mode : Standard Sound Mode : Custom Sleep Timer ◄ Stereo Off ► Add to Favorite Switch to Cable Move Adjust e Exit English - 50 1470A-03Eng.indb 50 2008-08-11 �� 2:21:53 Setting the On/Off Timer Plug & Play button. Language Setup 1.Press the MENU button to display the menu. Press the ▲ or ▼ button to select “Setup”, then press the ENTER button. Press the ▲ or ▼ button to select “Time”, then press the ENTER : English Time ► Network selection : Cable Cable Network Setup Wireless Network Setup V-Chip Caption External Settings Entertainment 2.Three different On/Off Timer Settings can be made. Press the ▲ or ▼ button to select “Timer 1”, “Timer 2” or “Timer 3”, then press the ENTER button. : Off Time Clock : 12 : 00 am Sleep Timer : Off Timer 1 : Inactivated Timer 2 : Inactivated Timer 3 : Inactivated Move 3.Press the ◄ or ► button to select the desired item below. Press the ▲ or ▼ button to adjust the setting. • On Time: Set the Hour, Minute, am/pm, and Activation/Inactivation. (To activate timer with the setting you’ve chosen, set to “Activate”.) • Off Time: Set the Hour, Minute, am/pm, and Activation/Inactivation. (To activate timer with the setting you’ve chosen, set to “Activate”.) • Volume: Set the required volume level. • Contents: When the “On Time” is active, you can turn on a specific channel or play back contents such as photo or audio files. – TV/USB: Select TV or USB. (Make sure that an USB device is connected to your TV.) – Antenna: Select “Air” or “Cable”. – Channel: Select the desired channel. – Music: Select the folder containing MP3 files on the USB device. – Photo: Select the folder containing JPEG files on the USB device. • Repeat: Select “Once”, “Everyday”, “Mon~Fri”, “Mon~Sat”, “Sat~Sun”, or “Manual”. ➣ When “Manual” is selected, press the ► button to select the desired day of the week. Press the ENTER button over the desired day and the mark will appear. ► Enter Return Timer 1 On Time 12 Off Time 12 Volume 10 00 am Inactivate 00 am Inactivate Contents TV Cable Repeat Once 3 Sun Mon Tue Wed Thu Fri Move Adjust Enter Sat Return Contents TV/USB TV Antenna Cable Channel Channel 3am Music None Photo None Move Adjust Enter Return Press the EXIT button to exit. ➣ You can set the hour, minute and channel by pressing the number buttons on the remote control. ➣ Auto Power Off When you set the timer On, the television will eventually turn off, if no controls are operated for 3 hours after the TV was turned on by the timer. This function is only available in timer On mode and prevents overheating, which may occur if a TV is on for too long time. English - 51 1470A-03Eng.indb 51 2008-08-11 �� 2:21:53 Function Description Selecting a Menu Language Plug & Play Setup 1.Press the MENU button to display the menu. Press the ▲ or ▼ button to select “Setup”, then press the ENTER button. Press the ▲ or ▼ button to select “Language”, then press the ENTER button. Language : English ► Time Network selection : Cable Cable Network Setup Wireless Network Setup V-Chip Caption External Settings 2. Plug & Play Setup Press the ▲ or ▼ button to select “English”, “Español” or “Français”. Press the ENTER button. Press the EXIT button to exit. English : English Language Español Time Français : Cable Network selection Cable Network Setup Wireless Network Setup V-Chip Caption External Settings Using the V-Chip The V-Chip feature automatically locks out programs that are deemed inappropriate for children. The user must enter a PIN (personal ID number) before any of the V-Chip restrictions are set up or changed. ➣ “V-Chip” function is not available in HDMI, Component or PC mode. U.S.A Only This product is covered by the following U.S.patents: US4, 930, 158, US4, 930, 160. Setting Up Your Personal ID Number (PIN) Cable Network Setup Wireless Network Setup Setup 1.Press the MENU button to display the menu. Press the ▲ or ▼ button to select “Setup”, then press the ENTER button. 2.Press the ▲ or ▼ button to select “V-Chip”, then press the ENTER button. The message “Enter PIN” will appear. Enter your 4 digit PIN number. ➣ The default PIN number of a new TV set is “0-0-0-0”. V-Chip ► Caption External Settings Entertainment : Off Energy Saving : Off PIP SW Upgrade V-Chip Enter PIN * * * 0~9 Enter PIN Return English - 52 1470A-03Eng.indb 52 2008-08-11 �� 2:21:54 3.The “V-Chip” screen will appear. Press the ▲ or ▼ button to select “Change PIN”, then press the ENTER button. The Change PIN screen will appear. Choose any 4 digits for your PIN and enter them. As soon as the 4 digits are entered, the “Confirm new PIN.” screen appears. Re-enter the same 4 digits. When the Confirm screen disappears, your PIN has been memorized. Press the EXIT button to exit. ➣ If you forget the PIN, press the remote-control buttons in the following sequence, which resets the pin to 0-0-0-0 : Power Off. → Mute → 8 → 2 → 4 → Power On. V-Chip V-Chip Lock : Off TV Parental Guidelines MPAA Rating Canadian English Canadian French Downloadable U.S. Rating Change PIN ► Move Enter Return Change PIN Enter new PIN. Confirm new PIN. 0~9 Enter PIN Return How to Enable/Disable the V-Chip Cable Network Setup Wireless Network Setup Setup 1.Press the MENU button to display the menu. Press the ▲ or ▼ button to select “Setup”, then press the ENTER button. 2.Press the ▲ or ▼ button to select “V-Chip”, then press the ENTER button. The message “Enter PIN” will appear. Enter your 4 digit PIN number. V-Chip ► Caption External Settings Entertainment : Off Energy Saving : Off PIP SW Upgrade V-Chip Enter PIN * 3.The “V-Chip” screen will appear. To enable the V-Chip feature, press the ENTER button so that the “V-Chip Lock” field is “On”. (Pressing the ▲ or ▼ button will alternate between “On” and “Off”.) Press the ENTER button. Press the EXIT button to exit. * * 0~9 Enter PIN Return V-Chip V-Chip Lock : Off ► TV Parental Guidelines MPAA Rating Canadian English Canadian French Downloadable U.S. Rating Change PIN Move Enter Return Enter Return V-Chip V-Chip Lock TV Parental Guidelines : Off Off MPAA Rating On Canadian English Canadian French Downloadable U.S. Rating Change PIN Move English - 53 1470A-03Eng.indb 53 2008-08-11 �� 2:21:54 How to Set up Restrictions Using the TV Parental Guidelines Setup First, set up a personal identification number (PIN) and enable the V-Chip. (See previous section.) Parental restrictions can be set up using either of two methods: The TV guidelines or the MPAA rating. 1.Press the MENU button to display the menu. Cable Network Setup Press the ▲ or ▼ button to select “Setup”, then press the ENTER button. Wireless Network Setup 2.Press the ▲ or ▼ button to select “V-Chip”, then press the ENTER V-Chip ► button. The message “Enter PIN” will appear. Enter your 4 digit PIN number. Caption 3.The “V-Chip” screen will appear. Press the ▲ or ▼ button to select “TV External Settings Parental Guidelines”, then press the ENTER button. Entertainment : Off 4.The “TV Parental Guidelines” screen will appear. Energy Saving : Off Press the ▲ or ▼ button to select one of the six aged based categories: PIP • TV-Y: Young children • TV-Y7: Children 7 and over • TV-G: General audience 5. At this point, one of the TV-Ratings is selected. Press the ENTER button. Depending on your existing setup, the “ ” symbol will be selected. (Blank = Unblocked, = Blocked) While “ ” is selected, press the ENTER button to block or unblock the category. To select a different TV-Rating, press the ▲ or ▼ button and then repeat the process. ➣ Allow all: Press to unlock all TV ratings. Block all: Press to lock all TV ratings. ➣ The TV-Y, TV-Y7, TV-G, TV-PG, TV-14 and TV-MA have additional options. See the next step to change any of the following sub-ratings: ALL / FV / V / S / L / D ➣ The V-Chip will automatically block certain categories that are “more restrictive”. For example, if you block “TV-Y” category, then TV-Y7 will automatically be blocked. Similarly, if you block the TV-G category, then all the categories in the “young adult” group will be blocked (TV-G, TV-PG, TV-14 and TV-MA). The sub-ratings (D, L, S, V) work together similarly. (See next section.) 6.How to set the FV, D, L, S and V sub-ratings. First, select one of these TV-Ratings: TV-Y, TV-Y7, TV-G, TV-PG, TV-14 or TV-MA (See Step 4) and press the ► button. The “ ” symbol will be displayed for each sub-rating. While “ ” is selected, press the ENTER button to go to a sub rating. Press ENTER to block the sub rating. To select a different TV-Rating, press the ▲ or ▼ button and then repeat the process. • ALL: Lock all TV ratings. • FV: Fantasy violence • V: Violence SW Upgrade • TV-PG: Parental guidance • TV-14: Viewers 14 and over • TV-MA: Mature audience • S: Sexual situation • L: Adult Language • D: Sexually Suggestive Dialog ➣ The V-chip will automatically block certain categories that are “More restrictive”. For example, if you block “L” sub-rating in TV-PG, then the “L” sub-ratings in TV-14 and TV-MA will automatically be blocked. 7.Press the EXIT button to clear all the screens. (Or proceed to the next section, and set up additional restrictions based on the MPAA codes.) ➣ These categories consist of two separate groups: TV-Y and TV-Y7 (young children through age 7) and TV-G through TV-MA (everybody else). The restrictions for these two groups work independently: If a household includes very young children as well as young adults, the TV guidelines must be set up separately for each age group. (See next step.) V-Chip Enter PIN * * * 0~9 Enter PIN Return V-Chip V-Chip Lock : On TV Parental Guidelines ► MPAA Rating Canadian English Canadian French Downloadable U.S. Rating Change PIN Move Enter Return TV Parental Guidelines ALL FV V S L D TV-Y Allow All Block All TV-Y7 TV-G TV-PG TV-14 TV-MA Move Enter Return TV Parental Guidelines ALL FV V S L D TV-Y Allow All Block All TV-Y7 TV-G TV-PG TV-14 TV-MA Move Enter Return English - 54 1470A-03Eng.indb 54 2008-08-11 �� 2:21:55 How to Set up Restrictions Using the MPAA Ratings: G, PG, PG-13, R, NC-17, X, NR Setup The MPAA rating system uses the Motion Picture Association of America (MPAA) system and its main application is for movies. When the V-Chip lock is on, the TV will automatically block any programs that are coded with objectionable ratings (either MPAA or TV-Ratings). 1.Press the MENU button to display the menu. Cable Network Setup Press the ▲ or ▼ button to select “Setup”, then press the ENTER button. Wireless Network Setup V-Chip ► Caption External Settings Entertainment : Off Energy Saving : Off PIP SW Upgrade 2.Press the ▲ or ▼ button to select “V-Chip”, then press the ENTER button. The message “Enter PIN” will appear. Enter your 4 digit PIN number. V-Chip Enter PIN * * * 0~9 Enter PIN 3.The “V-Chip” screen will appear. Press the ▲ or ▼ button to select “MPAA Rating”, then press the ENTER button. Return V-Chip V-Chip Lock : On TV Parental Guidelines MPAA Rating ► Canadian English Canadian French Downloadable U.S. Rating Change PIN 4.The “MPAA Rating” screen will appear. Repeatedly press the ▲ or ▼ button to select a particular MPAA category. Pressing the ▲ or ▼ button will cycle through the MPAA categories: • • • • • • • G: General audience (no restrictions). PG: Parental guidance suggested. PG-13: Parents strongly cautioned. R: Restricted. Children under 17 should be accompanied by an adult. NC-17: No children under age 17. X: Adults only. NR: Not rated. ➣ Allow all: Press to unlock all TV ratings. Block all: Press to lock all TV ratings. ➣ While a particular category is selected, press the ENTER button to activate it. The “ ” symbol will be displayed. Press the ENTER button to block or unblock the category. ➣ The V-Chip will automatically block any category that is “More restrictive”. For example, if you block the “PG-13” category, then “R”, “NC-17” and “X” will automatically be blocked also. Press the EXIT button to exit. Move Enter Return MPAA Rating G Allow All PG Block All PG-13 R NC-17 X NR Move Enter Return MPAA Rating G Allow All PG Block All PG-13 R NC-17 X NR Move Enter Return English - 55 1470A-03Eng.indb 55 2008-08-11 �� 2:21:56 How to Set up Restrictions Using the Canadian English Cable Network Setup button. Wireless Network Setup Setup 1.Press the MENU button to display the menu. Press the ▲ or ▼ button to select “Setup”, then press the ENTER V-Chip ► Caption External Settings Entertainment : Off Energy Saving : Off PIP SW Upgrade 2.Press the ▲ or ▼ button to select “V-Chip”, then press the ENTER button. The message “Enter PIN” will appear. Enter your 4 digit PIN number. V-Chip Enter PIN * * * 0~9 Enter PIN 3.The “V-Chip” screen will appear. Press the ▲ or ▼ button to select “Canadian English”, then press the ENTER button. Return V-Chip V-Chip Lock : On TV Parental Guidelines MPAA Rating Canadian English ► Canadian French Downloadable U.S. Rating Change PIN Move 4.Press the ▲ or ▼ button to select a appropriate restriction. Press the ENTER button to activate the restriction selected. The “ ” symbol is indicated. Press the EXIT button to exit. ➣ Allow all: Press to unlock all TV ratings. Block all: Press to lock all TV ratings. • C: Programming intended for children under age 8. • C8+: Programming generally considered acceptable for children 8 years and over to watch on their own. • G: General programming, suitable for all audiences. • PG: Parental Guidance. • 14+: Programming contains themes or content which may not be suitable for viewers under the age of 14. • 18+: Adult programming. ➣ The V-Chip will automatically block any category that is “More restrictive”. For example, if you block G category, then PG, 14+ and 18+ will automatically be blocked also. Enter Return Canadian English C Allow All C8+ Block All G PG 14+ 18+ Move Enter Return Canadian English C Allow All C8+ Block All G PG 14+ 18+ Move Enter Return English - 56 1470A-03Eng.indb 56 2008-08-11 �� 2:21:57 How to Set up Restrictions Using the Canadian French button. Cable Network Setup Wireless Network Setup Setup 1.Press the MENU button to display the menu. Press the ▲ or ▼ button to select “Setup”, then press the ENTER V-Chip ► Caption External Settings Entertainment : Off Energy Saving : Off PIP SW Upgrade 2.Press the ▲ or ▼ button to select “V-Chip”, then press the ENTER button. The message “Enter PIN” will appear. Enter your 4 digit PIN number. V-Chip Enter PIN * * * 0~9 Enter PIN 3.The “V-Chip” screen will appear. Press the ▲ or ▼ button to select “Canadian French”, then press the ENTER button. Return V-Chip V-Chip Lock : On TV Parental Guidelines MPAA Rating Canadian English Canadian French ► Downloadable U.S. Rating Change PIN Move 4.Press the ▲ or ▼ button to select an appropriate restriction. Press the ENTER button to activate the restriction selected. The “ ” symbol is indicated. Press the EXIT button to exit. ➣ Allow all: Press to unlock all TV ratings. Block all: Press to lock all TV ratings. • G: General • 8 ans+: Programming generally considered acceptable for children 8 years and over to watch on their own. • 13 ans+: Programming may not be suitable for children under the age of 13. • 16 ans+: Programming is not suitable for children under the age of 16. • 18 ans+: Programming restricted to adults. ➣ The V-Chip will automatically block any category that is “More restrictive”. For example, if you block 8 ans+ category, then 13 ans+, 16 ans+ and 18 ans+ will automatically be blocked also. Enter Return Canadian French G Allow All 8 ans+ Block All 13 ans+ 16 ans+ 18 ans+ Move Enter Return Canadian French G Allow All 8 ans+ Block All 13 ans+ 16 ans+ 18 ans+ Move Enter Return English - 57 1470A-03Eng.indb 57 2008-08-11 �� 2:21:57 Using the V-Chip for Digital channels Cable Network Setup Wireless Network Setup Setup Parental restriction information can be used while watching DTV channels. 1.Press the MENU button to display the menu. Press the ▲ or ▼ button to select “Setup”, then press the ENTER button. V-Chip ► Caption External Settings Entertainment : Off Energy Saving : Off PIP SW Upgrade 2.Press the ▲ or ▼ button to select “V-Chip”, then press the ENTER button. The message “Enter PIN” will appear. Enter your 4 digit PIN number. V-Chip Enter PIN 3.The “V-Chip” screen will appear. Press the ▲ or ▼ button to select “Downloadable U.S. Rating”, then press the ENTER button. ➣ If information is not downloaded from the broadcasting station, the Downloadable U.S. rating menu is deactivated. ➣ Parental restriction information is automatically downloaded while watching DTV channels. It may take several seconds. ➣ The Downloadable U.S. rating menu is available for use after information is downloaded from the broadcasting station. However, depending on the information from the broadcasting station, it may not be available for use. * * * Return 0~9 Enter PIN V-Chip V-Chip Lock : On TV Parental Guidelines MPAA Rating Canadian English 4.Press the ▲ or ▼ button to select a appropriate restriction. Press the ENTER button to activate the restriction selected. The “ ” symbol is indicated. Press the EXIT button to exit. ➣ Allow all: Press to unlock all TV ratings. Block all: Press to lock all TV ratings. ➣ Parental restriction levels differ depending on the broadcasting station. ➣ The default menu name and Downloadable US rating changes depending on the downloaded information. ➣ Even if you set the On-screen display to your desired language, the “Downloadable U.S. Rating” menu will appear in English only. ➣ The rating will automatically block certain categories that are more restrictive. ➣ The rating titles (For example: Humor Level..etc) and TV ratings (For example: DH, MH, H..etc) may differ depending on the broadcasting station. Canadian French Downloadable U.S. Rating ► Change PIN Move Enter Return The number of current rating information Rating title The number of all rating information Downloadable U.S. Rating ► Humor Level 1/2 DH Allow All MH Block All H VH EH Move Enter Return How to Reset the TV after the V-Chip Blocks a Channel (“Emergency Escape”) If the TV is tuned to a restricted channel, the V-Chip will block it. The screen will go blank and the following message will appear: 1.Press the ENTER button to select OK. To resume normal viewing, tune to a different channel using CH or CH button. Under certain conditions (depending on the rating of the local TV programs) the V-Chip might lock out all the channels. In this case, use the V-Chip function for an “emergency escape”: 2.Enter your PIN, then press the ENTER button, and press the ▲ or ▼ button to temporarily disable the V-Chip Lock. ➣ If you forget the PIN, press the remote-control buttons in the following sequence, which resets the pin to 0-0-0-0 : Power Off. → MUTE → 8 → 2 → 4 → Power On. Received Rating : TV-G/MPAA X/Canadian English : C8+ This channel is blocked by V-Chip. Prees ENTER to unblock. OK CH Change Enter Channel Is Locked by MPAA R/A/K/T Use the NUMBER buttons to enter your pin number to unlock all channels. Press EXIT to clear PIN. Press MENU for main menu. English - 58 1470A-03Eng.indb 58 2008-08-11 �� 2:21:58 Viewing Closed Captions (On-Screen Text Messages) - Analog Setup The Analog Caption function operates in either analog TV channel mode or when a signal is supplied from an external device to TV. (Depending on the broadcasting signal, the Analog Caption function may operate on digital channels.) 1.Press the MENU button to display the menu. Wireless Network Setup Press the ▲ or ▼ button to select “Setup”, then press the ENTER button. V-Chip Caption ► External Settings Entertainment : Off Energy Saving : Off PIP SW Upgrade 2.Press the ▲ or ▼ button to select “Caption”, then press the ENTER button. Caption Caption : Off Caption Mode : Default ► Digital Caption Options Enter button to select “Caption”. Press the ▲ or ▼ button to 3.Press the ENTER select “On”, then press the ENTER button. Caption Caption : Off Off Caption Mode Digital Caption Options : Default On Move 4.Press the ▲ or ▼ button to select “Caption Mode”, then press the ENTER button. Press the ▲ or ▼ button to select submenu (Default, CC1~CC4 or Text1~Text4) you want, the press the ENTER button. Press the EXIT button to exit. • The default is “CC1”. • CC1: The Primary Synchronous Caption Service. These are captions in the primary language that must be in sync with the sound, preferably matched to a specific frame. • CC2: The Special Non-Synchronous Use Captions. This channel carries data that is intended to augment information carried in the program. • CC3: Secondary Synchronous Caption Service. Alternate programrelated caption data, typically second language captions. • CC4: Special Non-Synchronous Use Captions. Similar to CC2. • Text1: First Text Service. This may be various non-program related data. • Text2: Second Text Service. Additional data, usually not program related. • Text3/Text4: Third and Fourth Text Services. These data channels should be used only if Text1 and Text2 are not sufficient. Return Enter Return Caption Caption : Off Default Caption Mode : Default CC1 Digital Caption Options CC2 Move Enter Return ➣ The Caption feature doesn’t work in Component, HDMI or PC modes. ➣ The availability of captions depends on the program being broadcast. O Press the CC button on the remote control to turn the Caption “On” or “Off”. English - 59 1470A-03Eng.indb 59 2008-08-11 �� 2:21:58 Viewing Closed Captions (On-Screen Text Messages) - Digital Wireless Network Setup Setup The Digital Captions function operates on digital channels. 1.Press the MENU button to display the menu. Press the ▲ or ▼ button to select “Setup”, then press the ENTER button. 2.Press the ▲ or ▼ button to select “Caption”, then press the ENTER button. 3.Press the ENTER button to select “Caption”. Press the ▲ or ▼ button to select “On”, then press the ENTER button. V-Chip Caption ► External Settings Entertainment : Off Energy Saving : Off PIP SW Upgrade 4.Press the ▲ or ▼ button to select “Caption Mode”, then press the ENTER button. Press the ▲ or ▼ button to select submenu (Default, Service1~Service6, CC1~CC4 or Text1~Text4) you want, then press the ENTER button. Caption Caption : Off Caption Mode : Default ► Digital Caption Options 5.Press the ▲ or ▼ button to select “Digital Caption Options”, then press the ENTER button. ➣ “Digital Caption Options” are available only when “Default” and “Service 1~Service 6” can be selected in “Caption Mode”. ➣ Service1~6 in digital caption mode may not be available depending on the broadcast. 6.Press the ▲ or ▼ button to select “Size”, then press the ENTER button. Press the ▲ or ▼ button to select the desired Caption option, then press the ENTER button. Press the ▲ or ▼ button to select the desired sub-menu options (see options below), then press ENTER . Press the EXIT button to exit. ➣ The availability of captions depends on the program being broadcast. ➣ “Default” means to follow the standard set by the broadcaster. ➣ Foreground and Background cannot be set to have the same color. ➣ “Foreground Opacity” and “Background Opacity” cannot be both set to Transparent. • Size: This option consists of “Default”, “Small”, “Standard” and “Large”. The default is “Standard”. • Font Style: This option consists of “Default”, “Style0 ~ Style 7”. You can change the font you want. The default is “Style 0”. • Foreground Color: This option consists of “Default”, “White”, “Black”, “Red”, “Green”, “Blue”, “Yellow”, “Magenta” and “Cyan”. You can change the color of the letter. The default is “White”. • Background Color: This option consists of “Default”, “White”, “Black”, “Red”, “Green”, “Blue”, “Yellow”, “Magenta” and “Cyan”. You can change the background color of the caption. The default is “Black”. • Foreground Opacity: This option consists of “Default”, “Transparent”, “Translucent”, “Solid” and “Flashing”. You can change the opacity of the letter. • Background Opacity: This option consists of “Default”, “Transparent”, “Translucent”, “Solid” and “Flashing”. You can change the background opacity of the caption. • Return to Default: This option sets each of “Size”, “Font Style”, “Foreground Color”, “Background color”, “Foreground Opacity” and “Background Opacity” to its default. Enter Return Caption Caption : Off Off Caption Mode Digital Caption Options : Default On Move Enter Return Caption Caption : Off Default Caption Mode : Default Service 1 Digital Caption Options Service 2 Move Enter Return Digital Caption Options Size : Default Font Style : Default Foreground Color : Default Background Color : Default Foreground Opacity : Default Background Opacity : Default Default Small Standard Large Return to Default Move Enter Return O Press the CC button on the remote control to turn the Caption “On” or “Off”. English - 60 1470A-03Eng.indb 60 2008-08-11 �� 2:21:59 Adjusting the TV On/Off Melody Sound V-Chip Setup A melody sound can be set to come on when the TV is powered On or Off. 1.Press the MENU button to display the menu. Press the ▲ or ▼ button to select “Setup”, then press the ENTER button. 2.Press the ▲ or ▼ button to select “External Settings”, then press the ENTER button. Off: Turns off the melody function. Low: Sets the melody volume to low. Medium: Sets the melody volume to medium. High: Sets the melody volume to high. External Settings ► Entertainment : Off Energy Saving : Off PIP 3.Press the ▲ or ▼ button to select “Melody”, then press the ENTER button. Press the ▲ or ▼ button to select “Off”, “Low”, “Medium” or “High”, then press the ENTER button. • • • • Caption SW Upgrade External Settings Melody : Medium Off Wall-Mount Adjustment Low Medium Press the EXIT button to exit. ➣ The Melody does not play - When no sound is output from the TV because the MUTE button has been pressed, - When no sound is output from the TV because the volume has been reduced to minimum with the VOL – button. - When the TV is turned off by Timer function. High Move Enter Return English - 61 1470A-03Eng.indb 61 2008-08-11 �� 2:21:59 Setting the Entertainment mode Setup The “Entertainment” mode enables you to select the optimal display and sound for sports, cinema and games. 1.Press the MENU button to display the menu. Caption Press the ▲ or ▼ button to select “Setup”, then press the ENTER button. External Settings 2.Press the ▲ or ▼ button to select “Entertainment”, then press the ENTER Entertainment : Off button. Energy Saving : Off 3.Press the ▲ or ▼ button to select “Off”, “Sports”, “Cinema” or “Game”, then PIP press the ENTER button. ► SW Upgrade Press the EXIT button to exit. ➣ If you set any of the three “Entertainment” modes to On, the settings will be locked and can not be adjusted. If you want to make Picture and Sound mode adjustments, the “Entertainment” mode must be turned off. ➣ The “Entertainment” settings are saved for each input source. ➣ If you set any of the three “Entertainment” modes to On, “SRS TruSurround XT” function is not available. Caption Setup • Off: Switches the “Entertainment” function off. • Sports: Provides the optimal picture and sound quality for sports. • Cinema: Provides the optimal picture and sound quality for movie watching. You can experience a richer picture and enhanced sound. • Game: Provides the optimal picture and sound quality for games. This mode accelerates the playing speed when using an external game console connected to the TV. External Settings Entertainment Energy Saving PIP SW Upgrade Off : Off Sports : Off Cinema ► Game O You can press the E.MODE button on the remote control repeatedly to change the “Entertainment” setting. Using the Energy Saving Feature Setup This feature adjusts the brightness of the TV in order to reduce power consumption. When watching TV at night, set the "Energy Saving “ mode option to “High” to reduce eye fatigue as well as power consumption. 1.Press the MENU button to display the menu. External Settings Press the ▲ or ▼ button to select “Setup”, then press the ENTER button. Entertainment : Off Energy Saving : Off ► PIP SW Upgrade • • • • • Off: Turns off the energy saving function. Low: Sets the TV to low energy saving mode. Medium: Sets the TV to medium energy saving mode. High: Sets the TV to high energy saving mode. Auto: Automatically adjusts the brightness of the TV screen in accordance with the scenes. External Settings Setup 2.Press the ▲ or ▼ button to select “Energy Saving”, then press the ENTER button. Select the required option (Off, Low, Medium, High, Auto) by pressing the ▲ or ▼ button. Press the ENTER button. Entertainment : Off Energy Saving Off : Off PIP SW Upgrade Low ► Medium High Auto Press the EXIT button to exit. English - 62 1470A-03Eng.indb 62 2008-08-11 �� 2:22:00 Upgrading the Software HDMI IN4 Samsung may offer upgrades for TV's firmware in the future. Please contact the Samsung call center at 1-800-SAMSUNG (726-7864) to receive information about downloading upgrades and using a USB drive. Upgrades will be possible by connecting a USB drive to the USB port located on your TV. 1.Insert a USB drive containing the firmware upgrade into the WISELINK port TV Side Panel on the side of the TV. ➣ Software can not be upgraded through the LAN connection. 2.Press the MENU button to display the menu. Press the ▲ or ▼ button to select “Setup”, then press the ENTER button. button. 4.Press the ENTER The message “Scanning for USB... It may take up to 30 seconds.” is displayed. 5.The message “Upgrade version XXXX to version XXXX? The system will be reset after upgrade.” is displayed. Press the ◄ or ► to select the “OK”, then press the ENTER button. Please be careful to not disconnect the power or remove the USB drive while upgrades are being applied. The TV will turn off and turn on automatically after completing the firmware upgrade. Please check the firmware version after the upgrades are complete. When software is upgraded, video and audio settings you have made will return to their default (factory) settings. We recommend you write down your settings so that you can easily reset them after the upgrade. Energy Saving Setup 3.Press the ▲ or ▼ button to select “SW Upgrade”, then press the ENTER button. USB Drive : Off PIP SW Upgrade ► Software Upgrade Scanning for USB..... It may take up to 30 seconds. Software Upgrade Upgrade version XXXX to version XXXX? The system will be reset after upgrade. OK Cancel English - 63 1470A-03Eng.indb 63 2008-08-11 �� 2:22:00 WISELINK Pro Using the WISELINK Pro Function Connecting a USB Device TV Side Panel HDMI IN4 You can view movies and photos and listen to music files stored on a USB Mass Storage Class (MSC) device. 1.Press the POWER button on the remote control or front panel. ➣ The TV is powered on. 2.Connect a USB device containing JPEG and/or MP3 files to the WISELINK jack (USB jack) on the side of the TV. USB Drive ➣ If you enter the WISELINK Pro mode with no USB device connected the message “No external storage device found. Check the connection status.” will appear. In this case, insert the USB device, exit the screen by pressing the W.LINK button on the remote control and enter the WISELINK Pro screen again. ➣ MTP (Media Transfer Protocol) is not supported. ➣ The file system only supports FAT16/32 (The NTFS file system is not supported). ➣ Certain types of USB Digital camera and audio devices may not be compatible with this TV. ➣ WISELINK Pro only supports USB Mass Storage Class devices (MSC). MSC is a Mass Storage Class Bulk-Only Transport device. Examples of MSC are Thumb drives and Flash Card Readers (Both USB HDD and HUB are not supported.) ➣ Please connect directly to the USB port of your TV. If you are using a separate cable connection, there may be a USB Compatibility problem. ➣ Before connecting your device to the TV, please back up your files to prevent them from damage or loss of data. SAMSUNG is not responsible for any data file damage or data loss. ➣ Do not disconnect the USB device while it is loading. ➣ MSC supports MP3 and JPEG files, while a PTP device supports JPEG files only. ➣ The sequential jpeg format is supported. ➣ Photo and audio files must be named in English, French or Spanish. If not, the files can not be played. Change the file names to English, French or Spanish if necessary. ➣ The higher the resolution of the image, the longer it takes to display on the screen. ➣ The maximum supported JPEG resolution is 15360X8640 pixels. ➣ For unsupported or corrupted files, the “Not Supported File Format” message is displayed. ➣ If the number of photo files exceeds 4000 (or the number of music files exceeds 3000), any files exceeding the 4000 limit may not be displayed in the Photo List (or Music List). Using the Remote Control Button in WISELINK Pro Menu Button Operations Wheel (▲/▼/◄/►) Move the cursor and select an item. ENTER Select the currently selected item. While playing a slide show, movie, or music file: - Pressing the ENTER button during play pauses the play. - Pressing the ENTER button during pause resumes the play. / RETURN TOOLS Play or pause the Slide Show, Music or Movie file. Return to the previous menu. Run various functions from the Photo, Music and Movie menus. Stop the current slide show, Music or Movie file. / INFO W.LINK CH / PRE.CH / FAV.CH / CH.LIST EXIT Jump to previous group / Jump to next group. Show file information. Exit WISELINK Pro mode. Stop WISELINK Pro mode and Returns to TV mode. Stop the current function and return to the WISELINK Pro main menu. English - 64 1470A-03Eng.indb 64 2008-08-11 �� 2:22:01 Using the WISELINK Pro Menu 1.Press the MENU button. Press the ▲ or ▼ button to select “Application”, then press the ENTER button. 2.Press the ▲ or ▼ button to select “WISELINK Pro”, then press the ENTER button. ➣ The “WISELINK Pro” menu is displayed. WISELINK Pro 851.98MB/995.00MB Free SUM PHOTO Photo SUM Device Music Movie Setup R Exit O Press the W.LINK button on the remote control to display the “WISELINK Pro” menu. O Press the SOURCE button on the remote control repeatedly to select “USB”, then press the ENTER button. 3.Press the Red button, then press the ▲ or ▼ button to select the corresponding USB Memory Device (i.e. if connected through a hub). Press the ENTER ➣ This function differs depending on the USB Memory Device connected to TV. ➣ The selected USB device name appears at the bottom left of the screen. button. 4.Press the ◄ or ► button to select an icon (Photo, Music, Movie, Setup), then press the ENTER ➣ To exit “WISELINK Pro” mode, press the W.LINK button on the remote control. button. Using the Photo List This menu shows Photo files saved on an USB memory device. Photo List 1.Press the W.LINK button on the remote control to display the “WISELINK Pro” menu. 2.Press the ◄ or ► button to select “Photo”, then press the ENTER button. ➣ Photo files are displayed. ➣ This menu only shows files whose file extension is jpg. Files of other formats such as bmp or tiff will not be displayed. ➣ Press the (Play) / ENTER button to start the Slide Show. ➣ To move to the previous / next group, press the (REW) or (FF) button. ➣ When moving to a photo, loading may take a few seconds. At this point, the loading icon will appear at the screen. ➣ It may take some time to load photo files as Thumbnail images. WISELINK Pro 851.98MB/995.00MB Free SUM PHOTO Photo SUM Device Music Movie Setup e Exit Photo Image001.jpg Preference Monthly Timeline SUM Device Favorites Setting Select ★★★ Jan Nov ▲ Jump TOOLS Option English - 65 1470A-03Eng.indb 65 2008-08-11 �� 2:22:04 Screen Display 1File(s) Selected5 Photo 1 Image001.jpg ★★★ Preference Monthly 2 SUM4 Device Nov3 Jan ▲ Timeline Favorites Setting Select Jump TOOLS Option 6 1 Currently selected photo Shows the currently selected photo. 2 Current Sort Standard Press the ▲ or ▼ button to change the standard for sorting photos. (“Monthly”, “Timeline”, “Color”, “Composition”, “Folder”, “Preference”) The item that is selected as the sorting standing is highlighted in the Photo Information Window. 3 View Groups Shows the sorting groups. The sorting group including the currently selected photo is highlighted. 4 Current Device Shows the currently selected device name. Press the Red button to select a device. 5 Item Selection Information Shows the number of photos that are selected by pressing the Yellow button. 6 Help Items • Red(Device) button: Selects a connected device. • Green(Favorites Setting) button: Changes the favorites setting for the selected photo. Press this button repeatedly until the desired value appears. (Refer to page 69) • Yellow(Select) button: Selects photos from the photo list. Selected photos are marked with a symbol on the left. • (Jump) button: Jumps to the previous sorting group / Jumps to the next sorting group. • TOOLS(Option) button: Displays the “Slide Show”, “Play Current Group”, “Rotate”, “Delete”, “Change Group Info” (in “Color” or “Composition” group),“Information” or “Safe Remove” menus. English - 66 1470A-03Eng.indb 66 2008-08-11 �� 2:22:04 Sorting Photo List You can sort photos in the Photo List by a particular standard. 1.Press the W.LINK button on the remote control to display the “WISELINK Pro” menu. 2.Press the ◄ or ► button to select “Photo”, then press the ENTER button. ➣ Photo files are displayed. 3.Press the ▲ or ▼ button to select a sorting standard. (“Monthly”, “Timeline”, “Color”, “Composition”, “Folder”, “Preference”) ➣ The photos are sorted according to the newly selected sorting standard. 4.Press the ENTER button to start the Slide Show in the order selected by the user. ➣ WISELINK Pro identifies the color and composition of images and groups them accordingly by analyzing the images on the USB device. ➣ The “Composition” and “Color” information extracted from a photo file may be different from what you selected. ➣ Photo information is automatically set. You can change the “Color”, “Composition”, and “Favorite”. ➣ Photos for which information cannot be displayed are set as “Unclassified”. ➣ PTP does not support folder sort mode. WISELINK Pro 851.98MB/995.00MB Free SUM PHOTO Photo SUM Device Music Movie Setup e Exit Photo Image001.jpg ★★★ Preference Monthly Jan Nov ▲ Timeline SUM Device Favorites Setting Select Jump TOOLS Option Monthly Sorts photos by month. ➣ It sorts and shows photos in the file by month. It sorts only by month (from January to December) regardless of year. 1. Select “Monthly” as the sorting standard in the Photo List. 2.Press the ◄ or ► button to select from the sublist of files grouped by Month. ➣ To move to the previous / next group, press the (REW) or (FF) button. 3.Press the TOOLS button. Press the ▲ or ▼ button to select “Play Current Group”. 4.Press ENTER to play the selected group of photo files from the sublist. Photo Image001.jpg Silde Show Play Current Group Rotate Delete ▼ ★★★ Preference Monthly Jan Nov ▲ Timeline SUM Device Favorites Setting Select Jump TOOLS Option Timeline Sorts photos by time. ➣ It sorts and shows photos by date. It sorts by year and month from the earliest photo. 1. Select “Timeline” as the sorting standard in the Photo List. 2.Press the ◄ or ► button to select from the sublist of files grouped by Timeline. ➣ To move to the previous / next group, press the (REW) or (FF) button. 3.Press the TOOLS button. Press the ▲ or ▼ button to select “Play Current Group”. 4.Press ENTER to play the selected group of photo files from the sublist. Photo Image001.jpg Silde Show Play Current Group Rotate Delete ▼ ★★★ Monthly Timeline 2008 Color SUM Device Favorites Setting Select 2008 Nov Jan ▲ Jump TOOLS Option English - 67 1470A-03Eng.indb 67 2008-08-11 �� 2:22:05 Color Sorts photos by color. ➣ You can change the photo color information. 1. Select “Color” as the sorting standard in the Photo List. 2.Press the ◄ or ► button to select from the sublist of files grouped by color. (REW) or ➣ To move to the previous / next group, press the (FF) button. 3.Press the TOOLS button. Press the ▲ or ▼ button to select “Play Current Group”. 4.Press ENTER to play the selected group of photo files from the sublist. Changing the color information 1.Select “Color” as the sorting standard in the Photo List and press the ◄ or ► button to select a photo. ➣ Changing the information of multiple files Press the ◄ or ► button to select the desired photo in the Photo list. Then press the yellow button. Repeat the above operation to select multiple photos. The mark appears to the left of the selected photo. 2. Press the TOOLS button. 3.Press the ▲ or ▼ button to select “Change Group Info”. Press the ENTER button. 4.Press the ◄ or ► button to select the desired option, then press the ENTER button. ➣ The group information of the current file is updated and the file is moved to the new group. ➣ “Color” options: Red, Yellow, Green, Blue, Magenta, Black, Gray, Unclassified. Photo Image001.jpg Silde Show Play Current Group Rotate Delete ▼ ★★★ Timeline Color ▲ Composition SUM Device Favorites Setting Select Photo Jump TOOLS Option Jump TOOLS Option Image001.jpg Timeline Color ▲ Composition SUM Device Favorites Setting Select Composition Sorts photos by composition. ➣ You can change the compositional information of photos. 1. Select “Composition” as the sorting standard in the Photo List. 2.Press the ◄ or ► button to select from the sublist of files grouped by compositon. ➣ To move to the previous / next group, press the (REW) or (FF) button. 3.Press the TOOLS button. Press the ▲ or ▼ button to select “Play Current Group”. 4.Press ENTER to play the selected group of photo files from the sublist. Changing the composition information 1.Select “Composition” as the sorting standard in the Photo List and press the ◄ or ► button to select a photo. ➣ Changing the information of multiple files Press the ◄ or ► button to select the desired photo in the Photo list. Then press the yellow button. Repeat the above operation to select multiple photos. The mark appears to the left of the selected photo. 2. Press the TOOLS button. 3.Press the ▲ or ▼ button to select “Change Group Info”. Press the ENTER button. 4.Press the ◄ or ► button to select the desired option, then press the ENTER button. ➣ The group information of the current file is updated and the file is moved to the new group. ➣ “Composition” options: (horizontal), (vertical), (object), (perspective), (pattern), Unclassified Photo Image001.jpg Silde Show Play Current Group Rotate Delete ▼ Color Composition Unclassified ▲ Folder SUM Device Favorites Setting Select Photo Jump TOOLS Option Image001.jpg Unclassified Color Composition Folder SUM Unclassified ▲ Device Favorites Setting Select Jump TOOLS Option English - 68 1470A-03Eng.indb 68 2008-08-11 �� 2:22:07 Folder Sorts photos by folder. ➣ If there are many folders in USB, the photos files are shown in order in each folder. The photo file in the Root folder is shown first and the others are shown in alphabetical order by name. 1. Select “Folder” as the sorting standard in the Photo List. 2.Press the ◄ or ► button to select from the sublist of files grouped by folder. (REW) or ➣ To move to the previous / next group, press the (FF) button. 3.Press the TOOLS button. Press the ▲ or ▼ button to select “Play Current Group”. 4.Press ENTER to play the selected group of photo files from the sublist. Photo Image001.jpg Silde Show Play Current Group Rotate Delete ▼ ★★★ Composition Folder P-other Preference SUM Photo-1 ▲ Device Favorites Setting Select Jump TOOLS Option Preference Sorts photos by preference. (Favorite) ➣ You can change the photo preferences. 1. Select “Preference” as the sorting standard in the Photo List. 2.Press the ◄ or ► button to select from the sublist of files grouped by preference. ➣ To move to the previous / next group, press the (REW) or (FF) button. 3.Press the TOOLS button. Press the ▲ or ▼ button to select “Play Current Group”. 4.Press ENTER to play the selected group of photo files from the sublist. Changing the Favorites setting 1. Press the ◄ or ► button to select the desired photo in the Photo list. ➣ Changing the information of multiple files Press the ◄ or ► button to select the desired photo in the Photo list. Then press the yellow button. Repeat the above operation to select multiple photos. The mark appears to the left of the selected photo. 2. Press the Green button repeatedly until the desired setting appears. ➣ Favorites settings change completed. ➣ “Favorite” options: ★ ★ ★ , ★ ★ ★ , ★ ★ ★ , ★ ★ ★ ➣ Users can select the number of stars (up to 3) according to their preference. Photo Image001.jpg ★★★ Folder Preference Monthly ★★★ ★★★ ▲ ★★★ SUM Device Favorites Setting Select Jump TOOLS ★★★ Option Rotating the Photo file 1. Press the ◄ or ► button to select the desired photo in the Photo list. 2. Press the TOOLS button. 3.Press the ▲ or ▼ button to select “Rotate”, then press the ENTER button. Press the ◄ or ► button repeatedly to rotate the photo by the desired amount. ➣ Whenever you press the ◄ button, it rotates by 270˚, 180˚, 90˚, and 0˚. ➣ Whenever you press the ► button, it rotates by 90˚, 180˚, 270˚, and 0˚. ➣ The Rotating function information icon is displayed. Photo Image001.jpg Silde Show Play Current Group Rotate Delete ▼ ★★★ Preference Monthly Jan Nov ▲ Timeline SUM Device Favorites Setting Select Jump TOOLS Option TOOLS Option Photo Icon Current OSD Function 0˚ Rotating (0°) This rotates a photo to its original position 90˚ Rotating (90°) This rotates a photo by 90 degrees 180˚ Rotating (180°) This rotates a photo by 180 degrees 270˚ Rotating (270°) This rotates a photo by 270 degrees Image001.jpg 180˚ Preference Rotate Monthly Timeline SUM Device Favorites Setting Select ★★★ Jan Nov ▲ Jump English - 69 1470A-03Eng.indb 69 2008-08-11 �� 2:22:09 Deleting the Photo file 1. Press the ◄ or ► button to select the desired photo in the Photo list. 2. Press the TOOLS button. 3.Press the ▲ or ▼ button to select “Delete”, then press the ENTER button. ➣ The “Delete this file?” message appear. 4.Press the ◄ or ►button to select “OK”, then press the ENTER button. ➣ The photo is deleted. ➣ When a read-only file is deleted, the “Read-only file(s). Delete the file(s)?” message appear. ➣ If you select “Cancel”, the deletion is cancelled. 5.To exit “WISELINK Pro” mode, press the W.LINK button on the remote control. ➣ You cannot remove the PTP-connected digital camera picture files. ➣ While removing files, don’t remove the USB memory device. ➣ You cannot recover a deleted photo file. Photo Image001.jpg Silde Show Play Current Group Rotate Delete ▼ ★★★ Preference Monthly Jan Nov ▲ Timeline SUM Device Favorites Setting Select Jump TOOLS Option Delete Selected File(s) :Image0... 1 File(s) Delete this file? OK Cancel Deleting Multiple Photos 1.Press the ◄ or ► button to select the desired photo in the Photo list. Then press the yellow button. ➣ Repeat the above operation to select multiple photos. ➣ The mark appears to the left of the selected photo. 2. Press the TOOLS button. 3.Press the ▲ or ▼ button to select “Delete selected File”, then press the ENTER button. ➣ The “Delete the selected files?” message appear. 4.Press the ◄ or ► button to select “OK”, then press the ENTER button. ➣ The selected photos are deleted. ➣ If you select “Cancel”, the deletion is cancelled. 5.To exit “WISELINK Pro” mode, press the W.LINK button on the remote control. ➣ You cannot remove the read-only files from the selected ones. ➣ You cannot recover a deleted photo file. Photo 2File(s) Selected Image001.jpg Silde Show Delete selected File Deselect All Safe Remove ★★★ Preference Monthly Jan Timeline SUM Nov ▲ Device Favorites Setting Select Jump TOOLS Option Delete Selected File(s) :Image0... 2 File(s) Delete the selected files? OK Cancel Viewing the Photo Information The photo file information including the order of the file in the current directory, the name, the size, the resolution, the date modified and the path is displayed. 1. Press the ◄ or ► button to select the desired photo in the Photo list. 2. Press the TOOLS button. 3.Press the ▲ or ▼ button to select “Information”, then press the ENTER button. ➣ The information on the selected photo appears. Photo Image001.jpg Rotate Delete Information Safe Remove ★★★ Preference Monthly Jan Nov ▲ Timeline SUM Device Favorites Setting Select Jump TOOLS Option Photo Info Name Size Resolution Date Path : Image001.jpg : 2.0MB : 440x440 : Jan.1.2008 : /Photo/ OK O Press the INFO button to viewing the information. English - 70 1470A-03Eng.indb 70 2008-08-11 �� 2:22:10 Viewing a Photo or Slide Show Viewing a Slide Show Photo 1.Press the W.LINK button on the remote control to display the “WISELINK Pro” menu. 2.Press the ◄ or ► button to move to “Photo”, then press the ENTER button. ➣ Photo files are displayed. 3. Press the ◄ or ► button to select the desired photo in the Photo list. 4. Press the TOOLS button. 5.Press the ▲ or ▼ button to select “Slide Show”, then press the ENTER button. Image001.jpg Silde Show Play Current Group Rotate Delete ▼ ★★★ Preference Monthly Jan Nov ▲ Timeline SUM Device Favorites Setting Select Jump 20/22 Image001.jpg 440x440 TOOLS Option 2.0KB 2008/1/1 ➣ All files in the photo list will be used for the Slide Show. ➣ During the slide show, files are displayed in order from the currently shown file. ➣ The Slide Show progresses in the order sorted in the Photo list. ➣ Music files can be automatically played during the Slide Show if the “Background Music” is set to “On”. (Refer to page 73). SUM E Slide Show Previous Next TOOLS Option Return (Play) / ENTER button on the remote control to start slide show. O While a photo list is displayed, press the To perform a SlideShow with only the selected files 1.Press the ◄ or ► button to select the desired photo in the Photo list. Then press the yellow button. Repeat the above operation to select multiple photos. ➣ The mark appears to the left of the selected photo. ➣ If you select one file, the SlideShow will not be performed. 2. Press the (Play) / ENTER button. ➣ The selected files will be used for the Slide Show. ➣ If you have selected files, only the selected files will be used for the Slide Show. Playing current group 1.Press the ▲ or ▼ button to select a sorting standard. (“Monthly”, “Timeline”, “Color”, “Composition”, “Folder”, “Preference”) 2.Press the ◄ or ► button to select the desired photo in the Photo list. (REW) or ➣ To move to the previous / next group, press the (FF) button. 3. Press the TOOLS button. 4.Press the ▲ or ▼ button to select “Play Current Group”, then press the ENTER button. Only the photos in the sorting group including the selected files will be used for the Slide Show. 5.To exit “WISELINK Pro” mode, press the W.LINK button on the remote control. Photo Image001.jpg Silde Show Play Current Group Rotate Delete ▼ Preference Monthly Timeline SUM Device Favorites Setting Select ★★★ Jan Nov ▲ Jump TOOLS Option Slide show function information icon (Displayed at the top left of the screen) Icon Current OSD Function ► (Photo) SlideShow Photo Slide Show is in progress. ❙❙ Photo Pause You can pause a Slide Show by pressing the (Pause)/ENTER button on the remote control during a Slide Show. To resume the Slide Show, press the (Play)/ENTER button on the remote control again. English - 71 1470A-03Eng.indb 71 2008-08-11 �� 2:22:12 Viewing a photo 1.Press the W.LINK button on the remote control to display the “WISELINK Pro” menu. 2.Press the ◄ or ► button to move to “Photo”, then press the ENTER button. ➣ Photo files are displayed. 3.Press the ◄ or ► button to select the desired photo in the Photo list. Then Press the Yellow button to select only one file. 4. Press the ENTER button over a photo icon. ➣ The currently selected photo is displayed in full screen. 20/22 Image001.jpg 440x440 SUM E Slide Show Previous Next TOOLS 2.0KB Option 2008/1/1 Return Using the option menu during a slide show (or Viewing a Photo) 1.During a slide show(or viewing a photo), Press the TOOLS button to set the option. 2.Press the ▲ or ▼ button to select the desired option. Then press the ENTER button. Start Slide Show (or Stop Slide Show) You can start or stop a Slide Show. Press the ▲ or ▼ button to select “Start Slide Show” (or “Stop Slide Show”), then press the ENTER button. TOOLS Stop Slide Show Rotate Zoom Slide Show Speed : Normal Background Music : Off Background Music Setting Picture Setting Sound Setting Information Move Rotate You can rotate images in full screen mode. Press the ▲ or ▼ button to select “Rotate”, then press the ENTER button. Press the ◄ or ► button repeatedly to rotate the photo by the desired amount. ➣ Whenever you press the ◄ button, it rotates by 270˚, 180˚, 90˚, and 0˚. ➣ Whenever you press the ► button, it rotates by 90˚, 180˚, 270˚, and 0˚. ➣ If you have select “Zoom”, the “Rotate” deactivated. ➣ The rotated file is not saved. ➣ The Rotating function information icon is displayed at the top right of the screen Icon Current OSD Function 0˚ Rotating (0°) This rotates a photo to its original position 90˚ Rotating (90°) This rotates a photo by 90 degrees 180˚ Rotating (180°) This rotates a photo by 180 degrees 270˚ Rotating (270°) This rotates a photo by 270 degrees Enter e Exit 90˚ Rotate English - 72 1470A-03Eng.indb 72 2008-08-11 �� 2:22:13 Zoom You can zoom into images in full screen mode. Press the ▲ or ▼ button to select “Zoom”, then press the ENTER button. Press the ◄ or ► button repeatedly to increase or decrease the Zoom effect. (x1 → x2 → x4) To move the enlarged photo image, press the ENTER button, then press the ▲/▼/◄/► buttons. ➣ Note that when the enlarged picture is smaller than the original screen size, the location change function doesn’t work. ➣ The enlarged file is not saved. ➣ If you have select “Rotate”, the “Zoom” deactivate. ➣ Zoom function information icon is displayed at the top right of the screen. Icon Current OSD Function x2 Zoom (x 2) Zoom-into a photo at 2x. x4 Zoom (x 4) Zoom-into a photo at 4x. x1 Zoom (x 1) Restore a photo to its original size. Pan Down Pan Up Pan Right Pan Left Pan down to view the lower part of a zoomed-in photo. Pan up to view the upper part of a zoomed-in photo. Pan right to view the right side of a zoomed-in photo. Pan left to view the left side of a zoomed-in photo. Slide Show Speed You can select the slide show speed. Press the ▲ or ▼ button to select “Slide Show Speed”. Press the ◄ or ► button to select the desired option. (Fast → Slow → Normal) ➣ You can select the SlideShow speed only during a slide show. ➣ You can also change the speed of the Slide Show by pressing the (REW) or (FF) key during the Slide Show. X2 Zoom X2 n Move Enter Return TOOLS Stop Slide Show Rotate Zoom Slide Show Speed ◄ Normal ► Background Music : Off Background Music Setting Picture Setting Sound Setting Information Move Background Music If you set ”Background Music” to On, the background music will be played when viewing photos one by one or in a Slide Show. Press the ▲ or ▼ button to select “Background Music”. Press the ◄ or ► button to select “On” or “Off”. ➣ If you set ”Background Music” to On, a screen appears immediately where you can set the Background Music. • On: When the background music is available, if you select On, the music is played back. To use this feature, there must be music and photo files stored on the USB device. • Off: Background music is not played. Adjust e Exit TOOLS Stop Slide Show Rotate Zoom Slide Show Speed : Normal Background Music ◄ Off ► Background Music Setting Picture Setting Sound Setting Information Move Adjust e Exit English - 73 1470A-03Eng.indb 73 2008-08-11 �� 2:22:13 TOOLS Background Music Setting You can set the background music. Press the ▲ or ▼ button to select “Background Music Setting”, then press the ENTER button. ➣ If you turn off the “Background Music”, even if the “Background Music Settings” have been set up, the background music will not be played. Stop Slide Show Rotate Zoom Slide Show Speed : Normal Background Music : Off Background Music Setting Picture Setting Sound Setting Information Move Enter e Exit Background Music setting ➣ Loading music files is needed to change BGM mode. Play music files in music category to load. ➣ “Background Music setting” menu is displayed. Press the ◄ or ► button to select the desired BGM (Background music) mode. (Shuffle, Selected file, Mood) • Shuffle: Plays music files in random order. • Selected file: Plays a selected music file. • Mood: Plays music files of a particular mood only. BGM Mode ◄ BGM Mood : Shuffle ► Calm Select Music File Move Adjust Enter Return Background Music setting BGM Mode ◄ Selected file ► BGM Mood : Calm Select Music File ➣ Selecting the background music file Press the ◄ or ► button to set “BGM Mode” to “Selected file”. Press the ▲ or ▼ button to select “Select Music File”, then press the ENTER button. Press the ▲ or ▼ button to select a music file, then press the yellow button. The mark appears to the left of the selected music. Repeat the above operation to select multiple music files. Press the ENTER button. Move Enter Return Background Music setting ../Music/ 2 File(s) Selected Upper Folder Thanks I Love You Better than yesterday Select ➣ Selecting the background music file mood Press the ◄ or ► button to set “BGM Mode” to Mood”. Press the ▲ or ▼ button to select “BGM Mood”. Then press ◄ or ► button to select the desired BGM mood. Press the ENTER button. BGM mode option: Energetic, Rhythmical, Sad, Exciting, Calm ➣ WISELINK Pro identifies the mood of the music files and groups them accordingly by analyzing the music files on the USB device. Enter Return Background Music setting BGM Mode : Mood BGM Mood ◄ Calm ► Select Music File Move Picture Setting Change the screen settings. (Refer to page 21) ▼ Move Adjust Enter Return Picture Setting Sound Setting Change the audio settings. (Refer to page 32) Information The photo file information including the order of the file in the current directory, the name, the size, the resolution, the date modified and the path is displayed. (Refer to page 70) Safe Remove You can remove the device safely from the TV. Press the ▲ or ▼ button to select “Safe Remove”, then press the ENTER button. The “Safely removing USB device.” message appears and then the “USB device can now be safely removed from TV.” appears. Remove the USB device from the TV. Picture Mode ◄ Contrast : Backlight : Color : Dynamic Contrast : Black Adjust : Auto Motion Plus 120Hz : Reset Move Adjust Dynamic 100 45 55 High High Low ► Enter R Return Sound Setting Sound Mode ◄ Balance : 100Hz : 300Hz : 1kHz : 3kHz : 10kHz : Reset Move Adjust Custom L50 R50 0 0 0 0 0 ► Enter R Return English - 74 1470A-03Eng.indb 74 2008-08-11 �� 2:22:14 Using the Music List This menu shows MP3 files from among the files saved on a USB memory device. 1.Press the W.LINK button on the remote control to display the “WISELINK Pro” menu. WISELINK Pro SUM Music Photo Music SUM Device 2.Press the ◄ or ► button to select “Music”, then press the ENTER button. ➣ Music files are displayed. ➣ Press the (Play) / ENTER button over a music icon to play the music. ➣ To move to the previous / next group, press the (REW) or (FF) button. 851.98MB/995.00MB Free Movie Setup e Exit Music Thanks I Love You Jee Darby Album 1 2005 Pop Album 2 2005 Pop Energetic ★★★ Better than yesterday Catherine Album 3 2005 Pop Sad ★★★ Calm ★★★ Preference Title F G H Artist I ▲ J SUM Device Favorites Setting Select L P S T Jump TOOLS Option V Screen Display Music 1File(s) Selected 5 Thanks 1 I Love You Better than yesterday Jee Darby Catherine Album 1 2005 Blues Album 2 2005 Pop Album 3 2005 Pop Energetic ★★★ Sad ★★★ Calm ★★★ Preference Title 2 Artist G H SUM4 Device I ▲ Favorites Setting J Select L P Jump S TOOLS T Option 3 V 6 1 Currently selected music Shows the currently selected music. 2 Current Sort Standard Press the ▲ or ▼ button to change the standard for sorting music files. (“Title”, “Artist”, “Genre”, “Mood”, “Folder”, “Preference”) 3 View Groups Shows the sorting groups. The sorting group including the currently selected music file is highlighted. 4 Current Device Shows the currently selected device name. Press the Red button to select a device. English - 75 1470A-03Eng.indb 75 2008-08-11 �� 2:22:15 5 Item Selection Information Shows the number of music files that are selected by pressing the Yellow button. 6 Help Items • Red(Device) button: Selects a connected device. • Green(Favorites Setting) button: Changes the favorites setting for the selected music. Press this button repeatedly until the desired value appears. (Refer to page 78) • Yellow(Select) button: Selects music files from the music list. Selected music files are marked with a symbol the left. • (Jump) button: Jumps to the previous sorting group / Jumps to the next sorting group. • TOOLS(Option) button: Displays the “Play Current Group”, “Delete”, “Change Group Info” (in “Mood” group), “Information” or “Safe Remove” menus. on Sorting Music List You can sort music files in the Music List by a particular standard. 1.Press the W.LINK button on the remote control to display the WISELINK Pro menu. 2.Press the ◄ or ► button to select “Music”, then press the ENTER button. ➣ Music files are displayed. 3.Press the ▲ or ▼ button to select a sorting standard. (“Title”, “Artist”, “Genre”, “Mood”, “Folder”, “Preference”) ➣ Music files are sorted according to the newly selected sorting standard. 4.Press the ENTER button to start playing music in the order selected by the user. ➣ Music information is set automatically and you can change the Favorite information. ➣ Music files for which information cannot be displayed are set to “Unclassified”. ➣ If there is no title information for a music file, the filename is displayed. ➣ If no information is available for the Genre, Artist, Album, or Year, the corresponding item is displayed as blank. WISELINK Pro SUM 851.98MB/995.00MB Free Music Photo Music SUM Device Movie Setup e Exit Music Thanks I Love You Better than yesterday Jee Darby Catherine Album 1 2005 Pop Album 2 2005 Pop Album 3 2005 Pop Energetic ★★★ Sad ★★★ Calm ★★★ Preference Title F G H Artist I ▲ J L SUM Device Favorites Setting Select P S T Jump TOOLS Option V Title Sorts music files by the title. ➣ It sorts and displays the Music titles in alphabetical order. 1. Select “Title” as the sorting standard in the Music List. 2.Press the ◄ or ► button to select from the sublist of files grouped in alphabetical order. ➣ To move to the previous / next group, press the (REW) or (FF) button. 3. Press the TOOLS button. 4.Press the ▲ or ▼ button to select “Play Current Group”. 5.Press ENTER sublist. to play the selected group of music files from the Music Thanks Darby Album 1 2005 Pop Album 2 2005 Pop Energetic than yesterday PlayBetter Current Group Delete Catherine InformationAlbum 3 2005 Safe Remove Pop I Love You Jee ★★★ Sad ★★★ Calm ★★★ Preference Title Artist F G H I ▲ J SUM Device Favorites Setting Select L P S T Jump TOOLS Option V English - 76 1470A-03Eng.indb 76 2008-08-11 �� 2:22:15 Artist Sorts music files by the artist. ➣ It sorts the music file by artist in alphabetical order. 1. Select “Artist” as the sorting standard in the Music List. 2.Press the ◄ or ► button to select from the sublist of files grouped in alphabetical order. ➣ To move to the previous / next group, press the (REW) or (FF) button. 3. Press the TOOLS button. 4.Press the ▲ or ▼ button to select “Play Current Group”. 5.Press ENTER to play the selected group of music files from the sublist. Music Thanks Darby Album 1 2005 Pop Album 2 2005 Pop Sad than yesterday PlayBetter Current Group Delete Catherine InformationAlbum 3 2005 Safe Remove Pop I Love You Jee Sad ★★★ Exciting ★★★ ★★★ Title Artist Catherine Darby Darby Darby Darby Jee Jee ▲ Genre SUM Device Favorites Setting Select Jump TOOLS Option Genre Sorts music files by the genre. 1. Select “Genre” as the sorting standard in the Music List. 2.Press the ◄ or ► button to select from the sublist of files grouped by Genre. ➣ To move to the previous / next group, press the (REW) or (FF) button. 3. Press the TOOLS button. 4.Press the ▲ or ▼ button to select “Play Current Group”. 5.Press ENTER to play the selected group of music files from the sublist. Music Thanks Darby Album 1 2005 Pop Album 2 2005 Pop Sad than yesterday PlayBetter Current Group Delete Catherine InformationAlbum 3 2005 Safe Remove Pop I Love You Jee Sad ★★★ Exciting ★★★ ★★★ Artist Genre Other Pop R&B Soundtr... Top 40 Acid Jazz Ball.. ▲ Mood SUM Device Favorites Setting Select Jump TOOLS Option Mood Sorts music files by the mood. ➣ You can change the music mood information. Music 1. Select “Mood” as the sorting standard in the Music List. 2.Press the ◄ or ► button to select from the sublist of files grouped by mood. ➣ To move to the previous / next group, press the (REW) or (FF) button. 3. Press the TOOLS button. 4.Press the ▲ or ▼ button to select “Play Current Group”. 5.Press ENTER to play the selected group of music files from the sublist. Thanks Darby Album 1 2005 Pop Album 2 2005 Pop Sad than Group yesterday PlayBetter Current Delete Catherine InformationAlbum 3 2005 Safe Remove Pop I Love You Jee ★★★ Sad ★★★ Exciting ★★★ Genre Mood Folder Rhythmical Sad ▲ Exciting SUM Device Favorites Setting Select Changing the Mood information 1.Select “Mood” as the sorting standard in the Music List and press the Music ◄ or ► button to select a music file. Thanks I Love You 2. Press the TOOLS button. Jee Darby 3.Press the ▲ or ▼ button to select “Change Group Info”. Press the ENTER button. Sad ★★★ Sad ★★★ ➣ WISELINK Pro identifies the mood of the music files and groups them Energetic Rhythmical Sad Exciting accordingly by analyzing the music files on the USB device. Mood ➣ “Mood” information extracted from a music file may not always match the Mood option. For example, a file you think is “Energetic” may be SUM Device Favorites Setting Select extracted to the “Exciting” mood option. 4.Press the ◄ or ► button to select the desired option, then press the ENTER button. ➣ The group information of the current file is updated and the file is moved to the new group. ➣ “Mood” options: Energetic, Rhythmical, Sad, Exciting, Calm, Unclassified Album 1 2005 Pop Calm Jump TOOLS ... Option Better than yesterday Catherine Album 2 2005 Pop Album 3 2005 Pop Exciting Calm Unclassified ★★★ Genre Folder Rhythmical Sad ▲ Exciting Jump Calm TOOLS ... Option English - 77 1470A-03Eng.indb 77 2008-08-11 �� 2:22:17 Folder Sorts music files by the folder. ➣ If there are many folders in USB, the files are shown in order in each folder. The music file in the Root folder is shown first and the others are shown in alphabetical order by name. 1. Select “Folder” as the sorting standard in the Music List. 2.Press the ◄ or ► button to select from the sublist of files grouped by Folder. (REW) or ➣ To move to the previous / next group, press the (FF) button. 3. Press the TOOLS button. 4.Press the ▲ or ▼ button to select “Play Current Group”. 5.Press ENTER to play the selected group of music files from the sublist. Music Thanks Darby Album 1 2005 Pop Sad than Group yesterday PlayBetter Current Delete Catherine InformationAlbum 3 2005 Safe Remove Pop I Love You Jee Album 2 2005 Pop ★★★ Sad ★★★ Exciting ★★★ Mood Folder Preference Other Music Other2 ▲ SUM Device Favorites Setting Select Jump TOOLS Option Preference Sorts music files by preference. (Favorite) ➣ You can change the music files preferences. 1. Select “Preference” as the sorting standard in the Music List. 2.Press the ◄ or ► button to select from the sublist of files grouped by Preference. ➣ To move to the previous / next group, press the (REW) or (FF) button. 3. Press the TOOLS button. 4.Press the ▲ or ▼ button to select “Play Current Group”. 5.Press ENTER to play the selected group of music files from the sublist. Changing the Favorites setting 1. Press the ◄ or ► button to select the desired music in the music list. 2. Press the Green button repeatedly until the desired setting appears. ➣ Favorites settings change completed. ➣ “Favorite” options: ★ ★ ★ , ★ ★ ★ , ★ ★ ★ , ★ ★ ★ ➣ Users can select the number of stars (up to 3) according to their preference. 3. Press the ENTER button to start playing music. Music Thanks I Love You Jee Darby Album 1 2005 Pop Album 2 2005 Pop Sad ★★★ Sad Better than yesterday Catherine Album 3 2005 Pop ★★★ Exciting ★★★ Folder Preference Title ★★★ ★★★ ▲ SUM Device Favorites Setting Select ★★★ Jump TOOLS ★★★ Option English - 78 1470A-03Eng.indb 78 2008-08-11 �� 2:22:17 Deleting the Music file 1. Press the ◄ or ► button to select the desired music file in the music list. 2. Press the TOOLS button. 3.Press the ▲ or ▼ button to select “Delete”, then press the ENTER button. ➣ The (for example) “Delete this file?” message appear. 4.Press the ◄ or ► button to select “OK”, then press the ENTER button. ➣ The music is deleted. ➣ When a read-only file is deleted, the “Read-only file(s). Delete the file(s)?” message appear. ➣ If you select “Cancel”, the deletion is cancelled. 5.To exit “WISELINK Pro” mode, press the W.LINK button on the remote control. ➣ While removing files, don’t remove the USB memory device. ➣ You cannot recover deleted music files. Music Thanks Darby Album 1 2005 Pop Album 2 2005 Pop Energetic than yesterday PlayBetter Current Group Delete Catherine InformationAlbum 3 2005 Safe Remove Pop I Love You Jee ★★★ Sad Calm ★★★ ★★★ Preference Title F G H Artist I ▲ J L SUM Device Favorites Setting Select P S T Jump TOOLS Option V Delete Selected File(s) :I Love Y... 1 File(s) Delete this file? OK Cancel Deleting Multiple Music files 1.Press the ◄ or ► button to select the desired music in the music list. Then press the yellow button. ➣ Repeat the above operation to select multiple music files. 2File(s) Selected Music ➣ The mark appears to the left of the selected music files. Thanks I Love You Better than yesterday Delete selected File 2. Press the TOOLS button. Deselect All Jee Darby Catherine 3.Press the ▲ or ▼ button to select “Delete selected File”, then press the Safe Remove ENTER button. Energetic ★★★ Sad ★★★ Calm ★★★ ➣ The (for example) “Delete the selected files?” message appear. 4.Press the ◄ or ► button to select “OK”, then press the ENTER button. Title ➣ The selected music files are deleted. Jump Option SUM Device Favorites Setting Select ➣ If you select “Cancel”, the deletion is cancelled. Delete 5.To exit “WISELINK Pro” mode, press the W.LINK button on the remote control. Selected File(s) :I Love Y... 2 File(s) Delete the selected files? ➣ You cannot remove the read-only files from the selected ones. ➣ You cannot restore the deleted music files. OK Cancel Album 1 2005 Pop Album 2 2005 Pop Album 3 2005 Pop Preference F G H Artist I ▲ J L P S T V TOOLS Viewing the Information The music file information including the order of the file in the current directory, the name, the size, the date modified and the path is displayed. 1. Press the ◄ or ► button to select the desired music in the music list. Music 2. Press the TOOLS button. 3.Press the ▲ or ▼ button to select “Information”, then press the ENTER Thanks I Love You than yesterday PlayBetter Current Group Delete button. Jee Darby Catherine Information ➣ The information on the selected file appears. Safe Remove Album 1 2005 Pop Energetic Album 2 2005 Pop ★★★ Album 3 2005 Pop Sad ★★★ Calm ★★★ Preference Title Artist F G H I ▲ J SUM Device Favorites Setting Select L P S T Jump TOOLS Option V Music Info O Press the INFO button to viewing the information. Name Size Date Path : I Love You.mp3 : 5.2MB : Jan.1.2008 : /Music/ OK English - 79 1470A-03Eng.indb 79 2008-08-11 �� 2:22:19 Playing a Music File Playing a music file 1.Press the W.LINK button on the remote control to display the “WISELINK Pro” menu. 2.Press the ◄ or ► button to select “Music”, then press the ENTER button. ➣ Music files are displayed. 3.Pressing the ◄ or ► button to select a music file to be played, then press the ENTER button. ➣ This menu only shows files with the MP3 file extension. Files with other file extensions are not displayed, even if they are saved on the same USB device. (Play) / ENTER button over a music icon to play ➣ Press the the music. ➣ (REW) or (FF) buttons do not function during play. ➣ Press the (Pause) / ENTER button while playing a music file to pause the file. Press the (Stop) button to exit Play mode. ➣ The selected file is displayed at the top with its playing time. ➣ To adjust the music volume, press the VOL – or VOL + button on the remote control. To mute the sound, press the MUTE button on the remote control. ➣ The playing duration of a music file may be displayed as ‘00:00:00’ if its playing time information is not found at the start of the file. 4.To exit “WISELINK Pro” mode, press the W.LINK button on the remote control. Playing the music group Music Thanks I Love You Better than yesterday Jee Darby Catherine Album 1 2005 Pop Album 2 2005 Pop Album 3 2005 Pop Energetic ★★★ Sad ★★★ Calm ★★★ Preference Title F G H Artist I ▲ J L SUM Device Favorites Setting Select 7/14 P S T Jump TOOLS Option 00:01:15 V 00:05:41 I Love You SUM E Pause Previous Next TOOLS Option Return Music 1.Press the W.LINK button on the remote control to display the WISELINK Thanks Pro menu. Jee 2.Press the ◄ or ► button to select “Music”, then press the ENTER button. Energetic ➣ To move to the previous / next group, press the (REW) or (FF) button. Title 3. Press the ◄ or ► button to select the desired music file. 4. Press the TOOLS button. SUM Device 5.Press the ▲ or ▼ button to select “Play Current Group”, then press the ENTER button. ➣ The music files in the sorting group including the selected file are played. 6.To exit “WISELINK Pro” mode, press the W.LINK button on the remote control. than yesterday PlayBetter Current Group I Love You Delete Darby Album 1 2005 Pop ★★★ Catherine 3 InformationAlbum 2005 Album 2 2005 Pop Pop Safe Remove Sad ★★★ Calm ★★★ Preference Artist F G H I ▲ J Favorites Setting Select L P S T Jump TOOLS Option V English - 80 1470A-03Eng.indb 80 2008-08-11 �� 2:22:21 Playing the selected music files 1.Press the W.LINK button on the remote control to display the WISELINK Pro menu. 2.Press the ◄ or ► button to select “Music”, then press the ENTER button. 3.Press the ◄ or ► button to select the desired music file, then press the yellow button. Repeat the above operation to select multiple music files. ➣ The mark appears to the left of the selected music file. Music (Play) / ENTER button. 4.Press the ➣ Only the selected file is played. ➣ Press the (Stop) button while playing to stop the current item and to return to the music list. 5.To exit “WISELINK Pro” mode, press the W.LINK button on the remote control. SUM Device Favorites Setting Select 2File(s) Selected Thanks I Love You Better than yesterday Jee Darby Catherine Album 1 2005 Pop Album 2 2005 Pop Album 3 2005 Pop Energetic ★★★ Sad Calm ★★★ ★★★ Preference Title F G H Artist 7/14 I ▲ J L P S T Jump TOOLS Option 00:01:15 V 00:05:41 I Love You SUM E Pause Previous Next TOOLS Option Return Music function information icon (Displayed at the top left of the screen) Icon Current OSD (Music) Repeat (Music) Once ► / ❙❙ (Music) Play/Pause Function When all music files in the folder(or the selected file) are repeated. “Repeat Mode” is “On”. When all music files in the folder(or the selected file) are played once. “Repeat Mode” is “Off”. (Play)/ (Pause)/ENTER When pressing the remote control while music is playing. button on the Repeating Music Play 1. 2. 3. While a Music file is playing, press the TOOLS button. Press the ▲ or ▼ button to select “Repeat Mode”. Press the ◄ or ► button to select “On” or “Off”. • On: Plays back all music files in the folder(or the selected file) repeatedly. • Off: Doesn’t play back repeatedly. TOOLS Repeat Mode Picture Setting Sound Setting Information Safe Remove Move ◄ Adjust On ► e Exit 4.To exit “WISELINK Pro” mode, press the W.LINK button on the remote control. English - 81 1470A-03Eng.indb 81 2008-08-11 �� 2:22:22 Using the Movie List This menu shows Movies files and folders saved on an USB memory device. Movie List 1.Press the W.LINK button on the remote control to display the “WISELINK Pro” menu. 2.Press the ◄ or ► button to select “Movie”, then press the ENTER button. ➣ Movie files are displayed. ➣ Press the (Play) / ENTER button over a movie icon to play the movie. ➣ When moving to a movie, loading may take a few seconds. At this point, the loading icon will appear on the screen. ➣ Supported Video Formats Extension avi mp4 mpg vro vob File Video Decoder Resolution H.264 MP 1920X1080 MPEG4 SP 800X600 MPEG4 ASP MJPEG H.264 BP 800X600 800X600 1920X1080 H.264 MP 1920X1080 MPEG2 1920X1080 MPEG2 1920X1080 AC3 800X600 851.98MB/995.00MB Free SUM MOVIE Photo SUM Device Music Movie Setup e Exit Movie Audio codec PCM ADPCM AC3 PCM ADPCM ADPCM PCM AAC PCM AAC AC3 Xvid WISELINK Pro ABC.avi ★★★ Preference Title SYMBOL ENG □ A M ▲ Timeline SUM Device Favorites Setting Select Jump TOOLS Option Screen Display Movie 5 1File(s) Selected 1 ABC.avi ★★★ Preference Title SYMBOL 2 ENG A □ Timeline 4 SUM Device M 3 ▲ Favorites Setting Select Jump TOOLS Option 6 1 Currently selected movie Shows the currently selected movie. 2 Current Sort Standard Press the ▲ or ▼ button to change the standard for sorting Movies. (“Title”, “Timeline”, “Folder”, “Preference”) English - 82 1470A-03Eng.indb 82 2008-08-11 �� 2:22:23 3 View Groups Shows the sorting groups. The sorting group including the currently selected movie is highlighted. 4 Current Device Shows the currently selected device name. Press the Red button to select a device. 5 Item Selection Information Shows the number of movie files that are selected by pressing the Yellow button. 6 Help Items • Red(Device) button: Selects a connected device. • Green(Favorites Setting) button: Changes the favorites setting for the selected movie. Press this button repeatedly until the desired value appears. (Refer to page 84) • Yellow(Select) button: Selects movies from the movie list. Selected movies are marked with a symbol on the left. • (Jump) button: Jumps to the previous sorting group / Jumps to the next sorting group. • TOOLS(Option) button: Displays the “Play Current Group”, “Delete”, “Information” or “Safe Remove” menus. Sorting Movie List You can sort movies in the Movie List by a particular standard. 1.Press the W.LINK button on the remote control to display the “WISELINK Pro” menu. 2.Press the ◄ or ► button to select “Movie”, then press the ENTER button. ➣ Movie files are displayed. 3.Press the ▲ or ▼ button to select a sorting standard. (“Title”, “Timeline”, “Folder”, “Preference”) ➣ The movies are sorted according to the newly selected sorting standard. ➣ Movie information is automatically set. You can change the “Favorite”. WISELINK Pro 851.98MB/995.00MB Free SUM MOVIE Photo Music SUM Device Movie Setup e Exit Movie ABC.avi ★★★ Preference Title SYMBOL ENG □ A M ▲ Timeline SUM Device Favorites Setting Select Jump TOOLS Option Title Sorts movie files by the title. ➣ It sorts and displays the Movie titles in alphabetical order. 1. Select “Title” as the sorting standard in the Movie List. 2.Press the ◄ or ► button to select from the sublist of files grouped by Title. (REW) or ➣ To move to the previous / next group, press the (FF) button. 3.Press the TOOLS button. Press the ▲ or ▼ button to select “Play Current Group”. 4.Press ENTER to play the selected group of movie files from the sublist. Movie ABC.avi Play Current Group Delete Information Safe Remove ★★★ Preference Title Timeline SYMBOL ENG □ A M ▲ SUM Device Favorites Setting Select Jump TOOLS Option English - 83 1470A-03Eng.indb 83 2008-08-11 �� 2:22:24 Timeline Sorts movies by time. ➣ It sorts and shows movies by date. It sorts by year and month from the earliest movie. 1. Select “Timeline” as the sorting standard in the Movie List. 2.Press the ◄ or ► button to select from the sublist of files grouped by Timeline. (REW) or ➣ To move to the previous / next group, press the (FF) button. 3.Press the TOOLS button. Press the ▲ or ▼ button to select “Play Current Group”. 4.Press ENTER to play the selected group of movie files from the sublist. Movie ABC.avi Play Current Group Delete Information Safe Remove ★★★ Title 2008 Timeline Dec ▲ Folder SUM Device Favorites Setting Select Jump TOOLS Option Folder Sorts movies by folder. ➣ If there are many folders in USB, the movies files are shown in order in each folder. The movie file in the Root folder is shown first and the others are shown in alphabetical order by name. 1. Select “Folder” as the sorting standard in the Movie List. 2.Press the ◄ or ► button to select from the sublist of files grouped by folder. ➣ To move to the previous / next group, press the (REW) or (FF) button. 3.Press the TOOLS button. Press the ▲ or ▼ button to select “Play Current Group”. 4.Press ENTER to play the selected group of movie files from the sublist. Movie ABC.avi Play Current Group Delete Information Safe Remove ★★★ Timeline Folder movie ▲ Preference SUM Device Favorites Setting Select Jump TOOLS Option Preference Sorts movies by preference. (Favorite) ➣ You can change the movie preferences. 1. Select “Preference” as the sorting standard in the Movie List. 2.Press the ◄ or ► button to select from the sublist of files grouped by preference. ➣ To move to the previous / next group, press the (REW) or (FF) button. 3.Press the TOOLS button. Press the ▲ or ▼ button to select “Play Current Group”. 4.Press ENTER to play the selected group of movie files from the sublist. Movie ABC.avi ★★★ Folder Preference Title ★★★ ★★★ ▲ SUM Device Favorites Setting Select ★★★ Jump TOOLS ★★★ Option Changing the Favorites setting 1.Press the ◄ or ► button to select the desired movie in the movie list. 2. Press the Green button repeatedly until the desired setting appears. ➣ Favorites settings change completed. ➣ “Favorite” options: ★ ★ ★ , ★ ★ ★ , ★ ★ ★ , ★ ★ ★ ➣ To exit “WISELINK Pro” mode, press the W.LINK button on the remote control. English - 84 1470A-03Eng.indb 84 2008-08-11 �� 2:22:25 Deleting a Movie file 1. Press the ◄ or ► button to select the desired movie in the Movie list. 2. Press the TOOLS button. 3.Press the ▲ or ▼ button to select “Delete”, then press the ENTER button. ➣ The “Delete this file?” message appear. ➣ When a read-only file is deleted, the “Read-only file(s). Delete the file(s)?” message appear. 4.Press the ◄ or ►button to select “OK”, then press the ENTER button. ➣ The movie is deleted. ➣ If you select “Cancel”, the deletion is cancelled. 5.To exit “WISELINK Pro” mode, press the W.LINK button on the remote control. ➣ While deleting files, don’t remove the USB memory device. ➣ You cannot recover a deleted Movie file. Movie ABC.avi Play Current Group Delete Information Safe Remove ★★★ Preference Title SYMBOL ENG □ A M ▲ Timeline SUM Device Favorites Setting Select Jump TOOLS Option Delete Selected File(s) :ABC... 1 File(s) Delete this file? OK Cancel Deleting Multiple Movie files 1.Press the ◄ or ► button to select the desired movie in the movie list. Then press the yellow button. ➣ Repeat the above operation to select multiple movie files. ➣ The mark appears to the left of the selected movie files. 2. Press the TOOLS button. 3.Press the ▲ or ▼ button to select “Delete selected File”, then press the ENTER button. ➣ The “Delete the selected files?” message appear. 4.Press the ◄ or ► button to select “OK”, then press the ENTER button. ➣ The selected movie files are deleted. ➣ If you select “Cancel”, the deletion is cancelled. 5.To exit “WISELINK Pro” mode, press the W.LINK button on the remote control. ➣ You cannot remove read-only files. ➣ You cannot restore the deleted Movie files. Viewing the Movie Information The movie file information including the order of the file in the current directory, the name, the size, the date modified and the path is displayed. 1. Press the ◄ or ► button to select the desired movie in the movie list. 2. Press the TOOLS button. 3.Press the ▲ or ▼ button to select “Information”, then press the ENTER button. ➣ The information on the selected movie appears. Movie 2File(s) Selected ABC.avi Delete selected File Deselect All Safe Remove ★★★ Preference Title SYMBOL ENG □ A M ▲ Timeline SUM Device Favorites Setting Select Jump TOOLS Option Delete Selected File(s) :ABC... 2 File(s) Delete the selected files? OK Cancel Movie ABC.avi Play Current Group Delete Information Safe Remove ★★★ Preference Title SYMBOL ENG □ A M ▲ Timeline SUM Device Favorites Setting Select Jump TOOLS Option Movie Info Name Size Date Path : ABC.avi :350.2MB : Jan.1.2008 : /Movie/ OK O Press the INFO button to viewing the information. English - 85 1470A-03Eng.indb 85 2008-08-11 �� 2:22:26 Playing a Movie File Playing a movie file 1. 2. 3. 4. Press the W.LINK button on the remote control to display the “WISELINK Pro” menu. Press the ◄ or ► button to select “Movie”, then press the ENTER button. Pressing the ◄ or ► button to select a movie to be played, then press the ENTER button. ➣ The selected file is played. ➣ Press the (Play) / ENTER button over a movie icon to play the movie. ➣ Press the (Pause) / ENTER button while playing a movie file to pause the file. Press the (Stop) button to exit Play mode. ➣ The selected file is displayed at the top with its playing time. ➣ The playing duration of a movie file may be displayed as ‘00:00:00’ if its playing time information is not found at the start of the file. ➣ Press the ◄ button while playing a video file to rewind by 20 seconds ➣ Press the ► button to fast forward by 20 seconds. To exit “WISELINK Pro” mode, press the W.LINK button on the remote control. Movie ABC.avi ★★★ Preference SYMBOL Title ENG □ A M ▲ Timeline SUM Device Favorites Setting Select Play Jump TOOLS 00:00:48 Option 00:23:05 ABC.avi SUM E Pause -20sec +20sec TOOLS Option Return Playing the movie group 1. 2. 3. 4. 5. Movie Press the W.LINK button on the remote control to display the “WISELINK Pro” menu. Press the ◄ or ► button to select “Movie”, then press the ENTER button. Press the ◄ or ► button to select the desired movie file. Press the TOOLS button. Press the ▲ or ▼ button to select “Play Current Group”, then press the Title ENTER button. SUM Device ➣ The movie files in the sorting group including the selected file are played. To exit “WISELINK Pro” mode, press the W.LINK button on the remote control. Preference Timeline 6. ABC.avi Play Current Group Delete Information Safe Remove ★★★ SYMBOL ENG □ A M ▲ Favorites Setting Select Jump TOOLS Option English - 86 1470A-03Eng.indb 86 2008-08-11 �� 2:22:28 Playing the selected movie files 1. 2. 3. Press the W.LINK button on the remote control to display the “WISELINK Pro” menu. Press the ◄ or ► button to select “Movie”, then press the ENTER button. Press the ◄ or ► button to select the desired movie file, then press the yellow button. Repeat the above operation to select multiple movie files. ➣ The mark appears to the left of the selected movie file. Movie 2File(s) Selected ABC.avi ★★★ Preference SYMBOL Title 4. 5. (Play) / ENTER button. Press the ➣ Only the selected file is played. ➣ Press the (Stop) button while playing to stop the current item and to return to the movie list. To exit “WISELINK Pro” mode, press the W.LINK button on the remote control. ENG □ A M ▲ Timeline SUM Device Favorites Setting Select Play Jump TOOLS Option 00:00:48 00:23:05 ABC.avi SUM E Pause -20sec +20sec TOOLS Option Return Movie function information icon (Displayed at the top left of the screen) Icon Current OSD (Movie) Repeat (Movie) Once ► / ❙❙ x2 Function When all movie files in the folder(or the selected file) are repeated. “Repeat Mode” is “On”. When all movie files in the folder(or the selected file) are played once. “Repeat Mode” is “Off”. (Movie) Play/Pause (Play)/ (Pause) / ENTER When pressing the remote control while movie is playing. (Movie) x2 Play When pressing the playing. button on the (FF) button on the remote control while movie is Repeating Movie Play 1. 2. 3. While a Movie file is playing, press the TOOLS button. Press the ▲ or ▼ button to select “Repeat Mode”. Press the ◄ or ► button to select “On” or “Off”. • On: Plays back all movie files in the folder(or the selected file) repeatedly. • Off: Doesn’t play back repeatedly. 4. TOOLS Repeat Mode Picture Setting Sound Setting Picture Size Information Safe Remove Move ◄ On : Fit Adjust ► e Exit To exit “WISELINK Pro” mode, press the W.LINK button on the remote control. Picture Size • Fit: Play video at the TV screen size. • Original: Play video at the original size. English - 87 1470A-03Eng.indb 87 2008-08-11 �� 2:22:29 Using the Setup Menu Setup displays the user settings of the WISELINK Pro menu. 1.Press the W.LINK button on the remote control to display the WISELINK Pro menu. 2.Press the ◄ or ► button to select “Setup”, then press the ENTER button. 3.Press the ▲ or ▼ button to select the desired option. (Slide Show Speed, Music Repeat Mode, Movie Repeat Mode, Screen Saver Run Time, Information, Safe Remove) 4. Press the ◄ or ► button to select the option, then press the ENTER button. ➣ To exit WISELINK Pro mode, press the W.LINK button on the remote control. WISELINK Pro SUM 851.98MB/995.00MB Free Setup Photo SUM Device Music Movie Setup e Exit Setup Slide Show Speed Select to control the slide show speed. Press the ▲ or ▼ button to select “Slide Show Speed”. Press the ◄ or ► button to select “Fast”, “Normal” or “Slow”. Slide Show Speed ◄ Normal ► Music Repeat Mode : Movie Repeat Mode : On On Screen Saver Run Time : 5 min Information Safe Remove SUM Device Move Adjust Return Setup Music Repeat Mode Select to repeatedly play music files. Press the ▲ or ▼ button to select “Music Repeat Mode”. Press the ◄ or ► button to select “On” or “Off”. Slide Show Speed : Music Repeat Mode ◄ Normal On Movie Repeat Mode : On Screen Saver Run Time : ► 5 min Information Safe Remove SUM Device Move Adjust Return Setup Movie Repeat Mode Select to repeatedly play movie files. Press the ▲ or ▼ button to select “Movie Repeat Mode”. Press the ◄ or ► button to select “On” or “Off”. Slide Show Speed : Normal Music Repeat Mode : On Movie Repeat Mode ◄ On Screen Saver Run Time : ► 5 min Information Safe Remove SUM Device Move Adjust Return Setup Screen Saver Run Time Select to set the waiting time before the screen saver appears. Press the ▲ or ▼ button to select “Screen Saver Run Time”. Press the ◄ or ► button to select “1 min”, “3 min” or “5 min”. Slide Show Speed : Normal Music Repeat Mode : On Movie Repeat Mode : Screen Saver Run Time ◄ On 5 min ► Information Safe Remove SUM Device Information Move Adjust Return Information Select to viewing the information of the connected device. Press the ▲ or ▼ button to select “Information”, then press the ENTER button. Device Type Device Available Memory Total Memory : USB : SUM : 852.90MB : 995.00MB OK Safe Remove You can remove the device safely from the TV. (Refer to page 74) English - 88 1470A-03Eng.indb 88 2008-08-11 �� 2:22:29 WISELINK Pro-DLNA Setting the DLNA Network DLNA allows you to watch videos and pictures saved on your PC on your TV through a network connection in Wiselink Pro mode. This removes the need to copy them to a USB storage device and then connect the device to your TV. To use DLNA, the TV must be connected to the network and the DLNA application must be installed on your PC. Network Connections Diagram TV Rear Panel The Modem Port on the Wall External Modem (ADSL/VDSL/Cable TV) 3 Modem Cable 1 LAN Cable 2 LAN Cable 1. Connect the [LAN] port on the rear panel of the TV to the external modem with a LAN Cable. 2. Connect the PC to which the “DLNA PC Share Manager” program will be installed and the external modem using a LAN cable. 3. Connect the LAN port on the wall and the external modem with a Modem Cable. PC Connecting to the Network 1. 2. When connecting to the network is complete, set up the network on the TV (see page 107). ➣ A Wireless Internet connection does not support DLNA. ➣ The first 3 digits (subnet address) of the IP addresses of the TV and the PC must be the same (e.g. IP Address: 123.456.789.XX ) Run a “Network Test” to check the network settings (see page 108). English - 89 1470A-03Eng.indb 89 2008-08-11 �� 2:22:30 Installing the DLNA Application To play content on the PC on the TV, you have to first install the application. System Requirements 1. Insert the Program CD supplied with this TV into your PC. 2. 20MB of free hard disk space is needed for the program installation. ➣ If you share files, up to 20MB of hard disk drive space is required for each 100 files. ➣ If you cancel file sharing, the hard disk drive space used for the thumbnail information is also freed. Supported Formats 1. Image : JPEG (jpg, jpeg) 2. Audio : MP3 (mp3) 3. Video : MPEG1(mpg, mpeg), MPEG2 PS/TS(mpg, mpeg, trp, ts, tp), divx(mpg, mpeg, avi), MPEG4 / H.264 (mpg, mpeg) Install the application 1. Run the Setup.exe file on the Program CD supplied with the product. ➣ Alternatively, you can download the file from www.samsung.com. 2. Install the SAMSUNG PC Share Manager as shown in the figures below. 3. When the installation is complete, the PC Share Manager icon appears on your Desktop. ➣ Double-click the icon to run the program. English - 90 1470A-03Eng.indb 90 2008-08-11 �� 2:22:30 Using the DLNA Application The Program Screen Layout 1 8 2 3 4 5 6 7 1. Menus: The following application menus are provided : “File”, “Share”, “Server”, and “Help”. 2. Click to share the selected PC server folder (see page 93) 3. Click to cancel sharing (see page 93) 4. Click to refresh the PC folder and files. 5. Click to synchronize the share status (see page 94) 6. The folders and files of the PC to be shared are listed. 7. Folders shared by the user are listed. English - 91 1470A-03Eng.indb 91 2008-08-11 �� 2:22:31 File Property: Shows information on the selected file or folder. Method 1: Select a file or folder and select the “File” menu and then select the “Property” sub-menu. Method 2: Select a file or folder, right-click over the selected file or folder and then select “Property” from the pop-up menu. Exit: Exits the DLNA application. If you select “Exit” without applying the changes after changing the shared status, a message will appear asking if you want to apply the changed settings to the PC. Select “Yes” to apply the changes and exit the application. English - 92 1470A-03Eng.indb 92 2008-08-11 �� 2:22:31 Share Sharing a Folder You can share a folder from your PC to the TV. The maximum number of folders that can be shared is 32. ➣ Your PC will operate as a server to the TV. Method 1: Select a folder in “My Computer”, select the “Share” menu and then select the “Share Folder” sub-menu. Method 2: Select a folder in “My Computer”, right-click over the selected folder and then select “Share Folder” from the pop-up menu. Method 3: Locate the mouse pointer over a folder in the “My Computer” folder list in the left pane and drag&drop the folder into the Shared Folders pane. If a message appears asking you to confirm the shared folder, select “Yes”. Cancelling a Shared Folder You can cancel a shared folder on your PC.. Select a folder from the “Shared Folder” pane and select “Unshare Folder”. Method 1: Select a folder from the “Shared Folder” pane, select the “Share” menu and then select “Unshare Folder”. Method 2: Select a folder from the “Shared Folder” pane, right-click over the selected folder and then select “Unshare Folder” from the pop-up menu. Method 3: Locate the mouse pointer over a folder in the “Shared Folder” pane and drag&drop the folder into the “My Computer” pane. If a message appears asking you to confirm the cancelation, select “Yes”. English - 93 1470A-03Eng.indb 93 2008-08-11 �� 2:22:32 Applying the Current Settings Perform this when synchronization is necessary due to a new shared folder or canceling a shared folder. The “Set Changed State” menu applies changes to shared folders to the data saved with the PC share program. Since applying changes to the internal data is a time-consuming process, this function enables users to apply changes to the data only when required. Until the “Set Changed State” menu is selected, the changed state of the shared folder is not applied to the server. Changes to the shared folders are not applied to your PC until you select the “Set Changed State” menu. Method 1: Select the “Share” menu and select the “Refresh DB” sub-menu. Method 2: Click the “Set Changed State” icon. Setting the Access Permission To enable the TV to find your PC, the TV must be set to “Set Device Policy” in the Access Permission Settings window. In addition, the PC server and the TV must be on the same subnet. Method: Select the “Share” menu and select “Set Device Policy”. ➣ Rejected items are represented in gray. ➣ You can change the access permissions by using the Allow “Accept”/”Deny” button. ➣ To delete an item, select the item and select “Delete Item”. English - 94 1470A-03Eng.indb 94 2008-08-11 �� 2:22:32 Server Server You can run or stop using your PC as a server. Start Server at Windows start You can determine whether to start the PC server automatically when Windows starts. Change server name You can rename the PC server. Enter a new name and click “OK”. The new name will appear at the top right of the window and will appear on the TV. Help Version The program version information message box appears. English - 95 1470A-03Eng.indb 95 2008-08-11 �� 2:22:33 Using the DLNA Function Using the DLNA Menu DLNA (Digital Living Network Alliance) enables content saved on a DLNA server (usually your PC) connected to your TV or over a network to be played. Wiselink Pro enables playing content saved on a USB memory device connected to the TV, while DLNA enables playing content saved on a DLNA server (your PC) connected to your TV or over the network. The procedures to use the content are the same as those for WISELINK Pro. ➣ If you install the PC share manager program supplied with the TV onto a PC, you can have the PC perform the role of a DLNA server over the network. PC TV LAN LAN External Modem (ADSL/VDSL/Cable TV) 1. Press the W.LINK button on the remote control to display the “DLNA” menu. WISELINK Pro DLNA : Server PHOTO 2. Press the ◄ or ►button to select an icon (Photo, Music, Movie, Setup), button. then press the ENTER ➣ To exit “DLNA” mode, press the W.LINK button on the remote control. Photo Music Server Device Photo ♦ Photo List – Sorting Photo List: Refer to page 67 – Viewing the Information: Refer to page 70 – Rotating the Photo file: Refer to page 69 – Viewing a Slide Show: Refer to page 71 Movie Setup e Exit Photo Image001.jpg ♦ During a Slide Show – Play & Pause: Refer to page 71 – Slide Show Speed: Refer to page 73 – Zoom: Refer to page 73 – Rotate: Refer to page 72 ★★★ Preference Monthly Jan Nov ▲ Timeline Server Device Select Jump TOOLS Option Music Music ♦ Music List – Sorting Music List: Refer to page 76 – Viewing the Information: Refer to page 79 – Playing a music file: Refer to page 80 Thanks ♦ While Playing a Music File – Play & Pause: Refer to page 81 – Repeat Mode: Refer to page 81 I Love You Jee Darby Album 1 2005 Pop Album 2 2005 Pop Energetic ★★★ Better than yesterday Catherine Album 3 2005 Pop Sad ★★★ Calm ★★★ Preference Title Artist F G H Server Device Select I ▲ J L Jump TOOLS Option P S T V English - 96 1470A-03Eng.indb 96 2008-08-11 �� 2:22:34 Movie Movie ABC.avi ♦ Movie List – Sorting Movie List: Refer to page 83 – Viewing the Information: Refer to page 85 – Playing a Movie file: Refer to page 86 ♦ While Playing a Movie File – Play & Pause: Refer to page 87 – Repeat Mode: Refer to page 87 ★★★ Preference Title ENG □ A M ▲ Timeline Server Device Select Setup – – – – – SYMBOL Jump TOOLS Option Setup Slide Show Speed: Refer to page 88 Music Repeat Mode: Refer to page 88 Movie Repeat Mode: Refer to page 88 Screen Saver Run Time: Refer to page 88 Information: Refer to page 88 Slide Show Speed ◄ Normal ► Music Repeat Mode : Movie Repeat Mode : Screen Saver Run Time : On On 5 min Information Server Device Move Adjust Return ➣ DLNA does not support the following functions. – The Background Music and Background Music Setting functions. – Sorting files by preference in the Photo, Music, and Movie folders. – The Change Group Info function. – The Delete function. – The Safe Remove function. – The REW/FF ( / ) key functions while a movie is playing. ➣ The Skip (◄/► keys) or Pause function may not work while a movie is playing for the DLNA of other manufacturers, depending on the corresponding content information. ➣ The playing time may not be displayed while a movie is playing. English - 97 1470A-03Eng.indb 97 2008-08-11 �� 2:22:34 Contents Library Using the Contents Library Application The “Contents Library” enables you to view or play the built-in contents on the TV or stored on your USB device. ➣ The Delete, Move and Update functions will not work with the built-in content on the TV. Using the Contents Library Menu 1.Press the MENU button. Press the ▲ or ▼ button to select “Application”, WISELINK Pro then press the ENTER button. Anynet+ (HDMI-CEC) 2.Press the ▲ or ▼ button to select “Contents Library”, then press the Contents Library ENTER button. InfoLink ➣ The “Contents Library” main menu is displayed. Product Guide ► O Press the CONTENT button on the remote control to display the “Contents Library” menu. 3.Press the ◄ or ► button to select an icon (Gallery, Cooking, Game, Children, Fitness), then press the ENTER button. ➣ To return to TV mode, press the CH / button on the remote control. ➣ If you press the Volume or MUTE button, no OSD is displayed, but the function operates accordingly. Contents Library Gallery Gallery Cooking Game Setup Children USB Fitness R Return e Exit Using the Remote Control Button in Contents Library Menu Button Operations Wheel (▲/▼/◄/►) Move the cursor and select an item. ENTER Select the currently selected item. RETURN EXIT CH / PRE.CH / FAV.CH / CH.LIST Color button VOL +/– CONTENT Return to the previous menu. Stop the current function and return to the “Contents Library” main menu. Stop Contents Library mode and Returns to TV mode. Keys that provide functions are described on the corresponding page. You can control the volume of the played content. Exit Contents Library mode. English - 98 1470A-03Eng.indb 98 2008-08-11 �� 2:22:35 Using the TV Memory Contents The built-in contents of the “Contents Library” are composed of the following sub-categories: “Gallery”, “Cooking”, “Game”, “Children”, and “Fitness”. Gallery This function plays a SlideShow with high resolution images and background music and produces various atmospheres. Using the Gallery function of the TV, you can change your home atmosphere. Contents Library Gallery 1. Press the ◄ or ► button to select “Gallery” in the “Contents Library” main menu. Then press the ENTER button. Gallery Cooking Game Setup 2. Press the ▲ or ▼ button to select “Art”, “Relaxation” or “Party”, then press the ENTER button. ➣ The selected slide show is played. ➣ There is default music for each for the “Art”, “Relaxation”, and “Party” options. Children USB Fitness R Return e Exit Gallery Art Relaxation Party 3. Press the yellow button to playback all images. ➣ To return to “Contents Library” main menu, press the EXIT button. ➣ To exit “Contents Library” mode, press the CH / button on the remote control. Play All R Return e Exit • Art: You can view masterpieces of the impressionists including Van Gogh, Monet, Degas, Cezanne, etc. • Relaxation: You can view beautiful and serene images of nature. • Party: You can view images that can produce a cheerful and exciting atmosphere. ➣ The copyrights of the “Gallery” contents and all issues related to them are reserved by Gallery Player, Inc. ➣ For additional “Gallery” contents, check for information through www.samsung.com. Please refer to the “Using Additional Content Using External USB Memory Storage” section (page 117) to see how to play additional imagery. CONTENT LIBRARY CONTAINS TEXT, GRAPHICS, IMAGES, MULTIMEDIA, AND OTHER MATERIALS FOR INFORMATIONAL AND PROMOTIONAL PURPOSES ONLY. MATERIALS IN CONTENT LIBRARY HAS BEEN MODIFIED AND KEEPS BEING REVISED AND UPDATED. THE MATERIALS IN THE CONTENT LIBRARY MAY NOT BE SUITABLE FOR ALL AUDIENCES. INFORMATION IN THE CONTENT LIBRARY IS PROVIDED “AS IS.” ALTHOUGH THE INFORMATION PROVIDED TO YOU IN THE CONTENT LIBRARY IS OBTAINED OR COMPLIED FROM SOURCES WE BELIEVE TO BE RELIABLE, SAMSUNG CANNOT AND DOES NOT GUARANTEE THE ACCURACY, VALIDITY, TIMELINESS OR COMPLETENESS OF ANY INFORMATION OR DATA MADE AVAILABLE TO YOU FOR ANY PARTICULAR PURPOSE. UNDER NO CIRCUMSTANCES, INCLUDING NEGLIGENCE, SHALL SAMSUNG BE HELD LIABLE, WHETHER IN CONTRACT OR TORT, FOR ANY DIRECT, INDIRECT, INCIDENTAL, SPECIAL OR CONSEQUENTIAL DAMAGES, ATTORNEY FEES, EXPENSES, OR ANY OTHER DAMAGES WHATSOEVER ARISING OUT OF, OR IN CONNECTION WITH, ANY INFORMATION CONTAINED IN, OR THE USE OF, THE CONTENT LIBRARY, EVEN IF ADVISED OF THE POSSIBILITY OF SUCH DAMAGES. English - 99 1470A-03Eng.indb 99 2008-08-11 �� 2:22:35 Cooking You can view various recipes that you can then easily follow step by step. Enjoy these contents which give you great ideas for meals. 1.Press the ◄ or ► button to select “Cooking” in the “Contents Library” main menu. Then press the ENTER button. 2. Press the ▲ or ▼ button to select “Starters”, “Main Courses” or “Dessert”, then press the ENTER button. • Starters: Selection of light meals and starters to bring your appetite. • Main Courses: Most popular recipes of Chicken, Seafood, Vegetables, and Grill. • Desserts: Wide choice of sweet treats and fancy beverages. ➣ The recipes introduced in the “Cooking” contents on the Samsung TV are based on recipes published by Anness Publishing. ➣ The copyrights of the “Cooking” contents and all issues related to them are reserved by Practical Pictures. 3. Press the ▲ or ▼ button to select a particular item. Press the ENTER button. 4. Press the ▲,▼, ◄ or ► button to select a recipe you want to use. Then press the ENTER button. Contents Library Cooking Gallery Cooking Game Setup Children USB Fitness R Return e Exit Cooking Starters Main Courses Desserts R Return e Exit R Return e Exit Cooking > Starters Sandwich Salads Soups & Appetizers 5. Press the ▲,▼, ◄ or ► button to use a recipe. ➣ To return to “Contents Library” main menu, press the EXIT button. ➣ To exit “Contents Library” mode, press the CH / button on the remote control. English - 100 1470A-03Eng.indb 100 2008-08-11 �� 2:22:36 Game This category provides entertainment games for the whole family. Contents Library 1.Press the ◄ or ► button to select “Game” in the “Contents Library” main menu. Then press the ENTER button. Game Gallery Cooking Game Setup Children USB Fitness R Return e Exit Game 2. Press the ▲ or ▼ button to select “Dynamic Bowling”, “Minimini Cook”, “Mini Game Pack”, “IQ Academy” or “Sudoku+”, then press the ENTER button. ➣ For the buttons used in the games, refer to the directions on the screen. ➣ To return to “Contents Library” main menu, press the EXIT button. ➣ To exit “Contents Library” mode, press the CH / button on the remote control. Dynamic Bowling Minimini Cook Mini Game Pack IQ Academy Sudoku + T T T R Return e Exit • Dynamic Bowling: A realistic bowling game enjoyable on your TV. To achieve victory select the best position and power that enables you to hit a strike. • Minimini Cook: A cooking game that allows you to cook delicious foods. If you play all the mini-games for each type of food, the food is completely cooked and a customer character eats the food. The greater the number of failures during the mini-games, the worse the reaction displayed by the customer character. If you avoid failure completely, the customer character eats your finished food! • Mini Game Pack: This is a collection of one-button games that you can play with the ENTER button only. Since operating the game is easy, the whole family can enjoy this game. Each game will give you a different delight. • IQ Academy: A brain training game the whole family can enjoy. This game improves your power to think fast, memorize and calculate by letting you solve problems within a specified time. The problems start at the elementary school level. You have to take examinations whenever your score exceeds the threshold. If you pass the examination, you change to a higher grade. If you graduate from university, you have completed the game. • Sudoku+: Now you can enjoy world-famous Sudoku (Magic Square) on the TV. The objective is to fill a 9×9 grid so that each column, each row, and each of the nine 3×3 boxes contains digits 1 to 9. ➣ For the 5 embedded games, the copyrights and all issues related to them are reserved bythe corresponding game providers. ➣ More detail instructions on how to play a game is given at the beginning of each game page. ➣ Mini Game Pack, IQ Academy and Sudoku+ are trial versions. You can purchase a full version or additional games at www.samsung.com or www.nurisam.com Color Buttons for Games Button Red Operations Press to move to the game home screen Green Press to pause the game Yellow Option Key Blue Press to exit the game English - 101 1470A-03Eng.indb 101 2008-08-11 �� 2:22:36 Children This is educational and interactive content that children can watch repeatedly. Enjoy existing stories, songs and games with the Boowa and Kwala characters. 1.Press the ◄ or ► button to select “Children” in the “Contents Library” main menu. Then press the ENTER button. 2. Press the ▲ or ▼ button to select “Story”, “Song” or “Play”, then press the ENTER button. • Story: You can watch storytelling content with the Boowa and Kwala characters. • Song: You can enjoy Sing Along content with the Boowa and Kwala characters. • Play: You can enjoy exciting and fun interactive games using the remote control. Contents Library Children Gallery Cooking Game Setup Children USB Fitness R Return e Exit Children Story Song ➣ The copyrights of the “Children” contents and issues related to them are reserved by UpToTen. Play R Return e Exit R Return e Exit Children > Story Scary Dinosaurs 3. Press the ▲ or ▼ button to select an item to play. Press the ENTER button. The selected content is played. ➣ To return to “Contents Library” main menu, press the EXIT button. ➣ To exit “Contents Library” mode, press the CH / button on the remote control. Wonderful Circus Mysterious Jungle Huge Farms Funny Dance Icing Sugar Cuddly Koalas English - 102 1470A-03Eng.indb 102 2008-08-11 �� 2:22:37 Fitness This is beneficial health management content that provides stretching and massage exercises that can be enjoyed by the whole family. Contents Library 1.Press the ◄ or ► button to select “Fitness” in the “Contents Library” main menu. Then press the ENTER button. Fitness Gallery Cooking Game Setup 2. Press the ▲ or ▼ button to select “Basic Stretches” or “Massage”, then press the ENTER button. • Basic Stretches: Follow the stretching exercises provided by detailed descriptions and slow motion images step by step. • Massage: Manage your health and release your stress through the easy to follow massages. Children USB e Exit Fitness Basic Stretches Massage ➣ The “Basic Stretches” contents for the Samsung TV are based on the book Stretching by Suzanne Martin which is published by DK and the “Massage” contents are based on the books published by Anness Publishing.” ➣ The copyrights to “Basic Stretches” are reserved by the DK Publishing Company. The copyrights to the “Massage” content are reserved by Practical Pictures. All issues related to copyrights are reserved by the corresponding company. 3. Press the ◄, ►, ▲ or ▼ button to select an item to view. Press the ENTER button. ➣ The “Basic Stretches” contents are automatically played so that you can easily follow the movements on the screen. To move to the previous or next operation, press the ◄ or ► button to view the required step. ➣ The selected item is displayed on the screen. ➣ To return to “Contents Library” main menu, press the EXIT button. ➣ To exit “Contents Library” mode, press the CH / button on the remote control. Fitness R Return R Return e Exit Fitness > Basic Stretches Head, Face and Eyes Head to Toe Neck Posture Program Shoulders Stretching Routines Arms and Hands Chest and Ribcage R Return e Exit Using the Remote Control Button in Fitness menu Button Operations Wheel (◄/►) View to previous step / View to next step ENTER Play or pause (in Basic Stretches) Setup Select to set the waiting time before the screen saver appears. 1.Press the yellow button to select “Setup” in the “Contents Library” main menu. 2. Press the ◄ or ►button to select “Off”, “4 hour”, “8 hour”, “10 hour”. Setup Screen Saver Run Time ◄ 4 hour Adjust ► Return e Exit English - 103 1470A-03Eng.indb 103 2008-08-11 �� 2:22:38 Using Additional Content Using External USB Memory Storage You can download contents onto a USB memory device and play them on your TV. (The contents on the external USB device are played directly without being copied to the built-in Flash memory of the TV.) Playing and Exiting New Content 1. Press the Red button in the “Contents Library” main menu. ➣ The USB Browser main screen is displayed. ➣ A list of files saved on the USB device is displayed. 2. Press the ▲ or ▼ button to move to the file (or folder) you want to play. Press the ENTER button. ➣ The selected content is played. ➣ The use of contents is the same as in using the TV memory contents. ➣ To return to the USB browser main screen, press the EXIT button. To exit “Contents Library” mode, press the CH / button on the remote control. ➣ “Contents Library” only supports USB Mass Storage Class devices (MSC). MSC is a Mass Storage Class Bulk-Only Transport device. Examples of MSC are Thumb drives and Flash Card Readers (Both USB HDD and HUB are not supported.) Playing a game using an external USB memory device will allow you to save your game (depending on the game). Take care as removing the USB memory device while saving data to the USB memory device may cause the data to be lost. Downloading New Contents Contents Library Gallery Gallery Cooking Contents Library ♦ USB Fitness e Exit << 1/1 >> Cooking Gallery Fitness Living Fitness Children ▼ TV Memory Show UDN USB > Game ▲ ▲ R Return << 1/1 >> Go to category Bowling Bowling Action FunnySoft 2006/12/21 17 MB Start Bowling Game. Minicook Mini Game Pack IQ Academy Sudoku ▼ TV Memory Show UDN ▲ R Return Finding a product number (Unique Device Number, UDN) 1. 2. . ♦ R Return Game Game Downloading Content 1. Visit the www.samsung.com website and open the Contents Library page. 2. Enter the product number (UDN, Unique Device Number). . Select a content item in the Contents Download page. 4. Download the contents onto the USB memory device. ➣ “Contents Library” only supports USB Mass Storage Class devices (MSC). MSC is a Mass Storage Class Bulk-Only Transport device. Examples of MSC are Thumb drives and Flash Card Readers (Both USB HDD and HUB are not supported.) 5. Go to “Contents Library” main menu by pressing “Contents” button or choosing “Contents Library” (MenuApplication”Contents Library”) 6. Plug the USB memory into USB port on the side of the TV. Children USB New content other than the built-in contents will be provided via the Samsung.com website with or without charge. ♦ Game Insert the USB memory into the USB port on the side of the TV. In the USB Browser main screen, press the Green button (Show UDN). The 18-digit number on the screen is the product code. Provided Content Additional contents are available on www.samsung.com The Remote Control Buttons Used in the USB “Contents Library” Button Red Green EXIT CH / / PRE.CH / FAV.CH / CH.LIST Operations Return to the main menu of the TV Memory “Contents Library”. Show the product number (unique device number) of the TV used to download content from the website. Stop the current function and return to the “Contents Library” main menu. Stop Contents Library mode and Returns to TV mode. English - 104 1470A-03Eng.indb 104 2008-08-11 �� 2:22:39 Network Settings and InfoLink To access Samsung’s Infolink network feature, you must make one of the connections on the following pages. Network Connection - Cable LAN Connection for a DHCP Environment The procedures to set up the network using Dynamic Host Configuration Protocol (DHCP) are described below. Since an IP address, subnet mask, gateway, and DNS are automatically allocated when DHCP is selected, you do not have to enter them manually. TV Rear Panel The Modem Port on the Wall External Modem (ADSL/VDSL/Cable TV) LAN 1 Cable 2 Modem Cable 1.Connect the [LAN] port on the rear panel of the TV and the external modem with a LAN Cable. 2.Connect the LAN port on the wall and the external modem with a Modem Cable. You can connect the LAN via a Sharer (Router). TV Rear Panel IP Sharer The Modem Port on the Wall External Modem (ADSL/VDSL/ Cable TV) LAN Cable LAN Cable Modem Cable You can connect the LAN port and the TV directly depending on your network status. TV Rear Panel The LAN Port on the Wall LAN Cable ➣ The terminals (the position of the port and the type) of the external device may differ depending on the manufacturer. ➣ If the IP address allocation by the DHCP server has failed, turn the external modem off, turn it on again after at least 10 seconds and then try again. ➣ For the connections between the external modem and the Sharer (Router), refer to the owner’s manual of the corresponding product. ➣ You can connect the TV to the LAN directly without connecting it through a Sharer (Router) ➣ You cannot use a manual-connection-type ADSL modem because it does not support DHCP. You have to use an automatic-connection-type ADSL modem. English - 105 1470A-03Eng.indb 105 2008-08-11 �� 2:22:41 LAN Connection for Static IP Environment The procedures to set up the network using a static IP address are described below. You have to manually enter the IP address, subnet mask, gateway, and DNS that are provided by your Internet Service Provider (ISP). TV Rear Panel The LAN Port on the Wall 1.Connect the [LAN] port on the rear panel of the TV and the LAN port on the wall using the LAN cable. 1 LAN Cable You can connect the LAN via a Sharer (Router). The LAN Port on the Wall IP Sharer TV Rear Panel LAN Cable LAN Cable ➣ The terminals (the position of the port and the type) of the external device may differ depending on the manufacturer. ➣ If you are using a static IP address, your ISP will inform you of the IP address, subnet mask, gateway, and DNS. You must enter these values to complete the network settings. If you do not know the values, ask your network administrator. ➣ For the information on how to configure and connect a Sharer (Router), refer to the owner’s manual for the corresponding product. ➣ You can connect the TV to the LAN directly without connecting it through a Sharer (Router). ➣ If you use an IP Sharer (IP Router) that supports DHCP, you can set up the device as either DHCP or static IP. ➣ For the procedures to use a static IP address, ask your Internet Service Provider. English - 106 1470A-03Eng.indb 106 2008-08-11 �� 2:22:42 Network Connection - Wireless You can connect to the Samsung’s Infolink network wirelessly through a wireless IP sharer. 1.Connect the Samsung Infolink Wireless adapter into the Wiselink terminal of the TV. The LAN Port on the Wall Wireless IP sharer Wireless LAN Adapter for InfoLink HDMI IN4 HDMI IN4 TV Side Panel LAN Cable ➣ ➣ ➣ ➣ ➣ ➣ ➣ ➣ ➣ You must use the Samsung Wireless LAN Adapter for InfoLink(WIS-08BG) to use a wireless network. The Samsung Wireless LAN Adapter for InfoLink is sold separately. Contact a Samsung Electronics agent or service center for purchasing. To use a wireless network, your TV must be connected to a wireless IP sharer. If the wireless IP sharer supports DHCP, you TV can use a DHCP or static IP address to connect to the wireless network. You must use a wireless IP sharer that supports IEEE 802.11 B or IEEE 802.11G. If the wireless IP sharer allows you to turn on/off the Ping connection function, turn it on. Set the wireless IP sharer to Infrastructure mode. Ad-hoc mode is not supported. Select a channel for the wireless IP sharer that is not currently being used. If the channel set for the wireless IP sharer is currently being used by another device nearby, this will result in interference and communications may fail. When applying the security key for the AP (wireless IP sharer), only the following is supported. • 1) Authentication Mode : WEP, WPAPSK, WPA2PSK • 2) Encryption Type : WEP, TKIP, AES If you apply a security system other than the systems listed above, it will not work with the TV. Network selection Language Setup Select Cable or Wireless as the method to connect to the Samsung’s Infolink network. 1.Press the MENU button to display the menu. Press the ▲ or ▼ button to select “Setup”, then press the ENTER button. 2.Press the ▲ or ▼ button to select “Network selection”, then press the ENTER button. : English Time Network selection : Cable ► Cable Network Setup Wireless Network Setup V-Chip Caption External Settings • Cable: Connect to Samsung’s Infolink network using a cable. • Wireless: Connect to Samsung’s Infolink network wirelessly. ➣ The menu is activated only if the Samsung Wireless LAN Adapter for InfoLink is connected. (See page 107) Setup 3. Press the ▲ or ▼ button to select “Cable” or “Wireless”, then press the ENTER button. Entertainment : Off Energy Saving : Off Language : English Time Network selection Cable : Cable ► Wireless Cable Network Setup Wireless Network Setup V-Chip Caption External Settings Entertainment : Off Energy Saving : Off English - 107 1470A-03Eng.indb 107 2008-08-11 �� 2:22:43 Cable Network Setup ➣ First, the “Network selection” must be set to “Cable”. (See page 107) Auto Setup Setup If you connect the LAN cable and it supports DHCP, the Internet Protocol (IP) Settings are automatically configured. ➣ Please check if the LAN cable is connected. (See page 105) 1.Press the MENU button to display the menu. Press the ▲ or ▼ button to select “Setup”, then press the ENTER button. Time 2.Press the ▲ or ▼ button to select “Cable Network Setup”, then press the Network selection : Cable ENTER button. Cable Network Setup ► Wireless Network Setup V-Chip Caption External Settings Entertainment : Off Energy Saving : Off PIP 3. Press the ENTER button to select “Internet Protocol Setup”. 4.Press the ▲ or ▼ button to select “Auto Setup”, then press the ENTER button. ➣ The Internet Protocol is set automatically. ➣ Select “Network Test” to check the network connectivity. (Refer to page 109) Press the EXIT button to exit. Cable Network Setup Internet Protocol Setup : Auto AutoSetup Setup Network Test Manual Setup IP Address : 0 0 0 0 Subnet Mask : 0 0 0 0 Gateway : 0 0 0 0 DNS Server : 0 0 0 0 Move Return Enter Manual Setup Time Network selection Setup To connect the TV to the LAN using a static IP address, you must set up the Internet Protocol (IP). ➣ Please check if the LAN cable is connected. (See page 106) 1.Press the MENU button to display the menu. Press the ▲ or ▼ button to select “Setup”, then press the ENTER button. 2.Press the ▲ or ▼ button to select “Cable Network Setup”, then press the ENTER button. : Cable Cable Network Setup ► Wireless Network Setup V-Chip Caption External Settings Entertainment : Off Energy Saving : Off PIP 3.Press the ENTER button to select “Internet Protocol Setup”. 4.Press the ▲ or ▼ button to select “Manual Setup”, then press the ENTER button. Cable Network Setup Internet Protocol Setup : Auto AutoSetup Setup Network Test Manual Setup IP Address : 0 0 0 0 Subnet Mask : 0 0 0 0 Gateway : 0 0 0 0 DNS Server : 0 0 0 0 Move 5.Press the ▲, ▼, ◄ or ► button to move to an item, and press the numeric button to configure the selected item. Press the ENTER button. ➣ Select “Network Test” to check the network connectivity. (Refer to page 109) Press the EXIT button to exit. Return Enter Cable Network Setup Internet Protocol Setup : Manual Setup Network Test IP Address : 0 0 0 0 Subnet Mask : 0 0 0 0 Gateway : 0 0 0 0 DNS Server : 0 0 0 0 Move 0 ~ 9 Number Enter Return English - 108 1470A-03Eng.indb 108 2008-08-11 �� 2:22:44 Network Test You can test or confirm the network connection status after setting up the network. Network selection Setup 1.Press the MENU button to display the menu. Press the ▲ or ▼ button to select “Setup”, then press the ENTER button. 2.Press the ▲ or ▼ button to select “Cable Network Setup”, then press the ENTER button. Time : Cable Cable Network Setup ► Wireless Network Setup V-Chip Caption External Settings Entertainment : Off Energy Saving : Off PIP Cable Network Setup 3.Press the ▲ or ▼ button to select “Network Test”, then press the ENTER button. ➣ The current network settings will appear. Press the EXIT button to exit. When unable to connect to a wired network 1. If your Internet service provider has registered the MAC address of the device used to connect to the Internet for the first time and authenticates the MAC address each time you connect to the Internet, your TV may not be able to connect to the Internet as the MAC address differs from that of the device (PC) used to connect to the Internet the first time. In this case, ask your Internet service provider about the procedures to connect devices other than your PC (such as your TV) to the Internet. 2. If your Internet service provider requires an ID or password to connect to the Internet (network), your TV may not be able to connect to the Internet. In this case, you have to enter your ID or password when connecting to the Internet using an Internet Sharer (Router). 3. The internet connection may fail due to a firewall problem. In this case, contact your Internet service provider. If you cannot connect to the Internet even if you have followed the procedures of your Internet service provider, please contact a Samsung Electronics Service Center. Internet Protocol Setup : Auto Setup Network Test ► IP Address : 0 0 0 0 Subnet Mask : 0 0 0 0 Gateway : 0 0 0 0 DNS Server : 0 0 0 0 Move Enter Return Network Test MAC Address IP Address, Subnet, Gateway, DNS Server Gateway Ping Domain Ping Network Test Completed. Your network is operating properly. If you still have a network problem, contact your network service provider. Return English - 109 1470A-03Eng.indb 109 2008-08-11 �� 2:22:44 Wireless Network Setup ➣ The menu is activated only if the Samsung Infolink Wireless adapter is connected. (See page 107) Auto Setup Network selection Setup ➣ If you connect the LAN cable and it supports DHCP, the Internet Protocol (IP) Settings are automatically configured. ➣ The wireless IP sharer to be connected to this product must support DHCP. : Wireless Cable Network Setup Wireless Network Setup ► V-Chip 1.Press the MENU button to display the menu. Press the ▲ or ▼ button to select “Setup”, then press the ENTER button. 2.Press the ▲ or ▼ button to select “Wireless Network Setup”, then press the ENTER button. Caption External Settings Entertainment : Off Energy Saving : Off PIP SW Upgade Wireless Network Setup Internet Protocol Setup : Auto AutoSetup Setup Network Test button to select “Internet Protocol Setup”. 3. Press the ENTER 4.Press the ▲ or ▼ button to select “Auto Setup”, then press the ENTER button. ➣ The Internet Protocol is set automatically. ➣ Select “Access Point Select” to check the network connectivity. (Refer to page 111) Press the EXIT button to exit. Manual Setup Access Point Select : AP1 IP Address : 0 0 0 0 Subnet Mask : 0 0 0 0 Gateway : 0 0 0 0 DNS Server : 0 0 0 Move 0 Return Enter Manual Setup Network selection Setup 1.Press the MENU button to display the menu. Press the ▲ or ▼ button to select “Setup”, then press the ENTER button. 2.Press the ▲ or ▼ button to select “Wireless Network Setup”, then press the ENTER button. : Wireless Cable Network Setup Wireless Network Setup ► V-Chip Caption External Settings Entertainment : Off Energy Saving : Off PIP SW Upgade 3.Press the ENTER button to select “Internet Protocol Setup”. 4.Press the ▲ or ▼ button to select “Manual Setup”, then press the ENTER button. 5.Press the ▲, ▼, ◄ or ► button to move to an item, and press the numeric button to configure the selected item. Press the ENTER button. ➣ If you want to use a static IP address, refer to the user manual of your wireless IP sharer. ➣ Select “Access Point Select” to check the network connectivity. (Refer to page 111) Press the EXIT button to exit. Wireless Network Setup Internet Protocol Setup : Auto AutoSetup Setup Network Test Manual Setup Access Point Select : AP1 IP Address : 0 0 0 0 Subnet Mask : 0 0 0 0 Gateway : 0 0 0 0 DNS Server : 0 0 0 0 Move Return Enter Cable Network Setup Internet Protocol Setup : Manual Setup Network Test Access Point Select : AP1 IP Address : 0 0 0 0 Subnet Mask : 0 0 0 0 Gateway : 0 0 0 0 DNS Server : 0 0 0 Move Enter 0 Return English - 110 1470A-03Eng.indb 110 2008-08-11 �� 2:22:44 Access Point Select You can select the IP sharer to use when using a wireless network. Network selection : Wireless Cable Network Setup Setup 1.Press the MENU button to display the menu. Press the ▲ or ▼ button to select “Setup”, then press the ENTER button. 2.Press the ▲ or ▼ button to select “Wireless Network Setup”, then press the ENTER button. Wireless Network Setup ► V-Chip Caption External Settings Entertainment : Off Energy Saving : Off PIP SW Upgade 3.Press the ▲ or ▼ button to select “Access Point Select”, then press the ENTER button. ➣ The wireless Access Points that exist in you area are searched and displayed in the Access Point List. Wireless Network Setup Internet Protocol Setup : Auto Setup Network Test Access Point Select : AP 1 IP Address : 0 0 0 0 Subnet Mask : 0 0 0 0 Gateway : 0 0 0 0 DNS Server : 0 0 0 0 Move 4.Press the ▲ or ▼ button to select the Access Point to use. Then press the ENTER button. ➣ If a wireless Access Point is not in the Access Point list, press the Red button. ➣ When the connection is made, you will be returned to the screen automatically. ➣ If you selected an Access Point that requires security authentication, enter the security key. ➣ You can enter up to 26 characters for a security key. Return Enter Wireless Network Setup Access Point Select 1/5 AP 1 AP 2 WEP AP 3 AP 4 Search Return Select Move Wireless Network Setup Securty Key ➣ If you have selected an Access Point with a security authentication: - The Security Key input screen appears. - Enter the security key and press the ENTER button. - Using the Remote Control Buttons on the Security Key Input Screen Button Wheel (▲/▼/◄/►) ENTER RED GREEN BLUE A B C D E F G H I J K L M N O P Q R S T U V W X Y Z Move Operations Moves the selection up/down/left/right. Enters (Inputs) the selected character. Switch between Upper- and Lower-Case Letters You can delete an already entered character. Press this button to finish entering the security key. _ Select 1~ 9 Number 0~9 Number Lowercase Delete Done Return Wireless Network Setup Access Point Select 1/5 0016018F0176 Connected ALKO_AP WEP NESPOTOK Search AP4 Move Select Return English - 111 1470A-03Eng.indb 111 2008-08-11 �� 2:22:45 Network Test You can test or confirm the network connection status after setting up the network. Network selection : Wireless Cable Network Setup Setup 1.Press the MENU button to display the menu. Press the ▲ or ▼ button to select “Setup”, then press the ENTER button. 2.Press the ▲ or ▼ button to select “Wireless Network Setup”, then press the ENTER button. Wireless Network Setup ► V-Chip Caption External Settings Entertainment : Off Energy Saving : Off PIP SW Upgade 3.Press the ▲ or ▼ button to select “Network Test”, then press the ENTER button. ➣ The current network settings will appear. ➣ If no “Access Point Select” is set up, the test cannot be completed. (See page 111) Press the EXIT button to exit. When unable to connect to a wireless network 1. Your TV may fail to locate an AP that is configured as a private SSID type. In this case, please change the AP settings and try again. 2. If your Internet service provider has registered the MAC address of the device used to connect to the Internet for the first time and authenticates the MAC address each time you connect to the Internet, your TV may not be able to connect to the Internet as the MAC address differs from that of the device (PC) used to connect to the Internet the first time. In this case, ask your Internet service provider about the procedures to connect devices other than your PC (such as your TV) to the Internet. If you cannot connect to the Internet even if you have followed the procedures of your Internet service provider, please contact a Samsung Electronics Service Center. Wireless Network Setup Internet Protocol Setup : Auto Setup Network Test Access Point Select : AP1 IP Address : 0 0 0 0 Subnet Mask : 0 0 0 0 Gateway : 0 0 0 0 DNS Server : 0 0 0 Move Enter 0 Return Network Test MAC Address IP Address, Subnet, Gateway, DNS Server Gateway Ping Domain Ping Network Test Completed. Return English - 112 1470A-03Eng.indb 112 2008-08-11 �� 2:22:45 Activating InfoLink You can view news, stock market and weather information services using SAMSUNG’s InfoLink service. ➣ Set up the network. (Refer to pages 105~112) 2.Press the ▲ or ▼ button to select “InfoLink”, then press the ENTER button. 3. Press the ◄ or ► button to select a service (“Weather”, “News”, “Stock” or “Setup”) and press the ENTER button. ➣ You can select and view more than one service at the same time only for ‘News (without detailed information)’, ‘Weather-Today’s Weather’, and ‘Stocks-Favorite Stocks, Market Summary’. Press the EXIT button to exit. Anynet+ (HDMI-CEC) Application 1.Press the MENU button to display the menu. Press the ▲ or ▼ button to select “Application”, then press the ENTER button. Weather Contents Library InfoLink Product Guide Move Return O Press the INFO.L button on the remote control to display the “InfoLink” menu. ALL THE MATERIALS AVAILABLE THROUGH INFOLINK [“INFOLINK CONTENT’] ARE THE PROPERTY OF THE ORIGINATOR OF THE CONTENT [“CONTENT OWNER’] AND/OR ITS AFFILIATES OR LICENSORS, AND ARE PROTECTED BY COPYRIGHT, TRADEMARK, AND OTHER INTELLECTUAL PROPERTY LAWS. ALL INFOLINK CONTENT IS PROVIDED SOLELY FOR YOUR PERSONAL NONCOMMERCIAL USE. YOU MAY NOT USE ANY INFOLINK CONTENT IN A MANNER THAT CONSTITUTES AN INFRINGEMENT OF THE CONTENT OWNERS’ RIGHTS OR THAT HAS NOT BEEN AUTHORIZED BY THE CONTENT OWNER. MORE SPECIFICALLY, UNLESS EXPLICITLY AUTHORIZED IN THIS DISCLAIMER OR BY THE CONTENT OWNER, YOU MAY NOT MODIFY, COPY, REPRODUCE, REPUBLISH, UPLOAD, POST, TRANSMIT, TRANSLATE, SELL, CREATE DERIVATIVE WORKS, EXPLOIT, OR DISTRIBUTE IN ANY MANNER OR MEDIUM (INCLUDING BY EMAIL OR OTHER ELECTRONIC MEANS) ANY INFOLINK CONTENT OR ANY OTHER MATERIAL FROM THE INFOLINK SERVICE. CONTENT PROVIDED CONTENT OWNERS IN CONNECTION WITH THE INFOLINK SERVICE MAY BE TIME-DELAYED AS SPECIFIED BY THE CONTENT OWNER AND/OR ITS AFFILIATES. INFOLINK IS PROVIDED THROUGH AGREEMENT BETWEEN SAMSUNG AND THE CONTENT OWNER. INFOLINK MAY BE TERMINATED OR INTERUPTED AT ANY TIME BY EITHER SAMSUNG OR THE CONTENT PROVIDER OR THROUGH TERMINATION OF THE AGREEMENT BETWEEN THEM. UNDER NO CIRCUMSTANCES, INCLUDING NEGLIGENCE, SHALL SAMSUNG OR THE CONTENT PROVIDER BE HELD LIABLE, WHETHER IN CONTRACT OR TORT, FOR ANY DIRECT, INDIRECT, INCIDENTAL, SPECIAL OR CONSEQUENTIAL DAMAGES, ATTORNEY FEES, EXPENSES, OR ANY OTHER DAMAGES WHATSOEVER ARISING OUT OF, OR IN CONNECTION WITH, SUCH TERMINATION OR INTERUPTION. SINCE CONTENT TRANSMITTED VIA INFOLINK IS RECEIVED BY MEANS OF NETWORKS AND TRANSMISSION FACILITIES OVER WHICH SAMSUNG HAS NO CONTROL, SAMSUNG EXPRESSLY DISCLAIMS ANY RESPONSIBILITY OR LIABILITY FOR ANY INTERRUPTION OR SUSPENSION OF INTERLINK SERVICE OR FOR THE ABSENCE OF CONTENT RESULTING THEREFROM. INFORMATION IN THE INFOLINK IS PROVIDED “AS IS,”AND CONSEQUENTLY, SAMSUNG DOES NOT WARRANT THE INFORMATION SO PROVIDED, EITHER EXPRESSLY OR IMPLIEDLY, FOR ANY PARTICULAR PURPOSE; AND SAMSUNG EXPRESSLY DISCLAIMS ANY IMPLIED WARRANTIES, INCLUDING BUT NOT LIMITED TO, WARRANTIES OF MERCHANTABILITY OR FITNESS FOR A PARTICULAR PURPOSE. SAMSUNG DOES NOT GUARANTEE THE ACCURACY, VALIDITY, TIMELINESS, LEGALITY, OR COMPLETENESS OF ANY INFORMATION OR DATA MADE AVAILABLE THROUGH INFOLINK FOR ANY PARTICULAR PURPOSE AND UNDER NO CIRCUMSTANCES, INCLUDING NEGLIGENCE, SHALL SAMSUNG BE HELD LIABLE, WHETHER IN CONTRACT OR TORT, FOR ANY DIRECT, INDIRECT, INCIDENTAL, SPECIAL OR CONSEQUENTIAL DAMAGES, ATTORNEY FEES, EXPENSES, OR ANY OTHER DAMAGES WHATSOEVER ARISING OUT OF, OR IN CONNECTION WITH, ANY INFORMATION CONTAINED IN, OR AS A RESULT OF THE USE OF INFOLINK BY YOU OR ANY THIRD PARTY, EVEN IF ADVISED OF THE POSSIBILITY OF SUCH DAMAGES. English - 113 1470A-03Eng.indb 113 2008-08-11 �� 2:22:47 Using InfoLink - United State ➣ The “Set Country” must be set to “United State”. (Refer to page 117) Using the Weather Service 1.Press the INFO.L button on the remote control. 2.Press the ◄ or ► button to move to the “Weather” service and press the ENTER button. Set up the Region 3.Press Yellow button. Input the postal (zip) code of the region by pressing the number buttons on the remote, then press the ENTER button. ➣ You can check the weather of the selected region. ➣ If you select the “Weather” service when no region is set, a message will appear asking if you want to set up the region. If you select “Yes” using the ◄ or ► button, a screen will appear where you can set up the postal (zip) code. Move Weather Return Los Angeles 59°F ● Options ● Zip ● Close Move Weather Set up Weather Option 4.Press the Red button while using the service to change the “Weather” service option. 5.Press ▲ or ▼ button and select “Weather” option. Return Options Today’s Weather Weekly Forecast Select Return Los Angeles 59°F ➣ To exit the ”Weather” service, press the Blue button. ➣ To exit the “InfoLink” service, press the EXIT button. Using the News Service ➣ The news provider may be changed in the future. 1.Press the INFO.L button on the remote control. 2.Press the ◄ or ► button to move to the “News” service and press the ENTER button. ➣ Press the ENTER button to view the detailed article. ➣ Press the ◄ or ► button to view the previous or next article. News Move Return Business GM turns 100 with focus on future Enter ● Options ● Close 3.Press the Red button while using the service to change the “News” service Option. 4. Press ▲ or ▼ button and select “News” service option. News Move Return Options Business Politics World Top news Entertainment Sports ➣ The News service option changes depending on the provided web service. ➣ To exit the ”News” service, press the Blue button. ➣ To exit the “InfoLink” service, press the EXIT button. Select Business Return GM turns 100 with focus on future English - 114 1470A-03Eng.indb 114 2008-08-11 �� 2:22:48 Using the Stock Service 1.Press the INFO.L button on the remote control. 2.Press the ◄ or ► button to move to the “Stock” service and press the ENTER button. 3.Press the Red button while using the service to change the “Stock” service option. 4.Press ▲ or ▼ button and select “Stock” service option, then press the ENTER button. 1/2 Wed 6:09 Stock NASDAQ ▲ 21.51 2713.50 0.80% Quotes delayed at least 15 minutes. Data provided by interastive Data. Return Move ● Options ● Close 1/2 Wed 6:09 Stock NASDAQ ▲ 21.51 2713.50 0.80% Quotes delayed at least 15 minutes. Data provided by interastive Data. Return Move ● Options ● Close • Favorite Stocks: The Favorite stock information is displayed. You can set up the Favorite Stocks by pressing the Yellow button. • Market Summary: Dow Jones, Nasdaq and S&P 500 are toggled and the entire index, amount of up or down, and % are displayed. • Stocks & News: The Favorite stock information and Dow Jones, NASDAQ and S&P 500 index and Financial news are displayed. Options Favorite Stocks Market Summary Stocks & News Select Return ➣ Stock quotes delayed at least 15 minutes. ➣ To exit the “Stock” service, press the Blue button. ➣ To exit the “InfoLink” service, press the EXIT button. Setting Favorite Stocks Items 1. Press the Yellow button when “Favorite Stocks” or “Stocks & News” is selected. The Set Favorite Stocks screen appears. 2.Press the ◄ button to move to the Category. Press the ▲ or ▼ button to select a Category. Press the ENTER button. 3.Press the ▲ or ▼ button to select a stock item and press the ENTER button. ➣ The selected stock is set as a Favorite Stock. ➣ The mark will appear to the left of the stock name. ➣ Press the ENTER button again to cancel the setting. The mark will disappear. ➣ To cancel all selections, press the Green button. ➣ Pressing the Red button toggles between NYSE and NASDAQ. 4.To finish the settings, press the RETURN button. 1/2 Wed 6:09 Stock Return Move NASDAQ ▲ 21.51 2713.50 0.80% Quotes delayed at least 15 minutes. Data provided by interastive Data. ● Options ● Close Options Favorite Stocks Market Summary Stocks & News Select Return Set Favorite Stocks NYSE 3/1844 A- B A AGILENT TECHNOLGIES, INC. C-E AA ALCOA INC. F-H AAI AIRTRAN HOLDING, INC I-K AAR AMR CORPORATION L-N AAB ABB ASEA BROWN BOVERI LT.. ● NASDAQ ● Reset Move Select ▲ ▼ Return English - 115 1470A-03Eng.indb 115 2008-08-11 �� 2:22:50 Using InfoLink - Canada ➣ The “Set Country” must be set to “Canada”.(Refer to page 117) Using the Weather Service 1.Press the INFO.L button on the remote control. 2.Press the ◄ or ► button to move to the “Weather” service and press the ENTER button. Set up the Region 3.Press the Yellow button. Press the ▲ or ▼ button to select the initial letter (A~Z) of the location you want, then press the ENTER button. 4.Press the ▲ or ▼ button to select the location you want and press the ENTER button. ➣ You can check the weather of the selected region. Move Weather Ottawa 21°F ● Options ● Location ● Close Move Weather Set up Weather Option 5.Press the Red button while using the service to change the “Weather” service option. 6.Press ▲ or ▼ button and select “Weather” option. Return Options Today’s Weather Weekly Forecast Select Return Ottawa 21°F ➣ To exit the ”Weather” service, press the Blue button. ➣ To exit the “InfoLink” service, press the EXIT button. Using the News Service Return News ➣ The news provider may be changed in the future. 1.Press the INFO.L button on the remote control. 2.Press the ◄ or ► button to move to the “News” service and press the ENTER button. ➣ Press the ENTER button to view the detailed article. ➣ Press the ◄ or ► button to view the previous or next article. Move Return French News Retour de la mission de I’AIEA en Syrie Enter ● Options ● Close News Move Return 3.Press the Red button while using the service to change the “News” service Option. 4. Press ▲ or ▼ button and select “News” service option. Options French News English News Select ➣ The News service option changes depending on the provided web service. ➣ To exit the ”News” service, press the Blue button. ➣ To exit the “InfoLink” service, press the EXIT button. French News Return Retour de la mission de I’AIEA en Syrie Using the Stock Service 1.Press the INFO.L button on the remote control. 6/26 Thu 5:17 ET Stock 2.Press the ◄ or ► button to move to the “Stocks” service and press the ENTER button. ➣ Stock quotes delayed at least 15 minutes. ➣ To exit the “Stocks” service, press the Blue button. ➣ To exit the “InfoLink” service, press the EXIT button. Move Return DOW JONES... ▲ 4.40 11811.83 0.04% Quotes delayed up to from 15 to 60 minutes except where indicated otherwise ● Close English - 116 1470A-03Eng.indb 116 2008-08-11 �� 2:22:51 InfoLink Setup 1.Press the INFO.L button on the remote control. 2. Press the ◄ or ► button to select “Setup”, then press the ENTER button. 3.Press the ▲ or ▼ button to select the desired option. (“Set Country”, “Auto Launch”, “Display Time”, “Font Size”, “Background Color”, “InfoLink’s Position”) 4.Press the ▲ or ▼ button to select an option, then press the ENTER button • Set Country: You can change the country for the InfoLink service connection. You can select either “United State” or “Canada”. • Auto Launch: Determines whether to launch InfoLink automatically when the TV is turned on. You can select either “Off” or “On”. • Display Time: Determines the time to display the news service on the TV screen. You can select “4 Hours”, “8 Hours”, “10 Hours”, or “Always”. • Font Size: You can select letter size “Standard” or “Large” through InfoLink service. • Background Color: You can select the Background Color of InfoLink service. The color is applied to each service, option and setup window. • InfoLink’s Position: You can set the position of each InfoLink service on the screen. You can select from six preset InfoLink positions (“Position 1”~“Position 6”). Setup Move Return InfoLink’s Setup Set Country Auto Launch : Off Display Time : 4 Hours Font Size : Standard Background Color : Black InfoLink’s Position Move Select Return ➣ To exit the “Setup” service, press the RETURN button. ➣ To exit the “InfoLink” service, press the EXIT button. InfoLink’s Position Weather Stocks Weather News Stocks News Position 1 News Position 4 Stocks Position 2 Weather Position 3 Weather Stocks Weather News Stocks News Position 5 News Stocks Weather Position 6 English - 117 1470A-03Eng.indb 117 2008-08-11 �� 2:22:53 Product Guide Application The Product Guide gives you information on the most important features of this TV. 1.Press the MENU button to display the menu. Press the ▲ or ▼ button to select “Application”, then press the ENTER button. 2.Press the ▲ or ▼ button to select “Product Guide”, then press the ENTER button. 3. Contents Library InfoLink Product Guide ress the ◄ or ► button to select a Guide (“Picture Quality”, P “Entertainment” or “Connectivity”) and press the ENTER button. 4.You can navigate the Product Guide screen by using the ◄ and ► buttons. Picture Quality Product Guide offers a simple introduction about main function to help users understand about SERIES 7. Please, refer to I/B to get more information. Full HD 1080p Auto Motion Plus 120 Hz Entertainment AutoPlay Move R Return e Exit InfoLink Contents Library Entertainment Mode Connectivity WISELINK Pro DLNA 4HDMI Anynet+ 6. Press the EXIT button to exit. Using the Remote Control Button in Product Guide Menu Button Yellow Button Wheel (◄/►) ENTER RETURN EXIT CH / PRE.CH / FAV.CH Operations Shows the contents of the Product Guide sequentially. (AutoPlay) Move the cursor and select an item. Select the currently selected item. Return to the previous menu. Stop the current function and return to the “Product Guide” main menu. Stop Product Guide mode and Returns to TV mode English - 118 1470A-03Eng.indb 118 2008-08-11 �� 2:22:53 About Anynet+ What is Anynet+? Anynet+ is a function that enables you to control all connected Samsung devices that support Anynet+ with your Samsung TV’s remote. Connecting Anynet+ Devices The Anynet+ system can be used only with Samsung devices that have the Anynet+ feature. To be sure your Samsung device has this feature, check if there is an Anynet+ logo on it. To connect to a TV TV Rear Panel Anynet+ Device 1 HDMI 1. Cable Anynet+ Device 2 HDMI 1. Cable Anynet+ Device HDMI 1. Cable Anynet+ Device 4 HDMI 1. Cable Connect the [HDMI 1], [HDMI 2], [HDMI 3] or [HDMI 4] jack on the TV and the HDMI OUT jack of the corresponding Anynet+ device using an HDMI cable. To connect to Home Theater 1. TV Rear Panel Anynet+ Device 1 HDMI 1. Cable HDMI 1. Cable Anynet+ Device Home Theater HDMI 1. Cable Anynet+ Device 2 Anynet+ Device 4 HDMI 1. Cable Optical Cable HDMI 1. Cable 2. Connect the [HDMI 1], [HDMI 2], [HDMI 3] or [HDMI 4] jack on the TV and the HDMI OUT jack of the corresponding Anynet+ device using an HDMI cable. Connect the HDMI IN jack of the home theater and the HDMI OUT jack of the corresponding Anynet+ device using an HDMI cable. ➣ Connect the Optical cable between the Digital Audio Out (Optical) jack on your TV and the Digital Audio Input on the Home Theater. ➣ When following the connection above, the Optical jack only outputs 2 channel audio. You will only hear sound from the Home Theater’s Front Left and Right speakers and the subwoofer. If you want to hear 5.1 channel audio, connect the DIGITAL AUDIO OUT (OPTICAL) jack on the DVD player or Cable/Satellite Box (ie Anynet Device 1 or 2) directly to the Amplifier or Home Theater, not the TV. ➣ Connect only one Home Theater. ➣ You can connect an Anynet+ device using the HDMI 1.3 cable. Some HDMI cables may not support Anynet+ functions. ➣ Anynet+ works when the AV device supporting Anynet+ is in the Standby or On status. ➣ Anynet+ supports up to 12 AV devices in total. Note that you can connect up to 3 devices of the same type. English - 11 1470A-03Eng.indb 119 2008-08-11 �� 2:22:54 Setting Up Anynet+ The following settings help set the Anynet+ functions. To use the Anynet+ Function, Anynet+ (HDMI-CEC) must be set to On Application 1.Press the MENU button. Press the ▲ or ▼ button to select “Application”, then press the ENTER button. 2.Press the ▲ or ▼ button to select “Anynet+ (HDMI-CEC)”, then press the ENTER button. 3. Press the ENTER button to select “Anynet+ (HDMI-CEC)”. 4. Press the ▲ or ▼ button to select “On”, then press the ENTER button. ➣ The “Anynet+ (HDMI-CEC)” function is enabled. ➣ If you select Off, “Anynet+ (HDMI-CEC)” is disabled. ➣ When the “Anynet+ (HDMI-CEC)” function is disabled, all the Anynet+ related operations are deactivated. WISELINK Pro Anynet+ (HDMI-CEC) ► Contents Library InfoLink Product Guide Anynet+ (HDMI-CEC) Anynet+ (HDMI-CEC) : ON Off Auto Turn Off : On Move Enter Return Setting an Anynet+ Device to turn Off Automatically when the TV is Turned Off 1.Press the ▲ or ▼ button to select “Auto Turn Off”, then press the ENTER button. 2. Press the ▲ or ▼ button to select “Yes”, then press the ENTER button. ➣ The “Auto Turn Off” function is enabled. ➣ If you select “No”, the “Auto Turn Off” function is canceled. Press the EXIT button to exit. ➣ The active source on the TV remote must be set to TV to use the Anynet+ function. ➣ If you set “Auto Turn Off” to “Yes”, connected external devices are also turned off when the TV is turned off. If an external device is still recording, it may or may not turn off. Anynet+ (HDMI-CEC) Anynet+ (HDMI-CEC) Auto Turn Off : On No : Yes Move Enter Return Scanning and Switching between Anynet+ Devices 1.Press the TOOLS button. Press the ▲ or ▼ button to select “Device List”, then press the ENTER button. ➣ Anynet+ devices connected to the TV are listed. ➣ If you cannot find a device you want, press the red button to scan for devices. 2.Press the ▲ or ▼ button to select to a particular device and press the ENTER button. It is switched to the selected device. ➣ Only when you set “Anynet+ (HDMI-CEC)” to On in the “Application” menu, the “Device List” menu appears. TOOLS Device List Record Timer Recording : Off Picture Size Receiver : 16:9 Picture Mode : Standard Sound Mode : Custom : Off Sleep Timer Move ▼ Enter e Exit ➣ Switching to the selected devices may take up to 2 minutes. You cannot cancel the operation during the switching operation. ➣ The time required to scan for devices is determined by the number of connected devices. ➣ When the device scan is complete, the number of devices found are not displayed. ➣ Although the TV automatically scans devices when it is turned on using the POWER button, devices connected when the TV is already on are not displayed in the device list. In this case, select the Searching Connections menu to search devices. ➣ If you have selected external input mode by pressing the SOURCE button, you cannot use the Anynet+ function. Make sure to switch to an Anynet+ device by using the TOOLS button. English - 120 1470A-03Eng.indb 120 2008-08-11 �� 2:22:55 Anynet+ Menu The Anynet+ menu changes depending on the type and status of the Anynet+ devices connected to the TV. Anynet+ Menu View TV Device List Record Menu on Device Device Operation Timer Recording Stop Recording Receiver Setup Description Switches from Anynet+ to TV broadcast mode. Displays the Anynet+ device list. Starts a recording. (This menu works only for a device supporting recording.) Shows the menu of the connected device. Example: When a DVD Recorder is connected, the DVD Recorder’s title menu appears. Shows the play control menu of the connected device. Example: When a DVD Recorder is connected, the play control menu of the DVD Recorder appears. Allows reserving a recording. (This menu works only for a device supporting recording reservations.) Stops recording. Sound is output through the receiver (home theater). You can set the Anynet+ (HDMI-CEC), auto turn off, and searching connections for using Anynet+. TV Remote Control Buttons Available in Anynet+ Mode Device Type Operating Status Anynet+ Device After switching to the device, when the menu of the corresponding device is displayed on the screen. Available Buttons Numeric buttons ▲/▼/◄/►/ENTER buttons Color buttons / EXIT button (Backward search) / (Stop) / (Play) / After switching to the device, while playing a file Device with built-in Tuner Audio Device After switching to the device, when you are watching a TV program When Receiver is activated CH / CH (Forward search) (Pause) button VOL – / VOL + / MUTE button ➣ The Anynet+ function only works when the active source on the TV remote control is set to TV. ➣ The button works only while in the recordable state. ➣ You cannot control Anynet+ devices using the buttons on the TV. You can control Anynet+ devices only using the TV remote control. ➣ The TV remote control may not work under certain conditions. In this case, reselect the Anynet+ device. ➣ The Anynet+ functions do not operate with other manufacturers’ products. ➣ The , operations may differ depending on the device. Recording You can make a recording of a TV program using a Samsung recorder. 1. Press the TOOLS button. 2.Press the ▲ or ▼ button to select Recording Immediately and press the ENTER button. Recording begins. When there is more than one recording device When multiple recording devices are connected, the recording devices are listed. Press the ▲ or ▼ button to select a recording device and press the ENTER button. Recording begins. When the recording device is not displayed Select “Device List” and press the red button to search devices. TOOLS Device List Record Timer Recording : Off Picture Size Receiver : 16:9 Picture Mode : Standard Sound Mode : Custom Sleep Timer Move ▼ : Off Enter e Exit Press the EXIT button to exit. ➣ You can record the source streams by selecting “Record” after pressing the TOOLS button. ➣ Pressing the button will record whatever you are currently watching. If you are watching video from another device, the video from the device is recorded. ➣ Before recording, check whether the antenna jack is properly connected to the recording device. To properly connect an antenna to a recording device, refer to the recording device’s users manual. English - 121 1470A-03Eng.indb 121 2008-08-11 �� 2:22:56 Listening through a Receiver (Home theater) TOOLS You can listen to sound through a receiver instead of the TV speaker. 1.Press the TOOLS button. Press the ▲ or ▼ button to select “Receiver”. Device List Record 2.Press the ◄ or ► button to select to “On”. Timer Recording Now you can listen to sound through the receiver. Receiver : Off 3. Press the EXIT button to exit. Picture Size : 16:9 Picture Mode : Standard ➣ If your receiver supports audio only, it may not appear in the device list. Sound Mode : Custom ➣ The receiver will work when you have properly connected the Optical IN jack of the Sleep Timer : Off ▼ receiver to the Optical Out jack of the TV. Move Enter e Exit ➣ When the receiver (home theater) is set to On, you can hear sound output from the TV’s Optical jack. When the TV is displaying a DTV(air) signal, the TV will send out 5.1 channel sound to the Home theater receiver. When the source is a digital component such as a DVD and is connected to the TV via HDMI, only 2 channel sound will be heard from the Home Theater receiver. ➣ When using the WISELINK Pro feature, sound may not output properly through the receiver. ➣ When listening through the receiver, there are restrictions for using the PIP and audio-related (MTS, Preferred language) menus. ➣ If there is a power interruption to the TV when the “Receiver” is set to “On” (by disconnecting the power cord or a power failure), the “TV Speaker” may be set to “Off” when you turn the TV on again. (see page 35) Troubleshooting for Anynet+ Symptom Anynet+ does not work. Solution • Check if the device is an Anynet+ device. The Anynet+ system supports Anynet+ devices only. • Connect only one receiver (home theater). • Check if the Anynet+ device power cord is properly connected. • Check the Anynet+ device’s Video/Audio/HDMI 1.3 cable connections. • Check whether Anynet+ (HDMI-CEC) is set to On in the Anynet+ setup menu. • Check whether the TV remote control is in TV mode. • Check whether it is Anynet+ exclusive remote control. • Anynet+ doesn’t work in certain situations. (Searching channels, Operating WISELINK Pro, Plug & Play, etc.) • When connecting or removing the HDMI 1.3 cable, please make sure to search devices again or turn your TV off and on again. • Check if the Anynet+ Function of Anynet+ device is set on. I want to start Anynet+. • Check if the Anynet+ device is properly connected to the TV and check if the Anynet+ (HDMI-CEC) is set to On in the Anynet+ Setup menu. • Press the TV button on the TV remote control to switch to TV. Then press the TOOLS button to show the Anynet+ menu and select a menu you want. + I want to exit Anynet . • Select View TV in the Anynet+ menu. • Press the SOURCE button on the TV remote control and select a device other than Anynet+ devices. • Press CH, CH LIST, PRE-CH, and FAV.CH to change the TV mode. (Note that the channel button operates only when a tuner-embedded Anynet+ device is not connected.) The message Connecting to • You cannot use the remote control when you are configuring Anynet+ or switching to a view mode. Anynet+ device... appears on the screen. • Use the remote control when the Anynet+ setting or switching to view mode is complete. The Anynet+ device does not play. You cannot use the play function when Plug & Play is in progress. • Check whether or not the device supports Anynet+ functions. The connected device is not displayed. • Check whether or not the HDMI 1.3 cable is properly connected. • Check whether Anynet+ (HDMI-CEC) is set to On in the Anynet+ setup menu. • Search Anynet+ devices again. • You can connect an Anynet+ device using the HDMI 1.3 cable only. Some HDMI cables may not support Anynet+ functions. • If it is terminated by an abnormal situation such as disconnecting the HDMI cable or power cord or a power failure, please repeat the device scan. The TV program cannot be Check whether the antenna jack on the recording device is properly connected. recorded. The TV sound is not output Connect the optical cable between TV and the receiver. through the receiver. English - 122 1470A-03Eng.indb 122 2008-08-11 �� 2:22:56 Appendix Troubleshooting If the TV seems to have a problem, first try this list of possible problems and solutions. If none of these troubleshooting tips apply, call Samsung customer service at 1-800-SAMSUNG. Problem Possible Solution Poor picture. Try another channel. Adjust the antenna. Check all wire connections. Poor sound quality. Try another channel. Adjust the antenna. No picture or sound. Try another channel. Press the SOURCE button. Make sure the TV is plugged in. Check the antenna connections. No sound or sound is too low at maximum volume. First, check the volume of units connected to your TV (digital broadcasting receiver, DVD, cable broadcasting receiver, VCR, etc.). Then, adjust the TV volume accordingly. Picture rolls vertically. Check all wire connections. The TV operates erratically. Unplug the TV for 30 seconds, then try operating it again. The TV won’t turn on. Make sure the wall outlet is working. Remote control malfunctions. Replace the remote control batteries. Clean the upper edge of the remote control (transmission window). Check the battery terminals. ‘Check signal cable’ message. Ensure that the signal cable is firmly connected to the PC source. ‘Not Supported Mode’ message. Check the maximum resolution and connected device’s Video frequency. Compare these values with the data in the Display Modes. Digital broadcasting screen problem. Please check the digital signal strength and input antenna. The image is too light or too dark. Adjust the Brightness and Contrast. Adjust the Fine tuning. Black bars on the screen. Make sure the broadcast you’re receiving is High Definition (HD). HD channels sometimes broadcast Standard Definition (SD) programming, which can cause black bars. Set your cable/satellite box to stretch or widescreen mode to eliminate the bars. Picture has a Red/Green or Pink tint. Make sure the Component cables are connected to the correct jacks. Closed Captioning not working. If you are using a Cable/Satellite box, you must set Closed Captioning on the box, not your TV. Snowy picture. Your cable box may need a firmware upgrade. Please contact your Cable company. Ghosting on picture. This is sometimes caused by compatibility issues with your cable box. Try connecting Component cables instead. Horizontal bars appear to flicker, jitter or shimmer on the image. Adjust the Coarse tuning and then adjust the Fine tuning. Vertical bars appear to flicker, jitter or shimmer on the image. Adjust the Coarse tuning and then adjust the Fine tuning. Screen is black and power indicator light blinks steadily. On your computer check: Power, Signal Cable. The TV is using its power management system. Move the computer's mouse or press any key on the keyboard. English - 123 1470A-03Eng.indb 123 2008-08-11 �� 2:22:56 Problem Possible Solution Image is not stable and may appear to vibrate when you have a computer connected to the PC input. If the setting is not correct, use your computer utility program to change the display settings. ➣ Your TV supports multiscan display functions within the following frequency domain: Horizontal frequency (kHz) 30~60 Vertical frequency (Hz) 60~75 PC Maximum refresh rate (at 60 Hz) 1920 x 1080 Image is not centered on the screen. Adjust the horizontal and vertical position. The screen position must be adjusted on the output source (i.e. STB) with a digital signal. The picture appears distorted in the corner of the screen. If “Just Scan” is selected with some external devices, the picture may appear distorted in the corner of the screen. This symptom is caused by the external devices, not TV. The ‘Resets all settings to the default values’ message appears. This appears when you press and hold the EXIT button for a while. The product settings are reset to the factory defaults. You may see small particles if you look closely at the edge of the bezel surrounding the TV screen. This is part of the product’s design and is not a defect. This TFT LCD panel uses a panel consisting of sub pixels (6 220 800) which require sophisticated technology to produce. However, there may be few bright or dark pixels on the screen. These pixels will have no impact on the performance of the product. English - 124 1470A-03Eng.indb 124 2008-08-11 �� 2:22:56 Installing the Stand 1. 2. Attach your LCD TV to the stand. ➣ Two or more people should carry the TV. ➣ Make sure to distinguish between the front and back of the stand when attaching it. ➣ To make sure the TV is installed on the stand at a proper level, do not apply excess downward pressure to the upper left of right sides of the TV. Fasten two screws at position 1 and then fasten two screws at position 2. ➣ Stand the product up and fasten the screws. If you fasten the screws with the LCD TV placed down, it may lean to one side. Disconnecting the Stand 1. 2. 3. Remove four screws from the back of the TV. Separate the stand from the TV. ➣ Two or more people should carry the TV. Cover the bottom hole with the cover. English - 125 1470A-03Eng.indb 125 2008-08-11 �� 2:22:57 Auto Wall-Mount Adjustment (Sold separately) Once the auto wall mount is installed, your TV’s position can be easily adjusted. V-Chip Auto Wall-Mount Caption Setup TV Rear Panel External Settings ► Entertainment : Off Energy Saving : Off PIP SW Upgrade EX-LINK Cable (Not supplied) Entering the menu External Settings 1. Press the ▲, ▼, ◄ or ► button on your remote control. ➣ The Wall Mount Adjustment screen is displayed. ➣ If the Wall Mount Adjustment screen is not displayed when clicking on a direction button while watching your TV, use the menu to display that screen. • Press the MENU button to display the menu. Press the ▲ or ▼ button to select “Setup”, then press the ENTER button. • Press the ▲ or ▼ button to select “External Settings”, then press the ENTER button. • Press the ▲ or ▼ button to select “Wall-Mount Adjustment”, then press the ENTER button. Melody : Medium Wall-Mount Adjustment Move Enter Return Wall-Mount Adjusment Remembering the Position 2. 3. 4. 5. Adjust to the desired position using the ▲,▼,◄,► buttons. ➣ If you press an arrow button when no OSD is displayed on the TV screen, the Adjustment screen appears. ➣ Press the INFO button to reset. Press the ◄ or ► button to select “Yes”, then press the ENTER button. The position is initialized to the default setting. Press the Blue button. Press the ▲ and ▼ buttons to select a save mode from either Position 1, Position 2 or Position 3 in order to save the current position. ➣ To not save the current position, press the RETURN button. ➣ When selecting a save mode, you cannot use the Color buttons. Press the ENTER button to save. ➣ When Position1 is selected, the message “Current position saved as Position1” is displayed. Press the ENTER button. ➣ The saved Position appears on the left side of the OSD. Moving to the remembered position 1. 2. Position Adjust 1 Save 2 INFO Center Save Select a mode to Save. Position1 Position2 Position Move Enter Return Wall-Mount Adjusment Position1 Complete Step 1 of “Entering the menu”. Position 1 Pressing a Color (Red, Green, Yellow) button moves the auto wall mount to Adjust Save the saved position. ➣ You can move the wall mount to one of the 3 pre-set positions by pressing the Red (Position 1), Green (Position 2) or Yellow (Position 3) buttons. ➣ If you adjust the position after moving to a pre-set position, the position display will disappear. 2 INFO Center ➣ For installation, refer to the Installation Manual provided with the wall mount. ➣ For product installation and the installation and moving of the wall mount, make sure to consult a specialized installation company. ➣ This installation manual is to be used when attaching the wall mount to a wall. When attaching to other building materials, please contact your nearest dealer. ➣ The auto wall mount will not work when Anynet+ or WISELINK Pro is operating. ➣ LN40A750R1F, LN46A750R1F and LN52A750R1F models are not compatible with the old electrically powered wall mount model (WMN5090A). English - 126 1470A-03Eng.indb 126 2008-08-11 �� 2:22:59 Wall Mount Kit Specifications (VESA) Install your wall mount on a solid wall perpendicular to the floor. When attaching to other building materials, please contact your nearest dealer. If installed on a ceiling or slanted wall, it may fall and result in severe personal injury. Product Family LCD-TV PDP-TV ➣ ➣ ➣ ➣ ➣ ➣ ➣ ➣ inches VESA Spec. (A * B) Standard Screw 23~ 26 200 * 100 M4 32 ~ 40 200 * 200 M6 46 ~ 52 600 * 400 57 700 * 400 (No VESA) 57 ~ 70 800 * 400 80 ~ 1400 * 800 42 ~ 50 600 * 400 55 ~ 70 800 * 400 63 No VESA 80 ~ 1400 * 800 Quantity 4 M8 4 M8 6 4 Standard dimensions for wall mount kits are shown in the table above. When purchasing our wall mount kit, a detailed installation manual and all parts necessary for assembly are provided. Do not use screws longer than the standard dimension, as they may cause damage to the inside of the TV set. For wall mounts that do not comply with the VESA standard screw specifications, the length of the screws may differ depending on their specifications. Do not use screws that do not comply with the VESA standard screw specifications. Do not fasten the screws too strongly, this may damage the product or cause the product to fall, leading to personal injury.Samsung is not liable for these kinds of accidents. Samsung is not liable for product damage or personal injury when a non-VESA or non-specified wall mount is used or the consumer fails to follow the product installation instructions. Our 57” and 63” models do not comply with VESA Specifications. Therefore, you should use our dedicated wall mount kit for this model. Do not exceed 15 degrees tilt when mounting this TV. Do not install your Wall Mount Kit while your TV is turned on. It may result in personal injury due to electric shock. English - 127 1470A-03Eng.indb 127 2008-08-11 �� 2:23:01 Using the Anti-Theft Kensington Lock (LN40A750R1F, LN46A750R1F) The Kensington Lock is a device used to physically fix the system when using it in a public place. The appearance and locking method may differ from the illustration depending on the manufacturer. Refer to the manual provided with the Kensington Lock for proper use. The locking device has to be purchased separately. Cable Figure 2 Figure 1 <Optional> ➣ The location of the Kensington Lock may be different depending on its model. 1.Insert the locking device into the Kensington slot on the LCD TV (Figure 1) and turn it in the locking direction (Figure 2). 2. Connect the Kensington Lock cable. 3. Fix the Kensington Lock to a desk or a heavy stationary object. English - 128 1470A-03Eng.indb 128 2008-08-11 �� 2:23:01 Specifications Model Name LN40A750R1F LN46A750R1F LN52A750R1F Screen Size (Diagonal) 40 inches 46 inches 52 inches 1920 x 1080 @ 60 Hz 1920 x 1080 @ 60 Hz 1920 x 1080 @ 60 Hz 10W X 2 (Sub woofer: 10W X 2) 10W X 2 (Sub woofer: 10W X 2) 10W X 2 (Sub woofer: 10W X 2) 40.9 X 3.3 X 25.1 inches (1040.0 X 84.7 X 638.0 mm) 40.9 X 10.7 X 27.0 inches (1040.0 X 271.9 X 686.0 mm) 46.1 X 3.9 X 28.0 inches (1172.0 X 98.0 X 711.5 mm) 46.1 X 11.8 X 30.1 inches (1172.0 X 299.9 X 765.5 mm) 52.0 X 4.2 X 31.7 inches (1321.4 X 107.0 X 805.0 mm) 52.0 X 13.3 X 33.9 inches (1321.4 X 337.8 X 861.0 mm) 42.8lbs (19.4 kg) 35.9lbs (16.3 kg) 64.8lbs (29.4 kg) 52.7lbs (23.9 kg) 80.7lbs (36.6 kg) 66.4lbs (30.1 kg) PC Resolution Sound Output Dimensions (WxDxH) Body With stand Weight With Stand Without Stand Environmental Considerations Operating Temperature Operating Humidity Storage Temperature Storage Humidity 50°F to 104°F (10°C to 40°C) 10% to 80%, non-condensing -4°F to 113°F (-20°C to 45°C) 5% to 95%, non-condensing Stand Swivel (Left / Right) 0˚ ➣ Design and specifications are subject to change without prior notice. ➣ This device is a Class B digital apparatus. ➣ For the power supply and Power Consumption, refer to the label attached to the product. English - 129 1470A-03Eng.indb 129 2008-08-11 �� 2:23:01 Dimensions LN40A750R1F TOP VIEW JACK PANEL DETAIL 3.7"H X 9.1"W 3.3 40.9 34.8 19.6 25.1 27.0 20.4 10.7 FRONT VIEW / SIDE VIEW 7.9 (200mm) 7.9 (200mm) REAR VIEW NOTE: All drawings are not necessarily to scale. Some dimensions are subject to change without prior notice. Refer to the dimensions prior to performing installation of your TV. Not responsible for typographical or printed errors. © 2008 Samsung Electronics America, Inc. English - 130 1470A-03Eng.indb 130 2008-08-11 �� 2:23:02 Dimensions LN46A750R1F TOP VIEW JACK PANEL DETAIL 3.7"H X 9.1"W 3.9 46.1 40.0 22.5 28.0 30.1 24.4 11.8 FRONT VIEW / SIDE VIEW 23.6 (600 mm) 15.7 (400 mm) REAR VIEW NOTE: All drawings are not necessarily to scale. Some dimensions are subject to change without prior notice. Refer to the dimensions prior to performing installation of your TV. Not responsible for typographical or printed errors. © 2008 Samsung Electronics America, Inc. English - 131 1470A-03Eng.indb 131 2008-08-11 �� 2:23:02 Dimensions LN52A750R1F TOP VIEW JACK PANEL DETAIL 3.7"H X 9.1"W 4.2 52.0 45.5 25.7 31.7 33.9 26.0 13.3 FRONT VIEW / SIDE VIEW 23.6 (600 mm) 15.7 (400 mm) REAR VIEW NOTE: All drawings are not necessarily to scale. Some dimensions are subject to change without prior notice. Refer to the dimensions prior to performing installation of your TV. Not responsible for typographical or printed errors. © 2008 Samsung Electronics America, Inc. English - 132 1470A-03Eng.indb 132 2008-08-11 �� 2:23:02 ■ This product uses parts of the software from the Independent JPEG Group. ■ This product uses parts of the software owned by the Freetype Project (www.freetype.org). ■ This product uses some software programs which are distributed under the GPL/LGPL license. Accordingly, the following GPL and LGPL software source codes that have been used in this product can be provided after asking to [email protected]. GPL software: Linux Kernel, Busybox, Binutils LGPL software: Glibc, Libusb, Libgphoto2, SDL The GNU General Public License (GPL) Version 2, June 1991 Copyright (C) 1989, 1991 Free Software Foundation, Inc. 59 Temple Place, Suite 330, Boston, MA 02111-1307 USA Everyone is permitted to copy and distribute verbatim copies of this license document, but changing it is not allowed. Preamble The licenses for most software are designed to take away your freedom to share and change it. By contrast, the GNU General Public License is intended to guarantee your freedom to share and change free software--to make sure the software is free for all its users. This General Public License applies to most of the Free Software Foundation’s software and to any other program whose authors commit to using it. (Some other Free Software Foundation software is covered by the GNU Library General Public License instead.) You can apply it to your programs, too. When we speak of free software, we are referring to freedom, not price. Our General Public Licenses are designed to make sure that you have the freedom to distribute copies of free software (and charge for this service if you wish), that you receive source code or can get it if you want it, that you can change the software or use pieces of it in new free programs; and th at you know you can do these things. To protect your rights, we need to make restrictions that forbid anyone to deny you these rights or to ask you to surrender the rights. These restrictions translate to certain responsibilities for you if you distribute copies of the software, or if you modify it. For example, if you distribute copies of such a program, whether gratis or for a fee, you must give the recipients all the rights that you have. You must make sure that they, too, receive or can get the source code. And you must show them these terms so they know their rights. We protect your rights with two steps: (1) copyright the software, and (2) offer you this license which gives you legal permission to copy, distribute and/or modify the software. Also, for each author’s protection and ours, we want to make certain that everyone understands that there is no warranty for this free software. If the software is modified by someone else and passed on, we want its recipients to know that what they have is not the original, so that any problems introduced by others will not reflect on the original authors’ reputations. Finally, any free program is threatened constantly by software patents. We wish to avoid the danger that redistributors of a free program will individually obtain patent licenses, in effect making the program proprietary. To prevent this, we have made it clear that any patent must be licensed for everyone’s free use or not licensed at all. The precise terms and conditions for copying, distribution and modification follow. TERMS AND CONDITIONS FOR COPYING, DISTRIBUTION AND MODIFICATION 0. This License applies to any program or other work which contains a notice placed by the copyright holder saying it may be distributed under the terms of this General Public License. The “Program”, below, refers to any such program or work, and a “work based on the Program” means either the Program or any derivative work under copyright law: that is to say, a work containing the Program or a portion of it, either verbatim or with modifications and/or translated into another language. (Hereinafter, translation is included without limitation in the term “modification”.) Each licensee is addressed as “you”. Activities other than copying, distribution and modification are not covered by this License; they are outside its scope. The act of running the Program is not restricted, and the output from the Program is covered only if its contents constitute a work based on the Program (independent of having been made by running the Program). Whether that is true depends on what the Program does. 1. You may copy and distribute verbatim copies of the Program’s source code as you receive it, in any medium, provided that you conspicuously and appropriately publish on each copy an appropriate copyright notice and disclaimer of warranty; keep intact all the notices that refer to this License and to the absence of any warranty; and give any other recipients of the Program a copy of this License along with the Program. You may charge a fee for the physical act of transferring a copy, and you may at your option offer warranty protection in exchange for a fee. 2. You may modify your copy or copies of the Program or any portion of it, thus forming a work based on the Program, and copy and distribute such modifications or work under the terms of Section 1 above, provided that you also meet all of these conditions: a) You must cause the modified files to carry prominent notices stating that you changed the files and the date of any change. b) You must cause any work that you distribute or publish, that in whole or in part contains or is derived from the Program or any part thereof, to be licensed as a whole at no charge to all third parties under the terms of this License. c) If the modified program normally reads commands interactively when run, you must cause it, when started running for such interactive use in the most ordinary way, to print or display an announcement including an appropriate copyright notice and a notice that there is no warranty (or else, saying that you provide a warranty) and that users may redistribute the program under these conditions, and telling the user how to view a copy of this License. (Exception: if the Program itself is interactive but does not normally print such an announcement, your work based on the Program is not required to print an announcement.) 1470A-03Eng.indb 133 2008-08-11 �� 2:23:02 These requirements apply to the modified work as a whole. If identifiable sections of that work are not derived from the Program, and can be reasonably considered independent and separate works in themselves, then this License, and its terms, do not apply to those sections when you distribute them as separate works. But when you distribute the same sections as part of a whole which is a work based on the Program, the distribution of the whole must be on the terms of this License, whose permissions for other licensees extend to the entire whole, and thus to each and every part regardless of who wrote it. Thus, it is not the intent of this section to claim rights or contest your rights to work written entirely by you; rather, the intent is to exercise the right to control the distribution of derivative or collective works based on the Program. In addition, mere aggregation of another work not based on the Program with the Program (or with a work based on the Program) on a volume of a storage or distribution medium does not bring the other work under the scope of this License. 3. You may copy and distribute the Program (or a work based on it, under Section 2) in object code or executable form under the terms of Sections 1 and 2 above provided that you also do one of the following: a) Accompany it with the complete corresponding machine-readable source code, which must be distributed under the terms of Sections 1 and 2 above on a medium customarily used for software interchange; or, b) Accompany it with a written offer, valid for at least three years, to give any third party, for a charge no more than your cost of physically performing source distribution, a complete machine-readable copy of the corresponding source code, to be distributed under the terms of Sections 1 and 2 above on a medium customarily used for software interchange; or, c) Accompany it with the information you received as to the offer to distribute corresponding source code. (This alternative is allowed only for noncommercial distribution and only if you received the program in object code or executable form with such an offer, in accord with Subsection b above.) The source code for a work means the preferred form of the work for making modifications to it. For an executable work, complete source code means all the source code for all modules it contains, plus any associated interface definition files, plus the scripts used to control compilation and installation of the executable. However, as a special exception, the source code distributed need not include anything that is normally distributed (in either source or binary form) with the major components (compiler, kernel, and so on) of the operating system on which the executable runs, unless that component itself accompanies the executable. If distribution of executable or object code is made by offering access to copy from a designated place, then offering equivalent access to copy the source code from the same place counts as distribution of the source code, even though third parties are not compelled to copy the source along with the object code. 4. You may not copy, modify, sublicense, or distribute the Program except as expressly provided under this License. Any attempt otherwise to copy, modify, sublicense or distribute the Program is void, and will automatically terminate your rights under this License. However, parties who have received copies, or rights, from you under this License will not have their licenses terminated so long as such parties remain in full compliance. 5. You are not required to accept this License, since you have not signed it. However, nothing else grants you permission to modify or distribute the Program or its derivative works. These actions are prohibited by law if you do not accept this License. Therefore, by modifying or distributing the Program (or any work based on the Program), you indicate your acceptance of this License to do so, and all its terms and conditions for copying, distributing or modifying the Program or works based on it. 6. Each time you redistribute the Program (or any work based on the Program), the recipient automatically receives a license from the original licensor to copy, distribute or modify the Program subject to these terms and conditions. You may not impose any further restrictions on the recipients’ exercise of the rights granted herein. You are not responsible for enforcing compliance by third parties to this License. 7. If, as a consequence of a court judgment or allegation of patent infringement or for any other reason (not limited to patent issues), conditions are imposed on you (whether by court order, agreement or otherwise) that contradict the conditions of this License, they do not excuse you from the conditions of this License. If you cannot distribute so as to satisfy simultaneously your obligations under this License and any other pertinent obligations, then as a consequence you may not distribute the Program at all. For example, if a patent license would not permit royalty-free redistribution of the Program by all those who receive copies directly or indirectly through you, then the only way you could satisfy both it and this License would be to refrain entirely from distribution of the Program. If any portion of this section is held invalid or unenforceable under any particular circumstance, the balance of the section is intended to apply and the section as a whole is intended to apply in other circumstances. It is not the purpose of this section to induce you to infringe any patents or other property right claims or to contest validity of any such claims; this section has the sole purpose of protecting the integrity of the free software distribution system, which is implemented by public license practices. Many people have made generous contributions to the wide range of software distributed through that system in reliance on consistent application of that system; it is up to the author/donor to decide if he or she is willing to distribute software through any other system and a licensee cannot impose that choice. This section is intended to make thoroughly clear what is believed to be a consequence of the rest of this License. 8. If the distribution and/or use of the Program is restricted in certain countries either by patents or by copyrighted interfaces, the original copyright holder who places the Program under this License may add an explicit geographical distribution limitation excluding those countries, so that distribution is permitted only in or among countries not thus excluded. In such case, this License incorporates the limitation as if written in the body of this License. 1470A-03Eng.indb 134 2008-08-11 �� 2:23:02 9. The Free Software Foundation may publish revised and/or new versions of the General Public License from time to time. Such new versions will be similar in spirit to the present version, but may differ in detail to address new problems or concerns. Each version is given a distinguishing version number. If the Program specifies a version number of this License which applies to it and “any later version”, you have the option of following the terms and conditions either of that version or of any later version published by the Free Software Foundation. If the Program does not specify a version number of this License, you may choose any version ever published by the Free Software Foundation. 10. If you wish to incorporate parts of the Program into other free programs whose distribution conditions are different, write to the author to ask for permission. For software which is copyrighted by the Free Software Foundation, write to the Free Software Foundation; we sometimes make exceptions for this. Our decision will be guided by the two goals of preserving the free status of all derivatives of our free software and of promoting the sharing and reuse of software generally. NO WARRANTY 11. BECAUSE THE PROGRAM IS LICENSED FREE OF CHARGE, THERE IS NO WARRANTY FOR THE PROGRAM, TO THE EXTENT PERMITTED BY APPLICABLE LAW. EXCEPT WHEN OTHERWISE STATED IN WRITING THE COPYRIGHT HOLDERS AND/OR OTHER PARTIES PROVIDE THE PROGRAM “AS IS” WITHOUT WARRANTY OF ANY KIND, EITHER EXPRESSED OR IMPLIED, INCLUDING, BUT NOT LIMITED TO, THE IMPLIED WARRANTIES OF MERCHANTABILITY AND FITNESS FOR A PARTICULAR PURPOSE. THE ENTIRE RISK AS TO THE QUALITY AND PERFORMANCE OF THE PROGRAM IS WITH YOU. SHOULD THE PROGRAM PROVE DEFECTIVE, YOU ASSUME THE COST OF ALL NECESSARY SERVICING, REPAIR OR CORRECTION. 12. IN NO EVENT UNLESS REQUIRED BY APPLICABLE LAW OR AGREED TO IN WRITING WILL ANY COPYRIGHT HOLDER, OR ANY OTHER PARTY WHO MAY MODIFY AND/OR REDISTRIBUTE THE PROGRAM AS PERMITTED ABOVE, BE LIABLE TO YOU FOR DAMAGES, INCLUDING ANY GENERAL, SPECIAL, INCIDENTAL OR CONSEQUENTIAL DAMAGES ARISING OUT OF THE USE OR INABILITY TO USE THE PROGRAM (INCLUDING BUT NOT LIMITED TO LOSS OF DATA OR DATA BEING RENDERED INACCURATE OR LOSSES SUSTAINED BY YOU OR THIRD PARTIES OR A FAILURE OF THE PROGRAM TO OPERATE WITH ANY OTHER PROGRAMS), EVEN IF SUCH HOLDER OR OTHER PARTY HAS BEEN ADVISED OF THE POSSIBILITY OF SUCH DAMAGES. END OF TERMS AND CONDITIONS How to Apply These Terms to Your New Programs If you develop a new program, and you want it to be of the greatest possible use to the public, the best way to achieve this is to make it free software which everyone can redistribute and change under these terms. To do so, attach the following notices to the program. It is safest to attach them to the start of each source file to most effectively convey the exclusion of warranty; and each file should have at least the “copyright” line and a pointer to where the full notice is found. One line to give the program’s name and a brief idea of what it does. Copyright (C) <year> <name of author> This program is free software; you can redistribute it and/or modify it under the terms of the GNU General Public License as published by the Free Software Foundation; either version 2 of the License, or (at your option) any later version. This program is distributed in the hope that it will be useful, but WITHOUT ANY WARRANTY; without even the implied warranty of MERCHANTABILITY or FITNESS FOR A PARTICULAR PURPOSE. See the GNU General Public License for more details. You should have received a copy of the GNU General Public License along with this program; if not, write to the Free Software Foundation, Inc., 59 Temple Place, Suite 330, Boston, MA 02111-1307 USA Also add information on how to contact you by electronic and paper mail. If the program is interactive, make it output a short notice like this when it starts in an interactive mode: Gnomovision version 69, Copyright (C) year name of author Gnomovision comes with ABSOLUTELY NO WARRANTY; for details type `show w’. This is free software, and you are welcome to redistribute it under certain conditions; type `show c’ for details. The hypothetical commands `show w’ and `show c’ should show the appropriate parts of the General Public License. Of course, the commands you use may be called something other than `show w’ and `show c’; they could even be mouseclicks or menu items--whatever suits your program. You should also get your employer (if you work as a programmer) or your school, if any, to sign a “copyright disclaimer” for the program, if necessary. Here is a sample; alter the names: Yoyodyne, Inc., hereby disclaims all copyright interest in the program `Gnomovision’ (which makes passes at compilers) written by James Hacker. signature of Ty Coon, 1 April 1989 Ty Coon, President of Vice This General Public License does not permit incorporating your program into proprietary programs. If your program is a subroutine library, you may consider it more useful to permit linking proprietary applications with the library. If this is what you want to do, use the GNU Library General Public License instead of this License. 1470A-03Eng.indb 135 2008-08-11 �� 2:23:03 GNU Lesser General Public License (LGPL) Version 2.1, February 1999 Copyright (C) 1991, 1999 Free Software Foundation, Inc. 59 Temple Place, Suite 330, Boston, MA 02111-1307 USA Everyone is permitted to copy and distribute verbatim copies of this license document, but changing it is not allowed. [This is the first released version of the Lesser GPL. It also counts as the successor of the GNU Library Public License, version 2, hence the version number 2.1.] Preamble The licenses for most software are designed to take away your freedom to share and change it. By contrast, the GNU General Public Licenses are intended to guarantee your freedom to share and change free software--to make sure the software is free for all its users. This license, the Lesser General Public License, applies to some specially designated software packages--typically libraries-of the Free Software Foundation and other authors who decide to use it. You can use it too, but we suggest you first think carefully about whether this license or the ordinary General Public License is the better strategy to use in any particular case, based on the explanations below. When we speak of free software, we are referring to freedom of use, not price. Our General Public Licenses are designed to make sure that you have the freedom to distribute copies of free software (and charge for this service if you wish); that you receive source code or can get it if you want it; that you can change the software and use pieces of it in new free programs; and that you are informed that you can do these things. To protect your rights, we need to make restrictions that forbid distributors to deny you these rights or to ask you to surrender these rights. These restrictions translate to certain responsibilities for you if you distribute copies of the library or if you modify it. For example, if you distribute copies of the library, whether gratis or for a fee, you must give the recipients all the rights that we gave you. You must make sure that they, too, receive or can get the source code. If you link other code with the library, you must provide complete object files to the recipients, so that they can relink them with the library after making changes to the library and recompiling it. And you must show them these terms so they know their rights. We protect your rights with a two-step method: (1) we copyright the library, and (2) we offer you this license, which gives you legal permission to copy, distribute and/or modify the library. To protect each distributor, we want to make it very clear that there is no warranty for the free library. Also, if the library is modified by someone else and passed on, the recipients should know that what they have is not the original version, so that the original author’s reputation will not be affected by problems that might be introduced by others. Finally, software patents pose a constant threat to the existence of any free program. We wish to make sure that a company cannot effectively restrict the users of a free program by obtaining a restrictive license from a patent holder. Therefore, we insist that any patent license obtained for a version of the library must be consistent with the full freedom of use specified in this license. Most GNU software, including some libraries, is covered by the ordinary GNU General Public License. This license, the GNU Lesser General Public License, applies to certain designated libraries, and is quite different from the ordinary General Public License. We use this license for certain libraries in order to permit linking those libraries into non-free programs. When a program is linked with a library, whether statically or using a shared library, the combination of the two is legally speaking a combined work, a derivative of the original library. The ordinary General Public License therefore permits such linking only if the entire combination fits its criteria of freedom. The Lesser General Public License permits more lax criteria for linking other code with the library. We call this license the “Lesser” General Public License because it does Less to protect the user’s freedom than the ordinary General Public License. It also provides other free software developers Less of an advantage over competing non-free programs. These disadvantages are the reason we use the ordinary General Public License for many libraries. However, the Lesser license provides advantages in certain special circumstances. For example, on rare occasions, there may be a special need to encourage the widest possible use of a certain library, so that it becomes a de-facto standard. To achieve this, non-free programs must be allowed to use the library. A more frequent case is that a free library does the same job as widely used non-free libraries. In this case, there is little to gain by limiting the free library to free software only, so we use the Lesser General Public License. In other cases, permission to use a particular library in non-free programs enables a greater number of people to use a large body of free software. For example, permission to use the GNU C Library in non-free programs enables many more people to use the whole GNU operating system, as well as its variant, the GNU/Linux operating system. Although the Lesser General Public License is Less protective of the users’ freedom, it does ensure that the user of a program that is linked with the Library has the freedom and the wherewithal to run that program using a modified version of the Library. The precise terms and conditions for copying, distribution and modification follow. Pay close attention to the difference between a “work based on the library” and a “work that uses the library”. The former contains code derived from the library, whereas the latter must be combined with the library in order to run. 1470A-03Eng.indb 136 2008-08-11 �� 2:23:03 TERMS AND CONDITIONS FOR COPYING, DISTRIBUTION AND MODIFICATION 0. This License Agreement applies to any software library or other program which contains a notice placed by the copyright holder or other authorized party saying it may be distributed under the terms of this Lesser General Public License (also called “this License”). Each licensee is addressed as “you”. A “library” means a collection of software functions and/or data prepared so as to be conveniently linked with application programs (which use some of those functions and data) to form executables. The “Library”, below, refers to any such software library or work which has been distributed under these terms. A “work based on the Library” means either the Library or any derivative work under copyright law: that is to say, a work containing the Library or a portion of it, either verbatim or with modifications and/or translated straightforwardly into another language. (Hereinafter, translation is included without limitation in the term “modification”.) “Source code” for a work means the preferred form of the work for making modifications to it. For a library, complete source code means all the source code for all modules it contains, plus any associated interface definition files, plus the scripts used to control compilation and installation of the library. Activities other than copying, distribution and modification are not covered by this License; they are outside its scope. The act of running a program using the Library is not restricted, and output from such a program is covered only if its contents constitute a work based on the Library (independent of the use of the Library in a tool for writing it). Whether that is true depends on what the Library does and what the program that uses the Library does. 1. You may copy and distribute verbatim copies of the Library’s complete source code as you receive it, in any medium, provided that you conspicuously and appropriately publish on each copy an appropriate copyright notice and disclaimer of warranty; keep intact all the notices that refer to this License and to the absence of any warranty; and distribute a copy of this License along with the Library. You may charge a fee for the physical act of transferring a copy, and you may at your option offer warranty protection in exchange for a fee. 2. You may modify your copy or copies of the Library or any portion of it, thus forming a work based on the Library, and copy and distribute such modifications or work under the terms of Section 1 above, provided that you also meet all of these conditions: a) The modified work must itself be a software library. b) You must cause the files modified to carry prominent notices stating that you changed the files and the date of any change. c) You must cause the whole of the work to be licensed at no charge to all third parties under the terms of this License. d) If a facility in the modified Library refers to a function or a table of data to be supplied by an application program that uses the facility, other than as an argument passed when the facility is invoked, then you must make a good faith effort to ensure that, in the event an application does not supply such function or table, the facility still operates, and performs whatever part of its purpose remains meaningful. (For example, a function in a library to compute square roots has a purpose that is entirely well-defined independent of the application. Therefore, Subsection 2d requires that any application-supplied function or table used by this function must be optional: if the application does not supply it, the square root function must still compute square roots.) These requirements apply to the modified work as a whole. If identifiable sections of that work are not derived from the Library, and can be reasonably considered independent and separate works in themselves, then this License, and its terms, do not apply to those sections when you distribute them as separate works. But when you distribute the same sections as part of a whole which is a work based on the Library, the distribution of the whole must be on the terms of this License, whose permissions for other licensees extend to the entire whole, and thus to each and every part regardless of who wrote it. Thus, it is not the intent of this section to claim rights or contest your rights to work written entirely by you; rather, the intent is to exercise the right to control the distribution of derivative or collective works based on the Library. In addition, mere aggregation of another work not based on the Library with the Library (or with a work based on the Library) on a volume of a storage or distribution medium does not bring the other work under the scope of this License. 3. You may opt to apply the terms of the ordinary GNU General Public License instead of this License to a given copy of the Library. To do this, you must alter all the notices that refer to this License, so that they refer to the ordinary GNU General Public License, version 2, instead of to this License. (If a newer version than version 2 of the ordinary GNU General Public License has appeared, then you can specify that version instead if you wish.) Do not make any other change in these notices. Once this change is made in a given copy, it is irreversible for that copy, so the ordinary GNU General Public License applies to all subsequent copies and derivative works made from that copy. This option is useful when you wish to copy part of the code of the Library into a program that is not a library. 4. You may copy and distribute the Library (or a portion or derivative of it, under Section 2) in object code or executable form under the terms of Sections 1 and 2 above provided that you accompany it with the complete corresponding machinereadable source code, which must be distributed under the terms of Sections 1 and 2 above on a medium customarily used for software interchange. If distribution of object code is made by offering access to copy from a designated place, then offering equivalent access to copy the source code from the same place satisfies the requirement to distribute the source code, even though third parties are not compelled to copy the source along with the object code. 1470A-03Eng.indb 137 2008-08-11 �� 2:23:03 5. A program that contains no derivative of any portion of the Library, but is designed to work with the Library by being compiled or linked with it, is called a “work that uses the Library”. Such a work, in isolation, is not a derivative work of the Library, and therefore falls outside the scope of this License. However, linking a “work that uses the Library” with the Library creates an executable that is a derivative of the Library (because it contains portions of the Library), rather than a “work that uses the library”. The executable is therefore covered by this License. Section 6 states terms for distribution of such executables. When a “work that uses the Library” uses material from a header file that is part of the Library, the object code for the work may be a derivative work of the Library even though the source code is not. Whether this is true is especially significant if the work can be linked without the Library, or if the work is itself a library. The threshold for this to be true is not precisely defined by law. If such an object file uses only numerical parameters, data structure layouts and accessors, and small macros and small inline functions (ten lines or less in length), then the use of the object file is unrestricted, regardless of whether it is legally a derivative work. (Executables containing this object code plus portions of the Library will still fall under Section 6.) Otherwise, if the work is a derivative of the Library, you may distribute the object code for the work under the terms of Section 6. Any executables containing that work also fall under Section 6, whether or not they are linked directly with the Library itself. 6. As an exception to the Sections above, you may also combine or link a “work that uses the Library” with the Library to produce a work containing portions of the Library, and distribute that work under terms of your choice, provided that the terms permit modification of the work for the customer’s own use and reverse engineering for debugging such modifications. You must give prominent notice with each copy of the work that the Library is used in it and that the Library and its use are covered by this License. You must supply a copy of this License. If the work during execution displays copyright notices, you must include the copyright notice for the Library among them, as well as a reference directing the user to the copy of this License. Also, you must do one of these things: a) Accompany the work with the complete corresponding machine-readable source code for the Library including whatever changes were used in the work (which must be distributed under Sections 1 and 2 above); and, if the work is an executable linked with the Library, with the complete machine-readable “work that uses the Library”, as object code and/or source code, so that the user can modify the Library and then relink to produce a modified executable containing the modified Library. (It is understood that the user who changes the contents of definitions files in the Library will not necessarily be able to recompile the application to use the modified definitions.) b) Use a suitable shared library mechanism for linking with the Library. A suitable mechanism is one that (1) uses at run time a copy of the library already present on the user’s computer system, rather than copying library functions into the executable, and (2) will operate properly with a modified version of the library, if the user installs one, as long as the modified version is interface-compatible with the version that the work was made with. c) Accompany the work with a written offer, valid for at least three years, to give the same user the materials specified in Subsection 6a, above, for a charge no more than the cost of performing this distribution. d) If distribution of the work is made by offering access to copy from a designated place, offer equivalent access to copy the above specified materials from the same place. e) Verify that the user has already received a copy of these materials or that you have already sent this user a copy. For an executable, the required form of the “work that uses the Library” must include any data and utility programs needed for reproducing the executable from it. However, as a special exception, the materials to be distributed need not include anything that is normally distributed (in either source or binary form) with the major components (compiler, kernel, and so on) of the operating system on which the executable runs, unless that component itself accompanies the executable. It may happen that this requirement contradicts the license restrictions of other proprietary libraries that do not normally accompany the operating system. Such a contradiction means you cannot use both them and the Library together in an executable that you distribute. 7. You may place library facilities that are a work based on the Library side-by-side in a single library together with other library facilities not covered by this License, and distribute such a combined library, provided that the separate distribution of the work based on the Library and of the other library facilities is otherwise permitted, and provided that you do these two things: a) Accompany the combined library with a copy of the same work based on the Library, uncombined with any other library facilities. This must be distributed under the terms of the Sections above. b) Give prominent notice with the combined library of the fact that part of it is a work based on the Library, and explaining where to find the accompanying uncombined form of the same work. 8. You may not copy, modify, sublicense, link with, or distribute the Library except as expressly provided under this License. Any attempt otherwise to copy, modify, sublicense, link with, or distribute the Library is void, and will automatically terminate your rights under this License. However, parties who have received copies, or rights, from you under this License will not have their licenses terminated so long as such parties remain in full compliance. 9. You are not required to accept this License, since you have not signed it. However, nothing else grants you permission to modify or distribute the Library or its derivative works. These actions are prohibited by law if you do not accept this License. Therefore, by modifying or distributing the Library (or any work based on the Library), you indicate your acceptance of this License to do so, and all its terms and conditions for copying, distributing or modifying the Library or works based on it. 1470A-03Eng.indb 138 2008-08-11 �� 2:23:03 10. Each time you redistribute the Library (or any work based on the Library), the recipient automatically receives a license from the original licensor to copy, distribute, link with or modify the Library subject to these terms and conditions. You may not impose any further restrictions on the recipients’ exercise of the rights granted herein. You are not responsible for enforcing compliance by third parties with this License. 11. If, as a consequence of a court judgment or allegation of patent infringement or for any other reason (not limited to patent issues), conditions are imposed on you (whether by court order, agreement or otherwise) that contradict the conditions of this License, they do not excuse you from the conditions of this License. If you cannot distribute so as to satisfy simultaneously your obligations under this License and any other pertinent obligations, then as a consequence you may not distribute the Library at all. For example, if a patent license would not permit royalty-free redistribution of the Library by all those who receive copies directly or indirectly through you, then the only way you could satisfy both it and this License would be to refrain entirely from distribution of the Library. If any portion of this section is held invalid or unenforceable under any particular circumstance, the balance of the section is intended to apply, and the section as a whole is intended to apply in other circumstances. It is not the purpose of this section to induce you to infringe any patents or other property right claims or to contest validity of any such claims; this section has the sole purpose of protecting the integrity of the free software distribution system which is implemented by public license practices. Many people have made generous contributions to the wide range of software distributed through that system in reliance on consistent application of that system; it is up to the author/donor to decide if he or she is willing to distribute software through any other system and a licensee cannot impose that choice. This section is intended to make thoroughly clear what is believed to be a consequence of the rest of this License. 12. If the distribution and/or use of the Library is restricted in certain countries either by patents or by copyrighted interfaces, the original copyright holder who places the Library under this License may add an explicit geographical distribution limitation excluding those countries, so that distribution is permitted only in or among countries not thus excluded. In such case, this License incorporates the limitation as if written in the body of this License. 13. The Free Software Foundation may publish revised and/or new versions of the Lesser General Public License from time to time. Such new versions will be similar in spirit to the present version, but may differ in detail to address new problems or concerns. Each version is given a distinguishing version number. If the Library specifies a version number of this License which applies to it and “any later version”, you have the option of following the terms and conditions either of that version or of any later version published by the Free Software Foundation. If the Library does not specify a license version number, you may choose any version ever published by the Free Software Foundation. 14. If you wish to incorporate parts of the Library into other free programs whose distribution conditions are incompatible with these, write to the author to ask for permission. For software which is copyrighted by the Free Software Foundation, write to the Free Software Foundation; we sometimes make exceptions for this. Our decision will be guided by the two goals of preserving the free status of all derivatives of our free software and of promoting the sharing and reuse of software generally. NO WARRANTY 15. BECAUSE THE LIBRARY IS LICENSED FREE OF CHARGE, THERE IS NO WARRANTY FOR THE LIBRARY, TO THE EXTENT PERMITTED BY APPLICABLE LAW. EXCEPT WHEN OTHERWISE STATED IN WRITING THE COPYRIGHT HOLDERS AND/OR OTHER PARTIES PROVIDE THE LIBRARY “AS IS” WITHOUT WARRANTY OF ANY KIND, EITHER EXPRESSED OR IMPLIED, INCLUDING, BUT NOT LIMITED TO, THE IMPLIED WARRANTIES OF MERCHANTABILITY AND FITNESS FOR A PARTICULAR PURPOSE. THE ENTIRE RISK AS TO THE QUALITY AND PERFORMANCE OF THE LIBRARY IS WITH YOU. SHOULD THE LIBRARY PROVE DEFECTIVE, YOU ASSUME THE COST OF ALL NECESSARY SERVICING, REPAIR OR CORRECTION. 16. IN NO EVENT UNLESS REQUIRED BY APPLICABLE LAW OR AGREED TO IN WRITING WILL ANY COPYRIGHT HOLDER, OR ANY OTHER PARTY WHO MAY MODIFY AND/OR REDISTRIBUTE THE LIBRARY AS PERMITTED ABOVE, BE LIABLE TO YOU FOR DAMAGES, INCLUDING ANY GENERAL, SPECIAL, INCIDENTAL OR CONSEQUENTIAL DAMAGES ARISING OUT OF THE USE OR INABILITY TO USE THE LIBRARY (INCLUDING BUT NOT LIMITED TO LOSS OF DATA OR DATA BEING RENDERED INACCURATE OR LOSSES SUSTAINED BY YOU OR THIRD PARTIES OR A FAILURE OF THE LIBRARY TO OPERATE WITH ANY OTHER SOFTWARE), EVEN IF SUCH HOLDER OR OTHER PARTY HAS BEEN ADVISED OF THE POSSIBILITY OF SUCH DAMAGES. 1470A-03Eng.indb 139 2008-08-11 �� 2:23:03 END OF TERMS AND CONDITIONS How to Apply These Terms to Your New Libraries If you develop a new library, and you want it to be of the greatest possible use to the public, we recommend making it free software that everyone can redistribute and change. You can do so by permitting redistribution under these terms (or, alternatively, under the terms of the ordinary General Public License). To apply these terms, attach the following notices to the library. It is safest to attach them to the start of each source file to most effectively convey the exclusion of warranty; and each file should have at least the “copyright” line and a pointer to where the full notice is found. <one line to give the library’s name and an idea of what it does.> Copyright (C) <year> <name of author> This library is free software; you can redistribute it and/or modify it under the terms of the GNU Lesser General Public License as published by the Free Software Foundation; either version 2.1 of the License, or (at your option) any later version. This library is distributed in the hope that it will be useful, but WITHOUT ANY WARRANTY; without even the implied warranty of MERCHANTABILITY or FITNESS FOR A PARTICULAR PURPOSE. See the GNU Lesser General Public License for more details. You should have received a copy of the GNU Lesser General Public License along with this library; if not, write to the Free Software Foundation, Inc., 59 Temple Place, Suite 330, Boston, MA 02111-1307 USA Also add information on how to contact you by electronic and paper mail. You should also get your employer (if you work as a programmer) or your school, if any, to sign a “copyright disclaimer” for the library, if necessary. Here is a sample; alter the names: Yoyodyne, Inc., hereby disclaims all copyright interest in the library `Frob’ (a library for tweaking knobs) written by James Random Hacker. signature of Ty Coon, 1 April 1990 Ty Coon, President of Vice That’s all there is to it! 1470A-03Eng.indb 140 2008-08-11 �� 2:23:03 Yahoo Terms of Service 1. ACCEPTANCE OF TERMS Welcome to Yahoo!. Yahoo! Canada Co. (“Yahoo!”) provides its service to you, subject to the following Terms of Service (“TOS”), which may be updated by us from time to time without notice to you. You can review the most current version of the TOS at any time at: http://ca.docs.yahoo.com/info/tos.html. In addition, when using particular Yahoo! services, you may be subject to guidelines or rules or additional terms (which may be posted from time to time) applicable to such services and which are incorporated by reference into the TOS. All such guidelines or rules are hereby incorporated by reference into the TOS. Yahoo! may also offer other services that are governed by different Terms of Service. For example, but without limitation, if you are a homesteader on Yahoo! GeoCities, please note that Yahoo! provides a different Terms of Service for GeoCities. 2. DESCRIPTION OF SERVICE Yahoo! currently provides users with access to a rich collection of resources, including, various communications tools, forums, shopping services, search services, personalized content and branded programming through its network of properties which may be accessed through various mediums or devices now known or hereafter developed (the “Service”). You understand and agree that the Service may include advertisements and that these advertisements are necessary for Yahoo! to provide the Service. You understand and agree that the Service may include certain communications from Yahoo!, such as service announcements and administrative messages that are considered part of the Yahoo! Membership, and that you cannot opt out of receiving them. Unless explicitly stated otherwise, any new features that augment or enhance the current Service, including the release of new Yahoo! properties, are subject to the TOS. You understand and agree that the Service is provided “AS-IS” and that Yahoo! assumes no responsibility for the timeliness, deletion, mis-delivery or failure to store any user communications or personalization settings. You are responsible for obtaining access to the Service and that access may involve third party fees (such as Internet service provider or airtime charges). You are responsible for those fees, including fees associated with the display or delivery of advertisements. In addition, you must provide and are responsible for all equipment necessary to access the Service. Please be aware that Yahoo! has created certain areas on the Service that contain adult or mature content. You must have attained the age of majority in the province or territory in which you live to access such areas on the Service. 3. YOUR REGISTRATION OBLIGATIONS In consideration of your use of the Service, you represent that you are of legal age to form a binding contract and are not a person barred from receiving services under the laws of Canada or other applicable jurisdictions. You also agree to: (a) provide true, accurate, current and complete information about yourself as prompted by the Service’s registration form (such information being the “Registration Data”) and (b) maintain and promptly update the Registration Data to keep it true, accurate, current and complete. If you provide any information that is untrue, inaccurate, not current or incomplete, or Yahoo! has reasonable grounds to suspect that such information is untrue, inaccurate, not current or incomplete, Yahoo! has the right to suspend or terminate your account and refuse any and all current or future use of the Service (or any portion thereof). Yahoo! is concerned about the safety and privacy of all its users, particularly children. For this reason, parents who wish to allow their children access to the Service should assist them in setting up any relevant accounts and supervise their access to the Service. By allowing your child access to the Service, they will be able to access all of the Services including, email, message boards, groups, instant messages and chat (among others). Please remember that the Service is designed to appeal to a broad audience. Accordingly, as the legal guardian, it is your responsibility to determine whether any of the Services and/or Content (as defined in Section 6 below) are appropriate for your child. 4. YAHOO PRIVACY POLICY Registration Data and certain other information about you is subject to our Privacy Policy. For more information, see our full privacy policy at http://privacy.yahoo.com/privacy/ca/. You understand that through your use of the Service you consent to the collection, use and disclosure of this information, only as permitted by the Privacy Policy, including the transfer of this information to the United States and/or other countries for storage, processing, and use by Yahoo! and its affiliates in order to provide the Service to you. The Yahoo! I.D. associated with your account is the property of Yahoo! or its affiliates, and is not your personal information. 5. MEMBER ACCOUNT, PASSWORD, AND SECURITY During registration for a Yahoo! I.D., you will select a password and Yahoo! I.D. Upon successful registration for the Service, you will receive an account designation. You understand and agree that you are solely responsible for maintaining the confidentiality of your account including your password, and are fully responsible for all activities that occur under your account, including your password. You agree to (a) immediately notify Yahoo! of any unauthorized use of your password or account or any other breach of security, and (b) exit from your account at the end of each session. Yahoo! will not be liable for any loss or damage arising from your failure to comply with this Section 5. 6. MEMBER CONDUCT You understand that all materials, including without limitation, information, data, text, software, music, sound, photographs, graphics, video, and email messages or other kinds of messages (“Content”), whether publicly posted or privately transmitted, are the sole responsibility of the person from which such Content originated. This means that you, and not Yahoo!, are entirely responsible for all Content that you upload, post, email, transmit, or otherwise make available via the Service. Yahoo! does not control the Content posted via the Service and, as such, does not guarantee the accuracy, integrity or quality of such Content. You understand that by using the Service, you may be exposed to Content that is offensive, indecent or objectionable. Under no circumstances will Yahoo! be liable in any way for any Content, including, but not limited to, for any errors or omissions in any Content, or for any loss or damage of any kind incurred as a result of the use of or reliance upon any Content posted, emailed, transmitted, or otherwise made available via the Service. 1470A-03Eng.indb 141 2008-08-11 �� 2:23:03 You agree that you will not use the Service to: (a)upload, post, email, transmit, or otherwise make available any Content that is harmful, threatening, abusive, harassing, tortious, defamatory, vulgar, obscene, libelous, invasive of another’s privacy, hateful, racially, ethnically or otherwise objectionable or generally unlawful; (b) harm minors in any way; (c)impersonate any person or entity, including, but not limited to, a Yahoo! official, forum leader, guide or host, or falsely state or otherwise misrepresent your affiliation with a person or entity; (d)forge headers or otherwise manipulate identifiers in order to disguise the origin of any Content transmitted through the Service; (e)upload, post, email, transmit or otherwise make available any Content that you do not have a right to make available under any law or under contractual or fiduciary relationships (such as inside information, proprietary and confidential information learned or disclosed as part of employment relationships or under nondisclosure agreements); (f)upload, post, email, transmit or otherwise make available any Content that infringes any patent, trademark, trade secret, copyright or other proprietary rights (“Rights”) of any party; (g)upload, post, email, transmit or otherwise make available any unsolicited or unauthorized advertising, promotional materials, “junk mail,” “spam,” “chain letters,” “pyramid schemes,” or any other form of illegal solicitation. You may, however, make legally compliant solicitations in those areas (such as shopping rooms) that are designated for such purpose; (h)upload, post, email, transmit or otherwise make available any material that contains software viruses or any other computer code, files or programs designed to interrupt, destroy or limit the functionality of any computer software or hardware or telecommunications equipment; (i)disrupt the normal flow of dialogue, cause a screen to “scroll” faster than other users of the Service are able to type, or otherwise act in a manner that negatively affects other users’ ability to engage in real time exchanges; (j)interfere with or disrupt the Service or servers or networks connected to the Service, or disobey any requirements, procedures, policies or regulations of networks connected to the Service; (k)intentionally or unintentionally violate any applicable local, provincial, national or international law, including, but not limited to, regulations promulgated by the Ontario Securities Commission, any rules of any national or other securities exchange, including, without limitation, the Toronto Stock Exchange, the Montreal Stock Exchange, the New York Stock Exchange, the American Stock Exchange or the NASDAQ, and any regulations having the force of law; (l)collect or provide funds, directly or indirectly, in order to carry out terrorist crimes, contribute to or facilitate the activities of a terrorist group, or instruct anyone to carry out a terrorist activity, including doing any of the foregoing in relation to a listed entity under s.83.05 of Part II.1 of the Criminal Code. (m) “stalk” or otherwise harass another; or (n)collect or store personal data about other users without their express consent or in connection with the prohibited conduct and activities set forth in paragraphs (a) through (m) above. You acknowledge that Yahoo! does not pre-screen Content, but that Yahoo! and its designees have the right (but not the obligation) in their sole discretion to refuse or move any Content that is available via the Service. Without limiting the foregoing, Yahoo! and its designees shall have the right to remove any Content that violates the TOS or is otherwise objectionable. You agree that you must evaluate, and bear all risks associated with, the use of any Content, including any reliance on the accuracy, completeness, or usefulness of such Content. In this regard, you acknowledge that you may not rely on any Content created by Yahoo! or submitted to Yahoo! that is available on any part of the Service, including without limitation information in Yahoo! Message Boards. You acknowledge and expressly consent to Yahoo! accessing, preserving, and disclosing your account information and Content if required to do so by law or in the good faith belief that such access, preservation or disclosure is reasonably necessary to: (a) comply with legal process; (b) enforce the TOS; (c) respond to claims that any Content violates the rights of third-parties; (d) respond to your requests for customer service; or (e) protect the rights, property, or personal safety of Yahoo!, its users and the public. You understand that the technical processing and transmission of the Service, including your Content, may involve (a) transmissions over various networks; and (b) changes to conform and adapt to technical requirements of connecting networks or devices. You understand that the Service and software embodied within the Service may include security components that permit digital materials to be protected, and use of these materials is subject to usage rules set by Yahoo! and/or content providers who provide Content to the Service. You agree that you will not attempt to override or circumvent any of the usage rules embedded into the Service. Any unauthorized reproduction, publication, further distribution or public exhibition of the materials provided on the Service, in whole or in part, is strictly prohibited. 7. SPECIAL ADMONITIONS FOR INTERNATIONAL USE Recognizing the global nature of the Internet, you agree to comply with all local rules regarding online conduct and acceptable Content. Specifically, you agree to comply with all applicable laws regarding the transmission of technical data exported from Canada or the country in which you reside. 8. CONTENT SUBMITTED OR MADE AVAILABLE FOR INCLUSION ON THE SERVICE Yahoo! does not claim ownership of Content you submit or make available for inclusion on the Service. However, with respect to Content you submit or make available for inclusion on publicly accessible areas of the Service, you grant Yahoo! the following world-wide, royalty free and non-exclusive license(s), as applicable: 1470A-03Eng.indb 142 2008-08-11 �� 2:23:03 •With respect to Content you submit or make available for inclusion on publicly accessible areas of Yahoo! Groups, the license to use, distribute, reproduce, modify, adapt, publicly perform, and publicly display such Content on the Service solely for the purposes of providing and promoting the specific Yahoo! Group to which such Content was submitted or made available. This licence exists only for as long as you elect to continue to include such Content on the Service and will terminate at the time you remove or Yahoo! removes such Content from the Service. •With respect to photos, graphics, audio, or video you submit or make available for inclusion on publicly accessible areas of the Service other than Yahoo! Groups, the license to use, distribute, reproduce, modify, adapt, publicly perform and publicly display such Content on the Service solely for the purpose for which such Content was submitted or made available. This licence exists only for as long as you elect to continue to include such Content on the Service and will terminate at the time you remove or Yahoo! removes such Content from the Service. •With respect to Content other than photos, graphics, audio or video you submit or make available for inclusion on publicly accessible areas of the Service other than Yahoo! Groups, the perpetual, irrevocable and fully sublicensable license to use, distribute, reproduce, modify, adapt, publish, translate, publicly perform and publicly display such Content (in whole or in part) and to incorporate such Content into other works in any format or medium now known or later developed. “Publicly accessible” areas of the Service are those areas of the Yahoo! network of properties that are intended by Yahoo! to be available to the general public. By way of example, publicly accessible areas of the Service would include Yahoo! Message Boards and portions of Yahoo! Groups, Photos and Briefcase that are open to both members and visitors. However, publicly accessible areas of the Service would not include portions of Yahoo! Groups, Photos, and Briefcase that are limited to members or visitors, Yahoo! services intended for private communication such as Yahoo! Mail or Yahoo! Messenger, or areas off of the Yahoo! network of properties such as portions of World Wide Web sites that are accessible through hypertext or other links but are not hosted or served by Yahoo!. 9. INDEMNITY You agree to indemnify and hold Yahoo! and its affiliates, officers, agents, co-branders or other partners, and employees harmless from any claim or demand, including reasonable legal fees, made by any third party due to or arising out of Content you submit, post, transmit or make available through the Service, your use of the Service, your connection to the Service, your violation of the TOS, or your violation of any rights of another. 10. NO RESALE OF SERVICE You agree not to reproduce, duplicate, copy, sell, trade, or exploit for any commercial purposes, any portion of the Service (including the Yahoo! I.D. associated with your account), use of the Service, or access to the Service. 11. GENERAL PRACTICES REGARDING USE AND STORAGE You acknowledge that Yahoo! may establish general practices and limits concerning use of the Service, including without limitation the maximum number of days that email messages, message board postings or other uploaded Content will be retained by the Service, the maximum number of email messages that may be sent from or received by an account on the Service, the maximum size of any email message that may be sent from or received by an account on the Service, the maximum disk space that will be allotted on Yahoo!’s servers on your behalf, and the maximum number of times (and the maximum duration for which) you may access the Service in a given period of time. You agree that Yahoo! has no responsibility or liability for the deletion or failure to store any messages and other communications or other Content maintained or transmitted by the Service. You acknowledge that Yahoo! reserves the right to log off accounts that are inactive for a certain period of time as determined by Yahoo!. You further acknowledge that Yahoo! reserves the right to change these general practices and limits at any time, in its sole discretion, with or without notice. 12. MODIFICATIONS TO SERVICE Yahoo! reserves the right at any time to modify or discontinue, temporarily or permanently, the Service (or any part thereof) with or without notice. You agree that Yahoo! will not be liable to you or to any third party for any modification, suspension or discontinuance of the Service. 13. TERMINATION AND RECYCLING OF ACCOUNTS You agree that Yahoo!, in its sole discretion, may terminate your account or any part thereof, including any associated email address or your use of the Service, and remove and discard any Content within the Service, for any reason, including, without limitation, (a) lack of use, (b) if Yahoo! believes that you have violated or acted inconsistently with the letter or spirit of the TOS, (c) requests by law enforcement or other government agencies, (d) a request by you (self-initiated account deletions), (e) discontinuance or material modification to the Service (or any part thereof), (f) unexpected technical or security issues or problems, (g) in compliance with legal process; (h) if you have or we believe you have engaged in illegal activities, including without limitation, fraud, and/or (i) nonpayment of any fees owed by you in connection with the Services. Yahoo! may also, in its sole discretion and at any time, discontinue providing the Service, or any part thereof, with or without notice. You acknowledge and agree that any termination of your access to the Service under any provision of this TOS may be effected without prior notice and that Yahoo! may immediately deactivate or delete your account and all related Content (including without limitation email messages and photos)) associated with or stored in your account and/or bar any further access to such Content or the Service. Further, you agree that Yahoo! is not liable to you or any third-party for termination of your account (including any associated email address), or termination of your access to the Service. As Yahoo! IDs and the related email addresses are the property of Yahoo!, upon termination of your account the Yahoo! I.D. or email address previously associated with your account will become available to other Yahoo! users to select as their Yahoo! I.D. While Yahoo! will take reasonable steps as described in our Privacy Policy to secure the information provided by you prior to the termination of your account, you understand and agree that it is solely your responsibility and obligation to notify others that you no longer can be contacted at a particular terminated Yahoo! I.D. or email address. You expressly acknowledge and agree that you, and not Yahoo!, are solely responsible for the receipt of correspondence erroneously directed to you at your terminated Yahoo! I.D. or email address that may now belong to another Yahoo! user. 1470A-03Eng.indb 143 2008-08-11 �� 2:23:03 14. DEALINGS WITH ADVERTISERS Your correspondence or business dealings with, or participation in promotions of, advertisers found on or through the Service, including payment and delivery of related goods or services, and any other terms, WARRANTIES, REPRESENTATIONS, OR CONDITIONS associated with such dealings, are solely between you and such advertiser. You agree that Yahoo! is not responsible or liable for any loss or damage of any sort incurred as a result of such dealings or as a result of the presence of such advertisers on the Service. 15. LINKS The Service may provide, or third parties may provide, links to other World Wide Web sites or resources. Because Yahoo! has no control over such sites and resources, you acknowledge and agree that Yahoo! is not responsible for the availability of such external sites or resources, and does not endorse and is not responsible or liable for any Content, advertising, products, or other materials on or available from such sites or resources. You further acknowledge and agree that Yahoo! is not responsible or liable, directly or indirectly, for any damage or loss caused or alleged to be caused by or in connection with use of or reliance on any such Content, goods or services available on or through any such site or resource. 16. YAHOO! PROPRIETARY RIGHTS You acknowledge and agree that the Service and any necessary software used in connection with the Service (“Software”) contain proprietary and confidential information that is protected by applicable intellectual property and other laws. You further acknowledge and agree that Content contained in sponsor advertisements or information presented to you through the Service or advertisers is protected by copyrights, trademarks, service marks, patents, or other proprietary rights and laws. Except as expressly authorized by Yahoo! or advertisers, you agree not to modify, rent, lease, loan, sell, distribute or create derivative works based on the Service or the Software, in whole or in part. Yahoo! grants you a personal, non-transferable and non-exclusive right and license to use the object code of its Software on a single computer; provided that you do not (and do not allow any third party to) copy, modify, create a derivative work of, reverse engineer, reverse assemble, or otherwise attempt to discover any source code, sell, assign, sublicense, grant a security interest in, or otherwise transfer any right in the Software. You agree not to modify the Software in any manner or form, or to use modified versions of the Software, including (without limitation) for the purpose of obtaining unauthorized access to the Service. You agree not to access the Service by any means other than through the interface that is provided by Yahoo! for use in accessing the Service. 17. DISCLAIMER OF WARRANTIES, REPRESENTATIONS, AND CONDITIONS YOU EXPRESSLY UNDERSTAND AND AGREE THAT: (a)YOUR USE OF THE SERVICE IS AT YOUR SOLE RISK. THE SERVICE IS PROVIDED ON AN “AS IS” AND “AS AVAILABLE” BASIS. YAHOO! EXPRESSLY DISCLAIMS ALL WARRANTIES, REPRESENTATIONS AND CONDITIONS OF ANY KIND, WHETHER EXPRESS OR IMPLIED, INCLUDING, BUT NOT LIMITED TO THE IMPLIED WARRANTIES, REPRESENTATIONS AND CONDITIONS OF MERCHANTABILITY, FITNESS FOR A PARTICULAR PURPOSE AND NON-INFRINGEMENT. (b)YAHOO! MAKES NO WARRANTY THAT (i) THE SERVICE WILL MEET YOUR REQUIREMENTS, (ii) THE SERVICE WILL BE UNINTERRUPTED, TIMELY, SECURE, OR ERROR-FREE, (iii) THE RESULTS THAT MAY BE OBTAINED FROM THE USE OF THE SERVICE WILL BE ACCURATE OR RELIABLE, (iv) THE QUALITY OF ANY PRODUCTS, SERVICES, INFORMATION, OR OTHER MATERIAL PURCHASED OR OBTAINED BY YOU THROUGH THE SERVICE WILL MEET YOUR EXPECTATIONS, AND (V) ANY ERRORS IN THE SOFTWARE WILL BE CORRECTED. (c)ANY MATERIAL DOWNLOADED OR OTHERWISE OBTAINED THROUGH THE USE OF THE SERVICE IS DONE AT YOUR OWN DISCRETION AND RISK AND THAT YOU WILL BE SOLELY RESPONSIBLE FOR ANY DAMAGE TO YOUR COMPUTER SYSTEM OR LOSS OF DATA THAT RESULTS FROM THE DOWNLOAD OF ANY SUCH MATERIAL. (d)NO ADVICE OR INFORMATION, WHETHER ORAL OR WRITTEN, OBTAINED BY YOU FROM YAHOO! OR THROUGH OR FROM THE SERVICE SHALL CREATE ANY WARRANTY NOT EXPRESSLY STATED IN THE TOS. 18. LIMITATION OF LIABILITY YOU EXPRESSLY UNDERSTAND AND AGREE THAT YAHOO! SHALL NOT BE LIABLE FOR ANY DIRECT, INDIRECT, INCIDENTAL, SPECIAL, CONSEQUENTIAL, OR EXEMPLARY DAMAGES, INCLUDING BUT NOT LIMITED TO, DAMAGES FOR LOSS OF PROFITS, GOODWILL, USE, DATA, OR OTHER INTANGIBLE LOSSES (EVEN IF YAHOO HAS BEEN ADVISED OF THE POSSIBILITY OF SUCH DAMAGES), RESULTING FROM: (i) THE USE OR THE INABILITY TO USE THE SERVICE; (ii) THE COST OF PROCUREMENT OF SUBSTITUTE GOODS AND SERVICES RESULTING FROM ANY GOODS, DATA, INFORMATION, OR SERVICES PURCHASED OR OBTAINED OR MESSAGES RECEIVED OR TRANSACTIONS ENTERED INTO THROUGH OR FROM THE SERVICE; (iii) UNAUTHORIZED ACCESS TO OR ALTERATION OF YOUR TRANSMISSIONS OR DATA; (iv) STATEMENTS OR CONDUCT OF ANY THIRD PARTY ON THE SERVICE; OR (v) ANY OTHER MATTER RELATING TO THE SERVICE. 19. EXCLUSIONS AND LIMITATIONS SOME JURISDICTIONS DO NOT ALLOW THE EXCLUSION OF CERTAIN WARRANTIES, REPRESENTATIONS AND CONDITIONS OR THE LIMITATION OR EXCLUSION OF LIABILITY FOR INCIDENTAL OR CONSEQUENTIAL DAMAGES. ACCORDINGLY, SOME OF THE ABOVE LIMITATIONS OF SECTIONS 17 AND 18 MAY NOT APPLY TO YOU. 20. SPECIAL ADMONITION FOR SERVICES RELATING TO FINANCIAL MATTERS If you intend to create or join any service, receive or request any news, messages, alerts, or other information from the Service concerning companies, stock quotes, investments or securities, please read the above Sections 17 and 18 again. They go doubly for you. In addition, for this type of information particularly, the phrase “Let the investor beware” is apt. The Service is provided for informational purposes only, and no Content included in the Service is intended for trading or investing purposes. Yahoo! and its licensors are not responsible or liable for the accuracy, usefulness or availability of any information transmitted or made available via the Service, and are not responsible or liable for any trading or investment decisions made based on such information. 1470A-03Eng.indb 144 2008-08-11 �� 2:23:03 21. NO THIRD PARTY BENEFICIARIES You agree that, except as otherwise expressly provided in this TOS, there shall be no third party beneficiaries to this Agreement. 22. NOTICE Notices to you may be made via either email or regular mail. The Service may also provide notices of changes to the TOS or other matters by displaying notices or links to notices to you on the Service. 23. TRADEMARK INFORMATION Yahoo! and the Yahoo! logo, Y! and the Y! logo, Y! MUSIC logo, My Yahoo!, 1-800-MY-YAHOO, Addressguard, Audibles, Big Idea Chair, Gameprowler and the Gameprowler logo, Games Domain logo, GeoCities, GeoGuide, Get Local, HotJobs, HotJobs.com and the HotJobs.com logo, Imvironments, Inktomi, JT’s Blocks, the Jumpin’ Y Guy logo, Life Engine, Matchcast, Naval Command, Resumix, Smartfit, Smartview, Viaweb, Word Racer, Wordaholic and the Yahooligans! trademarks and service marks and other Yahoo! logos and product and service names are trademarks of Yahoo! Inc. (the “Yahoo Marks”) used by Yahoo! in Canada under permission. You agree not to display or use in any manner the Yahoo! Marks unless you obtain Yahoo Inc.’s prior express permission. If you are seeking permission to use any Yahoo! trademarks, logos, service marks, trade dress, slogans, screen shots, copyrighted designs, or other brand features, please follow the Yahoo! Inc. instructions located at http://docs.yahoo.com/info/copyright/permission.html. 24. NOTICE AND PROCEDURE FOR MAKING CLAIMS OF COPYRIGHT OR INTELLECTUAL PROPERTY INFRINGEMENT Yahoo! respects the intellectual property of others, and we ask our users to do the same. Yahoo! may, in appropriate circumstances and at its discretion, disable and/or terminate the accounts of users who may be repeat infringers. If you believe that your work has been copied in a way that constitutes copyright infringement, or your intellectual property rights have been otherwise violated, please provide Yahoo! with the following information in writing: 1.a signature of the person authorized to act on behalf of the owner of the copyright or other intellectual property interest; 2. a description of the copyrighted work or other intellectual property that you claim has been infringed; 3. a description of where the material that you claim is infringing is located on the site; 4. your address, telephone number, and email address; 5.a statement by you that you have a good faith belief that the disputed use is not authorized by the copyright owner, its agent, or the law; and 6.a statement by you that the above information in your Notice is accurate and that you are the copyright or intellectual property owner or authorized to act on the copyright or intellectual property owner’s behalf. You can send claims of copyright or other intellectual property infringement to: Yahoo! Canada Legal Department 106 Front St. East, Suite 200 Toronto, Ontario, Canada M5A 1E1 24. GENERAL INFORMATION Entire Agreement. The TOS constitute the entire agreement between you and Yahoo! and govern your use of the Service, superseding any prior agreements, oral or written, between you and Yahoo! with respect to the Service. You may also be subject to additional terms and conditions that may apply when you use or purchase certain Yahoo! services, affiliate services, third-party content or third-party software. Choice of Law and Forum. The TOS and the relationship between you and Yahoo! shall be governed by the laws of the province of Ontario and Canada without regard to its conflict of law provisions. You and Yahoo! agree to submit to the personal and exclusive jurisdiction of the courts located within the province of Ontario, Canada. Waiver and Severability of Terms. The failure of Yahoo! to exercise or enforce any right or provision of the TOS shall not constitute a waiver of such right or provision. If any provision of the TOS is found by a court of competent jurisdiction to be invalid, the parties nevertheless agree that the court should endeavour to give effect to the parties’ intentions as reflected in the provision, and the other provisions of the TOS remain in full force and effect. No Right of Survivorship and Non-Transferability. You agree that your Yahoo! account is non-transferable and any rights to your Yahoo! I.D. or Content within your account terminate upon your death. Upon receipt of a copy of a death certificate, your account may be terminated and all Content permanently deleted. Statute of Limitations. You agree that regardless of any statute or law to the contrary, any claim or cause of action arising out of or related to use of the Service or related to the TOS must be filed within one (1) year after such claim or cause of action arose or be forever barred. Further Assurances. You agree to use reasonable efforts to do, make, execute, deliver, or cause to be done, made, executed, or delivered, all such further acts, documents, and things as Yahoo! may reasonably require from time to time for the purpose of giving effect to these TOS, including regularly reviewing the TOS and updating your registration information. Language. The parties hereto have agreed that this Agreement and any of its accessories, including notice, be written in the English language. Les parties aux présentes ont exigé que ce contrat et ses accessoires, y compris tout avis, soient rédigés en anglais. The section titles in the TOS are for convenience only and have no legal or contractual effect. 25. VIOLATIONS Please report any violations of the TOS to our Customer Care group. 1470A-03Eng.indb 145 2008-08-11 �� 2:23:03 TÉLÉVISEUR ACL Guide de l’utilisateur Imaginez les possibilités Merci d’avoir acheté un produit Samsung. Pour obtenir un service complet, veuillez enregistrer votre produit à: www.samsung.com/global/register Modèle 01470D-03Fre.indb 1 N° de série 2008-08-11 �� 1:33:41 Remarques importantes sur la garantie relative au format de l’image du téléviseur Le format écran large des écrans ACL (16:9, soit le rapport hauteur/largeur de l’image) est conçu principalement pour les vidéos plein écran à écran large. Les images affichées devraient être en format écran large 16:9 ou agrandi afin de remplir l’écran si votre modèle offre cette caractéristique et que les images sont constamment en mouvement. L’affichage de graphiques et d’images fixes, comme les barres noires des vidéos et des programmes de télévision en format standard non agrandi doit être limité au maximum à 5 % du temps d’écoute hebdomadaire. De plus, il faut limiter l’affichage d’images et de textes fixes, comme les rapports boursiers, les affichages de jeux vidéo, les logos des stations, les sites Web ou les images graphiques et les schémas des ordinateurs, tel qu’indiqué ci-dessus, et ce pour tous les téléviseurs. L’affichage d’images fixes qui ne respecte pas les directives ci-dessus peut causer un vieillissement inégal des écrans ACL en y créant des images fantôme subtiles mais permanentes. Pour éviter ce problème, faites varier les émissions et les images et regarder principalement des images plein écran en mouvement et non pas des images ou des barres foncées fixes. Dans les modèles d’écran à plasma qui offrent des caractéristiques de format d’image, utiliser ces commandes pour obtenir différents formats en plein écran. Prendre garde au choix des formats et à leur durée d’utilisation. Un vieillissement inégal résultant du choix et de l’utilisation d’un format, tout comme les images rémanentes, ne sont pas couverts par la garantie limitée de Samsung. États-Unis seulement L’appareil qui accompagne ce guide de l’utilisateur est fabriqué sous licence en vertu de droits de propriété intellectuelle de certaines tierces parties. Ce produit est protégé en vertu des brevets américains suivants : 5 991 715, 5 740 317, 4 972 484, 5 214 678, 5 323 396, 5 539 829, 5 606 618, 5 530 655, 5 777 992, 6 289 308, 5 610 985, 5 481 643, 5 544 247, 5 960 037, 6 023 490, 5 878 080, et en vertu de la demande de brevet nº 2001-44713-A1 publiée aux États-Unis. Cette licence permet aux consommateurs d’utiliser le contenu sous licence à des fins non commerciales. Aucun droit n’est accordé à l’égard d’une utilisation commerciale. Cette licence ne couvre aucun autre appareil que celui-ci et ne s’applique pas aux produits non pourvus d’une licence ni à tout processus conforme à la norme ISO/IEC 11172-3 ou ISO/IEC 13818-3 utilisé ou vendu de pair avec ce produit. La licence ne couvre que l’utilisation de cet appareil à des fins d’encodage et/ou de décodage de fichiers audio conformément à la norme ISO/IEC 11172-3 ou ISO/IEC 13818-3. Aucun droit n’est accordé en vertu de cette licence en ce qui a trait aux caractéristiques ou fonctions du produit qui ne sont pas conformes à la norme ISO/IEC 11172-3 ou ISO/IEC 13818-3. Autres pays L’appareil qui accompagne ce guide de l’utilisateur est fabriqué sous licence en vertu de droits de propriété intellectuelle de certaines tierces parties. Cette licence permet aux consommateurs d’utiliser le contenu sous licence à des fins non commerciales. Aucun droit n’est accordé à l’égard d’une utilisation commerciale. Cette licence ne couvre aucun autre appareil que celui-ci et ne s’applique pas aux produits non pourvus d’une licence ni à tout processus conforme à la norme ISO/IEC 11172-3 ou ISO/IEC 13818-3 utilisé ou vendu de pair avec ce produit. La licence ne couvre que l’utilisation de cet appareil à des fins d’encodage et/ou de décodage de fichiers audio conformément à la norme ISO/IEC 11172-3 ou ISO/IEC 13818-3. Aucun droit n’est accordé en vertu de cette licence en ce qui a trait aux caractéristiques ou fonctions du produit qui ne sont pas conformes à la norme ISO/IEC 11172-3 ou ISO/IEC 13818-3. SAMSUNG ELECTRONICS NORTH AMERICAN LIMITED WARRANTY STATEMENT Assujettie aux exigences, conditions, exclusions et limitations de la garantie limitée originale fournie avec les produits de Samsung Electronics (SAMSUNG) et les exigences, conditions, exclusions et limitations de la présente garantie, SAMSUNG offrira en plus un service de réparation sous garantie aux États-Unis pour les produits achetés au Canada et un service de réparation sous garantie au Canada pour les produits achetés aux États-Unis pendant la période de garantie précisée à l’origine et pour l’acheteur initial seulement. Les réparations sous garantie décrites ci-dessus doivent être effectuées dans un centre de réparation agréé SAMSUNG. En plus de la présente garantie, la garantie limitée originale et une facture datée en tant que preuve d’achat doivent être présentées au centre de réparation. Le transport de l’appareil au et à partir du centre de réparation demeure la responsabilité de l’acheteur. Les conditions couvertes ne sont limitées qu’aux vices de matériaux et de fabrication dans des conditions d’utilisation normale. Exclues, mais non pas limitées à, sont les dispositions précisées à l’origine pour le service à domicile ou sur place, durées de réparation minimales et maximales, échanges ou remplacements, accessoires, options, extensions ou produits non durables. Pour obtenir le nom d’un centre de réparation agréé Samsung, appelez sans frais : Aux États-Unis : 1-800-SAMSUNG (1-800-726-7864) Au Canada : 1-800-SAMSUNG ➣ Voir le bon de garantie pour avoir plus d’information sur les conditions de garantie. Précautions à prendre lors de l’affichage d’une image fixe Une image fixe peut causer des dommages irrémédiables à l’écran du téléviseur. • N’affichez pas une image fixe sur l’écran LCD plus de 2 heures. Cela pourrait provoquer une rémanence de l’image à l’écran. Cette rémanence de l’image est également appelée “brûlure de l’écran”. Pour éviter une telle rémanence de l’image à l’écran, réduisez la luminosité et le contraste de l’écran lorsque vous laissez une image fixe affichée. • Regarder l’écran LCD du téléviseur en format 4:3 pendant une longue période peut laisser des traces de bordures à gauche, à droite et au centre de l’écran, à cause de la différence d’émission de lumière sur l’écran. La lecture d’un DVD ou l’utilisation d’une console de jeu peut avoir un effet similaire sur l’écran. Les dommages provoqués par les effets qui précèdent ne sont pas couverts par la garantie. • L’affichage d’images fixes de jeux vidéo et d’ordinateurs pendant plus longtemps qu’une période spécifique peut provoquer des rémanences.Pour éviter cela, réduisez la “luminosité” et le “contraste” lors de l’affichage d’images fixes. © 2008 Samsung Electronics Co., Ltd. All rights reserved. 01470D-03Fre.indb 1 2008-08-11 �� 1:33:41 Table des matières Informations générales ■ ■ ■ ■ ■ ■ ■ Liste des fonctions..................................................................... 2 Accessoires............................................................................... 2 Présentation du panneau de commande................................... 3 Présentation du panneau de branchement................................ 4 Télécommande.......................................................................... 5 Insertion des piles dans la télécommande................................. 6 Utilisation des touches rétroéclairées de la télécommande ..... 6 ■ Connexion d’antennes VHF et UHF.......................................... 7 ■ Connexion du Câble TV............................................................. 7 ■ Connexion d’un lecteur DVD ou d’un décodeur Câble/récepteur satellite (boîtier décodeur) via HDMI......................................... 9 ■ Connexion d’un lecteur DVD ou d’un décodeur Câble/récepteur satellite (boîtier décodeur) via DVI............................................. 9 ■ Branchement d’un lecteur DVD, câblosélecteur ou récepteur satellite à l’aide de câbles composantes................................. 10 ■ Connexion d’un caméscope.................................................... 10 ■ Branchement d’un magnétoscope........................................... 11 ■ Branchement d’un système audio numérique......................... 12 ■ Connexion d’un amplificateur/home cinéma DVD................... 12 ■ Branchement d’un PC.............................................................. 13 Fonctionnement ■ ■ ■ ■ ■ ■ ■ ■ ■ ■ Mise en marche et arrêt de la télévision.................................. 14 Fonction Prêt à l’emploi........................................................... 14 Changement des canal............................................................ 16 Réglage du volume.................................................................. 16 Visualisation de l’affichage...................................................... 17 Visualisation des menus.......................................................... 17 Utilisation de la touche TOOLS............................................... 18 Mémorisation des canal........................................................... 18 Pour sélectionner la source..................................................... 20 Pour éditer le nom de la source............................................... 20 Contrôle de L’image ■ ■ ■ ■ ■ ■ Changement du format normal de l’image............................... 21 Personnalisation des réglages de l’image............................... 21 Paramétrage de la fonction Réglages des détails................... 22 Rétablir les paramètres de réglage de l’image d’usine............ 25 Configuration des options d’image.......................................... 26 Visionnement Image sur Image............................................... 30 Contrôle du Son ■ ■ ■ ■ ■ ■ ■ ■ ■ ■ Changement du format normal du son.................................... 32 Personnalisation du son.......................................................... 32 Paramétrage de la technologie TruSurround XT..................... 33 Choix de la langue privilégiée.................................................. 34 Sélection d’une piste sonore à canaux multiples (MTS).......... 34 Contrôle automatique du volume............................................. 35 Activation et désactivation des haut-parleurs.......................... 35 Activation du son de l’image (ISI) secondaire.......................... 36 Rétablir les paramètres de son par défaut............................... 36 Connexion du casque (Vendu séparément)............................ 36 Contrôle des Chaînes ■ ■ ■ ■ Gestion des canaux................................................................. 37 Suppression des canaux brouillés – canaux numériques........ 43 Syntonisation fine des chaînes analogiques............................ 43 Contrôle de la puissance du signal numérique........................ 44 Affichage PC ■ Utilisation de votre télévision comme un écran PC................. 45 ■ Modes d’affichage.................................................................... 45 ■ Configurer votre téléviseur avec votre PC............................... 46 Paramètre D’heure ■ Sélection d’une langue de menu............................................. 52 ■ Utilisation de la fonction puce V-Chip...................................... 52 ■ Affichage des sous-titres (messages texte à l’écran) – Analogique............................................................................ 59 ■ Affichage des sous-titres (messages texte à l’écran) – Numérique............................................................................ 60 ■ Réglage de la mélodie de marche/arrêt du téléviseur............. 61 ■ Réglage du mode Divertissement............................................ 62 ■ Fonction économiseur d’énergie.............................................. 62 ■ Mise à niveau du logiciel.......................................................... 63 WISELINK Pro ■ ■ ■ ■ ■ ■ ■ ■ ■ ■ ■ Utilisation de la fonction WISELINK Pro.................................. 64 Utilisation de la liste de photos................................................ 65 Liste de photos triées............................................................... 67 Visualisation d’une photo ou d’un diaporama.......................... 71 Utilisation de la liste musicale.................................................. 75 Tri de la liste de fichiers musicaux........................................... 76 Lecture d’un fichier musical..................................................... 80 Utilisation de la liste des films.................................................. 82 Classement de la liste des films.............................................. 83 Lecture d’un fichier film............................................................ 86 Utilisation du menu de configuration........................................ 88 Français Connexions Description de la Fonction WISELINK Pro-DLNA ■ ■ ■ ■ Configuration du réseau DLNA................................................ 89 Installation de l’application DLNA............................................ 90 Utilisation de l’application DLNA.............................................. 91 Utilisation de la fonction DLNA................................................ 96 Contents Library ■ Utilisation du mode Contents Library....................................... 98 ■ Utilisation du contenu intégré dans la mémoire du téléviseur........... 99 ■ Utilisation du contenu d’un dispositif de stockage externe USB..... 104 Paramètres du réseau et InfoLink ■ ■ ■ ■ ■ ■ ■ ■ ■ ■ Connexion au réseau - câble................................................. 105 Connexion au réseau - sans fil.............................................. 107 Sélection du réseau............................................................... 107 Configuration du réseau par câble......................................... 108 Configuration du réseau sans fil............................................ 110 Activation du service Infolien ................................................ 113 Utilisation d’Infolien - United State......................................... 114 Utilisation d’Infolien - Canada................................................ 116 Configuration Infolien............................................................. 117 Guide du produit.................................................................... 118 À propos d’Anynet+ ■ ■ ■ ■ ■ ■ ■ Qu’est-ce qu’Anynet+?.......................................................... 119 Branchement d’appareils Anynet+ . ...................................... 119 Configuration d’Anynet+ ....................................................... 120 Balayage et permutation entre les appareils Anynet+ .......... 120 Enregistrement...................................................................... 121 Écoute par l’intermédiaire d’un récepteur.............................. 122 Dépannage de la fonction Anynet+ ..................................... 122 Annexe ■ ■ ■ ■ ■ ■ Identification des problèmes.................................................. 123 Installation du support............................................................ 125 Démonter la base.................................................................. 125 Support mural à réglage automatique (vendu séparément)..... 126 Spécifications du jeu d’installation murale (VESA)................ 127 Utilisation du verrouillage Kensington antivol (LN40A750R1F, LN46A750R1F)........................................... 128 ■ Spécifications......................................................................... 129 ■ Dimensions............................................................................ 130 ■ Régler l’horloge........................................................................ 48 Symboles Appuyer Remarque Bouton d’accès rapide Français - 01470D-03Fre.indb 1 2008-08-11 �� 1:33:42 Informations générales Liste des fonctions • • • • • • • • • Paramètres d’image modifiables pouvant être stockés dans la mémoire du téléviseur. Minuterie automatique pour allumer ou éteindre le téléviseur. Minuterie de mise en veille spéciale. Interface numérique et de réseau exceptionnelle : Avec un syntoniseur numérique HD intégré, la vision des émissions HD sans inscription ne nécessite pas de décodeur Câble/récepteur satellite (boîtier décodeur). Il est possible d’obtenir les nouvelles, les prévisions météorologiques et les cotes de la bourse sur le réseau (service InfoLink de SAMSUNG). Il est possible d’écouter des fichiers de musique et de voir des images sur des appareils USB Mass Storage Class (MSC). Connexion HDMI/DVI entre votre PC et ce téléviseur. Excellente qualité d’image - La technologie DNIe offre des images d’une netteté aussi vraie que nature SRS TruSurround XT - La technologie SRS TruSurround XT offre une qualité de son ambiophonique. Accessoires Vérifiez que les éléments suivants sont inclus avec votre télévision LCD. S’il manque des éléments, contactez votre revendeur. Télécommande et piles (AAA x 2) (BN59-00696A) Cordon D’alimentation (3903-000144) Carte de garantie / Cartes d’enregistrement / Guide de sécurité (N’est pas disponible dans toutes les agences) Tissu de nettoyage (BN63-01798A) Émission CD (BN59-00726A) Instructions D’utilisation Panneau arrière (LN40A750R1F: BN63-04343A) (LN46A750R1F: BN63-04336A) (LN52A750R1F: BN63-04340A) Tore de ferrite pour cable de prise HDMI X 2 (câble HDMI4, DVI à HDMI) (3301-001110) ➣ La forme et la couleur des accessoires peuvent varier selon le modèle. ➣ Tore magnétique (câble HDMI4, DVI à HDMI) Les tores de ferrite sont utilisés pour protéger les câbles contre les interférences. Lorsque vous branchez un Câble, ouvrez le tore de ferrite et fixez-le sur le pourtour du Câble au niveau de la fiche. Français - 01470D-03Fre.indb 2 2008-08-11 �� 1:33:43 Présentation du panneau de commande Boutons situés en bas à droite du panneau Les boutons situés en bas à droite du panneau commandent les fonctions de base de votre téléviseur, notamment le menu à l’écran. Pour utiliser les fonctions plus avancées, vous devez utiliser la télécom-mande. 1 2 3 4 8 78 ➣ La couleur et la forme du produit peuvent varier en fonction du modèle. 1 SOURCE Bascule entre toutes les sources d’entrée disponibles (TV, AV1, AV2, S-Vidéo, Composante1, Composante2, PC, HDMI1, HDMI2/DVI, HDMI3, HDMI4, USB). Dans le menu à l’écran, utilisez ce bouton de la même manière que le bouton ENTER de la télécommande. 2 MENU Appuyez pour voir à l’écran le menu des fonctions de votre télévision. 3 – VOL + Appuyez sur ce bouton pour augmenter ou baisser le volume. Dans le menu à l’écran, utilisez les boutons – VOL + de la même manière que les boutons ◄ et ► de la télécommande. 4 5 6 Touches du panneau avant Appuyez sur une touche pour activer une fonction. 5 VOYANT D’ALIMENTATION Clignote puis s’arrête lorsque le téléviseur est allumé. S’allume en mode Veille. 6 (Alimentation) Appuyez sur ce bouton pour allumer et teindre la télévision. 7 Capteur de la télécommande Dirigez la télécommande vers de point de la télévision. 8haut-Parleurs CH Appuyez sur ce bouton pour changer de canal. Dans le menu à l’écran, utilisez les boutons CH de la même manière que les boutons ▼ et ▲ de la télécommande. Français - 01470D-03Fre.indb 3 2008-08-11 �� 1:33:45 Présentation du panneau de branchement Utiliser les prises du panneau de connexion pour brancher des composants audiovisuels utilisés continuellement, par exemple un lecteur DVD ou un magnétoscope. Pour plus d’informations sur le branchement des appareils, voir pages 7~13. [Panneau latéral de la télévision] HDMI IN4 [Pannear arrière de la télévision] ➣ La couleur et la forme du produit peuvent varier en fonction du modèle. 1 AUDIO OUT A connecter aux prises d’entrée audio de votre amplificateur/home cinéma. 8 2 DIGITAL AUDIO OUT (OPTICAL) À brancher à un appareil audio numérique. 9 PUISSANCE CONSOMMÉE Connectez le Câble d’alimentation fourni. (ÉCOUTEURS) A connecter à des écouteurs externes pour une écoute privée. 3 PC IN [PC] / [AUDIO] 0 COMPONENT IN 1, 2 / AV IN 1 A connecter aux prises de sortie audio et vidéo de votre PC. A connecter à la composante vidéo/audio. La prise COMPONENT IN 1 sert également de prise AV IN 1. 4 HDMI IN 1, 2, 3, 4 / DVI IN(HDMI2)[R-AUDIO-L] - Brancher le Câble vidéo à la prise COMPONENT IN 1 A connecter à la prise HDMI d’un périphérique doté d’une [Y/VIDEO] et le Câble audio aux prises COMPONENT IN sortie HDMI. 1 [R-AUDIO-L]. - Aucune connexion audio n’est requise entre deux appareils HDMI. ! LAN Utilisez la borne HDMI IN 2 pour la connexion DVI vers un Brancher un câble LAN à ce port afin d’établir une périphérique externe. connexion au réseau (service InfoLink de SAMSUNG). Utilisez un Câble DVI vers HDMI ou un adaptateur DVI(Voir aux pages 105 et 106). HDMI (DVI vers HDMI) pour la connexion vidéo et les prises @ EX-LINK DVI-IN (HDMI2) “R-AUDIO–L” pour la sortie audio. Brancher cette sortie à la prise sur le support mural - La prise d’entrée HDMI IN 2 doit être utilisée pour un en option. Cette fonction permet de régler l’angle de branchement de Câble HDMI/DVI. visionnement du téléviseur à l’aide de la télécommande. 5 ANT IN # VERROU KENSINGTON (LN40A750R1F, LN46A750R1F) A connecter à une antenne ou à un téléviseur par Câble. Le verrou Kensignton (en option) est un dispositif servant 6 WISELINK à immobiliser un appareil utilisé dans un endroit public. Si l’on désire utiliser un verrou, il faut communiquer avec le Brancher une mémoire de grande capacité USB pour magasin où le téléviseur a été acheté. voir des films et des fichiers photos et lire des fichiers ➣ L’emplacement du verrou Kensington peut être différent musicaux. Il est possible d’établir une connexion sans selon le modèle du téléviseur. fil en utilisant l’adaptateur InfoLink sans fil (vendu séparément). 7 AV IN 2 Entrée audio et vidéo pour périphériques externes, tels qu’un caméscope ou un magnétoscope. S-VIDEO Connectez un signal S-Vidéo provenant d’un caméscope ou d’un magnétoscope. Français - 01470D-03Fre.indb 4 2008-08-11 �� 1:33:45 Télécommande Vous pouvez utiliser la télécommande à une distance maximale du téléviseur d’environ 7 m. 1 POWER Permet d’allumer et d’éteindre le téléviseur. 2TV Pour sélectionner directement le mode TV. 3 Boutons numériques Permet de changer de chaîne. 4 Appuyez sur ce bouton pour sélectionner des canaux supplémentaires (numériques et analogiques) diffusées par la même station. Par exemple, pour sélectionner le canal “54-3”, appuyez sur “54”, puis sur “ ” et sur “3”. 5 (MUTE) Permet de couper le son temporairement et de le rétablir. 6 VOL – / VOL + Appuyer sur ces touches pour augmenter ou diminuer le volume. 7 CH LIST Afficher la liste des canaux à l’écran. 8 TOOLS Permettent de sélectionner les fonctions fréquemment utilisées. 9 INFO Appuyez sur cette touche pour afficher de l’information à l’écran. 0 TOUCHES DE COULEUR Utiliser ces touches à partir de la liste des canaux, WISELINK Pro, etc. ! CC Permet de commander la fonction de sous-titrage. @ E.MODE Appuyer sur cette touche pour sélectionner l’affichage préréglé et les modes sonores pour les sports, le cinéma et les jeux. # Utiliser ces touches pour les modes DMA, WISELINK Pro et Anynet+. : Cette télécommande ( peut servir à commander l’enregistrement sur des enregistreurs Samsung avec la fonction Anynet+. ON/OFF $ Appuyer sur cette touche pour rétroéclairer les touches de la télécommande. Cette fonction est utile durant la nuit ou lorsque la pièce est sombre. (L’utilisation de la télécommande alors que la ON/OFF est réglée touche à On réduit le temps d’utilisation des piles.) (Voir page 6) % PRE-CH Permet d’écouter le canal précédent. ^ CH / CH Permettent de changer de canal. & SOURCE Appuyer sur cette touche pour afficher et choisir les sources vidéo accessibles. * W.LINK (WISELINK Pro) Cette fonction permet de visualiser des photographies et d’écouter des fichiers audio depuis un appareil externe. (Consulter les pages 65 (Photo), 75 (Musique) et 82 (Films)) ( MENU Affiche le menu à l’écran principal. ) RETURN Retourne au menu précédent. aHAUT▲/BAS▼/GAUCHE◄/ DROITE► / ENTER Appuyer sur la partie supérieure, inférieure, gauche ou droite de la touche circulaire, puis sur Enter pour choisir des commandes de menu à l’écran et modifier des valeurs. Il est possible de parcourir le menu vers le haut et le bas, de changer de canal et de régler le volume en tournant la touche circulaire. (Consulter les pages 16 à 17) b EXIT Appuyer sur cette touche pour sortir du menu. c DMA (adaptateur pour les supports numériques) Utiliser cette fonction lorsqu’un appareil DMA de SAMSUNG est branché à une interface HDMI ou que le téléviseur est en mode DMA. Pour plus d’information sur les procédures d’utilisation, consulter le guide de l’utilisateur du dispositif DMA. Cette touche est active lorsque le mode “Anynet+(HDMI-CEC)” est activé. (Voir la page 120.) d INFO.L Appuyer sur cette touche pour accéder aux services des nouvelles, des prévisions météorologiques et des cotes de la bourse sur le réseau. (Voir page 113) e FAV.CH Appuyez sur ce bouton pour naviguer entre vos chaînes favorites. f CONTENT Cette fonction permet de consulter “Contents Library”. ➣ Une lumière intense peut affecter le bon fonctionnement de la télécommande. Français - 01470D-03Fre.indb 5 2008-08-11 �� 1:33:46 Insertion des piles dans la télécommande 1. 2. 3. Soulevez le panneau à l’arrière de la télécommande, comme illustré. Placez deux piles AAA. ➣ Assurez-vous de faire correspon dre les pôles “+” et “-” des iles avec le schéma situé à l’intérieur du compartiment. Replacez le couvercle. ➣ Retirez les piles et stockez-les dans un endroit frais et sec si vou n’utilisez pas la télécommande pendant longtemps. La télécommande peut être util isée jusqu’à environ 7 mètres de la télévision. (Pour une utilisation type de la télévision, les piles durent environ un an.) ➣ L’utilisation de la télécommande alors que la touche ON/OFF est réglée à On réduit le temps d’utilisation des piles. ➣ Si la télécommande ne fonctionne pas, vérifiez ce qui suit : 1. La télévision est-elle allumée ? 2. Les pôles (+ / -) des piles sont-ils inversés ? 3. Les piles sont-elles à plat ? 4. Y-a-t-il une rupture d’alimentation ou le cordon d’alimentation est-il débranché? 5. Y a-t-il une lampe fluorescente ou un néon à proximité ? Utilisation des touches rétroéclairées de la télécommande Utiliser cette fonction dans une pièce sombre et lorsqu’il est difficile de voir les touches de la télécommande clairement. 1.Appuyer sur la touche rétroéclairée ON/OFF . ➣ Le fait d’appuyer sur la touche ON/OFF permet d’activer et de désactiver le rétroéclairage. ➣ Lorsque cette fonction est activée, les touches sont rétroéclairées pendant un moment. ➣ Lorsque le rétroéclairage est activé, les touches de la télécommande s’éclairent pendant un moment. Lorsque la télécommande est manipulée ou déplacée et que le capteur détecte un mouvement de la télécommande, le rétroéclairage des touches sera activé pendant un moment. ➣ La télécommande comporte deux petits détecteurs de mouvements qui contrôlent la fonction de rétroéclairage. Si la télécommande est secouée ou tombe sur le sol, les détecteurs peuvent faire un bruit de cliquetis. Ceci est normal; ce n’est pas un défaut. ➣ Le rétroéclairage des touches ne fonctionne pas si la fonction est désactivée sur la télécommande. Français - 01470D-03Fre.indb 6 2008-08-11 �� 1:33:47 Connexions Connexion d’antennes VHF et UHF Si votre antenne se présente sous la forme d’un ensemble de câbles identique à la figure, voir “Antennes avec Câble bipolaire plat de 300 Ω”, ci-dessous. Si votre antenne est dotée d’un Câble semblable au schéma de droite, reportez-vous à la section “Antenne équipée de câbles ronds 75 Ω”. Si vous avez deux antennes, voir “ Antennes VHF et UHF séparées ”. Antennes avec Câble bipolaire plat de 300 Ω Si vous utilisez une antenne hertzienne (comme une antenne de toit ou une antenne en oreilles de lapin) munie d’un Câble bipolaire plat de 300 Ω procédez comme suit. 1.Placez les fils de votre Câble bipolaire sous les vis de l’adaptateur 300-75 Ω (non fourni). Utilisez un tournevis pour serrer les vis. ANT IN 2. Branchez l’adaptateur dans la borne ANT IN située à l’arrière du téléviseur. Antennes avec Câble rond de 75 Ω ANT IN 1.Branchez le Câble de l’antenne dans la prise ANT IN située en bas du panneau arrière. Antennes VHF et UHF séparées Si vous disposez de deux antennes séparées pour votre télévision (une VHF et une UHF), vous devez combiner les deux signaux des antennes avant de les brancher à la télévision. Cette procédure exige un multiplexeur-adaptateur (disponible dans la plupart des magasins d’électronique). 1. Branchez les deux câbles des antennes au multiplexeur. UHF VHF 2. Branchez le multiplexeur dans la prise ANT IN située en bas du panneau arrière. ANT IN UHF VHF Connexion du Câble TV Pour brancher un système de télévision par Câble, suivez les instructions ci-dessous. Câble sans boîte de jonction 1. ANT IN Branchez le Câble d’arrivée dans la prise ANT IN située à l’arrière de la télévision. ➣ Cette télévision étant équipée d’un dispositif pour le Câble, vous n’avez pas besoin de boîte de jonction pour voir des canal câblées en clair. Branchement d’une boîte de jonction servant à décrypter l’ensemble des canal ANT IN ANT OUT 1. Identifiez le Câble connecté à la prise ANT OUT de votre boîte de jonction. ➣ Cette prise peut s’appeler “ANT OUT”, “VHF OUT” ou simplement “OUT”. 2.Branchez l’autre extrémité de ce Câble à la prise ANT IN située à l’arrière de la télévision. ANT IN Français - 01470D-03Fre.indb 7 2008-08-11 �� 1:33:48 Branchement d’une boîte de jonction servant à décrypter certaines canal Si votre boîte de jonction ne décrypte que certaines canal (comme les canal dites ‘premium’), suivez les instructions ci-dessous. Pour ce faire, vous avez besoin d’un séparateur bidirectionnel, d’un interrupteur RF (A/B) et de quatre longueurs de Câble coaxial. (Ces articles sont disponibles dans la plupart des magasins d’électronique.) 1.Localisez et débranchez le Câble branché à la prise ANT IN de votre boîte de jonction. ➣ Cette prise peut s’appeler “ANT IN”, “VHF IN” ou simplement “IN”. ANT IN Câble d’arrivée Câble d’arrivée Séparateur Séparateur Boîte de jonction 2.Branchez ce Câble à un séparateur bidirectionnel. 3.Branchez un Câble de RF entre une des prises OUTPUT du séparateur et la prise IN de la boîte de jonction. 4.Branchez un Câble de RF entre la prise ANT OUT de la boîte de jonction et la prise B.IN de l’interrupteur RF (A/B). Câble d’arrivée Séparateur Boîte de jonction Câble d’arrivée Séparateur Boîte de jonction Interrupteur RF(A/B) Interrupteur RF(A/B) ANT IN 5.Branchez un autre Câble entre l’autre prise OUT du séparateur et la prise A.IN de l’interrupteur RF (A/B). Câble d’arrivée Séparateur Boîte de jonction Interrupteur RF(A/B) Arriére de la télévision 6.Connectez le dernier Câble RF entre la borne OUT du commutateur RF (A/B) et la borne ANT IN située à l’arrière du téléviseur. Après avoir établi cette connexion, réglez l’interrupteur A/B en position “A” pour regarder les canal normales. Placez l’interrupteur A/B en position “B” pour une regarder les canal cryptées. (Lorsque vous placez l’interrupteur A/B sur “B”, vous devez syntoniser votre télévision sur la canal de sortie de la boîte de jonction qui est habituellement la canal 3 ou 4.) Français - 01470D-03Fre.indb 8 2008-08-11 �� 1:33:49 Connexion d’un lecteur DVD ou d’un décodeur Câble/récepteur satellite (boîtier décodeur) via HDMI Ceci n’est réalisable que si le périphérique externe dispose d’un connecteur de sortie HDMI. 1.Branchez un Câble HDMI entre la prise HDMI IN (1, 2, 3 ou 4) du téléviseur et la prise HDMI du lecteur DVD ou du décodeur Câble/récepteur satellite (boîtier décodeur). Lecteur DVD ou décodeur Câble/ récepteur satellite (boîtier décodeur) Panneau latéral de la télévision Pannear arrière de la télévision Câble HDMI (non fourni) ou ➣ Qu’est-ce que le mode HDMI ? • HDMI ou high-definition multimedia interface (interface multimédia haute définition) est une interface de nouvelle génération qui permet la transmission de signaux numériques audio et vidéo à l’aide d’un simple Câble et sans compression. • La différence entre les interfaces HDMI et DVI réside dans le fait que la HDMI est de plus petites dimensions, qu’elle est dotée du composant de codage HDCP (protection contre la copie numérique à large bande passante). ➣ La configuration du panneau arrière de chaque lecteur DVD ou de chaque décodeur Câble/récepteur satellite (boîtier décodeur) diffère. ➣ Le téléviseur peut n’émettre aucun son et les images peuvent s’afficher avec une couleur anormale lorsque des lecteurs DVD/décodeurs/récepteurs satellite avec des versions du mode HDMI antérieures à HDMI 1.3 sont branchés. Lorsque vous branchez un Câble HDMI doté d’une version antérieure et qu’aucun son n’est émis, branchez le Câble HDMI à la prise HDMI IN 2 et les câbles audio aux prises DVI IN (HDMI2) [R-AUDIO-L] situées à l’arrière du téléviseur. Dans ce cas, contactez la société qui fournit le lecteur DVD/décodeur Câble/récepteur satellite afin de confirmer votre version HDMI, puis demandez une mise à jour. ➣ Les câbles HDMI qui ne sont pas de version 1.3 peuvent provoquer des nuisances à l’écran ou une absence d’image. Connexion d’un lecteur DVD ou d’un décodeur Câble/récepteur satellite (boîtier décodeur) via DVI Ceci n’est réalisable que si le périphérique externe dispose d’un connecteur de sortie DVI. 1.Branchez un Câble DVI vers HDMI ou un adaptateur DVI-HDMI entre la prise HDMI IN 2 du téléviseur et la prise DVI du lecteur DVD ou du décodeur Câble/récepteur satellite (boîtier décodeur). 2.Branchez les câbles audio entre la prise DVI IN (HDMI 2) [R-AUDIO-L] du téléviseur et le lecteur DVD ou le décodeur Câble/récepteur satellite (boîtier décodeur). Pannear arrière de la télévision DVD ou du décodeur Câble/ récepteur satellite (boîtier décodeur) 2 Câble Audio (non fourni) 1 Câble DVI vers HDMI (non fourni) ➣ La configuration du panneau arrière de chaque lecteur DVD ou de chaque décodeur Câble/récepteur satellite (boîtier décodeur) diffère. ➣ Lorsque vous branchez un lecteur DVD ou un décodeur Câble/récepteur satellite (boîtier décodeur), faites correspondre les couleurs de la borne de connexion à celles du Câble. ➣ La prise d’entrée HDMI IN 2 doit être utilisée pour un branchement de Câble HDMI/DVI. Français - 01470D-03Fre.indb 9 2008-08-11 �� 1:33:50 Branchement d’un lecteur DVD, câblosélecteur ou récepteur satellite à l’aide de câbles composantes Les prises du panneau arrière de votre téléviseur ont été spécialement conçues pour faciliter le branchement d’un lecteur DVD ou d’un décodeur Câble/récepteur satellite (boîtier décodeur) à votre téléviseur. 1.Branchez un Câble composant entre les prises COMPONENT IN (1 ou 2) [Y, PB, PR] du téléviseur et les prises COMPONENT [Y, PB, PR] du lecteur DVD ou du décodeur Câble/récepteur satellite (boîtier décodeur). 2.Branchez les câbles audio entre les prises COMPONENT IN (1 ou 2) [R-AUDIO-L] du téléviseur et les prises AUDIO OUT du lecteur DVD ou du décodeur Câble/récepteur satellite (boîtier décodeur). Pannear arrière de la télévision Lecteur DVD ou décodeur Câble/ récepteur satellite (boîtier décodeur) 2 1 Câble Audio (non fourni) Câble composante (non fourni) ➣ La composante vidéo sépare la vidéo entre Y (Luminosité), Pb (Bleu) et Pr (Rouge) pour une qualité vidéo accrue. Assurez-vous de faire correspondre la composante vidéo et les connexions audio. Par exemple, si un Câble vidéo Composante est branché à la prise d’entrée COMPONENT IN 1, le Câble audio doit être branché à la prise d’entrée COMPONENT IN 1 également. ➣ La configuration du panneau arrière de chaque lecteur DVD ou de chaque décodeur Câble/récepteur satellite (boîtier décodeur) diffère. ➣ Lorsque vous branchez un lecteur DVD ou un décodeur Câble/récepteur satellite (boîtier décodeur), faites correspondre les couleurs de la borne de connexion à celles du Câble. Connexion d’un caméscope Les prises du panneau latéral assurent la connexion aisée d’un caméscope à votre téléviseur. Elles vous permettent de visionner les cassettes de votre caméscope sans passer par un magnétoscope. 1.Connectez un Câble Vidéo (ou Câble S-Vidéo) entre les prises AV IN2 [VIDEO] (ou S-VIDEO) du téléviseur et les prises A UDIO OUT du caméscope. 2.Connectez un Câble Audio entre les prises AV IN 2 [R-AUDIO-L] du téléviseur et les prises AUDIO OUT du caméscope. Panneau latéral de la télévision ou Caméscope 1 S-Câble Vidéo (non fourni) 1 Câble Vidéo (non fourni) 2 Câble Audio (non fourni) ➣ La configuration arrière de chaque caméscope est différente suivant les appareils. ➣ Lorsque vous connectez un caméscope, faites correspondre les couleurs de la borne et du Câble. Français - 10 01470D-03Fre.indb 10 2008-08-11 �� 1:33:51 Branchement d’un magnétoscope Connexion vidéo Ces instructions supposent que vous avez déjà branché votre télévision à une antenne ou un système de télévision par Câble (en suivant les instructions pages 7-8). Sautez l’étape 1 si vous n’avez pas encore branché d’antenne ou de système de télévision par Câble. 1.Débranchez l’antenne ou le Câble de l’arrière de la ANT IN télévision. 2.Branchez le Câble ou l’antenne à la prise ANT IN située à l’arrière du magnétoscope. 3.Relier au moyen d’un Câble RF la borne ANT Panneau latéral de OUT du magnétoscope la télévision Pannear arrière de la télévision et la borne ANT IN du téléviseur. Panneau arriére du 4.Relier au moyen d’un magnétoscope Câble vidéo la prise de sortie vidéo du magnétoscope et la prise AV IN 1 [Y/VIDEO] ou AV IN 2 [VIDEO] du téléviseur. 5.Branchez les Câbles Audio entre les prises AUDIO OUT du magnétoscope et 5 Câble Audio (non fourni) les prises AV IN 1 (ou AV IN 2) [R-AUDIO-L] de la 4 Câble Vidéo (non fourni) télévision. 3 Câble RF (non fourni) ➣ Si le magnétoscope est un modèle “mono” (non stéréo), relier les prises d’entrée audio droite et Suivez les instructions de “Visualisation d’une cassette à l’aide d’un magnétoscope ou gauche du téléviseur d’un caméscope” pour visualiser une cassette à l’aide de votre magnétoscope. au moyen d’un ➣ La configuration arrière de chaque magnétoscope est différente suivant les connecteur en Y (non appareils. fourni). Il est également ➣ Lorsque vous connectez un magnétoscope, faites correspondre les couleurs de la possible de brancher borne et du Câble. le câble à la prise “R”. Si le magnétoscope ➣ La couleur de la prise d’entrée AV IN 1 [Y/VIDÉO] (vert) ne correspond pas à la fonctionne en stéréo, couleur du Câble vidéo (jaune). deux câbles distincts doivent être branchés. Connexion S-Vidéo Le téléviseur Samsung peut être branché à la prise S-Vidéo d’un magnétoscope. (Ce raccordement offre une meilleure qualité d’image que celle offerte par le raccordement vidéo standard ci-dessus). 1.Tout d’abord, suivez les Pannear arrière de la télévision étapes 1 à 3 de la section Panneau latéral de la télévision précédente pour brancher Panneau arriére du l’antenne ou le Câble à magnétoscope votre magnétoscope et à votre télévision. 2.Branchez les Câbles Audio entre les prises AUDIO OUT du magnétoscope et 1 Câble RF (non fourni) les prises AV IN 2 [R-AUDIO-L] de la 2 Câble S-Vidéo (non fourni) télévision. 3.Branchez les Câbles Audio 3 Câble Audio (non fourni) entre les prises AUDIO OUT du magnétoscope et les prises AV IN 2 Votre magnétoscope peut avoir une prise S-Vidéo. [R-AUDIO-L] de la (Sinon, se procurer les câbles requis dans une boutique d’électronique.) télévision. ➣ Chaque magnétoscope possède une configuration de panneau arrière différente. ➣ Lors du branchement d’un magnétoscope, les couleurs du Câble et de la borne de branchement doivent correspondre. Français - 11 01470D-03Fre.indb 11 2008-08-11 �� 1:33:53 Branchement d’un système audio numérique Les prises du panneau arrière du téléviseur permettent de brancher facilement une chaîne audio numérique (cinéma maison/récepteur) à votre téléviseur. 1.Branchez un Câble optique entre les prises “DIGITAL AUDIO OUT (OPTICAL)” (Sortie audio numérique/ Optique) du téléviseur et les prises d’entrée numérique du système audio numérique. Lorsqu’un système audio numérique est connecté à la borne “DIGITAL AUDIO OUT (OPTICAL)” : Baissez le gain (volume) du téléviseur et réglez le volume à l’aide de la commande de volume du système. Système Audio Numérique Pannear arrière de la télévision Câble Optique (non fourni) ➣ La diffusion audio en 5.1 canaux est possible lorsque le téléviseur est raccordé à un appareil externe doté de cette fonction audio. ➣ La configuration du panneau arrière de chaque système audio numérique diffère. ➣ Lorsque le récepteur (chaîne de cinéma maison) est réglé à On, il est possible d’entendre du son provenant de la prise optique du téléviseur. Lorsque le téléviseur émet des signaux numériques (air), il transmet le son en 5.1 canaux au récepteur de la chaîne de cinéma maison. Lorsque la source est un composant numérique, comme un lecteur DVD, et que ce dernier est branché au téléviseur à l’aide d’un Câble HDMI, seul un son deux canaux sera émis par le récepteur de la chaîne de cinéma maison. Connexion d’un amplificateur/home cinéma DVD 1.Connectez un Câble audio entre les prises AUDIO OUT [R-AUDIO-L] du téléviseur et les prises AUDIO IN [R-AUDIO-L] de l’amplificateur/ home cinéma DVD. Lorsqu’un amplificateur audio est connecté aux bornes “AUDIO OUT [R-AUDIO-L]” : Baissez le gain (volume) du téléviseur et réglez le volume à l’aide de la commande de volume de l’amplificateur. Pannear arrière de la télévision Amplificateur/Home cinéma DVD Câble Audio (non fourni) ➣ La configuration arrière de chaque amplificateur/home cinéma DVD est différente suivant les appareils. ➣ Lorsque vous connectez un amplificateur/home cinéma DVD, faites correspondre les couleurs de la borne et du Câble. Français - 12 01470D-03Fre.indb 12 2008-08-11 �� 1:33:54 Branchement d’un PC Utilisation d’un Câble secondaire D 1.Branchez un Câble secondaire D entre le connecteur PC IN [PC] du téléviseur et le connecteur de sortie PC de votre ordinateur. 2.Branchez un Câble audio PC entre la prise PC IN [AUDIO] du téléviseur et la prise Sortie audio de la carte son de votre ordinateur. Pannear arrière de la télévision 2 Câble Audio PC (non fourni) 1 Câble D-Sub (non fourni) Utilisation d’un Câble HDMI/DVI 1.Connectez le Câble HDMI/DVI à la prise HDMI IN 2 [PC] à l’arrière de votre unité 2.Branchez un Câble mini-prise stéréo 3,5 mm/2RCA entre la prise DVI IN (HDMI2) [R-AUDIO-L] du téléviseur et la prise Sortie audio de la carte son de votre ordinateur. Pannear arrière de la télévision 2 Câble mini-prise stéréo 3,5 mm/2RCA (non fourni) 1 Câble HDMI/DVI (non fourni) ➣ La configuration arrière de chaque PC est différente suivant les appareils. ➣ Lorsque vous connectez un PC, faites correspondre les couleurs de la borne et du Câble. ➣ La prise d’entrée HDMI IN 2 doit être utilisée pour un branchement de Câble HDMI/DVI. Français - 13 01470D-03Fre.indb 13 2008-08-11 �� 1:33:55 Fonctionnement Mise en marche et arrêt de la télévision Appuyez sur le bouton POWER de la télécommande. Il est aussi possible d’utiliser la touche POWER du téléviseur. Fonction Prêt à l’emploi Lors de la première mise en route du téléviseur, deux paramètres individuels de base sont proposés automatiquement à la configuration : 1.Appuyez sur le bouton POWER de la télécommande. “Menu Language, Store Demo, Channels and Time will be set.” s’affiche. Appuyez sur le bouton ENTER , le menu “Choisir la langue d’affichage.” s’affiche automatiquement. Appuyez sur le bouton ENTER . Plug & Play Menu Language, Store Demo, Channels and Time will be set. OK Enter 2.Utilisez les bouton ▲ ou ▼ pour sélectionner la langue appropriée, puis appuyez sur le bouton ENTER . Le message “Choisir ‘Utilisation à domicile’ pour un téléviseur à la maison.” s’affiche. Prêt à l’emploi Choisir la langue d'affichage. English Langue : English Español Français Dépl. 3.Appuyez sur les bouton ◄ ou ► pour sélectionner “Démo magasin” ou “Util. à domicile”, puis appuyez sur le bouton ENTER . Le message “Choisir les antennes à mettre en mémoire” s’affiche. ➣ Nous vous recommandons de régler la télévision sur le mode “Util. à domicile” pour une meilleure qualité d’image dans votre environnement personnel. ➣ Le mode “Démo magasin” n’est prévu que pour un usage en magasins. ➣ Pour retourner au mode “Util. à domicile” (Standard) si l’appareil est réglé au mode “Démo magasin” par inadvertance : appuyer sur la touche de volume du téléviseur. Lorsque le réglage du volume est affiché à l’écran, appuyer sur la touche MENU du téléviseur pendant 5 secondes. Prêt à l’emploi Choisir ‘Utilisation à domicile’ pour un téléviseur à la maison. Démo magasin Util. à domicile Dépl. Intro. Prêt à l’emploi Choisir les antennes à mettre en mémoire Air Démarrer Câble Démarrer Auto Démarrer Dépl. 4.Utilisez les bouton ▲ ou ▼ pour mémoriser le branchement sélectionné. pour sélectionner “Démarrer”. Appuyez sur le bouton ENTER ➣ Air : Signal d’antenne de type “Air”. Câble : Signal d’antenne de type “Câble”. Auto : Signaux d’antenne de type “Air” et “Câble”. ➣ En mode Câble, vous pouvez sélectionner la source de signal qui vous convient parmi STD, HRC et IRC en appuyant sur le bouton ▲, ▼, ◄ ou ►, puis appuyez sur le bouton ENTER . Si le Câble est numérique, sélectionner la source de signal pour une diffusion analogique et numérique. Contactez votre télédistributeur local pour identifier le type de système de Câble de votre région. Intro. Intro. Passer Prêt à l’emploi Choisir le tableau de câblodiffusion. analogique STD HRC IRC numérique STD HRC IRC Démarrer Dépl. Intro. Passer Prêt à l’emploi Progr. Aut. en cours DTV Air : 02 DTV Câble : 23 Air : 11 Câble : 21 Câble 38 50% Arrêt Dépl. Intro. Passer Français - 14 01470D-03Fre.indb 14 2008-08-11 �� 1:33:57 5.La mémorisation des canaux disponibles commence. ➣ Pour arrêter la recherche avant la fin, appuyez sur le bouton ENTER lorsque “Arrêt” est sélectionné. Une fois tous les canaux mémorisés, le téléviseur commence à éliminer les canaux brouillés (voir la page 43). Puis le menu Prog. auto s’affiche. Appuyer sur la touche ENTER lorsque la mémorisation des canaux est terminée. Le message “Régler le mode horloge.” s’affiche. Prêt à l’emploi Suppression des canaux brouillés. DTV Air : 05 DTV Câble : 25 Air : 12 DTV Câble 41 77% Câble : 32 Arrêt Intro. Passer Intro. Passer Prêt à l’emploi Progr. Aut. terminée 119 canaux sont mémorisés. DTV Air : 05 Air : 24 DTV Câble : 10 Câble : 80 OK 6.Appuyez sur le bouton ENTER . Appuyez sur les bouton ▲ ou ▼ pour sélectionner “Auto”, puis appuyez sur le bout on ENTER . Le message “Régler l’horloge à l’heure avancée.” s’affiche. Si “Manuel” est sélectionné, “Régler la date et l’heure du jour.” s’affiche. (Voir page 48) Prêt à l’emploi Régler le mode horloge. Mode horloge : Auto Auto Manuel Dépl. Intro. Passer Prêt à l’emploi Régler l’horloge à l’heure avancée. 7.Appuyez sur les bouton ▲ ou ▼ pour sélectionner “Off” ou “On”, puis appuyez sur le bouton ENTER . Le message “Choisir le fuseau horaire dans lequel vous vivez.” s’affiche. H. d’ été : Auto Off On Dépl. Intro. Passer Prêt à l’emploi 8.Appuyez sur les bouton ▲ ou ▼ pour sélectionner le fuseau horaire de votre région. Appuyez sur le bouton ENTER . Si vous recevez un signal numérique, l’horloge se règle automatiquement. Dans le cas contraire, rendez-vous à la page 48 pour savoir comment régler l’horloge. Choisir le fuseau horaire dans lequel vous vivez. Newfoundland Atlantique Est Centre Rocheuses Pacifique Dépl. 9.Le message “Prenez plaisir à regarder” s’affiche. Lorsque vous avez terminé, appuyez sur le bouton ENTER Intro. Passer Prêt à l’emploi . Prenez plaisir à regarder OK Configuration Si vous souhaitez réinitialiser ce paramètre... 1.Appuyez sur la touche MENU. Appuyez sur les bouton ▲ ou ▼ pour sélectionner “Configuration”, puis appuyez sur le bouton ENTER . 2.Appuyez sur ENTER pour choisir “Prêt à l’emploi”. Pour en savoir plus sur la configuration des options, consulter les pages 14 et 15. ➣ La fonction “Prêt à l’emploi” n’est accessible qu’en mode TV. Prêt à l’emploi Langue ► : Français Heure Sélection du réseau : Câble Configuration du réseau câblé Configuration du réseau sans fil V-Chip Sous-titres Français - 15 01470D-03Fre.indb 15 2008-08-11 �� 1:33:59 Changement des canal Utilisation des boutons de canal 1. Appuyez sur le bouton CH ou CH pour changer de canal. ➣ Quand vous appuyez sur le bouton CH ou CH , la télévision change de canal de façon séquentielle. Vous pourrez voir toutes les canal que la télévision a mémorisées. (La télévision doit avoir mémorisé au moins trois canal.) Vous ne pourrez pas voir les canal qui ont été enlevées, ni celles qui n’ont pas été mémorisées. Reportez-vous aux pages 16 pour mémoriser des chaînes. ➣ Pour passer au canal supérieur, tourner la touche circulaire en sens horaire lorsque le numéro du canal est affiché. Pour passer au canal inférieur, tourner la touche circulaire en sens antihoraire. Utilisation du pavé numérique 1.Appuyez sur le pavé numérique pour accéder directement à une chaîne. Par exemple, pour sélectionner la chaîne 27, appuyez sur 2, puis sur 7. ➣ Pour changer rapidement de canal, appuyer sur les touches numériques, puis sur la touche ENTER . Utilisation du bouton pour sélectionner les chaînes diffusant un signal numérique. Utilisez le bouton 1.Par exemple, pour choisir le canal 7-1, appuyer sur 7, puis sur et sur 1. ➣ HD indique que le téléviseur reçoit un signal DHD (Digital High Definition). SD indique que le téléviseur reçoit un signal analogique standard (Standard Definition). ➣ Pour changer rapidement de canal, appuyer sur les touches numériques, puis sur la touche ENTER . Appuyez sur la touche PRE-CH pour sélectionner la chaîne précédente 1.Appuyez sur le bouton PRE-CH. La télévision passe à la dernière canal regardée. ➣ Pour passer rapidement d’une canal à une autre canal éloignée, accédez à la canal ini tiale puis utilisez les boutons numériques pour sélectionner la seconde canal. Puis, utilisez le bouton PRE-CH pour passer rapidement de l’une à l’autre. Réglage du volume Utilisation des touches de réglage du volume 1.Appuyez sur les bouton VOL – ou VOL+ pour augmenter ou diminuer le volume. ➣ Pour augmenter le volume, tourner la roue en sens horaire lorsque la fenêtre de commande du volume est affichée. Pour abaisser le volume, tourner la touche circulaire en sens antihoraire. Utilisation de la fonction MUTE Vous pouvez à tout moment couper le son en appuyant sur le bouton MUTE. 1.Appuyez sur bouton MUTE et le son est coupé. “ ” s’affiche à l’écran. 2.Pour désactiver le mode Mute, appuyez de nouveau sur le bouton MUTE ou simplement sur les boutons VOL – ou VOL+. Français - 16 01470D-03Fre.indb 16 2008-08-11 �� 1:34:00 Visualisation de l’affichage L’affichage identifie la canal en cours et l’état de certains paramètres audio et vidéo. 1.Appuyez sur le bouton INFO de la télécommande. La télévision affiche la canal, le type de son et l’état de certains paramètres de son et d’image. TV #8 DTV Air 4-2 Sun, Sep 3 1 : 45 pm Dolby Digital ♥ Life On Venus Avenue 1080i | 16:9 | English 9 : 59 am - 10 : 59 am No Detaild Information ➣ Appuyez de nouveau sur la touche INFO ou attendez environ 10 secondes avant qu’il disparaisse automatiquement. Visualisation des menus 1.Une fois l’appareil allumé, appuyez sur le bouton MENU. Le menu principal apparaît à l’écran. La partie gauche du menu comprend les icônes suivantes : Image, Son, Chaîne, Configuration, Entrée, Application. Image 2.Appuyer sur la touche ▲ ou ▼ pour sélectionner une des icônes. Puis appuyez sur ENTER pour accéder au sous-menu de l’icône. ➣ Pour passer à un menu inférieur, tourner la roue en sens horaire lorsque les menus sont affichés. Pour passer au menu supérieur, tourner la touche circulaire en sens antihoraire. Mode :Standard Contre-jour :7 Contraste : 95 Luminosité : 45 Netteté : 50 Couleur : 50 Teinte (V/R) : V50/R50 Réglages des détails 3.Appuyez sur le bouton EXIT pour quitter. ➣ Les menus affichés à l’écran disparaissent après une minute environ. Français - 17 01470D-03Fre.indb 17 2008-08-11 �� 1:34:00 Utilisation de la touche TOOLS La touche TOOLS peut servir à sélectionner rapidement et aisément les fonctions utilisées fréquemment. Le menu “OUTILS” change selon le mode d’entrée externe choisi. 1.Appuyer sur la touche TOOLS. Le menu “OUTILS” s’affiche. 2. Appuyer sur la touche ▲ ou ▼ pour sélectionner un menu. 3.Appuyer sur la touche ▲/▼/◄/►, puis sur ENTER pour afficher, modifier ou utiliser les éléments sélectionnés. Pour une description plus détaillée de chaque fonction, voir la page correspondante. OUTILS • • • • • • • • • • Liste appareils : Voir la page 120 Son multi-piste : Voir la page 34 Image Format: Voir la page 26 Image Mode : Voir la page 21 Son Mode : Voir la page 32 Mise en veille : Voir la page 50 Ajouter aux favoris : Voir la page 39 Commuter sur Câble (ou Commuter sur Air) : Voir la page 18 ISI : Voir la page 31 Réglage Auto : Voir la page 46 Liste appareils Son multi-piste : Image Format : Stéréo 16:9 Image Mode : Standard Son Mode : Personnel Mise en veille : Off Ajouter aux favoris Commuter sur Air Dépl. e Quitter Intro. Mémorisation des canal Le téléviseur peut mémoriser tous les canaux captés par l’antenne (air) ou sur le Câble. Une fois les chaînes mémorisées, les touches CH ou CH permettent de les parcourir successivement, ce qui évite de syntoniser chaque canal manuellement avec les touches numériques. Cela évite de syntoniser chaque canal manuellement au moyen des touches numériques. La mémorisation des canaux s’effectue en trois étapes : sélection de la source de transmission, mémorisation (automatique) des canaux et ajout ou suppression (Liste des canaux) de canaux. Sélection de la source du signal vidéo Chaîne Avant que votre télévision ne puisse commencer à mémoriser les canal disponibles, vous devez spécifier le type de la source de signal reliée à la télévision (c’est-à-dire soit une antenne soit le Câble). 1.Appuyez sur le bouton MENU pour afficher le menu. Appuyez sur les bouton ▲ ou ▼ pour sélectionner “Chaîne”, puis appuyez sur le bouton ENTER . Antenne :Air ► Prog. auto Effacer les canaux brouillés Liste des canaux Syn. Précise Puissance signal Chaîne pour sélectionner “Antenne”. 2.Appuyez sur le bouton ENTER Appuyez plusieurs fois sur les bouton ▲ ou ▼ pour naviguer entre les options “Air” ou “Câble”, puis appuyez sur le bouton ENTER . Appuyez sur le bouton EXIT pour quitter. Antenne :Air Air ► Câble Prog. auto Effacer les canaux brouillés Liste des canaux Syn. Précise Puissance signal Réglage facile 1.Appuyer sur la touche TOOLS de la télécommande. 2.Appuyer sur la touche ▲ ou ▼ pour choisir “Commuter sur Câble (ou Commuter sur Air)”. 3. Appuyer sur la touche ENTER pour passer au “Câble” (ou “Air”). OUTILS Liste appareils Son multi-piste : Image Format : Stéréo 16:9 Image Mode : Standard Son Mode : Personnel Mise en veille : Off Ajouter aux favoris Commuter sur Air Dépl. Intro. e Quitter Français - 18 01470D-03Fre.indb 18 2008-08-11 �� 1:34:01 Enregistrement des canal dans la mémoire (méthode automatique) Chaîne 1.Appuyez sur le bouton MENU pour afficher le menu. Appuyez sur les bouton ▲ ou ▼ pour sélectionner “Chaîne”, puis appuyez sur le bouton ENTER . 2.Appuyez sur les bouton ▲ ou ▼ pour sélectionner “Prog. auto”, puis appuyez sur le bouton ENTER . Antenne :Air Prog. auto ► Effacer les canaux brouillés Liste des canaux Syn. Précise Puissance signal 3.Utilisez les bouton ▲ ou ▼ pour sélectionner l’antenne souhaitée, puis appuyez sur le bouton ENTER . ➣ Air : Signal d’antenne de type “Air”. Câble : Signal d’antenne de type “Câble”. Auto : Signaux d’antenne de type “Air” et “Câble”. 4.Au moment de la sélection du système de télévision par Câble : Appuyez sur ENTER pour amorcer la mémorisation automatique. Appuyer sur les touches ▲,▼, ◄ ou ► pour choisir la source du signal analogique appropriée “STD”, “HRC”, ou “IRC”. Appuyer sur la touche ▲ ou ▼ pour sélectionner “Démarrer”, puis sur ENTER . Si le Câble est numérique, sélectionner la source de signal pour une diffusion analogique et numérique. ➣ STD, HRC et IRC désignent différents systèmes de câblodistribution. Pour connaître le système utilisé dans votre région, communiquez avec votre câblodistributeur. La sélection de la source de diffusion est maintenant terminée. Prog. auto Choisir les antennes à mettre en mémoire Air Démarrer Câble Démarrer Auto Démarrer Intro. Dépl. Retour Prog. auto Choisir le tableau de câblodiffusion. analogique STD HRC IRC numérique STD HRC IRC Démarrer Intro. Dépl. Retour Prog. auto Progr. Aut. en cours Câble 38 50% DTV Câble : 12 Câble : 32 Arrêt Intro. Retour Prog. auto 5. Le téléviseur commence alors à mémoriser tous les canaux disponibles. ➣ Une fois tous les canaux mémorisés, le téléviseur commence à éliminer les canaux brouillés (voir la page 43). Puis le menu Prog. auto s’affiche. ➣ Pour arrêter la programmation automatique, appuyer sur ENTER . Le message “Arrêter Prog. auto?” s’affiche. Sélectionner “Oui” en appuyant sur la touche ◄ ou ►, puis sur ENTER . Appuyez sur le bouton EXIT pour quitter. Suppression des canaux brouillés. DTV Câble : 16 Câble : 45 DTV Câble 41 77% Arrêt Intro. Retour Prog. auto Arrêter Prog. auto? DTV Câble : 16 Câble : 45 77% Non Oui Dépl. Intro. Retour Intro. Retour Prog. auto Progr. Aut. terminée 90 canaux sont mémorisés. Air : 10 Câble : 80 OK Français - 19 01470D-03Fre.indb 19 2008-08-11 �� 1:34:02 Pour sélectionner la source Entrée Permet de sélectionner le téléviseur ou d’autres sources d’entrée externes comme les lecteurs DVD ou les décodeurs Câble/ récepteurs satellite (boîtiers décodeurs) connectés au téléviseur. Permet de sélectionner la source d’entrée de votre choix. 1.Appuyez sur le bouton MENU pour afficher le menu. Appuyez sur les bouton ▲ ou ▼ pour sélectionner “Entrée”, puis appuyez sur le bouton ENTER . Liste source 2.Appuyez sur le bouton ENTER pour sélectionner “Liste source”. Entrer le nom Utilisez les bouton ▲ ou ▼ pour sélectionner la source du signal, puis appuyez sur le bouton ENTER . ➣ Sources de signal accessibles : TV, AV1, AV2, S-Vidéo, Composante1, Composante2, PC, HDMI1, HDMI2/DVI, HDMI3, HDMI4, USB. ➣ Vous pouvez sélectionner uniquement les appareils externes déjà branchés sur le téléviseur. Dans la “Liste source”, les entrées branchées sont en surbrillance et se trouvent en haut de la liste. Les entrées non branchées figurent au bas de la liste. ➣ Utilisation des touches de couleur de la télécommande avec la Liste source TV • Rouge (Rafraîchir) : permet de rafraîchir les appareils externes branchés. • TOOLS (Option) : a ffiche les menus “Entrer le nom” et “Information”. AV1 ---- AV2 ---- S-Vidéo ---- Composante1 ---- Composante2 ---- PC ---- Rafraîchir TOOLS Option O Appuyez sur le bouton SOURCE de la télécommande pour afficher une source de signal externe. Pour éditer le nom de la source 2.Appuyer sur la touche ▲ ou ▼ pour sélectionner la prise d’entrée “AV1”, “AV2”, “S-Vidéo”, “Composante1”, “Composante2”, “PC”, “HDMI1”, “HDMI2/ DVI”, “HDMI3” ou “HDMI4”, suivie de la touche ENTER . Liste source Entrée Nommer le périphérique connecté aux entrées pour vous faciliter la sélection. 1.Appuyez sur le bouton MENU pour afficher le menu. Appuyez sur les bouton ▲ ou ▼ pour sélectionner “Entrée”, puis appuyez sur le bouton ENTER . Appuyez sur les bouton ▲ ou ▼ pour sélectionner “Entrer le nom”, puis appuyez sur le bouton ENTER . Entrer le nom ► Entrer le nom AV1 : ---- AV2 : ---- S-Vidéo : ---- Composante1 : ---- Composante2 : ---- PC : ---- HDMI1 ► : ---▼ Dépl. 3.Appuyez sur les touches ▲ ou ▼ pour sélectionner la source d’entrée “Magnétoscope”, “DVD”, “Câble STB”, “Satellite STB”, “PVR STB”, “Récepteur A/V”, “Jeu”, “Caméscope”, “PC”, “TV”, “IPTV”, “Blu-Ray”, “HD DVD” ou “Digital Media Adapter” puis appuyez sur la touche ENTER . Appuyez sur le bouton EXIT pour quitter. ➣ Lorsqu’un PC ayant une résolution de 1920 x 1080 à 60 Hz est branché au port HDMI IN 2, il faut régler le mode “HDMI2/DVI” à “PC” dans le mode “Entrer le nom” du mode “Entrée”. Intro. Retour Entrer le nom AV1 AV2 S-Vidéo Composante1 Composante2 PC HDMI1 : ------: ---Magnétoscope : ---DVD : ---Câble STB : ---Satellite STB : ---PVR STB : ---Dépl. Intro. Retour Français - 20 01470D-03Fre.indb 20 2008-08-11 �� 1:34:02 Contrôle de L’image Changement du format normal de l’image Il est possible de choisir le type d’image qui correspond le plus à ses exigences. 1.Appuyez sur le bouton MENU pour afficher le menu. Appuyez sur le bouton ENTER pour sélectionner “Image”. Image pour sélectionner “Mode”. 2.Appuyez sur le bouton ENTER Appuyez sur les bouton ▲ ou ▼ pour sélectionner “Dynamique”, “Standard” ou “Film”. Appuyez sur le bouton ENTER . :Standard Contre-jour :7 Contraste : 95 Luminosité : 45 Netteté : 50 Couleur : 50 Teinte (V/R) : V50/R50 Réglages des détails Image • Dynamique : choisit l’image pour la haute définition dans une pièce claire. • Standard : choisit la meilleure image possible dans un environnement normal. • Film : choisit une définition d’image pour regarder des films dans une pièce sombre. Mode 3.Appuyez sur le bouton EXIT pour quitter. Mode :Dynamic Dynamique ► Contre-jour Contraste : 7Standard Film : 95 Luminosité : 45 Netteté : 50 Couleur : 50 Teinte (V/R) : V50/R50 Réglages des détails OUTILS Réglage facile 1.Appuyer sur la touche TOOLS de la télécommande. 2. Appuyer sur la touche ▲ ou ▼ pour choisir “Image Mode”. 3. Appuyer sur la touche ◄ ou ► pour sélectionner l’option désirée. 4. Appuyer sur la touche EXIT ou TOOLS pour quitter. Liste appareils Son multi-piste : Image Format : Stéréo 16:9 Image Mode ◄ Standard Son Mode : Personnel Mise en veille : Off ► Ajouter aux favoris Commuter sur Air Dépl. Réglage e Quitter Personnalisation des réglages de l’image • • • • • • Image Le téléviseur offre plusieurs options de réglage de la qualité de l’image. 1.Pour sélectionner le mode souhaité, suivre les instructions 1 et 2 de la rubrique ‘Changement du format normal de l’image’. 2.Appuyez sur les bouton ▲ ou ▼ pour sélectionner “Contre-jour”, “Contraste”, “Luminosité”, “Netteté”, “Couleur” ou “Teinte (V/R)”, puis appuyez sur le bouton ENTER . 3.Appuyer sur la touche ◄ ou ► pour augmenter ou réduire la valeur d’un élément particulier. Appuyez sur le bouton ENTER . Appuyez sur le bouton EXIT pour quitter. ➣ Après la modification des paramètres “Contre-jour”, “Contraste”, “Luminosité”, “Netteté”, “Couleur” et “Teinte (V/R)”, l’image est ajustée en conséquence. ➣ En mode PC, il est possible de modifier uniquement les fonctions “Contre-jour”, “Contraste” et “Luminosité”. ➣ Les réglages peuvent être définis et mémorisés pour chacun des appareils externes branchés à une entrée sur le téléviseur. ➣ La consommation d’énergie peut être considérablement diminuée en diminuant le niveau de brillance de l’image, ce qui diminue également l’ensemble des coûts de fonctionnement. Mode : Standard Contre-jour :7 Contraste : 95 Luminosité : 45 Netteté : 50 Couleur : 50 Teinte (V/R) : V50/R50 ► Réglages des détails Options d’image Contre-jour Dépl. 7 Réglage Intro. Retour Contre-jour : règle la brillance du rétroéclairage de l’affichage LCD. Contraste : règle le niveau de contraste de l’image. Luminosité : règle le niveau de luminosité de l’image. Netteté : règle la définition du bord de l’image. Couleur : règle la saturation des couleurs de l’image. Teinte (V/R) : règle la teinte de couleur de l’image. Français - 21 01470D-03Fre.indb 21 2008-08-11 �� 1:34:03 Paramétrage de la fonction Réglages des détails Le nouveau téléviseur Samsung permet d’effectuer des réglages d’image encore plus précis que les modèles précédents. Voir ci-dessous pour exécuter des réglages détaillés de l’image. Activation de la fonction Réglages des détails Mode :Film Contre-jour :5 Contraste : 95 Luminosité : 45 Netteté : 20 Couleur : 50 Teinte (V/R) : V50/R50 ► Réglages des détails Image 3.Appuyez sur les bouton ▲ ou ▼ pour sélectionner “Réglages des détails”, puis appuyez sur le bouton ENTER . ➣ En mode PC, il est possible de modifier uniquement les fonctions “Contraste dynam.”, “Gamma” et “Équilibrage du blanc” à partir des éléments “Réglages des détails”. Image 1.Appuyez sur le bouton MENU pour afficher le menu. Appuyez sur le bouton ENTER pour sélectionner “Image”. 2.Appuyez sur le bouton ENTER pour sélectionner “Mode”. Appuyez sur les bouton ▲ ou ▼ pour sélectionner “Standard” ou “Film”, puis appuyez sur le bouton ENTER . ➣ “Réglages des détails” est disponible en mode “Standard” ou “Film”. Couleur : 50 Teinte (V/R) : V50/R50 Réglages des détails ► Options d’image Réinitialisation de l’image Réglage du noir Vous pouvez choisir le niveau de noir sur l’écran pour régler la profondeur de l’écran. 4.Appuyez sur les bouton ▲ ou ▼ pour sélectionner “Réglage du noir”, puis appuyez sur le bouton ENTER . 5.Appuyez sur le bouton ▲ ou ▼ pour sélectionner “Off”, “Basse”, “Moyen” ou “Haute”. Appuyez sur le bouton ENTER . • • • • Off : Désactive la fonction de réglage du noir. Basse : Utilise une profondeur de noir faible. Moyen : Utilise une profondeur de noir moyenne. Haute : Utilise une profondeur de noir élevée. Réglages des détails Réglage du noir : Off Contraste dynam. : Off ► Gamma :0 Espace couleur : Auto Équilibrage du blanc Ton chair :0 Améliorat. bords : Off ▼ Dépl. Intro. Retour Off Basse : Moyen Réglage du noir Haute Dépl. Intro. Retour Réglage du contraste dynamique Vous pouvez régler l’écran de façon à obtenir un contraste optimal. 6.Appuyez sur les bouton ▲ ou ▼ pour sélectionner “Contraste dynam.”, puis appuyez sur le bouton ENTER . 7.Appuyez sur le bouton ▲ ou ▼ pour sélectionner “Off”, “Basse”, “Moyen” ou “Haute”. Appuyez sur le bouton ENTER . • • • • Off : Désactive la fonction de réglage du contraste dynamique. Basse : Utilise un faible contraste dynamique. Moyen : Utilise un contraste dynamique moyen. Haute : Utilise un fort contraste dynamique. Réglages des détails Réglage du noir : Off Contraste dynam. : Off Gamma :0 ► Espace couleur : Auto Équilibrage du blanc Ton chair :0 Améliorat. bords : Off ▼ Dépl. Intro. Retour Off Basse : Moyen Contraste dynam. Haute Dépl. Intro. Retour Français - 22 01470D-03Fre.indb 22 2008-08-11 �� 1:34:03 Réglage du paramètre gamma Il est possible d’ajuster l’intensité des couleurs primaires (rouge, vert, bleu). (-3 ~ +3) 8.Appuyez sur les bouton ▲ ou ▼ pour sélectionner “Gamma”, puis appuyez sur le bouton ENTER . 9.Appuyer sur ◄ ou ► pour diminuer ou augmenter la valeur. Appuyez sur le bouton ENTER . Réglages des détails Réglage du noir : Off Contraste dynam. : Off Gamma :0 Espace couleur : Auto ► Équilibrage du blanc Ton chair :0 Améliorat. bords : Off ▼ Dépl. Intro. Retour Gamma 0 Réglage Réglage de l’espace couleur L’espace couleurs est une matrice composée des couleurs rouge, vert et bleu. Sélectionnez votre espace couleurs préféré et bénéficiez de couleurs des plus naturelles. 10.Appuyez sur les bouton ▲ ou ▼ pour sélectionner “Espace couleur”, puis appuyez sur le bouton ENTER . 11. Appuyez sur les bouton ENTER pour sélectionner “Espace couleur”. 12.Appuyez sur le bouton ▲ ou ▼ pour sélectionner “Auto”, “Standard” ou “Personnel”. Appuyez sur le bouton ENTER . • Auto : Cet espace couleurs s’ajuste automatiquement aux nuances couleurs naturelles sur la base des sources des programmes. • Standard : L’espace couleur natif offre des tons riches et pleins. • Personnel : Règle la gamme des couleurs selon votre préférence. (Voir ‘Personnalisation de l’espace couleur”) Intro. Retour Réglages des détails Réglage du noir : Off Contraste dynam. : Off Gamma :0 Espace couleur : Auto ► Équilibrage du blanc Ton chair :0 Améliorat. bords : Off ▼ Dépl. Intro. Retour Espace couleur Espace couleur : Auto Couleur : Rouge Rouge 50 Vert 0 Bleu 0 Régler Personnalisation de l’espace couleur Dépl. 13.Appuyez sur les bouton ▲ ou ▼ pour sélectionner “Couleur”, puis appuyez sur le bouton ENTER . ➣ La fonction “Couleur” est disponible lorsque “Espace couleur” est réglé à “Personnel”. 14.Appuyez sur le bouton ▲ ou ▼ pour sélectionner “Rouge”, “Vert”, “Bleu”, “Jaune”, “Cyan” ou “Magenta”. Appuyez sur le bouton ENTER . 15.Appuyer sur la touche ▲ ou ▼ pour choisir “Rouge”, “Vert” ou “Bleu” pour modifier la couleur. Appuyez sur le bouton ENTER . 16.Appuyer sur la touche ◄ ou ► pour augmenter ou réduire la valeur d’un élément particulier. Appuyez sur le bouton ENTER . ➣ Dans le paramètre “Couleur”, il est possible de régler les valeurs RVB pour la couleur choisie. ➣ Pour rétablir la valeur RVB ajustée, sélectionner “Régler”. • • • • Retour Auto Espace couleur : Dépl. Standard Personnel Intro. Retour Espace couleur Espace couleur : Personnel Couleur : Rouge Rouge 50 Vert 0 Bleu 0 Régler Dépl. Rouge : règle le niveau de saturation du rouge de la couleur choisie. Vert : règle le niveau de saturation du vert de la couleur choisie. Bleu : règle le niveau de saturation du bleu de la couleur choisie. Régler : réinitialise l’espace couleur aux valeurs par défaut. ➣ Une modification de la valeur des réglages entraîne un rafraîchissement de l’écran. ➣ Les réglages peuvent être définis et mémorisés pour chacun des appareils externes branchés à une entrée sur le téléviseur. Par exemple, si un lecteur DVD est branché à la prise HDMI 1 et qu’il est sélectionné présentement, les réglages seront sauvegardés pour le lecteur. Intro. Intro. Retour Rouge Vert Bleu Jaune : Cyan Magenta Couleur Dépl. Intro. Retour Espace couleur Rouge 50 Dépl. Réglage Intro. Retour Français - 23 01470D-03Fre.indb 23 2008-08-11 �� 1:34:04 Réglage de l’équilibrage du blanc Vous pouvez régler la température de la couleur pour obtenir des couleurs d’image plus naturelles. 17.Appuyez sur les bouton ▲ ou ▼ pour sélectionner “Équilibrage du blanc”, puis appuyez sur le bouton ENTER . 18.Sélectionnez l’option voulue en appuyant sur les boutons ▲ ou ▼, puis appuyez sur le bouton ENTER . 19.Appuyez sur les bouton ◄ ou ► pour augmenter ou réduire la valeur de l’élément souhaité. Appuyez sur le bouton ENTER . • • • • • • • Décal.-R : Règle la profondeur du rouge. Décal.-V : Règle la profondeur du vert. Décal.-B : Règle la profondeur du bleu. Gain-R : Règle la luminosité du rouge. Gain-V : Règle la luminosité du vert. Gain-B : Règle la luminosité du bleu. Régler : L’équilibrage du blanc mis au point précédemment sera ramené à ses valeurs par défaut. ➣ Toute modification de la valeur de réglage actualise l’écran modifié. Réglages des détails Réglage du noir : Off Contraste dynam. : Off Gamma :0 Espace couleur : Auto Équilibrage du blanc Ton chair ► :0 Améliorat. bords : Off ▼ Intro. Dépl. Retour Équilibrage du blanc Décal.-R 25 Décal.-V 25 Décal.-B 25 Gain-R 25 Gain-V 25 Gain-B 25 Régler Dépl. Intro. Retour Équilibrage du blanc Décal.-R 25 Dépl. Réglage Intro. Retour Réglage du ton chair Il est possible de rehausser le ton chair (rose) de l’image. 20.Appuyez sur les bouton ▲ ou ▼ pour sélectionner “Ton chair”, puis appuyez sur le bouton ENTER . 21.Appuyer sur la touche ◄ ou ► pour diminuer ou augmenter la valeur. Appuyez sur le bouton ENTER . ➣ La modification de la valeur de réglage permet de rafraîchir l’écran réglé. Réglages des détails Réglage du noir : Off Contraste dynam. : Off Gamma :0 Espace couleur : Auto Équilibrage du blanc Ton chair :0 Améliorat. bords : Off ► ▼ Intro. Dépl. Retour Ton chair 0 Réglage Intro. Retour Réglage de l’amélioration des bords de l’image Vous pouvez accentuer le bord des objets sur l’image. 22.Appuyez sur les bouton ▲ ou ▼ pour sélectionner “Améliorat. bords”, puis appuyez sur le bouton ENTER . 23.Appuyez sur les bouton ▲ ou ▼ pour sélectionner “Off” ou “On”. Appuyez sur le bouton ENTER . Réglages des détails ▲ Contraste dynam. : Off Gamma :0 Espace couleur : Auto Équilibrage du blanc Ton chair :0 Améliorat. bords : Off xvYCC : Off Dépl. Améliorat. bords : Dépl. ► Intro. Retour Intro. Retour Off On Français - 24 01470D-03Fre.indb 24 2008-08-11 �� 1:34:04 Réglage du xvYCC Le fait de régler le mode xvYCC à “On” augmente les détails et l’espace couleur durant l’écoute de films provenant d’un appareil externe (c.-à-d., un lecteur DVD) branché aux prises HDMI ou Composante IN. 24.Appuyez sur les bouton ▲ ou ▼ pour sélectionner “xvYCC”, puis appuyez sur le bouton ENTER . 25.Appuyez sur les bouton ▲ ou ▼ pour sélectionner “Off” ou “On”. Appuyez sur le bouton ENTER . ➣ “xvYCC” est disponible lorsque le mode d’image est réglé sur “Film” et que la source d’entrée externe est réglée au mode “HDMI” ou “Composante”. Réglages des détails ▲ Contraste dynam. : Off Gamma :0 Espace couleur : Auto Équilibrage du blanc Ton chair :0 Améliorat. bords : Off xvYCC : Off Dépl. xvYCC : Dépl. ► Intro. Retour Intro. Retour Off On Rétablir les paramètres de réglage de l’image d’usine Réglages des détails Image 1.Pour sélectionner le mode souhaité, suivez les instructions 1 et 2 de la rubrique “Modification des réglages de l’image” (voir page 21). 2.Appuyez sur les bouton ▲ ou ▼ pour sélectionner “Réinitialisation de l’image”, puis appuyez sur le bouton ENTER . Réinitialisation de l’image ► Réglages des détails Image 3.Appuyez sur les bouton ▲ ou ▼ pour sélectionner “OK” ou “Effacer”, puis appuyez sur le bouton ENTER . Appuyez sur le bouton EXIT pour quitter. ➣ Tous les modes peuvent être réinitialisés. Options d’image Options d’image Réinitialisation de l’image OK ► Effacer Français - 25 01470D-03Fre.indb 25 2008-08-11 �� 1:34:04 Configuration des options d’image Activation des options d’image Teinte(V/R) Sélection de la nuance de couleur 1.Suivre les instructions 1 et 2 de ‘Activation des options d’image’. 2.Appuyez sur les bouton ▲ ou ▼ pour sélectionner “Nuance coul.”, puis appuyez sur le bouton ENTER . : V50/R50 Réglages des détails Image 1.Appuyez sur le bouton MENU pour afficher le menu. Appuyez sur les boutons ENTER pour sélectionner “Image”. 2.Appuyez sur les bouton ▲ ou ▼ pour sélectionner “Options d’image”, puis appuyez sur le bouton ENTER . ➣ Appuyer sur la touche ▲ ou ▼ pour choisir un élément particulier. Appuyer sur la touche ENTER . ➣ Une fois le réglage effectué correctement, appuyer sur ENTER . ➣ En mode PC, il est possible de modifier uniquement “Nuance coul.” et “Format” à partir des éléments de “Options d’image”. Options d’image ► Réinitialisation de l’image Options d’image Nuance coul. : Normal Format : 16:9 Réduct. bruit num. : Auto DNle : Off Nv nr HDMI : Normal Mode Film : Off Mode bleu seu. ► : Off ▼ Dépl. 3.Appuyez sur le bouton ▲ ou ▼ pour sélectionner “Normal2”, “Normal1”, “Normal”, “Chaude1” ou “Chaude2”. Appuyez sur le bouton ENTER . ➣ “Chaude1” ou “Chaude2” n’est activée qu’en mode d’image “Film”. ➣ Les réglages peuvent être définis et mémorisés pour chacun des appareils externes branchés à une entrée sur le téléviseur. Intro. Options d’image Nuance coul. : Normal Froide2 Format Froide1 : 16:9 Réduct. bruit num. Normal : Auto DNle Chaude1 : Off Nv nr HDMI : Normal Mode Film : Off Mode bleu seu. : Off Chaude2 Réglage du format de l’image Dépl. Vous pouvez parfois modifier la taille de l’image sur votre écran. Six tailles d’écran différentes sont disponibles pour votre téléviseur, chacune conçue pour fonctionner au mieux avec des types d’entrées vidéo spécifiques. Votre décodeur Câble ou votre récepteur satellite peut également disposer de ses propres tailles d’écran. Toutefois, il est conseillé d’utiliser le mode 16:9, autant que possible. 1.Suivre les instructions 1 et 2 de ‘Activation des options d’image’. 2.Appuyez sur les bouton ▲ ou ▼ pour sélectionner “Format”, puis appuyez sur le bouton ENTER . 3.Appuyez sur les bouton ▲ ou ▼ pour sélectionner le format d’écran souhaité. Appuyez sur le bouton ENTER . Appuyez sur le bouton EXIT pour quitter. 16:9 : Pour régler l’image en mode 16:9. Zoom1 : Permet d’agrandir la taille de l’image affichée à l’écran. Zoom2 : Agrandit davantage la taille de l’image que “Zoom1”. Format large : Augmente le facteur de forme de l’image pour qu’elle remplisse l’écran en entier. • 4:3 : Pour régler l’image en mode normal, c.-à-d. 4:3. • Numér. seul. : Utilisez la fonction pour voir l’intégralité de l’image sans coupure lors de l’entrée de signaux HDMI (720p/1080i/1080p), Composante (1080i/1080p) ou DTV (1080i). • • • • Retour Intro. Retour Options d’image Nuance coul. : Normal Format : 16:9 Réduct. bruit num. : Auto DNle : Off Nv nr HDMI : Normal Mode Film : Off Mode bleu seu. ► : Off ▼ Dépl. Intro. Retour Intro. Retour Format 16:9 Zoom1 Zoom2 Format large 4:3 Numér. seul. Dépl. OUTILS Réglage facile 1.Appuyer sur la touche TOOLS de la télécommande. 2. Appuyer sur la touche ▲ ou ▼ pour choisir “Image Format”. 3. Appuyer sur la touche ◄ ou ► pour sélectionner l’option désirée. 4. Appuyer sur la touche EXIT ou TOOLS pour quitter. Liste appareils Son multi-piste : Image Format ◄ Stéréo 16:9 Image Mode : Standard Son Mode : Personnel Mise en veille : Off ► Ajouter aux favoris Commuter sur Air Dépl. Réglage e Quitter Français - 26 01470D-03Fre.indb 26 2008-08-11 �� 1:34:05 ➣ Lorsque le mode Double ( , ) a été défini sur ISI, le paramètre Taille de l’image ne peut pas être réglé. ➣ Une rémanence d’image temporaire peut se produire si une image fixe est affichée sur l’écran pendant plus de deux heures. Format ➣ Après avoir sélectionné “Zoom1”, “Zoom2” ou “Format large” : 16:9 Appuyer sur la touche ◄ ou ► pour sélectionner “Position”, puis sur ENTER . Appuyer sur la touche ▲ ou ▼ pour déplacer l’image vers le Zoom1 Position Régler bas et le haut. Zoom2 Reset : Appuyer sur la touche ◄ ou ► pour sélectionner “Régler”, puis Format large sur ENTER . Il est possible d’initialiser le réglage. 4:3 Numér. seul. ➣ Après avoir sélectionné “Numér. seul.” en mode HDMI (1080i/1080p) ou Composante (1080i/1080p) : Appuyer sur la touche ◄ ou ► pour sélectionner “Position”, puis sur ENTER . Appuyer sur la touche ▲, ▼, ◄ ou ► pour déplacer l’image. Régler : Appuyer sur la touche ◄ ou ► pour sélectionner “Régler”, puis sur ENTER . Il est possible d’initialiser le réglage. Réglage Intro. Retour Format 16:9 Zoom1 Zoom2 Format large 4:3 Numér. seul. ➣ HD (Haute définition) 16:9 - 1080i/1080p (1920x1080), 720p (1280x720) Position Réglage Régler Intro. Retour ➣ Les réglages peuvent être définis et mémorisés pour chacun des appareils externes branchés à une entrée sur le téléviseur. Source de l’entrée Format de l’image ATV, Video, S-Vidéo, Composante (480i, 480p) 16:9, Zoom1, Zoom2, 4:3 DTV(1080i), Composante (1080i, 1080p), HDMI (720p, 1080i, 1080P) 16:9, 4:3, Format large, Numér. seul. PC 16:9, 4:3 16:9 16:9 Pour régler l’image en mode 16:9. Zoom1 U Dépl. Zoom1 Permet d’agrandir la taille de l’image affichée à l’écran. Zoom2 U Dépl. Zoom2 Agrandit davantage la taille de l’image que “Zoom1”. Format large U Dépl. 4:3 Numér. seul. Format large Augmente le facteur de forme de l’image pour qu’elle remplisse l’écran en entier. 4:3 Pour régler l’image en mode normal, c.-à-d. 4:3. Numér. seul. Utilisez la fonction pour voir l’intégralité de l’image sans coupure lors de l’entrée de signaux HDMI (720p/1080i/1080p), Composante (1080i/1080p) ou DTV (1080i). Français - 27 01470D-03Fre.indb 27 2008-08-11 �� 1:34:06 Réglage de la réduction numérique des bruits Si le signal de diffusion capté par votre téléviseur est faible, vous pouvez activer la fonction de réduction numérique des bruits pour aider à éliminer les parasites et les images fantômes qui apparaissent à l’écran. 1.Suivre les instructions 1 et 2 de ‘Activation des options d’image’. (Consulter la page 26) 2.Appuyez sur les boutons ▲ ou ▼ pour sélectionner “Réduct. bruit num.”, puis appuyez sur le bouton ENTER . 3.Appuyez sur les boutons ▲ ou ▼ pour sélectionner “Off”, “Basse”, “Moyen”, “Haute” ou “Auto”. Appuyez sur le bouton ENTER . • • • • • Off : Désactive la fonction de réduction du bruit à l’écran. Basse : Règle le bruit à l’écran au niveau bas. Moyen : Règle le bruit à l’écran au niveau moyen. Haute : Règle le bruit à l’écran au niveau élevé. Auto : Détecte et diminue automatiquement le bruit à l’écran. Appuyez sur le bouton EXIT pour quitter. Options d’image Nuance coul. : Normal Format : 16:9 Réduct. bruit num. : Auto DNle : Off Nv nr HDMI : Normal Mode Film : Off Mode bleu seu. : Off ▼ Dépl. Intro. Retour Options d’image Nuance coul. : Normal Format : 16:9 Réduct. bruit num. : Auto Basse Off : Off Moyen DNle Nv nr HDMI : Normal Haute Mode Film Auto : Off Mode bleu seu. : Off Dépl. Réglage de DNIe (Digital Natural Image engine) Ce téléviseur comprend une fonction DNIe qui permet d’obtenir une qualité d’image supérieure. Si vous réglez DNIe à “On”, vous verrez à l’écran des images en mode DNIe. 1.Suivre les instructions 1 et 2 de ‘Activation des options d’image’. (Consulter la page 26) 2.Appuyez sur les boutons ▲ ou ▼ pour sélectionner “DNIe”, puis appuyez sur le bouton ENTER . 3.Appuyez sur les boutons ▲ ou ▼ pour sélectionner “Off” ou “On”, puis appuyez sur le bouton ENTER . ► Intro. Retour Options d’image Nuance coul. : Froide1 Format : 16:9 Réduct. bruit num. : Auto DNle : On Nv nr HDMI : Normal Mode Film : Off Mode bleu seu. ► : Off ▼ Dépl. • Off : Désactive le mode DNIe. • On : Active le mode DNIe. Intro. Retour Options d’image Appuyez sur le bouton EXIT pour quitter. ➣ DNIe™ (Image naturelle numérique) Cette fonction offre une image plus détaillée grâce à la réduction du bruit 3D et à l’amélioration des détails, du contraste et de l’amélioration des blancs. ➣ “DNIe” n’est disponible qu’en mode “Dynamique”. Nuance coul. : Froide1 Format : 16:9 Réduct. bruit num. : Auto DNle : On Nv nr HDMI : Normal Mode Film : Off Mode bleu seu. : Off Off On Dépl. Réglage du niveau de noir HDMI Il est possible de sélectionner le niveau de noir de l’écran afin d’ajuster la profondeur de l’écran. 1.Suivre les instructions 1 et 2 de ‘Activation des options d’image’. (Consulter la page 26) 2.Appuyez sur les boutons ▲ ou ▼ pour sélectionner “Nv nr HDMI”, puis appuyez sur le bouton ENTER . 3.Appuyez sur les boutons ▲ ou ▼ pour sélectionner “Normal” ou “Basse”, puis appuyez sur le bouton ENTER . Intro. Retour Options d’image Nuance coul. : Normal Format : 16:9 Digital NR : Auto DNle : Off Nv nr HDMI : Normal Mode Film : Off Mode bleu seu. ► : Off ▼ Dépl. • Normal : L’image est plus claire. • Basse : L’image est plus sombre. Intro. Retour Options d’image ➣ Cette fonction est active seulement lorsqu’un appareil externe est branché à un téléviseur par l’entremise d’un Câble HDMI. Il se peut que la fonction “Nv nr HDMI” ne soit pas compatible avec tous les appareils externes. Appuyez sur le bouton EXIT pour quitter. Nuance coul. : Normal Format : 16:9 Digital NR : Auto DNle : Off Nv nr HDMI : Normal Normal Mode Film Basse : Off Mode bleu seu. : Off Dépl. Intro. Retour Français - 28 01470D-03Fre.indb 28 2008-08-11 �� 1:34:06 Réglage du mode Film Il est possible de régler le téléviseur afin qu’il détecte et traite automatiquement les signaux de film provenant de toutes les sources et règle l’image pour obtenir une définition optimale. 1.Suivre les instructions 1 et 2 de ‘Activation des options d’image’. (Consulter la page 26) 2.Appuyez sur les boutons ▲ ou ▼ pour sélectionner “Mode Film”, puis appuyez sur le bouton ENTER . 3.Appuyez sur les boutons ▲ ou ▼ pour sélectionner “Off”, “Auto1” ou “Auto2”, puis appuyez sur le bouton ENTER . • Off: Désactive la fonction Mode film. • Auto1: Règle automatiquement l’image afin d’obtenir une qualité optimale pendant l’écoute d’un film. • Auto2: Optimise automatiquement le texte vidéo pendant l’écoute d’un film. Appuyez sur le bouton EXIT pour quitter. ➣ Le mode “Mode Film” est disponible dans les modes TV, AV, S-Vidéo, Composante et Composante (480i / 1080i) et HDMI (480i / 1080i). Options d’image Nuance coul. : Normal Format : 16:9 Réduct. bruit num. : Auto DNle : Off Nv nr HDMI : Normal Mode Film : Off Mode bleu seu. : Off ▼ Dépl. : Normal Format : 16:9 Réduct. bruit num. : Auto DNle : Off Nv nr HDMI : Normal Mode Film : Off Mode bleu seu. : Off Auto2 Off Auto1 Intro. ▲ Format : 16:9 Réduct. bruit num. : Auto DNle : Off Nv nr HDMI : Normal Mode Film : Off Mode bleu seu. : Off Motion Plus 120Hz aut. : Low Dépl. Appuyez sur le bouton EXIT pour quitter. ➣ Si vous activez le mode “Motion Plus 120Hz aut.”, des parasites peuvent apparaître sur l’écran. Le cas échéant, réglez “Motion Plus 120Hz aut.” sur “Off”. ► Intro. Retour Options d’image Format : 16:9 Réduct. bruit num. : Auto DNle : Off Nv nr HDMI : Normal Mode Film : Off Mode bleu seu. Off : Off Motion Plus 120Hz aut. On : Low Dépl. Off : Permet d’éteindre Motion Plus 120Hz aut. Basse : Règle Motion Plus 120Hz aut. sur minimum. Moyen : Règle Motion Plus 120Hz ant. sur moyen. Haute : Règle Motion Plus 120Hz ant. sur maximum. Démo : Affiche la différence entre les modes “Motion Plus 120Hz aut.” On et “Motion Plus 120Hz aut.” (Arrêt). L’écran après application de Motion Plus 120Hz ant. s’affiche à gauche. Retour Options d’image Réglage du Motion Plus 120Hz aut. Retire la traînée des scènes rapides comportant beaucoup de mouvements afin de rendre l’image plus claire. 1.Suivre les instructions 1 et 2 de ‘Activation des options d’image’. (Consulter la page 26) 2.Appuyez sur les boutons ▲ ou ▼ pour sélectionner “Motion Plus 120Hz aut.”, puis appuyez sur le bouton ENTER . 3.Appuyez sur les boutons ▲ ou ▼ pour sélectionner “Off”, “Basse”, “Moyen”, “Haute” ou “Demo”, puis appuyez sur le bouton ENTER . Retour Options d’image Dépl. 3.Appuyez sur les boutons ▲ ou ▼ pour sélectionner “Off” ou “On”, puis appuyez sur le bouton ENTER . Appuyez sur le bouton EXIT pour quitter. ➣ “Mode bleu seu.” n’est disponible que lorsque le mode d’image est réglé à “Film” ou “Standard”. • • • • • Intro. Nuance coul. Réglage du Mode bleu seulement Cette fonction est réservée aux experts en mesures d’appareils audiovisuels. Cette fonction affiche le signal bleu seulement en éliminant les signaux rouge et vert du signal vidéo afin d’offrir un effet de filtre bleu qui sert à régler la couleur et la teinte de l’image d’un appareil vidéo, comme un lecteur de DVD, une chaîne de cinéma maison, etc. En utilisant cette fonction, vous pouvez régler la couleur et la teinte en fonction des paramètres privilégiés convenant au niveau de signal de chaque appareil vidéo à l’aide des motifs à barres de couleur rouge, verte, bleue, cyan, magenta et jaune sans avoir à utiliser un filtre bleu supplémentaire. 1.Suivre les instructions 1 et 2 de ‘Activation des options d’image’. (Consulter la page 26) 2.Appuyez sur les boutons ▲ ou ▼ pour sélectionner “Mode bleu seu.”, puis appuyez sur le bouton ENTER . ► Intro. Retour Options d’image ▲ Format : 16:9 Réduct. bruit num. : Auto DNle : Off Nv nr HDMI : Normal Mode Film : Off Mode bleu seu. : Off Motion Plus 120Hz aut. : Basse Dépl. Intro. ► Retour Options d’image Format : 16:9 Réduct. bruit num. : Auto DNle : On Nv nr HDMI : Normal Mode Film : Off Mode bleu seu. : Off Motion Plus 120Hz aut. : Low Off Basse Moyen Haute Dépl. Démo Intro. Retour Français - 29 01470D-03Fre.indb 29 2008-08-11 �� 1:34:06 Visionnement Image sur Image Il est possible d’utiliser la fonction ISI afin d’écouter simultanément le syntoniseur télé et une source vidéo externe. (Reportez-vous à la page 36 pour sélectionner le son de l’image ISI.) Cet appareil est doté d’un syntoniseur intégré qui ne permet pas la fonction ISI dans le même mode. Consulter la section ‘Paramètres ISI’ ci-dessous pour les détails. ➣ lorsque V-Chip (Voir page 52) fonctionne, la fonction ISI ne peut pas être utilisée. Comment activer la fonction Image sur Image 2.Appuyez à nouveau sur le bouton ENTER . Appuyez sur les bouton ▲ ou ▼ pour sélectionner “On”, puis appuyez sur le bouton ENTER . ➣ Si vous mettez le moniteur hors tension alors qu’il est en mode ISI, lorsque vous le remettez sous tension, la fenêtre ISI disparaît. ➣ Les émissions télévisuelles analogiques peuvent être visionnées dans la fenêtre ISI (image secondaire) lorsque l’image principale provient d’un appareil externe branché à HDMI 1, HDMI/DVI 2, HDMI 3, HDMI 4, Composante1, 2 en mode PC. ➣ Paramètres ISI Image principale Image secondaire Composante1, 2 HDMI 1, HDMI/DVI 2, HDMI 3, HDMI 4 PC TV Configuration 1.Appuyez sur le bouton MENU pour afficher le menu. Appuyez sur les bouton ▲ ou ▼ pour sélectionner “Configuration”, puis appuyez sur le bouton ENTER . Appuyez sur les bouton ▲ ou ▼ pour sélectionner “ISI”, puis appuyez sur le bouton ENTER . Divertissement : Off Économiseur énergie : Off ISI ► Mise à niveau du logiciel ISI ISI : Off Off Format : On Position : Air/Câble : Air Chaîne : Air 11 Dépl. Intro. Retour Redimensionnement de la fenêtre ISI 3.Appuyez sur les bouton ▲ ou ▼ pour sélectionner “Format”, puis appuyez sur le bouton ENTER . Appuyer sur la touche ▲ ou ▼ pour sélectionner l’option voulue, puis sur ENTER . ➣ L’image de la fenêtre ISI peut sembler légèrement non naturelle lorsque l’écran principal est utilisé pour un jeu ou le karaoké. ISI ISI : On Format : Position : Air/Câble : Air Chaîne : Air 11 Dépl. Intro. Retour Repositionnement de la fenêtre ISI 4.Appuyez sur les bouton ▲ ou ▼ pour sélectionner “Position”, puis appuyez sur le bouton ENTER . Appuyer sur la touche ▲ ou ▼ pour sélectionner l’option voulue, puis sur ENTER . ➣ Il n’est pas possible de sélectionner “Position” en modes de fenêtre double ( ) et double largeur ( ). ISI ISI : On Format : Position : Air/Câble : Air Chaîne : Air 11 Dépl. Intro. Retour Français - 30 01470D-03Fre.indb 30 2008-08-11 �� 1:34:07 Changement du canal ISI 5.Appuyez sur les bouton ▲ ou ▼ pour sélectionner “Air/Câble”, puis appuyez sur le bouton ENTER . 6.Appuyez sur les bouton ▲ ou ▼ pour sélectionner “Air” ou “Câble”, puis appuyez sur le bouton ENTER . 7.Appuyez sur les bouton ▲ ou ▼ pour sélectionner “Chaîne”, puis appuyez sur le bouton ENTER . 8.Utiliser les touches ▲ ou ▼ pour sélectionner le canal à afficher dans la fenêtre ISI. Appuyez sur le bouton ENTER . ➣ Seuls les canaux analogiques peuvent être affichés sur l’image ISI (image secondaire). Appuyez sur le bouton EXIT pour quitter. ISI ISI : On Format : Position : Air/Câble Air : Air Chaîne : Air 11 Câble Dépl. Intro. ISI : On Format : Position : Air/Câble : Air Chaîne Air11 11 : Air Dépl. Réglage facile 1.Appuyer sur la touche TOOLS de la télécommande. 2. Appuyer sur la touche ▲ ou ▼ pour sélectionner “ISI”, puis sur ENTER 3. Appuyer sur la touche ▲ ou ▼ pour choisir un élément particulier. 4. Appuyer sur la touche ◄ ou ► pour sélectionner l’option désirée. 5. Appuyer sur la touche EXIT ou TOOLS pour quitter. Retour ISI ▲ ▼ Intro. Retour OUTILS . Liste appareils Image Mode : Standard Son Mode : Personnel Mise en veille : Off ISI Dépl. Intro. e Quitter ISI ISI ◄ Off Format : Position : Air/Câble : Air Chaîne : Air 11 Réglage ► Retour Français - 31 01470D-03Fre.indb 31 2008-08-11 �� 1:34:07 Contrôle du Son Changement du format normal du son Son Il est possible de choisir le mode sonore qui convient le mieux à l’émission écoutée. 1.Appuyez sur le bouton MENU pour afficher le menu. Appuyez sur les bouton ▲ ou ▼ pour sélectionner “Son”, puis appuyez sur le bouton ENTER . Mode : Personnel ► Égaliseur • • • • • • Son 2.Appuyer sur la touche ENTER pour sélectionner “Mode”. Appuyer sur la touche ▲ ou ▼ pour sélectionner “Standard”, “Musique”, “Film”, “Parole” ou “Personnel”, puis sur ENTER . Appuyez sur le bouton EXIT pour quitter. Standard : choisit le mode sonore normal. Musique : accentue la musique par rapport aux dialogues. Film : offre le meilleur son pour les films. Parole : accentue les dialogues par rapport aux autres sons. Personnel : rappelle les réglages sonores personnalisés. (Reportez-vous à la rubrique ‘Personnalisation du son’) SRS TruSurround XT : Off Langue privilégiée : English Son multi-piste : Stéréo Volume auto : Off Haut-parleur TV : On Sélect. son : Principale Mode : Custom Standard Langue privilégiée Film : Off Parole Son multi-piste Personnel : Stereo Volume auto : Off Haut-parleur TV : On Sélect. son : Principale SRS TruSurround XT Réglage facile 1.Appuyer sur la touche TOOLS de la télécommande. 2. Appuyer sur la touche ▲ ou ▼ pour choisir “Son Mode”. 3. Appuyer sur la touche ◄ ou ► pour sélectionner l’option désirée. 4. Appuyer sur la touche EXIT ou TOOLS pour quitter. ► Musique Égaliseur OUTILS Liste appareils Son multi-piste : Image Format : Stéréo 16:9 Image Mode : Standard Son Mode ◄ Personnel ► Mise en veille : Off Ajouter aux favoris Commuter sur Air Dépl. Réglage e Quitter Personnalisation du son Mode Son L’utilisateur peut ajuster les paramètres audio selon ses préférences personnelles. 1.Appuyez sur le bouton MENU pour afficher le menu. Appuyez sur les bouton ▲ ou ▼ pour sélectionner “Son”, puis appuyez sur le bouton ENTER . 2.Appuyez sur les bouton ▲ ou ▼ pour sélectionner “Égaliseur”, puis appuyez sur le bouton ENTER . : Custom Égaliseur ► SRS TruSurround XT : Off Langue privilégiée : English Son multi-piste : Stéréo Volume auto : Off Haut-parleur TV : On Sélect. son : Principale Réinitialisation du son Égaliseur 3.Appuyez sur les boutons ENTER pour sélectionner “Mode”. Appuyer sur la touche ▲ ou ▼ pour sélectionner “Standard”, “Musique”, “Film”, “Parole” ou “Personnel” puis sur ENTER . Mode : Standard Standard Balance G Musique R 100Hz - Film + 300Hz - Parole + 1kHz - Personnel + 3kHz - + 10kHz - + Dépl. Intro. Retour Français - 32 01470D-03Fre.indb 32 2008-08-11 �� 1:34:08 4.Appuyer sur ▲ ou ▼ pour choisir une fréquence particulière à ajuster. Appuyer sur la touche ◄ ou ► pour augmenter ou réduire le niveau d’une fréquence particulière. • Mode : Choisit le mode sonore parmi des réglages prédéfinis. • Balance G/R : Règle la balance entre les haut-parleurs droit et gauche. • Réglage de la largeur de bande (100Hz, 300Hz, 1kHz, 2kHz, 3kHz, 10kHz) : Pour régler le niveau des différentes fréquences de largeur de bande. Égaliseur Mode : Personnel Balance G D 100Hz - + 300Hz - + 1kHz - + 3kHz - + 10kHz - + ▼ Dépl. Réglage Intro. Retour Égaliseur ▲ Rétablir les réglages par défaut de l’égal 5.Appuyez sur les bouton ▲ ou ▼ pour sélectionner “Régler”, puis appuyez sur le bouton ENTER . ➣ Les valeurs par défaut de l’égaliseur sont rétablies. Appuyez sur le bouton EXIT pour quitter. Balance G D 100Hz - + 300Hz - + 1kHz - + 3kHz - + 10kHz - + ► Régler Dépl. Intro. Retour Paramétrage de la technologie TruSurround XT Son TruSurround XT est une technologie SRS brevetée qui résout le problème de la lecture de contenu multicanaux en 5.1, lorsque le système ne comprend que deux enceintes. La technologie Trusurround offre une qualité audio virtuelle exceptionnelle avec n’importe quel système à deux enceintes, y compris les haut-parleurs internes d’un téléviseur. Elle est entièrement compatible avec tous les formats multicanaux. Mode : Personnel 1.Appuyez sur le bouton MENU pour afficher le menu. Égaliseur Appuyez sur les bouton ▲ ou ▼ pour sélectionner “Son”, puis appuyez sur le SRS TruSurround XT : Off ► bouton ENTER . Langue privilégiée : English 2.Appuyez sur les bouton ▲ ou ▼ pour sélectionner “SRS TruSurround XT”, Son multi-piste : Stéréo puis appuyez sur le bouton ENTER . Volume auto : Off Haut-parleur TV : On Sélect. son : Principale Réinitialisation du son Mode : Personnel Égaliseur Son 3.Appuyez sur les bouton ▲ ou ▼ pour sélectionner “Off” ou “On”, puis appuyez sur le bouton ENTER . Appuyez sur le bouton EXIT pour quitter. SRS TruSurround XT : Off Off Langue privilégiée On : English ► Son multi-piste : Stéréo Volume auto : Off Haut-parleur TV : On Sélect. son : Principale Réinitialisation du son TruSurround XT, SRS et le symbole sont des marques commerciales de SRS Labs, Inc. La technologie TruSurround XT est intégrée sous licence de SRS Labs, Inc. Français - 33 01470D-03Fre.indb 33 2008-08-11 �� 1:34:09 Choix de la langue privilégiée Le système de transmission numérique du téléviseur assure la transmission simultanée de plusieurs pistes de son (par exemple, la traduction simultanée de l’émission en langues étrangères). Choisir la langue de la piste sonore. Égaliseur SRS TruSurround XT Son 1.Appuyez sur le bouton MENU pour afficher le menu. Appuyez sur les bouton ▲ ou ▼ pour sélectionner “Son”, puis appuyez sur le bouton ENTER . : Off Langue privilégiée : English Son multi-piste : Stéréo ► Volume auto : Off Haut-parleur TV : On Sélect. son : Principale Réinitialisation du son 2.Appuyez sur les bouton ▲ ou ▼ pour sélectionner “Langue privilégiée”, puis appuyez sur le bouton ENTER . SRS TruSurround XT Son 3.Appuyer sur la touche ▲ ou ▼ pour choisir la langue souhaitée (Anglais, Espagnol ou Français), puis sur ENTER . Appuyez sur le bouton EXIT pour quitter. Égaliseur : Off Langue privilégiée : English Anglais Son multi-piste Volume auto Espagnol : Stereo Français : Off ► Haut-parleur TV : On Sélect. son : Principale Réinitialisation du son ➣ “Langue privilégiée” est disponible uniquement en mode TV numérique. ➣ Seule une langue faisant partie des langues diffusées peut être sélectionnée. Sélection d’une piste sonore à canaux multiples (MTS) Son 1.Appuyez sur le bouton MENU pour afficher le menu. Appuyez sur les bouton ▲ ou ▼ pour sélectionner “Son”, puis appuyez sur le bouton ENTER . 2.Appuyez sur les bouton ▲ ou ▼ pour sélectionner “Son multi-piste”, puis appuyez sur le bouton ENTER . SRS TruSurround XT : Off Langue privilégiée : English Son multi-piste : Stéréo Volume auto : Off ► Haut-parleur TV : On Sélect. son : Principale Réinitialisation du son 3.Appuyer sur la touche ▲ ou ▼ pour choisir le réglage souhaité, puis sur ENTER . Appuyez sur le bouton EXIT pour quitter. Son • Mono : choisir ce réglage pour les canaux diffusés en monophonie ou si la réception d’un signal stéréo s’avère difficile. • Stéréo : choisir ce réglage pour les canaux diffusés en stéréophonie. • SAP : choisir ce réglage pour écouter une émission diffusée en mode SAP (Separate Audio Program), habituellement un doublage en langue étrangère. SRS TruSurround XT : Off Langue privilégiée : English Son multi-piste : Stereo Mono Volume auto Haut-parleur TV Stéréo : Off SAP : On ► Sélect. son : Principale Réinitialisation du son ➣ “Son multi-piste” n’est disponible qu’en mode de télévision analogique. ➣ Selon l’émission écoutée, il est possible de choisir parmi les modes “Mono”, “Stereo” ou “SAP”. OUTILS Liste appareils Réglage facile 1.Appuyer sur la touche TOOLS de la télécommande. 2. Appuyer sur la touche ▲ ou ▼ pour choisir “Son multi-piste”. 3. Appuyer sur la touche ◄ ou ► pour sélectionner l’option désirée. 4. Appuyer sur la touche EXIT ou TOOLS pour quitter. Son multi-piste ◄ Stéréo Image Format : 16:9 Image Mode : Standard Son Mode : Personnel Mise en veille : Off ► Ajouter aux favoris Commuter sur Air Dépl. Réglage e Quitter Français - 34 01470D-03Fre.indb 34 2008-08-11 �� 1:34:09 Contrôle automatique du volume Langue privilégiée : English Son multi-piste : Stéréo Volume auto : Off Haut-parleur TV : On ► Sélect. son : Principale Réinitialisation du son Son 3.Appuyer sur la touche ▲ ou ▼ pour choisir “Volume auto” “Off” ou “On”, puis sur ENTER . Appuyez sur le bouton EXIT pour quitter. Son Réduit les différences de niveau volume entre les chaînes. 1.Appuyez sur le bouton MENU pour afficher le menu. Appuyez sur les bouton ▲ ou ▼ pour sélectionner “Son”, puis appuyez sur le bouton ENTER . 2.Appuyez sur les bouton ▲ ou ▼ pour sélectionner “Volume auto”, puis appuyez sur le bouton ENTER . Langue privilégiée : English Son multi-piste : Stéréo Volume auto : Off Off Haut-parleur TV On : On ► Sélect. son : Principale Réinitialisation du son Activation et désactivation des haut-parleurs Internal Haut-parleur Son multi-piste : Stéréo Volume auto : Off Haut-parleur TV : On Sélect. son : Principale ► Réinitialisation du son Son 3.Appuyez sur les bouton ▲ ou ▼ pour sélectionner “Off”, puis appuyez sur le bouton ENTER . Appuyez sur le bouton EXIT pour quitter. ➣ Lorsque le “Haut-parleur TV” est réglé à “Off”, il est possible d’utiliser uniquement les fonctions “Langue privilégiée” (en mode numérique), “Son multi-piste” (en mode analogique), “Sélect. son” (en mode ISI) et “Réinitialisation du son” dans le menu Son. ➣ Les touches VOL –, VOL + et MUTE ne fonctionnent pas lorsque “Hautparleur TV” est réglé à “Off”. Son Le son des haut-parleurs du téléviseur est coupé. 1.Appuyez sur le bouton MENU pour afficher le menu. Appuyez sur les bouton ▲ ou ▼ pour sélectionner “Son”, puis appuyez sur le bouton ENTER . 2.Appuyez sur les bouton ▲ ou ▼ pour sélectionner “Haut-parleur TV”, puis appuyez sur le bouton ENTER . Son multi-piste : Stéréo Volume auto : Off Haut-parleur TV : On Off Sélect. son On : Main ► Réinitialisation du son Sortie audio optique (sortie G/D) vers la chaîne audio HF AV, S-Vidéo Composante, PC, HDMI HF AV, S-Vidéo Composante, PC, HDMI Haut-parleur TV On Sortie de hautparleur Sortie de hautparleur Sortie de hautparleur Sortie de hautparleur Sortie de hautparleur Sortie de hautparleur Haut-parleur TV Off Mute Mute Mute Sortie de hautparleur Sortie de hautparleur Sortie de hautparleur Aucun signal vidéo Mute Mute Mute Mute Mute Mute Fabriqué sous licence par Dolby Laboratories. Dolby et le symbole en forme de double D sont des marques déposées de Dolby Laboratories. Français - 35 01470D-03Fre.indb 35 2008-08-11 �� 1:34:10 Activation du son de l’image (ISI) secondaire Son Lorsque la fonction ISI est activée, vous pouvez écouter le son de l’image (ISI) secondaire. 1.Appuyez sur le bouton MENU pour afficher le menu. Appuyez sur les bouton ▲ ou ▼ pour sélectionner “Son”, puis appuyez sur le bouton ENTER . 2.Appuyez sur les bouton ▲ ou ▼ pour sélectionner “Sélect. son”, puis appuyez sur le bouton ENTER . Son 3.Appuyez sur les bouton ▲ ou ▼ pour sélectionner “Principale” ou “Secondaire”, puis appuyez sur le bouton ENTER . Appuyez sur le bouton EXIT pour quitter. Volume auto : Off Haut-parleur TV : On Sélect. son : Principale Volume auto : Off Haut-parleur TV : On Sélect. son : Main Principale ► Secondaire Réinitialisation du son • Principale : Permet d’écouter le son accompagnant l’image principale. • Secondaire : Permet d’écouter le son accompagnant l’image second. ► Réinitialisation du son ➣ Vous pouvez sélectionner cette option lorsque la fonction “ISI” est définie sur “On”. (Voir page 30) Rétablir les paramètres de son par défaut • Réinitial. tout : Toutes les valeurs relatives au son sont redevenues les réglages par défaut. • Réinitial. mode son : Les valeurs actuelles relatives au son redeviennent les réglages par défaut. • Effacer : Choisir les options de rétablissement du son. Son Il est possible de rétablir les paramètres audio par défaut. 1.Appuyez sur le bouton MENU pour afficher le menu. Appuyez sur les bouton ▲ ou ▼ pour sélectionner “Son”, puis appuyez sur le bouton ENTER . 2.Appuyez sur les bouton ▲ ou ▼ pour sélectionner “Réinitialisation du son”, puis appuyez sur le bouton ENTER . Appuyez sur le bouton EXIT pour quitter. 3. Appuyez sur les bouton ◄ ou ► pour sélectionner “Réinitial. tout”, “Réinitial. mode son” ou “Effacer”, puis appuyez sur le bouton ENTER . Appuyez sur le bouton EXIT pour quitter. Haut-parleur TV : On Sélect. son : Principale Réinitialisation du son ► Réinitialisation du son Choisir les options de rétablissement du son. Réinitial. tout Réinitial. mode son Effacer Intro. Retour Dépl. Connexion du casque (Vendu séparément) Il suffit de brancher un casque d’écoute au téléviseur pour écouter une émission sans déranger personne. ➣ Lorsque la fiche du casque d’écoute se trouve dans la prise du casque, il est Panneau latéral de la télévision possible d’utiliser uniquement les fonctions “Haut-parleur TV” est réglé à “Off”, seules les fonctions “Langue privilégiée” (en mode numérique), “Son multipiste” (en mode analogique), “Volume auto”, “Sélect. son” (en mode ISI) et “Réinitialisation du son” dans le menu Son. ➣ L’utilisation prolongée du casque à fort volume peut altérer votre audition. ➣ Les haut-parleurs n’émettent aucun son lorsqu’un casque d’écoute est branché au téléviseur. ➣ Le volume des écouteurs et du téléviseur se règle différemment. 15 Français - 36 01470D-03Fre.indb 36 2008-08-11 �� 1:34:11 Contrôle des Chaînes Gestion des canaux Ce menu permet d’ajouter et de supprimer ou de définir les canaux favoris et d’utiliser le télé-horaire pour les diffusions numériques. Afficher tous les canaux Appuyer sur la touche ◄ pour sélectionner “Canaux ajoutés”. Effacer les canaux brouillés Liste des canaux 2 Air 4 Air 4-2 8 13 13-1 Air Antenne Tous les canaux 3.Appuyer sur la touche ▲ ou ▼ pour choisir “Tous les canaux”. ➣ Affiche tous les canaux actuellement accessibles. Appuyer sur la touche ENTER . ► Syn. Précise Puissance signal Canaux ajoutés 2. Prog. auto Chaîne Affiche tous les canaux actuellement accessibles. Pour utiliser la fonction “Liste des canaux”, exécuter d’abord la fonction “Auto Program” (Voir page 19). 1.Appuyez sur le bouton MENU. Appuyez sur les bouton ▲ ou ▼ pour sélectionner “Chaîne”, puis appuyez sur le bouton ENTER . Appuyez sur les bouton ▲ ou ▼ pour sélectionner “Liste des canaux”, puis appuyez sur le bouton ENTER . 4.Appuyer sur la touche ▲ ou ▼ pour sélectionner le canal à écouter, puis sur ENTER . Il est possible d’écouter le canal sélectionné. ♥ TV #8 Air Air ♥ TV #3 Alice’s Adventures in Wonderland Zoom Choisir 2 Air 4 Air 4-2 8 13 13-1 Air Antenne TOOLS Option ♥ TV #8 Air Air ♥ TV #3 Alice’s Adventures in Wonderland Zoom Choisir TOOLS Option O Appuyer sur la touche CH LIST de la télécommande pour afficher les listes de canaux. À l’aide des touches de couleurs sur la télécommande avec la liste des canaux • • • • Rouge (Antenne) : Permet de passer au mode air ou Câble. Verte (Zoom) : Agrandit ou rapetisse un numéro de canal. Jaune (Choisir) : Sélectionne plusieurs listes de canaux. TOOLS (Option) : Affiche les menus “Ajouter” (ou “Supprimer”), “Ajouter aux favoris”(ou “Effacer des favoris”), “Écoute par minuterie”, “Modifier le nom du canal” et “Prog. auto”. ➣ Un canal affiché en gris indique que celui-ci a été supprimé. Le menu “Ajouter” ne s’affiche que pour les canaux supprimés. ➣ Un canal accompagné du symbole “♥” signifie que le canal est réglé en tant que canal favori. Le menu “Effacer des favoris” ne s’affiche que pour les canaux marqués du symbole “♥”. Français - 37 01470D-03Fre.indb 37 2008-08-11 �� 1:34:11 Ajout et suppression de canaux 2. Prog. auto Effacer les canaux brouillés Chaîne Il est possible d’ajouter ou de supprimer un canal pour afficher seulement les canaux désirés. 1.Appuyez sur le bouton MENU. Appuyez sur les bouton ▲ ou ▼ pour sélectionner “Chaîne”, puis appuyez sur le bouton ENTER . Appuyez sur les bouton ▲ ou ▼ pour sélectionner “Liste des canaux”, puis appuyez sur le bouton ENTER . Liste des canaux ► Syn. Précise Puissance signal Appuyer sur la touche ◄ pour sélectionner “Canaux ajoutés”. Canaux ajoutés 2 Air 4 Air 4-2 8 13 13-1 Air Antenne Tous les canaux 3.Appuyer sur la touche ▲ ou ▼ pour choisir “Tous les canaux”. ➣ Affiche tous les canaux actuellement accessibles. Appuyer sur la touche ENTER . Air Air ♥ TV #3 Alice’s Adventures in Wonderland Zoom Choisir 2 Air 4 Air 4-2 8 13 13-1 Air Antenne Tous les canaux 4.Appuyer sur la touche ▲ ou ▼ pour sélectionner un canal à supprimer, puis sur la touche TOOLS. 5.Appuyer sur la touche ENTER pour choisir “Supprimer”. ➣ Tous les canaux supprimés sont affichés dans le menu “Tous les canaux”. 6. Appuyer sur la touche EXIT pour quitter le menu. ➣ Il est également possible d’ajouter un canal au menu “Canaux ajoutés” de la même façon. ➣ Le canal doit être supprimé avant de pouvoir l’ajouter à nouveau dans la liste “Canaux ajoutés”. ➣ Pour ajouter (rétablir) à nouveau un canal dans la liste des canaux ajoutés, il faut suivre les étapes 1 à 3 ci-dessus, appuyer sur la touche ▲ ou ▼ pour choisir un canal à ajouter, puis appuyer sur la touche TOOLS. Appuyer sur la touche ENTER pour choisir “Ajouter”. ♥ TV #8 Air Air ♥ TV #3 Alice’s Adventures in Wonderland Zoom Choisir Air 4 Air 8 13 13-1 Air Antenne Option ♥ TV #8 2 4-2 TOOLS ♥ TV #8 Air Air TOOLS Option Supprimer Ajouter aux favoris Écoute par minuterie Modifier le nom du canal Prog. auto ♥ TV #3 Alice’s Adventures in Wonderland Zoom Choisir TOOLS Option O Appuyer sur la touche CH LIST de la télécommande pour afficher les listes de canaux. Français - 38 01470D-03Fre.indb 38 2008-08-11 �� 1:34:12 Sélection des canaux favoris Appuyer sur la touche ◄ pour sélectionner “Canaux ajoutés”. Effacer les canaux brouillés Liste des canaux 2 Air 4 Air 4-2 ♥ TV #8 8 Air 13 Air 13-1 Air Antenne Tous les canaux ♥ TV #3 Alice’s Adventures in Wonderland Zoom Choisir 2 Air 4 Air 4-2 Air Air 13-1 Air Antenne ♥ TV #3 Alice’s Adventures in Wonderland Zoom Choisir 2 Air 4 Air 4-2 Air 13 Air 13-1 Option TOOLS Supprimer Ajouter aux favoris ♥ TV #8 8 Air Antenne Option TOOLS ♥ TV #8 8 13 Tous les canaux 3.Appuyez sur les bouton ▲ ou ▼ pour sélectionner “Tous les canaux”. ➣ Affiche tous les canaux actuellement accessibles. Appuyer sur la touche ENTER . 4.Appuyer sur la touche ▲ ou ▼ pour choisir un canal en tant que canal favori. ➣ Ajout de plusieurs canaux aux canaux favoris Appuyer sur la touche ▲ ou ▼ pour choisir le canal voulu dans la liste des canaux. Puis appuyer sur la touche jaune. Répéter la procédure ci-dessus pour choisir plusieurs canaux. Le symbole s’affiche à la gauche du canal sélectionné. 5. Appuyer sur la touche TOOLS. 6.Appuyer sur la touche ▲ ou ▼ pour choisir “Ajouter aux favoris”, puis sur ENTER . Le symbole “♥” s’affiche et le canal est enregistré comme canal favori. 7.Pour annuler une sélection de canal favori, appuyer sur la touche TOOLS jusqu’à ce qu’un canal favori soit sélectionné. Appuyer sur la touche ▲ ou ▼ pour choisir “Effacer des favoris”, puis sur ENTER . Le canal est retiré de la liste des “Favoris” et le symbole “♥” disparaît. Appuyer sur la touche EXIT pour quitter le menu. ➣ Il est également possible d’ajouter ou de supprimer un canal dans la liste des favoris à l’aide du menu “Canaux ajoutés”, de la même façon. ➣ Tous les canaux favoris sont affichés dans le menu “Favoris”. ► Syn. Précise Puissance signal Canaux ajoutés 2. Prog. auto Chaîne Vous pouvez définir en favoris les chaînes que vous regardez fréquemment. 1.Appuyez sur le bouton MENU. Appuyez sur les bouton ▲ ou ▼ pour sélectionner “Chaîne”, puis appuyez sur le bouton ENTER . Appuyez sur les bouton ▲ ou ▼ pour sélectionner “Liste des canaux”, puis appuyez sur le bouton ENTER . Écoute par minuterie Modifier le nom du canal Prog. auto ♥ TV #3 Alice’s Adventures in Wonderland Zoom Choisir TOOLS Option O Appuyer sur la touche CH LIST de la télécommande pour afficher les listes de canaux. O Pour sélectionner les chaînes favorites que vous avez configurées, appuyez sur le bouton FAV.CH de la télécommande. Réglage facile 1.Appuyer sur la touche TOOLS de la télécommande. 2.Appuyez sur les bouton ▲ ou ▼ pour sélectionner “Ajouter aux favoris” (ou “Effacer des favoris”), puis appuyez sur le bouton ENTER . ➣ Le canal sélectionné est ajouté à la liste des favoris (ou en est supprimé). OUTILS Liste appareils Son multi-piste : Image Format : Stéréo 16:9 Image Mode : Standard Son Mode : Personnel Mise en veille : Off Ajouter aux favoris Commuter sur Air Dépl. Intro. e Quitter Français - 39 01470D-03Fre.indb 39 2008-08-11 �� 1:34:13 Pour réserver une émission (écoute par minuterie) Si une réservation d’émission à regarder est effectuée, le téléviseur passe automatiquement au canal réservé dans la liste des canaux, même si un autre canal est écouté. Pour réserver une émission, régler d’abord l’horloge. Voir pages 48 et 49. Il est possible de régler les canaux réservés uniquement s’ils sont dans la liste des canaux (voir page 37). Effacer les canaux brouillés Liste des canaux ► Syn. Précise Puissance signal Canaux ajoutés 2.Appuyer sur la touche ▲ ou ▼ pour sélectionner un canal à supprimer, puis sur la touche TOOLS. Prog. auto Chaînel 1.Appuyez sur le bouton MENU. Appuyez sur les bouton ▲ ou ▼ pour sélectionner “Chaîne”, puis appuyez sur le bouton ENTER . Appuyez sur les bouton ▲ ou ▼ pour sélectionner “Liste des canaux”, puis appuyez sur le bouton ENTER . 2 Air 4 Air 4-2 8 Ajouter aux favoris Écoute par minuterie Air 13 13-1 3.Appuyer sur la touche ▲ ou ▼ pour choisir “Écoute par minuterie”, puis sur ENTER . L’écran de réservation d’une émission (écoute par minuterie) apparaît. 4.Appuyer sur les touches ▲/▼/◄/► pour réserver un programme, puis sur ENTER . La réservation de l’émission est terminée. Appuyer sur la touche EXIT pour quitter le menu. ➣ Il est également possible de réserver une émission à l’aide des menus “Tous les canaux” ou “Favorite”, de la même façon. ➣ Pour des renseignements sur la confirmation d’une réservation d’émission, consulter la page 41. Seuls les canaux mémorisés peuvent être réservés. ➣ Il est possible de régler directement le canal, le mois, le jour, l’année, l’heure et les minutes à l’aide des touches numériques de la télécommande. Supprimer ♥ TV #8 Air Antenne Modifier le nom du canal Air Prog. auto ♥ TV #3 Alice’s Adventures in Wonderland Zoom Choisir TOOLS Option Écoute par minuterie Antenne Air Répéter Une fois Chaîne 4 Date 01 - 01 - 2008 Dépl. Heure de début 10 : 09 am Réglage Intro. Retour O Appuyer sur la touche CH LIST de la télécommande pour afficher les listes de canaux. Canaux ajoutés Guide d’émissions numériques et réservation d’émission Lorsqu’un canal numérique est sélectionné et que la touche ► est enfoncée, le Guide des émissions du canal s’affiche. Il est possible de réserver une émission en suivant les procédures ci-dessus. : une émission en cours. : une émission réservée. 2 Air 4 Air 1/1/2008 4-2 ♥ TV #8 12 : 59 pm M.Spillane’s mike Ha... 8 Air 1 : 59 pm Quincy, M.E 13 Air 3 : 21 pm The Égaliseur 13-1 ♥ TV #3 Air Zoom TOOLS Option Regarder Français - 40 01470D-03Fre.indb 40 2008-08-11 �� 1:34:13 Confirmer une réservation d’émission Appuyer sur la touche ◄ pour sélectionner “Canaux ajoutés”. Effacer les canaux brouillés Liste des canaux 2 Air 4 Air 4-2 ♥ TV #8 8 Air 13 Air 13-1 Air Antenne 6.Appuyer sur la touche ▲/▼/◄/► pour modifier une réservation, puis sur ENTER . La modification est apportée à la réservation. Annuler une réservation 4.Appuyer sur la touche ▲ ou ▼ pour sélectionner la réservation à annuler, suivie de la touche TOOLS. 5.Appuyer sur la touche ▲ ou ▼ pour choisir “Annuler les schedules”, puis sur ENTER . 6.Appuyez sur la touche ◄ ou ► pour choisir “OK”, puis sur ENTER . La réservation d’émission est annulée. Appuyer sur la touche EXIT pour quitter le menu. ♥ TV #3 Alice’s Adventures in Wonderland Zoom Choisir TOOLS Option 1/1/2008 1 : 59 pm 13-1 TV #3 Quincy, M.E 2 : 59 pm 13-1 TV #3 The Égaliseur 3 : 59 pm 13-1 TV #3 McMillan & Wife 5 : 59 pm 13-1 TV #3 M.Spillane’s mike Hammer Air Antenne Enregistrement par minuterie Modifier une réservation d’émission 4.Appuyer sur la touche ▲ ou ▼ pour sélectionner la réservation à modifier, suivie de la touche TOOLS. 5. Appuyer sur ENTER pour sélectionner “Information, modification”. Enregistrement par minuterie 3.Appuyer sur la touche ▲ ou ▼ pour choisir “Enregistrement par minuterie”. ➣ Affiche tous les canaux actuellement accessibles. Appuyer sur la touche ENTER . ► Syn. Précise Puissance signal Canaux ajoutés 2. Prog. auto Chaîne Il est possible de visualiser, de modifier ou de supprimer une réservation. 1.Appuyer sur la touche MENU. Appuyez sur les bouton ▲ ou ▼ pour sélectionner “Chaîne”, puis appuyez sur le bouton ENTER . Appuyez sur les bouton ▲ ou ▼ pour sélectionner “Liste des canaux”, puis appuyez sur le bouton ENTER . Zoom Choisir TOOLS Option Information 1/1/2008 1 : 59 pm 13-1 TV #3 Information, Quincy, M.E modification 2 : 59 pm 13-1 TV #3 The Égaliseur 3 : 59 pm 13-1 TV #3 McMillan & Wife 5 : 59 pm 13-1 TV #3 M.Spillane’s mike Hammer Air Antenne Zoom Choisir Annuler les schedules Information TOOLS Option Information Option programmée • Information, modification : Sélectionner pour modifier une réservation d’émission. • Annuler les schedules : Sélectionner pour annuler une réservation d’émission. • Information : Sélectionner pour afficher une réservation d’émission. O Appuyer sur la touche CH LIST de la télécommande pour afficher les listes de canaux. Français - 41 01470D-03Fre.indb 41 2008-08-11 �� 1:34:14 Identification des canaux – analogiques Chaîne Les canaux peuvent être identifiés de sorte que leur indicatif d’appel s’affiche chaque fois que le canal est sélectionné. Prog. auto 1.Appuyez sur le bouton MENU. Effacer les canaux brouillés Appuyez sur les bouton ▲ ou ▼ pour sélectionner “Chaîne”, puis appuyez sur le bouton ENTER . Liste des canaux Appuyez sur les bouton ▲ ou ▼ pour sélectionner “Liste des canaux”, puis Syn. Précise appuyez sur le bouton ENTER . ► Puissance signal Canaux ajoutés 2.Appuyer sur la touche ▲ ou ▼ pour sélectionner le canal à renommer, suivie de la touche TOOLS. 2 Air 4 Air 4-2 ♥ TV #8 8 Air 13 Air 13-1 Air Antenne Canaux ajoutés 3.Appuyez sur les bouton ▲ ou ▼ pour sélectionner “Modifier le nom du canal”, puis appuyez sur le bouton ENTER . Choisir Air Air 4-2 8 Air 13 Air TOOLS Option Supprimer Ajouter aux favoris ♥ TV #8 . Touches numériques : Il est possible d’entrer des chiffres. Touche rouge : Il est possible d’alterner entre l’anglais et les caractères. Touche verte : Il est possible de supprimer un caractère déjà saisi. Touche jaune : Il est possible de saisir une espace. Touche bleue : Appuyer sur cette touche une fois le canal renommé. Zoom 4 Air Antenne • • • • • Alice’s Adventures in Wonderland 2 13-1 4.Appuyer sur la touche ▲/▼/◄/► pour choisir une lettre, puis sur ENTER ♥ TV #3 Écoute par minuterie Modifier le nom du canal Prog. auto ♥ TV #3 Alice’s Adventures in Wonderland Zoom Choisir TOOLS Option Modifier le nom du canal _ 6 A B C D E F G H I J K L M N O P Q R S T U V W X Y Z Number 0~9 Character Supprimer Blank Done Dépl. Intro. Retour 5.Lorsque terminé, appuyer sur la touche bleue pour assigner le nouveau nom. Appuyer sur la touche EXIT pour quitter le menu. ➣ Les noms des canaux numériques sont automatiquement assignés et ne peuvent être identifiés. Mémorisation des canaux (Prog. auto) Canaux ajoutés 1.Appuyer sur la touche MENU. Appuyer sur la touche ▲ ou ▼ pour choisir “Chaîne”, puis sur ENTER . Appuyer sur la touche ▲ ou ▼ pour choisir “Liste des canaux”, puis sur ENTER . 2.Appuyer sur la touche ▲ ou ▼ pour sélectionner le canal à renommer, suivie de la touche TOOLS. 3.Appuyer sur la touche ▲ ou ▼ pour sélectionner “Prog. auto”, puis sur ENTER . ➣ Pour en savoir plus sur la configuration des options, consulter la page 19. 2 Air 4 Air 4-2 ♥ TV #8 8 Air 13 Air 13-1 Air Antenne Supprimer Ajouter aux favoris Écoute par minuterie Modifier le nom du canal Prog. auto ♥ TV #3 Alice’s Adventures in Wonderland Zoom Choisir TOOLS Option Français - 42 01470D-03Fre.indb 42 2008-08-11 �� 1:34:15 Suppression des canaux brouillés – canaux numériques Chaîne La fonction “Effacer les canaux brouillés” permet d’éliminer les canaux brouillés une fois que la programmation automatique est terminée. Cette procédure peut prendre de 20 à 30 minutes. 1.Appuyez sur le bouton MENU pour afficher le menu. Antenne : Câble Appuyez sur les bouton ▲ ou ▼ pour sélectionner “Chaîne”, puis appuyez Prog. auto sur le bouton ENTER . 2.Appuyez sur les bouton ▲ ou ▼ pour sélectionner “Effacer les canaux brouillés”, puis appuyez sur le bouton ENTER . Cette procédure permet de détecter les canaux brouillés qui doivent être supprimés de la liste. ➣ Pour arrêter la fonction de recherche des canaux brouillés; Appuyez sur les bouton ENTER pour sélectionner “Arrêt”. Appuyez sur les bouton ◄ pour sélectionner “Oui”, puis appuyez sur le bouton ENTER . Effacer les canaux brouillés ► Liste des canaux Syn. Précise Puissance signal Effacer les canaux brouillés 3.Lorsque la recherche de canaux brouillés est terminée, appuyez sur ENTER . Appuyez sur la touche EXIT pour quitter le menu. ➣ Cette fonction n’est accessible qu’en mode “Câble”. Suppression des canaux brouillés. DTV Câble 10 3% Arrêt Intro. Retour Syntonisation fine des chaînes analogiques Effacer les canaux brouillés Liste des canaux Chaîne La fonction de syntonisation fine permet d’optimiser la réception d’une chaîne. 1.Appuyez sur le bouton MENU pour afficher le menu. Appuyez sur les bouton ▲ ou ▼ pour sélectionner “Chaîne”, puis appuyez sur le bouton ENTER . 2.Appuyez sur les bouton ▲ ou ▼ pour sélectionner “Syn. Précise”, puis appuyez sur le bouton ENTER . Syn. Précise ► Puissance signal Syn. Précise 3.Utilisez les bouton ◄ ou ► pour régler la syntonisation fine. Pour mémoriser les réglages de syntonisation fine, appuyez sur le bouton ENTER . ➣ Si vous ne conservez pas de chaînes syntonisées dans la mémoire, les réglages ne sont pas enregistrés. 4.Pour réinitialiser les réglages de syntonisation fine, appuyez sur le bouton ▼ et sélectionnez “Régler”, puis appuyez sur ENTER . Appuyez sur la touche EXIT pour quitter le menu. ➣ Le symbole “*” apparaît à côté du nom des chaînes syntonisées. ➣ La syntonisation fine est possible uniquement avec les chaînes analogiques. Air 6 0 Régler Dépl. Réglage Enregistrer Retour Syn. Précise Air 6* Fine Tuned +3 Régler Dépl. Réglage Enregistrer Retour Syn. Précise Air 6 0 Régler Dépl. Intro. Retour Français - 43 01470D-03Fre.indb 43 2008-08-11 �� 1:34:15 Contrôle de la puissance du signal numérique Chaîne Contrairement aux chaînes analogiques, dont la qualité de réception peut varier (de “neigeuse” à claire), les chaînes numériques (HDTV) offrent soit une réception parfaite, soit aucune réception. Ainsi, contrairement aux chaînes analogiques, vous ne pouvez pas syntoniser les chaînes numériques. Cependant, vous pouvez régler votre antenne afin d’améliorer la réception des chaînes numériques disponibles. 1.Appuyez sur le bouton MENU pour afficher le menu. Liste des canaux Appuyez sur les bouton ▲ ou ▼ pour sélectionner “Chaîne”, puis appuyez Syn. Précise sur le bouton ENTER . Puissance signal ► 2.Appuyez sur les bouton ▲ ou ▼ pour sélectionner “Puissance signal”, puis appuyez sur le bouton ENTER . Si l’indicateur de puissance indique que le signal numérique est faible, déplacez votre antenne de manière à augmenter la puissance du signal. Continuez à régler l’antenne jusqu’à obtenir un signal maximum. Appuyez sur le bouton EXIT pour quitter. Puissance signal OK Intro. Retour Français - 44 01470D-03Fre.indb 44 2008-08-11 �� 1:34:16 Affichage PC Utilisation de votre télévision comme un écran PC Configuration de votre logiciel PC (basée surWindows XP) Les paramètres d’affichage Windows pour un ordinateur type sont indiqués ci-dessous. Cependant, les écrans réels de votre PC auront probablement un aspect différent, en fonction de votre propre version de Windows et de votre carte vidéo. Même si vos écrans réels apparaissent différents, les informations de base s’appliquent dans la plupart des cas. (Si tel n’est pas le cas, contactez le fabricant de votre ordinateur ou votre revendeur Samsung.) 1. Cliquez sur “Panneau de configuration” dans le menu Démarrer de Windows. 2.Lorsque vous êtes sur l’écran du panneau de configuration, cliquez sur “Apparence et Thèmes” et une boîte de dialogue Propriétés de l’affichage apparaît. 3.Lorsque vous êtes sur l’écran du panneau de configuration, cliquez sur “Affichage” et une boîte de dialogue Propriétés de l’affichage apparaît. 4.Allez sur l’onglet “Paramètres” dans la boîte de dialogue Propriétés de l’Affichage. Réglage correct de la taille (résolution) Optimum : 1920 X 1080 pixels Si votre boîte de dialogue des paramètres d’affichage comporte une option de fréquence verticale, la valeur correcte est “60” ou “60Hz”. Sinon cliquez sur “OK” et quittez la boîte de dialogue. Modes d’affichage Si le signal du système équivaut au mode de signal standard, l’écran se règle automatiquement. Si le signal du système ne correspond pas au mode de signal standard, réglez le mode en vous reportant le cas échéant au manuel d’utilisation de la carte vidéo. Pour les modes d’affichage figurant ci-dessous, l’image de l’écran a été optimisée lors de la fabrication. Entrée D-Sub Mode IBM VESA CVT Résolution Fréquence horizontale (kHz) Fréquence verticale (Hz) Fréquence d’horloge du pixel (MHz) Polarité synchronisée (H/V) 640 x 350 720 x 400 640 x 480 640 x 480 640 x 480 800 x 600 800 x 600 800 x 600 1024 x 768 1024 x 768 1024 x 768 1280 x 1024 1280 x 1024 1360 x 768 1600 x 1200 1920 x 1080RB 31.469 31.469 31.469 37.861 37.500 37.879 48.077 46.875 48.363 56.476 60.023 63.981 79.976 47.712 75.000 66.587 70.086 70.087 59.940 72.809 75.000 60.317 72.188 75.000 60.004 70.069 75.029 60.020 75.025 60.015 60.000 59.934 25.175 28.322 25.175 31.500 31.500 40.000 50.000 49.500 65.000 75.000 78.750 108.000 135.000 85.500 162.000 138.500 +/-/+ -/-/-/+/+ +/+ +/+ -/-/+/+ +/+ +/+ +/+ +/+ +/- Fréquence horizontale (kHz) 31.469 37.879 48.363 63.981 47.712 75.000 67.500 Fréquence verticale (Hz) 59.940 60.317 60.004 60.020 60.015 60.000 60.000 Fréquence d’horloge du pixel (MHz) 25.175 40.000 65.000 108.000 85.500 162.000 148.500 Entrée HDMI/DVI Mode VESA CEA Résolution 640 x 480 800 x 600 1024 x 768 1280 x 1024 1360 x 768 1600 x 1200 1920 x 1080p Polarité synchronisée (H/V) -/+/+ -/+/+ +/+ +/+ +/+ Français - 45 01470D-03Fre.indb 45 2008-08-11 �� 1:34:16 Configurer votre téléviseur avec votre PC Comment utiliser le réglage automatiq Utilisez la fonction ‘Réglage Auto’ pour que le téléviseur règle automatiquement les signaux vidéo qu’il reçoit. Cette fonction ajuste également automatiquement les paramètres, les fréquences et les positions. ➣ Cette fonction n’est pas disponible en mode numérique DVI. ➣ Préréglage : Appuyer sur la touche SOURCE pour sélectionner PC. 1.Appuyez sur le bouton MENU pour afficher le menu. Appuyez sur les bouton ▲ ou ▼ pour sélectionner “Image”, puis appuyez sur le bouton ENTER . TV PC ---- AV1 ---- AV2 ---- S-Video ---- Composante1 ---- Composante2 Rafraîchir Image 2.Appuyez sur les bouton ▲ ou ▼ pour sélectionner “Réglage Auto”, puis appuyez sur le bouton ENTER . Appuyez sur le bouton EXIT pour quitter. ---Option TOOLS Luminosité : 45 Netteté : 50 Réglage Auto ► Écran Réglages des détails Options d’image Réinitialisation de l’image Réglage auto . en cours. Attendez, s’il vous plait. Réglage facile 1.Appuyer sur la touche TOOLS de la télécommande. 2.Appuyez sur les bouton ▲ ou ▼ pour sélectionner “Réglage Auto”, puis appuyez sur le bouton ENTER . OUTILS Device List Son multi-piste : Stéréo Image Format : 16:9 Mode image : Standard Mode sonore : Personnel Mise en veille : Off ISI Réglage Auto Dépl. Intro. e Quitter Réglage de la qualité de l’écran Netteté : 50 Réglage Auto Image Le but du réglage de la qualité de l’image est d’éliminer ou de réduire le bruit de l’image (défauts). Si le bruit n’est pas éliminé en effectuant uniquement une syntonisation fine, réglez à nouveau la fréquence pour une syntonisation plus fine. Une fois le bruit réduit, réajustez l’image pour la centrer sur l’écran. ➣ Préréglage : Appuyer sur la touche SOURCE pour sélectionner PC. 1.Appuyez sur le bouton MENU pour afficher le menu. Appuyez sur les bouton ▲ ou ▼ pour sélectionner “Image”, puis appuyez sur le bouton ENTER . 2.Appuyez sur les bouton ▲ ou ▼ pour sélectionner “Écran”, puis appuyez sur le bouton ENTER . Écran ► Réglages des détails Options d’image Réinitialisation de l’image Écran 3.Appuyez sur les boutons ou ▲ ou ▼ pour sélectionner “Grain” ou “Affiné”, puis appuyez sur le bouton ENTER . Appuyez sur les bouton ◄ ou ► pour régler la qualité de l’écran. ➣ Des bandes verticales peuvent apparaître ou l’image peut devenir floue. Appuyez sur le bouton ENTER . Appuyez sur le bouton EXIT pour quitter. Grain 52 Affiné 24 Position Rétablir l’image Dépl. Intro. Grain Retour 52 Dépl. Réglage Intro. Retour Français - 46 01470D-03Fre.indb 46 2008-08-11 �� 1:34:17 Changement de la position de l’écran 2.Appuyez sur les bouton ▲ ou ▼ pour sélectionner “Écran”, puis appuyez sur le bouton ENTER . Netteté Image Régler la position de l’écran de l’ordinateur s’il ne correspond pas à celui du téléviseur. ➣ Préréglage : Appuyer sur la touche SOURCE pour sélectionner PC. 1.Appuyez sur le bouton MENU pour afficher le menu. Appuyez sur les bouton ▲ ou ▼ pour sélectionner “Image”, puis appuyez sur le bouton ENTER . : 50 Réglage Auto Écran ► Réglages des détails Options d’image Réinitialisation de l’image Écran Grain 52 Affiné 24 ► Position Rétablir l’image Dépl. 3.Appuyez sur les bouton ▲ ou ▼ pour sélectionner “Position”, puis appuyez sur le bouton ENTER . 4. Retour Intro. Position Appuyez sur les bouton ▲ ou ▼ pour régler Position vert. Appuyez sur les bouton ◄ ou ► pour régler Position hor. Appuyez sur le bouton ENTER . Appuyez sur le bouton EXIT pour quitter. Réglage Intro. Retour Initialisation de la position de l’écran (rapide et fin) Netteté Image Vous pouvez remplacer tous les paramètres d’image par les valeurs par défaut. ➣ Préréglage : Appuyer sur la touche SOURCE pour sélectionner PC. 1.Appuyez sur le bouton MENU pour afficher le menu. Appuyez sur les bouton ▲ ou ▼ pour sélectionner “Image”, puis appuyez sur le bouton ENTER . : 50 Réglage Auto Écran ► Réglages des détails Options d’image Réinitialisation de l’image Écran 2.Appuyez sur les bouton ▲ ou ▼ pour sélectionner “Écran”, puis appuyez sur le bouton ENTER . Grain 52 Affiné 24 3.Appuyez sur les bouton ▲ ou ▼ pour sélectionner “Rétablir l’image”, puis appuyez sur le bouton ENTER . Rétablir l’image Position ► Appuyez sur le bouton EXIT pour quitter. Dépl. Intro. Retour Mise à jour de l’image complétée Français - 47 01470D-03Fre.indb 47 2008-08-11 �� 1:34:17 Paramètre D’heure Régler l’horloge Régler l’horloge est nécessaire pour pouvoir utiliser les diverses fonctions relatives à l’heure de la télévision. Vous pouvez également contrôler l’heure pendant que vous regardez la télévision (appuyez juste sur le bouton INFO). Option 1 : Réglage manuel de l’horloge Prêt à l’emploi Langue Configuration 1.Appuyez sur le bouton MENU pour afficher le menu. Appuyez sur les bouton ▲ ou ▼ pour sélectionner “Configuration”, puis appuyez sur le bouton ENTER . Appuyez sur les bouton ▲ ou ▼ pour sélectionner “Heure”, puis appuyez sur le bouton ENTER . : Français Heure Sélection du réseau ► : Cable Configuration du réseau câblé Configuration du réseau sans fil V-Chip Sous-titres Réglages externes Divertissement 2. Appuyez sur les boutons ENTER pour sélectionner “Horloge”. : Off Heure Horloge : -- : -- -- Mise en veille : Off Minuterie 1 : Désactivé Minuterie 2 : Désactivé Minuterie 3 : Désactivé Dépl. pour sélectionner “Mode horloge”. 3.Appuyez sur les boutons ENTER Appuyez sur les bouton ▲ ou ▼ pour sélectionner “Manuel”, puis appuyez sur le bouton ENTER . Intro. Mode horloge : Auto Auto Réglage Horloge Manuel H. d’ été : Off Dépl. Appuyez sur le bouton EXIT pour quitter. ➣ L’heure s’affiche chaque fois que vous appuyez sur le bouton INFO. ➣ Vous pouvez régler directement le mois, le jour, les heures et les minutes en appuyant sur les boutons numériques de la télécommande. Intro. Retour Réglage Horloge Mois -- Jour -- Année ---- Heure -- Minute -- am/pm -- Dépl. 5.Appuyez sur les bouton ◄ ou ► pour nav iguer entre les paramètres “Mois”, “Jour”, “Année”, “Heure”, “Minute”, ou “am/pm”. Définissez la date et l’heure souhaitées en utilisant les bouton ▲ ou ▼ puis appuyez sur ENTER . Retour Horloge Fuseau hor. 4.Appuyez sur les bouton ▲ ou ▼ pour sélectionner “Réglage Horloge”, puis appuyez sur le bouton ENTER . ► Réglage Intro. Retour Réglage Horloge Mois 01 Jour 01 Année 2008 Heure 12 Minute 00 am/pm am Dépl. Réglage Intro. Retour Français - 48 01470D-03Fre.indb 48 2008-08-11 �� 1:34:18 Option 2 : Réglage Automatiquement de l’horloge Prêt à l’emploi Langue Configuration L’horloge peut être automatiquement réglée si vous recevez un signal numérique. 1.Appuyez sur le bouton MENU pour afficher le menu. Appuyez sur les bouton ▲ ou ▼ pour sélectionner “Configuration”, puis appuyez sur le bouton ENTER . Appuyez sur les bouton ▲ ou ▼ pour sélectionner “Heure”, puis appuyez sur le bouton ENTER . : Français Heure Sélection du réseau ► : Cable Configuration du réseau câblé Configuration du réseau sans fil V-Chip Sous-titres Réglages externes Divertissement 2. Appuyez sur les boutons ENTER pour sélectionner “Horloge”. pour sélectionner “Mode horloge”. 3.Appuyez sur les boutons ENTER Appuyez sur les bouton ▲ ou ▼ pour sélectionner “Auto”, puis appuyez sur le bouton ENTER . : Off Heure Horloge : -- : -- -- Mise en veille : Off Minuterie 1 : Désactivé Minuterie 2 : Désactivé Minuterie 3 : Désactivé Dépl. Intro. ► Retour Horloge Mode horloge : Auto Réglage Horloge Fuseau hor. H. d’ été ► : Off 4.Appuyez sur les bouton ▲ ou ▼ pour sélectionner “Fuseau hor.”, puis appuyez sur le bouton ENTER . Dépl. Intro. Retour Fuseau hor. Newfoundland 5.Appuyez sur les bouton ▲ ou ▼ pour sélectionner le fuseau horaire de votre région, puis appuyez sur le bouton ENTER . Atlantique Est Centre Rocheuses Pacifique Dépl. 6.Appuyer sur la touche ▲ ou ▼ pour sélectionner “H. d’ été”, puis sur ENTER . Appuyez sur les bouton ▲ ou ▼ pour sélectionner “Off” ou “On”, puis appuyez sur le bouton ENTER . Appuyez sur le bouton EXIT pour quitter. ➣ En fonction de la station émettrice et du signal, il est possible que la fonction de réglage automatique de l’heure ne fonctionne pas correctement. Dans un tel cas, réglez l’horloge manuelle ment. ➣ L’antenne ou le Câble doit être branché pour que le réglage automatiquement de l’horloge se fasse. Intro. Retour Horloge Mode horloge : Auto Réglage Horloge Off Fuseau hor. On : Off H. d’ été Dépl. Intro. Retour Français - 49 01470D-03Fre.indb 49 2008-08-11 �� 1:34:18 Paramétrer le minuteur Configuration Cette minuterie éteint automatiquement le téléviseur après le délai choisi (de 30, 60, 90, 120, 150 à 180 minutes). 1.Appuyez sur le bouton MENU pour afficher le menu. Prêt à l’emploi Appuyez sur les bouton ▲ ou ▼ pour sélectionner “Configuration”, puis Langue : Français appuyez sur le bouton ENTER . Heure Appuyez sur les bouton ▲ ou ▼ pour sélectionner “Heure”, puis appuyez sur le bouton ENTER . Sélection du réseau : Cable ► Configuration du réseau câblé Configuration du réseau sans fil V-Chip Sous-titres Réglages externes Divertissement 2.Appuyez sur les bouton ▲ ou ▼ pour sélectionner “Mise en veille”, puis appuyez sur le bouton ENTER . 3.Appuyer sur la touche ▲ ou ▼ pour sélectionner les minutes, suivie de la touche ENTER . Pour annuler la mise en veille : Appuyer sur la touche ▲ ou ▼ pour sélectionner “Off”, suivie de la touche ENTER . 4. : Off Heure Horloge : --Off : -- -- Mise en veille : Off 30 min. Minuterie 1 : Inactivated 60 min. Minuterie 2 : Inactivated 90 min. Minuterie 3 : Inactivated 120 min. 150 min. 180 min. Dépl. Appuyez sur le bouton EXIT pour quitter. Réglage facile 1.Appuyer sur la touche TOOLS de la télécommande. 2.Appuyer sur la touche ▲ ou ▼ pour choisir “Mise en veille”. 3.Appuyer sur la touche ◄ ou ► pour sélectionner les minutes. 4.Appuyer sur la touche EXIT ou TOOLS pour quitter. Intro. Retour OUTILS Liste appareils Son multi-piste : Image Format : Stéréo 16:9 Image Mode : Standard Son Mode : Personnel Mise en veille ◄ Off ► Ajouter aux favoris Commuter sur Air Dépl. Réglage e Quitter Français - 50 01470D-03Fre.indb 50 2008-08-11 �� 1:34:18 Réglage de la minuterie de mise en marche/arrêt Prêt à l’emploi Langue Configuration 1.Appuyez sur le bouton MENU pour afficher le menu. Appuyez sur les bouton ▲ ou ▼ pour sélectionner “Configuration”, puis appuyez sur le bouton ENTER . Appuyez sur les bouton ▲ ou ▼ pour sélectionner “Heure”, puis appuyez sur le bouton ENTER . : Français Heure Sélection du réseau ► : Cable Configuration du réseau câblé Configuration du réseau sans fil V-Chip Sous-titres Réglages externes Divertissement 2.Trois réglages de minuterie (mise en marche/arrêt) peuvent être effectués. Appuyer sur la touche ▲ ou ▼ pour sélectionner “Minuterie 1”, “Minuterie 2” ou “Minuterie 3”, puis sur ENTER . : Off Heure Horloge : 12 : 00 am Mise en veille : Off Minuterie 1 : Désactivé Minuterie 2 : Désactivé Minuterie 3 : Désactivé Dépl. 3.Appuyer sur la touche ◄ ou ► pour sélectionner l’élément désiré cidessous. Appuyer sur la touche ▲ ou ▼ pour ajuster ce paramètre. • Mise en marche : Sélectionner l’heure, les minutes, am/pm et Activer ou Désactive. (Pour activer la minuterie avec le réglage choisi, sélectionner “Activer”). • Arrêt : Sélectionner l’heure, les minutes, am/pm et Activer ou Désactive. (Pour activer la minuterie avec le réglage choisi, sélectionner “Activer”). • Volume : Sélectionner le niveau sonore désiré. • Contenu : Quand la “Mise en marche” est activée, il est possible de syntoniser un canal particulier ou lire d’autre type de contenu, comme des photographies ou des fichiers sonores. – TV/USB : sélectionne le téléviseur ou un dispositif USB. (Veiller à ce qu’un dispositif USB soit branché au téléviseur.) – Antenne : sélectionne “Air” ou “Câble”. – Chaîne : sélectionne le canal désiré. – Musique : sélectionne le dossier du dispositif USB contenant des fichiers MP3. – Photos : sélectionne le dossier du dispositif USB contenant des fichiers JPEG. • Répéter : Choisir “Une fois”, “Tous les jours”, “Lundi-vendredi”, “Lundisamedi”, “Sam. à dim.”, ou “Manuel”. Lorsque “Manuel” est choisi, appuyer sur la touche ► pour choisir le jour approprié de la semaine. Appuyer sur la touche ENTER sur le jour voulu et la marque s’affichera. Intro. ► Retour Minuterie 1 Mise en marche 12 Arrêt 12 Volume 10 00 am Désactive 00 am Désactive Contenu TV Câble Répéter Une fois Dépl. 3 Dim Lun Mar Mer Jeu Ven Sam Réglage Intro. Retour Contenu TV/USB TV Antenne Câble Chaîne Channel 3am Musique None Photo None Dépl. Réglage Intro. Retour Appuyez sur le bouton EXIT pour quitter. ➣ Vous pouvez régler les heures, les minutes et les chaînes directement à l’aide du pavé numérique de la télécommande. ➣ Arrêt automatique Quand la minuterie est activée, le téléviseur s’éteint automatiquement au bout de trois heures si aucune commande n’est utilisée. Cette fonction est disponible uniquement lorsque la minuterie est définie sur On ; elle permet d’éviter toute surchauffe occasionnée par une utilisation prolongée du téléviseur. Français - 51 01470D-03Fre.indb 51 2008-08-11 �� 1:34:19 Description de la Fonction Sélection d’une langue de menu Prêt à l’emploi Configuration 1.Appuyez sur le bouton MENU pour afficher le menu. Appuyez sur les bouton ▲ ou ▼ pour sélectionner “Configuration”, puis appuyez sur le bouton ENTER . Appuyez sur les bouton ▲ ou ▼ pour sélectionner “Langue”, puis appuyez sur le bouton ENTER . Langue : Français ► Heure Sélection du réseau : Cable Configuration du réseau câblé Configuration du réseau sans fil V-Chip Caption Réglages externes Prêt à l’emploi Configuration 2.Utilisez les bouton ▲ ou ▼ pour sélectionner la langue de votre choix “English”, “Español” ou “Français”. Appuyez sur le bouton ENTER . Appuyez sur le bouton EXIT pour quitter. English : English Langue Español Heure Français : Cable Sélection du réseau Configuration du réseau câblé Configuration du réseau sans fil V-Chip Sous-titres Réglages externes Utilisation de la fonction puce V-Chip La fonction puce V exclut automatiquement les programmes qui sont considérés comme inappropriés pour les enfants. L’utilisateur doit d’abord entrer un code NIP (numéro d’identification personnel) avant de pouvoir spécifier ou modifier les restrictions de la fonction puce V. ➣ La fonction de contrôle parental “V-Chip” n’est pas offerte en mode HDMI, Composante ou PC. États-Unis seulement Ce produit est protégé par les brevets des États-Unis suivants : US4, 930, 158, US4, 930, 160. Réglage de votre numéro d’identification personnel (NIP) Configuration du réseau câblé Configuration du réseau sans fil Configuration 1.Appuyez sur le bouton MENU pour afficher le menu. Appuyez sur les bouton ▲ ou ▼ pour sélectionner “Configuration”, puis appuyez sur le bouton ENTER . 2.Appuyez sur les bouton ▲ ou ▼ pour sélectionner “V-Chip”, puis appuyez sur le bouton ENTER . Le message “Enter PIN” s’affiche. Saisissez votre code NIP à 4 chiffres. ➣ Le code NIP par défaut d’un nouveau téléviseur est “0-0-0-0”. V-Chip ► Sous-titres Réglages externes Divertissement : Off Économiseur énergie : Off ISI Mise à niveau du logiciel V-Chip Entrez NIP * * * 0~9 Entrez NIP Retour Français - 52 01470D-03Fre.indb 52 2008-08-11 �� 1:34:19 3.L’écran “V-Chip” s’affiche. Appuyez sur les bouton ▲ ou ▼ pour sélectionner “Changer NIP”, puis appuyez sur le bouton ENTER . L’écran “Changer NIP” s’affiche. Choisissez un code NIP à 4 chiffres et saisissez-le. Lorsque vous avez entré le code NIP, l’écran “Confirmer NIP” apparaît. Saisissez de nouveau le code. Lorsque l’écran de confirmation disparaît, votre code NIP est mémorisé. Appuyez sur le bouton EXIT pour quitter. ➣ Si vous oubliez votre code NIP, appuyez sur les touches de la télécommande lorsque l’appareil est éteint) dans l’ordre suivant afin de remettre le code NIP à 0-0-0-0 : Hors tension. → Mute → 8 → 2 → 4 → Sous tension. V-Chip Blocage V-Chip : Off Contrôle parental TV Classif. MPAA Anglais canadien Français canadien Catég. américaine téléchargeable Changer NIP ► Dépl. Intro. Retour Changer NIP Nouveau NIP Confirmer NIP 0~9 Entrez NIP Retour Comment activer/désactiver la fonction puce V Configuration du réseau câblé Configuration du réseau sans fil Configuration 1.Appuyez sur le bouton MENU pour afficher le menu. Appuyez sur les bouton ▲ ou ▼ pour sélectionner “Configuration”, puis appuyez sur le bouton ENTER . 2.Appuyez sur les bouton ▲ ou ▼ pour sélectionner “V-Chip”, puis appuyez sur le bouton ENTER . Le message “Entrez NIP” s’affiche. Saisissez votre code NIP à 4 chiffres. V-Chip ► Sous-titres Réglages externes Divertissement : Off Économiseur énergie : Off ISI Mise à niveau du logiciel V-Chip Entrez NIP * * * 0~9 Entrez NIP 3.L’écran “V-Chip” apparaît. Pour activer la fonction puce V, appuyez sur le bouton ENTER pour régler le “Blocage V-Chip” sur “On”. (Appuyer plusieurs fois sur les bouton ▲ ou ▼ alterne entre les modes “On” et “Off”.) Appuyez sur le bouton ENTER . Appuyez sur le bouton EXIT pour quitter. Retour V-Chip Blocage V-Chip : Off ► Contrôle parental TV Classif. MPAA Anglais canadien Français canadien Catég. américaine téléchargeable Changer NIP Dépl. Intro. Retour V-Chip Blocage V-Chip Contrôle parental TV : Off Off Classif. MPAA On Anglais canadien Français canadien Catég. américaine téléchargeable Changer NIP Dépl. Intro. Retour Français - 53 01470D-03Fre.indb 53 2008-08-11 �� 1:34:20 Comment configurer les restrictions à l’aide des Contrôle parental TV Configuration Réglez d’abord le numéro d’identification personnel (NIP) et activez la fonction puce V. (Voir section précédente.) Les restrictions parentales peuvent être réglées à l’aide de l’une de ces deux méthodes : Les guides TV ou la Classification MPAA. 1.Appuyez sur le bouton MENU pour afficher le menu. Configuration du réseau câblé Appuyez sur les bouton ▲ ou ▼ pour sélectionner “Configuration”, puis Configuration du réseau sans fil appuyez sur le bouton ENTER . V-Chip 2.Appuyez sur les bouton ▲ ou ▼ pour sélectionner “V-Chip”, puis appuyez Sous-titres sur le bouton ENTER . Le message “Entrez NIP” s’affiche. Saisissez votre Réglages externes code NIP à 4 chiffres. Divertissement : Off 3.L’écran “V-Chip” s’affiche. Appuyez sur les bouton ▲ ou ▼ pour sélectionner Économiseur énergie : Off “TV Parental Guidelines”, puis appuyez sur le bouton ENTER . ISI Mise à niveau du logiciel 4.L’écran “TV Parental Guidelines” apparaît. Utilisez les bouton ▲ ou ▼ pour sélectionner l’une des six catégories établies en fonction de l’âge : • TV-Y : Jeunes enfants • TV-Y7 : Enfants de 7 ans et plus • TV-G : Tout public • TV-PG : Accord parental • TV-14 : Téléspectateurs de 14 ans et plus • TV-MA : Public averti 5. A ce stade, une des évaluations TV est choisie. Appuyez sur le bouton ENTER . En fonction de la configuration choisie, un symbole “ ” est sélectionné. (Espace = débloqué, = bloqué) Si le symbole “ ” est sélectionné, appuyez sur le bouton ENTER pour bloquer ou débloquer la catégorie. Pour sélectionner une autre évaluation TV, appuyez sur les bouton ▲ ou ▼ puis répétez la procédure. ➣ Perm. tout : déverrouille tous les réglages du téléviseur. Bloq. tout : verrouille tous les réglages du téléviseur. ➣ TV-Y, TV-Y7, TV-G, TV-PG, TV-14, et TV-MA disposent d’options supplémentaires. Voir l’étape suivante pour changer une des évaluations secondaires suivantes : ALL / FV / V / S / L / D ➣ La fonction V-Chip bloque automatiquement certaines catégories qui sont “plus restric tives”. Par exemple, si vous bloquez la catégorie “TV-Y”, la catégorie “TV-Y7” sera alors bloquée automatiquement. De la même façon, si vous bloquez la catégorie TV-G, toutes les catégories dans le groupe “jeunes adultes” seront alors bloquées (TV-G, TV-PG, TV-14 et TV-MA). Les évaluations secondaires (D, L, S, V) fonctionnent de la même façon. (voir section suivante.) 6.Comment régler les évaluations secondaires FV, D, L, S et V. Pour commencer, sélectionnez l’une des catégories : TV-Y, TV-Y7, TV-G, TV-PG, TV-14 ou TV-MA (voir étape 4) et appuyez sur le bouton ►. Un symbole “ ” apparaît pour chaque sous-catégorie. Lorsque le symbole “ ” est sélectionné, appuyez sur le bouton ENTER pour accéder à une sous-catégorie. Appuyez sur ENTER pour bloquer la sous-catégorie. Pour sé lectionner une autre évaluation TV, appuyez sur les bouton ▲ ou ▼ puis répétez la procédure. • ALL : Bloquer toutes les classifications. • FV : Fantastique Violence • V : Violence • S : Scènes de sexe • L : Langage adulte • D : Sexual suggestive Dialog ➣ La fonction V-Chip bloque automatiquement certaines catégories qui sont “plus restrictives”. Par exemple, si vous bloquez l’évaluation secondaire “L” dans TV-PG, les évaluations secondaires “L” dans TV-14 et TV-MA sont bloquées `automatiquement. 7.Appuyez sur le bouton EXIT pour effacer tous les écrans (ou bien passez à la section suivante et définissez des restrictions supplémentaires basées sur les codes MPAA). ➣ Ces catégories se composent de deux grands groupes : TV-Y et TV-Y7 (jusqu’à 7 ans) et TV-G à TV-MA (tous les autres). Les restrictions applicables à ces deux groupes sont indépendantes : si une famille compte de très jeunes enfants ainsi que des jeunes adultes, les catégories doivent être définies séparément (voir prochaine étape). ► V-Chip Entrez NIP * * * 0~9 Entrez NIP Retour V-Chip Blocage V-Chip : On Contrôle parental TV ► Classif. MPAA Anglais canadien Français canadien Catég. américaine téléchargeable Changer NIP Dépl. Intro. Retour Contrôle parental TV ALL FV V S L D TV-Y Perm. tout Bloq. tout TV-Y7 TV-G TV-PG TV-14 TV-MA Dépl. Intro. Retour Contrôle parental TV ALL FV V S L D TV-Y Perm. tout Bloq. tout TV-Y7 TV-G TV-PG TV-14 TV-MA Dépl. Intro. Retour Français - 54 01470D-03Fre.indb 54 2008-08-11 �� 1:34:21 Comment configurer les restrictions à l’aide des évaluations MPAA : G, PG, PG-13, R, NC-17, X, NR Configuration Le système d’évaluation MPAA utilise le système de la Motion Picture Association of America (Association cinématographique américaine) (MPAA) dont la principale application concerne les films. (il arrive également que des vidéocassettes de films soient cryptées à l’aide des évaluations MPAA.) Quand le verrouillage V-Chip est activé, la télévision bloque automatiquement tout programme codé avec des évaluations restrictives (évaluations MPAA ou TV). 1.Appuyez sur le bouton MENU pour afficher le menu. Configuration du réseau câblé Appuyez sur les bouton ▲ ou ▼ pour sélectionner “Configuration”, puis Configuration du réseau sans fil appuyez sur le bouton ENTER . V-Chip ► Sous-titres Réglages externes Divertissement : Off Économiseur énergie : Off ISI Mise à niveau du logiciel 2.Appuyez sur les bouton ▲ ou ▼ pour sélectionner “V-Chip”, puis appuyez sur le bouton ENTER . Le message “Entrez NIP” s’affiche. Saisissez votre code NIP à 4 chiffres. V-Chip Entrez NIP * * * 0~9 Entrez NIP 3.L’écran “V-Chip” apparaît. Appuyez sur les bouton ▲ ou ▼ pour sélectionner “Classif. MPAA”, puis appuyez sur le bouton ENTER . Retour V-Chip Blocage V-Chip : On Contrôle parental TV Classif. MPAA ► Anglais canadien Français canadien Catég. américaine téléchargeable Changer NIP Dépl. 4.L’écran “Classif. MPAA” s’affiche. Appuyez plusieurs fois sur les bouton ▲ ou ▼ pour sélectionner une catégorie MPAA spécifique. Utilisez de nouveau les boutons ▲ ou ▼ pour parcourir les catégories MPAA : G : Tout public (aucune restriction). PG : Accord parental souhaité. PG-13 : Parents vivement mis en garde. R : Les enfants de moins de 17ans doivent être accompag nés d’un adulte. • NC-17 : Aucun enfant de moins de 17 ans. • X : Adultes uniquement. • NR : Non évalué. • • • • ➣ Perm. tout : déverrouille tous les réglages du téléviseur. Bloq. tout : verrouille tous les réglages du téléviseur. ➣ Lorsqu’une catégorie spécifique est sélectionnée, appuyez sur le bouton ENTER pour l’activer. Un symbole “ ” s’affiche. Appuyez sur le bouton ENTER pour bloquer ou débloquer la catégorie. ➣ La fonction V-Chip bloque automatiquement toutes catégories qui sont “plus restrictives”. Par exemple, si vous bloquez “PG-13”, alors “R”, “NC17” et “X” sont également bloqués automatiquement Appuyez sur le bouton EXIT pour quitter. Intro. Retour Classif. MPAA G Perm. tout PG Bloq. tout PG-13 R NC-17 X NR Dépl. Intro. Retour Classif. MPAA G Perm. tout PG Bloq. tout PG-13 R NC-17 X NR Dépl. Intro. Retour Français - 55 01470D-03Fre.indb 55 2008-08-11 �� 1:34:21 Comment configurer les restrictions à l’aide des Anglais canadien Configuration du réseau câblé Configuration du réseau sans fil Configuration 1.Appuyez sur le bouton MENU pour afficher le menu. Appuyez sur les bouton ▲ ou ▼ pour sélectionner “Configuration”, puis appuyez sur le bouton ENTER . V-Chip ► Sous-titres Réglages externes Divertissement : Off Économiseur énergie : Off ISI Mise à niveau du logiciel 2.Appuyez sur les bouton ▲ ou ▼ pour sélectionner “V-Chip”, puis appuyez sur le bouton ENTER . Le message “Entrez NIP” s’affiche. Saisissez votre code NIP à 4 chiffres. V-Chip Entrez NIP * * * 0~9 Entrez NIP 3.L’écran “V-Chip” apparaît. Appuyez sur les bouton ▲ ou ▼ pour sélectionner “Anglais canadien”, puis appuyez sur le bouton ENTER . Retour V-Chip Blocage V-Chip : On Contrôle parental TV Classif. MPAA Anglais canadien ► Français canadien Catég. américaine téléchargeable Changer NIP 4.Appuyez sur la touche ▲ ou ▼ pour entrer une restriction appropriée. Appuyez sur la touche ENTER pour activer la restriction sélectionnée. Le “ ” s’affiche. Appuyez sur le bouton EXIT pour quitter. ➣ Perm. tout : Dévéverrouille tous les réglages du téléviseur. Bloq. tout : Verrouille tous les réglages du téléviseur. • C : Émissions destinées aux enfants de moins de 8 ans. • C8+ : Émissions convenant généralement aux enfants de 8 ans et plus, sans surveillance. • G : Émissions grand public convenant à tous les auditoires. • PG : Émissions à surveillance parentale. • 14+ : Émissions dont la teneur peut ne pas convenir, en tout ou en partie, aux personnes de moins de 14 ans. • 18+ : Émissions pour adultes. ➣ La fonction V-Chip bloque automatiquement toutes les catégories qui sont “plus restrictives”. Par exemple, si vous verrouillez la catégorie G, PG, 14+ et 18+ seront automatiquement verrouillées. Dépl. Intro. Retour Anglais canadien C Perm. tout C8+ Bloq. tout G PG 14+ 18+ Dépl. Intro. Retour Anglais canadien C Perm. tout C8+ Bloq. tout G PG 14+ 18+ Dépl. Intro. Retour Français - 56 01470D-03Fre.indb 56 2008-08-11 �� 1:34:22 Comment configurer les restrictions à l’aide des Français canadien Configuration du réseau câblé Configuration du réseau sans fil Configuration 1.Appuyez sur le bouton MENU pour afficher le menu. Appuyez sur les bouton ▲ ou ▼ pour sélectionner “Configuration”, puis appuyez sur le bouton ENTER . V-Chip ► Sous-titres Réglages externes Divertissement : Off Économiseur énergie : Off ISI Mise à niveau du logiciel 2.Appuyez sur les bouton ▲ ou ▼ pour sélectionner “V-Chip”, puis appuyez sur le bouton ENTER . Le message “Entrez NIP” s’affiche. Saisissez votre code NIP à 4 chiffres. V-Chip Entrez NIP * * * 0~9 Entrez NIP 3.L’écran “V-Chip” apparaît. Appuyez sur les bouton ▲ ou ▼ pour sélectionner “Français canadien”, puis appuyez sur le bouton ENTER . Retour V-Chip Blocage V-Chip : On Contrôle parental TV Classif. MPAA Anglais canadien Français canadien ► Catég. américaine téléchargeable Changer NIP Dépl. 4.Appuyez sur la touche ▲ ou ▼ pour entrer une restriction appropriée. Appuyez sur la touche ENTER pour activer la restriction sélectionnée. Le “ ” s’affiche. Appuyez sur le bouton EXIT pour quitter. ➣ Perm. tout : Dévéverrouille tous les réglages du téléviseur. Bloq. tout : Verrouille tous les réglages du téléviseur. • G : Général. • 8 ans+ : Émissions non recommandées pour les jeunes enfants. • 13 ans+ : Émissions pouvant ne pas convenir aux enfants de moins de 13 ans. • 16 ans+ : Émissions ne convenant pas aux enfants de moins de 16 ans. • 18 ans+ : Émissions réservées aux adultes. ➣ La fonction V-Chip bloque automatiquement toutes les catégories qui sont “plus restrictives”. Par exemple, si la classification 8 ans+ est bloquée, les classifications 13 ans+, 16 ans+ et 18 ans+ sont automatiquement bloquées. Intro. Retour Français canadien G Perm. tout 8 ans+ Bloq. tout 13 ans+ 16 ans+ 18 ans+ Dépl. Intro. Retour Français canadien G Perm. tout 8 ans+ Bloq. tout 13 ans+ 16 ans+ 18 ans+ Dépl. Intro. Retour Français - 57 01470D-03Fre.indb 57 2008-08-11 �� 1:34:22 Utilisation de la fonction V-Chip pour les canaux numériques Configuration du réseau câblé Configuration du réseau sans fil Configuration Il est possible d’utiliser de l’information sur le contrôle parental tout en regardant des canaux numériques. 1.Appuyez sur le bouton MENU pour afficher le menu. Appuyez sur les bouton ▲ ou ▼ pour sélectionner “Configuration”, puis appuyez sur le bouton ENTER . V-Chip Réglages externes Divertissement : Off Économiseur énergie : Off ISI 2.Appuyez sur les bouton ▲ ou ▼ pour sélectionner “V-Chip”, puis appuyez sur le bouton ENTER . Le message “Entrez NIP” s’affiche. Saisissez votre code NIP à 4 chiffres. 3.L’écran “V-Chip” apparaît. Appuyez sur les bouton ▲ ou ▼ pour sélectionner “Catég. américaine téléchargeable”, puis appuyez sur le bouton ENTER . ➣ Si l’information n’est pas téléchargée à partir de la station de radiodiffusion, le menu Catég. américaine téléchargeable est désactivé. ➣ L’information sur le contrôle parental est téléchargée automatiquement lorsqu’on regarde des canaux numériques.Cela peut nécessiter plusieurs secondes. ➣ Le menu Catég. américaine téléchargeable est disponible pour utilisation après téléchargement de l’information à partir de la station de radiodiffusion. ➣ Toutefois, selon l’information provenant de la station, il est possible qu’on ne puisse pas l’utiliser. ► Sous-titres Mise à niveau du logiciel V-Chip Entrez NIP * * * Retour 0~9 Entrez NIP V-Chip Blocage V-Chip : On Contrôle parental TV Classif. MPAA 4.Appuyez sur la touche ▲ ou ▼ pour entrer une restriction appropriée. Appuyez sur la touche ENTER pour activer la restriction sélectionnée. Le “ ” s’affiche. Appuyez sur le bouton EXIT pour quitter. ➣ Perm. tout : Appuyez sur cette touche pour déverrouiller toutes les catégories. Bloq. tout : Appuyez sur cette touche pour verrouiller toutes les catégories. ➣ Les niveaux de contrôle parental diffèrent selon la station de radiodiffusion. ➣ Le nom du menu par défaut, Catég. américaine téléchargeable, change en données téléchargées ➣ Même si vous réglez l’affichage à l’écran dans la langue souhaitée, le menu “Catég. américaine téléchargeable” s’affiche en anglais seulement. ➣ La classification bloque automatiquement certaines catégories plus restrictives. ➣ Les catégories (par exemple : violence, etc.) et les niveaux de classification (par exemple : DH, MH, H, etc.) peuvent différer selon la station de radiodiffusion. Anglais canadien Français canadien Catég. américaine téléchargeable ► Changer NIP Dépl. Titre de classification Intro. Retour Nombre total de titres de classification Nombre de titres de classification actuels Catég. américaine téléchargeable ► Humor Level 1/2 DH Perm. tout MH Bloq. tout H VH EH Dépl. Intro. Retour Réinitialisation du téléviseur lorsque la fonction Puce V bloque un canal (solution d’urgence) Si un canal à accès restreint est syntonisé, la fonction Puce V la bloque. L’écran devient vide et le message suivant s’affiche : 1.Appuyer sur la touche ENTER pour sélectionner OK. Pour rétablir l’image, sélectionner un autre canal à l’aide de la touche CH ou CH . Dans certains cas (selon la classification des programmes de télévision locaux), la fonction Puce V permet de bloquer tous les canaux. Dans un tel cas, utiliser la fonction Puce V en guise de solution d’urgence. 2.Entrer le NIP et appuyer sur ENTER , suivie la touche ▲ ou ▼ pour désactiver temporairement la fonction Blocage Puce V. ➣ Si le NIP est oublié, appuyer sur les touches de la télécommande dans l’ordre suivant pour rétablir le code 0-0-0-0 : Power Off (hors tension). → MUTE → 8 → 2 → 4 → Power On (sous tension). Classif. obtenue : TV-G/MPAA X/Anglais canadien : C8+ Ce canal est bloqué en mode puce V. Appuyer sur ENTER pour débloquer OK CH Changer Intro. La chaîne est bloquée MPAA R/A/K/T Entrer NIP sur les touches num. pour débloquer toutes les chaînes. Presser EXIT pour effacer le NIP MENU pour afficher menu principal. Français - 58 01470D-03Fre.indb 58 2008-08-11 �� 1:34:23 Affichage des sous-titres (messages texte à l’écran) – Analogique Configuration La fonction des sous-titres analogiques fonctionne en mode canaux de télévision ou lorsqu’un signal est fourni au téléviseur à partir d’un appareil externe. (Selon le signal émetteur, la fonction de sous-titrage analogique peut fonctionner sur les canaux numériques.) Configuration du réseau sans fil 1.Appuyez sur le bouton MENU pour afficher le menu. V-Chip Appuyez sur les bouton ▲ ou ▼ pour sélectionner “Configuration”, puis appuyez sur le bouton ENTER . Sous-titres ► Réglages externes Divertissement : Off Économiseur énergie : Off ISI Mise à niveau du logiciel 2.Appuyez sur les bouton ▲ ou ▼ pour sélectionner “Sous-titres”, puis appuyez sur le bouton ENTER . Sous-titres Sous-titres : Off Mode ss-titres codés : Par défaut ► Options de sous-titrage numérique Intro. pour sélectionner “Sous-titres”. 3.Appuyez sur les boutons ENTER Appuyez sur les bouton ▲ ou ▼ pour sélectionner “On”, puis appuyez sur le bouton ENTER . Sous-titres Sous-titres : Off Off : Par On défaut Options de sous-titrage numérique Mode ss-titres codés Dépl. 4.Appuyez sur les bouton ▲ ou ▼ pour sélectionner “Mode ss-titres codés”, puis appuyez sur le bouton ENTER . Utilisez les bouton ▲ ou ▼ pour sélection ner le sous-menu de votre choix (Par défaut, CC1 à CC4 ou Texte1 à Texte4), puis appuyez sur ENTER . Appuyez sur le bouton EXIT pour quitter. Retour Intro. Retour Sous-titres Sous-titres : Off Par défaut Mode ss-titres codés : Par CC1défaut Options de sous-titrage numérique CC2 • La valeur par défaut est “CC1”. • CC1 : Sous-titres principaux synchronisés. Il s’agit des sous-titres fournis dans la langue principale, qui doivent être synchronisés avec le son et de préférence avec une image spécifique. • CC2 : Sous-titres spéciaux non synchronisés. Ce canal contient les données destinées à augmenter les fournies par le programme. • CC3 : Sous-titres secondaires synchronisés. Données de sous-titres alternatives associées au programme. Il s’agit généralement de la langue secondaire. • CC4 : Sous-titres spéciaux non synchronisés. Similaire à CC2. • Texte1 : Premier service de texte. Il peut s’agir de données varies non liées aux programmes. • Texte2 : Deuxième service de texte. Données supplémentaires, généralement non liées aux programmes. • Texte3/Texte4 : Troisième et quatrième services de texte. Ces chaînes de données ne doivent être utilisées que si Texte 1 et Texte 2 ne suffisent pas. Dépl. Intro. Retour ➣ L’options Sous-titres ne fonctionne pas aux modes Composante, HDMI ou PC. ➣ L’option de Sous-titrage dépend du programme diffusé. O Appuyer sur la touche CC de la télécommande pour régler la fonction des sous-titres à “On” ou “Off”. Français - 59 01470D-03Fre.indb 59 2008-08-11 �� 1:34:23 Affichage des sous-titres (messages texte à l’écran) – Numérique 4.Appuyez sur les bouton ▲ ou ▼ pour sélectionner “Mode ss-titres codés”, puis appuyez sur le bouton ENTER . Utilisez les bouton ▲ ou ▼ pour sélectionner le sous-menu de votre choix (Par défaut, Service1 à Service6, CC1 à CC4 ou Texte1 à Texte4) puis appuyez sur ENTER . 5.Appuyez sur les bouton ▲ ou ▼ pour sélectionner “Options de sous-titrage numérique”, puis appuyez sur le bouton ENTER . ➣ Les “Options de sous-titrage numérique” sont disponibles uniquement lorsque les paramètres “Par défaut” et “Service1~Service6” peuvent être sélectionnés en “Mode ss-titres codés”. ➣ Les paramètres service1 à 6 en mode Sous-titres numériques ne sont pas tou jours disponibles, suivant le système de diffusion utilisé. 6.Appuyez sur les bouton ▲ ou ▼ pour sélectionner “Format”, puis appuyez sur le bouton ENTER . Appuyez sur les bouton ▲ ou ▼ pour sélection ner l’option de sous-titres souhaitée, puis appuyez sur le bouton de ENTER . Appuyez sur les bouton ▲ ou ▼ pour sélectionnez les options de sous-menu souhaitées (voir options ci-dessous), puis appuyez sur ENTER . Appuyez sur le bouton EXIT pour quitter. ➣ La disponibilité des sous-titres dépend du programme diffusé. ➣ La valeur “Par défaut” correspond à la configuration standard choisie par le fournisseur. ➣ Le premier plan et l’arrière plan ne peuvent pas être configurés avec la même couleur. ➣ Les paramètres “Opacité avant-plan” et “Opacité arrière-plan” ne peuvent pas être tous deux réglés sur Transparent. • Format : Cette option peut prendre les valeurs suivantes : “Par défaut”, “Petit”, “Standard” et “Grand”. La valeur par défaut est “Standard”. • Style des polices : Cette option peut prendre les valeurs suivantes : “Par défaut”, “Style0 ~ Style 7”. Vous pouvez modifier la police. La valeur par défaut est “Style 0”. • Couleur avant-plan : Cette option peut prendre les valeurs suivantes : “Par défaut”, “Blanc”, “Noir”, “Rouge”, “Vert”, “Bleu”, “Jaune”, “Magenta” et “Cyan”. Vous pouvez modifier la police. La valeur par défaut est “Blanc”. • Couleur arrière-plan : Cette option peut prendre les valeurs suivantes : “Par défaut”, “Blanc”, “Noir”, “Rouge”, “Vert”, “Bleu”, “Jaune”, “Magenta” et “Cyan”. Vous pouvez modifier la couleur des sous-titres. La valeur par défaut est “Noir”. • Opacité avant-plan : Cette option peut prendre les valeurs suivantes : “Par défaut”, “Transparent”, “Translucide”, “Opacifié” et “Luminescence”. Vous pouvez modifier l’opacité des caractères. • Opacité arrière-plan : Cette option peut prendre les valeurs suivantes : “Par défaut”, “Transparent”, “Translucide”, “Opacifié” et “Luminescence”. Vous pouvez modifier l’opacité d’arrière-plan des sous-titres. • Retour par défaut : Cette option permet de restaurer la valeur par défaut des paramètres suivants : “Format”, “Style des polices”, “Couleur avantplan”, “Couleur arrière-plan”, “Opacité avant-plan” et “Opacité arrière-plan”. Configuration du réseau sans fil Configuration La fonction Sous-titres numériques concerne les chaînes numériques uniquement. 1.Appuyez sur le bouton MENU pour afficher le menu. Appuyez sur les bouton ▲ ou ▼ pour sélectionner “Configuration”, puis appuyez sur le bouton ENTER . 2.Appuyez sur les bouton ▲ ou ▼ pour sélectionner “Sous-titres”, puis appuyez sur le bouton ENTER . 3.Appuyez sur les boutons ENTER pour sélectionner “Sous-titres”. Appuyez sur les bouton ▲ ou ▼ pour sélectionner “On”, puis appuyez sur le bouton ENTER . V-Chip Sous-titres ► Réglages externes Divertissement : Off Économiseur énergie : Off ISI Mise à niveau du logiciel Sous-titres Sous-titres : Off Mode ss-titres codés : Par défaut ► Options de sous-titrage numérique Intro. Retour Sous-titres Sous-titres : Off Off : Par On défaut Options de sous-titrage numérique Mode ss-titres codés Dépl. Intro. Retour Sous-titres Sous-titres : Off Par défaut Mode ss-titres codés : Par défaut Service 1 Options de sous-titrage numérique Service 2 Dépl. Intro. Retour Options de sous-titrage numérique Format : Par défaut Style des polices : Par défaut Couleur avant-plan : Par défaut Couleur arrière-plan : Par défaut Opacité avant-plan : Par défaut Opacité arrière-plan : Par défaut Par défaut Petit Standard Grand Retour par défaut Dépl. Intro. Retour O Appuyer sur la touche CC de la télécommande pour régler la fonction des sous-titres à “On” ou “Off”. Français - 60 01470D-03Fre.indb 60 2008-08-11 �� 1:34:24 Réglage de la mélodie de marche/arrêt du téléviseur Configuration Vous pouvez choisir et configurer une mélodie qui se déclenchera à la mise en marche et à l’arrêt du téléviseur. 1.Appuyez sur le bouton MENU pour afficher le menu. V-Chip Appuyez sur les bouton ▲ ou ▼ pour sélectionner “Configuration”, puis Sous-titres appuyez sur le bouton ENTER . Réglages externes 2.Appuyez sur les bouton ▲ ou ▼ pour sélectionner “Réglages externes”, puis Divertissement : Off appuyez sur le bouton ENTER . Économiseur énergie : Off 3.Appuyez sur les bouton ▲ ou ▼ pour sélectionner “Mélodie”, puis appuyez ISI sur le bouton ENTER . Mise à niveau du logiciel Appuyez sur le bouton ▲ ou ▼ pour sélectionner “Off”, “Basse”, “Moyen” ou “Haute”, puis appuyez sur le bouton ENTER . • • • • Off : Désactive la fonction Mélodie. Basse : Règle le volume de la mélodie au niveau bas. Moyen : Règle le volume de la mélodie au niveau moyen. Haute : Règle le volume de la mélodie au niveau élevé. Appuyez sur le bouton EXIT pour quitter. ➣ La mélodie est inaudible - Lorsque le téléviseur n’émet aucun son parce que l’on a appuyé sur la touche MUTE. - Lorsque le téléviseur n’émet aucun son parce que le volume a été réduit au minimum à l’aide de la touche VOL –. - Lorsque le téléviseur est éteint au moyen de la minuterie. ► Réglages externes Mélodie : Medium Off Réglage du support mural Basse Moyen Haute Dépl. Intro. Retour Français - 61 01470D-03Fre.indb 61 2008-08-11 �� 1:34:24 Réglage du mode Divertissement Configuration Le mode “Divertissement” permet de choisir l’affichage et le son optimaux pour les sports, le cinéma et les jeux. Sous-titres 1.Appuyez sur le bouton MENU pour afficher le menu. Réglages externes Appuyez sur les bouton ▲ ou ▼ pour sélectionner “Configuration”, puis appuyez sur le bouton ENTER . Divertissement : Off 2.Appuyez sur les bouton ▲ ou ▼ pour sélectionner “Divertissement”, puis Économiseur énergie : Off appuyez sur le bouton ENTER . ISI Mise à niveau du logiciel 3.Appuyez sur les bouton ▲ ou ▼ pour sélectionner “Off”, “Sports”, “Cinéma” ou “Jeu”, puis appuyez sur le bouton ENTER . Sous-titres Configuration • Off : désactive la fonction “Divertissement”. • Sports : offre une image et un son d’une qualité optimale pour les sports. • Cinéma : offre une image et un son d’une qualité optimale pour les films. L’image et le son sont plus riches. • Jeu : offre une image et un son d’une qualité optimale pour les jeux. Ce mode accélère la vitesse de jeu lorsqu’une console de jeu externe est branchée au téléviseur. ► Réglages externes Divertissement Économiseur énergie ISI Mise à niveau du logiciel Appuyez sur le bouton EXIT pour quitter. ➣ Si l’un des trois modes “Divertissement” est réglé à On, les réglages seront ne peuvent être modifiés. Pour régler les modes image et son, le mode “Divertissement” doit être désactivé. ➣ Si l’on règle un des trois modes “Divertissement” à On, la fonction “SRS TruSurround XT” n’est pas disponible. ➣ Les réglages”Divertissement” sont sauvegardés par chaque source d’entrée. Off : Off Sports : Off Cinéma ► Jeu O Il est possible d’appuyer à répétition sur le bouton E.MODE de la télécommande pour modifier le réglage “Divertissement”. Fonction économiseur d’énergie Configuration Cette option permet de régler la luminosité de l’écran afin de réduire la consommation d’énergie. Lorsqu’on regarde la télévision le soir, il faut régler l’option du mode “Économiseur énergie” à “Haute” pour réduire la fatigue oculaire et la consommation d’énergie. 1.Appuyez sur le bouton MENU pour afficher le menu. Réglages externes Appuyez sur les bouton ▲ ou ▼ pour sélectionner “Configuration”, puis Divertissement : Off appuyez sur le bouton ENTER . • • • • • Off : Désactive la fonction Économiseur d’énergie. Basse : Règle le téléviseur au mode d’économie d’énergie bas. Moyen : Règle le téléviseur au mode d’économie d’énergie moyen. Haute : Règle le téléviseur au mode d’économie d’énergie élevé. Auto : Règle automatiquement le niveau de brillance de l’écran afin de l’adapter aux scènes. ► ISI Mise à niveau du logiciel Réglages externes Configuration 2.Appuyez sur les bouton ▲ ou ▼ pour sélectionner “Économiseur énergie”, puis appuyez sur le bouton ENTER . Choisir l’option requise (Off, Basse, Moyen, Haute, Auto) en appuyant sur la touche ▲ ou ▼. Appuyez sur le bouton ENTER . Économiseur énergie : Off Divertissement : Off Off Économiseur énergie : Off ISI Mise à niveau du logiciel Basse ► Moyen Haute Auto Appuyez sur le bouton EXIT pour quitter. Français - 62 01470D-03Fre.indb 62 2008-08-11 �� 1:34:25 Mise à niveau du logiciel HDMI IN4 Ultérieurement, Samsung mettra à disposition des mises à niveau pour le logiciel du téléviseur. Contacter le centre d’appel Samsung au 1-800-SAMSUNG (726-7864) pour obtenir de l’information sur le téléchargement des mises à jour et sur l’utilisation d’une clé USB. Les mises à jour sont accessibles par le branchement d’une clé USB dans le port USB situé sur le téléviseur. 1.Branchez un lecteur USB contenant la mise à niveau du logiciel aux prises Panneau latéral de la télévision WISELINK situées sur la partie arrière du téléviseur. ➣ Le logiciel ne peut être mis à niveau par l’intermédiaire de la connexion au réseau local. 3.Appuyez sur les bouton ▲ ou ▼ pour sélectionner “Mise à niveau du logiciel”, puis appuyez sur le bouton ENTER . 4.Appuyez sur le bouton ENTER . L’affichage du message “Recherche du dispositif USB par balayage… Cela peut prendre jusqu’à 30 secondes.”. 5.L’affichage du message “Mettre à niveau la version XXXX en passant à la version XXXX? Le système doit être réinitialisé après la mise à niveau.”. Appuyez sur les bouton ◄ ou ► pour sélectionner “OK”, puis appuyez sur le bouton ENTER . Économiseur énergie Configuration 2.Appuyez sur le bouton MENU pour afficher le menu. Appuyez sur les bouton ▲ ou ▼ pour sélectionner “Configuration”, puis appuyez sur le bouton ENTER . USB Drive : Off ISI Mise à niveau du logiciel ► Software Upgrade Recherche du dispositif USB par balayage… Cela peut prendre jusqu’à 30 secondes. Software Upgrade Mettre à niveau la version XXXX en passant à la version XXXX? Le système doit être réinitialisé après la mise à niveau. OK Effacer Veillez à ne pas interrompre l’alimentation ou retirer le lecteur USB pendant que la procédure de mise à niveau est en cours. Le téléviseur se désactivera et réactivera automatiquement une fois la mise à niveau terminée. Veuillez vérifier la version du logiciel une fois que la mise à niveau est terminée. Au moment de la mise à niveau du logiciel, les réglages vidéo et audio effectués seront remplacés par les réglages par défaut (définis en usine). Nous vous recommandons de noter vos réglages afin de pouvoir les rétablir facilement après la mise à niveau. Français - 63 01470D-03Fre.indb 63 2008-08-11 �� 1:34:25 WISELINK Pro Utilisation de la fonction WISELINK Pro Branchement d’un dispositif USB Panneau latéral de la télévision HDMI IN4 Il est possible d’écouter des fichiers musicaux et de visualiser des films et des photos sur un appareil USB Mass Storage Class (MSC). 1.Appuyer sur la touche POWER de la télécommande ou sur le panneau avant. ➣ Le téléviseur est sous tension. 2.Brancher un dispositif USB contenant des fichiers JPEG et/ou MP3 à la prise WISELINK (prise USB) sur le côté du téléviseur. USB Drive ➣ Si on passe en mode WISELINK Pro et qu’aucun dispositif USB n’est branché, le message “Auc. app. branché. Vérifier branchement.” s’affichera. Le cas échéant, connecter le dispositif USB, quitter l’écran en appuyant sur la touche W.LINK de la télécommande et entrer dans l’écran WISELINK Pro de nouveau. ➣ MTP (Media transfer protocol) n’est pas pris en charge. ➣ Le système de fichiers ne prend en charge que FAT16/32 (Le système de fichier NTFS n’est pas pris en charge). ➣ Certains types d’appareils photos numériques USB et appareils audio peuvent ne pas être compatibles avec ce téléviseur. ➣ WISELINK Pro est compatible uniquement avec le dispositif à mémoire de grande capacité (MSC) USB. Le MSC est un dispositif de transport de gros volumes de données à mémoire de grande capacité. Parmi les MSC, mentionnons les clés USB et les lecteurs de carte Flash (USB HDD et HUB ne sont pas pris en charge). ➣ Brancher directement au port USB du téléviseur. Il peut y avoir un problème de compatibilité USB si on utilise une connexion par câble séparée. ➣ Avant de brancher le dispositif au téléviseur, sauvegarder lesfichiers pour éviter tout dommage ou perte de données. SAMSUNG décline toute responsabilité pour toute perte de données ou tout fichier endommagé. ➣ Ne pas débrancher l’appareil USB pendant qu’il est en mode de chargement. ➣ La MSC prend en charge les fichiers MP3 et JPEG, tandis qu’un dispositif PTP ne prend en charge que les fichiers JPEG. ➣ Le format de fichier séquentiel jpeg est pris en charge. ➣ Les fichiers de photos et de son doivent porter des noms en anglais, français ou espagnol. Dans le cas contraire, il est impossible de les lire. Remplacer les noms des fichiers par des noms en anglais, français ou espagnol si nécessaire. ➣ Plus la résolution de l’image est élevée, plus son affichage à l’écran prend de temps. ➣ La résolution JPEG maximale prise en charge est de 15360X8640 pixels. ➣ Le message “Format fichier non compatible.” s’affiche pour les fichiers non pris en charge ou corrompus. ➣ Si le nombre de fichiers photos est supérieur à 4000 (ou si le nombre de fichiers musicaux est supérieur à 3000), tous les fichiers au-delà de cette limite ne sont pas affichés dans la liste de photos (ou la liste de fichiers musicaux). Utilisation de la touche de la télécommande dans le menu WISELINK Pro Touche Touche circulaire ▲/▼/◄/► ENTER / RETURN TOOLS Actions Déplacer le curseur et choisir un élément. Choisir l’élément sélectionné. Pendant la lecture d’un diaporama, d’un film ou fichier musical : - Si on appuie sur la touche ENTER pendant la lecture, cette dernière s’interrompt. - Si on appuie sur la touche ENTER pendant l’interruption de la lecture, cette dernière reprend. Lancer ou interrompre la lecture d’un diaporama ou d’un fichier musical. Retourner au menu précédent. Activer diverses fonctions à partir des menus Photo et Musique. Arrêter le diaporama en cours ou le fichier musical. / INFO W.LINK CH / PRE.CH / FAV.CH / CH.LIST EXIT Aller directement au groupe précédent / Aller directement au groupe suivant. Afficher l’information sur le fichier. Quitter le mode WISELINK Pro. Quitter le mode WISELINK Pro et revenir au mode TV. Arrêter la fonction en cours et revenir au menu principal de WISELINK Pro. Français - 64 01470D-03Fre.indb 64 2008-08-11 �� 1:34:26 Utilisation du menu WISELINK Pro 1Appuyer sur la touche MENU. Appuyer sur la touche ▲ ou ▼ pour sélectionner “Application”, puis sur ENTER . 2.Appuyer sur la touche ▲ ou ▼ pour sélectionner WISELINK Pro, puis sur ENTER . ➣ Le menu “WISELINK Pro” s’affiche. WISELINK Pro 851.98MB/995.00MB libre SUM PHOTO Photo SUM Appareil Music Movie Setup R Retour O Appuyer sur la touche W.LINK de la télécommande pour afficher le menu WISELINK Pro. O Appuyer sur la touche SOURCE de la télécommande à plusieurs reprises pour sélectionner “USB”, puis sur ENTER . 3.Appuyer sur la touche rouge, suivie de la touche ▲ ou ▼ pour sélectionner le dispositif à mémoire USB correspondant (c.-à-d. en cas de connexion par l’entremise d’un concentrateur). Appuyer sur la touche ENTER . ➣ Cette fonction varie en fonction du dispositif de mémoire USB branché au téléviseur. ➣ Le nom du dispositif USB sélectionné s’affiche au bas de l’écran. 4.Appuyer sur la touche ◄ ou ► pour sélectionner une icône (Photo, Music, Movie, Setup), puis sur ENTER ➣ Pour quitter le mode “WISELINK Pro”, appuyer sur la touche W.LINK de la télécommande. . Utilisation de la liste de photos Ce menu contient les fichiers de photos enregistrés sur le dispositif de mémoire USB. Liste de photos 1.Appuyer sur la touche W.LINKde la télécommande pour afficher le menu “WISELINK Pro”. 2.Appuyer sur la touche ◄ ou ► pour sélectionner “Photo”, puis sur ENTER . ➣ Les fichiers de photos sont affichés. ➣ Ce menu ne présente que les fichiers dont l’extension est jpg. Les fichiers d’autres formats, comme bmp ou tiff, ne seront pas affichés. ➣ Appuyer sur la touche (Lecture) / ENTER pour lancer le diaporama. ➣ Pour aller au groupe précédent ou suivant, appuyer sur la touche (REW) ou (FF). ➣ Le passage à une autre photo peut nécessiter quelques secondes. À cette étape, l’icône de chargement s’affiche à l’écran. ➣ Si la photo est affichée en plein écran, il est possible d’effectuer un zoom avant et arrière ou de faire tourner la photo à l’écran.Il peut s’écouler quelques secondes pour charger les fichiers photo sous forme d’images miniatures. WISELINK Pro 851.98MB/995.00MB libre SUM PHOTO Photo SUM Appareil Music Movie Setup e Quitter Photo Image001.jpg P. préf. P. mois P. date SUM Appareil Régl. f. Choisir ★★★ Janv. nov. ▲ Saut TOOLS Option Français - 65 01470D-03Fre.indb 65 2008-08-11 �� 1:34:29 Affichage à l’écran Photo 1Fich. sél. 5 1 Image001.jpg ★★★ P. préf. P. mois 2 SUM4 Appareil nov.3 Janv. ▲ P. date Régl. f. Choisir Saut TOOLS Option 6 1 Photo présentement choisie Affiche la photo présentement choisie. 2 Unité de tri actuelle Appuyer sur la touche ▲ ou ▼ pour changer l’unité de tri des photos. (“P. mois”, “P. date”, “Couleur”, “P. comp.”, “Dossier”, “P. préf.”) L’article sélectionné comme unité de tri est mis en surbrillance dans la fenêtre d’information sur la photo. 3 Visualiser les groupes Affiche les groupes de tri. Le groupe de tri comprenant la photo actuellement sélectionnée est mis en surbrillance. 4 Appareil courant Affiche le nom de l’appareil présentement choisi. Appuyer sur la touche rouge pour sélectionner un appareil. 5 Information sur la sélection d’éléments Affiche le nombre de photos sélectionnées en appuyant sur la touche jaune. 6 Éléments d’aide • Touche (Appareil) rouge: Sélectionne un appareil branché. • Touche (Régl. f.) verte: modifie les réglages favoris pour la photo choisie. Appuyer à plusieurs reprises sur cette touche jusqu’à ce que la valeur voulue s’affiche. (Consulter la page 69) • Touche (Choisir) jaune: sélectionne des photos à partir de la liste de photos. Un symbole est placé à gauche des photos sélectionnées. • Touche (Saut) : Permet de passer au groupe de tri précédent ou suivant. • Touche (Option) TOOLS: Affiche les menus “Diaporama”, “Lire groupe cour.”, “Rotation”. “Supprimer”, “Mod. info groupe” (dans le groupe “Couleur” ou “Composition”), “Information” ou “Supp. sécurité”. Français - 66 01470D-03Fre.indb 66 2008-08-11 �� 1:34:29 Liste de photos triées Il est possible de trier les photos dans la liste de photos en suivant un ordre particulier. 1.Appuyer sur la touche W.LINKde la télécommande pour afficher le menu 851.98MB/995.00MB Free WISELINK Pro SUM “WISELINK Pro”. 2.Appuyer sur la touche ◄ ou ► pour sélectionner “Photo”, puis sur PHOTO ENTER . ➣ Les fichiers de photos sont affichés. 3.Appuyer sur la touche ▲ ou ▼ pour sélectionner une norme de tri. (“P. mois”, “P. date”, “Couleur”, “P. comp.”, “Dossier”, “P. préf.”) ➣ Les photos sont triées en fonction de l’unité de tri nouvellement Photo Music Movie Setup sélectionnée. SUM Appareil e Quitter 4.Appuyer sur la touche ENTER pour lancer le diaporama dans l’ordre Photo choisi par l’utilisateur. Image001.jpg ➣ Wiselink identifie la “Couleur” et la “Composition” des images et les regroupe en conséquence en analysant les images sur le dispositif USB. ➣ L’information sur la “Composition” et la “Couleur” extraite d’un fichier photo peut être différente de celle de l’utilisateur. ★★★ ➣ L’information sur la photo est fixée automatiquement. Il est possible P. mois de modifier les paramètres “Couleur”, “Composition” et “Favori”. Saut Option SUM Appareil Régl. f. Choisir ➣ Les photos pour lesquelles l’information ne peut pas être affichée sont désignées comme étant “Non classés”. ➣ PTP ne prend pas en charge le mode de tri par dossier. P. préf. Janv. nov. ▲ P. date TOOLS P. mois Trie les photos par mois. ➣ Permet de classer et afficher les photos par mois dans le fichier. Le tri s’effectue uniquement par mois (de janvier à décembre), indépendamment de l’année. 1.Choisir “P. mois” dans les critères de classement dans la liste de photos. 2.Appuyer sur la touche ◄ ou ► pour sélectionner à partir de la sous-liste des fichiers regroupés par mois. ➣ Pour aller au groupe précédent ou suivant, appuyer sur la touche (REW) ou (FF). 3.Appuyer sur la touche TOOLS. Appuyer sur la touche ▲ ou ▼ pour sélectionner “Lire groupe cour.”. 4.Appuyer sur la touche ENTER pour lire le groupe de fichiers photos sélectionnés dans la sous-liste. Photo Image001.jpg Diaporama Lire groupe cour. Rotation Supprimer ▼ ★★★ P. préf. P. mois Janv. P. date SUM nov. ▲ Appareil Régl. f. Choisir Saut TOOLS Option P. date Trie les photos par date. ➣ Les photos sont classées et affichées par date. Elles sont classées par mois et par année à partir de la photo la plus récente. 1. Choisir “P. date” dans les critères de classement dans la liste de photos. 2.Appuyer sur la touche ◄ ou ► pour sélectionner à partir de la sous-liste des fichiers regroupés par période. ➣ Pour aller au groupe précédent ou suivant, appuyer sur la touche (REW) ou (FF). 3.Appuyer sur la touche TOOLS. Appuyer sur la touche ▲ ou ▼ pour sélectionner “Lire groupe cour.”. 4.Appuyer sur la touche ENTER pour lire le groupe de fichiers photos sélectionnés dans la sous-liste. Photo Image001.jpg Diaporama Lire groupe cour. Rotation Supprimer ▼ ★★★ P. mois P. date 2008 Couleur SUM Appareil Régl. f. Choisir 2008 nov. Janv. ▲ Saut TOOLS Option Français - 67 01470D-03Fre.indb 67 2008-08-11 �� 1:34:30 Couleur Trie les photos par couleur. ➣ Il est possible de modifier l’information sur la couleur d’une photo. 1.Choisir “Couleur” dans les critères de classement dans la liste de photos. 2.Appuyer sur la touche ◄ ou ► pour sélectionner à partir de la sous-liste des fichiers regroupés par couleur. ➣ Pour aller au groupe précédent ou suivant, appuyer sur la touche (REW) ou (FF). 3.Appuyer sur la touche TOOLS. Appuyer sur la touche ▲ ou ▼ pour sélectionner “Lire groupe cour.”. 4.Appuyer sur la touche ENTER pour lire le groupe de fichiers photos sélectionnés dans la sous-liste. Modification de l’information relative à la couleur 1.Sélectionner “Couleur” comme unité de tri pour la liste de photos, puis sur la touche ◄ ou ► pour sélectionner une photo. ➣ Modification de l’information de plusieurs fichiers Appuyer sur la touche ◄ ou ► pour sélectionner la photo désirée dans la liste de photos. Puis appuyer sur la touche jaune. Répéter l’étape précédente pour sélectionner plusieurs photos. Le symbole apparaît à gauche de la photo sélectionnée. 2. Appuyer sur la touche TOOLS. 3.Appuyer sur la touche ▲ ou ▼ pour sélectionner “Mod. info groupe”. Appuyer sur la touche ENTER . 4.Appuyer sur la touche ◄ ou ► pour sélectionner l’option désirée, puis sur ENTER . ➣ L’information sur le groupe du fichier actuel est mise à jour et le fichier est déplacé vers le nouveau groupe. ➣ Option “Couleur” : Rouge, Jaune, Vert, Bleu, Magenta, Noir, Gris, Non classés. Photo Image001.jpg Diaporama Lire groupe cour. Rotation Supprimer ▼ ★★★ P. date Couleur ▲ P. comp. SUM Appareil Régl. f. Choisir Photo Saut TOOLS Option TOOLS Option Image001.jpg P. date Couleur ▲ P. comp. SUM Appareil Régl. f. Choisir Saut P. comp. Trie les photos par composition. ➣ Il est possible de modifier l’information sur la composition d’une photo. 1.Choisir “P. comp.” dans les critères de classement dans la liste de photos. 2.Appuyer sur la touche ◄ ou ► pour sélectionner à partir de la sous-liste des fichiers regroupés par composition. ➣ Pour aller au groupe précédent ou suivant, appuyer sur la touche (REW) ou (FF). 3.Appuyer sur la touche TOOLS. Appuyer sur la touche ▲ ou ▼ pour sélectionner “Lire groupe cour.”. 4.Appuyer sur la touche ENTER pour lire le groupe de fichiers photos sélectionnés dans la sous-liste. Modification de l’information sur la composition 1.Sélectionner “P. comp.” comme norme de tri pour la liste de photos, puis appuyer sur la touche ◄ ou ► pour sélectionner une photo. ➣ Modification de l’information de plusieurs fichiers Appuyer sur la touche ◄ ou ► pour sélectionner la photo désirée dans la liste de photos. Puis appuyer sur la touche jaune. Répéter l’étape précédente pour sélectionner plusieurs photos. Le symbole apparaît à gauche de la photo sélectionnée. 2. Appuyer sur la touche TOOLS. 3.Appuyer sur la touche ▲ ou ▼ pour sélectionner “Mod. info groupe” Appuyer sur la touche ENTER . 4.Appuyer sur la touche ◄ ou ► pour sélectionner l’option désirée, puis sur ENTER . ➣ L’information sur le groupe du fichier actuel est mise à jour et le fichier est déplacé vers le nouveau groupe. ➣ Option “P. comp.” : (horizontal), (vertical), (objet), (perspective), (motif), Non classés Photo Image001.jpg Diaporama Lire groupe cour. Rotation Supprimer ▼ Couleur P. comp. Unclassified ▲ Dossier SUM Appareil Régl. f. Choisir Photo Saut TOOLS Option Image001.jpg Non classés Couleur P. comp. Dossier Unclassified ▲ SUM Appareil Régl. f. Choisir Saut TOOLS Option Français - 68 01470D-03Fre.indb 68 2008-08-11 �� 1:34:34 Dossier Trie les photos par dossier. ➣ S’il y a beaucoup de dossiers dans le dispositif USB, les fichiers photos sont affichés dans l’ordre dans chacun des dossiers. Le fichier photos dans le dossier source est affiché en premier et les autres dans l’ordre alphabétique par nom. 1.Choisir “Dossier” dans les critères de classement dans la liste de photos. 2.Appuyer sur la touche ◄ ou ► pour sélectionner à partir de la sous-liste des fichiers regroupés par dossier. ➣ Pour aller au groupe précédent ou suivant, appuyer sur la touche (REW) ou (FF). 3.Appuyer sur la touche TOOLS. Appuyer sur la touche ▲ ou ▼ pour sélectionner “Lire groupe cour.”. 4.Appuyer sur la touche ENTER pour lire le groupe de fichiers photos sélectionnés dans la sous-liste. Photo Image001.jpg Diaporama Lire groupe cour. Rotation Supprimer ▼ ★★★ P. comp. Dossier P-other P. préf. SUM Photo-1 ▲ Appareil Régl. f. Choisir Saut TOOLS Option P. préf. Trie les photos par préférence. (Favori) ➣ Il est possible de modifier l’information sur les préférences d’une photo. 1. Choisir “P. préf.” dans les critères de classement dans la liste de photos. 2.Appuyer sur la touche ◄ ou ► pour sélectionner à partir de la sous-liste des fichiers regroupés par préférence. ➣ Pour aller au groupe précédent ou suivant, appuyer sur la touche (REW) ou (FF). 3.Appuyer sur la touche TOOLS. Appuyer sur la touche ▲ ou ▼ pour sélectionner “Lire groupe cour.”. 4.Appuyer sur la touche ENTER pour lire le groupe de fichiers photos sélectionnés dans la sous-liste. Modification des réglages favoris 1.Appuyer sur la touche ◄ ou ► pour sélectionner la photo désirée dans la liste de photos. ➣ Modification de l’information de plusieurs fichiers Appuyer sur la touche ◄ ou ► pour sélectionner la photo désirée dans la liste de photos. Puis appuyer sur la touche jaune. Répéter l’étape précédente pour sélectionner plusieurs photos. Le symbole apparaît à gauche de la photo sélectionnée. 2.Appuyer plusieurs fois sur la touche verte jusqu’à ce que le réglage désiré s’affiche. ➣ La modification du réglage des favoris est terminée. ➣ Option “Favori” : ★ ★ ★ , ★ ★ ★ , ★ ★ ★ , ★ ★ ★ ➣ L’utilisateur peut choisir le nombre d’étoiles (jusqu’à 3) selon sa préférence. Photo Image001.jpg ★★★ Dossier P. préf. P. mois ★★★ ★★★ ▲ SUM Appareil Régl. f. Choisir ★★★ Saut TOOLS ★★★ Option Faire pivoter le fichier photo 1.Appuyer sur la touche ◄ ou ► pour sélectionner la photo désirée dans la liste de photos. 2.Appuyer sur la touche TOOLS. 3.Appuyer sur la touche ▲ ou ▼ pour sélectionner “Rotation”, puis sur ENTER . Appuyer à plusieurs reprises sur la touche ◄ ou ► pour faire tourner la photo à la position voulue. ➣ Chaque fois que l’on appuie sur la touche ◄, la photo tourne de 270˚, 180˚, 90˚ et 0˚. ➣ Chaque fois que l’on appuie sur la touche ►, la photo tourne de 270˚, 180˚, 90˚ et 0˚. ➣ L’icône d’information relative à la fonction de rotation s’affiche. Icon Photo Image001.jpg Diaporama Lire groupe cour. Rotation Supprimer ▼ ★★★ P. préf. P. mois Janv. nov. ▲ P. date SUM Appareil Régl. f. Choisir Saut TOOLS Option Photo Affichage en cours Fonction 0˚ Rotation (0°) Fait tourner une photo vers sa position initiale. 90˚ Rotation (90°) Fait tourner la photo de 90 degrés 180˚ Rotation (180°) Fait tourner la photo de 180 degrés 270˚ Rotation (270°) Fait tourner la photo de 270 degrés Image001.jpg 180˚ P. préf. Rotation P. mois P. date SUM Appareil Régl. f. Choisir ★★★ Janv. nov. ▲ Saut TOOLS Option Français - 69 01470D-03Fre.indb 69 2008-08-11 �� 1:34:36 Suppression d’un fichier photo 1.Appuyer sur la touche ◄ ou ► pour sélectionner la photo désirée dans la liste de photos. 2. Appuyer sur la toucheTOOLS. 3.Appuyer sur la touche ▲ ou ▼ pour sélectionner “Supprimer”, puis sur ENTER . ➣ Le message : “Effacer le fichier?” s’affiche. 4.Appuyer sur la touche ◄ ou ► pour sélectionner “OK”, puis sur ENTER . ➣ La photo est supprimée. ➣ Lorsqu’un fichier en mémoire morte est supprimé, le message : “Fich. lect. seule. Supprimer fichiers?” s’affiche. ➣ Si l’on sélectionne “Effacer”, la suppression est annulée. 5.Pour quitter le mode “WISELINK Pro”, appuyer sur la touche W.LINK de la télécommande. ➣ Il est impossible de supprimer les fichiers photos d’un appareil photo numérique PTP branché. ➣ Lorsqu’on s’apprête à supprimer des fichiers, il ne faut pas débrancher le dispositif de mémoire USB. ➣ Il est impossible de récupérer un fichier photo supprimé. Photo Image001.jpg Diaporama Lire groupe cour. Rotation Supprimer ▼ ★★★ P. préf. P. mois Janv. nov. ▲ P. date SUM Appareil Régl. f. Choisir Saut TOOLS Option Supprimer sélectionné(s) :Image0... 1 Fichier(s) Effacer le fichier? OK Effacer Deleting Multiple Photos 1.Appuyer sur la touche ◄ ou ► pour sélectionner la photo désirée dans la liste de photos. Puis appuyer sur la touche jaune. ➣ Répéter l’étape précédente pour sélectionner plusieurs photos. ➣ Le symbole apparaît à gauche de la photo sélectionnée. 2. Appuyer sur la touche TOOLS. 3.Appuyer sur la touche ▲ ou▼ pour sélectionner “Effacer fichier sél.”, puis sur ENTER . ➣ Le message : “Suppr. fich. sél.?” s’affiche. 4.Appuyer sur la touche ◄ ou ► pour sélectionner “OK”, puis sur ENTER . ➣ Les photos sélectionnées sont supprimées. ➣ Si l’on sélectionne “Effacer”, la suppression est annulée. 5.Pour quitter le mode “WISELINK Pro”, appuyer sur la touche W.LINK de la télécommande. ➣ Il est impossible de retirer les fichiers en mémoire morte des fichiers sélectionnés. ➣ Il est impossible de récupérer un fichier photo supprimé. Photo 2Fich. sél. Image001.jpg Diaporama Effacer fichier sél. Désélect. tout Supp. sécurité ★★★ P. préf. P. mois Janv. P. date SUM nov. ▲ Appareil Régl. f. Choisir Saut TOOLS Option Supprimer sélectionné(s) :Image0... 2 Fichier(s) Suppr. fich. sél.? OK Effacer Photo Visualisation de l’information photo Image001.jpg L’information sur le fichier photo, y compris l’ordre des fichiers dans le répertoire courant, le nom, la taille, la résolution, la date de modification et le chemin, est affichée. 1.Appuyer sur la touche ◄ ou ► pour sélectionner la photo désirée dans la liste de photos. 2. Appuyer sur la touche TOOLS. 3.Appuyer sur la touche ▲ ou ▼ pour sélectionner “Information”, puis sur ENTER . ➣ L’information de la photo sélectionnée s’affiche. O Appuyer sur la touche INFO pour voir l’information. Rotation Supprimer Mod. info groupe Supp. sécurité ★★★ P. préf. P. mois Janv. nov. ▲ P. date SUM Appareil Régl. f. Choisir Saut TOOLS Option Information Nom Taille fic. Résolution Date Chemin : Image001.jpg : 2.0MB : 440x440 : Janv.1.2008 : /Photo/ OK Français - 70 01470D-03Fre.indb 70 2008-08-11 �� 1:34:38 Visualisation d’une photo ou d’un diaporama Visualiser un diaporama 1.Appuyer sur la touche W.LINK de la télécommande pour afficher le menu “WISELINK Pro”. 2.Appuyer sur la touche ◄ ou ► pour passer à “Photo”, puis sur ENTER . ➣ Les fichiers photos sont affichés. 3.Appuyer sur la touche ◄ ou ► pour sélectionner la photo désirée dans la liste de photos. 4. Appuyer sur la touche ENTER . 5.Appuyer sur la touche ▲ ou ▼ pour passer à “Diaporama”, puis sur ENTER . ➣ Tous les fichiers photo contenus dans la liste de photos seront utilisés pour le diaporama. ➣ Durant le diaporama, les fichiers sont présentés en ordre à partir du fichier affiché. ➣ Les photos du diaporama sont affichées dans l’ordre donnée par la liste de photos. ➣ La lecture automatique des fichiers musicaux au cours du diaporama est possible si “Musique de fond” est réglé à “On”. (Voir la page 73.) Photo Image001.jpg Diaporama Lire groupe cour. Rotation Supprimer ▼ ★★★ P. préf. P. mois Janv. nov. ▲ P. date SUM Appareil Régl. f. Choisir Saut TOOLS 20/22 Image001.jpg 440x440 SUM E Diaporama Préc. Suivant Option 2.0KB TOOLS 2008/1/1 Option Retour O Lorsque la liste de photos est affichée, appuyer sur la touche (Lecture)/ENTER de la télécommande pour lancer le diaporama. Pour présenter un diaporama contenant seulement les fichiers sélectionnés 1.Appuyer sur la touche ◄ ou ► pour sélectionner la photo désirée dans la liste de photos. Puis appuyer sur la touche jaune. Répéter l’étape précédente pour sélectionner plusieurs photos. ➣ Le symbole apparaît à gauche de la photo sélectionnée. ➣ Si un seul fichier est sélectionné, le diaporama ne fonctionnera pas. 2. Appuyer sur la touche (Lecture) / ENTER . ➣ Les fichiers sélectionnés seront utilisés pour le diaporama. Lecture groupe cour. 1.Appuyer sur la touche ▲ ou ▼ pour sélectionner une norme de tri. Photo (“P. mois”, “P. date”, “Couleur”, “Composition”, “Dossier”, “P. préf.”) 2.Appuyer sur la touche ◄ ou ► pour sélectionner la photo désirée dans la liste de photos. ➣ Pour aller au groupe précédent ou suivant, appuyer sur la touche (REW) ou (FF). 3. Appuyer sur la touche TOOLS. P. mois 4.Appuyer sur la touche ▲ ou ▼ pour sélectionner “Lire groupe cour.”, puis sur ENTER . Seules les photos dans le groupe de tri, y compris les SUM Appareil Régl. f. fichiers sélectionnés, seront utilisés dans le diaporama. 5.Pour quitter le mode “WISELINK Pro”, appuyer sur la touche W.LINK de la télécommande. Image001.jpg Diaporama Lire groupe cour. Rotation Supprimer ▼ ★★★ P. préf. Janv. nov. ▲ P. date Choisir Saut TOOLS Option Icône d’information sur les fonctions du diaporama (affichée dans l’angle supérieur gauche de l’écran) Icon ► ❙❙ Affichage en cours Fonction Diaporama Diaporama en cours. Pause Pour interrompre le diaporama, il suffit d’appuyer sur la touche (Pause)/ENTER de la télécommande durant le diaporama. Pour poursuivre le diaporama, appuyer à nouveau sur la touche (Lecture)/ENTER de la télécommande. Français - 71 01470D-03Fre.indb 71 2008-08-11 �� 1:34:39 Visionnement d’une photo 1.Appuyer sur la touche W.LINK de la télécommande pour afficher le menu “WISELINK Pro”. 2.Appuyer sur la touche ◄ ou ► pour passer à “Photo”, puis sur ENTER . ➣ Les fichiers de photos sont affichés. 3.Appuyer sur la touche ◄ ou ► pour sélectionner la photo désirée dans la liste de photos. Puis appuyer sur la touche jaune pour ne sélectionner qu’un fichier. 4. Appuyer sur ENTER sur une icône de photo. ➣ La photo présentement sélectionnée est affichée en plein écran. 20/22 Image001.jpg 440x440 SUM E Diaporama Préc. Suivant TOOLS 2.0KB Option 2008/1/1 Retour Utilisation du menu d’options durant un diaporama (ou pendant le visionnement d’une photo) 1.Pendant un diaporama (ou le visionnement d’une photo), appuyer sur la touche TOOLS pour régler une option. 2.Appuyer sur la touche ▲ ou ▼ pour sélectionner l’option désirée. Puis appuyer sur la touche ENTER . Lancer ou arrêter un diaporama Il est possible de lancer ou d’arrêter un diaporama. Appuyer sur la touche ▲ ou ▼ pour sélectionner “Démarrer le diaporama” (ou “Arrêter le diaporama”), puis sur ENTER . OUTILS Démarrer le diaporama Rotation Zoom Vitesse du diaporama : Normal Musique de fond : Off Sélection musique de fond Réglage de l’image Réglage du son Information Dépl. Rotation Il est possible de faire tourner les images en mode Plein écran. Appuyer sur la touche ▲ ou ▼ pour sélectionner “Rotation”, puis sur ENTER . Appuyer à plusieurs reprises sur la touche ◄ ou ► pour faire tourner la photo à la position voulue. ➣ Chaque fois que l’on appuie sur la touche ◄, la photo tourne de 270˚, 180˚, 90˚ et 0˚. ➣ Chaque fois que l’on appuie sur la touche ►, la photo tourne de 270˚, 180˚, 90˚ et 0˚. Rotation ➣ Si l’option “Rotation” est sélectionnée, la fonction “Zoom” est désactivée. ➣ Le fichier en rotation n’est pas sauvegardé. ➣ L’icône d’information sur la fonction de rotation est affichée dans l’angle supérieur droit de l’écran. Icon 0˚ Affichage en cours Fonction Rotation (0°) Fait tourner une photo vers sa position initiale. 90˚ Rotation (90°) Fait tourner la photo de 90 degrés 180˚ Rotation (180°) Fait tourner la photo de 180 degrés 270˚ Rotation (270°) Fait tourner la photo de 270 degrés Intro. e Quitter 90˚ Français - 72 01470D-03Fre.indb 72 2008-08-11 �� 1:34:40 Zoom Il est possible de zoomer les images en mode Plein écran. Appuyer sur la touche ▲ ou ▼ pour sélectionner “Zoom”, puis sur ENTER . Appuyer plusieurs fois sur la touche ◄ ou ► pour augmenter ou diminuer l’effet du zoom. (x1 → x2 → x4) Pour déplacer la photo agrandie, appuyer sur ENTER , puis sur les touches ▲/▼/◄/►. ➣ Notons que lorsque la photo agrandie est plus petite que la taille d’écran initiale, la fonction de déplacement ne fonctionne pas. ➣ Le fichier agrandi n’est pas sauvegardé. ➣ Si l’option “Rotation” est sélectionnée, la fonction “Zoom” est désactivée. ➣ L’icône d’information sur la fonction Zoom est affichée dans l’angle supérieur droit de l’écran. Icône Affichage en cours Fonction x2 Zoom (x 2) Zoom avant de la photo 2x. x4 Zoom (x 4) Zoom avant de la photo 4x. x1 Zoom (x 1) Rétablit une photo à sa taille initiale. Panoramiquer vers le bas pour voir la partie inférieure d’une photo agrandie à l’aide du zoom. Panoramiquer vers le haut pour voir Panoramiquer haut la partie supérieure d’une photo agrandie à l’aide du zoom. Panoramiquer vers la droite pour Panoramiquer droite voir la partie droite d’une photo agrandie à l’aide du zoom. Panoramiquer vers la gauche pour Panoramiquer voir la partie gauche d’une photo gauche agrandie à l’aide du zoom. X2 Zoom X2 n Dépl. Intro. Retour Panoramiquer bas Vitesse du diaporama Il est possible de choisir la vitesse du diaporama. Appuyer sur la touche ▲ ou ▼ pour sélectionner “Vitesse du diaporama”. Appuyer sur la touche ◄ ou ► pour sélectionner l’option désirée. (Rapide → Lent → Normal) ➣ La vitesse du diaporama ne peut être réglée qu’au cours de la présentation. ➣ Il est possible de modifier la vitesse du diaporama en appuyant sur la touche (REW) ou (FF) pendant la lecture. Musique de fond Si la “Musique de fond” est réglée à “On”, elle sera lue durant le visionnement des photos une à une ou pendant un diaporama. Appuyer sur la touche ▲ ou ▼ pour choisir “Musique de fond”. Appuyer sur la touche ◄ ou ► pour sélectionner “On” ou “Off”. ➣ Si la “Musique de fond” est réglée à “On”, un écran s’affiche immédiatement afin de permettre le choix de la musique. OUTILS Arrêter le diaporama Rotation Zoom Vitesse du diaporama ◄ Normal ► Musique de fond : Off Sélection musique de fond Réglage de l’image Réglage du son Information Dépl. Réglage e Quitter OUTILS Arrêter le diaporama Rotation Zoom Vitesse du diaporama : Normal Musique de fond ◄ Off ► Sélection musique de fond Réglage de l’image Réglage du son Information Dépl. Réglage e Quitter • On : La musique de fonds disponible sera lue si l’option “On” est sélectionnée. Pour utiliser cette fonction, des fichiers musicaux et photos doivent être enregistrés sur le dispositif USB. • Off : La musique de fond n’est pas lue. Français - 73 01470D-03Fre.indb 73 2008-08-11 �� 1:34:41 Sélection musique de fond Il est possible de choisir une musique de fond. Appuyer sur la touche ▲ ou ▼ pour choisir “Sélection musique de fond”, puis sur ENTER . ➣ Si la “Musique de fond” est désactivée, même si “Sélection musique de fond” est configurée, la musique de fond ne sera pas lue. ➣ Il faut charger des fichiers musicaux pour pouvoir modifier le mode de musique de fond. Lire les fichiers musicaux dans la catégorie musicale à charger. ➣ Le menu “Sélection musique de fond” s’affiche. Appuyer sur la touche ◄ ou ► pour sélectionner le mode de musique de fond désiré. (Lect. al., Fichier sélect., Ambiance) OUTILS Arrêter le diaporama Rotation Zoom Vitesse du diaporama : Normal Musique de fond : Off Sélection musique de fond Réglage de l’image Réglage du son Information Intro. Dépl. e Quitter Sélection musique de fond Mode mus. de fond ◄ Lect. al. Mode mus. de fond : Calme ► Sél. fichier musical • Lect. al. : Lit les fichiers musicaux dans un ordre aléatoire. • Fichier sélect. : Lit un fichier musical sélectionné. • Ambiance : Lit seulement les fichiers musicaux offrant une ambiance particulière. Dépl. Réglage Intro. Retour Sélection musique de fond ➣ Choisir le fichier de musique de fond Appuyer sur la touche ◄ ou ► afin de régler “Mode mus. de fond” à “Fichier sélect.”. Appuyer sur la touche ▲ ou ▼ pour sélectionner “Sél. fichier musical”, puis sur ENTER . Appuyer sur la touche ▲ ou ▼ pour sélectionner un fichier musical, puis sur la touche jaune. Le symbole apparaît à gauche du fichier musical sélectionné. Répéter l’étape précédente pour sélectionner plusieurs fichiers musicaux. Appuyer sur la touche ENTER . Mode mus. de fond ◄ Fichier sélect. ► Mode mus. de fond : Calme Sél. fichier musical Dépl. Intro. Retour Sélection musique de fond ../Musique/ 2 Fich. sél. Dossier supérieur Thanks I Love You Better than yesterday ➣ Choisir l’ambiance du fichier musical de la musique de fond Appuyer sur la touche ◄ ou ► pour régler le “Mode mus. de fond” à “Ambiance”. Appuyer sur la touche ▲ ou ▼ pour choisir “Mode mus. de fond”. Puis appuyer sur la touche ◄ ou ► pour sélectionner l’ambiance désirée. Appuyer sur la touche ENTER . Options du mode de musique de fond : Énergique, Rythmé, Triste, Stimulant, Calme ➣ WISELINK Pro détermine l’ambiance des fichiers musicaux et les regroupe en conséquence en analysant les fichiers musicaux se trouvant sur le dispositif USB. ▼ Retour Intro. Dépl. Choisir Sélection musique de fond Mode mus. de fond : Ambiance Mode mus. de fond ◄ Calme ► Intro. Retour Sél. fichier musical Dépl. Réglage Réglage de l’image Réglage de l’image Changer les paramètres de réglage de l’image. (Consulter la page 21) Réglage du son Changer les paramètres de réglage du son. (Consulter la page 32) Information L’information sur le fichier photo, y compris l’ordre des fichiers dans le répertoire courant, le nom, la taille, la résolution, la date de modification et le chemin, est affichée. (Consulter la page 70) Supp. sécurité Il est possible de retirer le dispositif du téléviseur de façon sécuritaire. Appuyer sur la touche ▲ ou ▼ pour sélectionner “Supp. sécurité”, puis sur ENTER . Le message “Retrait sécuritaire du dispositif USB.” s’affiche, puis le message “Le dispositif USB peut maintenant être retiré du téléviseur en toute sécurité.” s’affiche. Retirer le dispositif USB du téléviseur. Mode image ◄ Contraste : Luminosité : Couleur : Contraste dynam. : Réglage du noir : Motion Plus 120Hz aut. : Régler Dépl. Réglage Dynamique ► 100 45 55 Haute Haute Basse Intro. R Retour Réglage du son Mode sonore ◄ Balance : 100Hz : 300Hz : 1kHz : 3kHz : 10kHz : Régler Dépl. Réglage Personnel G50 D50 0 0 0 0 0 Intro. ► R Retour Français - 74 01470D-03Fre.indb 74 2008-08-11 �� 1:34:42 Utilisation de la liste musicale Ce menu présente les fichiers musicaux qui se touvent parmi les fichiers sauvegardés sur un dispositif à mémoire USB. 851.98MB/995.00MB libre 1.Appuyer sur la touche W.LINK de la télécommande pour afficher le menu WISELINK Pro SUM “WISELINK Pro”. Music Photo Music SUM Appareil 2.Appuyer sur la touche ◄ ou ► pour sélectionner “Music”, puis sur ENTER . ➣ Les fichiers musicaux sont affichés. ➣ Appuyer sur la touche (Lecture) / ENTER au-dessus de l’icône musicale pour lire le fichier musical. ➣ Pour aller au groupe précédent ou suivant, appuyer sur la touche (REW) ou (FF). Movie Setup e Quitter Music Thanks I Love You Better than yesterday Jee Darby Catherine Album 1 2005 Pop Album 2 2005 Pop Album 3 2005 Pop Énergique ★★★ Triste ★★★ Calme ★★★ P. préf. Titre F G H P. artis. I ▲ SUM Appareil Régl. f. Choisir J L Saut TOOLS P S T V Option Affichage à l’écran Music 1Fich. sél. Thanks 1 I Love You Better than yesterday Jee Darby Catherine Album 1 2005 Blues Album 2 2005 Pop Album 3 2005 Pop Énergique ★★★ Triste ★★★ 5 Calme ★★★ P. préf. Titre P. artis. 2 G H I ▲ J SUM4 Appareil Régl. f. Choisir L Saut P TOOLS S Option T 3 V 6 1 Musique actuellement sélectionnée Affiche la musique présentement choisie. 2 Norme de tri actuelle Appuyer sur la touche ▲ ou ▼ pour changer la norme de tri des fichiers musicaux. (“Titre”, “P. artis.”, “Genre”, “Ambiance”, “Dossier”, “P. préf.”) 3 Visualiser les groupes Affiche les groupes de tri. Le groupe de tri comprenant le fichier musical actuellement sélectionné est mis en surbrillance. 4 Appareil courant Affiche le nom de l’appareil présentement choisi. Appuyer sur la touche rouge pour sélectionner un appareil. Français - 75 01470D-03Fre.indb 75 2008-08-11 �� 1:34:44 5 Information sur la sélection d’éléments Affiche le nombre de fichiers musicaux sélectionnés à l’aide de la touche jaune. 6 Éléments d’aide • Touche (Appareil) rouge: Sélectionne un appareil branché. • Touche (Régl. f.) verte: Modifie les réglages favoris pour la musique choisie. Appuyer à plusieurs reprises sur cette touche jusqu’à ce que la valeur voulue s’affiche. (Consulter la page 78) • Touche (Choisir) jaune: Sélectionne des fichiers musicaux à partir de la liste de fichiers musicaux. Un symbole est placé à gauche des fichiers musicaux sélectionnés. • Touche (Saut) : Permet de passer au groupe de tri précédent ou suivant. • Touche (Option) TOOLS: Affiche les menus “Lire groupe cour.”, “Supprimer”, “Mod. info groupe” (dans le groupe “Ambiance”), “Information” ou “Supp. sécurité”. Tri de la liste de fichiers musicaux Il est possible de trier les fichiers musicaux dans la liste selon une norme particulière 1.Appuyer sur la touche W.LINK de la télécommande pour afficher le menu WISELINK Pro SUM “WISELINK Pro”. 2.Appuyer sur la touche ◄ ou ► pour sélectionner “Music”, puis sur Music ENTER . ➣ Les fichiers musicaux sont affichés. 3.Appuyer sur la touche ▲ ou ▼ pour sélectionner une norme de tri. (“Titre”, “P. artis.”, “Genre”, “Ambiance”, “Dossier”, “P. préf.”) Photo Music Movie ➣ Les fichiers musicaux sont triés selon la norme de tri nouvellement sélectionnée. SUM Appareil e Quitter pour lancer la lecture musicale dans 4.Appuyer sur la touche ENTER l’ordre choisi par l’utilisateur. ➣ L’information musicale est réglée automatiquement et l’information sur les favoris peut être modifiée. ➣ Les fichiers musicaux pour lesquels l’information ne peut pas être affichée sont désignés comme étant “Non classés”. ➣ S’il n’y a pas de titre pour un fichier musical, le nom du fichier est affiché. ➣ S’il n’existe aucune information sur le genre, l’artiste, l’album ou l’année, l’élément correspondant affiché est vierge. 851.98MB/995.00MB libre Setup Music Thanks I Love You Better than yesterday Jee Darby Catherine Album 1 2005 Pop Album 2 2005 Pop Album 3 2005 Pop Énergique ★★★ Triste ★★★ Calme ★★★ P. préf. Titre F G H P. artis. I ▲ J SUM Appareil Régl. f. Choisir L Saut P TOOLS S T V Option Titre Trie les fichiers musicaux par titre. ➣ Classe et affiche les fichiers musicaux par ordre alphabétique. 1.Choisir “Titre” dans les critères de classement dans la liste de fichiers musicaux. 2.Appuyer sur la touche ◄ ou ► pour sélectionner à partir de la sous-liste des fichiers regroupés par ordre alphabétique. ➣ Pour aller au groupe précédent ou suivant, appuyer sur la touche (REW) ou (FF). 3. Appuyer sur la touche TOOLS. 4.Appuyer sur la touche ▲ ou ▼ pour sélectionner “Lire groupe cour.”. 5.Appuyer sur la touche ENTER pour lire le groupe de fichiers musicaux sélectionnés dans la sous-liste. Music Thanks Darby Album 1 2005 Pop Énergique thancour. yesterday LireBetter groupe Supprimer Catherine InformationAlbum 3 2005 Supp. sécurité Pop I Love You Jee Album 2 2005 Pop ★★★ Triste ★★★ Calme ★★★ P. préf. Titre P. artis. F G H I ▲ SUM Appareil Régl. f. Choisir L J Saut TOOLS P S T V Option Français - 76 01470D-03Fre.indb 76 2008-08-11 �� 1:34:45 P. artis. Trie les fichiers musicaux par artiste. ➣ Les fichiers musicaux sont classés par artiste par ordre alphabétique. 1.Choisir “P. artis.” dans les critères de classement dans la liste de fichiers musicaux. 2.Appuyer sur la touche ◄ ou ► pour sélectionner à partir de la sous-liste des fichiers regroupés par ordre alphabétique. ➣ Pour aller au groupe précédent ou suivant, appuyer sur la touche (REW) ou (FF). 3. Appuyer sur la touche TOOLS. 4.Appuyer sur la touche ▲ ou ▼ pour sélectionner “Lire groupe cour.”. pour lire le groupe de fichiers 5.Appuyer sur la touche ENTER musicaux sélectionnés dans la sous-liste. Music Thanks Darby Album 1 2005 Pop Album 2 2005 Pop Triste thancour. yesterday LireBetter groupe Supprimer Catherine InformationAlbum 3 2005 Supp. sécurité Pop I Love You Jee Triste ★★★ Stimulant ★★★ ★★★ Titre P. artis. Catherine Darby Darby Appareil Régl. f. Choisir SUM Darby Darby Jee Jee ▲ Genre Saut TOOLS Option Genre Trie les fichiers musicaux par genre. 1.Choisir “Genre” dans les critères de classement dans la liste de fichiers musicaux. 2.Appuyer sur la touche ◄ ou ► pour sélectionner à partir de la sous-liste des fichiers regroupés par genre. ➣ Pour aller au groupe précédent ou suivant, appuyer sur la touche (REW) ou (FF). 3. Appuyer sur la touche TOOLS. 4.Appuyer sur la touche ▲ ou ▼ pour sélectionner “Lire groupe cour.”. 5.Appuyer sur la touche ENTER pour lire le groupe de fichiers musicaux sélectionnés dans la sous-liste. Music Thanks Darby Album 1 2005 Pop Album 2 2005 Pop Triste than cour. yesterday LireBetter groupe Supprimer Catherine InformationAlbum 3 2005 Supp. sécurité Pop I Love You Jee Triste ★★★ Stimulant ★★★ ★★★ P. artis. Genre Other Pop R&B Appareil Régl. f. Choisir SUM Soundtr... Top 40 Acid Jazz Ball.. ▲ Ambiance Saut TOOLS Option Ambiance Trie les fichiers musicaux par ambiance. ➣ Il est possible de modifier l’information sur l’ambiance musicale. 1.Choisir “Ambiance” dans les critères de classement dans la liste de fichiers musicaux. 2.Appuyer sur la touche ◄ ou ► pour sélectionner à partir de la sous-liste des fichiers regroupés par ambiance. ➣ Pour aller au groupe précédent ou suivant, appuyer sur la touche (REW) ou (FF). 3. Appuyer sur la touche TOOLS. 4.Appuyer sur la touche ▲ ou ▼ pour sélectionner “Lire groupe cour.”. pour lire le groupe de fichiers 5.Appuyer sur la touche ENTER musicaux sélectionnés dans la sous-liste. Modification de l’information sur l’ambiance 1.Sélectionner “Ambiance” comme norme de tri dans la liste de fichiers musicaux, puis appuyer sur la touche ◄ ou ► pour sélectionner un fichier musical. 2. Appuyer sur la touche TOOLS. 3.Appuyer sur la touche ▲ ou ▼ pour sélectionner “Mod. info groupe”. Appuyer sur la touche ENTER . ➣ WISELINK Pro détermine l’ambiance des fichiers musicaux et les regroupe en conséquence en analysant les fichiers musicaux se trouvant sur le dispositif USB. ➣ L’information “Ambiance” provenant d’un fichier musical ne correspond pas toujours à l’option Ambiance. Par exemple, un fichier que l’on considère “Énergique” peut provenir de l’option d’ambiance “Stimulant”. 4.Appuyer sur la touche ◄ ou ► pour sélectionner l’option désirée, puis sur ENTER . ➣ L’information sur le groupe du fichier actuel est mise à jour et le fichier est déplacé vers le nouveau groupe. ➣ Option “Ambiance” : Énergique, Rythmé, Triste, Stimulant, Calme, Non classés Music Thanks Darby Album 1 2005 Pop Triste thancour. yesterday LireBetter groupe Supprimer Catherine InformationAlbum 3 2005 Supp. sécurité Pop I Love You Jee Album 2 2005 Pop ★★★ Triste ★★★ Stimulant ★★★ Genre Ambiance Dossier Rythmé Triste ▲ Stimulant SUM Appareil Régl. f. Choisir Saut TOOLS Calme ... Option Music Thanks Triste I Love You Better than yesterday Jee Darby Catherine Album 1 2005 Pop Album 2 2005 Pop Album 3 2005 Pop ★★★ Énergique Rythmé Triste ★★★ Triste Stimulant Stimulant Calme ★★★ Non classés Genre Ambiance Dossier SUM Rythmé Triste ▲ Appareil Régl. f. Choisir Stimulant Saut TOOLS Calme ... Option Français - 77 01470D-03Fre.indb 77 2008-08-11 �� 1:34:46 Dossier Trie les fichiers musicaux par dossier. ➣ S’il y a beaucoup de dossiers dans le dispositif USB, les fichiers sont affichés dans l’ordre dans chacun des dossiers. Le fichier musical dans le dossier source est affiché en premier et les autres dans l’ordre alphabétique par nom. 1.Choisir “Dossier” dans les critères de classement dans la liste de fichiers musicaux. 2.Appuyer sur la touche ◄ ou ► pour sélectionner à partir de la sous-liste des fichiers regroupés par dossier. ➣ Pour aller au groupe précédent ou suivant, appuyer sur la touche (REW) ou (FF). 3. Appuyer sur la touche TOOLS. 4.Appuyer sur la touche ▲ ou ▼ pour sélectionner “Lire groupe cour.”. 5.Appuyer sur la touche ENTER pour lire le groupe de fichiers musicaux sélectionnés dans la sous-liste. Music Thanks Darby Album 1 2005 Pop Album 2 2005 Pop Triste thancour. yesterday LireBetter groupe Supprimer Catherine InformationAlbum 3 2005 Supp. sécurité Pop I Love You Jee ★★★ Triste ★★★ Stimulant ★★★ Ambiance Dossier P. préf. Other Musique Other2 ▲ SUM Appareil Régl. f. Choisir Saut TOOLS Option P. préf. Trie les fichiers musicaux par préférence. (Favori) ➣ Il est possible de modifier l’information sur les préférences des fichiers musicaux. 1.Choisir “P. préf.” dans les critères de classement dans la liste de fichiers musicaux. 2.Appuyer sur la touche ◄ ou ► pour sélectionner à partir de la sous-liste des fichiers regroupés par préférence. ➣ Pour aller au groupe précédent ou suivant, appuyer sur la touche (REW) ou (FF). 3. Appuyer sur la touche TOOLS. 4.Appuyer sur la touche ▲ ou ▼ pour sélectionner “Lire groupe cour.”. 5.Appuyer sur la touche ENTER pour lire le groupe de fichiers musicaux sélectionnés dans la sous-liste. Modification des réglages favoris 1.Appuyer sur la touche ◄ ou ► pour sélectionner le fichier musical désiré dans la liste de fichiers musicaux. 2.Appuyer plusieurs fois sur la touche verte jusqu’à ce que le réglage désiré s’affiche. ➣ La modification du réglage des favoris est terminée. ➣ Option “Favori” : ★ ★ ★ , ★ ★ ★ , ★ ★ ★ , ★ ★ ★ ➣ L’utilisateur peut choisir le nombre d’étoiles (jusqu’à 3) selon sa préférence. 3. Appuyer sur la touche ENTER pour lancer la lecture musicale. Music Thanks I Love You Better than yesterday Jee Darby Catherine Album 1 2005 Pop Album 2 2005 Pop Album 3 2005 Pop Triste ★★★ Triste ★★★ Stimulant ★★★ Dossier P. préf. Titre ★★★ ★★★ ▲ SUM Appareil Régl. f. Choisir ★★★ Saut TOOLS ★★★ Option Français - 78 01470D-03Fre.indb 78 2008-08-11 �� 1:34:48 Suppression d’un fichier musical 1.Appuyer sur la touche ◄ ou ► pour sélectionner le fichier musical désiré dans la liste de fichiers musicaux. 2. Appuyer sur la toucheTOOLS. 3.Appuyer sur la touche ▲ ou ▼ pour sélectionner “Supprimer”, puis sur ENTER . ➣ Le message “Effacer le fichier?” s’affiche. 4.Appuyer sur la touche ◄ ou ► pour sélectionner “OK”, puis sur ENTER . ➣ Le fichier musical est effacé. ➣ Lorsqu’un fichier en mémoire morte est supprimé, le message : “Fich. lect. seule. Supprimer fichiers?” s’affiche. ➣ Si l’on sélectionne “Effacer”, la suppression est annulée. 5.Pour quitter le mode “WISELINK Pro”, appuyer sur la touche W.LINK de la télécommande. ➣ Lorsqu’on s’apprête à supprimer des fichiers, il ne faut pas débrancher le dispositif de mémoire USB. ➣ Il est impossible de récupérer un fichier musical supprimé. Music Thanks thancour. yesterday LireBetter groupe Supprimer Catherine InformationAlbum 3 2005 Supp. sécurité Pop I Love You Jee Darby Album 1 2005 Pop Énergique Album 2 2005 Pop ★★★ Triste Calme ★★★ ★★★ P. préf. Titre F G H P. artis. I ▲ J SUM Appareil Régl. f. Choisir L Saut P TOOLS S T V Option Supprimer sélectionné(s) :I Love Y... 1 Fichier(s) Effacer le fichier? OK Effacer Suppression de plusieurs fichiers musicaux 1.Appuyer sur la touche ◄ ou ► pour sélectionner le fichier musical désiré dans la liste de fichiers musicaux. Puis appuyer sur la touche jaune. ➣ Répéter l’étape précédente pour sélectionner plusieurs fichiers musicaux. ➣ Le symbole apparaît à gauche du fichier musical sélectionné. 2. Appuyer sur la touche TOOLS. 3.Appuyer sur la touche ▲ ou ▼ pour sélectionner “Effacer fichier sél.”, puis sur ENTER . ➣ Le message “Suppr. fich. sél.?” s’affiche. 4.Appuyer sur la touche ◄ ou ► pour sélectionner “OK”, puis sur ENTER . ➣ Les fichiers musicaux sélectionnés sont supprimés. ➣ Si l’on sélectionne “Effacer”, la suppression est annulée. 5.Pour quitter le mode “WISELINK Pro”, appuyer sur la touche W.LINK de la télécommande. ➣ Il est impossible de retirer les fichiers en mémoire morte des fichiers sélectionnés. ➣ Il est impossible de récupérer les fichiers musicaux supprimés. Music 2Fich. sél. Thanks Darby Album 1 2005 Pop Album 2 2005 Pop Énergique Betterfichier than yesterday Effacer sél. Désélect. tout Catherine Supp. sécurité Album 3 I Love You Jee 2005 Pop Triste ★★★ Calme ★★★ ★★★ P. préf. Titre F G H P. artis. SUM I ▲ J Appareil Régl. f. Choisir L Saut P TOOLS S T V Option Supprimer sélectionné(s) :I Love Y... 2 Fichier(s) Suppr. fich. sél.? OK Effacer Music Visualisation de l’information L’information sur le fichier photo, y compris l’ordre des fichiers dans le répertoire courant, le nom, la taille, la date de modification et le chemin, est affichée. 1.Appuyer sur la touche ◄ ou ► pour sélectionner le fichier musical désiré dans la liste de fichiers musicaux. 2. Appuyer sur la touche TOOLS. 3.Appuyer sur la touche ▲ ou ▼ pour sélectionner “Information”, puis sur ENTER . ➣ L’information du fichier musical sélectionné s’affiche. O Appuyer sur la touche INFO pour voir l’information. Thanks Darby Album 1 2005 Pop Énergique thancour. yesterday LireBetter groupe Supprimer Catherine InformationAlbum 3 2005 Supp. sécurité Pop I Love You Jee Album 2 2005 Pop ★★★ Triste ★★★ Calme ★★★ P. préf. Titre P. artis. F G H I ▲ SUM Appareil Régl. f. Choisir J L Saut TOOLS P S T V Option Inform. mus. Nom Taille fic. Date Chemin : I Love You.mp3 : 5.2MB : Janv.1.2008 : /Musique/ OK Français - 79 01470D-03Fre.indb 79 2008-08-11 �� 1:34:49 Lecture d’un fichier musical Lecture d’un fichier musical Music 1.Appuyer sur la touche W.LINK de la télécommande pour afficher le menu “WISELINK Pro”. Thanks I Love You Better than yesterday 2.Appuyer sur la touche ◄ ou ► pour sélectionner “Music”, puis sur Jee Darby Catherine ENTER . ➣ Les fichiers musicaux sont affichés. Énergique ★★★ Triste ★★★ Calme ★★★ 3.Appuyer sur la touche ◄ ou ► pour sélectionner un fichier musical à lire, puis sur ENTER . Titre ➣ Ce menu affiche uniquement les fichiers pouvrus d’une extension MP3. Les fichiers comportant d’autres extensions ne sont pas affichés, SUM Appareil Régl. f. Choisir Saut Option même s’ils sont mémorisés sur le même dispositif USB. 7/14 00:01:15 00:05:41 (Lecture) / ENTER au-dessus de ➣ Appuyer sur la touche l’icône musicale pour lire le fichier musical. I Love You ➣ (REW) et (FF) ne fonctionnent pas pendant la lecture. ➣ Appuyer sur la touche (Pause) ou ENTER pendant la lecture d’un fichier musical pour interrompre la lecture. Appuyer sur la touche (Arrêt) pour quitter le mode Lecture. ➣ Le fichier sélectionné est affiché en tête de liste avec la durée de déroulement. Pause Préc. Suivant Option Retour SUM ➣ Pour régler le volume de la musique, appuyer sur la touche VOL – ou VOL + de la télécommande. Pour couper le son, appuyer sur la touche MUTE de la télécommande. ➣ La durée de lecture d’un fichier musical peut s’afficher sous la forme ‘00:00:00’ si ladite durée ne figure pas au début du fichier. 4.Pour quitter le mode “WISELINK Pro”, appuyer sur la touche W.LINK de la télécommande. Album 1 2005 Pop Album 2 2005 Pop Album 3 2005 Pop P. préf. P. artis. F G H I ▲ J L P S T V TOOLS TOOLS Lecture du groupe musical 1.Appuyer sur la touche W.LINK de la télécommande pour afficher le menu “WISELINK Pro”. 2.Appuyer sur la touche ◄ ou ► pour sélectionner “Music”, puis sur ENTER . ➣ Pour aller au groupe précédent ou suivant, appuyer sur la touche (REW) ou (FF). 3.Appuyer sur la touche ◄ ou ► pour sélectionner le fichier musical désiré. 4. Appuyer sur la touche TOOLS. 5.Appuyer sur la touche ▲ ou ▼ pour sélectionner “Lire groupe cour.”, puis sur ENTER . ➣ Les fichiers musicaux contenus dans le groupe de tri comprenant le fichier sélectionné sont lus. 6.Pour quitter le mode “WISELINK Pro”, appuyer sur la touche W.LINK de la télécommande. Music Thanks Énergique than cour. yesterday LireBetter groupe Supprimer Catherine InformationAlbum 3 2005 Supp. sécurité Pop I Love You Jee Darby Album 1 2005 Pop Album 2 2005 Pop ★★★ Triste ★★★ Calme ★★★ P. préf. Titre P. artis. F G H I ▲ SUM Appareil Régl. f. Choisir J L Saut TOOLS P S T V Option Français - 80 01470D-03Fre.indb 80 2008-08-11 �� 1:34:53 Lecture des fichiers musicaux sélectionnés 1.Appuyer sur la touche W.LINKde la télécommande pour afficher le menu “WISELINK Pro”. 2.Appuyer sur la touche ◄ ou ► pour sélectionner “Music”, puis sur ENTER . 3.Appuyer sur la touche ◄ ou ► pour sélectionner le fichier musical désiré, puis appuyer sur la touche jaune. Répéter l’étape précédente pour sélectionner plusieurs fichiers musicaux. ➣ Le symbole apparaît à gauche du fichier musical sélectionné. Music 2 Fich. sél. Thanks I Love You Better than yesterday Jee Darby Catherine Album 1 2005 Pop Album 2 2005 Pop Album 3 2005 Pop Énergique ★★★ Triste Calme ★★★ ★★★ P. préf. Titre F G H P. artis. SUM (Lecture) / ENTER . 4.Appuyer sur la touche ➣ Seul le fichier sélectionné est lu. ➣ Appuyer sur la touche (Arrêt) pendant la lecture pour arrêter la lecture de l’élément courant et revenir à la liste de fichiers musicaux. 5.Pour quitter le mode “WISELINK Pro”, appuyer sur la touche W.LINK de la télécommande. I ▲ J Appareil Régl. f. Choisir 7/14 L Saut P TOOLS S T V Option 00:01:15 00:05:41 I Love You SUM Pause Préc. Suivant TOOLS Option Retour Icône d’information sur la fonction de musique (affichée dans l’angle supérieur gauche de l’écran) Icon Affichage en cours (Musique) Répéter (Musique) Une fois ► / ❙❙ (Musique) Lecture/ Pause Function Répète la lecture de tous les fichiers musicaux dans le dossier (ou du fichier sélectionné). “Mode de répétition” est réglé à “On”. Lit une fois tous les fichiers musicaux dans le dossier (ou du fichier sélectionné). “Mode de répétition” est réglé à “Off”. (Lecture)/ (Pause)/ENTER de la Appuyer sur la touche télécommande pendant que la musique est en cours de lecture. Reprise de la lecture de la musique 1. 2. 3. Pendant la lecture d’un fichier musical, appuyer sur la touche TOOLS. Appuyer sur la touche ▲ ou ▼ pour sélectionner “Mode de répétition”. Appuyer sur la touche ◄ ou ► pour sélectionner “On” ou “Off”. • On : effectue la lecture de tous les fichiers musicaux dans le dossier (ou du fichier sélectionné). • Off : pas de reprise de lecture. OUTILS Mode de répétition ◄ Réglage de l’image Réglage du son Information Supp. sécurité Dépl. Réglage On ► e Quitter 4.Pour quitter le mode “WISELINK Pro”, appuyer sur la touche W.LINK de la télécommande. Français - 81 01470D-03Fre.indb 81 2008-08-11 �� 1:34:54 Utilisation de la liste des films Ce menu affiche des fichiers et des dossiers de films sauvegardés sur un dispositif à mémoire USB. Liste des films 1.Appuyer sur la touche W.LINK de la télécommande pour afficher le menu “WISELINK Pro”. 2.Appuyer sur la touche ◄ ou ► pour choisir “Movie”, puis sur ENTER . ➣ Les fichiers films s’affichent. ➣ Appuyer sur la touche (Lecture) / ENTER sur une icône de film pour lire ce dernier. ➣ En passant à un film, le chargement peut prendre quelques secondes. À ce moment, l’icône de chargement apparaît à l’écran. ➣ Vous pouvez visualiser des fichiers jeux multimédias passionnants, mais la fonction de jeux n’est pas prise en charge. ➣ Formats vidéo compatibles Fichier Extension avi mp4 mpg vro vob H.264 MP 1920X1080 MPEG4 SP 800X600 MPEG4 ASP 800X600 MJPEG H.264 BP 800X600 1920X1080 H.264 MP 1920X1080 MPEG2 1920X1080 Compression/ décompression audio PCM Codage ADPCM AC3 PCM Codage ADPCM Codage ADPCM PCM AAC PCM AAC AC3 MPEG2 1920X1080 AC3 Décodeur vidéo Résolution Xvid 800X600 WISELINK Pro SUM 851.98MB/995.00MB libre MOVIE Photo Music SUM Appareil Movie Setup e Quitter Movie ABC.avi ★★★ P. préf. Titre P. date SYMBOL ENG □ A M ▲ SUM Appareil Régl. f. Choisir Saut TOOLS Option Affichage à l’écran Movie 5 1Fich. sél. 1 ABC.avi ★★★ P. préf. Titre SYMBOL 2 ENG 4 M 3 ▲ P. date SUM Appareil A □ Régl. f. Choisir Saut TOOLS Option 6 1 Film présentement sélectionné Affiche le film actuellement sélectionné. 2 Critères de classement courants Appuyer sur la touche ▲ ou ▼ pour modifier les critères de classement des films. (“Titre”, “P. date”, “Dossier”, “P. préf.”) Français - 82 01470D-03Fre.indb 82 2008-08-11 �� 1:34:57 3 Affichage des groupes Affiche les groupes de classement. Le groupe de classement incluant le film actuellement sélectionné est mis en évidence. 4 Appareil courant Affiche le nom de l’appareil actuellement sélectionné. Appuyer sur la touche rouge pour choisir un appareil. 5 Information sur le choix des éléments Affiche le nombre de fichiers films sélectionnés en appuyant sur la touche jaune. 6 Éléments d’aide • Touche rouge (appareil) : permet de sélectionner un appareil branché. • Touche verte (réglage favori) : permet de modifier le réglage favori pour le film sélectionné. Appuyer sur cette touche à répétition jusqu’à ce que la valeur désirée s’affiche. (Consulter la page 84) • Touche jaune (sélectionner) : permet de sélectionner des films dans la liste. Les flms sélectionnés sont marqués d’un symbole à gauche. • Touche (saut) : permet de passer au groupe de classement précédent ou suivant. • Touche TOOLS (option): Affiche les menus “Lire groupe cour.”, “Supprimer”, “Information” ou “Supp. sécurité”. Classement de la liste des films Il est possible de classer les films dans la liste selon un critère de classement particulier. 1.Appuyer sur la touche W.LINK de la télécommande pour afficher le menu “ WISELINK Pro”. 2.Appuyer sur la touche ◄ ou ► pour choisir “Movie”, puis sur ENTER . ➣ Les fichiers films s’affichent. 3Appuyer sur la touche ▲ ou ▼ pour sélectionner un critère de classement. (“Titre”, “P. date”, “Dossier”, “P. préf.”) ➣ Les films sont classés selon le nouveau critère de classement sélectionné. ➣ L’information relative au film est réglée automatiquement. Il est possible de modifier l’option “Favori”. WISELINK Pro 851.98MB/995.00MB libre SUM MOVIE Photo Music SUM Appareil Movie Setup e Quitter Movie ABC.avi ★★★ P. préf. Titre SYMBOL ENG □ A M ▲ P. date SUM Appareil Régl. f. Choisir Saut TOOLS Option Titre Permet de classer les fichiers films selon le titre. ➣ Classe et affiche les titres de films par ordre alphabétique. 1. Choisir “Titre” comme critère de classement dans la liste des films. 2.Appuyer sur la touche ◄ ou ► pour sélectionner à partir de la sous-liste des fichiers regroupés par titre. ➣ Pour passer au groupe précédent ou suivant, appuyer sur la touche (REW) ou (FF). 3.Appuyer sur la touche TOOLS. Appuyer sur la touche ▲ ou ▼ pour sélectionner “Lire groupe cour.”. 4.Appuyer sur ENTER pour lire le groupe de fichiers films sélectionné dans la sous-liste. Movie ABC.avi Lire groupe cour. Supprimer Information Supp. sécurité ★★★ P. préf. Titre P. date SYMBOL ENG □ A M ▲ SUM Appareil Régl. f. Choisir Saut TOOLS Option Français - 83 01470D-03Fre.indb 83 2008-08-11 �� 1:34:58 P. date Permet de classer les films en fonction de la période. ➣ Les films sont classés et lus en ordre de date. Ils sont classées par mois et par année à partir du film. le plus récent. 1. Choisir “P. date” comme critère de classement dans la liste des films. 2.Appuyer sur la touche ◄ ou ► pour sélectionner à partir de la sous-liste des fichiers regroupés par période. ➣ Pour passer au groupe précédent ou suivant, appuyer sur la touche (REW) ou (FF). 3.Appuyer sur la touche TOOLS. Appuyer sur la touche ▲ ou ▼ pour sélectionner “Lire groupe cour.”. 4.Appuyer sur ENTER pour lire le groupe de fichiers films sélectionné dans la sous-liste. Movie ABC.avi Lire groupe cour. Supprimer Information Supp. sécurité ★★★ Titre 2008 P. date Dec ▲ Dossier SUM Appareil Régl. f. Choisir Saut TOOLS Option Dossier Permet de classer les films par dossier. ➣ S’il y a beaucoup de dossiers mémorisés dans le dispositif USB, les fichiers films sont affichés dans l’ordre dans chacun des dossiers. Le fichier film dans le dossier source est affiché en premier et les autres dans l’ordre alphabétique par nom. 1. Choisir “Dossier” comme critère de classement dans la liste des films. 2.Appuyer sur la touche ◄ ou ► pour sélectionner à partir de la sous-liste des fichiers regroupés par dossier. ➣ Pour passer au groupe précédent ou suivant, appuyer sur la touche (REW) ou (FF). 3.Appuyer sur la touche TOOLS. Appuyer sur la touche ▲ ou ▼ pour sélectionner “Lire groupe cour.”. 4.Appuyer sur ENTER pour lire le groupe de fichiers films sélectionné dans la sous-liste. Movie ABC.avi Lire groupe cour. Supprimer Information Supp. sécurité ★★★ P. date Dossier movie ▲ P. préf. SUM Appareil Régl. f. Choisir Saut TOOLS Option P. préf. Permet de classer les films par préférence. (Favori) ➣ Il est possible de modifier les préférences en matière de films. 1. Choisir “P. préf.” comme critère de classement dans la liste des films. 2.Appuyer sur la touche ◄ ou ► pour sélectionner à partir de la sous-liste des fichiers regroupés par préférence. ➣ Pour passer au groupe précédent ou suivant, appuyer sur la touche (REW) ou (FF) . 3.Appuyer sur la touche TOOLS. Appuyer sur la touche ▲ ou ▼ pour sélectionner “Lire groupe cour.”. 4.Appuyer sur ENTER pour lire le groupe de fichiers films sélectionné dans la sous-liste. Movie ABC.avi ★★★ Dossier P. préf. Titre ★★★ ★★★ ▲ SUM Appareil Régl. f. Choisir ★★★ Saut TOOLS ★★★ Option Modification du réglage favori 1.Appuyer sur la touche◄ ou ► pour sélectionner le film voulu dans la liste. 2.Appuyer sur la touche verte à répétition jusqu’à ce que le réglage voulu s’affiche. ➣ Le changement des réglages favoris a été effectué. ➣ Option “Favori”: ★ ★ ★ , ★ ★ ★ , ★ ★ ★ , ★ ★ ★ ➣ Pour sortir du mode “WISELINK Pro”, appuyer sur la touche W.LINK de la télécommande. Français - 84 01470D-03Fre.indb 84 2008-08-11 �� 1:35:00 Suppression d’un fichier film 1.Appuyer sur la touche◄ ou ► pour sélectionner le film voulu dans la liste. 2. Appuyer sur la touche TOOLS. 3.Appuyer sur la touche ▲ ou ▼ pour choisir “Supprimer”, puis sur ENTER . ➣ Le message “Effacer le fichier?” s’affiche. ➣ Lorsqu’un fichier en lecture seule est effacé, le message “Fich. lect. seule. Supprimer fichiers?” s’affiche. 4.Appuyer sur la touche ◄ ou ► pour choisir “OK”, puis sur ENTER . ➣ Le film est supprimé. ➣ Si “Effacer” est sélectionné, la suppression est annulée. 5.Pour sortir du mode “WISELINK Pro”, appuyer sur la touche W.LINK de la télécommande. ➣ Ne pas retirer le dispositif de mémoire USB pendant la suppression des fichiers. ➣ Il est impossible de restaurer un fichier film supprimé. Movie ABC.avi Lire groupe cour. Supprimer Information Supp. sécurité ★★★ P. préf. Titre SYMBOL ENG □ A M ▲ P. date SUM Appareil Régl. f. Choisir Saut TOOLS Option Supprimer sélectionné(s) : ABC... 1 Fichier(s) Effacer le fichier? OK Effacer Suppression de plusieurs fichiers films 1.Appuyer sur la touche ◄ ou ► pour choisir le film voulu dans la liste. Puis appuyer sur la touche jaune. ➣ Répéter la procédure ci-dessus pour sélectionner plusieurs fichiers films. ➣ Le symbole s’affiche à la gauche des fichiers films sélectionnés. 2. Appuyer sur la touche TOOLS. 3.Appuyer sur la touche ▲ ou ▼ pour choisir “Effacer fichier sél.”, puis sur ENTER . ➣ Le message “Suppr. fich. sél.?” s’affiche. 4.Appuyer sur la touche ◄ ou ► pour choisir “OK”, puis sur ENTER . ➣ Les fichiers films sélectionnés sont supprimés. ➣ Si “Effacer” est sélectionné, la suppression est annulée. 5.Pour sortir du mode “WISELINK Pro”, appuyer sur la touche W.LINK de la télécommande. ➣ Il est impossible de supprimer des fichiers en lecture seule. ➣ Les fichiers films supprimés ne peuvent être restaurés. SUM Affichage de l’information sur le film Movie L’information sur le film, incluant l’ordre du fichier dans le répertoire en cours, le nom, la taille, la date de modification et le chemin, est affichée. 1.Appuyer sur la touche◄ ou ► pour sélectionner le film voulu dans la liste. 2. Appuyer sur la touche TOOLS. 3.Appuyer sur la touche ▲ ou ▼ pour choisir “Information”, puis sur ENTER . ➣ L’information sur le film sélectionné s’affiche. Movie 2Fich. sél. ABC.avi Effacer fichier sél. Désélect. tout Supp. sécurité ★★★ P. préf. Titre SYMBOL ENG □ A M ▲ P. date Appareil Régl. f. Choisir Saut TOOLS Option Supprimer sélectionné(s) : ABC... 2 Fichier(s) Suppr. fich. sél.? OK Effacer ABC.avi Lire groupe cour. Supprimer Information Supp. sécurité ★★★ P. préf. Titre SYMBOL ENG □ A M ▲ P. date SUM Appareil Régl. f. Choisir Saut TOOLS Option Information, film Nom Taille fic. Date Chemin : ABC.avi :350.2MB : Janv.1.2008 : /film/ OK O Appuyer sur la touche INFO pour visualiser l’information. Français - 85 01470D-03Fre.indb 85 2008-08-11 �� 1:35:02 Lecture d’un fichier film Lecture d’un fichier film 1. 2. 3. 4. Appuyer sur la touche W.LINK de la télécommande pour afficher le menu “WISELINK Pro”. Appuyer sur la touche ◄ ou ► pour choisir “Movie”, puis sur ENTER . Appuyer sur la touche ◄ ou ► pour choisir un film à lire, puis sur ENTER . ➣ Le fichier sélectionné est lu. ➣ Appuyer sur la touche (Lecture) / ENTER sur une icône de film pour lire ce dernier. ➣ Appuyer sur la touche (Pause) / ENTER pendant la lecture d’un fichier film pour interrompre la lecture. Appuyer sur la touche (Stop) pour quitter le mode de lecture. ➣ Le fichier sélectionné est affiché en tête de liste avec sa durée de lecture. ➣ La durée de lecture d’un fichier film peut s’afficher sous la forme ‘00:00:00’ si ladite durée n’est pas détectée au début du fichier. ➣ Appuyer sur la touche ◄ pendant la lecture d’un fichier vidéo afin d’effectuer un retour en arrière de 20 secondes. ➣ Appuyer sur la touche ► pour effectuer une avance rapide de 20 secondes. Pour sortir du mode “WISELINK Pro”, appuyer sur la touche W.LINK de la télécommande. Movie ABC.avi ★★★ P. préf. SYMBOL Titre ENG □ SUM A M ▲ P. date Appareil Régl. f. Choisir Lecture Saut TOOLS Option 00:00:48 00:23:05 ABC.avi SUM E Pause -20sec +20sec TOOLS Option Retour Lecture du groupe de films 1. 2. 3. 4. 5 6. Appuyer sur la touche W.LINK de la télécommande pour afficher le menu “WISELINK Pro”. Appuyer sur la touche ◄ ou ► pour choisir “Movie”, puis sur ENTER . Appuyer sur la touche ◄ ou ► pour choisir le fichier film voulu. Appuyer sur la touche TOOLS. Appuyer sur la touche ▲ ou ▼ pour sélectionner “Lire groupe cour.”, puis sur ENTER . ➣ Les fichiers films dans le groupe de classement, y compris le fichier sélectionné, sont lus. Pour sortir du mode “WISELINK Pro”, appuyer sur la touche W.LINK de la télécommande. Movie ABC.avi Lire groupe cour. Supprimer Information Supp. sécurité ★★★ P. préf. Titre P. date SYMBOL ENG □ A M ▲ SUM Appareil Régl. f. Choisir Saut TOOLS Option Français - 86 01470D-03Fre.indb 86 2008-08-11 �� 1:35:05 Lecture des fichiers films sélectionnés 1. 2. 3. Appuyer sur la touche W.LINK de la télécommande pour afficher le menu “WISELINK Pro”. Appuyer sur la touche ◄ ou ► pour choisir “Movie”, puis sur ENTER . Appuyer sur la touche ◄ ou ► pour choisir le fichier film voulu, puis sur la touche jaune. Répéter la procédure ci-dessus pour sélectionner plusieurs fichiers films. ➣ Le symbole s’affiche à la gauche du fichier film sélectionné. Movie 2 Fich. sél. ABC.avi ★★★ P. préf. SYMBOL Titre 4. 5. (Lecture)/ ENTER . Appuyer sur la touche ➣ Seul le fichier sélectionné est lu. ➣ Appuyer sur la touche (Stop) pendant la lecture pour arrêter l’élément en cours et revenir à la liste des films. Pour sortir du mode “WISELINK Pro”, appuyer sur la touche W.LINK de la télécommande. ENG □ A M ▲ P. date SUM Appareil Régl. f. Choisir Lecture Saut TOOLS Option 00:00:48 00:23:05 ABC.avi SUM E Pause -20sec +20sec TOOLS Option Retour Icône d’information de la fonction Film (affichée dans le coin supérieur gauche de l’écran). Icône Affichage actuel (Film) Relecture (Film) une fois ► / ❙❙ x2 (Film) Lecture/Pause (Film) Lecture x2 Fonction Lorsque tous les fichiers films dans le dossier (ou le fichier sélectionné) sont relus. “Repeat Mode” est réglé à “On”. Lorsque tous les fichiers films dans le dossier (ou le fichier sélectionné) sont lus une fois. “Repeat Mode” est réglé à “Off”. (Lecture)/ (Pause) / ENTER de Lorsqu’on appuie sur la touche la télécommande pendant la lecture du film. Appuyer sur la touche (FF) de la télécommande pendant la lecture du film. Relecture d’un film 1. 2. 3. Pendant la lecture d’un fichier film, appuyer sur la touche TOOLS. Appuyer sur la touche ▲ ou ▼ pour choisir “Repeat Mode”. Appuyer sur la touche ◄ ou ► pour choisir “On” ou “Off”. • On : permet de relire tous les fichiers films dans le dossier (ou le fichiers sélectionné) à répétition. • Off : pas de relecture à répétition. 4. Pour sortir du mode “WISELINK Pro”, appuyer sur la touche W.LINK de la télécommande. OUTILS Mode de répétition ◄ On ► Réglage de l’image Réglage du son Image Format : Ajustement Information Supp. sécurité Dépl. Réglage e Quitter Image Format • Ajustement : permet de lire un fichier vidéo en adaptant l’image à la taille de l’écran. • Original : permet de lire un fichier vidéo à la taille d’origine. Français - 87 01470D-03Fre.indb 87 2008-08-11 �� 1:35:06 Utilisation du menu de configuration La configuration affiche les paramètres d’utilisateur du menu “WISELINK Pro”. 1.Appuyer sur la touche W.LINK de la télécommande pour afficher le menu “WISELINK Pro”. 2.Appuyer sur la touche ◄ ou ► pour sélectionner “Setup”, puis sur ENTER . 3.Appuyer sur la touche ▲ ou ▼ pour sélectionner l’option désirée. (Vitesse du diaporama, Musique Mode de répétition, Film Mode de répétition, Tps fct. écran veille, Information, Supp. sécurité) 4.Appuyer sur la touche ◄ ou ► pour sélectionner l’option, puis sur ENTER . ➣ Pour quitter le mode “WISELINK Pro”, appuyer sur la touche W.LINK de la télécommande. Vitesse du diaporama Permet de commander la vitesse du diaporama. Appuyer sur la touche ▲ ou ▼ pour sélectionner “Vitesse du diaporama”. Appuyer sur la touche ◄ ou ► pour sélectionner “Rapide”, “Normal” ou “Lent”. WISELINK Pro 851.98MB/995.00MB Free SUM Setup Photo SUM Appareil Music Movie Setup e Quitter Setup Vitesse du diaporama ◄ Normal ► Musique Mode de répétition On Film Mode de répétition : On Tps fct. écran veille 5 min Information Supp. sécurité SUM Appareil Musique Mode de répétition Choisir ce mode pour lire des fichiers musicaux à répétition. Appuyer sur la touche ▲ ou ▼ pour sélectionner “Musique Mode de répétition”. Appuyer sur la touche ◄ ou ► pour sélectionner “On” ou “Off”. Dépl. Réglage Retour Setup Vitesse du diaporama Normal Musique Mode de répétition◄ On ► Film Mode de répétition : On Tps fct. écran veille 5 min Information Supp. sécurité Film Mode de répétition Choisir ce mode pour lire des fichiers musicaux à répétition. Appuyer sur la touche ▲ ou ▼ pour sélectionner “Film Mode de répétition”. Appuyer sur la touche ◄ ou ► pour sélectionner “On” ou “Off”. SUM Appareil Dépl. Réglage Retour Setup Vitesse du diaporama Musique Mode de répétition Film Mode de répétition ◄ Tps fct. écran veille Normal On On ► 5 min Information Supp. sécurité SUM Appareil Tps fct. écran veille Choisir cette option pour fixer le temps d’attente avant que l’économiseur d’écran ne soit lancé. Appuyer sur la touche ▲ ou ▼ pour choisir “Tps fct. écran veille”. Appuyer sur la touche ◄ ou ► pour choisir “1 min”, “3 min” ou “5 min”. Dépl. Réglage Retour Setup Vitesse du diaporama Musique Mode de répétition Film Mode de répétition : Tps fct. écran veille ◄ Normal On On 5 min ► Information Supp. sécurité Information Sélectionner cette option pour visualiser l’information sur l’appareil branché. Appuyer sur la touche ▲ ou▼ pour sélectionner “Information”, puis sur ENTER . Supp. sécurité Il est possible de retirer le dispositif du téléviseur de façon sécuritaire. (Consulter la page 74) SUM Appareil Dépl. Réglage Retour Information Type appar. Appareil Mém dispo Mém. Totale : USB : SUM : 852.90MB : 995.00MB OK Français - 88 01470D-03Fre.indb 88 2008-08-11 �� 1:35:09 WISELINK Pro-DLNA Configuration du réseau DLNA Le réseau DLNA permet de visualiser sur le téléviseur des vidéos et des images enregistrées sur ordinateur par l’intermédiaire d’une connexion en mode Wiselink Pro. Cela évite de les copier sur un dispositif de stockage USB et de connecter ce dernier au téléviseur. Pour utiliser l’application DLNA, le téléviseur doit être branché au réseau et l’application DLNA doit être installée sur l’ordinateur. Diagramme des connexions réseau Panneau arrière du téléviseur Le port de modem mural Modem externe (ADSL/VDSL/câblodistribution) 3 Câble de modem 1 Câble LAN 2 Câble LAN 1. Brancher le port [LAN] au panneau arrière du téléviseur au téléviseur au modem externe à l’aide d’un câble LAN. 2. Connecter l’ordinateur sur lequel le programme “DLNA PC Share Manager” sera installé et le modem externe à l’aide d’un câble LAN. 3. Connecter le port LAN mural et le modem externe à l’aide d’un câble Modem. PC Connexion au réseau 1. 2. Lorsque la connexion au réseau est établie, configurer le réseau sur le téléviseur (voir la page 107). ➣ Une connexion Internet sans fil n’est pas compatible avec l’application DLNA. ➣ Les trois premiers chiffres (adresse de sous-réseau) des adresses IP du téléviseur et de l’ordinateur doivent être identiques (p. ex., Adresse IP : 123.456.789.XX ) Exécuter un “Test du réseau” pour vérifier la configuration du réseau (voir à la page 108). Français - 89 01470D-03Fre.indb 89 2008-08-11 �� 1:35:10 Installation de l’application DLNA Pour pouvoir lire le contenu enregistré dans l’ordinateur sur le téléviseur, il faut d’abord installer l’application. Configuration nécessaire 1. Insérer dans l’ordinateur le CD contenant le programme fourni avec le téléviseur. 2. L’ installation du programme nécessite 20 MB d’espace mémoire sur le disque dur. ➣ S’il y a partage de fichiers, il faut disposer de 20 MB d’espace mémoire sur le disque dur pour 100 fichiers. ➣ Si la fonction de partage de fichiers est annulée, l’espace mémoire sur le disque dur utilisé pour l’information affichée dans l’image miniature est libéré. Formats compatibles 1. Fichier image : JPEG (jpg, jpeg) 2. Fichier audio : MP3 (mp3) 3. Fichier vidéo : MPEG1(mpg, mpeg), MPEG2 PS/TS(mpg, mpeg, trp, ts, tp), divx(mpg, mpeg, avi), MPEG4 / H.264 (mpg, mpeg) Installer l’application 1. Exécuter le fichier Setup.exe du CD contenant le programme fourni avec le téléviseur. ➣ Il est aussi possible de télécharger le fichier à partir du site www.samsung.com. 2. Installer le gestionnaire de partage SAMSUNG PC Share Manager tel qu’illustré ci-après. 3. Lorsque l’installation est terminée, l’icône du gestionnaire de partage s’affiche sur le bureau. ➣ Cliquer deux fois sur l’icône pour exécuter le programme. Français - 90 01470D-03Fre.indb 90 2008-08-11 �� 1:35:11 Utilisation de l’application DLNA Affichage du programme à l’écran 1 8 2 3 4 5 6 7 1. Menu : Le menu donne accès aux options suivantes : “Fichier”, “Partage”, “Serveur” et “Aider”. 2. Cliquer ici pour partager le dossier serveur PC sélectionné (voir page 93). 3. Cliquer ici pour annuler le partage (voir page 93). 4. Cliquer ici pour rafraîchir le dossier et les fichiers PC. 5. Cliquer ici pour synchroniser le statut de partage (voir page 94). 6. Liste des dossiers et fichiers PC devant être partagés. 7. Liste des dossiers partagés par l’utilisateur. Français - 91 01470D-03Fre.indb 91 2008-08-11 �� 1:35:11 Fichier Propriété: permet d’afficher l’information du dossier ou fichier sélectionné. Méthode n° 1: Sélectionner un dossier ou un fichier et sélectionner le menu “Fichier” et ensuite sélectionner le sous-menu “Propriété”. Méthode n° 2: Sélectionner un dossier ou un fichier, cliquer à droite sur le dossier ou le fichier sélectionné et ensuite sélectionner “Propriété” dans le menu qui s’affiche. Quitter: p&&ermet de quitter l’application DLNA. Si l’on sélectionne “Quitter” sans appliquer les changements après avoir changé le statut de partage, un message s’affiche demandant si les changements de configuration doivent être appliqués à l’ordinateur. Sélectionner “Yes” pour appliquer les changements et quitter l’application. Français - 92 01470D-03Fre.indb 92 2008-08-11 �� 1:35:12 Partage Partager un dossier Il est possible de partager un dossier de l’ordinateur sur le téléviseur. Le nombre maximum de fichiers qui peuvent être partagés est de 32. ➣ L’ordinateur assure les fonctions d’un serveur pour le téléviseur. Méthode n° 1 : S électionner un dossier dans “Mon ordinateur”, sélectionner le menu “Partage” et sélectionner le sous-menu “Partage Dossier”. Méthode n° 2 :: Sélectionner un dossier dans “Mon ordinateur”, cliquer à droite sur le dossier sélectionné et sélectionner “Partage Dossier” dans le menu qui apparaît. Méthode n° 3 : P lacer le pointeur de la souris sur un dossier dans la liste de dossiers sous “Mon ordinateur” dans la sous-fenêtre de gauche et glisser et déplacer le dossier dans la sous-fenêtre “Partage Dossier”. Si un message apparaît demandant de confirmer le dossier partagé, sélectionner “Yes”. Annuler un dossier partagé Il est possible d’annuler un dossier partagé sur l’ordinateur. Sélectionner un dossier dans la sous-fenêtre “Partage Dossier” et sélectionner “Désactiver Partage”. électionner un dossier dans la sous-fenêtre Méthode n° 1 : S “Partage Dossier”, sélectionner le menu “Partage” et ensuite sélectionner “Désactiver Partage”. électionner un dossier dans la sous-fenêtre Méthode n° 2 : S “Partage Dossier”, cliquer à droite sur le dossier sélectionné et ensuite sélectionner “Désactiver Partage” dans le menu qui apparaît. Méthode n° 3 :: Placer le pointeur de la souris sur un dossier dans la sous-fenêtre “Partage Dossier”, glisser et déplacer le dossier dans la sous-fenêtre “Mon ordinateur”. Si un message apparaît demandant de confirmer l’annulation, sélectionner “Yes”. Français - 93 01470D-03Fre.indb 93 2008-08-11 �� 1:35:12 Application des paramètres actuels Il faut exécuter cette procédure pendant la synchronisation parce qu’il y a un nouveau dossier partagé ou annulation d’un dossier partagé. Le menu “Mise à j. DB” applique les changements apportés aux dossiers partagés aux données enregistrées à l’aide du programme de partage sur l’ordinateur. L’application des changements aux données internes étant un processus qui prend du temps, cette fonction permet à l’utilisateur d’appliquer les changements aux données uniquement lorsque nécessaire. À moins que le menu “Mise à j. DB” ne soit sélectionné, le changement au dossier partagé n’est pas appliqué au serveur. Les changements aux dossiers partagés ne sont pas appliqués à l’ordinateur tant que le menu “Mise à j. DB” n’a pas été sélectionné. Méthode n° 1 : S électionner le menu “Partage” et sélectionner le sous-menu “Rafraîchir”. Méthode n° 2 : Cliquer sur l’icône “Mise à j. DB”. Configuration de la permission d’accès Pour que le téléviseur puisse détecter l’ordinateur, il doit être réglé à “Définir Dispositif Politique” dans la fenêtre de configuration de la permission d’accès. De plus, le serveur et le téléviseur doivent être sur le même sous-réseau. électionner le menu “Partage” et sélectionner Méthode : S “Définir Dispositif Politique”. ➣ Les éléments rejetés sont représentés en gris. ➣ Il est possible de changer les permissions d’accès à l’aide de la touche “Acceptent”/”Nient”. ➣ Pour effacer un élément, le sélectionner et sélectionner “Suppr. fichier item”. Français - 94 01470D-03Fre.indb 94 2008-08-11 �� 1:35:13 Serveur Serveur L’ordinateur peut être utilisé comme un serveur. Démarrage du serveur au démarrage de Windows Il est possible de déterminer que le serveur démarre automatiquement au démarrage de Windows. Changer le nom du serveur Il est possible de renommer le serveur. Entrer un nouveau nom et cliquer sur “OK”. Le nouveau nom apparaît en haut à droite de la fenêtre et s’affiche sur l’écran du téléviseur. Aider Version La boîte de message d’information relative à la version du programme s’affiche. Français - 95 01470D-03Fre.indb 95 2008-08-11 �� 1:35:13 Utilisation de la fonction DLNA Utilisation du menu DLNA La fonction DLNA (Digital Living Network PC TV Alliance) permet de lire le contenu mémorisé sur un serveur DLNA (habituellement l’ordinateur) branché au téléviseur ou par LAN l’intermédiaire d’un réseau. Wiselink Pro permet de lire le contenu mémorisé dans un dispositif de mémoire USB branché au téléviseur, et la fonction Modem externe DLNA permet de lire le contenu mémorisé (ADSL/VDSL/câblodistribution) sur un serveur DLNA (l’ordinZateur) branché au téléviseur ou par l’intermédiaire d’un réseau. Les procédures pour accéder au contenu sont les mêmes que celles pour WISELINK Pro. ➣ Si le programme de gestion de partage sur PC fourni avec le téléviseur est installé sur l’ordinateur, ce dernier peut assumer les fonctions d’un serveur DLNA par l’intermédiaire du réseau. 1. Appuyer sur la touche W.LINK de la télécommande pour afficher le menu “DLNA”. WISELINK Pro 2. Appuyer sur la touche ◄ ou ►pour sélectionner une icône (Photo, Music, Movie, Setup), puis sur ENTER . ➣ Pour quitter le mode “DLNA”, appuyer sur la touche W.LINK de la télécommande. LAN DLNA : Server PHOTO Photo Server Music Appareil Movie Setup R Retour Photo ♦ Liste de photos – Classement de la liste de photos : consulter la page 67. – Visualiser l’information : consulter la page 70. – Faire pivoter le fichier photo : consulter la page 69. – Visualiser un diaporama : consulter la page 71. ♦ Pendant un diaporama – Lecture/Pause : consulter la page 71. – Vitesse du diaporama : consulter la page 73. – Zoom : consulter la page 73. – Rotation : consulter la page 72. Photo Image001.jpg ★★★ P. préf. P. mois Janv. Server nov. ▲ P. date Appareil Choisir Saut Option TOOLS Music ♦ Liste des fichiers musicaux – Classement de la liste des fichiers musicaux : consulter la page 76. – Voir l’information : consulter la page 79. – Lecture d’un fichier musical : consulter la page 80. ♦ Pendant la lecture d’un fichier musical – Lecture/Pause : consulter la page 81. – Mode de répétition : consulter la page 81. Music Thanks Énergique I Love You Better than yesterday Jee Darby Catherine Album 1 2005 Pop Album 2 2005 Pop Album 3 2005 Pop ★★★ Triste Calme ★★★ ★★★ P. préf. Titre P. artis. Server F G H Appareil Choisir I ▲ J Saut L TOOLS P S T V Option Français - 96 01470D-03Fre.indb 96 2008-08-11 �� 1:35:15 Movie ♦ Liste des films – Classement de la liste des films : consulter la page 83. – Voir l’information : consulter la page 85. – Lecture d’un fichier film : consulter la page 86. ♦ Pendant la lecture d’un fichier film – Lecture/Pause : consulter la page 87. – Mode de répétition : consulter la page 87. Movie ABC.avi ★★★ P. préf. Titre SYMBOL ENG □ Setup – – – – – Vitesse du diaporama : consulter la page 88. Musique Mode de répétition : consulter la page 88. Film Mode de répétition : consulter la page 88. Tps fct. écran veille : consulter la page 88. Information : consulter la page 88. A M ▲ P. date Server Appareil Choisir Saut TOOLS Option Setup Vitesse du diaporama ◄ Normal ► Musique Mode de répétition On Film Mode de répétition : On Tps fct. écran veille 5 min Information Server Appareil Dépl. Réglage Retour ➣ DLNA ne prend pas en charge les fonctions suivantes. – Fonctions Musique de fond et Réglage de la musique de fond. – Classement des fichiers par préférence dans les dossiers Photo, Musique et Film. – Fonction Modifier l’info du groupe. – Fonction Supprimer. – Fonction Retirer en sécurité. – Fonctions des touches REW/FF ( / ) pendant la lecture d’un film. ➣ Il se peut que les fonctions Saut (touches◄/►) ou Pause ne marchent pas pendant la lecture d’un film s’il s’agit d’une application DLNA d’une autre marque, en fonction de l’information correspondante. ➣ Il se peut que la durée ne soit pas affichée pendant la lecture d’un film. Français - 97 01470D-03Fre.indb 97 2008-08-11 �� 1:35:15 Contents Library Utilisation du mode Contents Library Application Le mode “Contents Library” permet de visualiser ou de lire le contenu intégré dans la mémoire du téléviseur ou mémorisé dans un dispositif USB. ➣ Les fonctions Supprimer, Déplacer et Mettre à jour ne fonctionnent pas pour le contenu intégré dans la mémoire du téléviseur. Utilisation du menu Contents Library 1.Appuyer sur la touche MENU. Appuyer sur la touche ▲ ou ▼ pour WISELINK Pro sélectionner “Application”, puis sur ENTER . Anynet+ (HDMI-CEC) 2.Appuyer sur la touche ▲ ou ▼ pour choisir “Contents Library”, puis sur Contents Library ► ENTER . InfoLink ➣ Le menu principal “Contents Library” s’affiche. Product Guide O Appuyer sur la touche CONTENT de la télécommande pour afficher le menu “Contents Library”. 3.Appuyer sur la touche ◄ ou ► pour choisir une icône (“Galerie”, “Recettes”, “Jeux”, “Anglais pour enfants” et “Fitness”), puis sur ENTER . ➣ Pour retourner au mode TV, appuyer sur la touche CH / de la télécommande. ➣ Lorsqu’on appuie sur la touche Volume ou MUTE, rien ne s’affiche à l’écran, mais la fonction s’exécute en conséquence. Contents Library Galerie Galerie Recettes Jeux Configuration Anglais pour enfants USB R Retour Fitness e Quitter Utilisation des touches de la télécommande dans le menu Contents Library Touche Touche circulaire (▲/▼/◄/►) ENTER Opérations Permet de déplacer le curseur et choisir un élément. Permet de sélectionner l’élément en surbrillance. RETURN EXIT Permet de retourner au menu précédent. Permet d’arrêter la fonction en cours et de retourner au menu principal “Contents Library”. CH / PRE.CH / FAV.CH / CH.LIST Permet d’arrêter le mode “Contents Library” et de retourner au mode TV. Touche de couleur Les touches avec une fonction sont décrites sur la page correspondante. VOL / CONTENT Permet de régler le volume du contenu lu. Permet de quitter le mode “Contents Library”. Français - 98 01470D-03Fre.indb 98 2008-08-11 �� 1:35:16 Utilisation du contenu intégré dans la mémoire du téléviseur Le contenu intégré dans “Contents Library” se répartit selon les sous-catégories suivantes : “Galerie”, “Recettes”, “Jeux”, “Anglais pour enfants” et “Fitness”. Galerie Cette fonction sert à lire un diaporama à images haute définition, avec musique de fond et permet de produire diverses ambiances. À l’aide de la fonction “Galerie” du téléviseur, il est possible de changer l’ambiance de l’environnement. 1.Appuyer sur la touche ◄ ou ► pour choisir “Galerie” à partir du menu principal “Contents Library”. Appuyer ensuite sur la touche ENTER . Contents Library Galerie Galerie Recettes Jeux Configuration 2.Appuyer sur la touche ▲ ou ▼ pour choisir “Art”, “Relaxation” ou “Groupe”, puis sur ENTER . ➣ Le diaporama sélectionné est lancé. ➣ Un morceau de musique par défaut a été assignée à chacune des options “Art”, “Relaxation” et “Groupe”. 3. Appuyez sur la touche jaune pour faire défiler toutes les imageries. ➣ Pour revenir au menu principal “Contents Library”, appuyer sur la touche EXIT. ➣ Pour quitter le mode “Contents Library”, appuyer sur la touche CH / de la télécommande. Anglais pour enfants USB Fitness R Retour e Quitter Galerie Art Relaxation Groupe Lire tous R Retour e Quitter • Art: Permet de voir des chefs-d’œuvre d’impressionnistes tels que Van Gogh, Monet, Degas, Cezanne, etc. • Relaxation: Permet de voir de magnifiques images de nature inspirant la sérénité. • Groupe: Permet de voir des images qui produisent une ambiance enjouée et excitante. ➣ Les contenus de la catégorie “Galerie”, et tout ce qui s’y rattache, sont protégés par des droits d’auteur réservés pour Galerie Player, Inc. ➣ Pour obtenir d’autres contenus de la catégorie “Galerie”, consulter le site Web www.samsung.com. Consulter la section “Utilisation du contenu d’un dispositif de stockage externe USB” (page117) pour savoir comment lire des imageries supplémentaires. LA BIBLIOTHÈQUE DE CONTENUS CONTIENT DES TEXTES, DES GRAPHIQUES, DES IMAGES, DES SUPPORTS MULTIMÉDIAS ET AUTRES MATÉRIAUX DESTINÉS EXCLUSIVEMENT À DES FINS PROMOTIONNELLES OU INFORMATIVES. TOUS LES MATÉRIAUX QUE COMPREND LA BIBLIOTHÈQUE DE CONTENUS ONT FAIT L’OBJET DE MODIFICATIONS, DE RÉVISIONS ET DE MISES À JOUR CONSTANTES. CES MATÉRIAUX PEUVENT NE PAS CONVENIR À TOUS LES PUBLICS. L’INFORMATION CONTENUE DANS LA BIBLIOTHÈQUE DE CONTENUS EST FOURNIE “TELLE QUELLE”. BIEN QUE L’INFORMATION QUI VOUS EST FOURNIE PROVIENNE DE SOURCES QUE NOUS CONSIDÉRONS COMME FIABLES, SAMSUNG NE GARANTIT PAS ET NE PEUT GARANTIR L’EXACTITUDE, LA VALIDITÉ, L’ACTUALITÉ OU L’EXHAUSTIVITÉ DE TOUTE INFORMATION OU DONNÉE MISES À VOTRE DISPOSITION POUR QUELQUE BUT QUE CE SOIT. EN AUCUNE CIRCONSTANCE, Y COMPRIS EN CAS DE NÉGLIGENCE, SAMSUNG NE SAURAIT ÊTRE TENUE RESPONSABLE, NI EN VERTU DU CONTRAT NI EN CAS DE DÉLIT, POUR TOUT DOMMAGE DIRECT, INDIRECT, CONSÉCUTIF OU PARTICULIER, DES FRAIS D’AVOCAT, DES COÛTS OU DE TOUT AUTRE DOMMAGE, DE QUELQUE NATURE QUE CE SOIT, DÉCOULANT DE TOUTE INFORMATION CONTENUE DANS LA BIBLIOTHÈQUE DE CONTENUS, OU EN RELATION AVEC LADITE INFORMATION OU DE SON UTILISATION, MÊME SI ELLE AVAIT ÉTÉ AVISÉE DE LA POSSIBILITÉ DE TELS DOMMAGES. Français - 99 01470D-03Fre.indb 99 2008-08-11 �� 1:35:16 Recettes Permet de voir plusieurs recettes qu’il est ensuite facile de suivre étape par étape. Des articles qui donnent de merveilleuses idées de repas. 1.Appuyer sur la touche ◄ ou ► pour choisir “Recettes” à partir du menu principal “Contents Library”. Appuyer ensuite sur la touche ENTER . Contents Library Recettes 2.Appuyer sur la touche ▲ ou ▼ pour choisir “Entrées”, “Plats” ou “Desserts”, puis sur ENTER . • Entrées: Choix de repas légers et d’amuse-gueules pour vous ouvrir l’appétit. • Plats: Recettes les plus populaires au poulet, fruits de mer, légumes et sur le gril. • Desserts: Vaste choix de friandises et de boissons de fantaisie. ➣ Les recettes contenues dans la catégorie “Recettes” intégrée dans la mémooire du téléviseur Samsung sont tirées des recettes publiées par Anness Publishing. ➣ Les contenus de la catégorie “Recettes”, et tout ce qui s’y rattache, sont protégés par des droits d’auteur réservés pour Practical Pictures. Galerie Recettes Jeux Configuration Anglais pour enfants USB Fitness R Retour e Quitter Recettes Entrées Plats Desserts R Retour e Quitter R Retour e Quitter Recettes > Entrées 3. ppuyer sur la touche ▲ ou ▼ pour choisir un élément particulier. A Appuyer sur la touche ENTER . Sandwiches 4. Appuyer sur la touche ▲,▼, ◄ ou ► pour choisir la recette souhaitée. Appuyer ensuite sur la touche ENTER . Soupes et hors-d’œuvre 5. Appuyer sur la touche ▲,▼, ◄ ou ► pour se servir de la recette. ➣ Pour revenir au menu principal “Contents Library”, appuyer sur la touche EXIT. ➣ Pour quitter le mode “Contents Library”, appuyer sur la touche CH / de la télécommande. Salades Français - 100 01470D-03Fre.indb 100 2008-08-11 �� 1:35:17 Jeux Cette catégorie contient des jeux qui divertiront toute la famille. 1.Appuyer sur la touche ◄ ou ► pour choisir “Jeux” à partir du menu principal “Contents Library”. Appuyer ensuite sur la touche ENTER . Contents Library Jeux Galerie Recettes Jeux Configuration 2. Appuyer sur la touche ▲ ou ▼ pour sélectionner “Bowling dynamique”, “Mini cuisine”, “Pack mini-jeux”, “QI Académie” ou “ Sudoku Plus “, puis appuyer sur la touche ENTER . ➣ Se reporter aux instructions à l’écran pour connaître les touches utilisées pendant le jeu. ➣ Pour revenir au menu principal “Contents Library”, appuyer sur la touche EXIT. ➣ Pour quitter le mode “Contents Library”, appuyer sur la touche CH / de la télécommande. Anglais pour enfants USB R Retour Fitness e Quitter Jeux Bowling dynamique Mini cuisine Pack mini-jeux QI Académie Sudoku Plus T T T R Retour e Quitter • Bowling dynamique: Un jeu de quilles réaliste agréable à jouer sur le téléviseur. Pour gagner, choisir les meilleures position et puissance de tir pour faire un abat. • Mini cuisine : U n jeu de cuisine qui permet de cuisiner de délicieux plats. Lorsque tous les mini-jeux sont terminés pour chaque type d’aliment, toute la nourriture est apprêtée et un client mange les plats. Plus le taux d’échec est élevé pendant les mini-jeux, plus les réactions du client sont négatives. Si l’on réussit tous les mini-jeux, le client mange tous les plats. • Pack mini-jeux : Il s’agit d’un recueil de jeux qui se jouent uniquement à l’aide de la touche ENTER . Puisqu’il est facile d’y jouer, toute la famille peut en profiter. Chaque partie procure un plaisir différent. • QI Académie: Un jeu d’exercices cérébraux pour toute la famille. Ce jeu améliore la capacité à penser rapidement, à mémoriser et à calculer; il faut résoudre des problèmes dans un délai précis. Le premier niveau de difficulté des questions est du niveau de l’école primaire.Il faut passer un examen chaque fois que les résultats dépassent le seuil indiqué. Si l’on réussit l’examen, on passe au niveau supérieur. La partie se termine lorsque l’on réussit le niveau universitaire. • Sudoku Plus : Il est possible maintenant de jouer au Sudoku (le carré magique), le jeu mondialement célèbre. L’objectif consiste à remplir une grille de 9 carreaux sur 9 afin que chaque colonne, chaque ligne et chacune des neuf cases de 3x3 contiennent les nombres de 1 à 9. ➣ Pour les cinq jeux intégrés et tout ce qui s’y rattache, les droits d’auteur sont réservés par les fournisseurs respectifs. ➣ Des instructions plus détaillées sur la façon de jouer une partie sont données au début de chaque page de jeu. ➣ “Pack mini-jeux”, “QI Académie” et “Sudoku Plus” sont des versions d’essai. Il est possible de se procurer les versions complètes ou des jeux additionnels à l’adresse www.samsung.com ou www.nurisam.com Touches de couleur pour les jeux Touche Opérations Rouge Permet de se rendre à l’écran d’accueil du jeu Verte Permet d’interrompre une partie Jaune Touche Option Bleue Permet de quitter une partie Français - 101 01470D-03Fre.indb 101 2008-08-11 �� 1:35:18 Anglais pour enfants Contenu éducatif et interactif que les enfants peuvent regarder à plusieurs reprises. Un univers enchanté avec des histoires, des chansons et des jeux mettant en scène les personnages Boowa et Kwala. 1.Appuyer sur la touche ◄ ou ► pour choisir “Anglais pour enfants” à partir du menu principal “Contents Library”. Appuyer ensuite sur la touche ENTER . Contents Library Anglais pour enfants Galerie Recettes Jeux Configuration 2.Appuyer sur la touche ▲ ou ▼ pour choisir “Histoire”, “Chanson” ou “Jeu”, puis sur ENTER . • Histoire: Contient des narrations mettant en scène les personnages Boowa et Kwala. • Chanson: : P our chanter avec les personnages Boowa et Kwala. • Jeu: Jeux amusants et excitants interactifs à faire à l’aide de la télécommande. ➣ Les contenus de la catégorie “Anglais pour enfants”, et tout ce qui s’y rattache, sont protégés par des droits d’auteur réservés pour UpToTen. Anglais pour enfants USB R Retour Fitness e Quitter Anglais pour enfants Histoire Chanson Jeu R Retour e Quitter R Retour e Quitter Anglais pour enfants > Histoire Scary Dinosaurs 3. Appuyer sur la touche ▲ ou ▼ pour choisir un élément à lire. Appuyer sur la touche ENTER . Le contenu sélectionné est lu. ➣ Pour revenir au menu principal “Contents Library”, appuyer sur la touche EXIT. ➣ Pour quitter le mode “Contents Library”, appuyer sur la touche CH / de la télécommande. Wonderful Circus Mysterious Jungle Huge Farms Funny Dance Icing Sugar Cuddly Koalas Français - 102 01470D-03Fre.indb 102 2008-08-11 �� 1:35:18 Fitness Contient des articles bénéfiques pour le conditionnement physique qui présentent des exercices d’étirement et de massage pour toute la famille. 1.Appuyer sur la touche ◄ ou ► pour choisir “Fitness” à partir du menu principal “Contents Library”. Appuyer ensuite sur la touche ENTER . Contents Library Fitness Galerie 2.Appuyer sur la touche ▲ ou ▼ pour choisir “Étirements de base” ou “Massage”, puis sur ENTER . • Étirements de base: Suivre les descriptions détaillées et les images au ralenti qui fournissent des exercices d’étirement étape par étape. • Massage: Gérer sa santé et éliminer le stress avec des massages faciles. Recettes Jeux Configuration Anglais pour enfants USB e Quitter Fitness Étirements de base Massage ➣ Le contenu de la catégorie “Étirements de base” mémorisé dans le téléviseur Samsung est basé sur le livre “Stretching” de Suzanne Martin publié par DK et le contenu de la catégorie “Massage” est basé sur les livres publiés par Anness Publishing. ➣ Les contenus de la catégorie “Étirements de base” sont protégés par des droits d’auteur réservés pour la compagnie DK Publishing. Les contenus de la catégorie “Massage” sont protégés par des droits d’auteur réservés pour Practical Pictures. Toutes les questions se rapportant aux droits d’auteur sont réservées par les sociétés correspondantes. 3. Appuyer sur la touche ◄, ►, ▲ ou ▼ pour sélectionner un élément à afficher. Appuyer sur la touche ENTER . ➣ Le contenu de la catégorie “Étirements de base” est lu automatiquement afin de pouvoir suivre facilement les mouvements à l’écran. Pour passer à l’étape précédente ou suivante, appuyer sur la touche ◄ ou ► pour voir l’exercice désiré. ➣ L’élément sélectionné s’affiche à l’écran. ➣ Pour revenir au menu principal “Contents Library”, appuyer sur la touche EXIT. ➣ Pour quitter le mode “Contents Library”, appuyer sur la touche CH / de la télécommande. Fitness R Retour R Retour e Quitter Fitness > Étirements de base Tête, visage et yeux Tête aux pieds Cou Programme d’exercices Épaules Étirements quotidiens Bras et mains Buste et thorax R Retour e Quitter Utilisation des touches de la télécommande dans le menu Fitness Touche Touche circulaire (◄/►) ENTER Opérations Voir l’étape précédente / voir l’étape suivante Lecture ou Pause (dans Basic Stretches) Configuration Configuration Il est possible de retirer le dispositif du téléviseur de façon sécuritaire. Minuterie écran de veille ◄ 4 Heurer ► 1.Appuyez sur la touche jaune pour sélectionner “Configuration” dans le menu principal “Contents Library”. 2.Appuyer sur la touche ◄ ou ► pour sélectionner “Off”, “4 Heurer”, “8 Heurer” ou “10 Heurer”. Réglage Retour e Quitter Français - 103 01470D-03Fre.indb 103 2008-08-11 �� 1:35:19 Utilisation du contenu d’un dispositif de stockage externe USB Il est possible de télécharger un contenu dans un dispositif de stockage USB et le faire lire sur le téléviseur. (Le contenu du dispositif externe USB est lu directement sur le téléviseur sans être copié dans la mémoire interne Flash du téléviseur.) Lire et quitter un nouveau contenu 1. Appuyer sur le bouton rouge une fois dans le menu “Contents Library”. ➣ L’écran principal du navigateur USB s’affiche. ➣ La liste de tous les fichiers enregistrés sur le dispositif USB s’affiche. 2. Appuyer sur la touche ▲ ou ▼ pour passer au fichier (ou dossier) voulu. Appuyer sur la touche ENTER . ➣ Le contenu sélectionné est lu. ➣ Le contenu dans un dispositif USB est lu de la même façon que le contenu dans la mémoire du téléviseur. ➣ Pour revenir à l’écran principal du navigateur USB, appuyer sur la touche EXIT. Pour quitter le mode “Contents Library”, appuyer sur la touche CH / sur la télécommande. ➣ La catégorie “Contents Library” est compatible uniquement avec les dispositifs à mémoire de grande capacité (MSC) USB. MSC est un dispositif de transport mémoire de grande capacité en bloc seulement. Parmi les exemples de MSC, on trouve les disques Thumb et les lecteurs de cartes Flash (USB, HDD et HUB ne sont pas pris en charge). Si un jeu est lu à l’aide d’un dispositif de stockage externe USB, il est possible d’enregistrer la partie (selon le jeu choisi). Attention : ne pas retirer le dispositif de mémoire USB pendant la sauvegarde sur le dispositif, cela pourrait entraîner la perte des données. Contents Library Galerie Galerie Jeux Configuration Contents Library Fitness R Retour e Quitter USB << 1/1 >> Recettes Galerie Fitness Living Fitness Anglais pour enfants ▼ TV Memory Jeux Show UDN USB > Jeux ▲ Il est possible de télécharger un nouveau contenu gratuit ou payant à partir du site Web samsung.com. Anglais pour enfants USB Jeux Téléchargement de nouveaux contenus ♦ Recettes ▲ R Retour << 1/1 >> Go to category Bowling Bowling Action FunnySoft 2006/12/21 Minicook Pack mini-jeux Téléchargement de contenu QI Académie 1. Visiter le site Webwww.samsung.com et ouvrir la page “Contents Library”. Sudoku 2. Entrer le numéro du produit (UDN, Unique Device Number). R Retour TV Memory Show UDN 3. Sélectionner un article dans le contenu de la page de téléchargement. 4. Télécharger le contenu dans le dispositif de stockage USB. ➣ La catégorie “Contents Library” est compatible uniquement avec les dispositifs à mémoire de grande capacité (MSC) USB. MSC est un dispositif de transport mémoire de grande capacité en bloc seulement. Parmi les exemples de MSC, on trouve les disques Thumb et les lecteurs de cartes Flash (USB, HDD et HUB ne sont pas pris en charge). 5. Aller au menu principal “Contents Library” en appuyant sur la touche “Contents” ou en choisissant “Contents Library” (menu“Application” puis “Contents Library”) 6. Insérer le dispositif de stockage USB dans le port USB sur le côté du téléviseur. 17 MB Start Bowling Jeux. ▼ ♦ ▲ Localiser le numéro de produit (UDN, Unique Device Number) 1. 2. 3. ♦ Insérer le dispositif de stockage USB dans le port USB sur le côté du téléviseur. À partir du menu principal du navigateur USB, appuyer sur la touche verte (affiche le UDN). Le numéro de 18 chiffres à l’écran est le code de produit. Contenu fourni Des contenus supplémentaires sont disponibles à l’adresse www.samsung.com Touches de la télécommande utilisées dans la catégorie “Contents Library” USB Touche Rouge Verte EXIT CH / / PRE.CH / FAV.CH / CH.LIST Opérations Permet de revenir au menu principal de la catégorie “Contents Library” de la mémoire du téléviseur. Permet d’afficher le numéro de produit (numéro d’appareil unique) du téléviseur utilisé pour télécharger le contenu à partir du site Web. Permet d’arrêter la fonction en cours et de retourner au menu principal “Contents Library”. Permet d’arrêter le mode “Contents Library” et de retourner au mode TV. Français - 104 01470D-03Fre.indb 104 2008-08-11 �� 1:35:20 Paramètres du réseau et InfoLink Pour avoir accès au service InfoLink de Samsung, il faut effectuer une des connexions décrites dans les pages suivantes. Connexion au réseau - câble Les procédures de configuration du réseau à l’aide du protocole DHCP (Dynamic Host Configuration Protocol) sont décrites ci-après. Étant donné qu’une adresse IP, un masque de sous-réseau, une passerelle et le DNS sont attribués automatiquement lorsque le protocole DHCP est sélectionné, il n’est pas nécessaire de les entrer manuellement. Connexion LAN pour un environnement DHCP Panneau arrière du téléviseur Le port modem mural Modem externe (ADSL/VDSL/câblodistribution) Câble 1 LAN 2 Câble modem 1.Connecter le port [LAN] au panneau arrière du téléviseur et le modem externe à l’aide d’un câble LAN. 2.Connecter le port LAN mural et le modem externe à l’aide d’un câble Modem. Il est possible de brancher le LAN par l’intermédiaire d’un routeur. Routeur IP Le port modem mural Modem externe (ADSL/VDSL/ câblodistribution) Panneau arrière du téléviseur Câble LAN Câble LAN Câble modem Il est possible de brancher le port [LAN] et le téléviseur directement selon l’état du réseau. Panneau arrière du téléviseur Le port LAN mural Câble LAN ➣ Les bornes (le type de port et son emplacement) de l’appareil externe peuvent varier selon la marque. ➣ Si l’attribution de l’adresse IP par le serveur DHCP a échoué, mettre le modem externe hors tension, le remettre sous tension au bout de 10 secondes et réessayer. ➣ Pour les raccordements entre le modem externe et le dispositif interconnecteur (le routeur), se reporter au guide d’utilisation du produit correspondant. ➣ Le téléviseur peut être connecté directement au réseau LAN par l’intermédiaire d’un routeur. ➣ Il n’est pas possible d’utiliser un modem ADSL à connexion manuelle parce qu’il ne prend pas en charge le protocole DHCP. Il faut utiliser un modem ADSL à connexion automatique. Français - 105 01470D-03Fre.indb 105 2008-08-11 �� 1:35:22 Connexion LAN pour un environnement à adresse IP statique Les procédures de configuration du réseau à l’aide d’une adresse IP statique sont décrites ci-après. Il faut entrer manuellement l’adresse IP, le masque de sous-réseau, la passerelle et le DNS fournis par votre fournisseur d’accès Internet. Panneau arrière du téléviseur Le port LAN mural 1.Connecter le port [LAN] au panneau arrière du téléviseur et le port LAN mural à l’aide du câble LAN. 1 Câble LAN Il est possible de brancher le LAN par l’intermédiaire d’un routeur. Le port LAN mural Routeur IP Panneau arrière du téléviseur Câble LAN Câble LAN ➣ Les bornes (le type de port et son emplacement) de l’appareil externe peuvent varier selon la marque. ➣ Si on utilise une adresse IP statique, le fournisseur d’accès Internet vous transmettra l’adresse IP, le masque de sousréseau, la passerelle et le DNS. Il faut entrer ces valeurs pour achever la configuration du réseau. Si elles ne sont pas connues, il faut s’informer auprès de l’administrateur du réseau. ➣ Pour toute information sur la manière de configurer et connecter un routeur, se reporter au guide d’utilisation du produit correspondant. ➣ Le téléviseur peut être connecté directement au réseau LAN par l’intermédiaire d’un routeur. ➣ Si on utilise un routeur IP qui prend en charge le protocole DHCP, il faut le configurer en mode DHCP ou à adresse IP statique. ➣ Pour connaître les procédures d’utilisation d’une adresse IP statique, il faut s’informer auprès du fournisseur d’accès Internet. Français - 106 01470D-03Fre.indb 106 2008-08-11 �� 1:35:26 Connexion au réseau - sans fil Le réseau Infolink de Samsung peut être utilisé sans fil en utilisant un routeur IP sans fil. 1.Brancher l’adaptateur sans fil pour Infolink de Samsung à la prise Wiselink du téléviseur. Le port de LAN mural Routeur IP sans fil Adaptateur LAN sans fil pour InfoLink HDMI IN4 HDMI IN4 Panneau latéral du téléviseur Câble de LAN ➣ ➣ ➣ ➣ ➣ ➣ ➣ ➣ ➣ Pour utiliser un réseau sans fil, il faut utiliser l’adaptateur LAN sans fil Samsung pour InfoLink(WIS-08BG). L’adaptateur LAN sans fil Samsung pour InfoLink est vendu séparément. Pour l’achat, communiquer avec un représentant de Samsung Electronics ou le centre de service à la clientèle. Pour utiliser un réseau sans fil, le téléviseur doit être connecté à un routeur IP sans fil. Si le routeur IP sans fil n’est pas compatible avec le mode DHCP, le téléviseur doit utiliser une adresse IP statique ou DHCP pour pouvoir établir la connexion au réseau sans fil. Il faut utiliser un routeur IP compatible avec la norme IEEE 802.11 B ou IEEE 802.11G. Activer la fonction de connexion Ping si le routeur IP sans fil permet de l’activer et la désactiver. Mettre le routeur IP sans fil en mode Infrastructure. Le mode ad hoc n’est pas pris en charge. Pour le routeur IP sans fil, sélectionner un canal qui n’est pas en cours d’utilisation. Si ce canal est utilisé par un autre appareil à proximité, il y aura des interférences et la communication peut échouer. L’application du code de sécurité pour le routeur AP (routeur IP sans fil) est compatible uniquement avec les paramètres suivants. • 1) Mode d’authentication : WEP, WPAPSK, WPA2PSK • 2) Type de cryptage : WEP, TKIP, AES Si un autre système de sécurité que ceux indiqués ci-dessus est appliqué, il ne fonctionnera pas sur le téléviseur. Sélection du réseau Configuration Pour se connecter au réseau InfoLink de Samsung, sélectionner le mode “Câble” ou “Sans fil”. 1.Appuyer sur la touche MENU pour afficher le menu. Langue : Français Appuyer sur la touche ▲ ou ▼ pour choisir “Configuration”, puis sur ENTER Heure . Sélection du réseau : Câble 2.Appuyer sur la touche ▲ ou ▼ pour choisir “Sélection du réseau”, puis sur Configuration du réseau câblé ENTER . ► Configuration du réseau sans fil V-Chip Sous-titres Réglages externes • Câble : connexion au réseau Infolink de Samsung à l’aide d’un câble. • Sans fil : c onnexion sans fil au réseau Infolink de Samsung. ➣ Le menu est activé uniquement si l’adaptateur LAN sans fil Samsung pour InfoLink est branché. (Voir la page 107) Configuration 3. Appuyer sur la touche ▲ ou ▼ pour choisir “Câble” ou “Sans fil”, puis sur ENTER . Divertissement : Off Économiseur énergie : Off Langue : Français Heure Câble Sélection du réseau : Câble ► Sans fil Configuration du réseau câblé Configuration du réseau sans fil V-Chip Sous-titres Réglages externes Divertissement : Off Économiseur énergie : Off Français - 107 01470D-03Fre.indb 107 2008-08-11 �� 1:35:27 Configuration du réseau par câble ➣ Il faut d’abord régler “Sélection du réseau” à “Câble”. (Voir la page 107) Réglage automatique Configuration Si on branche le câble LAN et qu’il est compatible avec le protocole DHCP, les paramètres IP sont configurés automatiquement. ➣ Vérifier si le câble LAN est connecté. (Voir la page 105) Heure 1.Appuyer sur la touche MENU pour afficher le menu. Sélection du réseau : Câble Appuyer sur la touche ▲ ou ▼ pour choisir “Configuration”, puis sur ENTER . Configuration du réseau câblé 2.Appuyer sur la touche ▲ ou ▼ pour choisir “Configuration du réseau câblé”, Configuration du réseau sans fil puis sur ENTER . V-Chip ► Sous-titres Réglages externes Divertissement : Off Économiseur énergie : Off ISI Configuration du réseau câblé 3. Appuyer sur la touche ENTER pour choisir “Réglage pr. Internet”. 4.Appuyer sur la touche ▲ ou ▼ pour choisir “Réglage autom.”, puis sur ENTER ➣ Le protocole Internet est réglé automatiquement. ➣ Choisir “Test du réseau” pour vérifier la connectivité du réseau. (Voir la page 109) Appuyer sur la touche EXIT pour quitter le menu. Réglage pr. Internet . : Réglage Réglage autom. autom. Test du réseau Réglage manuel Adresse IP : 0 0 0 0 Masque de sous-réseau : 0 0 0 0 Passerelle : 0 0 0 0 Serveur DNS : 0 0 0 0 Dépl. Réglage manuel Retour Intro. Heure Sélection du réseau Configuration Pour connecter le téléviseur au câble LAN à l’aide d’une adresse IP statique, il faut configurer le protocole Internet. ➣ Vérifier si le câble LAN est connecté. (Voir la page 106) 1.Appuyer sur la touche MENU pour afficher le menu. Appuyer sur la touche ▲ ou ▼ pour choisir “Configuration”, puis sur ENTER . 2.Appuyer sur la touche ▲ ou ▼ pour choisir “Configuration du réseau câblé”, puis sur ENTER . : Câble Configuration du réseau câblé ► Configuration du réseau sans fil V-Chip Sous-titres Réglages externes Divertissement : Off Économiseur énergie : Off ISI Configuration du réseau câblé 3.Appuyer sur la touche ENTER pour choisir “Réglage pr. Internet”. 4.Appuyer sur la touche ▲ ou ▼ pour choisir “Réglage manuel”, puis sur ENTER . Réglage pr. Internet : Réglage Réglage autom. autom. Test du réseau Réglage manuel Adresse IP : 0 0 0 0 Masque de sous-réseau : 0 0 0 0 Passerelle : 0 0 0 0 Serveur DNS : 0 0 0 0 Dépl. Retour Intro. Configuration du réseau câblé 5.Appuyer sur la touche ▲, ▼, ◄ ou ► pour parvenir à un élément, puis sur la touche numérique pour configurer l’élément choisi. Appuyer sur la touche ENTER . ➣ Choisir “Test du réseau” pour vérifier la connectivité du réseau. (Voir la page 109) Appuyer sur la touche EXIT pour quitter. Réglage pr. Internet : Réglage manuel Test du réseau Adresse IP : 0 0 0 0 Masque de sous-réseau : 0 0 0 0 Passerelle : 0 0 0 0 Serveur DNS : 0 0 0 0 Dépl. 0 ~ 9 Numéro Intro. Retour Français - 108 01470D-03Fre.indb 108 2008-08-11 �� 1:35:28 Test du réseau Il est possible de tester ou de confirmer l’état de la connexion réseau après avoir configuré le réseau. 1.Appuyer sur la touche MENU pour afficher le menu. Appuyer sur la touche ▲ ou ▼ pour choisir “Configuration”, puis sur ENTER . 2.Appuyer sur la touche ▲ ou ▼ pour choisir “Configuration du réseau câblé”, puis sur ENTER . Heure Configuration Sélection du réseau : Câble Configuration du réseau câblé ► Configuration du réseau sans fil V-Chip Sous-titres Réglages externes Divertissement : Off Économiseur énergie : Off ISI 3.Appuyer sur la touche ▲ ou ▼ pour choisir “Test du réseau”, puis sur ENTER ➣ Les paramètres de réseau en cours s’afficheront. Appuyer sur la touche EXIT pour quitter le menu. Impossible de se connecter à un réseau câblé 1. Si votre fournisseur Internet a enregistré l’adresse MAC de l’appareil utilisé pour vous connecter à Internet pour la première fois et procède à l’authentification de l’adresse MAC chaque fois que vous vous connectez à Internet, il se peut que votre téléviseur ne puisse pas se connecter à Internet puisque l’adresse MAC est différente de celle de l’appareil (ordinateur) utilisé pour la connexion initiale à Internet. Dans ce cas, demandez à votre fournisseur Internet la procédure à suivre pour connecter d’autres appareils (par exemple le téléviseur) à Internet. 2. Si votre fournisseur Internet vous demande un mot de passe et un code d’utilisateur pour vous connecter à Internet (ou à un réseau), il se peut que le téléviseur ne puisse pas se connecter à Internet. Dans ce cas, vous devez entrer votre code d’utilisateur ou mot de passe pour la connexion à Internet à l’aide d’un dispositif de partage de la connexion Internet (routeur). 3. La connexion Internet peut échouer en raison d’un problème avec le parefeu. Dans ce cas, communiquez avec votre fournisseur Internet. Si vous êtes incapable de vous connecter à Internet après avoir suivi toutes les procédures données par votre fournisseur Internet, veuillez communiquer avec un centre de service Samsung Electronics. . Configuration du réseau câblé Réglage pr. Internet : Réglage autom. Test du réseau ► Adresse IP : 0 0 0 0 Masque de sous-réseau : 0 0 0 0 Passerelle : 0 0 0 0 Serveur DNS : 0 0 0 0 Dépl. Intro. Retour Test du réseau Adresse MAC Adresse IP, Sous-réseau, Passerelle, Serveur DNS PING passerelle PING domaine Test réseau terminé. Votre réseau fonctionne correctement. Si vous avez toujours des problèmes de réseau, communiquez avec votre fournisseur de services. Retour Français - 109 01470D-03Fre.indb 109 2008-08-11 �� 1:35:28 Configuration du réseau sans fil ➣ Le menu est activé uniquement si l’adaptateur sans fil pour InfoLink de Samsung est branché. (Voir la page 107) Réglage automatique ➣ Si on branche le câble LAN et qu’il est compatible avec le protocole DHCP, les paramètres IP sont configurés automatiquement. ➣ Le routeur IP sans fil à connecter à ce téléviseur doit être compatible avec le protocole DHCP. Sélection du réseau : Sans fil Configuration du réseau câblé Configuration 1.Appuyer sur la touche MENU pour afficher le menu. Appuyer sur la touche ▲ ou ▼ pour choisir “Configuration”, puis sur ENTER . 2.Appuyer sur la touche ▲ ou ▼ pour choisir “Configuration du réseau sans fil”, puis sur ENTER . Configuration du réseau sans fil ► V-Chip Sous-titres Réglages externes Divertissement : Off Économiseur énergie : Off ISI SW Upgrade pour choisir “Réglage pr. Internet”. 3. Appuyer sur la touche ENTER 4.Appuyer sur la touche ▲ ou ▼ pour choisir “Réglage autom.”, puis sur ENTER . ➣ Le protocole Internet est réglé automatiquement. ➣ Choisir “Sélect. point accès” pour vérifier la connectivité du réseau. (Voir la page 111) Appuyer sur la touche EXIT pour quitter le menu. Configuration du réseau sans fil Réglage pr. Internet : Réglage Réglage autom. autom. Test du réseau Réglage manuel Sélect. point accès : AP1 Adresse IP : 0 0 0 0 Masque de sous-réseau : 0 0 0 0 Passerelle : 0 0 0 0 Serveur DNS : 0 0 0 0 Dépl. Retour Intro. Réglage manuel Sélection du réseau : Sans fil Configuration du réseau câblé Configuration 1.Appuyer sur la touche MENU pour afficher le menu. Appuyer sur la touche ▲ ou ▼ pour choisir “Configuration”, puis sur ENTER . 2.Appuyer sur la touche ▲ ou ▼ pour choisir “Configuration du réseau sans fil”, puis sur ENTER . Configuration du réseau sans fil ► V-Chip Sous-titres Réglages externes Divertissement : Off Économiseur énergie : Off ISI SW Upgrade Configuration du réseau sans fil 3.Appuyer sur la touche ENTER pour choisir “Réglage pr. Internet”. 4.Appuyer sur la touche ▲ ou ▼ pour choisir “Réglage manuel”, puis sur ENTER . Réglage pr. Internet : Réglage Réglage autom. autom. Test du réseau Réglage manuel Sélect. point accès : AP1 Adresse IP : 0 0 0 0 Masque de sous-réseau : 0 0 0 0 Passerelle : 0 0 0 0 Serveur DNS : 0 0 0 0 Dépl. 5.Appuyer sur la touche ▲, ▼, ◄ ou ► pour parvenir à un élément, puis sur la touche numérique pour configurer l’élément choisi. Appuyer sur la touche ENTER . ➣ Si l’on utilise une adresse IP statique, se reporter au guide de l’utilisateur du routeur IP sans fil. ➣ Choisir “Sélect. point accès” pour vérifier la connectivité du réseau. (Voir la page 111) Appuyer sur la touche EXIT pour quitter. Retour Intro. Configuration du réseau câblé Réglage pr. Internet Test du réseau : Réglage manuel Sélect. point accès : AP1 Adresse IP : 0 0 0 0 Masque de sous-réseau : 0 0 0 0 Passerelle : 0 0 0 0 Serveur DNS : 0 0 0 Dépl. Intro. 0 Retour Français - 110 01470D-03Fre.indb 110 2008-08-11 �� 1:35:29 Sélection du point d’accès Il est possible de sélectionner le routeur IP lorsqu’on utilise un réseau sans fil. Sélection du réseau : Sans fil Configuration du réseau câblé Configuration 1.Appuyer sur la touche MENU pour afficher le menu. Appuyer sur la touche ▲ ou ▼ pour choisir “Configuration”, puis sur ENTER . 2.Appuyer sur la touche ▲ ou ▼ pour choisir “Configuration du réseau sans fil”, puis sur ENTER . Configuration du réseau sans fil ► V-Chip Sous-titres Réglages externes Divertissement : Off Économiseur énergie : Off ISI SW Upgrade Configuration du réseau sans fil 3.Appuyer sur la touche ▲ ou ▼ pour choisir “Sélect. point accès”, puis sur ENTER . ➣ Les points d’accès sans fil existant dans votre région sont détectés et affichés dans la liste des points d’accès. Réglage pr. Internet : Réglage autom. Test du réseau Sélect. point accès : AP 1 Adresse IP : 0 0 0 0 Masque de sous-réseau : 0 0 0 0 Passerelle : 0 0 0 0 Serveur DNS : 0 0 0 0 Dépl. 4.Appuyer sur la touche ▲ ou ▼ pour sélectionner le point d’accès à utiliser. Appuyer ensuite sur la touche ENTER . ➣ Si un point d’accès sans fil ne se trouve pas dans la liste, appuyer sur la touche rouge. ➣ Lorsque la connexion est établie, le système repasse automatiquement à l’écran. ➣ Si un point d’accès nécessitant une authentification de sécurité est sélectionné, entrer le code de sécurité. ➣ Le code de sécurité peut comprendre jusqu’à 26 caractères. Retour Intro. Configuration du réseau sans fil Sélect. point accès 1/5 AP 1 AP 2 WEP AP 3 AP 4 Recherche Retour Choisir Dépl. Configuration du réseau sans fil code sécurité ➣ Si un point d’accès nécessitant une authentification de sécurité a été sélectionné : - La fenêtre de saisie du code de sécurité s’affiche. - Entrer le code de sécurité et appuyer sur la touche ENTER . - Utilisation des touches de la télécommande pour la fenêtre de saisie du code de sécurité Touche Circulaire (▲/▼/◄/►) ENTER Rouge Verte Bleue Opérations Déplacer la sélection vers le haut/vers le bas/vers la gauche/vers la droite. Entrer (saisir) le caractère sélectionné. Commuter entre les majuscules et minuscules. Il est possible de supprimer un caractère déjà saisi. Appuyer sur cette touche après avoir saisi le code de sécurité. _ A B C D E F G H I J K L M N O P Q R S T U V W X Y Z Dépl. 1~ 9 Numéro 0~9 Numéro Minuscules Supprimer Fait Choisir Retour Configuration du réseau sans fil Sélect. point accès 1/5 0016018F0176 branché ALKO_AP WEP NESPOTOK Recherche AP4 Dépl. Choisir Retour Français - 111 01470D-03Fre.indb 111 2008-08-11 �� 1:35:30 Test du réseau Il est possible de tester ou de confirmer l’état de la connexion réseau après avoir configuré le réseau. 1.Appuyer sur la touche MENU pour afficher le menu. Appuyer sur la touche ▲ ou ▼ pour choisir “Configuration”, puis sur ENTER . 2.Appuyer sur la touche ▲ ou ▼ pour choisir “Configuration du réseau sans fil”, puis sur ENTER . Sélection du réseau : Sans fil Configuration Configuration du réseau câblé Configuration du réseau sans fil ► V-Chip Sous-titres Réglages externes Divertissement : Off Économiseur énergie : Off ISI SW Upgrade Configuration du réseau sans fil 3.Appuyer sur la touche ▲ ou ▼ pour choisir “Test du réseau”, puis sur ENTER ➣ Les paramètres de réseau en cours s’afficheront. ➣ Si le mode “Sélect. point accès” n’est pas configuré, le test ne peut pas être effectué. (Voir la page 111) Appuyer sur la touche EXIT pour quitter le menu. . Réglage pr. Internet : Réglage autom. Test du réseau Sélect. point accès : AP1 Adresse IP : 0 0 0 0 Masque de sous-réseau : 0 0 0 0 Passerelle : 0 0 0 0 Serveur DNS : 0 0 0 Dépl. Impossible de se connecter à un réseau sans fil 1. Votre téléviseur n’arrive pas à trouver le point d’accès configuré en tant que SSID privé (réseau sans fil privé). Dans ce cas, modifiez les paramètres du point d’accès et essayez de nouveau. 2. Si votre fournisseur Internet a enregistré l’adresse MAC de l’appareil utilisé pour vous connecter à Internet pour la première fois et procède à l’authentification de l’adresse MAC chaque fois que vous vous connectez à Internet, il se peut que votre téléviseur ne puisse pas se connecter à Internet puisque l’adresse MAC est différente de celle de l’appareil (ordinateur) utilisé pour la connexion initiale à Internet. Dans ce cas, demandez à votre fournisseur Internet la procédure à suivre pour connecter d’autres appareils (par exemple le téléviseur) à Internet. Si vous êtes incapable de vous connecter à Internet après avoir suivi toutes les procédures données par votre fournisseur Internet, veuillez communiquer avec un centre de service Samsung Electronics. Intro. 0 Retour Test du réseau Adresse MAC Adresse IP, Sous-réseau, Passerelle, Serveur DNS PING passerelle PING domaine Test réseau terminé. Retour Français - 112 01470D-03Fre.indb 112 2008-08-11 �� 1:35:30 Activation du service Infolien Le service Infolien de SAMSUNG permet de voir les nouvelles, le marché de la bourse et la météo. ➣ Configuration du réseau. (Consulter lespages 105 à 112) 2.Appuyer sur la touche ▲ ou ▼ pour sélectionner “Infolien”, puis sur ENTER . 3. Appuyer sur la touche ◄ ou ► pour sélectionner un service (“Météo”, “Nouvelles”, “Actions” ou “Configuration”) puis sur ENTER . ➣ Il est possible de sélectionner et voir plusieurs service en même temps uniquement pour les options ‘Nouvelles (sans information détaillée)’, ‘Météo-Météo actuelle’ et ‘Actions-Actions favorites, Sommaire du marché’. Appuyer sur la touche EXIT pour quitter. WISELINK Application 1.Appuyer sur la touche MENUpour afficher le menu. Appuyer sur la touche ▲ ou ▼ pour sélectionner “Application”, puis sur ENTER . Météo Anynet+ (HDMI-CEC) Infolien Product Guide Dépl. Retour O Appuyer sur la touche INFO.L de la télécommande pour afficher le menu “Infolien”. Français - 113 01470D-03Fre.indb 113 2008-08-11 �� 1:35:32 Utilisation d’Infolien - United State ➣ Il faut d’abord régler “Choisir le pays” à “United State”. (Voir la page 117) Utilisation du service de météo Dépl. Météo Retour 1.Appuyer sur la touche INFO.L de la télécommande. 2.Appuyer sur la touche ◄ ou ► pour aller au service “Météo”, puis sur ENTER . Entrer la région 3.Appuyer sur la touche jaune. Appuyer sur les touches numériques pour entrer le code postal de la région, puis sur ENTER . ➣ Il est possible de consulter le service météo de la région sélectionnée. ➣ Si on sélectionne le service “Météo” et qu’aucune région n’a été entrée, un message s’affiche demandant d’entrer la région concernée. Si on choisit “Oui” à l’aide des touches ◄ ou ►, un écran s’affiche demandant d’entrer le code postal. Réglage de l’option Météo 4.Pendant l’utilisation de ce service, appuyer sur la touche rouge pour changer l’option “Météo”. 5.Appuyer sur la touche ▲ ou ▼ et sélectionner l’option “Météo”. ➣ Pour quitter l’option “Météo”, appuyer sur la touche bleue. ➣ Pour quitter l’option “Infolien”, appuyer sur la touche EXIT. Los Angeles 59°F ● Option ● Zip ● Fermer Dépl. Météo Retour Option Météo actuelle Prévisions météo Choisir Retour Los Angeles 59°F Utilisation du service de nouvelles ➣ Il est possible de changer de fournisseur de service de nouvelles ultérieurement. 1.Appuyer sur la touche INFO.L de la télécommande. 2.Appuyer sur la touche ◄ ou ► pour aller au service “Nouvelles” puis sur ENTER . ➣ Appuyer sur la touche ENTER pour voir l’article en détail. ➣ Appuyer sur la touche ◄ ou ► pour voir l’article précédent ou l’article suivant. Nouvelles Dépl. Retour Business GM turns 100 with focus on future Intro. ● Option ● Fermer 3.Pendant l’utilisation de ce service, appuyer sur la touche rouge pour changer l’option “Nouvelles”. 4. Appuyer sur la touche ▲ ou ▼ et sélectionner l’option “Nouvelles”. ➣ L’option “Nouvelles” change en fonction du service Web fourni. ➣ Pour quitter l’option “Nouvelles”, appuyer sur la touche bleue. ➣ Pour quitter l’option “Infolien”, appuyer sur la touche EXIT. Nouvelles Dépl. Retour Options Business Politics World Top news Entertainment Sports Choisir Business Retour GM turns 100 with focus on future Français - 114 01470D-03Fre.indb 114 2008-08-11 �� 1:35:34 Utilisation du service de la bourse 1.Appuyer sur la touche INFO.L de la télécommande. 2.Appuyer sur la touche ◄ ou ► pour aller au service “Actions”, puis sur ENTER . 3.Pendant l’utilisation de ce service, appuyer sur la touche rouge pour changer l’option “Actions”. 4.Appuyer sur la touche ▲ ou ▼ et choisir l’option “Actions”, puis sur ENTER . 1/2 Mer 6 : 09 Actions Dépl. Retour NASDAQ ▲ 21.51 2713.50 0.80% Quotes delayed at least 15 minutes. Data provided by interastive Data. ● Option ● Fermer 1/2 Mer 6 : 09 Actions Dépl. Retour NASDAQ ▲ 21.51 2713.50 0.80% Quotes delayed at least 15 minutes. Data provided by interastive Data. ● Option ● Fermer • Actions favorites : L’information sur les actions favorites s’affiche. Appuyer sur la touche jaune pour régler l’option Actions favorites. • Sommaire du marché : Les indices Dow Jones, Nasdaq et S&P 500 sont basculés et l’ensemble des indices, avec les hausses et les baisses ainsi que le pourcentage s’affichent. • Actions et nouvelles : S’affichent alors l’information sur les actions favorites et les indices Dow Jones NASDAQ et S&P 500 ainsi que des nouvelles d’ordre financier. Options Actions favorites Sommaire du marché Actions et nouvelles Choisir Retour ➣ Les cotes des titres sont annoncées avec un retard de 15 minutes au moins. ➣ Pour quitter l’option “Actions”, appuyer sur la touche bleue. ➣ Pour quitter l’option “Infolien”, appuyer sur la touche EXIT. Réglage de l’option Actions favorites 1. Appuyer sur la touche jaune lorsque l’option “Actions favorites” ou “Actions et nouvelles” est sélectionnée. L’écran Régler l’option Actions favorites s’affiche. 2.Appuyer sur la touche ◄ pour passer à la catégorie. Appuyer sur la touche ▲ ou ▼ pour sélectionner une catégorie. Appuyer sur la touche ENTER . 3.Appuyer sur la touche ▲ ou ▼ pour sélectionner une action, puis sur ENTER . ➣ L’action sélectionnée est classée comme Action favorite. ➣ La coche s’affiche à droite ou à gauche de l’action. ➣ Appuyer à nouveau sur la touche ENTER pour annuler le réglage. La coche disparaît. ➣ Appuyer sur la touche verte pour annuler toutes les sélections. ➣ En appuyant sur la touche rouge, il est possible de basculer entre les indices NYSE et NASDAQ. 4.Pour terminer les réglages, appuyer sur la touche RETURN. 1/2 Mer 6 : 09 Actions Dépl. Retour NASDAQ ▲ 21.51 2713.50 0.80% Quotes delayed at least 15 minutes. Data provided by interastive Data. ● Option ● Fermer Options Actions favorites Sommaire du marché Actions et nouvelles Choisir Retour Réglez les actions favorites NYSE 3/1844 A- B A AGILENT TECHNOLGIES, INC. C-E AA ALCOA INC. F-H AAI AIRTRAN HOLDING, INC I-K AAR AMR CORPORATION L-N AAB ABB ASEA BROWN BOVERI LT.. ● NASDAQ ● Régler Dépl. Choisir ▲ ▼ Retour Français - 115 01470D-03Fre.indb 115 2008-08-11 �� 1:35:36 Utilisation d’Infolien - Canada ➣ Il faut d’abord régler “Choisir le pays” à “Canada”. (Voir la page 117) Utilisation du service de météo 1.Appuyer sur la touche INFO.L de la télécommande. 2.Appuyer sur la touche ◄ ou ► pour aller au service “Météo”, puis sur ENTER . Entrer la région 3.Appuyer sur la touche jaune. Appuyer sur la touche ▲ ou ▼ pour choisir une lettre initiale (A~Z) de la zone voulue, puis appuyez sur le bouton ENTER . 4.Appuyez sur la touche ▲ ou ▼ pour choisir la zone voulue et ensuite sur la touche ENTER . ➣ Il est possible de consulter le service météo de la région sélectionnée. Réglage de l’option Météo 5.Pendant l’utilisation de ce service, appuyer sur la touche rouge pour changer l’option “Météo”. 6.Appuyer sur la touche ▲ ou ▼ et sélectionner l’option “Météo”. ➣ Pour quitter l’option “Météo”, appuyer sur la touche bleue. ➣ Pour quitter l’option “Infolien”, appuyer sur la touche EXIT. Dépl. Météo Retour Ottawa 21°C Options Location Fermer Dépl. Météo Retour Option Météo actuelle Prévisions météo Choisir Retour Ottawa 21°C Utilisation du service de nouvelles ➣ Il est possible de changer de fournisseur de service de nouvelles ultérieurement. 1.Appuyer sur la touche INFO.L de la télécommande. 2.Appuyer sur la touche ◄ ou ► pour aller au service “Nouvelles” puis sur ENTER . ➣ Appuyer sur la touche ENTER pour voir l’article en détail. ➣ Appuyer sur la touche ◄ ou ► pour voir l’article précédent ou l’article suivant. Nouvelles Dépl. French News Retour Retour de la mission de I’AIEA en Syrie Intro. ● Options ● Fermer 3.Pendant l’utilisation de ce service, appuyer sur la touche rouge pour changer l’option “Nouvelles”. 4. Appuyer sur la touche ▲ ou ▼ et sélectionner l’option “Nouvelles”. Nouvelles Retour Dépl. ➣ L’option “Nouvelles” change en fonction du service Web fourni. ➣ Pour quitter l’option “Nouvelles”, appuyer sur la touche bleue. ➣ Pour quitter l’option “Infolien”, appuyer sur la touche EXIT. Options French News English News Choisir French News Retour Retour de la mission de I’AIEA en Syrie Utilisation du service de la bourse 1.Appuyer sur la touche INFO.L de la télécommande. 2.Appuyer sur la touche ◄ ou ► pour aller au service “Actions”, puis sur ENTER . 6/26 Thu 5:17 ET Actions Dépl. Retour DOW JONES... ▲ 4.40 11811.83 0.04% Quotes delayed up to from 15 to 60 minutes except where indicated otherwise ● Fermer ➣ Les cotes des titres sont annoncées avec un retard de 15 minutes au moins. ➣ Pour quitter l’option “Actions”, appuyer sur la touche bleue. ➣ Pour quitter l’option “Infolien”, appuyer sur la touche EXIT. Français - 116 01470D-03Fre.indb 116 2008-08-11 �� 1:35:37 Configuration Infolien 1.Appuyer sur la touche INFO.L de la télécommande. 2. Appuyer sur la touche ◄ ou ► “Configuration”, puis sur ENTER . Configuration 3.Appuyer sur la touche ▲ ou ▼ pour sélectionner l’option souhaitée. (“Choisir le pays”, “Lancement auto.”, “Durée de l’affichage”, “Taille de la police”, “Couleur arrière-plan”, “Position InfoLink”) 4.Appuyer sur la touche ▲ ou ▼ pour sélectionner une option, puis sur ENTER . • Choisir le pays : Vous pouvez changer le pays pour la connexion du service Infolien. Sélectionner “United State” ou “Canada”. • Lancement auto. : Détermine s’il faut lancer automatiquement le mode InfoLink lorsque le téléviseur est sous tension. Sélectionner “Off” ou “On”. • Durée de l’affichage : Détermine la durée d’affichage des nouvelles à l’écran. Il est possible de sélectionner “4 Heures”, “8 Heures”, “10 Heures”, ou “Toujours”. • Taille de la police : Le service InfoLink permet de sélectionner “Standard” ou “Grand”. • Couleur arrière-plan : Permet de régler la couleur de l’arrière-plan du service InfoLink. La couleur s’applique à toutes les fenêtres de service, d’option et de configuration. • Position InfoLink : Permet de régler la position de chaque service InfoLink à l’écran. La sélection peut s’effectuer à partir de six positions InfoLink prédéfinies (“Position 1”~“Position 6”). Dépl. Retour Réglage d’InfoLink Choisir le pays Lancement auto. : Off Durée de l’affichage : 4 Heures Taille de la police : Standard Couleur arrière-plan : Noir Position InfoLink Dépl. Choisir Retour ➣ Pour quitter l’option “Configuration”, appuyer sur la touche RETURN. ➣ Pour quitter l’option “Infolien”, appuyer sur la touche EXIT. Position InfoLink Météo Actions Météo Nouvelles Actions Nouvelles Position 1 Nouvelles Position 4 Actions Position 2 Météo Position 3 Météo Actions Météo Nouvelles Actions Nouvelles Position 5 Nouvelles Actions Météo Position 6 Français - 117 01470D-03Fre.indb 117 2008-08-11 �� 1:35:40 Guide du produit Application Le guide du produit fournit de l’information sur les caractéristiques principales du téléviseur. Contents Library 1.Appuyer sur la touche MENU pour afficher le menu. InfoLink Appuyer sur la touche ▲ ou ▼ pour choisir “Application”, puis sur ENTER . Product Guide 2.Appuyer sur la touche ▲ ou ▼ pour choisir “Product Guide”, puis sur ENTER . 3. ppuyer sur la touche ◄ ou ► pour sélectionner un guide (“Picture A Quality”, “Entertainment” ou “Connectivity”) et appuyer sur la touche ENTER . 4.Les touches ◄ ou ► permettent de se déplacer dans la fenêtre Guide du produit. Product Guide offers a simple introduction about main function to help users understand about SERIES 7. Please, refer to I/B to get more information. Picture Quality Full HD 1080p Entertainment InfoLink AutoPlay Move R Return e Exit Auto Motion Plus 120 Hz Contents Library Entertainment Mode Connectivity WISELINK Pro DLNA 4HDMI Anynet+ 6. Appuyer sur la touche EXIT pour quitter. Utilisation des touches de la télécommande pour le menu Guide du produit Touche Touche jaune Touche circulaire (◄/►) ENTER RETURN EXIT CH / PRE.CH / FAV.CH Opérations Affiche séquentiellement le contenu du Guide du produit. (Auto Play) Déplacer le curseur et choisir un élément. Sélectionner l’élément en surbrillance. Retourner au menu précédent. Arrêter la fonction en cours et retourner au menu précédent “Product Guide”. Arrêter le mode Guide du produit et retourner au mode Téléviseur. Français - 118 01470D-03Fre.indb 118 2008-08-11 �� 1:35:40 À propos d’Anynet+ Qu’est-ce qu’Anynet+? Anynet+ est une fonction qui vous permet de contrôler tous les appareils Samsung connectés compatibles Anynet+ avec votre télécommande Samsung. Branchement d’appareils Anynet+ Le système Anynet+ peut être utilisé uniquement avec les appareils Samsung disposant de la fonction Anynet+. Afin de vérifier que votre appareil Samsung dispose de cette fonction, assurez-vous qu’il comporte le logo Anynet+. Connexion à un téléviseur Panneau arrière du téléviseur Anynet+ Appareil 1 Câble HDMI 1.3 Anynet+ Appareil 2 Câble HDMI 1.3 Anynet+ Appareil Câble HDMI 1.3 Anynet+ Appareil 4 Câble HDMI 1.3 Raccorder la prise [HDMI 1], [HDMI 2], [HDMI 3] ou [HDMI 4] du téléviseur à la prise de sortie HDMI OUT de l’appareil Anynet+ correspondant à l’aide du câble HDMI. Connexion à un système home cinéma 1. Panneau arrière du téléviseur Anynet+ Appareil 1 Câble HDMI 1.3 Câble HDMI 1.3 Anynet+ Appareil Cinéma maison Câble HDMI 1.3 Anynet+ Appareil 2 Anynet+ Appareil 4 Câble HDMI 1.3 Câble optique Câble HDMI 1.3 2. Raccorder la prise [HDMI1], [HDMI2], [HDMI3] ou [HDMI4] du téléviseur à la prise de sortie HDMI OUT de l’appareil Anynet+ correspondant à l’aide du câble HDMI. Raccorder la prise d’entrée HDMI IN du cinéma maison et la prise de sortie HDMI OUT de l’appareil Anynet+ correspondant à l’aide du câble HDMI. ➣ Connectez le câble optique entre la prise Sortie audio numérique (Optique) de votre téléviseur et l’entrée Audio numérique de votre système home cinéma. ➣ En suivant les instructions de connexion ci-avant, la prise optique alimente uniquement les périphériques audio 2 canaux. Vous entendrez du son uniquement au niveau des haut-parleurs gauche et droit avants de votre système home cinéma et du caisson de basses. Pour écouter des chaînes audio 5.1, branchez la prise SORTIE AUDIO NUMERIQUE (OPTIQUE) du lecteur DVD ou du décodeur câble/récepteur satellite (c.-à-d. appareil Anynet 1 ou 2) directement sur l’amplificateur ou sur un système home cinéma, et non sur le téléviseur. ➣ Connexion uniquement à un seul système home cinéma. ➣ Il est possible de brancher un appareil Anynet+ à l’aide du câble HDMI 1.3 Certains câbles HDMI ne prennent pas en charge des fonctions Anynet+. ➣ Anynet+ fonctionne lorsque l’appareil AV compatible est en mode Veille ou en mode Marche. ➣ Anynet+ prend en charge jusqu’à 12 appareils AV. Vous pouvez connecter jusqu’à 3 appareils du même type. Français - 119 01470D-03Fre.indb 119 2008-08-11 �� 1:35:41 Configuration d’Anynet+ Les réglages suivants permettent de configurer les fonctions Anynet+. Pour utiliser la fonction Anynet+, le Anynet+ (HDMI-CEC) doit être activé. Application 1.Appuyer sur la touche MENU. Appuyer sur la touche ▲ ou ▼ pour sélectionner “Application”, suivie de la touche ENTER . 2.Appuyer sur la touche ▲ ou ▼ pour sélectionner “Anynet+ (HDMI-CEC)”, suivie de la touche ENTER . 3. Appuyez sur le bouton ENTER pour sélectionner “Anynet+ (HDMI-CEC)”. 4.Appuyer sur la touche ▲ ou ▼ pour sélectionner “On”, suivie de la touche ENTER . ➣ La fonction “Anynet+ (HDMI-CEC)” est activée. ➣ Si “Off” est sélectionné, la fonction “Anynet+ (HDMI-CEC)” est désactivée. ➣ Lorsque la fonction de “Anynet+ (HDMI-CEC)” est désactivée, toutes les opérations Anynet+ connexes sont désactivées. WISELINK Pro Anynet+ (HDMI-CEC) ► Contents Library Infolien Product Guide Anynet+ (HDMI-CEC) Anynet+ (HDMI-CEC) : ON Off Arrêt automatique : On Dépl. Intro. Retour Régler un appareil Anynet+ de sorte qu’il s’arrête automatiquement lorsque le téléviseur est hors tension 1.Appuyer sur la touche ▲ ou ▼ pour sélectionner “Arrêt automatique”, suivie de la touche ENTER . 2.Appuyer sur la touche ▲ ou ▼ pour sélectionner “Oui”, suivie de la touche ENTER . ➣ La fonction “Arrêt automatique” est activée. ➣ Si “Non” est sélectionné, la fonction “Arrêt automatique” est désactivée. Appuyer sur la touche EXIT pour quitter le menu. ➣ La source active de la télécommande du téléviseur doit être réglée à TV afin que l’on puisse utiliser la fonction Anynet+. ➣ Si “Arrêt automatique” est “Oui”, les appareils externes branchés sont également éteints en même temps que le téléviseur. Cependant, si l’appareil est en mode d’enregistrement, il ne pourra être éteint. Anynet+ (HDMI-CEC) Anynet+ (HDMI-CEC) : On Non Arrêt automatique : Oui Dépl. Intro. Retour Balayage et permutation entre les appareils Anynet+ 1.Appuyer sur la touche TOOLS. Appuyer sur la touche ▲ ou ▼ pour sélectionner “Liste appareils”, suivie de la touche ENTER . ➣ La liste des appareils Anynet+ branchés au téléviseur s’affiche. ➣ S’il est impossible de trouver l’appareil désiré, appuyer sur la touche rouge pour effectuer un balayage des appareils. 2.Appuyer sur la touche ▲ ou ▼ pour sélectionner un appareil particulier, suivie de la touche ENTER . Le système commande l’appareil sélectionné. ➣ Le menu “Liste appareils” ne s’affiche que lorsque la commande “Anynet+ (HDMICEC)” est activée dans le menu “Application”. OUTILS Liste appareils Enregistrer Enr. minuterie : Off Image Format Récepteur : 16:9 Image Mode : Standard Son Mode : Personnel : Off Mise en veille Dépl. ▼ Intro. e Quitter ➣ Permuter vers les appareils sélectionnés peut prendre jusqu’à 2 minutes. Il n’est pas possible d’annuler l’opération de permutation. ➣ La durée nécessaire au balayage des appareils dépend du nombre d’appareils branchés. ➣ Lorsque le balayage est terminé, le nombre d’appareils trouvés n’est pas affiché. Bien que le téléviseur recherche automatiquement tous les appareils lorsqu’il est mis en marche à l’aide de la touche POWER, ceux qui sont branchés lorsque le téléviseur est en marche ne sont pas affichés. Dans ce cas, sélectionner Recherche de connexions pour détecter les appareils. ➣ Si vous avez sélectionné un appareil externe en appuyant sur la touche SOURCE, il est impossible d’utiliser la fonction Anynet+. Veiller à permuter vers un appareil Anynet+ externe à l’aide de la touche TOOLS. Français - 120 01470D-03Fre.indb 120 2008-08-11 �� 1:35:42 Menu Anynet+ Le menu Anynet+ varie selon le type et l’état des appareils Anynet+ branchés au téléviseur. Menu Anynet+ Regarder la télévision Liste appareils Enregistrer Menu de l’appareil Fonctionnement de l’appareil Enregistrement par minuterie Arrêter l’enregistrement Récepteur Configuration Description Permuter d’Anynet+ vers le mode d’émission télévisuel. Affiche la liste des appareils Anynet+. Démarre l’enregistrement. (Ce menu fonctionne uniquement avec un appareil pouvant enregistrer.) Affiche le menu de l’appareil raccordé. Exemple : Lorsqu’un enregistreur DVD est branché, le menu principal de l’enregistreur DVD s’affiche. Affiche le menu de contrôle de lecture de l’appareil raccordé. Exemple : Lorsqu’un enregistreur DVD est branché, le menu de contrôle de lecture de l’enregistreur DVD s’affiche. Permet de programmer un enregistrement. (Ce menu ne fonctionne que pour un appareil qui prend en charge la programmation d’enregistrements.) Arrête l’enregistrement. Le son sort par le récepteur (cinéma maison). Vous pouvez régler la Anynet+ (HDMI-CEC), la fonction d’arrêt automatique et la détection de connexions pour l’utilisation de la fonction Anynet+. Touches de la télécommande du téléviseur accessibles en mode Anynet+ Type d’appareil Appareil Anynet+ État de fonctionnement Après une permutation vers l’appareil, lorsque le menu de l’appareil correspondant s’affiche à l’écran. Après la permutation vers l’appareil, pendant la lecture d’un fichier Appareil avec syntoniseur intégré Appareil audio Touches accessibles Touches numériques ▲/▼/◄/►/ENTER Touches Touches de couleur / Touche EXIT (Recherche vers l’arrière) / (Recherche vers l’avant) (Arrêt) / (Lecture) / (Pause) Après la permutation vers l’appareil, CH / CH Touche pendant l’écoute d’une émission télévisée Lorsque le récepteur est activé VOL – / VOL + / MUTE Touches ➣ La fonction Anynet+ ne fonctionne que lorsque la source active de la télécommande du téléviseur est réglée à TV. ➣ La touche ne fonctionne qu’à l’état d’écoute de la télévision. ➣ Il est impossible de commander des appareils Anynet+ à l’aide des touches du téléviseur. Il est possible de contrôler les appareils Anynet+ à l’aide du téléviseur. ➣ Il est possible que la télécommande du téléviseur ne fonctionne pas dans certaines conditions. Le cas échéant, resélectionner l’appareil Anynet+. ➣ Les fonctions Anynet+ ne fonctionnent pas avec des produits d’autres marques. ➣ Les fonctions , peuvent varier selon l’appareil. Enregistrement Il est possible d’enregistrer une émission télévisée à l’aide d’un enregistreur Samsung. 1. Appuyer sur la touche TOOLS. 2.Appuyer sur la touche ▲ ou ▼ pour sélectionner Enregistrement immédiat, puis sur ENTER . L’enregistrement démarre. Lorsque plus d’un appareil d’enregistrement est branché Lorsque plusieurs appareils sont connectés, les appareils d’enregistrement sont indiqués. Appuyer sur la touche ▲ ou ▼ pour sélectionner un appareil d’enregistrement, puis sur ENTER . L’enregistrement démarre. Lorsque l’appareil branché n’est pas affiché Sélectionner “Liste appareils” et appuyer sur la touche rouge pour rechercher les appareils. OUTILS Liste appareils Enregistrer Enr. minuterie : Off Image Format Récepteur : 16:9 Image Mode : Standard Son Mode : Personnel : Off Mise en veille Dépl. ▼ Intro. e Quitter Appuyer sur la touche EXIT pour quitter le menu. ➣ Vous pouvez enregistrer le train binaire source en activant Enregistrer après avoir appuyé sur la touche TOOLS. ➣ Appuyez sur la touche pour enregistrer ce que vous écouter présentement. Pour la connexion de l’antenne à l’appareil enregistreur, consulter le guide d’utilisation. ➣ Avant d’enregistrer, vérifier si la prise d’antenne est correctement branchée à l’appareil enregistreur. Pour brancher correctement une antenne à un appareil d’enregistrement, consultez le guide d’utilisation de l’appareil. Français - 121 01470D-03Fre.indb 121 2008-08-11 �� 1:35:43 Écoute par l’intermédiaire d’un récepteur Il est possible d’écouter le son par l’intermédiaire d’un récepteur, plutôt que par les haut-parleurs du téléviseurs. 1.Appuyer sur la touche TOOLS. OUTILS Appuyer sur la touche ▲ ou ▼ pour sélectionner “Récepteur”. Liste appareils 2.Appuyer sur la touche ◄ ou ► pour sélectionner “On”. Enregistrer Enr. minuterie Il à présent possible d’écouter le son par l’intermédiaire du récepteur. Récepteur ◄ Off ► 3. Appuyer sur la touche EXIT pour quitter le menu. Image Format : 16:9 ➣ Si votre récepteur ne prend en charge que le son, il peut ne pas figurer dans la liste Image Mode : Standard des appareils. Son Mode : Personnel Mise en veille : Off ➣ Le récepteur fonctionnera lorsque la prise d’entrée optique sera reliée à la prise de ▼ sortie optique du téléviseur. Dépl. Réglage e Quitter ➣ Lorsque le récepteur (cinéma maison) est réglé à marche, vous pouvez entendre du son provenant de la prise optique du téléviseur. Lorsque le téléviseur émet des signaux numériques (antenne), il transmet le son en 5.1 canaux au récepteur du cinéma maison. Lorsque la source est un composant numérique, comme un lecteur DVD, et que ce dernier est branché au téléviseur à l’aide d’un câble HDMI, seul un son deux canaux sera émis par le récepteur du cinéma maison. ➣ Lorsqu’on utilise la fonction WISELINK Pro, il est possible que le son émis par le récepteur soit médiocre. ➣ Lorsque le récepteur est en mode d’écoute, certaines restrictions relatives à la fonction ISI et aux fonctions audio (MTS, langue privilégiée) s’appliquent. ➣ Si l’alimentation du téléviseur est coupée lorsque le “Récepteur” est sous tension (déconnexion du cordon d’alimentation ou panne d’électricité), le “Haut-parleur TV” pourrait être désactivé au moment où le téléviseur sera rallumé. (Voir la page 35.) Dépannage de la fonction Anynet+ Symptôme Anynet+ ne fonctionne pas. Je souhaite lancer Anynet+. Je souhaite quitter Anynet+. Le message Connexion à l’appareil Anynet+... s’affiche à l’écran. L’appareil Anynet+ ne lit pas. L’appareil branché n’est pas affiché. L’émission ne peut pas être enregistrée. Le son du téléviseur ne sort pas par le récepteur. Solution • Vérifier si l’appareil est bien un appareil Anynet+. Le système Anynet+ ne prend en charge que les appareils Anynet+. • Ne brancher qu’un seul récepteur. • Vérifier si le cordon d’alimentation de l’appareil Anynet+ est bien branché. • Vérifier les branchements des câbles vidéo/audio/HDMI 1.3 de l’appareil Anynet+. • Vérifier si Anynet+ (HDMI-CEC) est activé dans le menu Configuration Anynet+. • Vérifier si la télécommande est en mode TV. • Vérifier s’il s’agit de la télécommande exclusive Anynet+. • Anynet+ ne fonctionne pas dans certaines conditions. (recherche de canaux, utilisation de WISELINK Pro, Prêt-à-l’emploi, etc.) • Au moment du branchement ou du débranchement du câble HDMI 1.3, s’assurer d’effectuer une nouvelle recherche des appareils ou de mettre le téléviseur hors tension et le redémarrer. • Vérifier si la fonction Anynet+ de l’appareil Anynet+ est activée. • Vérifier si l’appareil Anynet+ est bien branché au téléviseur et vérifier si Anynet+ (HDMI-CEC) est activé dans le menu Configuration d’Anynet+. • Appuyer sur la touche TV de la télécommande du téléviseur pour permuter vers le téléviseur. Appuyer ensuite sur la touche TOOLS pour afficher le menu Anynet+ et sélectionner le menu désiré. • Sélectionner Écouter la télévision dans le menu Anynet+. • Appuyer sur la touche SOURCE de la télécommande du téléviseur pour sélectionner un appareil autre que les appareils Anynet+. • Appuyer sur CH, CH LIST, PRE-CH et FAV.CH pour changer de mode au téléviseur. (Remarque : le bouton des canaux ne fonctionne que si aucun appareil à syntoniseur intégré Anynet+ n’est branché.) • La télécommande ne peut être utilisée pendant la configuration d’Anynet+ ou pour la permutation vers un mode de visionnement. • Utiliser la télécommande lorsque le réglage d’Anynet+ ou la permutation vers le mode de visionnement sont terminés. Vous ne pouvez pas utiliser la fonction lecture lorsque le mode Prêt-à-l’emploi est en cours d’exécution. • Vérifier si l’appareil prend en charge les fonctions Anynet+. • Vérifier si le câble HDMI 1.3 est bien branché. • Vérifier si Anynet+ (HDMI-CEC) est activé dans le menu Configuration d’Anynet+. • Rechercher les appareils Anynet+ à nouveau. • Seul le câble HDMI 1.3 permet de brancher un appareil Anynet+. Certains câbles HDMI ne prennent pas en charge des fonctions Anynet+. • S’il y a interruption suite à une anomalie par exemple si le câble HDMI ou le cordon d’alimentation est déconnecté ou s’il y a une panne de courant, répéter le balayage. Vérifier si la prise d’antenne sur l’appareil enregistreur est branchée correctement. Brancher le câble optique entre le téléviseur et le récepteur. Français - 122 01470D-03Fre.indb 122 2008-08-11 �� 1:35:43 Annexe Identification des problèmes Le tableau ci-dessous dresse la liste des problèmes courants et suggère des solutions. Si aucun de ces conseils ne permet de corriger le problème, communiquer avec le service à la clientèle de Samsung en composant le 1-800-SAMSUNG. Problème Solution possible Image de qualité médiocre. Essayez une autre canal. Réglez l’antenne. Vérifiez tous les branchements. Son de qualité médiocre. Essayez une autre canal. Réglez l’antenne. Aucune image ou aucun son. Essayez une autre canal. Appuyez sur le bouton SOURCE. Vérifiez que la télévision est branchée. Vérifiez les branchements de l’antenne. Il n’y a pas de son ou le son est trop bas alors que le volume est réglé au maximum. Dans un premier temps, vérifiez le volume pour les éléments branchés sur votre téléviseur (récepteur de diffusion numérique, DTV, DVD, récepteur de diffusion par câble, magnétoscope, etc.). Puis, réglez le volume du téléviseur en conséquence. L’image roule verticalement. Vérifiez tous les branchements des câbles. La télévision fonctionne irrégulièrement. Débranchez la télévision pendant 30 secondes puis essayez de nouveau. Le téléviseur ne s’allume pas. Vérifiez que la prise électrique fonctionne correctement. Dysfonctionnement de la télécommande. Remplacez les piles de la télécommande. Nettoyez la partie supérieure de la télécommande (fenêtre de transmission). Vérifiez les bornes de la batterie. Message ‘Vérifier signal câble.’. Assurez- vous que le câble d’interface est solidement branché aux sources PC. Message ‘Mode non disponible’. Vérifier la résolution maximale et la fréquence vidéo de l’appareil raccordé. Comparez ces valeurs aux données des modes. Problème d’écran en diffusion numérique. Vérifiez la puissance du signal numérique et l’entrée de l’antenne. L’image est trop claire ou trop sombre. Réglez la luminosité et le contraste. Utilisez la fonction de réglage fin. Barres noires à l’écran. Assurez-vous que votre réception est en haute définition (HD). Les stations des canaux à haute définition émettent parfois en signaux à définition standard (SD), ce qui peut causer la formation de barres noires. Réglez votre câblosélecteur ou récepteur satellite sur le mode Étirer ou format large pour éliminer les barres. L’image a une teinte rouge/verte ou rose. Assurez-vous que les câbles pour composants sont branchés aux prises correspondantes. Le mode Sous-titres ne fonctionne pas. Si vous utilisez un câblosélecteur ou un récepteur satellite, vous devez réglez le mode Sous-titres sur le récepteur et non sur le téléviseur. Image embrouillée Le logiciel de votre câblosélecteur a besoin d’une mise à niveau. Communiquez avec votre câblodistributeur. Images fantômes. La raison peut être une incompatibilité avec votre câblosélecteur. Pour supprimer ce problème, branchez les câbles pour composants. Des barres horizontales et clignotent, scintillent ou tremblent sur l’image. Ajustez la fonction de réglage de base, puis réglez la fonction de réglage fin. Des barres verticales et clignotent, scintillent ou tremblent sur l’image. Ajustez la fonction de réglage de base, puis réglez la fonction de réglage fin. Français - 123 01470D-03Fre.indb 123 2008-08-11 �� 1:35:43 Problème Solution possible L’écran est noir et l’Indicateur d’alimentation clignote. A partir de votre ordinateur, vérifiez: l’alimentation, le câble signal. La télévision est en mode gestion d’énergie. Déplacez la souris de l’ordinateur ou appuyez sur n’importe quelle touche du clavier. Il est possible que l’image ne soit pas stable et qu’elle donne l’impression de vibrer lorsqu’un ordinateur est connecté à l’entrée PC. Si le réglage est incorrect, utilisez le programme utilitaire de votre ordinateur pour modifier les paramètres d’affichage. ➣ Votre télévision prend en charge les fonctions d’affichage multiscan dans le domaine de fréquence suivant : Fréquence horizontale (kHz) 30~60 Fréquence verticale (Hz) 60~75 Taux de rafraîchissement maxi (60 Hz) 1920 x 1080 L’image n’est pas centrée sur l’écran. Réglez la position horizontale et verticale. Ne réglez pas la position de l’écran en Signal Numérique. L’image semble déformée dans un angle de l’écran. Si la fonction “Numérisation seulement” est sélectionnée avec certains appareils externes, l’image peut sembler déformée dans un angle de l’écran. Ce dommage est causé par les appareils externes et non par le téléviseur. Le message ‘rétablit tous les paramètres aux réglages prédéfinis’ s’affiche. Ce message s’affiche lorsqu’on maintient la touche EXIT enfoncée pendant quelques instants. Les paramètres sont rétablis aux réglages prédéfinis en usine. Si l’on regarde attentivement, on peut remarquer la présence de petites particules sur le cadre de l’écran du téléviseur. Cela fait partie des caractéristiques du produit; ce n’est pas un défaut. L’écran TFT LCD utilise un affichage constitué de pixels secondaires (6 220 800) nécessitant une technologie sophistiquée. Cependant, il se peut qu’il y ait à l’écran quelques pixels lumineux ou noirs. Ces pixels n’ont aucun impact sur les performances de ce produit Français - 124 01470D-03Fre.indb 124 2008-08-11 �� 1:35:43 Installation du support 1. 2. Connecter le téléviseur et le support. ➣ Deux personnes ou plus devraient porter le téléviseur. ➣ S’assurer de bien distinguer le devant et l’arrière du support lors de l’assemblage. ➣ Pour être sûr que le téléviseur est installé sur le support au niveau approprié, ne pas exercer de pression excessive sur les côtés supérieurs droit et gauche du téléviseur. Resserrer les deux vis à la position 1 puis resserrer les deux (2) vis à la position 2. ➣ Placer l’appareil à la verticale puis resserrer les vis. Si l’on resserre les vis lorsque le téléviseur est en position horizontale, il pourrait pencher vers un côté. Démonter la base 1. 2. 3. Retirez les 4 vis à l’arrière de la télévision. Séparer le support et le téléviseur. ➣ Deux personnes ou plus devraient porter le téléviseur. Placer le couvercle sur l’orifice inférieur. Français - 125 01470D-03Fre.indb 125 2008-08-11 �� 1:35:44 Support mural à réglage automatique (vendu séparément) Lorsque le support mural à réglage automatique est installé, la position du téléviseur peut être facilement ajustée. Panneau arrière du téléviseur V-Chip Support mural automatique Configuration Sous-titres Réglages externes ► Divertissement : Off Économiseur énergie : Off ISI Mise à niveau du logiciel Câble EX-LINK (non fourni) Pour entrer dans le menu 1. Appuyez sur la touche ▲, ▼, ◄ ou ► de la télécommande. ➣ L’écran de réglage du support mural s’affiche. ➣ Si l’écran de réglage du support mural ne s’affiche lorsqu’on clique sur une touche de direction pendant que le téléviseur est en marche, utilisez le menu pour l’afficher. • Appuyez sur MENU pour afficher le menu. Appuyez sur la touche ▲ ou ▼ pour choisir “Configuration”, puis sur ENTER . • Appuyez sur la touche ▲ ou ▼ pour choisir “Réglages externes”, puis sur ENTER . • Appuyez sur la touche ▲ ou ▼ pour choisir “Réglage du support mural”, puis sur ENTER . Réglages externes Mélodie : Moyen Réglage du support mural Dépl. 3. 4. 5. Réglez à la position souhaitée à l’aide des touches ▲,▼,◄,►. ➣ Si vous appuyez sur une touche fléchée lorsqu’il n’y a pas d’affichage à l’écran du téléviseur, l’écran de réglage s’affiche alors. ➣ Appuyez sur la touche INFO pour réinitialiser. Appuyez sur la touche ◄ ou ► pour sélectionner “Oui”, puis sur ENTER . La position est initialisée au réglage par défaut. Appuyez sur la touche bleue. Appuyez sur les touches ▲ et ▲ pour sélectionner un mode de sauvegarde à partir des positions 1, 2 ou 3 afin de sauvegarder la position en cours. ➣ Pour ne pas sauvegarder la position en cours, appuyez sur la touche RETURN. ➣ Vous ne pouvez pas utiliser les touches de couleur pendant que vous sélectionnez un mode de sauvegarde. Appuyez sur ENTER pour sauvegarder. ➣ Lorsque la position 1 est sélectionnée, le message “Position en cours sauvegardée comme Position 1.” s’affiche. Appuyez sur la touche ENTER . ➣ La position sauvegardée s’affiche à gauche de l’écran. Retour Réglage du support mural Mémorisation de la position 2. Intro. Position Réglage 1 Enregistrer 2 INFO 3 Centre Enregistrer Choisissez un mode à sauvegarder. Position1 Position2 Position Dépl. Intro. Retour Réglage du support mural Position1 Réglage à la position mémorisée 1. 2. ➣ ➣ ➣ ➣ ➣ Effectuez l’étape 1 de la fonction ‘Pour entrer dans le menu’. Position 1 2 3 INFO Centre Réglage Enregistrer En appuyant sur une touche de couleur (rouge, verte, jaune), le support mural à réglage automatique se règle sur la position mémorisée. ➣ Vous pouvez régler le support mural sur une des trois positions préréglées en appuyant sur les touches rouge (Position 1), verte (Position 2) ou jaune (Position 3). ➣ Si vous réglez la position après avoir activé une position préréglée, l’affichage disparaît. Pour l’installation, reportez-vous au guide d’installation fourni avec le support mural. Pour installer le téléviseur ainsi que pour installer et déplacer le support mural, adressez-vous à une société spécialisée en installation. Ce dispositif doit être utilisé pour poser le support mural sur un mur. Pour le fixer à d’autres matériaux, veuillez communiquer avec votre détaillant. Le support mural automatique ne fonctionne pas lorsque la fonction Anynet+ ou WISELINK Pro est activée. Les modèles LN40A750R1F, LN46A750R1F et LN52A750R1F ne sont pas compatibles avec l’ancien modèle de support mural (WMN5090A). Français - 126 01470D-03Fre.indb 126 2008-08-11 �� 1:35:47 Spécifications du jeu d’installation murale (VESA) Installez votre support mural sur un mur massif perpendiculaire au plancher. Pour le fixer à d’autres matériaux, veuillez communiquer avec votre détaillant. Si vous l’installez au plafond ou sur un mur incliné, il risque de tomber et de causer des blessures. Type de produit LCD-TV PDP-TV pouces Spéc. VESA (A * B) Vis standard 23~ 26 200 * 100 M4 32 ~ 40 200 * 200 M6 46 ~ 52 600 * 400 57 700 * 400 (Pas de spécifications VESA) 57 ~ 70 800 * 400 80 ~ 1400 * 800 42 ~ 50 600 * 400 55 ~ 70 800 * 400 63 Pas de spécifications VESA 80 ~ 1400 * 800 Quantité 4 M8 4 M8 6 4 ➣ Les dimensions standard pour les ensembles de fixation murale figurent dans le tableau ci-dessus. ➣ Un manuel d’installation détaillée et toutes les pièces nécessaires à l’assemblage sont comprises avec l’achat de notre jeu d’installation murale. ➣ Ne pas utiliser de vis plus longues que les dimensions standard : elles pourraient endommager l’intérieur du téléviseur. ➣ En ce qui a trait aux supports muraux qui ne sont pas conformes aux spécifications de vis standard VESA, la longueur des vis peut différer selon leurs spécifications. ➣ N’utilisez pas de vis non conformes aux spécifications de vis standard VESA. Ne serrez pas trop les vis, cela pourrait endommager le produit ou en provoquer la chute et causer des blessures. Samsung décline toute responsabilité dans le cas où de tels accidents se produisent. ➣ Samsung ne saurait être tenu responsable des dommages au produit ou des blessures occasionnés par l’utilisation d’un support mural autre que VESA ou non recommandé, ou si le consommateur ne suit pas les instructions d’installation du produit. ➣ Nos modèles de 145 cm (57 po) et 160 cm (63 po) ne sont pas conformes aux spécifications VESA. Par conséquent, vous devez utiliser notre ensemble de fixation conçu pour ces modèles. ➣ Lors du montage, l’inclinaison du téléviseur ne doit pas dépasser 15°. N’installez pas votre kit de montage mural lorsque votre téléviseur est en fonctionnement. Une blessure par choc électrique pourrait en résulter. Français - 127 01470D-03Fre.indb 127 2008-08-11 �� 1:35:49 Utilisation du verrouillage Kensington antivol (LN40A750R1F, LN46A750R1F) Le verrouillage Kensington est un dispositif utilisé pour fixer physiquement le système dans le cas d’une utilisation dans un endroit public. Le dispositif de verrouillage doit être acheté séparément. L’aspect et la méthode de verrouillage peuvent différer de l’illustration en fonction du fabricant. Reportez-vous au manuel fourni avec le verrouillage Kensington pour une utilisation correcte. Câble Figure 2 Figure 1 <Optionnel> ➣ L’emplacement du “Verrou Kensington” peut varier en fonction du modèle. 1.Insérez le dispositif de verrouillage dans la fente Kensington de la télévision LCD (Figure 1) et tournez-le dans le sens de verrouillage (Figure 2). 2. Branchez le câble du verrouillage Kensington. 3. Fixez le verrouillage Kensington sur un bureau ou tout autre objet lourd inamovible. Français - 128 01470D-03Fre.indb 128 2008-08-11 �� 1:35:49 Spécifications Modéle Taille de l’écra (diagonale) Résolution PC Son Sortie Dimensions (WxDxH) TV Avec support Poids Avec support Sans support Considérations environnementales Température de fonctionnement Humidité au cours du fonctionnement Température de stockage Humidité du stockage LN40A750R1F LN46A750R1F LN52A750R1F 40 pouces 46 pouces 52 pouces 1920 x 1080 @ 60 Hz 1920 x 1080 @ 60 Hz 1920 x 1080 @ 60 Hz 10W X 2 (Sub woofer: 10W X 2) 10W X 2 (Sub woofer: 10W X 2) 10W X 2 (Sub woofer: 10W X 2) 40,9 X 3.3 X 25.1 pouces (1040.0 X 84.7 X 638.0 mm) 40.9 X 10.7 X 27.0 pouces (1040.0 X 271.9 X 686.0 mm) 46.1 X 3.9 X 28.0 pouces (1172.0 X 98.0 X 711.5 mm) 46.1 X 11.8 X 30.1 pouces (1172.0 X 299.9 X 765.5 mm) 52.0 X 4.2 X 31.7 pouces (1321.4 X 107.0 X 805.0 mm) 52.0 X 13.3 X 33.9 pouces (1321.4 X 337.8 X 861.0 mm) 42.8lbs (19.4 kg) 35.9lbs (16.3 kg) 64.8lbs (29.4 kg) 52.7lbs (23.9 kg) 80.7lbs (36.6 kg) 66.4lbs (30.1 kg) 50°F to 104°F (10°C to 40°C) 10% to 80%, sans condensation -4°F to 113°F (-20°C to 45°C) 5% to 95%, sans condensation Socle orientable (Gauche/Droite) 0˚ ➣ Le design et les spécifications peuvent changer sans préavis. ➣ Ce périphérique est un appareil numérique de classe B. ➣ Pour les caractéristiques d’alimentation et de consommation électrique, voir l’étiquette fixée au produit. Français - 129 01470D-03Fre.indb 129 2008-08-11 �� 1:35:49 Dimensions LN40A750R1F VUE DU HAUT DETAILS DU PANNEAU DES PRISES 3.7"H X 9.1"W 3.3 40.9 34.8 19.6 25.1 27.0 20.4 10.7 VUE AVANT/VUE LATERALE 7.9 (200mm) 7.9 (200mm) VUE ARRIERE REMARQUE : Les dessins ne sont pas nécessairement tous à l’échelle. Certaines dimensions sont susceptibles de changer sans préavis. Consultez les dimensions avant d’installer votre téléviseur. Aucune responsabilité ne saurait être acceptée en cas d’erreur typographique ou d’impression. © 2008 Samsung Electronics America, Inc. Français - 130 01470D-03Fre.indb 130 2008-08-11 �� 1:35:50 Dimensions LN46A750R1F VUE DU HAUT DETAILS DU PANNEAU DES PRISES 3.7"H X 9.1"W 3.9 46.1 40.0 22.5 28.0 30.1 24.4 11.8 VUE AVANT/VUE LATERALE 23.6 (600 mm) 15.7 (400 mm) VUE ARRIERE REMARQUE : Les dessins ne sont pas nécessairement tous à l’échelle. Certaines dimensions sont susceptibles de changer sans préavis. Consultez les dimensions avant d’installer votre téléviseur. Aucune responsabilité ne saurait être acceptée en cas d’erreur typographique ou d’impression. © 2008 Samsung Electronics America, Inc. Français - 131 01470D-03Fre.indb 131 2008-08-11 �� 1:35:50 Dimensions LN52A750R1F VUE DU HAUT DETAILS DU PANNEAU DES PRISES 3.7"H X 9.1"W 4.2 52.0 45.5 25.7 31.7 33.9 26.0 13.3 VUE AVANT/VUE LATERALE 23.6 (600 mm) 15.7 (400 mm) VUE ARRIERE REMARQUE : Les dessins ne sont pas nécessairement tous à l’échelle. Certaines dimensions sont susceptibles de changer sans préavis. Consultez les dimensions avant d’installer votre téléviseur. Aucune responsabilité ne saurait être acceptée en cas d’erreur typographique ou d’impression. © 2008 Samsung Electronics America, Inc. Français - 132 01470D-03Fre.indb 132 2008-08-11 �� 1:35:51 Cette page est laissée intentionnellement en blanc. 01470D-03Fre.indb 133 2008-08-11 �� 1:35:51