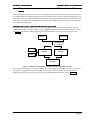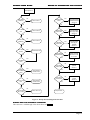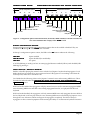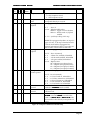
1
Copyright, disclaimers, and trademarks
Europa User Guide
Copyright
Copyright © 1994-2001 Synthcom Systems, Incorporated. All rights reserved. No part of this manual or
CD-ROM (including cover design, illustrations, or interior design) may be reproduced or transmitted in
any form by any means, including but not limited to electronic forms, photocopying, recording, or
otherwise, without the prior written permission of Synthcom Systems, Incorporated. Visit
http://www.synthcom.com for most current documentation, downloadable images, and support
information.
Limit of Liability/Disclaimer of Warranty
Synthcom Systems, Incorporated and its representatives have used their best efforts in preparing this CDROM and manual. Synthcom Systems, Inc. makes no representation or warranties with respect to the
accuracy or completeness of the contents of the CD-ROM or files contained within it, and specifically
disclaim any implied warranties or merchantability or fitness for any particular purpose, and shall in no
event be liable for any loss of profit or any other commercial damage, including but not limited to special,
incidental, consequential or other damages. Synthcom Systems, Incorporated reserves the right to update
the files contained within this CD-ROM and is not required nor expected to ship updated CD-ROMs to
existing owners.
Trademarks
All brand names and product names used in this CD-ROM and manual are trademarks, registered
trademarks, or trade names of their respective holders. Synthcom Systems, Incorporated is not associated
with any product or vendor mentioned in this book, nor does it necessarily endorse any product or
vendor.
Europa User Guide
Table Of Contents
1.
Introduction ................................................................
..................................................................
.................................. 7
2.
3.
Terminology and symbols
symbols................................
..............................................
.............................................. 9
New feature summary ..................................................
.................................................. 10
4.
Operational differences between Europa and Roland
code................................
code ................................................................
...............................................................................
............................................... 13
What’s on disc ................................................................
................................................................................................
..................................................................
.................................. 7
Additional arpeggiator modes................................
modes ................................................................
......................................................................
...................................... 10
Additional arpeggiator synchronization sources ....................................
.................................... 10
Send and receive MIDI continuous controllers .......................................
....................................... 10
Send and receive presets/patches via MIDI ...............................................
............................................... 10
Europa firmware updates via MIDI ...............................................................
............................................................... 10
Patches/presets stored in flash ................................................................
.................................................................
................................. 10
Additional voice assignment modes .............................................................
............................................................. 10
Board state retention ................................................................
..................................................................................
.................................................. 10
Configurable MIDI channel ................................................................
..........................................................................
.......................................... 10
Random patch generator ................................................................
..............................................................................
.............................................. 10
Improved user interface
interface................................
ace ................................................................
................................................................................
................................................ 10
Circular oscillator sync ................................................................
..............................................................................
.............................................. 11
Oscillators independently disableable................................
disableable......................................................
...................................................... 11
Additional hardware diagnostics ................................................................
................................................................ 11
Voice watch ................................................................
................................................................................................
.....................................................................
..................................... 11
Patch edit compare ................................................................
........................................................................................
........................................................ 11
MIDI Activity monitor................................
monitor................................................................
.....................................................................................
..................................................... 11
Glide time and Unison detune stored separately for split modes ........ 11
Foot pedal adapta
adaptation
tion................................
tion ................................................................
...................................................................................
................................................... 11
Assignable MIDI messages ................................................................
............................................................................
............................................ 11
Factory settings restoration ................................................................
......................................................................
...................................... 11
Local mode control ................................................................
.......................................................................................
....................................................... 11
What is not included ................................................................
.....................................................................................
..................................................... 12
LFOLFO-2 Control and Pitch bend ...............................................................
............................................................... 12
MIDI Syncable LFOs ................................................................
.................................................................................
................................................. 12
Tape operation ................................................................
..........................................................................................
.......................................................... 12
Arpeggiator, voice, and synchronization structure ................................ 13
Arpeggiator/UI assign modes................................
modes ................................................................
........................................................................
........................................ 14
Arpeggiator up/down button differences................................
differences ...................................................
................................................... 14
VCOVCO-1/VCO1/VCO-2 Waveform select buttons................................
buttons ......................................................
...................................................... 14
VCO Sync buttons................................
buttons................................................................
..........................................................................................
.......................................................... 14
Writing patches (patch protect nonexistent) ............................................
............................................ 14
Writing patches with memory protect on blinks entire board ................ 14
Additional voice assignment modes .............................................................
............................................................. 15
Manual mode ................................................................
................................................................................................
...................................................................
................................... 15
Patch edit compare ................................................................
........................................................................................
........................................................ 15
5.
Power up diagnostics and actions ............................. 16
6.
Configuration options and action functions ........... 22
Power up diagnostics ................................................................
....................................................................................
.................................................... 16
Group A boot codes................................
codes................................................................
.......................................................................................
....................................................... 16
Group B boot codes................................
codes................................................................
.......................................................................................
....................................................... 17
Group E boot codes................................
codes ................................................................
.......................................................................................
....................................................... 17
Group F boot codes ................................................................
.......................................................................................
....................................................... 18
Europa boot and diagnostic flowchart................................
flowchart ......................................................
...................................................... 19
Power up action functions ................................................................
...........................................................................
........................................... 21
Setting the Jupiter 6’s base MIDI channel................................
channel................................................
................................................ 22
Configuration options/action functions
functions overview ....................................
.................................... 22
Europa configuration options ................................................................
.....................................................................
..................................... 23
Local mode (A) – Default: Enabled .........................................................
......................................................... 23
Continuous Controller Transmit (B) – Default: Enabled .................. 24
System Exclusive Transmit (C) – Default: Disabled ............................ 24
Velocity Transmit (D) – Default: Disabled ............................................
............................................ 24
Voice watch (E) – Default: Disabled .......................................................
....................................................... 24
Europa action functions ................................................................
...............................................................................
............................................... 24
Modulation wheel assign (1) ................................................................
...................................................................
................................... 25
Pitch bend assign (2)................................
(2) ................................................................
................................................................................
................................................ 25
Page 3
Table Of Contents
Europa User Guide
Aftertouch assign (3) ................................................................
..............................................................................
.............................................. 25
Velocity assign (4) ................................................................
....................................................................................
.................................................... 25
Dump currently edited patch to MIDI (5)................................
(5) ..............................................
.............................................. 26
Dump currently edited preset to MIDI (6) ............................................
............................................ 26
Dump everything to MIDI (7)................................
(7)................................................................
....................................................................
.................................... 26
Generate random patch (8) ................................................................
.....................................................................
..................................... 26
7.
Voice assignment modes ..............................................
.............................................. 27
8.
Arpeggiator ................................................................
..................................................................
.................................. 30
9.
How do I……..? ..............................................................
.............................................................. 42
Page 4
Solo [Solo assign LED lit solid] ................................................................
.................................................................
................................. 27
Solo rotate [S
[Solo
olo assign LED blinking]................................
blinking] .....................................................
..................................................... 27
Solo unison [Solo and unison assign LEDs lit solid]..............................
solid] .............................. 27
Unison [unison LED lit solid] ................................................................
.......................................................................
....................................... 28
Unison steal [unison LED blinking] .............................................................
............................................................. 28
Poly 1 [Poly 1 LED lit solid]................................
solid]................................................................
........................................................................
........................................ 28
Poly 1 steal [Poly 1 LED blinking]................................
blinking]..............................................................
.............................................................. 28
Poly 2 [Poly 2 LED lit solid]................................
solid]................................................................
........................................................................
........................................ 28
Poly 2 steal [Poly 2 LED blinking]................................
blinking]..............................................................
.............................................................. 29
Stable arpeggiator clock ................................................................
.............................................................................
............................................. 30
Improved user interface................................
interface................................................................
................................................................................
................................................ 30
Arpeggiator drives voice mode................................
mode................................................................
.....................................................................
..................................... 30
Arpeggiator can be logically separated from internal voices .............. 30
Arpeggiator architecture ................................................................
.............................................................................
............................................. 32
Arpeggiator clocking sources ................................................................
.....................................................................
..................................... 32
MIDI CLOCK ................................................................
...............................................................................................
............................................................... 32
INTERNAL CLOCK ................................................................
.....................................................................................
..................................................... 32
EXTERNAL CLOCK................................
CLOCK ................................................................
.....................................................................................
..................................................... 32
Sources of notes to be played and keyboard/MIDI interaction ............. 33
Arpeggiator mode selections ................................................................
.......................................................................
....................................... 34
Note lists ................................................................
................................................................................................
........................................................................
........................................ 34
Arpeggio note list ................................................................
....................................................................................
.................................................... 34
Sequence note list ................................................................
...................................................................................
................................................... 34
Arpeggiator/sequence step calculator ......................................................
...................................................... 34
Arpeggio note calculator ................................................................
............................................................................
............................................ 35
The Arpeggiator user interface................................
interface................................................................
...................................................................
................................... 35
Arpeggiator sync options and clock multiplier/divider ........................... 35
Internal clock (A) ................................................................
.....................................................................................
..................................................... 36
External clock (B) ................................................................
....................................................................................
.................................................... 36
MIDI Clock (C) ................................................................
...........................................................................................
........................................................... 36
MIDI Clock transmit (D) ................................................................
...........................................................................
........................................... 36
Polyrhythm setting (F)................................
(F) ................................................................
.............................................................................
............................................. 36
Multiplier/divider settings
settings (1 - 8) ..........................................................
.......................................................... 36
Arpeggiator mode and options ................................................................
.....................................................................
..................................... 36
Repeat count (A & B) ................................................................
................................................................................
................................................ 37
Legato enable (D)................................
(D) ................................................................
......................................................................................
...................................................... 37
Upper/lower sequence and rhythm link (E) ...........................................
........................................... 37
Rest note enable (F) ................................................................
.................................................................................
................................................. 37
Setting a rest note ................................................................
.......................................................................................
....................................................... 37
Arpeggiator and sequence modes ................................................................
................................................................ 38
Normal mode (1) ................................................................
........................................................................................
........................................................ 38
Ordered mode (2) ................................................................
......................................................................................
...................................................... 38
PingPing-pong mode (3) ................................................................
....................................................................................
.................................................... 38
Random mode (4)................................
(4) ................................................................
........................................................................................
........................................................ 38
Sequence modes and options................................
options................................................................
........................................................................
........................................ 38
Recording a sequence................................
sequence................................................................
....................................................................................
.................................................... 39
Arpeggiated sequence mode (5) ..............................................................
.............................................................. 39
Sequenced arpeggio mode (6) ................................................................
..................................................................
.................................. 39
Interval mode (7) ................................................................
......................................................................................
...................................................... 39
Chord mode (8) ................................................................
..........................................................................................
.......................................................... 40
Programming the arpeggiator step rhythm................................
rhythm................................................
................................................ 40
Transfer patches from tape to Europa? ....................................................
.................................................... 42
Set Europa’s MIDI channel?................................
channel?................................................................
.........................................................................
......................................... 42
Reload factory patches and board settings?................................
settings? ...........................................
........................................... 42
Boot to Roland mode? ................................................................
..................................................................................
.................................................. 43
Europa User Guide
Table Of Contents
Copy patches/presets from Europa to NVRAM so that Roland code can
see them? ................................................................
................................................................................................
.........................................................................
......................................... 43
Restore all patches and presets from MIDI? ...........................................
........................................... 43
Save all patches and presets to MIDI? .....................................................
..................................................... 44
10. Common
Common problems ........................................................
........................................................ 45
I can’t get any sound out of Europa from the local keyboard..............
keyboard .............. 45
Europa won’t respond to MIDI................................
MIDI ................................................................
.....................................................................
..................................... 45
The arpeggiator is enabled but it won’t start ..........................................
.......................................... 46
I get two notes for every one I play (or notes sound flanged) ............. 46
The ENVENV-2 slider doesn’t work! ................................................................
...................................................................
................................... 46
I’m not recording sysex/CCs from Europa in my sequencer .................... 46
Timing
Timing is sloppy when playing back a sequence with controller changes
................................................................
................................................................................................
..........................................................................................
.......................................................... 47
Not all patches/presets were restored properly from a sysex dump .. 47
I hear unplayed or missing notes in my arpeggiations ............................. 47
The arpeggiator runs too fast/slow or doesn’t stay in sync ................ 48
The Europa Firmware Update Utility times out when I try to update .... 48
11. Europa Firmware Update Utility (EFUU) .................... 49
The Windows firmware
firmware update utility ..........................................................
.......................................................... 49
Step 1: Establish communication with Europa................................
Europa .....................................
..................................... 50
Step 2: Locate an image to update ........................................................
........................................................ 51
Step 3: Update the Jupiter 6................................
6................................................................
..................................................................
.................................. 52
The Apple Macintosh Europa Firmware Update Utility.............................
Utility............................. 53
Step 1: Establish communication with Europa................................
Europa .....................................
..................................... 53
Step 2: Locate an image to update ........................................................
........................................................ 54
Step 3: Update the Jupiter 6................................
6................................................................
..................................................................
.................................. 55
Additional Notes on the Macintosh EFUU ...........................................
........................................... 55
12. Europa MIDI Implementation .......................................
....................................... 56
Basic MIDI functionality ................................................................
...............................................................................
............................................... 56
Europa’s MIDI transmission/reception capabilities ..................................
.................................. 57
Continuous controllers supported ...........................................................
........................................................... 57
System Exclusive operations ................................................................
.......................................................................
....................................... 64
System exclusive examples ................................................................
...........................................................................
........................................... 76
Example #1 – Restore factory settings ...............................................
............................................... 76
Example #2 – Request dump of all patches .........................................
......................................... 76
Example #3 – Write a patch to flash................................
flash.....................................................
..................................................... 76
Example #4 – Assign aftertouch to VCF frequency............................
frequency ............................ 76
13. Europa internal architecture ....................................
.................................... 77
Boot block ................................................................
................................................................................................
......................................................................
...................................... 77
Europa ................................................................
................................................................................................
.............................................................................
............................................. 77
14. Contact information
information................................
....................................................
.................................................... 78
Visit Synthcom on the internet: ................................................................
..................................................................
.................................. 78
Via email: ................................................................
................................................................................................
..........................................................................
.......................................... 78
Join the Roland Jupiter 6/Europa mailing list:................................
list: .........................................
......................................... 78
VIA Telephone: ................................................................
................................................................................................
................................................................ 78
VIA Postal Mail: ................................................................
.............................................................................................
............................................................. 78
15. Europa limited warranty .............................................
............................................. 79
User installed Europa upgrades................................
upgrades ................................................................
.................................................................
................................. 79
Synthcom installed Europa upgrades ........................................................
........................................................ 79
16. Acknowledgements ......................................................
...................................................... 81
17. Europa Supermode Reference Sheet ......................... 82
Page 5
Table Of Contents
Europa User Guide
Table of figures:
figures:
Figure 1 – Roland code arpeggiator,
arpeggiator, clocking, and voice assignment
structure ................................................................
...........................................................................
...........................................13
........... 13
Figure 2 – Oversimplified Europa arpeggiator, clocking, and voice
assign structure................................
structure...............................................................
...............................................................14
............................... 14
Figure 3 – Boot code AA-2 shown on bootup ......................................
......................................16
...... 16
Figure 4 – Europa boot and diagnostic flowchart ...........................19
...........................19
Figure 5 – MIDI Channel sel
select
ect display – Example above shows MIDI
channel set to 10................................
10.............................................................
.............................................................22
............................. 22
Figure 6 – Configuration options and action functions (local mode,
MIDI continuous controller transmit, and voice watch
enabled in t
this
his example) when TAPE is held ..................23
.................. 23
Figure 7 – Voice activity indication with voice watch mode (this
example has 3 voices on)................................
on)..................................................
..................................................24
.................. 24
Figure 8 – Europa’s arpeggiator, clocking, and note
flowchart/architecture................................
flowchart/architecture....................................................
....................................................31
.................... 31
Figure 9 – Arpeggiator sync, clock multiplier/divider, and
polyrhythm options when DOWN is held........................
held ........................35
........................ 35
Figure 10 – Arpeggiator mode and options when the UP button is
held................................
held................................................................
.....................................................................................
.....................................................37
..................... 37
Figure 11 – Arpeggiator step rhythm programming buttons ...........40
........... 40
Figure 12 – Europa’s patch, preset, and voice board architecture
................................................................
............................................................................................
............................................................56
............................ 56
Figure 13 – Europa's overall MIDI reception and transmission
capabilities................................
capabilities................................................................
.........................................................................
.........................................57
......... 57
Figure 14 – Europa's Continuous Controller map ............................63
............................ 63
Figure 15 – Continuous Controller # 61 (Arpeggiator rate) value
to beats per
per minute settings................................
settings ...........................................
...........................................64
........... 64
Figure 16 – Command 00h - Write factory Europa settings to the
Jupiter 6’s NVRAM ............................................................
............................................................65
............................ 65
Figure 17 – Command 01h - Reset NVRAM and Europa's internal
flash to factory patch/preset settings ........................66
........................ 66
Figure 18 – Command 02h - Set Europa's base MIDI channel ..........66
.......... 66
Figure 19 – Command 03h - Generate random patch ........................66
........................ 66
Figure 20 – Command 04h - Dump block request command ..............67
.............. 67
Figure 21 – Command 05h - Write block command .............................67
............................. 67
Figure 22 – Patch save data format (block type 000) .....................69
..................... 69
Figure 23 – Preset save data forma
format
t (block type 001) ....................73
.................... 73
Figure 24 – Arpeggiator rhythm/sequence save format (block type
011) ................................................................
....................................................................................
....................................................74
.................... 74
Figure 25 – Command 06h - Write patch
flash....
....74
patch or preset edit to flash
.... 74
Figure 26 – Command 07h – Assign controller
controller................................
.................................
................................. 75
Page 6
Europa User Guide
1.
Terminology and symbols
Introduction
Congratulations on your purchase of Synthcom System’s Europa upgrade for your Roland Jupiter 6!
Europa is an operating system replacement for a fantastic sounding classic analog synthesizer, giving it
new flexibility while increasing the operational and storage reliability of the original board.
The goal of Europa is to increase the Jupiter 6’s feature set, maintain an affordable price, keep the
upgrade process simple, and increase the Jupiter 6’s reliability.
It is assumed the reader is familiar with the basic operation of the Jupiter 6. It is not the goal of this
document to replace the Roland user manual, rather supplement it with Europa’s new features. The
terminology used in this document is that of Roland’s Jupiter 6 manual – without the odd phrasing and
strange descriptions.
Familiarity with Apple Macintosh (MacOS based) and/or Microsoft Windows 95/98/NT
4.x/ME/XP/2000 based IBM compatible personal computers is also assumed for the purpose of the
firmware update utility. Europa itself is compatible with any MIDI capable device, but firmware updates
do require the use of a personal computer.
Shall we get started?
What’s on disc
Europa should have come with a CD-ROM that contains this manual, the Europa Firmware Update
Utility, source code to the Europa Firmware Update utility, and Adobe Acrobat. If one was not provided
in the received package, please contact Synthcom Systems for prompt shipment of one.
The Europa CD-ROM can be read on a Windows PC or a Macintosh. The folder layout is identical for
both parts of the disc. While the folder tree below is shown as it appears under Windows Explorer, the
layout is identical on the Macintosh. The disc does not automatically execute when it is inserted, so it is
assumed the user know how to navigate a folder tree on their computer:
All Europa documentation is in Adobe Acrobat format, and to
read it, Adobe Acrobat Reader must already be installed or
installed from the CD-ROM. Adobe Acrobat Reader is provided
on the Europa CD-ROM in the Adobe Acrobat Reader folder as
shown in the tree. Both Windows and Macintosh versions are
provided.
Europa’s installation instructions and user guide are contained in
the Documentation folder.
Europa’s Firmware Update Utility (EFUU) executable is contained
in the Europa Firmware Update/Executables folder. Choose the
appropriate update utility version under the Windows and
Macintosh folders.
Europa’s reference (release) image is contained in the Europa
Images folder. It is only needed in case of a corrupt Europa image.
The latest image can always be found on Synthcom’s web site.
Page 7
Introduction
Europa User Guide
The Europa Firmware Update/Source Code folders contain the source code required to build the
Windows and Macintosh Europa Firmware Update Utilities. If you are not a programmer or have no
intention of modifying the EFUU or porting it to another platform, skip on to Terminology and
symbols.
symbols
Note that Synthcom is not under obligation to provide support for source code recompilations. Phone
support will not be given for source code questions. Send email instead (documented in the Contact
information section of the manual). It is assumed anyone who wishes to modify the EFUU is fully
knowledgeable about programming and the environments described below.
The Windows EFUU was compiled with Microsoft Visual C++ 6.0 service pack 2. The Windows EFUU
contains all of the necessary project files and resources to compile the application (start with efuu.dsw).
No additional libraries or third party code is required to recompile the application.
The Macintosh EFUU was compiled with Mertrowerks Code Warrior 8. It uses OMS 2.0 SDK dated
5/23/96 that will need to be obtained from Gibson due to licensing restrictions. The Macintosh EFUU
also uses the FinderProgressBar 2.0 library, written and copyrighted by Chris Larson (© 1993-1995). Used
with permission per the FinderProgressBar license.
The best code to work with for designing a completely different port is located in Europa Firmware
Update/Source Code/Windows/Core. It is written in ANSI C. This contains all of the necessary code to
verify and parse the Europa image file as well as the code to format the system exclusive messages and
translate error codes. The porter must provide a series of platform specific APIs for full compilation. The
best example is in Europa Firmware Update/Source Code/Windows/efuu/win32.c. Look at all
procedures that begin with the name Host for what needs to be implemented. It is assumed the porter is
familiar enough with coding and working by example enough to answer their own questions, so no
further information is provided.
Synthcom places no restrictions on Synthcom written code. It is public domain. Synthcom retains the
copyright and trademark of the Europa icon. Synthcom will only support Synthcom compiled or
Synthcom approved code.
Page 8
Europa User Guide
2.
Terminology and symbols
Terminology and symbols
This section documents the terminology and symbols used throughout this manual:
BOLD
- Indicates a hyperlink, Jupiter 6 front panel button or button group
Flash
- The Europa chip’s on chip nonvolatile flash memory. Used for storing patches/presets.
LED
- Light Emitting Diode – refers to the various red indicator lights on the Jupiter 6’s front
panel
Macintosh
- Apple Computer Corporation’s MacOS based personal computers
NVRAM
- Nonvolatile RAM. Refers to the Jupiter 6’s controller board nonvolatile battery backed
RAM that holds patches/presets, and with Europa, board settings
Power cycle
- Turning power off and then on again
Presets
- Roland’s user guide calls these “Patch presets” – simplified for ease of understanding
Roland code
- Original Jupiter 6 operating system prior to Europa
Roland mode
- Booting Europa to Roland code (TAPE
TAPE + powerup)
TAPE
- Roland’s user guide refers to it as the TAPE MEMORY button
User interface - The Jupiter 6’s buttons, LEDs, knobs, and sliders
Windows
- Microsoft Windows 95, 98, 98SE, Millennium Edition, NT 4.x, XP, and 2000
Wink
- An LED being shut off and turned on quickly
- An unlit (off) LED.
- A lit (steady on) LED.
- A blinking LED.
Page 9
New feature summary
3.
Europa User Guide
New feature summary
This section briefly summarizes the new features that are present in Europa. Each is described in detail
later in this manual.
Additional arpeggiator modes
In addition to regular Roland Jupiter 6 arpeggiator operation, Europa adds many new arpeggiator
modes, some exclusive to Europa!
Additional arpeggiator synchronization sources
The arpeggiator can now be synchronized from external clock trigger, MIDI clock or the improved
internal clock. Europa’s internal clock is extremely steady and can now be used to trigger and clock
external MIDI equipment.
Send and receive MIDI continuous controllers
Almost all (excluding master volume and bender board controls) sliders, knobs, and soft switches have
the ability to be changed via standard MIDI continuous controllers. This is great for modifying board
parameters in real time.
Send and receive presets/patches via MIDI
One of Europa’s primary new functions! Europa includes the ability to save and load patches/presets via
MIDI. Never use that unreliable tape interface again! Trade patches with other Europa upgraded Jupiter 6
owners!
Europa firmware updates via MIDI
The Europa operating system can be updated by way of the MIDI interface from any Microsoft Windows
or Apple Macintosh based personal computers. No need to open the board! Source code for the update
utility is available so it may be ported to any platform.
Patches/presets stored iin
n flash
Europa stores all patches and presets in its onboard flash. This means no more lost patches or presets
when the controller board battery goes bad!
Additional voice assignment modes
Europa includes 4 additional voice assignment modes over the factory Roland code.
Board state retention
Europa remembers the state of all of the Jupiter 6’s settings even after power down. If you’re in the
middle of editing a patch and you power down, the board will be in the same state when it was powered
off! This, of course, is only possible if the memory protect switch is not on, as the board’s current settings
are stored in the onboard controller’s NVRAM.
Configurable MIDI channel
Most versions of Roland’s firmware for the Jupiter 6 did not allow changing of the MIDI channel. Europa
allows this and retains this setting even after power off.
Random patch generator
Europa can generate a random patch! It is great when you’re looking for inspiration or just want to make
strange noises.
Improved user interface
VCO 1 And VCO 2 ’s waveforms can be enabled and disabled individually without having to hold
down multiple buttons. Many people do not know that more than one waveform can be enabled because
Roland’s interface was not set up this way!
Page 10
Europa User Guide
New feature summary
Circular oscillator sync
VCO 1 And VCO 2 can be synchronized to each other. Good for making interesting sounds.
Oscillators independently disableable
VCO 1 And VCO 2 oscillators can be completely disabled. This is to allow the creation of patches that
use the resonant filter as the oscillator or for single oscillator patches – something not possible with the
original Roland code even with the oscillator balance set to either extreme.
Additional hardware diagnostics
Europa includes additional hardware diagnostics on boot up that are valuable to both the Jupiter 6 owner
and the repair technician.
Voice watch
Voice allocation can be monitored on the front panel. This is useful for gauging voice utilization during
performance as well as assisting in debugging a malfunctioning Jupiter 6.
Patch edit compare
The patch edit compare feature allows comparing the current patch edit with any stored patch. This
makes hunting for a good spot to put the new patch edit easy, and allows A/B comparisons to the current
patch edit and any stored patch.
MIDI Activity monitor
Europa will blink the TUNE LED when MIDI data is being received. Great for debugging and knowing
when activity is present!
Glide time and Unison detune stored separately for split modes
Europa’s preset format stores glide time and unison detune values – one for each SPLIT.
SPLIT The Roland
code only allows a single detune and glide time in SPLIT mode.
Foot pedal adaptation
Europa allows either normally closed or normally open foot pedals to be used.
Assignable MIDI messages
Europa can assign incoming pitch bend, modulation wheel, channel aftertouch, and note velocity to any
continuous controller. It will respond to incoming pitch bend messages as an assignable controller but
will not alter the pitch of the notes played as a traditional pitch bend would. Incoming note velocity is
changed on a per voice board basis and affects all held notes on a given SPLIT.
SPLIT Europa will not transmit
pitch bend, key press velocity, or aftertouch.
Factory settings restoration
Europa can restore factory patches and presets, and will not malfunction if NVRAM becomes corrupt.
Local mode control
The Jupiter 6’s local keyboard can be enabled and disabled.
Page 11
New feature summary
Europa User Guide
What is not included
We have not included some features that would be expected in an upgrade like Europa. This section
documents the reasons for not including these desirable features. We would like these features ourselves,
but adding them would have extended the development time, increased cost, and increased the
complexity of the upgrade - all beyond the project’s goals. In the future, Synthcom Systems may provide
such an upgrade, but one is not available at the time of this writing.
LFOLFO-2 Control and Pitch bend
The LFO 2 and pitch bend controls are direct wirings from the bender board to the voice boards. The
controller board has no control over the bender board, which means Europa has no control over it. This
modification would require additional hardware.
MIDI Syncable LFOs
MIDI Syncable LFOs is a feature that everyone would like to have. The voice board LFOs are software
generated, and their rates are preprogrammed in the voice board code. The controller board has no way
of telling the voice boards to retrigger the LFO or setting the rate to a granular enough level to make
syncable LFOs possible. However, most sequencer packages provide continuous controller based LFOs,
so the behavior of a MIDI syncable LFO can be simulated by the sequencer via MIDI CC messages.
Tape operation
Tape support was not included for hopefully obvious reasons. Once you have the ability to save and
restore patches via MIDI, what use is the tape interface? If you have old patches lying around on
cassettes, you can still boot the Roland code and retrieve your patches, reboot to Europa, and save them
via MIDI.
Page 12
Europa User Guide
4.
Operational differences
Operational differences between Europa and Roland
code
This section gives a brief overview of how Europa differs from the base Roland user interface and feature
set. Further detail is found in appropriate sections of this document. We have tried to keep Europa’s user
interface as close as possible to the Roland user interface, but several improvements to the user interface
were made. The front panel on the Jupiter 6 is limited, and extending functionality with such limitations
was extremely challenging!
Arpeggiator, voice, and synchronization structure
Europa has changed the architecture of how the arpeggiator interfaces to the assign modes. With the
regular Roland code, a user has a choice of the arpeggiator OR the assign mode being enabled as shown
in Figure 1. This means enabling the arpeggiator will disable the voice assign mode, and vice versa:
MIDI Notes
Local keyboard
Arpeggiator or assign
mode switch
Internal clk
Arpeggiator
Voice assign
Arp clk in
Voice board(s)
Figure 1 – Roland code arpeggiator, clocking, and voice assignment structure
This is somewhat limiting, as with this architecture it is impossible to arpeggiate any of the voice modes.
For example, arpeggiation with unison mode voice assign sounds cool, but is not possible with the
Roland code! It is possible, however, with Europa (oversimplified architecture shown in Figure 2):
Page 13
Operational differences
Europa User Guide
MIDI Notes
Local keyboard
Arpeggiator enable
Internal clk
Arp clk in
Arpeggiator
MIDI Clk
Voice assign
MIDI Note
Transmit
Voice board(s)
Figure 2 – Oversimplified Europa arpeggiator, clocking, and voice assign structure
This is a far more flexible architecture. It allows the arpeggiator to be clocked from MIDI, the arpeggiator
to drive the voice assignment, and arpeggiator notes to be transmitted via MIDI! The highly detailed
Europa arpeggiator/voice architecture and operation is documented in Chapter 9 (Arpeggiator, page 30).
Arpeggiator/UI assign modes
The bank (A
A-F) and number (1
1-8) buttons allow setting of various options on the arpeggiator when
the arpeggiator’s up and down buttons are held. Details on their settings and operation are documented
in Chapter 9 (Arpeggiator).
Arpeggiator up/down button differences
The original Roland code required both the up and down buttons to be held to set the arpeggiator’s
leadoff direction. With Europa, pressing either up or down alone will turn on or off the arpeggiator
and/or set the leadoff direction.
VCOVCO-1/VCO1/VCO-2 Waveform select buttons
The VCOVCOVCO-1/VCO
VCO-2 waveform select buttons with the original Roland code required the end user to
hold down on all desired waveforms. Many users of the Jupiter 6 did not know that more than one
waveform could be enabled simultaneously due to this clumsy interface. Europa allows toggling of these
waveforms by just pressing the desired waveform button. It will not clear other waveforms when a
single waveform is pressed.
VCO Sync buttons
The original Roland code did not allow the VCO sync buttons to be synchronized to each other. Europa
allows this. The net effect is a fatter and heavily detuned oscillator sync.
Writing patches (patch protect nonexistent)
nonexistent)
Writing a patch with Europa requires pressing write,
write the bank,
bank and the number (twice). Europa does
not include the single patch write protect feature that exists in the Roland code.
Writing patches with memory protect on blinks entire board
If a patch or preset write is attempted with memory protect on, Europa will blink all of the processor
controlled LEDs on the board. This is an extremely visible reminder to the end user that memory protect
is on. The original Roland code would not do anything when write was pressed.
Page 14
Europa User Guide
Operational differences
Additional voice assignment modes
Europa includes four additional voice assignment modes that extend the LED behavior on the assign
buttons. See chapter 8 (voice assign modes) for more detail.
Manual mode
Europa’s MANUAL mode operates differently from the Roland code in several ways.
When first entering manual mode with the Roland code, the current state of the knobs and sliders are
read and sent to the voice board(s), however, the switches (such as waveform, polarity, etc…) are
changed to the Roland default settings. Europa also reads the current state of the knobs and sliders, but
uses the state of the switches as they are set in the patch edit when entering MANUAL mode.
Europa allows comparisons to be made between the MANUAL
MANUAL mode settings and either the patch or
patch edit by pressing the MANUAL button to toggle between them. This allows the user to jump
quickly between the edited patch and MANUAL mode to position the sliders/knobs to match the patch
edit. The Roland code requires the user to save the patch edit, remember which memory it is in, and
alternate between pressing that location's button and the manual button.
The Roland code maintains a separate memory for the switch settings in manual mode, and Europa does
not. With the Roland code, if the user switches from MANUAL mode to patch edit mode, moves sliders,
changes switch settings, and returns to MANUAL mode, the slider settings change but the switch
settings revert to where they were before leaving MANUAL mode. We found this to be counterintuitive
and unlike the way MANUAL mode works in several other synthesizers. With Europa, the switch
settings for MANUAL mode are kept in the patch edit. If the user leaves MANUAL mode, the switch
settings ARE ONLY MAINTAINED IF THE PATCH IS NOT EDITED BEFORE RETURNING TO
MANUAL MODE! This means it is possible to leave MANUAL mode, look for a patch memory location
to write to, return to MANUAL mode, and write the patch.
Patch edit compare
Europa also includes a patch edit compare to allow comparison of the patch edit and any stored patch.
This allows toggling between a reference (stored) patch and the current patch edit to easily hear
differences. It is also useful in hunting for a place to store a given patch edit, as stored patches can be
recalled and heard without modifying/erasing the edited patch. The user interface for this feature
changes the way patch recalls work.
To toggle between the patch edit and a stored patch, simply press the A-F or 1-8 while in patch mode. If
the “patched change” indication (one of the NUMBER lights is blinking) is present, press the blinking
NUMBER light again and it will light solid, indicating the patch heard is the stored patch. Unlike the
Roland code, this will not recall the stored patch into the patch edit buffer, even after multiple recalls of
patches throughout any BANK or NUMBER!
NUMBER Press the solidly lit LED again and it will begin blinking,
indicating the sound heard is now the patch edit and not the stored patch.
To copy a stored patch into the edit buffer, select the patch desired. Ensure the NUMBER light is not
blinking. If it is, press the corresponding NUMBER again until the appropriate NUMBER LED is
steady. Make a change to the patch. As before, the NUMBER light will start blinking – indicating the
patch has changed. All stored patches will copy from the edit buffer only.
Page 15
Power up diagnostics and actions
5.
Europa User Guide
Power up diagnostics and actions
Power up diagnostics
Europa’s onboard diagnostics are quite extensive – much more so than the original Roland code. An
NVRAM corruption on the Jupiter 6 can render the board useless with the Roland code! Europa is not
susceptible to crashing with a corrupt NVRAM and will repair it if corruption is found. Also, patches and
presets are stored in the Europa chip’s flash so it is not susceptible to losing patches if the controller
board’s battery fails.
When problems arise, Europa will display boot codes. Boot codes are identified by the board’s LEDs
being in the following state just after board powerup:
•
•
•
•
All LEDs are off except…
LFO 1 LED Is blinking, steadily lit or off
LFO 2’s
2 Rate LED is blinking or other bender board LEDs are lit
Only LEDs on the BANK and NUMBER buttons are lit solid or blinking (indicating a boot
code)
As an example, if the text indicates that a code of A-2 is shown, only BANK A and NUMBER 2 are
shown along with the LFO 1 and LFO 2 LEDs as described above. Like this:
A
B
C
D
E
F
1
2
3
4
5
6
7
8
Figure 3 – Boot code A-2 shown on bootup
Some boot codes are fatal and the board will not boot, and others are purely informational. All boot codes
are indicative of a problem. With recoverable boot codes, pressing a key or a button on the front panel
will cause the Jupiter 6 to continue booting. Fatal boot codes will cause the board to hang, since they
indicate a problem that prevents Europa’s operation.
Diagnostic information is not particularly useful to an end user of Europa, but is extremely valuable to
the technician who is diagnosing or repairing a malfunctioning Europa enhanced Jupiter 6. While the A-F
and 1-8 lights are being strobed left and right, Europa is running the diagnostics as described in Figure
4. This chapter gives a sequential list of power up diagnostics that Europa performs as it boots.
Group A b
boot
oot codes
The A group of boot codes indicates unrecoverable component diagnostic failures in either the Europa
chip itself or the scratch RAM chip on the controller board. They are not recoverable, and Europa will not
run:
A-1
Internal CPU RAM failure. This is a failure of the Europa chip itself. If the Europa is still
under warranty, contact Synthcom Systems, Inc. to arrange a replacement.
A-2
Scratch RAM failure. This failure occurs when Europa cannot get reliable data storage on
the scratch RAM chip on the Jupiter 6’s controller board. Either the scratch RAM chip
itself is bad or the interconnecting circuitry is making communication with it unreliable.
This is not a failure with the Europa chip! If this occurs directly after a Europa installation,
look for solder bridges or unintentionally cut traces.
Page 16
Europa User Guide
A-3
Power up diagnostics and actions
Internal “external” CPU RAM failure. The Europa chip contains an additional 1K of
onboard static RAM and this indicates its failure. This is a failure with the Europa chip
itself. As with boot code A-1, contact Synthcom Systems, Inc. to arrange replacement if
still under warranty.
Group B boot codes
The B group of boot codes indicates that Europa is executing firmware transfer mode. It is indicated by
the B BANK LED being lit solid and one 1-8 NUMBER LED lit solidly with all other NUMBER LEDs
blinking. All B boot codes are recoverable:
B-1
Europa image is bad, not present, or TAPE + WRITE (force Firmware Transfer Mode)
was held on board powerup. The Jupiter 6 is waiting for a Europa image to be
programmed in. This code can come up if a prior Europa firmware update failed or the
Europa image is bad. Not to worry! This just means the Europa Firmware Update Utility
needs to send the board a good image!
B-2
Europa image area prepared and awaiting programming.
B-3
Europa programming in process.
B-4
Europa programming complete. Check code/image is good!
B-5
Europa programming complete. Check code/image is bad!
Group E boot codes
The E group of boot codes indicates diagnostic failures that Europa has detected and corrected. For
example, it is possible for E-6 to be shown, (requiring pressing a button/key), followed by E-2 (also
requiring pressing a button/key). Pressing a button or key will cause the board to continue the bootup
process. More than one E code can be shown simultaneously as well as sequentially:
E-1
Bad patch data found in flash and corrected. This usually indicates that Europa has
trashed a patch – most likely due to a bug. Note that this code is expected after a first
time Europa installation! This is because the Roland code does not validate its patches or
presets, and Europa does. If E-1 codes are persistent, it may indicate the Europa chip is
failing or has failed. Corrections can occur even if write protect is thrown, because the
flash writability is not controlled by the memory protect switch.
E-2
Indicates operator has pressed the PORTAMENTO button and powered the Jupiter 6 on
– causing the contents of the NVRAM to be copied in to flash. This is not a failure! It is
positive feedback to a user requested action.
E-3
Bad preset data found in flash and corrected. This is identical to E-1 in terms of root
cause.
E-4
Bad Europa board settings found and defaults loaded. Europa uses part of the NVRAM
for storing current board state and settings. This code is shown when the area contains
bad/bogus settings. This failure can also be shown when the board is first powered up
after Europa is installed, the controller board’s battery is failing, or if a boot to the Roland
code was performed.
E-5
Bad Europa board settings checksum – defaults loaded. Similar to code E-4 listed above,
the checksum of the board settings area is bogus. Checksums are not reliable enough to
detect all corruptions, so both checking in-block data and entire block data is needed.
Page 17
Power up diagnostics and actions
Europa User Guide
E-6
Roland factory patches reloaded. This occurs when Europa has been ordered to reload
Roland factory patches/presets into its NVRAM and flash via holding BENDER and
powering the board on.
E-7
Patches and presets copied from internal flash to NVRAM. This converts presets from
Europa format back to Roland format so the Roland code can read the patches and
presets. Note that many Europa specific settings are lost if the data is copied to NVRAM,
and then back to flash. This is accomplished by holding GLISSANDO and powering
up.
Group F boot codes
The F group of boot codes indicates diagnostic failures that Europa has detected, but cannot correct, due
to the memory protect switch being on. One or more of these codes will be shown, but the board will not
boot further, as they are hard failures that need to be corrected before board operation can occur:
F-4 to FF-5
Identical to E-4 and E-5 as listed in the prior E group section, but the
conditions are not correctable due to the memory protect switch being on. To
correct, power off the Jupiter 6, disable the memory protect, and power the
Jupiter 6 on.
F-6
Indicates that one or both voice boards are not responding. This fault can also
show up if the voice boards’ connections to the controller board were installed
backwards or are not making a solid connection to the controller board.
F-7
Identical to E-7 above, but indicates that the copy to NVRAM is not possible
because the memory protect switch is on.
Page 18
Europa User Guide
Power up diagnostics and actions
Board power on
CPU Stack
RAM OK?
No
Show code A-1
Yes
CPU XRAM
OK?
Yes
No
Show code A-2
Portamento
button held?
Yes
No
Show code A-3
Glissando
button held?
Yes
No
Boot Roland code
Board settings
in NVRAM OK?
Flash stored
patches OK?
Yes
No
Load NVRAM
settings defaults.
Show boot code
E-4 or E-5
No
Correct bad
patches
Show E-1
No
Correct bad
presets
Show E-3
Yes
Yes
No
TAPE &
WRITE Buttons
held?
Convert flash
patches/presets
and copy to
NVRAM
Show E-7
Yes
No
TAPE Button
held?
Convert NVRAM
patches/presets
and copy to flash
Show E-2
No
Yes
"JIG" Switch
thrown?
Reload factory
patches/presets to
NVRAM and flash
Show E-6
No
Yes
Board scratch
RAM OK?
Bender button
held?
Boot firmware
transfer mode
Yes
No
Europa image
OK?
No
Flash stored
presets OK?
Boot firmware
transfer mode
Yes
Yes
Voice boards
idle in 5 sec?
No
Show code F-6
Europa boots!
Yes
Figure 4 - Europa boot and diagnostic flowchart
Europa boot and diagnostic flowchart
This section is a walkthrough of the chart shown in Figure 4.
Page 19
Power up diagnostics and actions
Europa User Guide
1. Internal CPU stack RAM is tested
The internal RAM on the CPU is tested for data integrity. If this test fails, BANK A and NUMBER 1 are
light brightly. The board is halted at this point since it cannot function without working CPU RAM.
2. Internal CPU XRAM is tested
The Europa CPU has 1K of general purpose RAM on chip and is checked. If the XRAM check fails,
BANK A and NUMBER 2 are light brightly. The board is halted at this point and cannot function
without working internal XRAM.
3. External scratch RAM is tested
This test checks the off-CPU volatile scratch RAM present on the controller board. If it fails, BANK A
and NUMBER 3 are lit brightly, and the board is halted.
4. “Jig” mode is tested
Europa will look at the position of the “JIG” switch located on the controller board. If it is set to the “JIG”
position, the Roland code is booted so the diagnostics steps in the Jupiter 6 service manual can be
followed.
5. TAPE Button is tested
If TAPE is held on power on, the Roland code is executed and Europa is bypassed.
6. TAPE/WRITE Buttons are tested
If TAPE and WRITE is held on power on, Europa enters firmware transfer mode.
7. Europa image integrity tested
Europa does a binary check code on the Europa image. If the image check code is not valid, firmware
transfer mode is entered (signaled by BANK B being lit solid with NUMBER 1 lit solid and 2-8
blinking), giving an opportunity for a proper image to be uploaded. See chapter 12 (Europa firmware
update utility) for further information. If the Europa image is good, there is no reason to update firmware
to the same version! The EFUU will alert the user to any bad images and if the image is not bad, updating
to the same version will change nothing!
8. Europa execution begins
Europa continues the diagnostic process by waiting for the voice boards to become idle. If either board
does not become idle in a period of 5 seconds, a voice board failure code is shown (indicated by BANK F
being lit solid with NUMBER 6 lit solid). This indicates one or both voice boards failing or swapped
cables to the controller board.
9. Voice boards tuned
A command is sent to both voice boards for them to tune themselves. Europa waits for up to 5 seconds
for the voice boards to become busy, and up to 5 seconds for them to become idle. If the voice boards do
not become idle, a voice board failure is assumed and a voice board failure code is shown (indicated by
BANK F lit solid with NUMBER 6 lit solid).
10. Bender button tested
If the BENDER button is held and memory protect is not on, Roland factory patches and presets are
loaded into the Jupiter 6’s NVRAM as well as Europa’s flash memory. A boot code of E-6 is shown.
11. Portamento button tested
If the PORTAMENTO button is held and memory protect is not on, Europa copies the NVRAM patches
and presets into Europa’s flash memory. A boot code of E-2 is shown.
12. Glissando button tested
If the GLISSANDO button is held and memory protect is off, Europa copies the patches and presets
that are in Europa’s flash memory to NVRAM. A boot code of E-7 is shown.
Page 20
Europa User Guide
Power up diagnostics and actions
13. NVRAM Settings verified
NVRAM Is checked for proper Europa settings. Europa stores all board settings (except patches and
presets) in NVRAM – in the same location as the Roland code’s BANK C & D of presets. If this NVRAM
region has bad settings, a boot code of E-4 or E-5 is shown (depending upon the exact problem). This
also occurs if the NVRAM region’s checksum is invalid. In either situation, the default Europa board
settings are reloaded.
14. Flash patches and presets are verified
All patches and presets stored in flash are verified for valid content. If an invalid patch is found, a boot
code of E-1 is shown. The bad patch(es) are corrected regardless of the memory protect switch’s position.
If an invalid preset is found, a boot code of E-3 is shown. As with patches, presets are also corrected
regardless of the memory protect switch setting.
At this point, the board has passed all diagnostics and has booted into operational (Europa) mode.
Power up action functions
Europa has several actions that it can perform on powerup. Each is performed by holding the keys
mentioned below, turning the Jupiter 6’s power on, and holding until no longer required (as
documented):
TAPE
Boot to Roland mode. No need to hold the TAPE button after the board has booted.
Once it has booted, the board is ready for operation. Note that patches created under
Europa will not be usable under Roland code without a manual conversion step
(documented below). Conversely, patches created under Roland code will also need
conversion to Europa. But then again, once the patches have been converted to
Europa, why go back to the Roland code?
WRITE + TAPE Force firmware transfer mode (FTM) boot. The only reason to use this is if the
operational code image is good but crashes when firmware transfer is attempted, and
standard contact with the Europa Firmware Update Utility does not work. A lit B
LED ,1
1 LED, and 2-8 blinking indicates a successful boot to FTM. Follow the
instructions in the Europa Firmware Update Utility chapter.
BENDER
Restore factory patches, presets, and default Europa board settings. It reloads the
Roland factory patches and presets to NVRAM, writes a converted version of the
NVRAM to on-chip flash, and loads Europa factory defaults into the board settings.
Be sure to hold BENDER until boot code E-6 shows up. Once E-6 is displayed,
press a key or button to continue the boot process.
Portamento
Copy NVRAM patches and presets to internal Europa flash and convert to Europa
patch/preset format. This is used to convert recently restored patches and presets
(via tape) over to Europa. One such use would be booting Roland code and loading
patches and presets from cassette. NVRAM Is only used as a copy source and is not
altered. Hold until boot code E-2 is shown. Note that Europa will automatically do
this the first time the chip is installed.
Glissando
Copy flash patch/presets to NVRAM and convert the NVRAM to Roland format.
The only reason to use this feature is to share patches and presets with non-Europa
upgraded Jupiter 6 owners. Note that many preset settings, mostly related to the
arpeggiator, are lost since Roland’s NVRAM preset format doesn’t store Europa
specific settings.
Page 21
Configuration options and action functions
6.
Europa User Guide
Configuration options and action functions
Setting the Jupiter 6’s base MIDI channel
With Europa, the Jupiter 6 has a settable base MIDI channel. Only later revisions of the Roland code
allowed this. Unlike the Roland code, Europa will remember the base MIDI channel after the board is
powered off.
When the Jupiter 6 is in either SPLIT mode, the lower patch is addressed by the base MIDI channel and
the upper patch is addressed by the base MIDI channel + 1. If the Jupiter 6’s base MIDI channel is set to
channel 16 and SPLIT mode is enabled, the upper patch is accessed on channel 1. The MIDI channels for
upper and lower patches are not individually selectable.
To set the base MIDI channel, press and hold TUNE. The board will briefly tune and the
BANK/NUMBER
BANK NUMBER LEDs will look something like Figure 5:
A
B
C
D
E
F
1
2
3
4
5
6
7
8
Figure 5 – MIDI Channel select display – Example above shows MIDI channel set to 10
Continue to hold the TUNE button. A solidly lit LED indicates selection, and a blinking LED indicates a
possible selection (but not currently selected). The A and B buttons select MIDI channel group 1-8 or 916. The 1-8
8 buttons select a MIDI channel within the group selected with A or B. Here is the MIDI
channel setting chart:
Selection
Base MIDI channel
Selection
Base MIDI channel
A-1
A-2
A-3
A-4
A-5
A-6
A-7
A-8
1
2
3
4
5
6
7
8
B-1
B-2
B-3
B-4
B-5
B-6
B-7
B-8
9
10
11
12
13
14
15
16
When the base MIDI channel selection is complete, release the TUNE button. The new base MIDI
channel takes effect immediately and is retained even when power is shut off.
Configuration
Configuration options/action functions overview
Europa also has various board configuration options, as well as a few critical action functions. Pressing
and holding the TAPE button allows access to configuration options and action functions, and the
context of this chapter assumes that TAPE is held. This causes the function of the A through F (BANK
BANK)
BANK
and 1 through 8 (NUMBER
NUMBER)
NUMBER buttons to change their functions as shown in Figure 6:
Page 22
Europa User Guide
Configuration options and action functions
Europa configuration options
A
B
C
D
E
Europa action functions
F
1
2
3
4
5
6
7
8
Mod wheel
assign
Pitch bend
Voice Watch
assign
Aftertouch assign
Velocity transmit
Sysex transmit
Velocity assign
Continuous Controller Transmit
Local mode
Dump patch edit to MIDI
Dump preset edit to MIDI
Dump ALL to MIDI
Random patch
Figure 6 – Configuration options and action functions (local mode, MIDI continuous controller transmit, and
voice watch enabled in this example) when TAPE is held
Europa configuration options
Europa includes several board-wide configuration options that can be enabled or disabled. They are
contained on A through F of the BANK row of buttons.
In Europa’s configuration options context, the LEDs on the A-F buttons indicate the following:
LED ON
LED Blinking
LED Off
Option enabled
Option disabled (but enableable)
No option
A lit LED (blinking or steady) can have its setting toggled between enabled (LED on) and disabled (LED
blinking) by pressing it.
Local mode (A) – Default: Enabled
Enables or disables playing the internal voices with the local Jupiter 6 keyboard and arpeggiator. Local
Mode should not be turned off by an inexperienced user! If the Jupiter 6 is not making sound from the
local keyboard, make sure Local Mode is on.
Local Mode has the following effects on the Jupiter 6’s internal voices and incoming MIDI notes. This is
described in further detail in the Sources of notes to be played and keyboard/MIDI
interaction section.
With local mode enabled, the arpeggiator will play internal voices as well as transmit arpeggiated MIDI
notes. Incoming MIDI notes will add to the existing arpeggiated note list, as if played from the local
keyboard.
With local mode disabled, the arpeggiator will only transmit MIDI notes and arpeggiate the notes held on
the local keyboard. It will not play internal voices. Incoming MIDI notes will instead play Jupiter 6 voices
through the voice allocation scheme and bypass the arpeggiator completely. This allows Europa’s
arpeggiator to drive external equipment while retaining the ability to use the internal synthesis functions.
Page 23
Configuration options and action functions
Europa User Guide
Continuous Controller Transmit (B) – Default: Enabled
Enables or disables Europa from transmitting MIDI continuous controllers when knobs, sliders, or
buttons are pressed on the Jupiter 6’s front panel. Continuous controllers are intended for use in
sequences due to the shortness of the associated MIDI messages. For patch based continuous controllers,
parameters will only be changed on the voice boards and not the patch edit. For preset based continuous
controllers, parameters will be changed in both the preset edit and the voice boards. The continuous
controller’s meanings are documented in the Europa MIDI Implementation chapter.
System Exclusive Transmit (C) – Default: Disabled
Disabled
Enables or disables Europa from transmitting MIDI system exclusive messages when knobs, sliders, or
buttons are pressed on the Jupiter 6’s front panel. System exclusive messages are designed for patch
editors/librarians rather than performance due to the length of the system exclusive message. When
played back to Europa, system exclusive messages will cause the current edit buffer to be changed as well
as the affected voice board (if applicable) – just as if it was being changed from the front panel. The
continuous controller’s meanings are documented in the Europa MIDI Implementation chapter.
Velocity Transmit (D) – Default: Disabled
Enables or disables the velocity transmit function. When velocity transmit is enabled, moving the VCA
ENVENV-2 LEVEL slider will no longer alter the ENVENV-2 LEVEL,
LEVEL but instead will change the note on
velocity for each note transmitted. When this feature is disabled, Europa will transmit a note on velocity
of 70h. Velocity transmit is particularly useful for externally controlling a device while the arpeggiator is
running.
Voice watch (E) – Default: Disabled
Enables or disables the ability of watching which voices are being allocated. When enabled, the BANK
A-F LEDs indicate which voices are allocated when notes are played via the local keyboard or from
MIDI. Normally the BANK LEDs show which patch or preset bank is currently selected. When voice
watch is enabled, pressing any button on the front panel will temporarily cause voice watch to shut off
and the current bank to be shown instead. After one second with no other button presses, it will revert to
voice watch mode and the meaning of the BANK AA-F LEDs is as shown in Figure 7:
A
B
C
Voice #1 on 4 voice board
D
E
F
Voice #1 on 2 voice board
Voice #2 on 4 voice board
Voice #1 on 2 voice board
Voice #3 on 4 voice board
Voice #4 on 4 voice board
Figure 7 – Voice activity indication with voice watch mode (this example has 3 voices on)
When unison or any steal voice modes are enabled (described in the Voice assignment modes
chapter), if a voice is reallocated to a new note, the LED will wink.
Voice watch mode is also useful for diagnosing missing or malfunctioning voices, and during operation,
it is fun to watch!
Europa action functions
Europa uses the NUMBER 11-8 buttons to perform various actions. They are not settable options, but
rather “one shot” actions. One press equals one action.
Page 24
Europa User Guide
Configuration options and action functions
Modulation wheel assign (1)
Europa can assign incoming messages to any controller controlled slider or knob on the Jupiter 6’s front
panel. This function assigns the modulation wheel input to a given slider or knob. Here is how to assign:
•
•
•
•
•
•
Press and hold TAPE
Press and release button 1 (modulation wheel assign)
The TAPE light will blink
Release the TAPE button
Move any slider/knob desired. This will not alter the current patch or preset
Press and release TAPE.
TAPE The last slider/knob moved before TAPE is pressed again is where the
modulation wheel will be assigned
To unassign:
•
•
•
•
•
Press and hold TAPE
Press and release button 1 (modulation wheel assign)
The TAPE light will blink
Don’t touch any sliders or knobs
Press and release TAPE.
TAPE This unassigns the modulation wheel from anything it is currently assigned
to.
Pitch bend assign (2)
Identical to modulation wheel assign, but instead assigns incoming MIDI pitch bend messages to a
controller controlled slider or knob. Follow the instructions in the Modulation wheel assign section
above, but instead press button 2 as documented in Figure 6).
Pitch bend messages can vary in range from –8192 to 8191, which is far more resolution than any
controller on the Jupiter 6 has. Europa scales pitch bend values –8192 through 0 to 0-63, and pitch bend
values 0 through 8191 to 64-127. A centered pitch bend wheel will set a slider or knob to mid scale (64).
Aftertouch assign (3)
This assigns incoming MIDI channel aftertouch messages to a given slider/knob. Follow the instructions
in the Modulation wheel assign section above to assign channel aftertouch, but instead press
button 3 as documented in Figure 6).
Velocity assign (4)
This assigns note velocity to a given slider or knob. In addition to the MIDI note on turning on the
appropriate note, it also sets the assigned slider/knob to the value of the note’s velocity on receipt of each
note! As an example, assigning ENVENV-2 LEVEL to velocity will cause the ENVENV-2 LEVEL to be changed
after every MIDI note ON received.
NOTE:
NOTE The velocity assign will change the value of the controller for the entire voice board – not just the
incoming note!
The instructions in the Modulation wheel assign (1) section above will assign note velocity, but
instead press button 4 as documented in Figure 6).
Page 25
Configuration options and action functions
Europa User Guide
Dump currently edited patch to MIDI (5)
This will dump the current patch edit to MIDI via Europa’s system exclusive patch dump message. If the
board is in SPLIT mode, the UPPER and LOWER LEDs will determine which patch is dumped. In
WHOLE mode, the UPPER patch is dumped. See the System Exclusive operations section for
further details on the format of Europa’s system exclusive messages. This feature will function regardless
of the system exclusive transmit setting.
Dump currently edited preset
preset to MIDI (6)
Similar to dumping the currently edited patch, this will dump the preset currently being edited to MIDI
via Europa’s system exclusive patch dump message. The System Exclusive operations section
contains further detail on the format of the preset system exclusive message format. This feature will
function regardless of the system exclusive transmit setting.
Dump everything to MIDI (7)
This is effectively a “Save board state”. It will dump all patches in flash, all presets in flash, the current
patch and preset edit buffers, and the settings of all board options to MIDI via Europa’s system exclusive
messages. Refer to the System Exclusive operations section for further details. This feature will
function regardless of the system exclusive transmit setting.
Generate random patch (8)
This is one of the more fun features of Europa – a random patch generator! Executing the random patch
generator will cause the currently edited patch to be randomized in the following fashion:
•
•
The VCA ENVENV-2 LEVEL is always set to 127 for maximum output
The following potentiometers/sliders are randomized with an inverse logarithmic response. That is,
they most likely will be 0 and least likely to be 127 (maximum). All other potentiometers/sliders are
completely random:
•
•
•
•
•
•
LFO Delay
Manual Cross MOD
VCO 1 Range
VCA LFO
ENVENV-1 Key track
ENVENV-2 Key track
•
The VCOVCOVCO-1/VCO
VCO-2 mixer is center weighted, meaning the most likely values will be near the center
with a 50/50 mix split
The filter settings have a 50% chance of being low pass, 25% of being high pass, and 25% of being
band pass
All other buttons are completely random, though only valid settings will be chosen
•
•
Remember, in synthesis there are more ways to make no sound than a sound. That is why the random
patch generator does not randomize all settings – to help minimize the possibility of complete silence. If
the generated random patch does not make sound initially, hold down on the key for a few seconds, as
attack time may be a bit longer than immediate. If after 10 or so seconds there is no sound or you just get
too impatient, press 8 again to create another random patch!
The random patch generator was designed to help guide sound generation rather than being a polished
patch. Tweaking of the random patch is encouraged and expected.
Creating a random patch will always transmit a “generate random patch” system exclusive message.
Page 26
Europa User Guide
7.
Voice assignment modes
Voice assignment modes
Several voice modes have been added to the Jupiter 6’s voice assign feature. When in either SPLIT
mode, the voice allocation on each voice board can be set independently. This section documents the
entire assignment operation as well as the Europa extensions to it.
Since the Jupiter 6’s keyboard has 61 keys, but can only play six notes at a time, the Jupiter's CPU must
have some way to decide what to do when a key is pressed on the local keyboard or a note is played
through MIDI. The ASSIGN mode buttons are used to select how the Jupiter 6 assigns a note to one of
its six voices, or four or two voices when in split mode. Each of the nine ASSIGN modes in Europa
does this differently, because each mode has different musical uses.
Turning on the VOICE WATCH feature (as described in the Voice watch (E) – Default: Disabled
section) will help in understanding of the various modes and their functions. By watching which LEDs
turn on, the operation of each of the ASSIGN modes becomes obvious. This is also a handy way of
identifying an out of tune or nonfunctional voice (great for the service tech!). Each voice mode is
described in detail in this section:
Solo [Solo assign LED lit solid]
Pressing the SOLO button once (from any assign mode other than SOLO mode being set already) lights
the SOLO button’s LED solid and puts the board in SOLO mode. SOLO Mode will only sound one
note at a time - the last note played. If a note is held down and another note played, the voice will jump to
the new note, but the envelope will not retrigger. This allows playing of smooth solo lines. If the second
note is released before the first note, the first note will sound again. If the sound quickly dies away, try
increasing the SUSTAIN level of ENVENV-2. A patch with a quick ATTACK and DECAY with no
SUSTAIN does not work well in SOLO mode because the envelope only gets retriggered when all
notes are released. Only one voice is used in SOLO mode.
Solo rotate [Solo assign LED blinking]
Pressing the SOLO button a second time makes the SOLO button's LED blink and puts the board in
SOLO ROTATE mode. As with SOLO mode, SOLO ROTATE sounds only the last note played.
However, each new note is assigned to a new voice, which makes the envelope retrigger for each new
note. This is good for playing short, percussive sounds with a long RELEASE,
RELEASE because new notes will
not immediately interrupt the RELEASE with a new ATTACK like in SOLO mode (unless many notes
are played quickly). All available voices are used in SOLO ROTATE mode.
Solo unison [Solo and unison assign LEDs lit solid]
Pressing the SOLO and UNISON buttons at the same time lights both the SOLO and UNISON LEDs
and puts the board in SOLO UNISON mode. The SOLO UNISON mode works just like SOLO
mode, only all available voices are used to play each note. If the board is in WHOLE mode, six voices
sound at one time, and in SPLIT mode either four or two. This makes for some very fat sounds. The
fatness can be adjusted by using the UNISON DETUNE knob just to the left of the ASSIGN buttons.
A setting of 0 tunes the voices very close together, while a setting of 10 detunes the voices so much that
it starts sounding nasty - but not a good sort of nasty.
Page 27
Voice assignment modes
modes
Europa User Guide
Unison [unison LED lit solid]
Pressing the UNISON button once lights the UNISON LED solid and puts the board in UNISON
mode. UNISON Is a polyphonic mode, meaning more than one note can be played at a time. The idea
behind UNISON is to make the fattest sound possible. The UNISON mode works like SOLO
UNISON for the first note played, then things start getting strange. If two or more notes are being
played, the voices divide between the notes played. Since the number of different voices available
depends on if the board is in WHOLE or SPLIT mode, the number of voices per note depends on the
KEY MODE as well. It is confusing, so here is a table to make it easier to understand:
WHOLE
SPLIT 4
SPLIT 2
1 Key – All 6 voices
2 Keys - 3 Voices each
3 Keys - 2 Voices each
4-6 Keys- 1 Voice each
1 Key - 4 Voices
2 Keys - 2 Voices each
3-4 Keys- 1 Voice each
1 Key - 2 Voices
2 Keys - 1 Voice each
If more keys are held down than there are voices available, then only the first voices will play. For
example, in WHOLE mode, only the first six notes will be played. The seventh note will play when one
of the first six notes is released. When the seventh note sounds, it will not retrigger the envelope. This is
useful for subtle changes to the color of a chord. As with SOLO UNISON,
UNISON the UNISON DETUNE
knob will make the sound fatter.
Unison steal [unison LED blinking]
blinking]
Pressing the UNISON button a second time makes the LED blink and puts the board in UNISON
STEAL mode. It is just like UNISON mode, until more notes than there are available voices are played.
Then, the oldest note playing has its voice stolen to play the new note. For instance, in WHOLE mode,
when the seventh note is played, it plays, but the first note goes silent. The second note goes silent to play
the eighth note, and so on. Each new note retriggers the envelope with a new ATTACK.
ATTACK Now, if a note is
released while the first and second notes are still held, the second note will sound. Release another key
and the first note will sound. The notes that have their voice stolen and get replayed will not retrigger the
envelopes. The STEAL modes are great for playing chords. If voice watch is enabled, a winking LED will
indicate the stolen voice(s).
Poly 1 [Poly 1 LED lit solid]
Pressing the POLY 1 button once lights the LED and puts the board in POLY 1 mode. POLY 1 Mode
is another polyphonic mode, and is designed to preserve a note's RELEASE as long as possible. Here is
an example of how it works: If A B C D E F are played in WHOLE mode, releasing the keys in reverse
order (F E D C B A) will cause the next allocated voice to be F. That is because it has been released the
longest, so it has the best chance of having completed the RELEASE cycle of its envelopes. As with
UNISON mode, when too many notes are played, the later notes will not sound, at least until one or
more of the other notes playing are released.
Poly 1 steal [Poly 1 LED blinking]
Pressing the POLY 1 button a second time blinks the LED and puts the board in POLY STEAL mode.
It works like the POLY 1 mode until there are no free allocated voices. Then, like UNISON STEAL,
STEAL it
will steal the earliest note's voice to play the new note. If voice watch is enabled, the stolen voice will be
indicated by a LED wink on that voice.
Poly 2 [Poly 2 LED lit solid]
Pressing POLY 2 lights the LED and puts the board in POLY 2 mode. POLY 2 Is, as the name
implies, polyphonic, and is designed for use with PORTAMENTO.
PORTAMENTO If a chord is played, then release the
notes and play a new chord. The notes of the new chord will be reassigned to the same voices. Normally
this just means that the RELEASE of the notes gets cut off, but if PORTAMENTO is on, a super cool
polyphonic glide sound will be heard that will make you the envy of your friends! POLY 2,
2 Like POLY
1 and UNISON,
UNISON does nothing when more notes are played than allocatable.
Page 28
Europa User Guide
Voice assignment modes
Poly 2 steal [Poly 2 LED blinking]
If you've been paying attention, you've probably figured out that the second press of the POLY 2 button
enables POLY 2 STEAL mode, with a blinking POLY 2 LED indicating so. POLY2 STEAL works
like POLY 2 until there are no more allocatable voices, at which point it acts like the other steal modes.
Page 29
Arpeggiator
8.
Europa User Guide
Arpeggiator
Europa’s arpeggiator is one of the main features of Europa. It is far more capable than the Roland
arpeggiator, offering more features and better flexibility to aid in musical creation. All of the originally
arpeggiator features are still present – with an improved user interface! This section documents the
entirety of Europa’s arpeggiator, including the features that are also present in the Roland code. The
following changes have been made to the base feature set:
Stable arpeggiator clock
Europa’s arpeggiator clock (unlike Roland’s) is stable – accurate to within 0.2% of the desired BPM.
Individual BPMs can be selected from the front panel (from 60 to 234 BPM) or by way of MIDI
continuous controllers. See section Figure 15 - Continuous Controller # 61 (Arpeggiator
rate) value to beats per minute settings for a complete table of arpeggiator rates.
Improved user interface
UP And DOWN do not have to be held to select UP/D
UP DOWN and DOWN/UP
DOWN UP arpeggiator modes. A
simple press of the leadoff direction desired will advance the setting.
Arpeggiator drives voice mode
The Roland code would give the user a choice of the arpeggiator OR the voice assignment mode.
Europa’s arpeggiator drives the voice assign mode!
Arpeggiator can be logically separated from internal voices
With local mode enabled, the arpeggiator will play internal voices as well as transmit arpeggiated MIDI
notes. Incoming MIDI notes will add to the existing arpeggiated note list, as if played from the local
keyboard.
With local mode disabled, the arpeggiator will only transmit MIDI notes and arpeggiate the notes held on
the local keyboard. It will not play internal voices. Incoming MIDI notes will instead play Jupiter 6 voices
through the voice allocation scheme and bypass the arpeggiator completely. This allows Europa’s
arpeggiator to drive external equipment while retaining the ability to use the internal synthesis functions.
Information on how to set local mode is described in the Local mode (A) – Default: Enabled section.
Before going in to great detail about Europa’s arpeggiator features, it is best to understand the
arpeggiator and how it fits in with the synchronization, voice, and preset architecture:
Page 30
Enabled only for
internal/external
clock
Upper /Whole
rhythm
MIDI
OUT
MIDI Clock transmit
L o wer
rhythm
Upper/lower rhythm
link
Upper/whole
clock divider/
multiplier unit
/1.5,2,4 or
X1,1.5,2,4
Lower clock
divider/
multiplier unit
/1.5,2,4 or
X1,1.5,2,4
Sync
source
Upper/whole select
polyrhythm
enable
External
Clock
Upper/
whole
polyrhythm
Internal
Clock
L o wer
polyrhythm
L o wer
Polyrhythm
enable
MIDI
Clock
Setting
Control/influence
Notes
Clock
L o wer
legato & #
of repeats
Local mode
Lower voice board
Voice assign
Off
On
(whole mode)
MIDI
OUT
Upper/whole
legato & # of
repeats
Sequence step
calculator
Upper/whole
sequence note
list
Seq mode
select:
Chord
Arpeggiated
seq
Seq arpeggio
Interval
Upper voice board
Voice assign
Off
Upper/
whole
Arpeggio note calculator
seq
mode
On
Local mode enable
Octave
Range setting
Arpeggio step
calculator
Upper/
whole
arp
enable
Jupiter 6
Keyboard
Upper/
whole arp
range, up &
down
directions
Arp mode
enable
Upper/whole
arpeggio note
list
Arp mode
select:
Normal
Ordered
Ping-Pong
Random
(upper or whole mode arpeggiator)
Local mode
On
MIDI Note
transmit
Off
L o wer
seq
mode
enable
Sequence step
calculator
L o wer
sequence note
list
Seq mode
select:
Arpeggiated
seq
Seq arpeggio
Interval
Chord
Arpeggio note calculator
Octave
Range setting
Arpeggio step
calculator
L o wer
arp
enable
Lower arp
range, up &
down
directions
On
Arp mode
enable
Lower arpeggio
note list
Arp mode
select:
Normal
Ordered
Ping-Pong
Random
(lower arpeggiator)
Local mode
Off
MIDI Note In
Europa User Guide
Arpeggiator
Arpeggiator
Figure 8 – Europa’s arpeggiator, clocking, and note flowchart/architecture
Page 31
Arpeggiator
Europa User Guide
Even though the arpeggiator diagram is initially intimidating, Europa’s arpeggiator architecture really is
simple when broken down into its individual components. The interaction between them can be very
simple to extremely complex depending upon the settings and features used. The important thing is to
understand at least the basic interaction between the modules even if the entire functionality of the
modules is not understood. Regardless, it is still possible to be creative with the arpeggiator! Note that
when in SPLIT mode, there are two arpeggiators – lower and upper. The clock is the only component
that is shared between the two arpeggiators. The rest of the settings are completely independent.
Arpeggiator architecture
This section describes the arpeggiator’s architecture, systematically, to help make the architecture easier
to understand.
Arpeggiator clocking sources
The arpeggiator can be synchronized to one of three different
MIDI
Internal
External
clock sources: MIDI Clock, the internally generated clock, or the
Clock
Clock
Clock
external clock input found on the back of the Jupiter 6 (labeled
trigger in on the back of the Jupiter 6). This clock signal is sent to
Sync
source
both arpeggiators when in SPLIT mode, or to the upper voice
select
arpeggiator when in whole mode. Upper and lower arpeggiator
sync sources are not independently selectable. The clock sources are a global setting and are saved with
the board NVRAM - not in the presets.
MIDI CLOCK
MIDI IN Clock synchronization is a new feature with Europa. It synchronizes at 24 parts per quarter
note (per step – assumes no divider or multiplier). Receipt of a MIDI start message will start the
arpeggiator back to the beginning of the arpeggiation stepping (more on that later!). MIDI Clock is not
transmitted when synchronized to MIDI clock.
INTERNAL CLOCK
Europa’s internal clock is far more accurate than the original Roland code’s clock, and exact BPM
speeds are selectable and are accurate within 0.2% (see Figure for the clock rate table). MIDI Clock will
be transmitted when set to the internal clock.
EXTERNAL CLOCK
The external clock advances the arpeggiator at a rate of a single step per pulse. MIDI Clock is
transmitted at the rate of the external clock pulses * 12. This assumes that the external clock is one pulse
per eighth note. MIDI Clock and other arpeggiator clocking features will not behave in a predictable
manner if the external clock is not received at a regular interval.
From this point forward, it is assumed that a single clock is equal to one step of the arpeggiator,
regardless of the source clock.
The clock signal (blue line at the top of the diagram to the right) is then
fed in to each of the arpeggiators. If polyrhythm is disabled, the clock
is routed directly to the multiplier/divider. If polyrhythm is enabled,
the number of steps between clocks is equal to the number of notes
currently held. As an example, if one note is being held, one step will
occur per clock. If two notes are being held, two steps will occur per
clock, and so on. Regardless of the polyrhythm setting, the clock is
routed through the multiplier/divider.
Page 32
Polyrhythm enable
From note
held list
Polyrhythm
Europa User Guide
Arpeggiator
Arpeggiator
Polyrhythm is independently selectable for upper and lower arpeggiators, and settings for each are
stored in the preset. The arpeggiators keep track of all notes held and feed the note count to the
polyrhythm module (indicated by the purple arrow).
When polyrhythm is disabled, the clock passes through unaltered.
After the optional polyrhythm processing, the clock is sent in to the multiplier/divider module as
outlined in the figure on the right.
At this point the clock can be set to divide by 1.5, 2, or 4 to slow down the incoming
clock, or multiplied by 1 (unaltered), 1.5, 2, or 4 to increase the clock speed. As the
diagram shows, this is done after the polyrhythm step.
Note that separate upper and lower clock divider/multipliers can be selected, and are
saved in the stored preset.
Upper/w hole
clock divider/
m ultiplier unit
/1.5,2,4 or
X1,1.5,2,4
Once the step rate has been multiplied or divided, it is fed into the lower and/or upper
rhythm. The rhythm determines whether or not the arpeggiator should advance on the
current beat. The lower and upper rhythms are comprised of 16 possible steps – each can be enabled or
disabled. Receipt of MIDI start/stop or disabling the arpeggiator will reset the step counter to the
beginning of the rhythmic pattern programmed in each SPLIT:
SPLIT
When the upper/lower rhythm link option is enabled, rather
than a 16 step rhythm for each of the SPLITS,
SPLITS one 32 step
rhythm drives both upper and lower SPLITS,
SPLITS starting at
the lower rhythm and continuing through the upper rhythm.
Upper/lower rhythm link
Lower rhythm
Upper /Whole
rhythm
From here, the command to step is given to the arpeggiator
note calculator which figures out what note to step to next.
For the time being, set aside the rhythm calculation for discussion on other aspects of the arpeggiator.
Sources of notes to be played and keyboard/MIDI interaction
Arpeggiated notes can come from MIDI notes, the local keyboard, or from a user programmed sequence
inside the Jupiter 6. As with arpeggiated notes, the user programmed sequence can be recorded from
either MIDI or from the local Jupiter 6 keyboard. The arpeggiator can be thought of as an extension to the
local keyboard, which helps make understanding the arpeggiator’s interaction with local mode easier.
Also keep in mind that this chapter assumes the arpeggiator is enabled.
Local mode is shown as several separate switches in the arpeggiator architecture diagram (Figure 8) for
the sake of simplicity, but it should be viewed as a single standard local mode setting – described in the
Configuration options and action functions chapter. Local mode applies to both SPLITS (if
in either SPLITS mode).
When local mode is on, the locally played keys and incoming MIDI notes are routed to the arpeggiator
engine, which in turn sends notes to the voice assign component. Locally played keys will transmit MIDI
notes of the played keys and not the arpeggio itself.
When local mode is off, the local keyboard still sends notes to the arpeggiator engine, but the arpeggiator
transmits the MIDI notes of the arpeggiated sequence without sending those notes to the voice assign
component. Incoming MIDI notes will be routed directly to the voice assign modes to play voices and
will not have any effect on the arpeggiator’s operation. This allows the Jupiter 6 to be used as a sound
module while externally transmitting arpeggiated MIDI notes to a remote MIDI device.
Page 33
Arpeggiator
Europa User Guide
Although not explicitly shown in the diagram, sequence recording is simple. If recording was initiated
from the Jupiter 6’s front panel, the source of the recorded notes is the Jupiter 6 keyboard. If recording
was initiated from MIDI, the recorded note source is the remote MIDI device. This helps separate the two
note sources so they can act independently – helpful when performing live! More information on
recording a sequence is described later in this chapter.
Note the “LOWER
LOWER arp enable” and “UPPER
UPPER/WHOLE
UPPER WHOLE arp enable” shown in Figure 8. This is not a
physical switch or setting in Europa. It means an arpeggiator mode, a sequence mode, or one of each is
enabled. Notes are only routed to the arpeggiator if the arpeggiator is enabled!
Arpeggiator mode selections
The arpeggiator has four arpeggiator modes and four sequence modes, and one of each can be
independently or simultaneously selected. The arpeggiator mode controls the order of the arpeggiated
notes played, and the sequence mode controls how the sequenced notes are used (described with
examples in the Arpeggiator and sequence modes section).
Note lists
The arpeggiator keeps two lists of notes to use as criteria in driving the arpeggiator:
Arpeggio note list
This is a list of currently held notes. In arpeggiator mode
selections, this becomes the list of notes to be arpeggiated. In
sequence mode, these notes are the base keys that will be used
to transpose the sequence notes relative to middle C.
Arpeggio note
list
Sequence note
list
Sequence note list
This is a recorded sequence of notes and is used as the list of
notes to be used by the sequence mode when selected.
Arpeggiator/sequence step calculator
Both arpeggio and sequence step calculators keep track of the next note to be played in each respective
note list.
The arpeggio step calculator determines the next note in the arpeggio note list to use based upon the
arpeggiator mode. The incoming arpeggiator clock, the range setting, and the UP/DOWN
UP DOWN direction
settings are also an influencing control when only an arpeggio mode is selected.
The sequence step calculator determines the
next note in the sequence note list to be used
based upon the sequence mode. As with the
arpeggio step calculator, the sequence step
calculator is influenced by the clock, range, and
UP/
UP/DOWN directions.
Upper/whole arp range, up &
down directions
Arp mode
enable
Arpeggio step
calculator
Sequence step
calculator
If only an arpeggiator mode is selected, the
range and direction affect the held notes in the
arpeggio note list.
If only a sequence mode is selected, the range and direction affect the notes recorded in the sequence note
list. The held keys are treated as a one octave UP arpeggio, which cycles the recorded sequence through
each note of the arpeggio, transposing it by the distance between the note and middle C. No
transposition occurs if middle C is played.
Page 34
Europa User Guide
Arpeggiator
Arpeggiator
If both an arpeggiator and sequence mode are selected, the arpeggiator gets the notes to play from the
recorded sequence using the held notes as transpositions for sequence playback – just like with a
sequence only mode; however, the range and UP/
UP/DOWN directions affect the arpeggiator mode. This
might be the most difficult concept to understand about the Europa arpeggiator, but play with it – it is
easier to understand by playing with it than reading about it.
Arpeggio note calculator
The arpeggio note calculator takes the note to play
from the sequence step calculator and/or the arpeggio
step calculator. It uses the RANGE,
RANGE octave, legato,
and number of repeats as influence to decide which
note to play next. The arpeggio note calculator will
also transpose the note if necessary. If local mode is
disabled, the arpeggiated notes are transmitted over
MIDI only. Internal voices are not used. If local mode
is enabled, the arpeggiated notes are sent to the local
voices, and only the physically played notes on the
keyboard are transmitted over MIDI.
Range setting
Legato & #
of repeats
Octave
Seq
mode
enable
Arpeggio note calculator
Local mode
On
Local mode
Off
On
Off
Voice assign
MIDI Note transmit
Voice board
The Arpeggiator user interface
Europa’s user interface employs “supermodes”. That is, the meaning of various buttons changes
depending upon what other buttons are held. The arpeggiator settings, above and beyond the Roland
code’s arpeggiator settings, are accessed by holding arpeggiator related buttons (up
up,
up down,
down range,
range or
hold)
hold for more than one second.
Each of the aforementioned buttons will perform their original function as it would operate in the Roland
code. With Europa, pressing the button and holding it for more than one second will enable one of three
supermodes – all of which have options that are settable in the A-F and 1-8 buttons as documented
below. In all supermodes, a blinking LED indicates that an option is settable but is currently not set. A
solid LED indicates that particular option is enabled. An unlit LED indicates no settable option.
Arpeggiator sync options and c
clock
lock multiplier/divider
This supermode is enabled by pressing and holding the DOWN button for a period of more than one
second. During the time that the DOWN button is held, buttons A-F and 1-8 become arpeggiator sync
source, clock multiplier/divider, and polyrhythm options as shown in Figure 9:
Arpeggiator sync options
A
B
C
D
Arpeggiator clock multiplier/divider
E
F
Polyrhythm enable
1
2
3
4
5
6
7
8
4X
2X
1.5X
1X
/1.5
/2
/3
/4
MIDI Clock Xmit
MIDI Clock sync
External clock sync
Internal clock sync
Figure 9 – Arpeggiator sync, clock multiplier/divider, and polyrhythm options when DOWN is held
The following three synchronization sources are selectable. Only one synchronization source is selectable
at any time. The synchronization source is applicable to both arpeggiators (if in SPLIT mode) and is
saved as a global board setting.
Page 35
Arpeggiator
Europa User Guide
Internal clock (A)
The arpeggiator is clocked from Europa’s internally generated clock. The rate is settable via the RATE
knob on the front panel (under the ARPEGGIO section of the front panel). This selection will generate a
standard 24 PPQN MIDI clock.
External clock (B)
This setting synchronizes the arpeggiator to the external clock on the back of the Jupiter 6. The
arpeggiator is clocked at one step per pulse, just like the Roland code. This selection will generate a
standard 24 PPQN MIDI clock.
MIDI Clock (C)
The arpeggiator is synchronized to the incoming MIDI clock at a rate of 24 pulses per step (PPQN). The
arpeggiator’s standard stepping is on a eighth note basis. MIDI Clock (unlike internal and external
settings) will NOT be transmitted when synchronized to an external MIDI clock source.
External and MIDI clock sources can be multiplied and divided by the setting of the multiplier/divider
and by polyrhythm. The arpeggiator needs a regular interval clock to function properly at any
multiplier/divider setting other than 1X or if polyrhythm is enabled. Gradual changes will be tracked
and followed, but uneven, irregular, or sudden drops in clock pulses from any source will yield
unpredictable behavior. This does not apply when the arpeggiator is synchronized to the internal clock.
MIDI Clock transmit (D)
(D)
Controls whether or not Europa transmits MIDI clock when synchronized to the internal or external clock
sources. MIDI Clock is not transmitted when the arpeggiator is synchronized to MIDI clock.
Button E is not used and has no action when pressed.
Polyrhythm
Polyrhythm setting (F)
Polyrhythm evenly divides the number of steps per clock by the number of currently held notes. Holding
a single note would play one note per step, holding two notes would play two notes per step, etc… up to
a maximum of 16 notes with the time evenly divided between the notes. If the 17th note is played, the
polyrhythm mode will revert to operating as if one note is held. At high tempos with many notes held,
the effect is more like an LFO modulating a VCO than it is of distinct notes being played. At extreme
tempos, the arpeggiator will not have time to transmit the voice allocation requests to the voice boards
and will revert to operating as if only one note is held.
Polyrhythm is an independently enableable feature on a per-SPLIT
SPLIT basis. The polyrhythm enable is
saved with the preset edit.
Multiplier/divider settings (1 - 8)
The 1-8 buttons select a multiplier (buttons 1- 4) or a divider (buttons 5-8) on the incoming step clock.
Only one of the eight options can be set. The multiplier/divider is independently selectable for both the
upper and lower SPLITS (when in SPLIT mode) and is saved with the preset edit.
Arpeggiator mode and options
Arpeggiator mode and options are selected by pressing the UP button and holding it for more than 1
second. Buttons A-F and1
1-8 then have the meaning as shown in Figure 10.
Page 36
Europa User Guide
Arpeggiator
Arpeggiator
Arpeggiator options
A
B
C
D
E
Legato
enable
Repeat count
A + B Off = No repeat
A Off/B On = 1 Repeat
A On/B Off = 2 Repeats
A + B Off = 3 Repeats
Sequence modes
Arpeggiator modes
F
1
2
3
Rest note
enable
4
5
6
7
8
Chord
Interval
Sequenced
arpeggio
Arpeggiated
sequence
Random
Ping-pong
Upper/lower
sequence and
rhythm link
Ordered
Normal
Figure 10 - Arpeggiator mode and options when the UP button is held
Repeat count (A & B)
This tells the arpeggiator the number of times to repeat each note in the arpeggiated sequence. As an
example, if C, E, and G were held and the repeat count is set to 1, Europa would play, C, C, E, E, G, G.
The repeat count is settable on the upper and lower SPLITS independently, and is saved with the preset
edit.
The C button has no function and is not settable.
Legato enable (D)
Legato mode causes the arpeggiator to release the prior note after the current note has been played. This
is useful in conjunction with synthesizers that have fingered portamento so that a slide occurs between
the notes, very similar to what the Roland TB-303 can do. It is also useful when the Jupiter 6 is in SOLO
voice assign mode and retriggering of the attack is not desired. Legato mode is settable on both SPLITS
independently and is saved with the preset edit.
Upper/lower sequence and rhythm link (E)
Upper/lower rhythm/sequence link causes the arpeggiator to step through both 16 step rhythms,
starting at the upper rhythm and working its way through the lower rhythm, for a total of 32 steps. This
option is available in all SPLIT modes and is saved with the preset edit.
Rest note enable (F)
This enables the option to have a rest note in a sequence of held notes. When the rest note is enabled, it
affects both arpeggiators (UPPER
UPPER and LOWER)
LOWER and is saved with the preset. However, the actual rest
note for each SPLIT is independently settable.
Setting a rest note
To set a sequence’s rest note, perform the following steps:
•
•
•
Turn rest note on (press & hold UP,
UP then press F as described above)
Continue to hold UP,
UP and while doing so, press the key on the keyboard to assign to the rest note
functionality. If the board is in SPLIT mode, pressed keys in the upper SPLIT will set the upper
sequence rest note, and pressed keys in the lower SPLIT will set the lower sequence rest note. The
upper sequence rest note is what’s used for whole mode rest note
Release UP.
UP The last note pressed will be assigned rest note functionality
Rest notes are stored as a global board setting and are not stored in the preset edit.
Page 37
Arpeggiator
Europa User Guide
Arpeggiator and sequence modes
The arpeggiator modes (options1
1-4) control the type of arpeggiation, and the sequence modes (options
5-8) control sequence related arpeggiations. One arpeggiator mode and one sequence mode can be
selected simultaneously as well as only one of the two.
Normal mode (1)
When this mode is set, the arpeggiator works as it did with the Roland code. If the up direction is
selected, notes are played in lowest note held to highest note held. If down is selected, the notes are
played in highest note held to lowest note held. Up/down and down/up modes cause the notes to follow
their respective directions.
Ordered mode (2)
Ordered arpeggiator mode causes arpeggiation to occur in the order the notes were played or recorded. If
the up direction is selected, notes are played in first note played to last note played order. Conversely, if
the down direction is selected, notes are played in the last note played to first note played order.
Up/down and down/up modes cause the notes to follow their respective directions.
PingPing-pong mode (3)
Notes are played in the order of first pressed, last pressed, second pressed, second to the last pressed,
etc… For example, if the following notes were played and held and UP mode is selected:
CDEFGAB
Ping-pong mode would arpeggiate them as:
C B D A E G F C B D A E G F ….
Setting DOWN reverses this order and up/down and down/up modes cause the notes to follow as
expected.
Random mode (4)
Notes are played in a completely random order. The Up/down settings will have no effect in random
mode.
Sequence modes and options
The following four options cover the sequence modes. All sequence modes (settings 5-8) arpeggiate the
recorded sequence and one must be recorded before these modes will function. When a sequence mode is
enabled, the UP/DOWN directions and RANGE settings affect the sequence, and the sequence is
transposed by the held notes in order from first to last played. If both an arpeggiator and a sequence
mode are enabled, the UP/DOWN directions and the RANGE settings determine the transposition order
of the sequence.
Page 38
Europa User Guide
Arpeggiator
Arpeggiator
Recording a sequence
Recording a sequence is accomplished as follows:
•
•
•
•
•
•
•
•
Press and hold the HOLD button
Play the notes desired in the sequence. After the first note, the HOLD LED will start blinking
indicating sequence record mode. It is not necessary to continue to press the HOLD button after
the first recorded note
If link mode is not enabled, up to 16 recorded notes are possible. When the 16th note is played, the
HOLD LED will stop blinking, indicating termination of record mode
If link mode is enabled, up to 32 recorded notes are possible. When the 32nd note is played, the
HOLD LED will stop blinking, indicating termination of record mode
If a shorter than maximum sequence is desired, press the blinking HOLD button to stop recording
If in WHOLE mode and link mode is disabled, the notes are recorded to the UPPER sequence
If in SPLIT mode and link mode is disabled, the notes are record to their respective SPLITS.
PLITS
If link mode is enabled, the notes are recorded first to the upper and then the lower sequence, for a
maximum of 32 notes. Both arpeggiators use the same sequence when link mode and SPLIT
modes are set
Sequences are stored as separate board settings and are not stored in the preset edit. Recordings initiated
from the front panel as described above will only accept sequence notes from the local Jupiter 6 keyboard.
Recordings initiated from MIDI will only record notes from the incoming MIDI stream.
Arpeggiated sequence mode (5)
Pressing a single note will play back and loop (while the single note is held) the sequence recorded in the
key that was pressed. If multiple notes are held, the sequence is played transposed by the first key held,
then again transposed to the second key, etc… for as many keys held.
Sequenced arpeggio mode (6)
The recorded sequence dictates which keys the currently held notes will be played in. For example, if C,
E, and G are held and the sequence has recorded A, B, and C, the held notes will be transposed to the key
of A and played, transposed to the key of B and played, and finally transposed to the key of C and played
(repeat!).
Interval mode (7)
Causes the arpeggiator to arpeggiate from a base note to an ending note at a step dictated by the distance
of the base note to the interval note.
The base note, interval note, and ending note must be recorded in a sequence in one or more groups of 3
notes:
•
•
•
The first note is the base note, or in other words, the starting note
The second note is the interval. The distance (in notes) between the base note and the interval note
(in # of notes) dictates how many notes the arpeggiator will skip per step when advancing toward
the end note
The third note pressed and held is the ending note. Arpeggiations will go up to but not higher than
this note. If the ending note is lower than the starting note, then the only note played in the
arpeggiation is the starting note
If a non-multiple of 3 notes is recorded, the extra notes are ignored. For example, if a sequence of 8 notes
has been recorded, the first interval will be notes 1-3, the second interval 4-6, and notes 7 and 8 will be
ignored. If less than 3 notes have been recorded, Interval mode will not sound.
Interval mode will cycle through all groups of intervals recorded in the sequence. The held notes will
dictate the key in which the intervals are played.
Page 39
Arpeggiator
Europa User Guide
Chord mode (8)
Chord mode causes 4 notes to be played simultaneously, or 8 notes to be played if link mode is enabled.
The recorded sequence is divided in to groupings of 4 notes (or 8 notes if in link mode) and all notes are
played simultaneously. A maximum of 4 chords can be recorded, either four 4 note chords, or four 8 note
chords (if in link mode). If a non-multiple of 4 or 8 notes is recorded, the remaining notes are considered a
short chord and are played.
If the following 16 note sequence is recorded into Europa:
C E G A# D F A C# E G# B E F A C E
Assuming chord mode enabled, link mode is disabled, and C is held, each step of the arpeggiator would
play (each line assumes notes are played simultaneously):
C E G A#
D F A C#
E G# B E
FACE
…repeat….
If E, F, and G are held down, the above 4 chords play in the key of E, F, G, and repeat.
If only 14 notes of the above listed note sequence were recorded (missing the C and E off the last chord),
then the 4th chord would just play the “short chord” of F & A.
When link mode is enabled, the behavior as described above is the same with the exception of the
sequence being a maximum of 32 notes and eight note chords are played instead of four note chords.
Also, link mode joins the upper and lower rhythms and sequences, so if the Jupiter 6 is in either SPLIT
mode and chord mode is enabled, both SPLITS follow a 32 step rhythm and four note chords.
Programming the arpeggiator step rhythm
The arpeggiator has two 16 step rhythms (upper/lower rhythms) or one 32 step rhythm when
rhythm/sequence link mode is enabled. It is always active when any arpeggiator mode has been selected.
Enable the rhythm programming mode by pressing UP and waiting for 1 second. The PATCH
PRESET,
PRESET A-F, 1-8, and MANUAL buttons become beats 1 through 16 as shown in Figure 11:
Arpeggiator step rhythm - beat 1 (patch preset) through beat 16 (manual) - On=Step, Off=No step
Patch
preset
A
B
C
D
E
F
1
2
3
4
5
6
7
8
Manual
Figure 11 - Arpeggiator step rhythm programming buttons
While the arpeggiator is running, a winking LED indicates the current beat. This is very similar to the
operation of the Roland TR-707, TR-808, and TR-909 drum machines. Pressing one of the buttons shown
in Figure 11 will toggle the step on or off. A lit LED indicates the arpeggiator will step to the next note(s)
when that beat is reached, while an unlit LED indicates the arpeggiator will not step on that beat.
Page 40
Europa User Guide
Arpeggiator
Arpeggiator
The rhythm programming buttons show different results depending upon the SPLIT mode and whether
or not link mode is enabled:
•
In whole mode with link mode disabled, the rhythm shown is the upper patch’s 16 step rhythm
sequence.
•
In whole mode with link mode enabled, the display alternates between the upper rhythm (beats 1-16)
and the lower rhythm (17-32)
•
In SPLITS mode with link mode disabled, the rhythm shown for the upper or lower SPLIT is
dependent on the LOWER and UPPER buttons’ state. Obviously, when LOWER is lit, the lower
SPLIT’S 16 step rhythm is shown, and when UPPER is lit, the UPPER SPLIT’S 16 step rhythm
is shown.
•
In SPLIT mode with link mode enabled, the display alternates between the upper rhythm (beats 116) and lower rhythm (17-32). The 32 step rhythm is applied to both SPLITS.
SPLITS
•
If the clock multiplier/divider is set to X1.5, /1.5, or /3, the rhythm is shortened to 12 steps, or 24
steps in link mode to make the rhythm fall on even measure intervals.
Page 41
How do I……..?
9.
Europa User Guide
How do I……..?
Transfer patches from tape to Europa?
When Europa is initially installed and powered on for the first time, Europa will automatically copy all of
the patches and presets stored in NVRAM into Europa’s internal flash, so there is no need to follow these
steps to do a first time transfer.
NOTE: These steps will clobber the patches/presets stored in Europa’s internal flash, so if they need to be
saved, do so by following the instructions in the “Save
Save all patches and presets to MIDI?”
MIDI?
section below. This process will also clobber Europa’s persistent state, so any currently edited patches,
MIDI channel or other board settings should be saved if desired.
A tape restore is accomplished by performing the following steps:
•
•
•
•
•
•
•
•
•
•
Power off the Jupiter 6
Press and hold TAPE while powering on (to boot up to Roland mode)
Load the patches/presets from tape as done before the Europa upgrade
Verify that patches/presets are OK while still in Roland mode – all banks and all numbers
Power off the Jupiter 6
Press and hold PORTAMENTO while powering on. This will force patches and presets to be copied
from NVRAM into Europa’s internal flash. Keep holding PORTAMENTO down until a boot code is
shown! If this step is skipped, preset bank C & D will be overwritten with Europa’s persistent
settings!
Boot code E-2 will be shown, indicating that patches/presets have been copied from NVRAM and
converted in Europa’s flash
Boot code E-4 and/or E-5 may appear indicating that NVRAM is corrupt. This is expected, as
Europa uses NVRAM occupied by Roland’s preset bank C & D to store its internal settings.
Reloading patches/presets from tape will most likely clobber Europa’s settings
Press a front panel button or a key on the keyboard to continue booting
Verify that patches/presets are OK. They are now preset in Europa’s flash
Repeat as necessary for the number of tapes with patches/presets on them. Save them to MIDI, and
throw the tapes away!
Set Europa’s MIDI channel?
Not only is Europa’s MIDI channel settable, it is also remembered across board power cycles if memory
protect is disabled! To set, press and hold the TUNE button. Pressing A allows channel selection of 1-8
through the 1-8 NUMBER buttons, and B allows channel selection of 9-16 – also by selecting it via the
1-8 NUMBER buttons. See the Setting the Jupiter 6’s base MIDI channel section for
further details.
Reload factory patches and board settings?
The following steps will reload factory patches into NVRAM and Europa’s flash, as well as Europa’s
default settings. Be sure to save off any critical patches/presets to MIDI beforehand!
•
•
•
•
•
Power off the Jupiter 6
Press and hold the BENDER button
Power on the Jupiter 6
Wait for a boot code E-6. Press a front panel button or key on the keyboard to continue
All patches/presets in NVRAM and in Europa’s flash have been restored to factory defaults
Page 42
Europa User Guide
How do I……..?
Boot to Roland mode?
When booting Roland mode, be forewarned that if Europa has run already, preset bank C & D will
contain junk presets. Europa uses this area to store persistent state, such as the current patch edits, MIDI
channel, and other persistent board settings (not patches or presets though!). Recalling preset bank C OR
D under Roland mode may cause the board to crash! The Roland code does not check for invalid memory
settings and usually causes the board to lock up.
To boot Roland mode:
•
•
•
Power off the Jupiter 6
Press and hold the TAPE button
Power on the Jupiter 6
The board will boot to the original Roland code. NOTE: Patches and presets made with Europa will not
be available to the Roland code! See the next question for details on how to get Europa patches/presets to
NVRAM so the Roland code can see it…
Copy patches/presets from Europa to NVRAM so that Roland code can see them?
We’re not exactly sure why this is desirable (maybe to make a tape for someone who doesn’t have a
Europa?) but it is included for the sake of completeness.
•
•
•
•
•
•
•
Power off the Jupiter 6
Press and hold the Glissando button
Power on the Jupiter 6
Wait for boot code E-7 to show. DO NOT PRESS ANY KEYS OR BUTTONS!
Power off the Jupiter 6
Press and hold the TAPE button to boot to Roland mode
Power on the Jupiter 6
Any patches/presets edited while in Roland mode will NOT automatically appear in the Europa flash.
Also, Europa formatted presets will lose setting information, such as non-Roland mode supported
assignment modes, sequences, rhythms, etc.. since the Roland code does not have these features.
Restore all patches and presets from MIDI?
Provided that the steps in the section (Save
Save all patches and presets to MIDI?)
MIDI? below were
followed, the only step required to restore all patches/presets is to simply play the sequence back to the
Jupiter 6.
The Jupiter 6’s front panel lights will shimmer or flicker during restoration – this is normal! The Jupiter 6
hardware requires that Europa strobe the front panel lights, and strobing is not possible when Europa is
writing to flash.
If these steps have not been followed, ensure that there is at least a 70 millisecond gap between all system
exclusive messages, otherwise restoration of patches/presets will be intermittent if not incomplete.
Page 43
How do I……..?
Europa User Guide
Save all patches and presets to MIDI?
Europa stores patches/presets as a series of individual MIDI system exclusive messages. It is a
requirement that the recording device (dedicated sequencer or computer running a sequencer package) is
capable of receiving and recording system exclusive messages! If unsure, consult the documentation that
came with the recording device.
Follow these steps for a successful save (and future load) of all patches/presets:
•
•
•
•
•
•
•
Set up the recording device (called a ‘sequencer’ from here forward) to record. Be sure system
exclusive messages are not filtered out. Many sequencers filter out system exclusive messages by
default. This is dependent on the sequencer itself – consult the sequencer’s manual for specific
information on how to verify that it is enabled
Make sure that the Jupiter 6’s MIDI OUT is connected to the input (or one of the inputs) to the
sequencer
Start recording on the sequencer
Press and hold TAPE
Press 7. This will dump all patches/presets to MIDI
Release any held buttons. The dump process takes about 6 seconds. The TAPE LED will go out when
the dump is complete
Stop recording on the sequencer
The sequencer should have recorded about 6 seconds of system exclusive messages.
It is important that the timing of the system exclusive dump is kept. Europa places a 70 millisecond delay
between each patch and preset, which is required for a successful restoration. Europa writes all
patches/presets to flash, and during this write, Europa is not executing code and will lose incoming MIDI
data.
Page 44
Europa User Guide
Common problems
10. Common problems
I can’t get any sound out of Europa from the local keyboard
In order, check the following and try playing local keys at each step to see what cures the problem:
•
•
•
•
•
•
•
•
•
•
•
•
Verify that the volume is turned up to an acceptable level
Does sound come out with headphones plugged in to the PHONES jack on the back of the Jupiter 6?
If using the balanced or ¼” outputs on the back of the Jupiter 6, is the mixer it is connected to
powered and the track nonmuted?
Is local mode enabled? Press and hold TAPE.
TAPE Make sure the A LED is lit solid (local mode enabled if
it is). If it isn’t, while still holding TAPE,
TAPE press A to turn local mode back on
Is the arpeggiator turned on? If it is, shut it off for the sake of testing
Is the board in SPLIT mode? Is the SPLIT point reasonable? Press and hold one of the KEY MODE
buttons (SPLIT
SPLIT 4/2,
4/2 SPLIT 2/4,
2/4 WHOLE)
WHOLE and press a key, such as middle C (indicated by the
white arrow on the front panel that points to the keyboard) to set a reasonable SPLIT point
Has an external sequencer sent a continuous controller 7 (Volume) to Europa? Europa responds to
board level volume control where the Roland code did not. Power cycle the Jupiter 6 to clear this
condition, though if this is cures the problem, check with the sequencer documentation for volume
change information. Europa will restore the Jupiter 6 to full volume after each power cycle
Does the current patch make a sound? Try recalling other patches
Is the HOLD LED on? If so, shut it off
Turn voice watch mode on by pressing and holding TAPE and ensuring the E LED is lit solid. If not,
press it to turn on voice watch. Press some keys on the local keyboard. Do any of the A-F LEDs light
in sequence to the repeatedly played keys?
Set Poly 1 mode. With voice watch still enabled, repeatedly press a single key. The A-F LEDs should
sequence as the key is being played
As a last resort, restore factory patches by powering off the Jupiter 6, holding the BENDER button
and turning on the Jupiter 6. A boot code of E-6 will show – press any front panel button or
keyboard key to boot Europa. Take the board out of PRESET mode and select patch A-2. Press
some keys
If no sound is heard at this point, then most likely one or both of the sound boards is at fault.
Europa won’t respond to MIDI
Europa has many additional features that the Roland code does not. A handful of these features can
expose problems that have existed all along that were not possible to see on a synthesizer with a brain
dead MIDI implementation.
•
•
•
•
Ensure the Jupiter 6 has proper MIDI connectivity. Is there an IN cable plugged in? Does the TUNE
LED blink with receive activity? If not, then check the sequencer or the master device for problems
If the tune light blinks, is the correct MIDI channel selected? Most Roland code would allow
reception on any MIDI channel (OMNI mode). Europa will not respond in OMNI mode. MIDI Data
must be received on the set MIDI channel (described in the section Setting the Jupiter 6’s
base MIDI channel)
channel for Europa to respond to it
Is the memory protect switch on? Was the channel set earlier but now is set to some other channel?
Make sure the memory protect switch is turned off, otherwise Europa cannot memorize any board
settings (such as the MIDI channel)
Europa responds to continuous controller # 7 (volume). Roland code does not. Is the sequencer
sending out a volume control change that is muting or reducing the volume of the voices? Most
sequencers set volume values on sequence start. Ensure the volume value is set in the sequencer to
something reasonable (try 127 – the maximum – for full volume output)
Page 45
Common problems
Europa User Guide
The arpeggiator is enabled but it won’t start
Europa adds several features to the Arpeggiator that can cause the Arpeggiator to not start or step.
•
Is the clock source set properly? Press the DOWN button for at least one second and hold it. Look at
the A, B, and C LEDs in the BANK group of buttons (only one of the LEDs will be lit):
A - Internal clock (rate adjustable by the RATE knob in the arpeggio section). is the RATE
something other than 0? Try turning the RATE knob to mid scale
B - External clock. Verify that there is a cable plugged in to the “Arpeggio
Arpeggio clock in”
in jack on the
back of the Jupiter 6 and that the master clocking device is generating one pulse per step
•
•
•
C - MIDI Clock. Is the MIDI clock source transmitting MIDI clock? Note that most sequencers have
MIDI clock transmission turned off by default. Consult the documentation for the sequencer being
used
Is a sequence arpeggio mode selected with no recorded sequence? A sequence arpeggio mode with
an empty sequence will produce no notes. Either record a sequence or unset an arpeggiator sequence
mode (described in “Arpeggiator and sequence modes”
modes”)
Is a blank rhythm set? Double check it by pressing and holding the RANGE button and ensuring
that at least some of the PATCH PRESET,
PRESET A-F, 1-8, and MANUAL LEDs are set. If no rhythm is
programmed, the arpeggiator will not step
Is a combination of the rate being set very low and the divider/multiplier being set to a large divider?
If clocked internally, try setting the RATE knob to about midrange (5), and set the divider to 1X as
documented in the Multiplier/divider settings (1 - 8) section
I get two notes for every one I play (or notes sound flanged)
Ensure the sequencer being used is not looping back notes. If it is, either set the sequencer to not do MIDI
loopback or shut local mode on the Jupiter 6 off (press and hold TAPE and press A until it blinks). This
is not a problem with Europa, rather one that can be noticed with Europa due to voice watch.
The ENVENV-2 slider doesn’t work!
Turn off velocity transmit. Press and hold TAPE and press D until it blinks. This restores the ENVENV-2
slider to normal operation instead of controlling the velocity of played notes.
I’m not recording sysex/CCs from Europa in my sequencer
Check the sequencer and ensure that continuous controllers and/or system exclusive messages are not
filtered out. By default, most sequencers fill filter out (drop) all system exclusive messages during
recording. It must be manually enabled. Check with the sequencer documentation to verify that system
exclusive messages will be recorded.
Assuming the sequencer is properly set to record system exclusive and/or continuous controller
messages, press and hold the TAPE button on the Jupiter 6. Verify that B is lit solid. This indicates that
continuous controllers will be transmitted on knob, slider, and button changes. If system exclusive
recording is desired, verify that C is lit solid.
NOTE: System exclusive messages should not be used for recording or performance purposes. The
messages themselves are significantly larger than continuous controller messages and can induce sloppy
MIDI timing. Instead, record continuous controller messages.
Page 46
Europa User Guide
Common problems
Timing is sloppy when playing back a sequence with controlle
controller
r changes
Does the sequence contain system exclusive messages? Check with the sequencer to ensure that none
were recorded. As mentioned in the “I’m
I’m not recording sysex/CCs from Europa in my
sequencer”
sequencer section, system exclusive transmission on the Jupiter 6 should not be enabled when
recording a sequence. Even if the sequencer is not recording the system exclusive messages, it still takes
up MIDI bus time and will cause the continuous controller timing to be sloppy.
Disable system exclusive transmission by pressing and holding the TAPE button, and press C until it is
blinking, and rerecord the sequence. Either that, or eliminate all system exclusive messages in the
recorded sequence.
Not all patches/presets were restored
restored properly from a sysex dump
Europa requires that there be 70 milliseconds of delay between each system exclusive message that stores
a patch or preset in the Jupiter 6. This is a requirement due to the hardware putting the processor to sleep
when writing to internal flash.
The best way to help eliminate incomplete restores is to follow the instructions in the “Save
Save all
patches and presets to MIDI?”
Restore all patches and presets from MIDI?”
MIDI? and “Restore
MIDI?
sections. This clearly outlines how to reliably save and restore patches, presets, and board state.
If patches/presets are not being restored properly, check the following:
•
•
•
Was the saved patch/preset sequence played back at the same tempo it was recorded? If not, restore
it to the original tempo and try again. Europa dumps patches and presets with the delays needed for
successful restoration, so they will be recorded
Are the start and end markers in the sequencer playing the entire system exclusive sequences
recorded? Double check it!
If a dedicated system exclusive recorder was used instead, make sure the sequencing package can
place delays between system exclusive messages, and verify that there is at least 70 milliseconds of
delay between each message. The actual MIDI bytes do not have to be paced – only a delay between
entire system exclusive messages is necessary
I hear unplayed or missing notes in my arpeggiations
There can be a variety of reasons for missing or skipped notes within an arpeggiation, and it is important
to find the root cause of the missing note(s):
•
•
•
Verify first that the rhythm itself is not missing any beats. Do this by pressing and holding the
RANGE button, and observe the PATCH PRESET,
PRESET A-F, 1-8 and MANUAL
MANUAL buttons. Are any of
the LEDs on those buttons blinking? If so, and it is not desired, press the missing beats until the LED
no longer blinks. Setting the rhythm is described in the “Programming
Programming the arpeggiator step
rhythm”
rhythm section
Is the range going beyond the Jupiter 6’s note range capability or beyond MIDI note number 127
entirely? This is very easy to do by setting the range to 4 and pressing the top note of the Jupiter 6.
Notes that go beyond the Jupiter 6’s note range capability become a rest. If the note range is beyond
the Jupiter 6’s capability but still within the MIDI note range of 0-127, that note will still be
transmitted even though the Jupiter 6 will not sound. If the arpeggiated note is beyond note 127, no
note will be played, and it will act like a rest for that step
Is the rest note enabled? As a temporary check, disable it by pressing and holding the UP button and
checking the F LED. If it is enabled (steady LED), press the F button until it blinks. This will disable
the rest note. If this is the source of the problem, change the rest note (described in the “Setting
Setting a
rest note”
note section), rerecord the sequence, or press and hold notes that do not contain the rest
note
Page 47
Common problems
Europa User Guide
The arpeggiator runs too fast/slow or doesn’t stay in sync
Check the following:
•
•
•
Is the arpeggiator clock multiplier/divider set to a desired value? See section “Arpeggiator
Arpeggiator sync
options and clock multiplier/divider”
multiplier/divider on how to set the multiplier/divider to the proper
value
Is the arpeggiator synchronization setting set to the proper source? See section “Arpeggiator
Arpeggiator
sync options and clock multiplier/divider”
multiplier/divider for how to set the arpeggiator synchronization
source. If the clock source is set to external arpeggio, if an external clock stops advancing, Europa will
continue to provide clocking at the last rate received. The only way to clear this condition is to feed
the Jupiter 6 a new arpeggio clock or change the clock sync to internal or MIDI
Check the rhythm and ensure that no unintended beats are missing. See section “Programming
Programming
the arpeggiator step rhythm”
rhythm for details on how to check and set the rhythm
The Europa Firmware Update Utility times out when I try to update
The EFUU needs bidirectional communication. That is, both the MIDI IN and OUT cables to the Jupiter 6
must be connected to the computer running the EFUU. Check the following:
•
•
•
•
•
Be sure to connect the Jupiter 6’s MIDI IN to the computer’s MIDI OUT, and the Jupiter 6’s MIDI
OUT to the computer’s MIDI IN. Do not connect INs to INs and OUTs to OUTs!
Verify communication between the computer and the Jupiter 6 works properly by playing a sample
sequence to it. Also, make sure the computer can record MIDI messages from the Jupiter 6.
Once the EFUU is executed, be sure to select the Jupiter 6’s MIDI IN and OUT buses. When the EFUU
connect button is pressed, it will send out a message every 2 seconds looking for a response from the
Jupiter 6. Look at the TUNE LED to see if it is blinking at that interval. If not, then there is no
communication from the computer to the Jupiter 6
If using the Macintosh, uncheck the Sync box and try connecting again
Be sure there are no other MIDI applications running at the time the EFUU is running – PC or
Macintosh! This includes (but is not limited to) sequencers and MIDI monitors. These programs will
most often interfere with MIDI operations.
Page 48
Europa User Guide
Europa Firmware Update Utility
11. Europa Firmware Update Utility (EFUU)
Europa comes with a utility for both Windows and the Apple Macintosh running Macs (any version prior
to OSX). It is used to update Europa with new images that are released by Synthcom Systems, Inc. New
Europa images may add new features or fix bugs. Throughout this chapter, “the update utility” refers to
either the Windows or the Macintosh version of the Europa Firmware Update Utility (EFUU).
Both the Windows and Macintosh versions of the EFUU have been designed to operate and function as
closely as possible for ease in switching between platforms.
The update utility requires the Jupiter 6 to have both a MIDI In and MIDI Out cable connected, as the
communication between the utility and the Jupiter 6 must be bidirectional. This may require temporary
rewiring of MIDI cables, but firmware updates seldom occur.
The Europa image files are checked against corruption, so it is not possible for the file itself to be bad and
still properly work, as the firmware update utility will indicate so.
It is assumed that the MIDI interfaces on both supported platforms have been installed and are working
properly. If MIDI operation has not been verified, please do this first. Instructions for installation of the
MIDI interface can be found in the MIDI interface’s manual.
Do not modify the system’s MIDI configuration while the EFUU is running! The MIDI configuration is
checked on the startup of the EFUU and is not checked again until the EFUU is restarted. So if
modification to the system’s MIDI configuration is required, do so before running the EFUU.
NOTE: Do not update the firmware image in Europa if it is good and its version matches that of the
update file! Europa’s image is heavily guarded against corruption and self-checks on bootup (see the
Diagnostics chapter for intimate detail on this). Reupdating with an identical image when the Europa
image is OK will do no good! The update utility will warn the user against this. It will not alter any of the
board’s settings nor reload any defaults. Do not expect it to fix anything except a bad image! If the update
utility has updated the image before and indicated that the image is good, the update was completely
successful! The only reasons to update a Europa image:
•
•
•
•
A new Europa image is posted on Synthcom Systems’ web site and it is a desirable update
A prior firmware update has failed
The Jupiter 6 is booting to Firmware Transfer Mode and Europa never executes
The Jupiter 6 is not booting at all
In the case where the Jupiter 6 is not booting, press and hold WRITE and TAPE while turning on the
Jupiter 6. This will force Europa to boot to Firmware Transfer Mode. A non-booting Jupiter 6 indicates
that the Europa image has become corrupt, most likely from an incomplete update.
If the firmware update fails or is canceled during the update process, DON’T PANIC! It is recoverable! As
with a corrupt image, press and hold WRITE and TAPE while turning on the Jupiter 6. Europa will boot
to Firmware Transfer Mode, and rerunning the update utility is all that is required!
The Windows firmware update utility
The Windows update utility runs on Windows 95, 98, 98SE, NT 4.x, XP, ME, or 2000. It will not work on
Windows 3.x, Windows NT 3.x, or Windows For Workgroups. If the update utility complains there are
no MIDI interface installed or the expected MIDI interface(s) do not show up in the receive/transmit
ports, double check that the MIDI interface drivers are installed and working properly.
Page 49
Europa Firmware Update Utility
Europa User Guide
A NOTE ABOUT SOUND CARD MIDI INTERFACES: The Europa Firmware Update Utility requires
bidirectional system exclusive communication. Flaky operation has been observed and root caused to the
sound card’s MIDI drivers dropping outgoing data. Don’t be surprised if it takes a couple of tries to
connect and successfully update using these interfaces!
Execute the EFUU.EXE file that has been downloaded from Synthcom Systems’ web site or on the
provided CD-ROM. Note that the version encountered on the CD or web site may differ from the
examples below, but operation remains the same.
Step 1: Establish communication with Europa
After executing the Windows EFUU.EXE file, a dialog box will pop up and look like this:
Click on the down arrows in the “Transmit to:” and “Receive from:” (shown as “(Choose a MIDI port)” in
the dialog box above) drop lists and select the input and output MIDI bus where the Jupiter 6 is located:
The drop list will show all available input and output MIDI buses. Once the MIDI buses have been
selected, the “Connect” button becomes available. Click on the “Connect” button. A “Connecting” dialog
box will appear briefly, and if communication is established, the following dialog is shown:
Page 50
Europa User Guide
Europa Firmware Update Utility
If communication is not established, acknowledge the failure by clicking on OK on the “MIDI Response
timeout” dialog, double check the MIDI cabling and the transmit/receive buses selected in the dialog and
try connecting again.
If communication is established, click OK in the “Connection established!” dialog. The update utility will
now show the original dialog box with Europa’s serial number and the currently installed Europa version
number. If the Europa image is bad, a serial number and current version will not be displayed.
Step 2: Locate an image to update
The “Find image” button will become active and can be pressed to locate an update image:
Select the image by double clicking on the filename, or single clicking on the filename and clicking on the
“Open” button.
Another alternative to using the “Find image” button is to click on the “Image filename” line on the main
dialog and manually type in the path and filename of the image to apply. Changing focus to another part
of the dialog will cause the update utility to check the file and will inform the operator of a bad filename
or corrupt image. If the file is good, the “Update” button will become active.
Europa images have a .efi file extension, and are always named the update version they contain. NOTE:
Do not rename the Europa update image filename! The update utility recognizes full length Windows
filenames. It will just cause confusion later on if multiple .efi files are present.
After the image is selected, it is completely verified to ensure the file does not contain any corruptions
and is not malformed. If the image is bad, a dialog box will pop up indicating that the file has a CRC
error. Redownload the image from Synthcom Systems’ web site.
Page 51
Europa Firmware Update Utility
Europa User Guide
Step 3: Update the Jupiter 6
Once the update file has been selected and verified good, the “Update” button becomes active. If the
Jupiter 6’s Europa image is bad, the serial # and Europa version # fields will be blank. Notice that
Europa’s serial number is shown as well as the version of the currently installed Europa image:
To update Europa, click “Update”. A small progress dialog box will pop up:
The entire update process will take between 15 and 60 seconds to complete depending upon the image
size, the number of other programs/tasks running, and the speed of the platform. The LEDs will
shimmer during updating – this is normal! Timeouts or other errors will be reported if the update is not
successful. If the update is successful, the following is shown:
Click “OK”, and then click on “Exit” or the “X” in the upper right hand corner of the dialog box to exit.
Update complete! The serial # and Europa Version is updated at the end of the update to reflect the new
version.
Page 52
Europa User Guide
Europa Firmware Update Utility
The Apple Macintosh Europa Firmware Update Utility
The Macintosh firmware update utility works on any Macintosh with OMS 1.2 or an equivalent (such as
FreeMIDI 1.35 which emulates OMS 1.2), installed and running. OMS 1.2 (or equivalent) must be
configured to send to and receive from the Europa enhanced Jupiter 6. It is assumed the system is already
set up and working, as it is beyond the ability for this manual to give specific instructions for any given
MIDI hardware/software configuration. Refer to the MIDI interface’s manual for proper setup and
configuration.
Special note for FreeMIDI 1.35 and later users: If a hang is experienced when running the EFUU, try
unchecking the “Async” box and running the EFUU again. There’s no technical way for the EFUU to
differentiate between a real OMS implementation and FreeMIDI’s OMS emulation, and thus no way for
the EFUU to automatically uncheck the Async option.
Execute the Macintosh EFUU either from the provided CD-ROM or from Synthcom Systems’ web site.
Note that the version encountered on the CD or web site may differ from the examples below, but
operation remains the same.
Step 1: Establish communication with Europa
When the EFUU is launched, it will look like this:
The “Async” checkbox is enabled and defaulted to "checked" when OMS 2.0 or greater is installed. This
checkbox controls the method used to transmit data from EFUU to the Jupiter 6. The box should normally
be left checked unless problems are encountered when transmitting to the Jupiter 6. It's far more likely
that a problem will occur when unchecked, as some USB interfaces (like the Opcode MIDIport 32) may
not work with the box unchecked.
Page 53
Europa Firmware Update Utility
Europa User Guide
Using the pop up menus on the “Transmit to:” and “Receive from:” selections, select the Jupiter 6 from
each list. All buttons will be disabled until both MIDI buses have been selected. If the Jupiter 6 is not
present in both lists, refer to OMS setup for proper configuration before continuing. A selection of the
transmit and receive ports will appear as follows:
Once the transmit and receive ports have been selected, click on the “Connect” button. The progress
window will open, briefly, while connecting. If the connection is successful, the serial number and
version number will be displayed. If communication is not established, an error message will be
displayed. In this case, double check the Jupiter 6’s IN and OUT MIDI cables and be sure the computer
has the ability to communicate bidirectionally with the Jupiter 6 and the proper MIDI ports are selected.
Step 2: Locate an image to update
The “Find image” button will become active and can be pressed to locate a Europa image:
Using the dialog box, select the desired Europa firmware image file to update, and click the Open button.
The filename is then displayed in the main window.
Page 54
Europa User Guide
Europa Firmware Update Utility
Step 3: Update the Jupiter 6
Once the image is selected, click “Update” to update Europa:
The process of updating can take anywhere from 15 seconds to a minute, depending on the size of the
image, the speed of the host computer, and the number of other running processes. The LEDs on the
Jupiter 6 will shimmer during updating – this is normal! If any errors occur during the update, a window
will pop up indicating the failure.
To cancel the update process, click the “Cancel” button AND CONTINUE HOLDING THE MOUSE
BUTTON DOWN until the “Cancel” button is highlighted (which may take up to three seconds). The
mouse button can then be released, and the process will cancel.
A successful update will look like this:
Click “OK” to continue. Europa was successfully updated! The new version number will be shown in the
main window.
Additional Notes on the Macintosh EFUU
Manually setting the firmware image file's creator and type codes both to 'EFUU' should result in the file
getting the official EFUU document icon. This is not required in order to use the file with EFUU, but it
does help aesthetics.
EFUU Doesn't support opening the image file by double-clicking the file's icon or by file drag-and-drop.
However, double-clicking the file's icon will open EFUU, as will file drag-and-drop - only if the file's
creator has been set to 'EFUU'. In any case, the Find Image button will still need to be used to open the
Europa image file.
Page 55
Europa MIDI Implementation
Europa User Guide
12. Europa MIDI Implementation
Features of Europa’s MIDI implementation are contained within this chapter. Europa offers a vast feature
set over the Roland code, including realtime control of the voice parameters via MIDI continuous
controllers (CC) and the ability to save and load patches via MIDI system exclusive messages (Sysex). It is
assumed the reader is familiar with binary and hexadecimal notation.
Basic MIDI functionality
This section describes Europa’s MIDI operation. Details on system exclusive commands and continuous
controller messages are documented in later sections of this chapter.
Europa responds to all channel voice messages (any channel specific MIDI message) on its base MIDI
channel, or also on its base MIDI channel + 1 if SPLIT 4/2 or SPLIT 2/4 modes are enabled. When in
SPLIT mode, the lower voice is always the base MIDI channel and the upper voice is always the base
MIDI channel + 1. If the base MIDI channel is 16 and the Jupiter 6 is in either SPLIT mode, the upper
voice is addressed on channel 1.
If the Jupiter 6 is in SPLIT 4/2 mode, the channel voice messages received on the base MIDI channel
will affect the 4 voice board and the channel voice messages received on the base MIDI channel + 1 will
affect the 2 voice board.
If the Jupiter 6 is in SPLIT 2/4 mode, the channel voice messages received on the base MIDI channel
will affect the 2 voice board, and the channel voice messages received on the base MIDI channel + 1 will
affect the 4 voice board.
The following diagram illustrates the relationship of MIDI continuous controllers and system exclusive
messages to the voice boards, the preset edit, and patch edits:
MIDI CCs
Preset edit
MIDI Sysex
Upper/whole
patch edit
Lower patch edit
(whole mode)
2 Voice board
4 Voice board
Figure 12 – Europa’s patch, preset, and voice board architecture
Some things to note:
•
•
•
•
MIDI CCs affecting the patch will go to the voice boards only. They are temporary changes to the
patch that are not recorded nor saved in the patch edit buffers
MIDI System exclusive messages affecting the patch will go to both the voice boards and the
appropriate patch edit(s). These messages will cause the “changed” number light to blink as a
modified patch in Roland mode would
MIDI CCs or system exclusive messages that affect preset parameters will both change the preset edit
buffer. There is no temporary setting distinction as there is in patches since preset settings are rarely
used in performances and it would make the user interface very confusing
The upper patch edit is used when the Jupiter 6 is in WHOLE mode.
Page 56
Europa User Guide
Europa MIDI Implementation
Europa’s MIDI transmission/reception capabilities
The following table describes all MIDI messages, how Europa responds to them, and whether or not they
are transmitted by front panel actions. With this chart, it is assumed that Europa keeps in sync with the
incoming MIDI messages even though some MIDI messages are ignored.
M IDI Message
R
X
T
X
Notes
Note on
X
X
Note off
Poly aftertouch
Control change
X
X
X
Program change
X
X
Channel aftertouch
Pitch bend
X
X
Sysex messages
X
X
Song position pointer
Song select
Tune request
X
X
X
X
MIDI Clock
X
X
MIDI Start
X
X
MIDI Continue
X
MIDI Stop
X
Active sensing
System reset
Running status
X
X
X
Note on with a velocity of 0 is treated as a note off. Locally played
notes will transmit a note on command with a velocity of 0 when
a key is released, and a velocity of 70h when a key is pressed. Key
velocity may be mapped to VCA ENVENV-2 level if transmit
velocity mode is enabled. Note velocity is ignored unless
assigned to a CC via velocity assign.
Same as a note on with velocity of 0
Understood but no action taken
Transmits only when continuous controller transmit is enabled.
Always receives CCs.
Program changes 0-47 select patches in the current slot. Program
changes 64-95 select presets and will place the board in preset
mode.
Only recognized if aftertouch assign is enabled.
Only recognized if pitch bend assign is enabled. NOTE: Pitch
bend receives will not alter the pitch in a traditional pitch bend
fashion!
Europa will only respond to system exclusive messages with the
Europa signature and will ignore all others.
Understood but no action taken
Understood but no action taken
Europa transmits a tune request on powerup and press of the
tune button.
Sent only when the arpeggiator is running and set to internal
clock.
Transmitted when the arpeggiator is enabled, set to internal
clock, and the first note is pressed. If received and arpeggiator is
enabled, the arpeggiator starts.
If the arpeggiator is enabled, the arpeggiator continues from the
point where it stopped.
Transmitted when the arpeggiator is turned off. If received when
the arpeggiator is enabled, the arpeggiator stops.
Understood but no action taken
Understood but no action taken
Received and memorized for all channel voice messages. Base
MIDI Channel 1 assumed on board powerup. Europa will need to
receive at least one full channelized MIDI message to synchronize
with the MIDI stream.
X
Figure 13 - Europa's overall MIDI reception and transmission capabilities
Continuous
Continuous controllers supported
The following table is a layout and description of each of the continuous controllers that Europa receives
and/or transmits. It is assumed that the reader understand binary notation, as it is used in the
descriptions of several of the continuous controllers.
Page 57
Europa MIDI Implementation
Europa User Guide
Each of the continuous controller numbers listed in this table is synonymous with the controller number
mentioned in the system exclusive section of this chapter. The only difference is system exclusive
messages will cause the contents of the patch edits to change, whereas continuous controllers alone will
not change the patch edits.
Each column in the table has the following meanings:
Ctrl #
RX
TX
Valid values
Name
Description
Alters
Global
Various
Preset
Voice
– MIDI Continuous Controller number – in decimal
– If checked, indicates Europa receives and responds to the continuous controller
– If checked, indicates Europa transmits this controller through front panel button
presses and knob/slider movements
– Valid ranges that Europa responds
– Name/function of continuous controller
– Functional description and detail of controller values
– Indicates what reception of the continuous controller will alter:
– Modifies a board global setting (those not stored with a patch or a preset)
– Modification will depend on assignment
– Modifies preset edit
– Makes a temporary modification to the voice but does not alter the patch edit
Ctrl
#
R
X
0
X
0
1
X
0-127
Mod wheel
5
7
X
X
0-127
0-127
GLIDE Time
Volume
8
X
0-127
SPLIT Balance
32
33
34
X
X
X
X
X
X
0-127
0-127
0-127
35
X
X
0-127
36
X
X
0-127
37
X
X
0-127
38
X
X
0-127
39
X
X
0-127
LFO 1 Rate
LFO 1 Delay
VCO MOD
LFO
VCO MOD
ENV 1
PWM Pulse
width
PWM Pulse
width source
amount
XMOD
Manual
XMOD ENVENV-1
Page 58
T
X
Valid
values
Name
Description
Alters
Slot select
Sets current patch/preset memory storage slot
#
Function varies – user assignable to other CCs
Global
Modifies GLIDE time (same as CC #62)
Sets output level on either SPLIT or entire
voice if in WHOLE mode. Outputs are set to
max (127) when board is powered and volume
setting is not retained across power cycles.
NOTE: The volume knob on the front panel
will not transmit this CC!
Sets volume balance between upper and lower
SPLITS
SPLITS.
TS No effect in WHOLE mode.
0=LOWER
LOWER SPLIT,
UPPER SPLIT,
SPLIT 127=UPPER
SPLIT
64=Equal SPLIT between upper and lower.
Identical to CC #80.
Set LFO 1’s
1 rate
Set LFO 1’s
1 delay time
Set LFO 1’s
1 effect on VCO
Variou
s
Preset
Global
Preset
Voice
Voice
Voice
Set ENV 1’s
1 effect on VCO
Voice
Set the PWM pulse width
Voice
Set the PWM pulse width source amount
Voice
Set the XMOD MANUAL slider
Voice
Set the XMOD ENVENV-1 slider
Voice
Europa User Guide
Ctrl
#
R
X
T
X
Valid
values
40
X
X
41
X
42
Europa MIDI Implementation
Name
Description
0-127
VCO 1 Range
X
0-127
VCO 2 Range
X
X
0-127
43
X
X
0-127
VCO 2 Fine
tune
VCO MIXER
Set VCO 1’s
1 operational range:
2-17
32’
29-44
16’
56-71
8’
83-98
4’
110-125
2’
126-127
1’
Values between each tuning range provide
various tunings between them. Values 0-1
provide an almost subharmonic oscillation.
Set VCO 2’s
2 operational range:
2-17
32’
29-44
16’
56-71
8’
83-98
4’
110-125
2’
126-127
1’
Values between each tuning range provide
various tunings between them. Values 0-1
provide an almost subharmonic oscillation.
Set VCO 2’s
2 fine tune level
44
45
46
47
X
X
X
X
X
X
X
X
0-127
0-127
0-127
0-127
48
49
X
X
X
X
0-127
0-127
50
51
52
53
54
55
X
X
X
X
X
X
X
X
X
X
X
X
0-127
0-127
0-127
0-127
0-127
0-127
56
57
58
59
60
X
X
X
X
X
X
X
X
X
X
0-127
0-127
0-127
0-127
0-127
61
X
X
0-127
VCF Frequency
VCF Resonance
VCF ENV mod
VCF LFO 1
mod
VCF Key mod
VCA ENV 2
Level
VCA LFO Mod
ENV 1 Attack
ENV 1 Decay
ENV 1 Sustain
ENV 1 Release
ENV 1 Key
follow
ENV 2 Attack
ENV 2 Decay
ENV 2 Sustain
ENV 2 Release
ENV 2 Key
follow
Arpeggiator rate
Alters
Voice
Voice
Voice
Set the VCO MIXER level. 0=VCO
VCO 1
entirely, 127=VCO
VCO 2 entirely, 63=VCO
VCO 1 and
VCO 2 evenly balanced
Set the VCF‘s
VCF frequency
Set the VCF‘s
VCF resonance amount
Set the VCF ENV effect on the VCF
Set LFO 1‘s
1 effect on the VCF
Voice
Set the VCF keyboard modulation level
Set ENV 2‘s
2 effect on the VCA
Voice
Voice
Set LFO 1‘s
1 effect on the VCA
Set ENV 1‘s
1 attack time
Set ENV 1‘s
1 decay time
Set ENV 1‘s
1 sustain level
Set ENV 1‘s
1 release time
Set ENV 1‘s
1 key follow
Voice
Voice
Voice
Voice
Voice
Voice
Set ENV
Set ENV
Set ENV
Set ENV
Set ENV
Voice
Voice
Voice
Voice
Voice
2‘s
2 attack time
2‘s
2 decay time
2‘s
2 sustain level
2‘s
2 release time
2‘s
2 key follow
Set arpeggiator rate. Rate is applied to both
SPLITS
SPLITS (if board is in SPLIT mode). See the
arpeggiator rate table later in this chapter for
controller value to BPM mapping.
Voice
Voice
Voice
Voice
Preset
Page 59
Europa MIDI Implementation
Ctrl
#
R
X
T
X
Valid
values
62
X
X
63
X
64
Europa User Guide
Name
Description
Alters
0-127
GLIDE Time
X
0-127
X
X
0-127
UNISON
Detune
Sustain pedal
65
X
X
0-127
Portamento
66
X
X
0-3
LFO 1
Waveform
Set Portamento or glissando rate (whichever
selected) 0=Fast, 127=Slow
Set UNISON detune level. 0=No detune,
127=Heavy detune.
Standard MIDI sustain pedal treatment. 063=Sustain pedal off, 64-127=Sustain pedal on
Standard MIDI Portamento enable/disable. 063=Portamento off, 64-127=Portamento on
Set LFO 1’s
1 waveshape:
0 – Random waveform
1–
Square wave
Sawtooth
2–
67
X
X
0-3
VCO Mod &
PWM
68
X
X
0-3
VCO Modulation
69
X
X
0-15
VCO 1
Waveform
3Triangle
Set PWM modifier control enables:
0 – No PWM modifiers
1 – PWM Modified by LFO 1 only
2 – PWM Modified by ENV 1 only
3 – PWM Modified by LFO 1 & ENV 1
Set VCO MOD enables:
0 – No modulation active for either VCO
1 – Modulation active for VCO 2
2 – Modulation active for VCO 1
3 – Modulation active for VCO 2 and
VCO 1
Select VCO 1‘s
1 waveforms:
Preset
Preset
Preset
Preset
Voice
Voice
Voice
Voice
Bits 7-4 – Set to 0 (unused)
70
X
X
0-15
VCO 2
Waveform
Bit 3
Bit 2
–
–
- 1=Triangle wave, 0=Disabled
- 1=Sawtooth wave, 0=Disabled
Bit 1
Bit 0
–
–
- 1=Pulse wave, 0=Disabled
- 1=Square wave, 0=Disabled
NOTE: If an attempt is made to turn the pulse
and square wave on simultaneously, the
square wave will become active and the pulse
wave inactive. It is valid to shut off all
waveforms.
Select VCO 2‘s
2 waveforms:
Voice
Bits 7-4 – Set to 0 (unused)
71
X
Page 60
X
0-2
Filter modes
Bit 3
Bit 2
–
–
- 1=Triangle wave, 0=Disabled
- 1=Sawtooth wave, 0=Disabled
Bit 1
Bit 0
–
–
- 1=Pulse wave, 0=Disabled
- 1=Noise, 0=Disabled
It is valid to shut off all waveforms.
Set the VCF’s
VCF mode:
0 – High pass filter
1 – Low pass filter
2 – Band pass filter
Voice
Europa User Guide
Ctrl
#
R
X
T
X
72
X
X
73
X
74
Valid
values
Europa MIDI Implementation
Name
Description
0-3
Sync modes
X
0-1
VCF ENV Mod
X
X
0-1
ENV 1 Polarity
75
X
X
1-3
KEY MODE
76
X
X
0-1
LOWER/UPPE
LOWER UPPE
R select
77
X
X
0-8
Voice assignment
mode
78
X
X
0-15
Miscellaneous
settings
Set the VCO sync mode:
0 – Sync mode disabled
1 – VCO 2 Syncs to VCO 1
2 – VCO 1 Syncs to VCO 2
3 – VCO 1&
1 VCO 2 Sync to each other
Set the VCF envelope modulation control:
0 – VCF Altered by ENV 1
1 – VCF Altered by ENV 2
Set the polarity of ENV 1:
1
0 – Negative polarity
1 – Positive polarity
Set the KEY MODE:
MODE
1 – Split 2/4 mode
2 – Split 4/2 mode
3 – WHOLE mode
Set the PANEL MODE:
MODE
0 – LOWER
1 – UPPER
Set the voice ASSIGN mode:
0 – Poly 1
1 – Poly 1 steal
2 – Poly 2
3 – Poly 2 steal
4 – Unison
5 – Unison steal
6 – Solo
7 – Solo rotate
8 – Solo unison
Set miscellaneous settings:
Alters
Voice
Voice
Voice
Preset
Global
Preset
Preset
Bits 7-4 – Set to 0 (unused)
Bit 3 – 1=HOLD
HOLD mode on, 0=Disabled
Bit 2 – 1=GLISSANDO
GLISSANDO on, 0=Disabled
Bit 1 – 1=PORTAMENTO
PORTAMENTO on, 0=Disabled
Bit 0 – 1=BENDE
BENDER
BENDER on, 0=Disabled
79
X
X
0-127
Master tune
80
X
X
0-127
SPLIT Balance
NOTE: If GLISSANDO and
PORTAMENTO are both set on,
GLISSANDO / PORTAMENTO settings
are not changed.
Set master tune value. 0=Tuned flat,
127=Tuned sharp, 63=Normal tune
Sets volume balance between upper and lower
SPLITS
SPLITS. No effect in WHOLE mode. 0=
LOWER SPLIT,
SPLIT 127= UPPER SPLIT,
SPLIT
64=Equal SPLIT between upper and lower.
See also CC #8.
Global
Preset
Page 61
Europa MIDI Implementation
Ctrl
#
R
X
T
X
81
X
X
82
X
X
Valid
values
0-7
0-15
Europa User Guide
Name
Description
Arpeggiator sync
Set arpeggiator sync source. This is a setting
that applies to both upper and lower SPLITS
(if in SPLIT mode):
Arpeggiator
mode
0 – Internal clock, polyrhythm off
1 – External trigger, polyrhythm off
2 – MIDI Clock, polyrhythm off
3 – MIDI Clock/24, polyrhythm off
4 – Internal clock, polyrhythm on
5 – External trigger, polyrhythm on
6 – MIDI Clock, polyrhythm on
7 – MIDI Clock/24, polyrhythm on
Set arpeggiator mode:
Preset
Preset
Bits 7
Bit 6
83
X
X
0-7
Arpeggiator
clock
divider/multiplie
r
84
X
X
0-3
Arpeggiator
direction
85
X
X
0-3
Arpeggiator
range
Page 62
– Set to 0 (unused)
– 1=Arpeggiator enabled,
0=Disabled
Bit 5
– 1=Sequence mode enabled,
0=Disabled
Bit 4
– 1=Arpeggiator mode enabled,
0=Disabled
Bits 3-2 – Sequence mode
00 = Arpeggiated Sequence
01 = Sequence arpeggio
10 = Interval
11 = Chord
Bits 1-0 – Arpeggiator mode:
00 = Normal
01 = Ordered
10 = Ping Pong
11 = Random
Set arpeggiator clock multiplier/divider
(applies to all sync sources):
0 – 4X
1 – 2X
2 – 1.5X
3 – 1X
4 – / 1.5
5–/2
6–/3
7–/4
Set arpeggiator direction:
0 – Up
1 – Down
2 – Up lead, down
3 – Down lead, up
Set arpeggiator range:
0 – 1 Octave
1 – 2 Octaves
2 – 3 Octaves
3 – 4 Octaves
Alters
Preset
Preset
Preset
Europa User Guide
Ctrl
#
R
X
T
X
Valid
values
86
X
X
0-1
87
X
X
0-127
88
X
X
0-127
Europa MIDI Implementation
Name
Description
Sequence record
Sequence record control:
0 – Stop sequence record
1 – Start sequence record
Set sequence rest note. Value of 0-127
corresponds directly to a note #.
Set arpeggiator rhythm nibble:
Sequence rest
note
Arpeggiator
rhythm
Alters
Preset
Preset
Preset
Bit 7 – Set to 0
Bits 6-4 – Rhythm nibble select
000-011 – Upper or lower rhythms
000-111 – Whole mode w/seq link
enabled
Bit 3-0 – (each bit) 1=Step, 0=No step
89
X
X
0-31
Arpeggiator
options
NOTE: The arpeggiator rhythm is 16 steps for
upper or lower, or 32 steps when the board is
in whole mode and the arpeggiator has
sequence link enabled. This CC sets 4 bits at a
time in either of these fields in LSB order.
Set various arpeggiator options:
Bits 7-5
Bit 4
Bit 3
Bit 2
Bits 1-0
90
X
X
0-31
91
X
X
0-1
92
X
X
0-1
93
X
X
0-127
Europa soft
switch options
MANUAL mode
control
Preset mode
control
SPLIT Point set
– Set to 0 (unused)
– 1=Rest note enabled, 0=Disabled
– 1=Link mode enabled, 0=Disabled
– 1=Legato enabled, 0=Disabled
– Repeat count:
00 = 0 Repeats (note played once)
01 = 1 Repeat (note played 2 times)
10 = 2 Repeats (note played 3 times)
11 = 3 Repeats (note played 4 times)
Set various Europa options:
Preset
Bits 7-5 – Set to 0 (unused)
Bit 4 – 1=Voice watch on, 0=Disabled
Bit 3 – 1=Velocity transmit on, 0=Disabled
Bit 2 – 1=Sysex transmit on, 0=Disabled
Bit 1 – 1=CC transmit on, 0=Disabled
Bit 0 – 1=Local mode on, 0=Disabled
Set manual mode: 0=MANUAL
MANUAL mode
disabled, 1=MANUAL
MANUAL mode enabled.
Set preset/patch mode: 0=Patch mode,
1=Preset mode.
Set the SPLIT point (note) between the
UPPER voice and lower voice when the
board is in SPLIT 2/4 or SPLIT 4/2 mode.
The controller value directly corresponds to a
note #.
Global
Preset
Preset
Global
Figure 14 - Europa's Continuous Controller map
Page 63
Europa MIDI Implementation
Europa User Guide
Value
BPM
Value
BPM
Value
BPM
Value
BPM
0
1
2
3
4
5
6
7
8
9
10
11
12
13
14
15
16
17
18
19
20
21
22
23
24
25
26
27
28
29
30
31
No clock
60.0
62.0
64.0
66.0
68.0
70.0
72.0
74.0
76.0
78.0
80.0
82.0
84.0
86.0
88.0
90.0
91.0
92.0
93.0
94.0
95.0
96.0
97.0
98.0
99.0
100.0
101.0
102.0
103.0
104.0
105.0
32
33
34
35
36
37
38
39
40
41
42
43
44
45
46
47
48
49
50
51
52
53
54
55
56
57
58
59
60
61
62
63
105.5
106.0
106.5
107.0
107.5
108.0
108.5
109.0
109.5
110.0
110.5
111.0
111.5
112.0
112.5
113.0
113.5
114.0
114.5
115.0
115.5
116.0
116.5
117.0
117.5
118.0
118.5
119.0
119.5
120.0
120.5
121.0
64
65
66
67
68
69
70
71
72
73
74
75
76
77
78
79
80
81
82
83
84
85
86
87
88
89
90
91
92
93
94
95
121.5
122.0
122.5
123.0
123.5
124.0
124.5
125.0
125.5
126.0
126.5
127.0
127.5
128.0
128.5
129.0
129.5
130.0
130.5
131.0
131.5
132.0
132.5
133.0
133.5
134.0
134.5
135.0
136.0
137.0
138.0
139.0
96
97
98
99
100
101
102
103
104
105
106
107
108
109
110
111
112
113
114
115
116
117
118
119
120
121
122
123
124
125
126
127
140.0
141.0
142.0
143.0
144.0
145.0
146.0
147.0
148.0
149.0
150.0
154.0
158.0
162.0
166.0
170.0
174.0
178.0
182.0
186.0
190.0
194.0
198.0
202.0
206.0
210.0
214.0
218.0
222.0
226.0
230.0
234.0
Figure 15 - Continuous Controller # 61 (Arpeggiator rate) value to beats per minute settings
Europa features an extremely stable and accurate internal clock for the Arpeggiator – accurate to within
0.2% of the desired beats per minute (BPM) setting. Figure 15 is a continuous controller -> BPM mapping
for continuous controller # 61.
System Exclusive operations
Europa’s system exclusive implementation is extensive and complex. At all times, Europa will receive
and respond to system exclusive messages at all times. System exclusive messages will not be transmitted
unless sysex transmission is enabled (see section “System
System Exclusive Transmit (C) – Default:
Disabled
Disabled”
led for details).
Page 64
Europa User Guide
Europa MIDI Implementation
System exclusive messages in Europa area used for the following reasons:
•
Provide a means for setting and restoring board settings that have no corresponding continuous
controller
Allow patches and presets to be saved and restored via MIDI in an efficient fashion
•
Europa listens to all system exclusive message activity. It will only respond to the system exclusive
request if the message header ID and MIDI channel matches, otherwise Europa will ignore the message.
Europa processes the message once it has been fully received (which includes the terminating F7h end of
system exclusive message).
Europa’s system exclusive message format is as follows:
F0h
41h
0xh
4ah
36h
-
Standard MIDI system exclusive header
Roland MIDI ID
MIDI Channel, or 10h if the receive channel doesn’t matter (omni)
‘J’ – For Jupiter
‘6’
All Jupiter 6 system exclusive messages are preceded by this series of bytes. The next byte is the
command Europa is to execute. Note there are more bytes to follow in each system exclusive message:
00h
01h
02h
03h
04h
05h
06h
07h
-
Resets the Jupiter 6’s NVRAM to Europa defaults
Reload factory patches and presets into both NVRAM and Europa flash
Set the base MIDI channel
Generate a random patch in one of the patch edits
Request Europa to dump a patch, preset, or sequence from the board
Write a patch, preset, or sequence to flash or NVRAM
Write patch edit, preset edit, or sequence edit to flash
Assign controller
Commands 20h-7fh are identical to continuous controllers #32-127 (documented extensively in the
“Co
Continuous
Continuous controllers supported”
supported section) with the addition of making modifications to
both the patch edit and the currently active patch. This will cause the number light on the currently
selected patch or preset to blink, just like the Roland code.
There must be at least a 70 millisecond delay between each system exclusive command that writes to
flash!
Each of the following descriptions of the commands are contained within the table. Each table assumes a
Europa system exclusive header before the bytes in the table, and an end system exclusive byte after the
table:
Byte #
Value
Description
0
1
2
00h
68h
36h
Reset the Jupiter 6 to Europa’s factory NVRAM settings
Figure 16 - Command 00h - Write factory Europa settings to the Jupiter 6’s NVRAM
This will write factory Europa board settings to the Jupiter 6’s NVRAM. It will not write factory patches
or presets back to NVRAM.
Page 65
Europa MIDI Implementation
Europa User Guide
Byte #
Value
Description
0
01h
Reset the Jupiter 6’s NVRAM and Europa’s internal flash to factory patch/preset
settings
1
2
4ah
36h
Figure 17 - Command 01h - Reset NVRAM and Europa's internal flash to factory patch/preset settings
This will write factory Europa board settings to the Jupiter 6’s NVRAM. It will not write factory patches
or presets back to NVRAM – only Europa board settings. This command will not have any effect if the
memory protect switch is on.
Byte #
Value
Description
0
1
02h
00h-0fh
Set Europa’s base MIDI channel
Base MIDI channel desired. All other values ignored.
Figure 18 - Command 02h - Set Europa's base MIDI channel
Sets Europa’s base MIDI channel. The new MIDI channel is retained across board power cycles. This
command will not have any effect if the memory protect switch is on.
Byte #
Value
Description
0
1
03h
00h-7fh
Generate a random patch on one of the SPLITS
00h=Random patch is generated on lower SPLIT,
SPLIT non-00h=Random patch is
generated on the upper SPLIT (upper SPLIT used when in WHOLE mode)
Figure 19 - Command 03h - Generate random patch
Generates a random patch on either of the key mode SPLITS.
SPLITS The patch edit buffer is modified and the
voice boards are set to the newly randomized patch. If the board is set to whole mode and a random
patch is created for the lower voice, the lower patch edit is modified but is not heard. Setting the board in
either SPLIT mode will allow the randomized lower patch to be heard. The upper patch is used for
whole mode.
Byte #
Value
Description
0
1
04h
Bitwise
2
Varies
depending
on block
dump
type value
in byte 1
Request a patch, preset, or sequence dump
Bit 7
Unused – set to 0
Bits 6-4
Block dump type:
000 – Dump patch
001 – Dump preset
010 – Reserved – not valid
011 – Rhythm/sequence
100 – Board state – All settings, patches, and presets – everything!
101-111 – Not valid - Command will be ignored
Bits 3-0
Unused – set to 0 (other values will invalidate the message and it
will be ignored).
Dump patch (000 on bits 6-4):
00h-2fh – Dump patches A-1 through F-8 from flash
30h-7ch – Invalid (command will be ignored)
7dh
- Dump all patches from flash (xmit delays included)
7eh
- Dump lower patch edit
7fh
- Dump upper patch edit
Page 66
Europa User Guide
Europa MIDI Implementation
Dump preset (001 on bits 6-4):
00h-2fh – Dump preset A-1 through D-8 in flash
30h-7eh – Invalid (command will be ignored)
7fh
- Dump preset edit
Dump sequence (011 on bits 6-4):
00h
- Dump upper arpeggiator rhythm/sequence
01h
- Dump lower arpeggiator rhythm/sequence
Figure 20 - Command 04h - Dump block request command
Requests a sequence, patch or patch block, preset or preset block dump from Europa. It responds with
one or more write block commands (05h). In the case where multiple presets or patches are dumped,
multiple write block commands will be sent – one for each patch or preset. Europa delays 70 milliseconds
between each write block command transmitted because of this command. This ensures the patches
and/or presets will be properly restored when played back to the Jupiter 6, as this delay is required for
writing to Europa’s flash memory.
Byte #
Value
Description
0
1
05h
Bitwise
2-n
Depends on the
block type
Write block – patch, preset, or sequence
Bit 7
Unused – set to 0
Bits 6-4
Block type to write:
000 – Patch
001 – Preset
010 – Reserved – not valid
011 – Arpeggiator step rhythm/sequence
100-111 – Not valid - Command will be ignored
Bits 3-0
Unused – set to 0 (other values will invalidate the
message and it will be ignored.
See tables below for appropriate patch, preset, or sequence dump
Figure 21 - Command 05h - Write block command
Instructs Europa to store a patch, preset, or sequence block in flash or edit buffer. Note that any patch or
preset written to flash must delay at least 70 milliseconds afterward to give time for Europa to write to
internal flash, otherwise any subsequent command for that time period will be ignored/dropped!
Depending upon byte 1 of the command 05h data stream, one of the following three tables will be
applicable:
Byte #
Valid
range
Name
Description
2
0-47,
126-127
Patch number
3
0-16
Patch name length
4-19
0-127
Patch name
20
21
22
0-127
0-127
0-127
LFO 1 Rate
LFO 1 Delay
VCO MOD LFO
Place to store patch #0-47 are patch flash positions
A-1 through F-8. 126=Lower patch edit,
127=Upper patch edit (used in WHOLE mode)
Length of patch’s name. Can be up to 16 ASCII
characters
Patch’s name (in ASCII). This is actually a variable
length field and is only as long as the data in byte #
3.
Set LFO 1’s
1 rate
Set LFO 1’s
1 delay time
Set LFO 1’s
1 effect on VCO
Page 67
Europa MIDI Implementation
Byte #
Valid
range
Name
Description
Set ENV 1’s
1 effect on VCO
Set the PWM pulse width
Set the PWM pulse width source amount
23
24
25
0-127
0-127
0-127
26
27
28
0-127
0-127
0-127
VCO MOD ENV 1
PWM Pulse width
PWM Pulse width
source amount
XMOD Manual
XMOD ENVENV-1
VCO 1 Range
29
0-127
VCO 2 Range
30
31
0-127
0-127
VCO 2 Fine tune
VCO MIXER
32
33
34
35
36
37
38
39
40
41
42
43
44
45
46
47
48
0-127
0-127
0-127
0-127
0-127
0-127
0-127
0-127
0-127
0-127
0-127
0-127
0-127
0-127
0-127
0-127
0-127
VCF Frequency
VCF Resonance
VCF ENV mod
VCF LFO 1 mod
VCF Key mod
VCA ENV 2 Level
VCA LFO Mod
ENV 1 Attack
ENV 1 Decay
ENV 1 Sustain
ENV 1 Release
ENV 1 Key follow
ENV 2 Attack
ENV 2 Decay
ENV 2 Sustain
ENV 2 Release
ENV 2 Key follow
Page 68
Europa User Guide
Set the XMOD MANUAL slider
Set the XMOD ENVENV-1 slider
Set VCO 1’s
1 operational range:
2-17
32’
29-44
16’
56-71
8’
83-98
4’
110-125
2’
126-127
1’
Values between each tuning range provide various
tunings between them. Values 0-1 provide an
almost subharmonic oscillation.
Set VCO 2’s
2 operational range:
2-17
32’
29-44
16’
56-71
8’
83-98
4’
110-125
2’
126-127
1’
Values between each tuning range provide various
tunings between them. Values 0-1 provide an
almost subharmonic oscillation.
Set VCO 2’s
2 fine tune level
Set the VCO MIXER level. 0=VCO
VCO 1 entirely,
127=VCO
VCO 2 entirely, 63=VCO
VCO 1 and VCO 2
evenly balanced
Set the VCF‘s
VCF frequency
Set the VCF‘s
VCF resonance amount
Set the VCF ENV effect on the VCF
Set LFO 1‘s
1 effect on the VCF
Set the VCF keyboard modulation level
Set ENV 2‘s
2 effect on the VCA
Set LFO 1‘s
1 effect on the VCA
Set ENV 1‘s
1 attack time
Set ENV 1‘s decay time
Set ENV 1‘s
1 sustain level
Set ENV 1‘s
1 release time
Set ENV 1‘s
1 key follow
Set ENV 2‘s
2 attack time
Set ENV 2‘s
2 decay time
Set ENV 2‘s
2 sustain level
Set ENV 2‘s
2 release time
Set ENV 2‘s
2 key follow
Europa User Guide
Byte #
49
Valid
range
0-15
Europa MIDI Implementation
Name
Description
Switch data (nibble 1)
Set LFO 1’s
1 waveshape (only one bit is valid):
Bits 7-4 –
Set to 0
1 - Triangle
1 - Sawtooth
1 - Square wave
1 - Random waveform
Bit 3 Bit 2 –
Bit 1 –
Bit 0 –
50
0-15
Switch data (nibble 2)
Set PWM/VCO
PWM/VCO
Bits 7-4 –
Bit 3 –
Bit 2 –
Bit 1 –
Bit 0 –
51
0-15
Switch data (nibble 3)
Set VCO 1 waveform(s):
Bits 7-4 –
Set to 0
52
0-15
Switch data (nibble 4)
Bit 3
Bit 2
–
–
- 1=Triangle wave, 0=Disabled
- 1=Sawtooth wave, 0=Disabled
Bit 1
Bit 0
–
–
- 1=Pulse wave, 0=Disabled
- 1=Square wave, 0=Disabled
NOTE: Bits 0 & 1 (pulse and square waves) cannot
be enabled simultaneously! Setting it this way will
cause the entire patch to be ignored.
Set VCO 2 waveform(s):
Bits 7-4 –
Set to 0
Bit 3
Bit 2
53
0-15
Switch data (nibble 5)
54
0-15
Switch data (nibble 6)
MOD enables:
Set to 0
1 - PWM ENV 1
1 - PWM LFO
1 - VCO 1 MOD
1 - VCO 2 MOD
–
–
- 1=Triangle wave, 0=Disabled
- 1=Sawtooth wave, 0=Disabled
- 1=Pulse wave, 0=Disabled
Bit 1 –
- 1=Noise, 0=Disabled
Bit 0 –
Set VCF/Sync setting(s):
Bits 7-4 –
Set to 0
Bits 3-2 – VCF Type:
00 = Invalid
01 = High pass
10 = Low pass
11 = Bandpass
- 1=VCO
VCO 1->VCO
Bit 1 –
1 VCO 2 Sync
Bit 0 –
- 1=VCO
VCO 2->VCO
2 VCO 1 Sync
Set filter mode setting(s):
Bits 7-4 –
Set to 0
Bits 3-2 – ENV Polarity:
Polarity
00 = Invalid
01 = Negative
10 = Positive
11 = Invalid
1=VCF
VCF Modified by ENV 1
Bit 1 –
1=VCF
VCF Modified by ENV 2
Bit 0 –
Figure 22 - Patch save data format (block type 000)
Page 69
Europa MIDI Implementation
Europa User Guide
Instructs Europa to write a patch to a given flash location or to either of the patch edits. If the
destination is to either patch edit, the patch is immediately changed (and heard) and the patch
changed indication occurs (the NUMBER LED blinks). If any data in the patch is invalid or bits 4-7
are set in any of the switch data, the write block will be ignored.
Byte #
2
Valid
range
Name
Description
Preset number
Place to store preset #. 0-31 Is preset flash positions A1 through D-8. 127=Preset edit
Length of preset’s name. Can be up to 16 ASCII
characters
Preset’s name (in ASCII). This is actually a variable
length field and is only as long as the data in byte # 3.
Bits 7-4 –
Set to 0
Bit 3 –
UPPER Arpeggiator enable
1=On, 0=Off
Bit 2 –
LOWER Arpeggiator enable
1=On, 0=Off
Bit 1 –
LOWER Sequence mode enable
1=On, 0=Off
Bit 0 –
LOWER Arpeggiator mode enable
1=On, 0=Off
Bits 7-4 –
Set to 0
Bits 3-2 –
Unused – set to 0
Bit 1 UPPER Sequence mode enable
1=On, 0=Off
Bit 0 UPPER Arpeggiator mode enable
1=On, 0=Off
Bits 7-4 –
Set to 0
Bits 3-2 –
LOWER Sequence mode
00 – Arpeggiated sequence
01 – Sequenced arpeggio
10 – Interval
11 – Chord
Bits 1-0 –
LOWER Arpeggiator mode
00 – Normal
01 – Forward
10 – Ping pong
11 – Random
Bits 7-4 –
Set to 0
Bits 3-2 –
UPPER Sequence mode
00 – Arpeggiated sequence
01 – Sequenced arpeggio
10 – Interval
11 – Chord
Bits 1-0 –
UPPER Arpeggiator mode
00 – Normal
01 – Forward
10 – Ping pong
11 – Random
3
0-31,
127
0-16
Preset name length
4-19
0-127
Preset name
20
0-15
21
0-3
0-15
23
Page 70
0-15
Europa User Guide
Byte #
Valid
range
Europa MIDI Implementation
Name
Description
Bits 7-4 –
Set to 0
Bits 3-0 – Voice ASSIGN mode:
0000 – Poly 1
0001 – Poly 1 steal
0010 – Poly 2
0011 – Poly 2 steal
0100 – Unison
0101 – Unison steal
0110 – Solo
0111 – Solo rotate
1000 – Solo unison
1001-1111 – Invalid
Bits 7-4 –
Set to 0
Bits 3-0 – Voice ASSIGN mode:
0000 – Poly 1
0001 – Poly 1 steal
0010 – Poly 2
0011 – Poly 2 steal
0100 – Unison
0101 – Unison steal
0110 – Solo
0111 – Solo rotate
1000 – Solo unison
1001-1111 - Invalid
Bits 7-4 –
Set to 0
Bit
31=HOLD
HOLD On, 0=HOLD
HOLD Off
Bit
21=Glissando
Glissando On,
0=Glissando
Glissando Off
Bit
11=Portamento
Portamento On,
0=Portamento
Portamento Off
Bit
01=Bender
Bender On, 0=Bender
Bender Off
Bits 7-4 –
Set to 0
Bits 3-2 – UPPER /WHOLE
WHOLE arpeggiator RANGE:
RANGE
00 – Range 1
01 – Range 2
10 – Range 3
11 – Range 4
Bits 1-0 – UPPER /WHOLE
WHOLE arpeggiator direction:
00 – Up
01 – Down
10 – Up/Down
11 – Down/Up
Bits 7-4 –
Set to 0
Bit
31=HOLD
HOLD On, 0=HOLD
HOLD Off
Bit
21=Glissando
Glissando On,
0=Glissando
Glissando Off
Bit
11=Portamento
Portamento On,
0=Portamento
Portamento Off
Bit
01=Bender
Bender On, 0=Bender
Bender Off
24
0-8
LOWER voice
allocation mode
25
0-8
UPPER/WHOLE
UPPER WHOLE
voice allocation mode
26
0-15
UPPER/WHOLE
UPPER WHOLE
voice Bender,
Bender
Portamento,
Portamento
Glissando,
Glissando and
Hold
Hold Modes
27
0-15
UPPER /WHOLE
WHOLE
voice arpeggiator
range and direction
28
0-15
LOWER voice
Bender
Bender,
nder
Portamento,
Portamento
Glissando,
Glissando and
Hold Modes
Page 71
Europa MIDI Implementation
Byte #
Valid
range
Name
Description
Bits 7-4 –
Set to 0
Bits 3-2 – LOWER arpeggiator RANGE:
RANGE
00 – Range 1
01 – Range 2
10 – Range 3
11 – Range 4
Bits 1-0 – LOWER arpeggiator direction:
00 – Up
01 – Down
10 – Up/Down
11 – Down/Up
Bits 7-4 Set to 0
Bit
3Polyrhythm – 1=On, 0=Off
Bits 2-0 – LOWER arpeggiator clock divider
000 – 4X
001 – 2X
010 – 1.5X
011 – 1X
100 - /1.5
101 - /2
110 - /3
111 - /4
Bits 7-4 Set to 0
Bit
3Polyrhythm – 1=On, 0=Off
Bits 2-0 – UPPER/WHOLE
UPPER WHOLE arpeggiator clock divider
000 – 4X
001 – 2X
010 – 1.5X
011 – 1X
100 - /1.5
101 - /2
110 - /3
111 - /4
Bits 7-4 –
Set to 0
Bits 3-0 – Lower 4 bits of upper patch #. Combine
with offset 33 to form 6 total bits for the
UPPER patch #. 0=A1
A1,
A8,
B1,
A1 7=A8
A8 8=B1
B1
etc..
Bits 7-2 –
Set to 0
Bits 1-0 – Upper 2 bits of upper patch # for this
Preset. Combine with 4 bits in offset 32
above for a full 6 bits. Valid range is 0-47
(A1
A1A1-F8)
F8
Bits 7-4 –
Set to 0
Bits 3-0 – Lower 4 bits of lower patch #. Combine
with offset 31 to form 6 total bits for the
LOWER patch #. 0=A1
A1,
A8,
B1,
A1 7=A8
A8 8=B1
B1
etc..
29
0-15
LOWER voice
arpeggiator range
and direction
30
0-15
LOWER arpeggiator
divider/polyrhythm
setting
31
0-15
UPPER /WH
WHOLE
WHOLE
arpeggiator
divider/polyrhythm
setting
32
0-15
UPPER /WHOLE
WHOLE
patch # (partial)
33
0-3
UPPER /WHOLE
WHOLE
patch #
34
0-15
LOWER patch #
(partial)
Page 72
Europa User Guide
Europa User Guide
Byte #
Europa MIDI Implementation
Valid
range
Name
Description
35
0-3 and
8-11
LOWER patch
#/preset key mode
36
0-15
LOWER arpeggiator
options #1
37
0-15
UPPER arpeggiator
options #2
38
39
40
0
0
0-127
41
0-127
42
0-127
43
0-127
44
0-127
Unused
Unused
LOWER voice
UNISON
DETUNE time
LOWER voice
GLIDE time
UPPER /WHOLE
WHOLE
voice UNISON
DETUNE time
UPPER /WHOLE
WHOLE
voice GLIDE time
Balance
45
0-127
Arpeggiator rate
Bits 7-4 –
Set to 0
Bits 3-2 – KEY MODE:
MODE
00 – Invalid
01 – SPLIT 4/2
10 – SPLIT 2/4
11 - WHOLE
Bits 1-0 – Upper 2 bits of LOWER patch # for this
Preset. Combine with 4 bits in offset 30
above for a full 6 bits. Valid range is 0-47
(A1
A1A1-F8)
F8
Bits 7-4 –
Set to 0
Bit
31=Link upper/lower in whole
Bit
2LOWER arpeggiator legato mode:
1=On, 0=Off
Bits 1-0 LOWER arpeggiator # of repeats:
00 – No repeats
01 – 1 Repeat
10 – 2 Repeats
11 – 3 Repeats
Bits 7-4 –
Set to 0
Bit
3Rest note: 1=On, 0=Off
Bit
2UPPER arpeggiator legato mode:
1=On, 0=Off
Bits 1-0 UPPER arpeggiator # of repeats:
00 – No repeats
01 – 1 Repeat
10 – 2 Repeats
11 – 3 Repeats
Bits 7-0 –
Set to 0
Bits 7-0 –
Set to 0
Bit
7–
Set to 0
Bits 6-0 LOWER voice UNISON
DETUNE time.
Bit
7–
Set to 0
Bits 6-0 LOWER voice GLIDE time.
Bit
7–
Set to 0
Bits 6-0 UPPER voice UNISON
DETUNE time.
Bit
7–
Set to 0
Bits 6-0 UPPER voice GLIDE time.
Bit
7–
Set to 0
Bits 6-0 BALANCE setting.
Bit
7–
Set to 0
Bits 6-0 See Figure for value information
Figure 23 - Preset save data format (block type 001)
Instructs Europa to write a preset to a given preset location – either to the current preset edit or a
preset location in flash. If the write is to the current preset edit, the front panel will change according
to the preset’s settings and it will load up the patches associated with the preset. The preset changed
indication (blinking the preset’s NUMBER LED). If any data in the preset is invalid or any unused
bits are set to 1, the write block command will be ignored.
Page 73
Europa MIDI Implementation
Byte #
Valid
range
2
0-1
3-6
0-15
(for
each
byte)
7-N (max
of 16
notes)
0-127
Europa User Guide
Name
Description
UPPER (WHOLE
WHOLE)/
WHOLE
LOWER
rhythm/sequence
select
Rhythm
Arpeggiator rhythm/sequence destination:
7eh – Store to upper arpeggiator rhythm/sequence
7fh – Store to lower arpeggiator rhythm/sequence
Arpeggiator step rhythm represented as follows:
Byte 1: Bits 3-0
Bit 0 –
Beat 1 (1=Step, 0=No step)
Bit 1 –
Beat 2 (1=Step, 0=No step)
Bit 2 –
Beat 3 (1=Step, 0=No step)
Bit 3 –
Beat 4 (1=Step, 0=No step)
Bits 4-7 – Unused – set to 0
Byte 2: Bits 3-0
Bit 0 –
Beat 5 (1=Step, 0=No step)
Bit 1 –
Beat 6 (1=Step, 0=No step)
Etc….
Note sequence
Bits 4-7 Are required to be set to 0. The incoming
message will be ignored if any of these bits are set.
Notes that make up this sequence. The note numbers
are the same as MIDI notes. If no notes are provided,
this will clear the sequence for the appropriate edit. If
there are more than 16 notes present, the entire
command is ignored.
Figure 24 - Arpeggiator rhythm/sequence save format (block type 011)
Instructs Europa to write an arpeggiator step rhythm/sequence to either the upper or lower step
rhythm edits.
Byte #
Value
Description
0
1
06h
Bitwise
2
Depends
on block
type
Write patch edit, preset edit, or sequence edit to flash
Bit 7
Unused – set to 0
Bits 6-4 Block type to write to flash:
000 – UPPER /WHOLE
WHOLE patch edit
001 – LOWER patch edit
010 – Preset edit
011-111 – Not valid - Command will be ignored
Bits 3-0
Unused – set to 0 (other values will invalidate the message causing
the command to be ignored.
Write UPPER /WHOLE
WHOLE or LOWER patch edit to flash (000 or 001 on bits 6-4):
00h-2fh – A1-F8
F8 – Destination (in flash) to write patch edit
Write preset edit (001 on bits 6-4):
00h-1fh – A1-D8
A1 D8 – Destination (in flash) to write preset edit
Figure 25 – Command 06h - Write patch or preset edit to flash
Instructs Europa to write the currently active patch or preset edit to flash. This command acts as if the
user has written a preset or patch to flash. Any invalid bits being set will cause this command to be
ignored. The command will also be ignored if the Jupiter 6’s memory write protect is on.
Page 74
Europa User Guide
Europa MIDI Implementation
Byte #
Value
Description
0
1
07h
0-3
2
32-127
Assign controller
Bits 7-2
Unused – set to 0
Bits 1-0 Controller to assign:
00 – Mod wheel
01 – Pitch wheel
10 – Channel aftertouch
11 – Note ON velocity
Controller destination (see Figure 14 for controller number information). If
controller # 127 is given, the assignment becomes inactive.
Figure 26 – Command 07h – Assign controller
This assigns modulation wheel, pitch bend, channel aftertouch, or note on velocity to one of Europa’s
continuous controllers (see Figure 14 for controller number information). If controller # 127 is provided as
a destination, it becomes unassigned.
Page 75
Europa MIDI Implementation
Europa User Guide
System exclusive examples
The following is a list of system exclusive message examples, in complete byte form, to help understand
how the various tabled components fit together.
Example #1 – Restore factory settings
F0h 41h 10h 4ah 36h 00h 68h 36h f7h
End Sysex
Required for command 00h - see figure 16
Command 00h - Restore factory settings
Europa system exclusive header
Begin sysex
Example #2 – Request dump of all patches
F0h 41h 10h 4ah 36h 04h 00h 7dh f7h
End Sysex
Dump all patches from flash
Dump patch
Command 04h - Dump block request
Europa system exclusive header
Begin sysex
Example #3 – Write a patch to flash
F0h 41h 10h 4ah 36h 05h 00h 08h 04h 54h 65h 73h 74h .. .. .. .. .. .. .. .. f7h
End Sysex
Patch data @ byte #20-54 (Figure 22)
Patch name in ASCII - "Test"
Patch name - 4 bytes in length
Write to flash patch location B-1
Write patch
Command 05h - Write block request
Europa system exclusive header
Begin sysex
Example #4 – Assign aftertouch to VCF frequency
F0h 41h 10h 4ah 36h 07h 02h 2ch f7h
End Sysex
VCF Frequency (CC #44)
Aftertouch
Command 07h - Assign controller
Europa system exclusive header
Begin sysex
Page 76
Europa User Guide
Europa Internal Architecture
13. Europa internal architecture
Europa is a completely new operating system replacement for the Roland Jupiter 6. The code is an entire
rewrite from the original Roland code and uses a compatible microprocessor with modern features, such
as flash storage and double performance of the original 8051/8031 at the same clock rate. The source code
is over a megabyte of MCS-51 assembly language, which compiles down to roughly a 32K binary
executable. The additional processor performance allows Europa to expand the Jupiter 6’s feature set and
perform tasks the original Roland Jupiter 6 controller board could not. Due to backward compatibility,
Europa’s installation is greatly simplified as compared to many other synthesizer retrofits.
Europa is comprised of two images:
Boot block
The boot block provides basic flash writing services, Jupiter 6 controller board diagnostics, check coding
of the Europa image itself, firmware transfer mode, and other boot time diagnostics. This area is never
written to and is guaranteed to be there even after a bad Europa upload. The boot block will not attempt
to execute a Europa image if it is bad or missing or if the board’s uncorrectable diagnostics fail.
Europa
The Europa operating system itself. All runtime board functionality is present in this image. It can be
updated by the Europa Firmware Update Utility.
Europa contains a custom message queued operating system. When Europa has no messages to process,
it puts the microprocessor to sleep waiting for the next event. Europa runs with a single foreground
thread. MIDI Messages and timer callbacks (for user interface and clocking) are run as interrupts. Timers
check for other events (such as arpeggiator advancement and clocking), the buttons/LEDs are checked
and strobed, and potentiometers/sliders are checked – looking for changes in board operation. Changes
are deposited in the message queue at timer interrupt time for processing by the foreground process. The
differences in messages deposited from MIDI and the front panel is a single bit. To Europa’s messaging
system, the front panel is a MIDI device! The same code – literally – handles the processing of MIDI and
front panel events.
Internally, the message queues have a depth of 128 outstanding messages. Almost all messages
(excluding those that write to flash) are processed in under 1 millisecond, giving the best possible
performance. As a comparison, the original Roland code had a latency of as much as 15 milliseconds!
Note that the controller board speaks to the voice board over a serial port, so it is possible for Europa fall
behind in processing incoming notes and controllers. We’ve found that Europa and the Jupiter 6 voice
boards can sustain a flood of controllers and notes at the rate of 32nd notes @ 500 beats per minute – roughly
a single event every 3.8 milliseconds. It’s highly unlikely that anyone would ever realistically reach this
limitation - especially considering most other synthesizers would drop notes or lock up at much lower
rates. Changes at this rate are nonmusical.
Arpeggiator clocks are maintained in a separate queue. Clocking takes priority over all regular events.
This contributes to Europa’s ultra stable internal clock – performing to within 0.2% of the desired BPM
setting over a range of 60-240BPM!
The Europa source code itself is an object oriented design. Each subsystem is its own independent bit of
code allowing for great modularity and ease of development making Europa much easier to expand or
modify in the future. The code took about a year to write. No Roland code was used or harmed in the
process – it’s completely Synthcom developed code.
Page 77
Contact
Contact Information
Europa User Guide
14. Contact information
Synthcom Systems, Inc. is contactable in several ways. The preferred method of contact is through the
internet due to after hours accessibility, but we can also be contacted via regular United States mail or by
telephone.
Visit
Visit Synthcom on the internet:
http://www.synthcom.com
http://www.synthcom.com/Europa
- Synthcom Systems, Inc. homepage
- Europa specific section (updates, utilities, documents)
Via email:
[email protected]
[email protected]
- Support questions
- General information and sales questions
Typical expected response time is less than 24 hours.
Join the Roland Jupiter 6/Europa mailing list:
Synthcom hosts a mailing list devoted to Roland Jupiter 6 and Europa owners. Topics of discussion range
from Europa specific to Jupiter 6 specific, seldom is off topic, and traffic is light (peak at 10 messages a
day, typically no messages for weeks). To subscribe:
1) Send an email to [email protected] with “subscribe” in the message body
2) To post a message to the list, send to [email protected].
3) To unsubscribe, send an email to [email protected] with “unsubscribe” in the message
body
4) All messages from the mailing list have JP6: prefixed on the subject line so they are easy to spot and
automatically categorize in folders.
VIA Telephone:
(503) 318-8954 (For all reasons)
Hours: 10AM-5PM Pacific Time (Daylight saving time observed)
Monday through Friday
Messages left after hours will be returned the next business day. Please state the reason for your call,
what time zone you’re calling from, your return phone number including area/country code, and the best
time to call.
VIA Postal Mail:
Synthcom Systems, Incorporated
1818 NE 27th Street
Portland, Oregon
USA
97212
Page 78
Europa User Guide
Europa Limited Warranty
Warranty
15. Europa limited warranty
Synthcom Systems Incorporated is referred to as Synthcom throughout this chapter. Synthcom reserves
the right to alter the contents of this warranty without notice at any time.
User installed Europa upgrades
Synthcom will guarantee the Europa chip for 6 months from the date of purchase. All Europa upgrades
are fully tested (including flash updating) before shipment. Replacements will be given for DOA units
upon receipt of returned malfunctioning chip(s) to Synthcom at the expense of Synthcom. Synthcom
reserves the right to determine the root cause of the failure and if Synthcom determines the failure to be
end user damage, warranty will not be honored. If Synthcom determines the failure to be non-end user
damaged, Synthcom will pay for shipping charges to and from the customer. If the customer paid for
shipping already, the customer will be reimbursed reasonable shipping charges as defined by Synthcom.
Synthcom will not guarantee Europas that have broken or bent pins or Europa chips that have been
installed incorrectly. Synthcom will not guarantee Europa against damage done during installation of
Europa by a third party to any Europa component or Jupiter 6 component. Synthcom Systems cannot be
held liable for incorrect installation by a third party or incidental damage incurred by the installation
process of a third party.
Synthcom is liable for shipping of the Europa upgrade kit to the end user or installer. If it is damaged
upon receipt, Synthcom will provide a new upgrade replacement upon receipt of the damaged package
to Synthcom. The customer will be reimbursed any additional shipping charges incurred in the return of
the damaged package to Synthcom.
Synthcom will provide support for the installation process but will not provide walkthroughs or
assistance in basic soldering/installation techniques or board troubleshooting unrelated to the Europa
upgrade process. It is assumed the installer has knowledge of the Europa upgrade process, and if not
qualified, the installation should not be attempted. Users asking for textual or verbal descriptions of
detailed changes to the board will immediately be referred to the installation guide for accurate pictorial
examples.
Subcomponents of the upgrade, which include a socket and resistor, are not subject to a warranty of any
kind except for shipping damage as outlined above. All parts are examined for damaged before shipping
and will not be shipped if they exhibit damage.
Synthcom installed Europa upgrades
Synthcom will verify the controller board (upon receipt) works fully upon receipt before any work is
done. If the board is not found to be fully functional (Synthcom's discretion), Synthcom will notify the
owner by whatever means available for a course of action. Additional repair charges may apply.
Synthcom will not upgrade a nonfunctioning controller board. Shipping charges to/from Synthcom
systems still apply regardless of the health of the controller board. Synthcom will not accept entire Jupiter
6s shipped to Synthcom. It will be refused upon delivery. On-site entire board upgrades can be
performed. Please contact Synthcom to arrange the upgrade.
Synthcom will upgrade the controller board and be liable for any damage to the board incurred by the
upgrade process. Synthcom will do full controller board verification before and after the upgrade so it is
known to be working upon receipt and when shipped back to the customer.
Page 79
Europa Limited Warranty
Europa User Guide
Synthcom will not be held liable for shipping damage from the customer to Synthcom. If the container
appears to be damaged when shipped to Synthcom systems, photographs will be taken and the owner
contacted with the information before anything is done. It is assumed the owner has provided sufficient
insurance ($1000/US) to cover damage and it will be the responsibility of the customer to obtain
compensation from the shipper. Return shipping charges, regardless of the condition of the controller
board, from Synthcom to the customer will still apply. Synthcom will work with the customer in the case
of a shipper mishandling dispute.
Synthcom will not be held liable for shipping damage from Synthcom to the customer. If the controller
board is determined to be lost on behalf of the shipper or the board arrives damaged to the customer,
Synthcom will do whatever is necessary to collect funds from the shipping company. Funds will first be
obtained by Synthcom from the shipping company (which, in worst case, can take months), and then the
customer will be reimbursed for the insured amount. Synthcom may require the damaged board to be
sent back to Synthcom systems before reimbursement can proceed.
Synthcom will not ship controller boards by any method that is not insured for at least $1000/US and
trackable. Jupiter 6 controller boards are no longer manufactured and cannot be obtained anywhere even from Roland. The only alternative is to purchase a used Jupiter 6 as the replacement. Synthcom
reserves the right to change the price of the insured amount to reflect market prices on used Roland
Jupiter 6s.
Synthcom is not expected nor required to send out updates via postal mail. It is assumed the end user can
keep current with postings of the manual and new firmware images on Synthcom's web site. Synthcom
guarantees the included CD will provide advertised Europa functionality. Bug fixes, feature
enhancements, or Europa documentation may be obtained from Synthcom’s web site free of charge.
Page 80
Europa User Guide
Acknowledgements
16. Acknowledgements
Special thanks go out to Europa’s beta testers. Here they are in no particular order: Rod MacQuarrie, Kent
Williams, Geoff Rittmeyer, Steve Grace, Jeff Needham, Rob Lodes, Doug Terrebonne, Charles Scheffold,
Lior Zelmanowicz, Jochen Feldkoetter, Marc Frajola, Gary Weber, Greg Easley, and Jeff Koepper for
helping test Europa! Thanks guys!
The progress bar control (FinderProgressBar 2.0), used in the Macintosh Europa Firmware Update Utility,
was written by Chris Larson and is copyrighted by him (© 1993-1995). Used with permission per the
FinderProgressBar license. Thank you, Chris! The library can be found here:
http://macinsearch.com/infomac2/development/src/finder-progress-bar-20-c.html
And thanks to all of those who waited, literally, years for Europa to be released. Sooner certainly
would’ve been better than later, but Europa is a far better product because of advancements in
microcontroller technology! It is now time to write some music…
Neil Bradley
Jeffrey McEachin
Synthcom Systems, Incorporated
Page 81
Europa supermode reference sheet
17. Europa Supermode Reference
Reference Sheet
Europa configuration options
A
B
C
D
Europa action functions
E
F
1
2
3
4
5
6
7
8
Mod wheel
assign
Pitch bend
Voice Watch
assign
Aftertouch assign
Velocity transmit
Velocity assign
Sysex transmit
Continuous Controller Transmit
Dump patch edit to MIDI
Local mode
Dump preset edit to MIDI
Dump ALL to MIDI
Random patch
Configuration options and action functions (local mode, MIDI continuous controller transmit, and voice watch
enabled in this example) when TAPE is held
Arpeggiator sync options
A
B
C
D
Arpeggiator clock multiplier/divider
E
F
Polyrhythm enable
1
2
3
4
5
6
7
8
4X
2X
1.5X
1X
/1.5
/2
/3
/4
MIDI Clock Xmit
MIDI Clock sync
External clock sync
Internal clock sync
Arpeggiator sync, clock multiplier/divider, and polyrhythm options when DOWN is held
Arpeggiator options
A
B
C
D
E
F
1
2
3
Rest note
enable
Legato
enable
Repeat count
4
5
6
7
8
Chord
Interval
Sequenced
arpeggio
Arpeggiated
sequence
Random
Ping-pong
Upper/lower
sequence and
rhythm link
A + B Off = No repeat
A Off/B On = 1 Repeat
A On/B Off = 2 Repeats
A + B Off = 3 Repeats
Sequence modes
Arpeggiator modes
Ordered
Normal
Arpeggiator mode and options when the UP button is held
Arpeggiator step rhythm - beat 1 (patch preset) through beat 16 (manual) - On=Step, Off=No step
Patch
preset
A
B
C
D
E
F
1
2
3
4
5
6
7
8
Manual
Arpeggiator step rhythm programming buttons when the RANGE button is held. Example shows steps 1-3, 6, 7, 911, and 13-16 enabled
Page 82