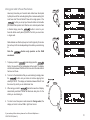
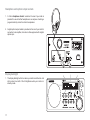
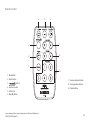
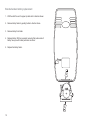
1
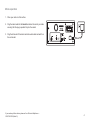
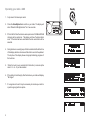
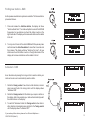
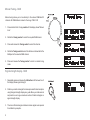
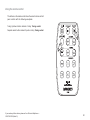
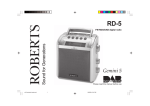
Sound for Generations
ROBERTS
RD-6R
FM RDS/DAB digital radio
with
Please read this manual before use
Contents
Controls ........................................................................... 2-3
Using the remote control ................................................ 20
Mains operation ................................................................. 4
Clock display ................................................................... 21
Operating your radio - DAB ............................................... 5
General ............................................................................ 22
Selecting a station - DAB ................................................. 6
Specifications .................................................................. 22
Secondary services - DAB ................................................ 7
Circuit features ................................................................ 22
Display modes - DAB ........................................................ 7
Mains Supply ................................................................... 23
Finding new stations - DAB .............................................. 8
Guarantee ........................................................................ 24
Autoselect - DAB .............................................................. 8
Notes .......................................................................... 25-26
Manual tuning - DAB ......................................................... 9
Signal strength display - DAB .......................................... 9
Using your radio's Pause Plus feature ...................... 10-11
Operating your radio - FM ............................................... 12
Manual tuning - FM .......................................................... 13
Display modes - FM ........................................................ 14
FM stereo/mono .............................................................. 14
Presetting stations - FM ................................................. 15
Recalling a preset station - DAB and FM ...................... 15
System reset ................................................................... 16
Headphone and optical output sockets ......................... 17
Display backlight ............................................................. 17
Remote control ................................................................ 18
Remote handset battery replacement ............................ 19
1
Controls
(Front)
1
2
3
4
5
6
7
8
9
10
1.
button
2. Band button
3. Auto tune button
11
7. Infra Red sensor
8. Volume control
9. Tone control
4. Info button
10. Tuning control
5. LCD display
11. Preset buttons
6. StandBy button and indicator
If you need any further advice, please call our Technical Helpline on :020 8758 0338 (Mon-Fri)
2
Controls
(Rear)
12
3
13
14
15
16
17
12. Telescopic aerial
15. Optical output socket (Toslink)
13. Headphone socket
16. Telescopic aerial holder
14. Deep bass boost switch
17. Mains input socket
Mains operation
1. Place your radio on a flat surface.
2. Plug the mains lead into the Socket located on the rear of your radio
ensuring that the plug is pushed fully into the socket.
3. Plug the other end of the mains lead into a wall socket and switch on
the wall socket.
If you need any further advice, please call our Technical Helpline on :020 8758 0338 (Mon-Fri)
4
Operating your radio - DAB
1. Fully extend the telescopic aerial.
1
2. Press the StandBy button to switch on your radio. The display will
show "Roberts DAB digital radio" for a few seconds.
3. If this is the first time the radio is used a quick scan of UK Band III DAB
channels will be carried out. The display will show "Autotune Quick
scan". If the radio has been used before the last used station will be
selected.
4. During Autotune as each group of stations is detected the bottom line
of the display will show its name and the station count will be updated.
The top line of the display shows a bargraph indicating progress of
the Autotune.
5.
When the Auto tune is complete the first station (in numeric-alpha
order 0...9...A....Z) will be selected.
6. If the station list is still empty after the Autotune your radio will display
"No Signal".
7. If no signals are found it may be necessary to relocate your radio to
a position giving better reception.
5
Selecting a station - DAB
1. The top line of the display shows the name of the station currently
selected.
2. Rotate the Tuning control to scroll through the list of available
stations. Stop rotating the Tuning control when you find the station
that you wish to hear.
3. Press and release the Tuning control to select the station. The
display may show "Tuning" while your radio finds the new station.
4. Adjust the Volume, Tone and Deep bass boost switch to the
required settings.
2
Note: If after selecting a station the display continues to show "Not
Available" it may be necessary to relocate your radio to a position
giving better reception.
4
4
4
If you need any further advice, please call our Technical Helpline on :020 8758 0338 (Mon-Fri)
6
Secondary services - DAB
1. Certain radio stations have one or more secondary services associated
with them. If a station has a secondary service associated with it the
display will show ">" next to the station name on the station list. The
secondary service will then appear immediately after the primary
service as you rotate the tuning control clockwise.
Display modes - DAB
Your radio has five display modes:1. Press the Info button to cycle through the various modes.
1
a. Scrolling text
Displays scrolling text messages such
as artist/track name, phone in number,
etc.
b. Programme type
Displays type of station being listened to
e.g. Pop, Classic, News, etc.
c. Multiplex Name
Displays name of multiplex to which
current station belongs.
d. Signal strength
Displays signal strength for station being
listened to.
a
b
e. Time and date
c
d
Displays current time and date.
e
7
Finding new stations - DAB
As time passes new stations may become available. To find new stations
proceed as follows:-
1
1. Press and release the AutoTune button, the display will show
"Autotune Quick Scan". Your radio will perform a scan of the UK DAB
frequencies. As new stations are found the station counter on the
right-hand side of the display will increase and stations will be added
to the list
2. To carry out a full scan of the entire DAB Band III frequencies press
and hold down the AutoTune button for more than 2 seconds and
then release. The display will show "Autotune Full scan". As new
stations are found the station counter on the right-hand side of the
display will increase and stations will be added to the list
2
Autoselect - DAB
As an alternative to pressing the tuning control to select a station your
radio can be set so as to automatically select a station.
1. Rotate the Tuning control a few clicks in either direction, immediately press and hold in the tuning control until the display shows
"Autoselect ON".
2. Rotate the Tuning control until the station you require is visible on
the display, after a few seconds your radio will automatically select
the station shown on the display.
3. To switch off Autoselect rotate the Tuning control a few clicks in
either direction, immediately press and hold in the Tuning control
until the display shows "Autoselect OFF".
1
If you need any further advice, please call our Technical Helpline on :020 8758 0338 (Mon-Fri)
8
Manual Tuning - DAB
Manual tuning allows you to tune directly to the various DAB Band III
channels. UK DAB stations located in the range 11B to 12D.
1. Press and hold in the Tuning control until the display shows "Manual
tune".
2. Rotate the Tuning control to select the required DAB channel.
1
3. Press and release the Tuning control to select the channel.
4. Rotate the Tuning control to select the stations contained within the
Multiplex for the selected DAB channel.
5. Press and release the Tuning control to return to normal tuning
mode.
Signal strength display - DAB
1. Repeatedly press and release the Info button until the lower line of
the display shows signal strength.
2. Position your radio and angle the telescopic aerial for best reception
using the signal strength display as a guide. Move your radio around
and position so as to give maximum number of black rectangles on
signal strength display.
3. The clear unfilled rectangle indicates minimum signal level required
for satisfactory reception.
9
1
Using your radio's Pause Plus feature
How many times has your favourite radio station been interrupted
by that phone call from a double glazing firm or someone selling that
must have item? Sound familiar? Now with a single press of the
button you can put your favourite station on hold while
you answer that important call. After the call or other important task
is finished simply press the
button to return to your
favourite station exactly where you left off so that you never miss
a single word.
Radio stations can effectively be put on hold for typically 15 minutes
but can be up to 35 minutes depending on the station you are listening
to.
Note the
waveband.
feature only operates on the DAB
1
2
1. To place your radio in
mode simply press the
button, the sound from the loudspeaker will be muted. The display
will alternate between PAUSE and the time which the radio station
has been on Pause.
2. To return to the radio station that you were listening to simply press
the
button and your radio will continue playing from
where you left off. The display will alternate between DELAY and
the amount by which you are behind real time.
3. When using your radio's
feature the lower line of display
automatically switches to show the Maximum delay time for the
station you are listening to.
4. To return to real time press in and release the Tuning control, the
display will return to show DAB in right hand corner.
4
If you need any further advice, please call our Technical Helpline on :020 8758 0338 (Mon-Fri)
10
Pause Plus continued
1. As soon as you switch on your radio the
feature is
working silently in the background so, say for example, you want
to hear a news item again press the
twice and rotate the
tuning control anti-clockwise to scroll back to the item you wish to
listen. The display will show the amount of time you have scrolled
back.
Note the
switched on.
1
memory only starts when your radio is
2. When using your radio's
feature the lower line of display
automatically switches to show the Maximum delay time for the
station you are listening to.
1
Pause Plus memory length
By default the
memory is set to a fixed length of 10 minutes;
this is to allow for reconfiguration of a station from say speech to music.
The
memory will always follow the station reconfiguration
correctly. If you are listening to a news, play or other speech program
then the
memory can be set to variable length so that you
may be able to pause a station for up to 35 minutes depending on the
station you are listening to.
1. To change the
down the
Rewind Memory.
2. To change the
hold down the
Rewind Memory.
Note the
memory to variable length press and hold
button until the display shows VARIABLE
memory back to fixed length press and
button until the display shows FIXED
memory is cleared when changing sta-
tions, changing from fixed to variable
switching off your radio.
11
1
memory or
2
Operating your radio - FM
1. Fully extend the telescopic aerial.
3
2
2. Press the StandBy button to switch on your radio. The display will
show "Roberts DAB digital radio" for a few seconds.
3. Press the Band button to select the FM band.
4. Press and immediately release the Auto Tune button, your radio will
scan in an upwards direction (low frequency to high frequency) and
stop automatically when it finds a station of sufficient strength.
4
5. After a few seconds the display will update and show station name.
6. To find other stations press and release the AutoTune button as
before.
7. To scan the FM band in a downwards direction (high frequency to low
frequency) press and hold down the AutoTune button for 0.5
seconds and then release.
8. When the waveband end is reached your radio will recommence
tuning from the opposite waveband end.
9
9
9
9. Adjust the Volume, Tone and Deep bass boost switch to the
required settings.
10. To switch off your radio press the StandBy button.
10
If you need any further advice, please call our Technical Helpline on :020 8758 0338 (Mon-Fri)
12
Manual tuning - FM
1. Press the StandBy button to switch on your radio.
1
2
2. Press the Band button to select the FM band. Fully extend the
Telescopic aerial .
3. Rotate the Tuning control to tune to a station. The frequency will
change in steps of 50kHz.
4. When the waveband end is reached the radio will recommence
tuning from the opposite waveband end.
5. Set the Volume, Tone and Deep bass boost switch to the desired
settings.
3
6. To switch off your radio press the StandBy button.
5
5
6
13
5
Display modes - FM
a
On FM the bottom line of the display can be set to any of the following
modes:1. Press the Info button to cycle through the various modes.
1
a. Scrolling text
b
Displays scrolling text messages such
as artist/track name, phone in number
etc.
c
b. Program Type
Displays type of station being listened to
e.g. Pop, Classic, News, etc.
c. Signal strength
Displays signal strength for station being
listened to.
d. Time and date
Displays current time and date.
e
e. Frequency
Displays frequency of the station being
listened to.
f
d
f. Audio mode
Display shows Auto (stereo) or mono.
FM Stereo/Mono
1. If a station being received is weak some hiss may be audible. To
reduce the hiss press and hold in the Tuning control until the display
shows "Audio mode : mono" your radio will switch to mono mode.
2. To return to stereo mode press and hold in the Tuning control until
the display shows "Audio mode :Auto", your radio will switch to
stereo mode.
Note: FM stereo is only available when using earphone/headphones
1
If you need any further advice, please call our Technical Helpline on :020 8758 0338 (Mon-Fri)
14
Presetting stations - DAB and FM
There are 5 memory presets for each of the 2 wavebands.
1. Press the StandBy button switch your radio.
2. Tune to the required station as previously described.
1
3. Press and hold down the required Preset button until the display
shows e.g. "Preset 1 stored". The station will be stored under the
chosen preset button. Repeat this procedure for the remaining
presets.
3
4. Stations stored in preset memories may be overwritten by following
the above procedure.
Recalling a preset station - DAB and FM
1. Press the StandBy button to switch on your radio.
2. Select the required waveband by pressing the Band button.
3. Momentarily press the required Preset button, your radio will tune
to the station stored in preset memory.
1
3
15
System reset
If your radio fails to operate correctly, or some digits on the display are
missing or incomplete carry out the following procedure.
1. Press and hold in the Info button until the display shows Roberts
v2.2
2. Press the Info button twice the display will show System reset.
3. Press in and release the Tuning control to select System reset.
1
2
3
4. If DAB was used last then a "Quick scan" of the DAB band will be
performed, otherwise a "Quick scan" will be carried out the next time
the DAB band is selected.
If a problem persists our technical staff would be pleased to help offer
any assistance on operating the radio. Our technical helpline number
is 020 8758 0338.
If you need any further advice, please call our Technical Helpline on :020 8758 0338 (Mon-Fri)
16
Headphone and optical output sockets
1. A 3.5mm Headphone Socket located on the rear of your radio is
provided for use with either headphones or an earpiece. Inserting a
plug automatically mutes the internal loudspeaker.
2. A digital optical output socket is provided on the rear of you radio for
connection to an amplifier, mini-disc or other equipment with a digital
optical input.
1
2
Display backlight
1. The display backlight will turn on when your radio is switched on and
dim to about one tenth of the full brightness when your radio is in
standby mode.
1
17
Remote control
4
5
6
3
7
2
8
1
9
1. Band button
2. Select button
3.
7. Volume up/down buttons
button
4. Auto tune button
8. Tuning up/down buttons
9. Preset buttons
5. Info button
6. StandBy button
If you need any further advice, please call our Technical Helpline on :020 8758 0338 (Mon-Fri)
18
Remote handset battery replacement
1. With the aid of the end of a paper clip slide catch in direction shown.
2. Remove battery holder by pushing holder in direction shown.
3. Remove battery from holder.
4. Replace battery (2025 or equivalent) ensuring that positive side of
battery faces you with holder positioned as shown.
5. Replace the battery holder.
1
2
3
4
5
19
Using the remote control
The buttons on the remote control have the same functions as front
panel controls with the following exceptions:Tuning Up/down buttons instead of rotary Tuning control.
Seperate select button instead of push on rotary Tuning control.
2
1
If you need any further advice, please call our Technical Helpline on :020 8758 0338 (Mon-Fri)
20
Clock display
1. Your radio will display clock time when it is set to StandBy mode
using the remote handset.
2. During StandBy mode the clock will receive updates from the last
station tuned to before entering StandBy mode.
When in StandBy mode your radios clock will automatically track
Summer\Winter time changes.
21
1
General
Do not allow this radio to be exposed to water, steam or sand. Do not
leave your radio where excessive heat could cause damage. It is
recommended that the DAB band be used wherever possible as better
results in terms of quality and freedom from interference will usually be
obtained than on the FM band.
Specifications
Circuit Features
Power Requirements
Mains
AC 230 volts, 50Hz
Battery (Remote control)
3.0V 2025 button type
only
Frequency Coverage
FM
87.5-108MHz
DAB
174.928 - 239.200MHz
Loudspeaker
75mm 8ohms
Output Power
5 Watts
Headphone socket
3.5mm dia
Aerial System FM
Telescopic aerial
DAB
Telescopic aerial
If you need any further advice, please call our Technical Helpline on :020 8758 0338 (Mon-Fri)
22
Mains supply
The RD-6R will operate from a supply of AC 230 volts, 50Hz
only.
DO NOT cut off the mains plug from this equipment. If the plug
fitted is not suitable for the power points in your home or the cable is too
short to reach a power point, then obtain an appropriate safety approved
extension lead or adaptor. If in doubt consult your dealer.
The wire coloured BLUE must be connected to the terminal marked N or
coloured BLACK.
The wire coloured BROWN must be connected to the terminal marked L
or coloured RED.
If nonetheless the mains plug is cut off, remove the fuse and dispose of
the plug immediately to avoid a possible shock hazard by inadvertent
connection to the mains supply.
If this product is not supplied with a mains plug, or one has to be fitted,
then follow the instructions given below:
IMPORTANT. DO NOT make any connection to the larger terminal which
is marked with the letter E or by the safety earth symbol
or coloured
Green or Green-and-yellow.
The wires in the mains lead are coloured in accordance with the following
codes :BLUE - NEUTRAL
BROWN - LIVE
Fuse
When replacing the fuse only a 3A ASTA approved to BS1362 type
should be used and be sure to re-fit the fuse cover.
IF IN DOUBT - CONSULT A QUALIFIED ELECTRICIAN.
Replacement fuse holders are available from Roberts Radio Technical
Services at the address shown on the rear of this manual.
23
Guarantee
This instrument is guaranteed for twelve months from the date of delivery to the original owner against failure due to faulty workmanship or component
breakdown, subject to the procedure stated below. Should any component or part fail during this guarantee period it will be repaired or replaced free
of charge.
The guarantee does not cover:
1. Damage resulting from incorrect use.
2. Consequential damage.
3. Receivers with removed or defaced serial numbers.
N.B. Damaged or broken telescopic aerials will not be replaced under guarantee.
Procedure:
Any claim under this guarantee should be made through the dealer from whom the instrument was purchased. It is likely that your Roberts' dealer
will be able to attend to any defect quickly and efficiently, but should it be necessary the dealer will return the instrument to the company’s service
department for attention. In the event that it is not possible to return the instrument to the Roberts' dealer from whom it was purchased, please contact
Roberts Radio Technical Services at the address shown on the rear of this manual.
If you need any further advice, please call our Technical Helpline on :020 8758 0338 (Mon-Fri)
24
Notes
25
Notes
If you need any further advice, please call our Technical Helpline on :020 8758 0338 (Mon-Fri)
26
ROBERTS RADIO TECHNICAL SERVICES
97-99 Worton Road
Isleworth Middlesex
TW7 6EG
Issue 1
Technical Helpline :- 020 8758 0338 (Mon-Fri during office hours)