1
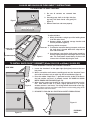
OPERATORS MANUAL
MODELS 2032-OS, 2048-OS, 204830-OS, 3068-OS
RIDGID ON-SITE STORAGE EQUIPMENT
DANGER
• Do NOT put fuels, flammables, explosives or hazardous
materials inside these products.
• Gasoline, solvents, gun powder or other munitions,
dynamite, propane, acetylene or other such products
can explode if stored inside these products.
• Use these products ONLY for storing and transporting
electric or hand tools and equipment, and other similar
materials.
• Failure to follow these warnings or modifications or
other uses of these products could result in death, serious injury or property damage.
WARNING
For Models 2048-OS and 204830-OS:
To prevent electric shock, explosion, fire and/or serious
personal injury when using storage chest with:
Extension Cord -
• Do NOT connect extension cord to outlet that also supplies critical safety equipment with power.
Cordless Power Tool Battery Chargers -
• Follow all Extension Cord manufacturer’s Warnings and
Instructions.
• After removing knock-out, insert Rapid Pass™ rubber
grommet. Do NOT insert extension cord through hole
without grommet in place (see figure 8, on page 3).
• Only use a three-wire extension cord with all three prongs
intact. Never remove the round grounding prong.
• Extension cord must be connected to a 120 Volt GFCI
protected outlet with proper ground. If GFCI outlet is not
available, use an extension cord with GFCI protection
built in.
• Check the insulation and plugs of extension cord before
using. Do NOT use cord if it is worn or damaged.
• Do NOT overload extension cord.
• Remove extension cord from the Rapid Pass™ hole
before moving or transporting storage chest.
• Only use an extension cord that is rated for outdoor
use.
• See Charger’s Owner’s Manual for proper use and care
of charger and batteries. Follow all Warnings and
Instructions provided with your battery charger.
• Place chargers and electrical connections in tray.
• Chargers are Dry location use only. Do NOT expose to
liquid, vapor, or rain. Should your charger become wet,
Do NOT attempt to use. Unplug extension cord from
supply before handling wet charger or cords.
• Only use chargers and batteries that are intact and operating properly.
• Do NOT touch metal prongs when plugging charger into
extension cord.
• Keep flammable materials like paper or rags away from
charger, cords or connections.
• Do NOT place or attempt to charge lead acid, car type
batteries in storage chest.
WARNING
Keep hands clear when closing lid. Failure to do so could result in severe injury.
–ATTENTION–
Read and understand all instructions and warnings before operating or using this product.
–NOTICE–
Any modification or unintended use of this product
shall immediately void all manufacturers warranties.
Manufacturer disclaims all liability for injuries to persons or
property resulting from any modification to, or unintended
use of this product.
PADLOCK INSTALLATION INSTRUCTIONS FOR ALL UNITS
U-Bolt
7/8"-1"
Figure 1
Figure 2
Lock Shackle
TOOLS REQUIRED- One wrench with 7/16” socket.
PADLOCK INFORMATION- Padlock with 7/8”–1” shackle
height (figure 3) (recommended Master No 5 or equivalent, not included).
Figure 3
(measure height
when lock is closed)
3. Guide the U-bolt through the two holes in the back of
the lock housing (figure 2).
4. Secure the U-bolt with the two nylon lock nuts supplied.
5. Repeat the procedure for the second lock.
6. To lock, close lid and push bottom of padlock until
lock “clicks” closed.
7. To open, turn key and open lid.
1. Open your padlock and slide the U-bolt over the lock
shackle.
2. Slide the lock through the lock housing on the front of
the box (figure 1).
3068-OS PROP-ARM INSTRUCTIONS
TOP POINT
PROP
ARM
LOCKING
SUPPORT
ARM
Figure 4
FOR FIELD DESK CAPABILITY
1. Hold cover in the middle with one hand, pull left prop
arm outward and disengage from retaining clasp.
2. Switch hands on cover and repeat (figure 4) for opposite side.
3. Hold the cover at it’s top point with your right hand.
With your left hand, slightly pull the locking support
arm at the hinge until there is a slight bend (figure 4).
4. Slowly lower cover until it is parallel with the ground.
Be sure the prop arms are engaged in slots as shown
below (figure 5). Make sure prop arms are fully
engaged forward so that the prop arms are perpendicular to the cover.
5. The final position for Field Desk Capability is shown in
Figue 6
3068-OS,PropArm-1.eps
SIDE
VIEW
ENGAGEMENT
POINT
Figure 5
Figure 6
3068-OS,PropArm-2.eps
WARNING
Do NOT use cover as a step.
2
2048-OS AND 204830-OS FLEXI-SHELF™ INSTRUCTIONS
FOR REMOVING THE SHELF FROM BOX
1. Be sure all contents are removed from
shelf.
2. Securely grasp shelf at the right side (facing box) with both hands and gently lift
(figure 7).
3. Remove from box and store properly.
Figure 7
ADJUSTING THE FLEXI-SHELF™ FOR YOUR STORAGE NEEDS
To adjust dividers:
1. Gently lift dividers straight up while holding down
shelf with other hand.
2. Remove divider to desired storage location and
2048-OS,FlexiShelf-1.eps
reverse procedure (figure 8).
Securing shelf for transport:
STOP TAB 1. To minimize movement during transport, make sure
the shelf front is located behind the stop tabs on
each side of the box.
2. Once the box is on-site the shelf can be moved forward by slightly lifting the front edges over the stop
tabs. The shelf bottom should always lie flat on the
Figure 8
runners when finished adjusting the shelf.
HAND TOOL
STORAGE
SCREWDRIVER
TO INSTALL RAPID PASS™ GROMMET (Model 2048-OS and Model 204830-OS)
2048-OS,FlexiShelf-2.eps
TOOLS REQUIRED- Hammer and flat blade screwdriver.
SIDE VIEW
Figure 9
1. Locate the “knockout” on the upper right (facing box) corner of the rear
box panel.
2. With a screwdriver and hammer, carefully punch out the “knockout” from
the inside of the box so that metal ring will fall outside box (figure 9).
3. Place the rubber “Rapid Pass”™ grommet from the inside of the box in
the hole and be sure that it is properly seated. BE SURE NO SHARP
METAL EDGES ARE EXPOSED (figure 10).
4. When passing cords into the box, be sure to always enter box from the
rear. After head of cord is in place, slightly pull back 2-3” to ensure
weather resistant “star bursts” are facing toward the outside of box (figure 11). Never push the cord from inside the box so that mating plug points
are exposed to the environment
5. BE SURE TO FOLLOW ALL ELECTRICAL SAFETY PRECAUTIONS.
Figure 11
EXTERIOR
VIEW
Figure 10
"RapidPassThru"-1.eps
3
FOR REPLACEMENT PARTS, CONTACT RIDGID ON-SITE STORAGE EQUIPMENT
AT 1-800-4-RIDGID (1-800-474-3443)
MODEL NUMBER
DESCRIPTION
USE WITH
QUANTITY
7357
U-Bolt & Nylon Lock Nut
Hardware Kit
2032-OS, 2048-OS, 204830-OS, 3068-OS
4 Pack
7628
Rapid Pass™ Rubber Grommet
2048-OS, 204830-OS
1 Pack
• No other replacement parts are available for these models.
ACCESSORY CASTERS, CALL 1800-4 RIDGID (1-800-474-3443)
MODEL NUMBER
DESCRIPTION
USE WITH
LOAD RATING
404-OS
4” Caster Set
2032-OS, 2048-OS, 204830-OS, 3068-OS
1060 lbs
606-OS
6” Caster Set
2032-OS, 2048-OS, 204830-OS, 3068-OS
1360 lbs.
• Casters come as a set of four.
• Load ratings are for all four wheels combined.
• Load rating includes storage chest weight and contents.
CAUTION
• Casters are not suitable for keeping the units in place
when transporting.
• Do not use casters on uneven or rough surfaces.
• Do not tow caster mounted boxes.
• Failure to comply can cause injury or property damage.
LIMITED WARRANTY
This LIMITED WARRANTY is made by RIDGID On-Site Storage Equipment, 420 E. Terra. Cotta Ave., Crystal Lake, Illinois to the original retail purchaser of RIDGID®
Storage Products.
RIDGID STORAGE EQUIPMENT WARRANTS THAT RIDGID ON-SITE STORAGE EQUIPMENT WILL BE FREE FROM DEFECTS IN MATERIAL AND WORKMANSHIP
FOR A PERIOD OF THREE (3) YEARS FROM DATE OF PURCHASE BY THE ORIGINAL RETAIL PURCHASER. THIS WARRANTY IS SPECIFIC TO THIS STORAGE
EQUIPMENT. WARRANTIES FOR OTHER RIDGID PRODUCTS MAY VARY.
If, before the expiration of the Warranty period, purchaser discovers that this RIDGID On-Site Storage Equipment fails to fulfill the Warranty, purchaser shall contact
RIDGID On-Site Storage Equipment at 1-800-4-RIDGID (1-800-474-3443) to make arrangements for an inspection of the product. If RIDGID On-Site Storage
Equipment determines a defect exists, RIDGID Storage On-Site Equipment shall, at its option and expense, repair or replace any defective part. All Warranty repairs shall
be made by an authorized RIDGID On-Site Storage Equipment dealer or RIDGID On-Site Storage Equipment approved service company.
This Warranty shall not apply if the RIDGID On-Site Storage Equipment has been subjected to misuse, abnormal service or handling, improper maintenance, or alterations
made by anyone other than RIDGID On-Site Storage Equipment dealer or a RIDGID On-Site Storage Equipment approved service company.
THE WARRANTY PRINTED ABOVE IS THE ONLY WARRANTY APPLICABLE TO THIS PURCHASE. ALL OTHER WARRANTIES, EXPRESS OR IMPLIED, INCLUDING BUT
NOT LIMITED TO THE IMPLIED WARRANTIES OF MERCHANTABILITY AND FITNESS FOR A PARTICULAR PURPOSE ARE HEREBY DISCLAIMED.
RIDGID ON-SITE STORAGE EQUIPMENT SHALL NOT BE LIABLE FOR ANY INCIDENTAL OR CONSEQUENTIAL DAMAGES ARISING OUT OF ANY BREACH OF THIS
WARRANTY NOR SHALL THE DAMAGES EXCEED THE RETURN AMOUNT OF THE PURCHASE PRICE PAID BY THE ORIGINAL PURCHASER
This Warranty is in lieu of all Warranties express or implied. The terms of this Warranty shall not be modified by any party, their successors and assigns. This Warranty
gives you specific legal rights, and you may also have other rights which vary from state to state.
If you have any questions, please call our customer service department at 1-800-4-RIDGID
(1-800-474-3443). Products are protected by one or more of the following patents or trademarks:
U.S.-1182982, 1517767, 1897535; Canada-281398; U.K.-1390299; Australia-754070;
N.Z.-296048; other patents pending.
RIDGID ON-SITE STORAGE EQUIPMENT
420 E. Terra Cotta Ave, Crystal Lake, IL 60014
RIDGID is a registered trademark of RIDGID, Inc. and is used
by Knaack Manufacturing Company under license.
Rev. 10/03 Part No. 14-0015
4