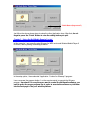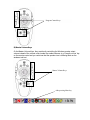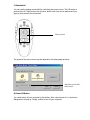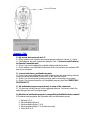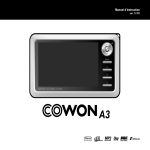
1
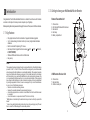
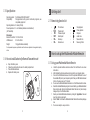
MULTIMEDIA MASTER
Remote Transmitter & USB Remote Receiver
Owner’s Manual
1.2 Getting to know your Multimedia Master Remote
1 Introduction
1
Congratulations! Your Multimedia Master Remote is a state-of-the-art device which delivers
a remote control system to home personal computer at your fingertips.
Before operating the remote, please read thoroughly this manual. Then, reserve it for future reference.
1.1 Key Features
Remote Transmitter Unit
1. Infra-red lens
2. LED indicator/Windows OS shut down
3. Remote ball
4. Hard keys
5. Battery compartment
• Pre-programmed with control commands of popular multimedia programs
• 3-in-1 remote allowing functional control up to 3 user programmed multimedia
softwares
• Built-in remote ball for replacing PC mouse
• Hard keys for direct program functional access ( PLAY, STOP,
PAUSE, L ,
R , NEXT, PREVIOUS)
• Windows OS Master Volume control and Shut down
• Easy set up
2
2
1
3
VOL
PRE
VOL
NEXT
3
4
L
R
5
Note:
This equipment has been tested and found to comply with limits for a Class B digital device,
pursuant to Part 15 of the FCC Rules. These limits are designed to provide reasonable
protection against harmful interference in a residential installation. This equipment generate,
use and can radiate radio frequency energy and, if not installed and used in accordance
with the instruction, may cause harmful interference to radio communication. However, this
is not guarantee that interference will not occur in a particular installation. If this equipment
does cause harmful interference to radio or television reception, which can be determined
by turning the equipment off and on, the user is encouraged to try to correct the interference
by one or more of the following measures:
– Reorient or relocate the receiving antenna.
– Increase the separation between the equipment and receiver.
– Connect the equipment into an outlet on a circuit different from that to which the receiver
is connected.
– Consult the dealer or an experienced radio/TV technician for help.
“Modifications not authorized by the manufacturer may void users’ authority to operate this
device.”
“In case of any electrostatic discharge, the product may not be working properly. The user
has to connect the USB cable again to resume the operation.”
1
USB Remote Receiver Unit
6. Infra-red lens
7. Remote holder
8. USB connection jack
7
8
6
2
1.3 Specifications
2 Getting start
Operating system:
Compatibility:
For Windows 98SE, 2000 and XP
Preprogrammed with popular multimedia programs, see
compatible program list
Operating distance: 8 metres (25 feet)
Power requirement: 2 x AA batteries (alkaline is recommended)
(for Transmitter)
Dimensions
Remote Transmitter: 127 x 60 x 38 mm
USB Receiver:
90 x 80 x 48 mm
Weight:
140g (with batteries installed)
For improvement purposes, specifications and functions are subjected to change without priority
notice.
1.4 How to install batteries for Remote Transmitter unit
a.
b.
c.
d.
Open the battery cover.
Follow the polarity symbol shown in the battery compartment.
Place the batteries inside.
Replace the battery cover.
2.1 Remote key function list
•
•
•
•
•
•
PRE
NEXT
VOL+
VOL–
PC shut down
Program start
Previous chapter
Next chapter
Volume up
Volume down
•
•
•
•
•
•
L
R
Stop playback
Pause playback
Playback
Audio mute
Mouse left click
Mouse right click
3 How to set up the Multimedia Master Remote
3.1 Set up your Multimedia Master Remote
a.
b.
c.
d.
e.
f.
g.
h.
3
1/2/3
Install the provided software and device driver first and follow the on-screen
instructions.
After installed the software and device driver, restart your computer system.
Connect the USB Remote Receiver Unit with the provided USB cable to one of
the available USB port on your computer system. Place your USB Remote Receiver
Unit to a free area near your PC monitor.
You can see the Multimedia Master Remote icon on the Windows toolbar is active.
Select the installed Multimedia program to be controlled by your Multimedia Master
Remote by double clicking the Multimedia Master Remote icon (Device Setup
dialogue box) on the Windows toolbar.
Select your installed Multimedia software by clicking the “ Application ” box and
input the correct program path.
Select “ Finish ” and close the Multimedia Master Remote Device Setup dialogue
box.
You are now ready to use your remote.
4
6 Troubleshooting
IMPORTANT:
Compatible program list:
Only the below listed programs are compatible for your Multimedia Master Remote:
Q : My remote does not work at all !!!
Windows Media Player 6x, 7x, 8x, 9x
WinAmp 2.0, 3.0
CyberLink Power DVD 4.0/5.0
A:
A:
4 Operating your remote
A:
A:
Check whether your batteries are inserted properly and are in correct +/– marks.
If the batteries are weak, replace the batteries. See “ 1.4 How to install batteries
for Remote Transmitter unit ”.
Check if you have installed the provided software and device driver.
Check whether your USB Remote Receiver Unit is connected to an available USB
port of your computer.
Q : I cannot activate any multimedia program.
4.1 Normal Operation
A:
Once you have setup the remote for your computer system, it operates like a wireless
remote control handset of your computer system. Just aim it at your computer, press
an appropriate Program Key to invoke the desired program. By pressing a corresponding
key on the remote to invoke the desired function. The indicator flashes during signal
transmission.
A:
A:
Check if you have configured the control programs from the setup dialogue box
by clicking the Multimedia Master Remote icon on the Windows toolbar.
Check if you have selected a wrong program path for executing your program.
Check if you have selected the non-compatible programs from the COMPATIBLE
PROGRAM LIST.
Q : My multimedia program responds only to some of the commands.
4.2 Shut down your Windows
A:
You can simply press
to pop up the system shut down dialogue box. Select “ Shut
down ” to turn off your computer system.
You have set a wrong version of the suggested software. You have to check the
setup dialogue box and re-configure again.
5 Maintenance
–
–
–
–
–
Do not expose your remote and receiver to dust, strong sunlight, humidity, high temperature,
or mechanical shock.
Do not use old and new batteries together as old batteries tend to leak.
Do not use corrosive or abrasive cleansers on your remote and receiver.
Keep the unit dust free by wiping it with a soft, dry cloth.
Do not disassemble your remote and receiver, they contain no user-serviceable parts.
5
6
BW6130 MANUAL UPDATE (Nov 1, 2004)
1) Quick Setup Guide:
Please follow the below steps to setup your Multimedia Master Remote
a. Install the provided software and device driver first and follow the
on-screen instruction.
b. After installed the software and device driver, restart your computer
system.
c. Connect the USB Remote Receiver Unit with the provided USB Cable to
one of the available USB port on your computer system. Place your USB
Remote Control Receiver Unit to a free area near your PC monitor.
d. You can see the Multimedia Master Remote icon on the Window toolbar is
active.
e. Select the installed Multimedia program to be controlled by your
Multimedia Remote icon (Device Setup dialogue box) on the Window
toolbar.
f. Select your installed Multimedia software by clicking the
“Application” box and input the correct program path. **(Note)
g. Select “Finish” and close the Multimedia Master Remote Device Setup
dialogue box.
h. You are now ready to use your remote.
Note:
If you are not able to provide the correct program path, please:
-Move the mouse cursor to the “Start” button on the Window tool bar.
-Left Click and move to “Program”
-Move the mouse cursor to your target program then right click.
-Select “Properties” and left click
-Go to the shortcut page
-On the Target bar, you will be able to find the correct program state up
path within the two invert commas “”.
e.g. "C:\Program Files\Windows Media Player\mplayer2.exe",
-Follow and input this path into the Multimedia software (NOT INCLUDED THE
INVERT COMMAS) and press the dialogue box and you will see that you have
successfully input the right path.
2) Compatible program list:
The below listed programs are compatible with your Multimedia Remote, we
will keep up-date our compatible program list frequently and provide new
version of PC software in our webpage:
http://www.remotec.com.hk/eng/tech.htm
We highly recommend our customer to visit our website frequently to download
the latest software.
1.
2.
3.
4.
5.
6.
7.
8.
9.
10.
11.
12.
13.
14.
15.
16.
Winamp 2 /3 /5
Windows Media Player 6
Windows Media Player 7 /8 /9
Windows Media Player 7 /8 /9 (skinned mode)
Power DVD 4 /5
Real Player 10
Direct DVD 5
Win DVD 5
Musicmatch Jukebox 8
Sonique 1.9
Foobar 2000
JetAudio 6
Media JukeBox 8
Quintessential Player 4
Power Cinema 3
Microsoft PowerPoint 2000/2002/2003
MultiMedia Remote Control User Guide
Please follow the below steps for installation of your MultiMedia Master remote.
1) Software and Driver Installation
2) Setup the MultiMedia Master Remote Control
3) Using the Multimedia Master Remote Control
4) FAQ
Chapter 1 – Software and Driver Installation
1- Do not connect your MultiMedia Master remote control until the software and
driver is installed.
2- Insert the installation CD Disk into your CD Drive, and select the file “setup.exe”
3- Then, a dialogue box should pop up and tell you that you must not run any Multimedia
Master Remote Control software while the installation process is commenced. Please
ensure that you have not installed ANY Multimedia Master software before and click ‘Yes’.
4- Click ‘Next’ to continue.
5-You can specify a Destination to install the software of Multimedia Master Remote Control,
or use the suggested default path.
6- The software will start to install and should take about 2 minutes for the installation
process.
7. Restart your computer to update the necessary configuration of your Windows system.
The software installation is completed.
Chapter 2 - Setup the MultiMedia Master Remote Control
After the computer is re-started, you should be able to see a new icon on your windows
tool bar. This icon should be blurred, as your MultiMedia Master remote control set has
not yet connected to your computer.
Icon for Multimedia Master 100
You can now connect your Multimedia Master remote control (Receiver unit) to your
computer via the provided USB cable and one of the available USB port from your
computer. Do not forget to insert a pair of new AA batteries into your Multimedia Master
remote (Transmitter unit).
As this is the first time you connecting your MultiMedia Master remote control to your
computer, a dialogue box will pop up and inform you that a new USB device has been
detected.
Click ‘Next’ to start the installation of the device driver.
Select the option “Search for the best driver for your device.”
Keep the Installation CD disk of the MultiMedia Master in your CD Drive, and click the
option ‘CD-ROM drive’, then ‘Next’.
Your computer should be able to locate the driver for the device, click ‘Next’ to continue
the installation of the device driver.
Icon for Multimedia Master
100
Now you can see the icon of the Multimedia Master remote control is active. You may now
start to setup the MultiMedia Master remote control program.
Just simply double click the icon of Multimedia Master, the below setting dialogue box will
pop up.
Application boxes
In this dialogue box, you can see that there are 3 application boxes which represent what
software that you will use to control by the program key ‘1’, ‘2’, ‘3’ on your MultiMedia
Master remote.
Now you need to setup each application box one by one, e.g. WinAmp for listing MP3/CD
Music, then assign WinAmp to Program Key ‘Application 1’.
Click the ‘Application 1’ box and the below dialogue box will pop up.
Program list
Program path
On the above illustration, there are two fields that we need to input, the first one is the
program list - this is telling what software that the Multimedia Master is supporting and
which program should be selected, e.g. ‘WinAmp 2/5’.
The second setting is instructing the location of the corresponding execution file of the
selected program.
For each media softwares, it should have an execution file to start up with. Simply we have
already provided the default path for those software. If you have changed the path during
the installation of the Media Player software (e.g. WinAmp 5), you need to input the correct
path manually, e.g. Winamp was installed in the drive “D:\winamp/winamp.exe” instead of the default path “C:\PROGRAM FILES\WINAMP\WINAMP.EXE”, so you have to type
manually the path for the execution file.
There are two ways to find out the execution path for the media program path:
You can either right click from the shortcut icon from the desktop, or
Go to ‘Programs’ from the start menu, point to the winamp execution file under windows
program bar, right click and select ‘Properties’.
Under the ‘Shortcut’ folder, you can see the execution path from the “Target” row.
Just copy the content of the Target column and paste on to the Multimedia Master program.
Test button
You can now click the test button to check if you have input the right execution path or not
The Winamp player should be started after you pressed the Test button.
Finish Button (Important!!)
Just follow the above above steps to setup the other Application keys. After that, do not
forget to press the ‘Finish’ Button to save the setting before you quit.
Chapter 3 - Using the MultiMedia Remote Control
In this example, I am currently using Winamp for MP3 music and Window Media Player 6
for movie, and my setting is showing as below:
In the setup option, I have selected ‘Application 1’ button for Winamp 5 program.
I can now press the program button 1 on the remote control to execute the Winamp
program. Important: For every time you want to control the Multimedia software, you
need to press the proper program key in order to execute the software or pick them
into the front page of the your window platform.
Winamp
Now I can start to control the WinAmp player, with the below function keys:
A) Media Player function keys
1)
2)
3)
4)
5)
Play;
Stop;
Pause;
Previous;
Next.
Program Control keys
B) Master Volume Keys
Or the Master Volume Keys, they are directly controlling the Windows master output
volume instead of the volume control under the media software. (e.g. Press the ‘mute’ key
on the remote control and you could see that the speaker icon is showing Mute on the
windows tool bar.)
Master Volume Keys
After pressing Mute key
C) Remote Ball
You can use the analog remote ball for controlling the mouse cursor. The L/R button to
perform the Left / Right mouse click function, also the left click can be performed if you
apply a short-press to the mouse ball.
Mouse control
The speed of the mouse cursor can be adjusted in the setup page as below:
Adjust the speed of the
mouse cursor
D) Power Off Button
You could switch off your computer by this button. After a short-press of it, a shut down
dialogue box will pop up. Simply confirm to turn off your computer.
Power Off button
Chapter 4 - FAQ
Q : My remote does not work at all !!!
A : Check whether your batteries are inserted properly and are in correct +/– marks.
A : If the batteries are weak, replace the batteries. See “ 1.4 How to install batteries
for Remote Transmitter unit ”.
A : Check if you have installed the provided software and device driver.
A : Check whether your USB Remote Receiver Unit is connected to an available USB
port of your computer.
Q : I cannot activate any multimedia program.
A : Check if you have configured the control programs from the setup dialogue box by
clicking the Multimedia Master Remote icon on the Windows toolbar.
A : Check if you have selected a wrong program path for executing your program.
A : Check if you have selected the non-compatible programs from the COMPATIBLE
PROGRAM LIST.
Q : My multimedia program responds only to some of the commands.
A : You have set a wrong version of the suggested software. You have to check the
setup dialogue box and re-configure again.
Q: What kind of multimedia program is compatible to MultiMedia Master remote?
A:The below listed programs are compatible with your Multimedia remote
1.
2.
3.
4.
5.
Winamp 2 /3 /5
Windows Media Player 6
Windows Media Player 7 /8 /9
Windows Media Player 7 /8 /9 (skinned mode)
Power DVD 4 /5
6. Real Player 10
7. Direct DVD 5
8. Win DVD 5
9. Musicmatch Jukebox 8
10. Sonique 1.9
11. Foobar 2000
12. JetAudio 6
13. Media JukeBox 8
14. Quintessential Player 4
15. Power Cinema 3
16. Microsoft PowerPoint 2000/2002/2003
~End of the MultiMedia Remote Control User Guide~