1
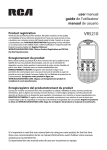
v1.0 (1.0.1.0) (EN/F/E)
English
IMPORTANT SAFETY INSTRUCTIONS
PLEASE READ AND SAVE THIS FOR FUTURE REFERENCE
•
user manual
guide de l’utilisateur
manual de usuario
•
RC141
Product registration
Thank you for purchasing an RCA product. We pride ourselves on the quality
and reliability of all our electronic products but if you ever need service or
have a question, our customer service staff stands ready to help. Contact us at
www.rcaaudiovideo.com. PURCHASE REGISTRATION: Registering On-line will
allow us to contact you in the unlikely event a safety notification is required
under the Federal Consumer Safety Act. Register Online at:
WWW.RCAAUDIOVIDEO.COM. Click on Product Registration and Fill Out
the Brief Questionnaire.
•
•
Enregistrement du produit
Merci d’avoir acheté un produit RCA. Nous sommes fiers de la qualité et de
la fiabilité de tous nos produits électroniques, mais en cas de nécessité de
réparation ou pour toute question, le personnel de notre service clientèle est
prêt à vous aider. Contactez-nous sur www.rcaaudiovideo.com. ENREGISTREMENT D’ACHAT: Enregistrer votre produit
en ligne nous permettra de communiquer avec vous pour tout avis de sécurité au sujet du produit en vertu du Federal
Consumer Safety Act (Loi fédérale de protection du consommateur). Enregistrez votre produit en ligne sur:
WWW.RCAAUDIOVIDEO.COM. Cliquez sur Enregistrement produit et remplissez le court questionnaire.
Enregisregistro del productotrement du produit
Gracias por comprar un producto RCA. Nos enorgullece la calidad y fiabilidad de todos nuestros productos electrónicos,
pero si alguna vez necesita servicios técnicos o si tiene alguna pregunta, nuestro personal de atención al cliente está a su
disposición para ayudarle. Comuníquese con nosotros en www.rcaaudiovideo.com. REGISTRO DE COMPRA: El registro
en línea nos permitirá comunicarnos con usted en el caso de tener que enviarle algún aviso de seguridad en virtud de la
Ley Federal de Seguridad del Consumidor. Registre el producto en línea en: WWW.RCAAUDIOVIDEO.COM. Haga
clic en Registro del producto y responda al cuestionario.
EN/F/E
It is important to read this user manual prior to using your new product for the first time.
Nous vous recommandons de lire ce manuel d’instructions avant d’utiliser votre nouveau produit pour la première fois.
Es importante leer este manual antes de usar por vez primera su equipo.
Some of the following information may not apply to
your particular product; however, as with any electronic
product, precautions should be observed during handling
and use.
• Read these instructions.
• Keep these instructions.
• Heed all warnings.
• Follow all instructions.
• Do not use this apparatus near water.
• Clean only with dry cloth.
• Do not block any ventilation openings. Install in
accordance with the manufacturer’s instructions.
• Do not install near any heat sources such as radiators,
heat registers, stoves, or other apparatus (including
amplifiers) that produce heat.
• Do not defeat the safety purpose of the polarized
or grounding-type plug. A polarized plug has two
blades with one wider than the other. A grounding
type plug has two blades and a third grounding
prong. The wide blade or the third prong is provided
for your safety. If the provided plug does not fit into
your outlet, consult an electrician for replacement of
the obsolete outlet.
• Protect the power cord from being walked on or
pinched particularly at plugs, convenience receptacles,
and the point where they exit from the apparatus.
Only use attachments/accessories specified by the
manufacturer.
Use only with the cart, stand,
]
tripod, bracket, or table specified
by the manufacturer, or sold with
the apparatus. When a cart is
used, use caution when moving
the cart/apparatus combination to
Portable Cart Warning
avoid injury from tip-over.
Unplug this apparatus during
lightning storms or when unused for long periods of
time.
Refer all servicing to qualified service personnel.
Servicing is required when the apparatus has been
damaged in any way, such as power-supply cord or
plug is damaged, liquid has been spilled or objects
have fallen into the apparatus, the apparatus has
been exposed to rain or moisture, does not operate
normally, or has been dropped.
ADDITIONAL SAFETY INFORMATION
• Apparatus shall not be exposed to dripping or
splashing and no objects filled with liquids, such as
vases, shall be placed on the apparatus.
• Always leave sufficient space around the product for
ventilation. Do not place product in or on a bed, rug,
in a bookcase or cabinet that may prevent air flow
through vent openings.
• Do not place lighted candles, cigarettes, cigars, etc. on
the product.
• Connect power cord only to AC power source as
marked on the product.
• Care should be taken so that objects do not fall into
the product.
• Do not attempt to disassemble the cabinet. This
product does not contain customer serviceable
components.
• The marking information is located at the bottom of
apparatus.
• To be completely disconnect the power input, the
mains plug of apparatus shall be disconnected from
the mains.
• Mains plug is a disconnect device. The mains plug
•
•
•
•
should not be obstructed OR should be easily accessed
during intended use.
The ventilation should not be impeded by covering
the ventilation openings with items such as
newspaper, table-cloths, curtains etc.
No naked flame sources such as lighted candled
should be placed on the apparatus.
Attention should be drawn to the environmental
aspects of battery disposal.
The use of apparatus in moderate climates.
This is class II equipment designed with
double or reinforced insulation so it does not
require a safety connection to electrical earth
(US: ground).
Plugging in for power
AC OUTLET POWER SUPPLY:
120 V ~ 60 Hz
The AC power plug is polarized (one
blade is wider than the other) and only
fits into AC power outlets one way.
If the plug will not go into the outlet
completely, turn the plug over and try
to insert it the other way. If it still does
not fit, contact a qualified electrician to
change the outlet, or use a different one. Do not attempt
to bypass this safety feature.
Important battery precautions
•
•
•
Any battery may present a risk of fire, explosion,
or chemical burn if abused. Do not try to charge a
battery that is not intended to be recharged, do not
incinerate, and do not puncture.
Non-rechargeable batteries, such as alkaline batteries,
may leak if left in your product for a long period of
time. Remove the batteries from the product if you
are not going to use it for a month or more.
If your product uses more than one battery, do not
mix types and make sure they are inserted correctly.
Mixing types or inserting incorrectly may cause them
to leak.
•
Discard any leaky or deformed battery immediately.
They may cause skin burns or other personal injury.
• Please help to protect the environment by recycling or
disposing of batteries according to federal, state, and
local regulations.
WARNING: The battery (battery or batteries or battery
pack) shall not be exposed to excessive heat such as
sunshine, fire or the like.
Electrical consumption
Power Supply: 120 V ~ 60 Hz
Power Consumption: 4 Watts
FCC Information
Sleep function
Auxiliary source
Warranty information
Right view
Back view
Wake to alarm
–VOLUME+ –
Adjust volume
BRIGHTNESS
– Select display
brightness (Hi
or Lo)
Press RADIO/AUX to turn on the radio.
Rotate the TUNING knob on the right of the unit to adjust
the radio frequency. Radio frequency shows on the display.
Wake to radio
1. Connect your auxiliary source (e.g. mp3 player) to the
AUX input jack on the right side of the unit with an
audio cable (not included).
2. Turn on the unit and your auxiliary source.
3. Press RADIO/AUX to switch to listen to auxiliary
source. The AUX indicator on the front will turn on.
Press again to switch back to listen to the radio.
12 Month Limited Warranty
Applies to RCA Clock Radios
Tuning the radio
The unit is equipped with GRAD-U-WAKE. The alarm
volume will increase gradually to its maximum in about 30
to 45 seconds.
In sleep mode, the unit will turn off automatically after a
specified time (up to 2 hours).
DST – Turn
daylight saving
function on
or off
Clock
Built-in AFC
The Built In Automatic Frequency Control (AFC) helps to
reduce drift on FM reception and keeps the radio locked in
on the FM station to which it is tuned.
This unit is equipped with an FM antenna at the back.
Uncoil the antenna to its full length for best reception.
Tape the end of the antenna onto the wall if possible to
improve reception.
Setting wake time
1. Slide the
/WAKE1/WAKE2/
switch to select
WAKE 1 or WAKE 2 setting mode.
2. Press
REV or FWD
to set the wake time.
• Press and hold to decrease or increase the time value
quickly.
• The “:” flashes on the display in wake time setting
mode.
• The clock is in 12 hour format. The AM indicator lights
to show AM time.
/WAKE1/WAKE2/
switch to
.
3. Slide the
Français
Slide the
/WAKE1/WAKE2/
switch to WAKE 1 or
WAKE 2 to check the set wake time.
Ways to turn off alarm
•
•
1. Slide the
/WAKE1/WAKE2/
switch to
to
enter the clock setting mode.
2. Press
REV or FWD
to set the time.
• Press and hold to decrease or increase the time value
quickly.
• The “:” flashes on the display in clock setting mode.
• The clock is in 12 hour format. The AM indicator lights
to show AM time.
/WAKE1/WAKE2/
switch to
.
3. Slide the
Selecting wake source
You may be woken up by radio or alarm.
• Press WAKE –
OFF 1 or 2 repeatedly to select
your choice of wake source (alarm
/ radio ).
• The corresponding wake setting icon will light when
alarm is set to activate.
set wake radio station:
Select radio band.
Select desired station.
Adjust the volume by + VOL –.
NAP function
Checking wake time
Wake function
Setting clock manually
See giftbox for instructions on how to use
the Automatic Time Set feature.
To
1.
2.
3.
•
To silence the wake function momentarily, press
SNOOZE. The alarm or radio will be on again when
the snooze period (default: 9 minutes) is over. (see
SmartSnoozeTM section for more info)
To turn off the alarm, press OFF. The wake alarm or
radio will activate again the next day.
To disable the wake function completely, press WAKE
–
OFF 1 or 2 repeatedly until no wake mode
icon shows on the display.
SmartSnoozeTM
•
•
•
This operation allows extra sleep time when the alarm
sounds. The alarm can be turned off temporarily by
pressing SNOOZE, NAP, SLEEP,
REV or FWD
until the snooze period is over.
Snooze function can be used repeatedly up to 30
minutes. After this, the alarm will turn off until the
next alarm conditions are met.
SmartSnoozeTM will be activated only when the
/
WAKE1/WAKE2/
switch is set to
.
Brightness control
Slide BRIGHTNESS switch on the back of the unit to Hi
(high) or Lo (low) position to adjust the brightness of the
display.
For catnaps up to 2 hours without disturbing the regular
alarm settings, the NAP function wakes you up after a short
period of time.
AUDIOVOX ACCESSORIES CORP. (the Company) warrants
to the original retail purchaser of this product that should
this product or any part thereof, under normal use and
conditions, be proven defective in material or workmanship
within 12 months from the date of original purchase, such
defect(s) will be repaired or replaced with reconditioned
product (at the Company’s option) without charge for parts
and repair labor.
To obtain repair or replacement within the terms of this
Warranty, the product is to be delivered with proof of
warranty coverage (e.g. dated bill of sale), specification of
defect(s), transportation prepaid, to the Company at the
address shown below.
This Warranty does not extend to the elimination of
externally generated static or noise, to correction of
antenna problems, loss/interruptions of broadcast or
internet service, to costs incurred for installation, removal
or reinstallation of product, to corruptions caused by
computer viruses, spyware or other malware, to loss of
media, files, data or content, or to damage to tapes, discs,
removable memory devices or cards, speakers, accessories,
computers, computer peripherals, other media players,
home networks or vehicle electrical systems.
To set the NAP time:
1. Press NAP once and the NAP icon will flash on the
display. Press NAP repeatedly to set the NAP time
(each press decreases or increases duration by 10
minutes. When you first set the NAP time, the first
default value is 20 minutes).
2. The current time shows after a few seconds if no
button is pressed. The icon NAP lights on the display.
3. To check remaining NAP time, press NAP once to show
briefly the NAP time left with the NAP icon flashing
on the display.
4. When the alarm sounds, press SNOOZE to switch it
off.
• To cancel the function before the nap time ends, press
and hold NAP until no nap icon shows on the display.
This Warranty does not apply to any product or part
thereof which, in the opinion of the Company, has suffered
or been damaged through alteration, improper installation,
mishandling, misuse, neglect, accident, or by removal or
defacement of the factory serial number/bar code label(s).
THE EXTENT OF THE COMPANY’S LIABILITY UNDER THIS
WARRANTY IS LIMITED TO THE REPAIR OR REPLACEMENT
PROVIDED ABOVE AND, IN NO EVENT, SHALL THE
COMPANY’S LIABILITY EXCEED THE PURCHASE PRICE PAID
BY PURCHASER FOR THE PRODUCT.
To set the “quiet” period with Snooze:
1. Press and hold SNOOZE.
2. Press
REV or FWD
to adjust snooze time. Then
release SNOOZE button to save the setting.
Changes or modifications not expressly approved by
Audiovox could void the user’s authority to operate the
equipment.
This Class B digital apparatus complies with Canadian
ICES-003.
Cet appareil numérique de la classe B est conforme à
la norme NMB-003 du Canada.
•
•
•
•
•
Il est possible que certains des articles ci-dessous ne
s’appliquent pas à votre appareil. Cependant, il faut
prendre certaines précautions quand on manipule et utilise
tout appareil électronique.
• Lisez ces instructions.
• Conservez ces instructions.
• Portez attention à tous les avertissements.
• Observez toutes les instructions.
• N’utilisez pas cet appareil près de l’eau.
• Nettoyez avec un chiffon sec seulement.
• N’obstruez pas les ouvertures de ventilation. Exécutez
l’installation selon les instructions du fabricant.
• N’installez pas près d’une source de chaleur tel
que radiateur, grille de chauffage, poêle ou autres
appareils (incluant les amplificateurs) qui produisent
de la chaleur.
• Ne déjouez pas le dispositif de sécurité des fiches
polarisées ou avec mise à la terre. Une fiche polarisée
comprend deux lames, l’une étant plus large. Une
fiche avec mise à la terre comprend deux lames
et une broche de mise à la terre. La lame la plus
large ou la broche de mise à la terre assurent votre
sécurité. Si la fiche fournie ne convient pas à la prise
INFORMATIONS DE SECURITES SUPPLEMENTAIRES
• L’appareil ne doit pas être exposé à des infiltrations ou
éclaboussures d’eau et aucun objet rempli de liquide –
tel qu’un vase – ne doit jamais être placé sur l’appareil.
• Toujours laisser suffisamment d’espace autour de
l’appareil pour assurer la ventilation. Ne pas placer
l’appareil sur un lit, un tapis ou sur un étagère ou
dans un meuble qui pourrait bioquer les ouvertures de
ventilation.
• Ne pas placer de chandelles, de cigarettes, de cigares,
etc, sur l’appareil.
• Ne brancher le cordon d’alimentation que dans une
prise de courant c.a. comme indiqué sur l’appareil.
• Prendre garde que des objets ne tombent pas dans
l’appareil.
• Ne pas tenter de démonter l’appareil. Celui-ci ne
contient pas de composants pouvant être réparés par
•
•
•
•
•
•
l’utilisateur.
Les renseignements sur les caractéristiques sont situés
sur le dessous de l’appareil.
Pour couper complètement l’alimentation électrique,
la fiche pour prise muraledoit être débranché de la
prise.
La fiche pour prise muralesert de dispositif de
débranchement. La fiche pour prise murale ne doit
pas être obstrué ET doit demeurer accessible pendant
l’utilisation.
La ventilation ne doit pas être limitée en recouvrant
les orifices de ventilation avec des objets comme un
journal, une nappe, des rideaux, etc.
Aucune source de flamme nue, comme une chandelle
allumée, ne doit être déposée sur l’appareil.
Soyez conscients des conséquences environnementales
lorsque vous vous débarrassez des piles.
L’appareil doit être utilisé dans des conditions
climatiques normales.
Cet appareil de classe II est doté d’une
isolation double ou renfermée et ne requiert
pas de mise à la terre de sécurité.
Branchement
ALIMENTATION COURANT ALTERNATIF :
120 V ~ 60 Hz
La prise de l’appareil est polarisée (une
des fiches est plus large que l’autre) et ne
peut s’enclencher que d’une seule façon
dans une prise de courant alternatif. Si
la prise n’est pas complètement insérée
dans la prise murale, retournez la prise et
essayez de l’insérer dans l’autre sens. Si
elle ne rentre toujours pas, contactez un électricien agréé
pour changer la prise ou utilisez une autre prise. N’essayez
pas de contourner cette mesure de sécurité.
General controls
WAKE 1 WAKE 2
Refer to the Clock section for instructions on
properly setting the Clock.
•
•
This clock radio is equipped with a time keeping
system that is powered with 2 “AA” batteries
(included). The power failure protection circuit will
not operate unless batteries is installed.
When normal household power is interrupted, or AC
line cord is unplugged, the batteries will power the
clock radio to keep track of time and alarm settings
programmed into memory.
Normal operation will resume after AC power is
restored so you will not have to reset the time or the
alarm.
To install the battery:
1. Remove battery compartment door (located at the
bottom of the radio) by applying thumb pressure to
the tab on battery door and then lift the door out
and off the cabinet.
2. Insert 2 AA batteries (included).
3. Replace the compartment door.
LIMITED TO THE DURATION OF THIS WRITTEN WARRANTY.
ANY ACTION FOR BREACH OF ANY WARRANTY
HEREUNDER INCLUDING ANY IMPLIED WARRANTY OF
MERCHANTABILITY MUST BE BROUGHT WITHIN A PERIOD
OF 24 MONTHS FROM DATE OF ORIGINAL PURCHASE.
IN NO CASE SHALL THE COMPANY BE LIABLE FOR ANY
CONSEQUENTIAL OR INCIDENTAL DAMAGES FOR BREACH
OF THIS OR ANY OTHER WARRANTY. No person or
representative is authorized to assume for the Company
any liability other than expressed herein in connection with
the sale of this product.
Some states do not allow limitations on how long an
implied warranty lasts or the exclusion or limitation
of incidental or consequential damage so the above
limitations or exclusions may not apply to you. This
Warranty gives you specific legal rights and you may also
have other rights which vary from state to state.
Recommendations before returning your product for
a warranty claim:
• Properly pack your unit. Include any remotes, memory
cards, cables, etc. which were originally provided with
the product. However DO NOT return any removable
batteries, even if batteries were included with the
original purchase. We recommend using the original
carton and packing materials. Ship to the address
shown below.
• Note that product will be returned with factory
default settings. Consumer will be responsible to
restore any personal preference settings.
Top view
OFF – Turn the unit off
REV/FWD
– Adjust clock time
SNOOZE – Turn off the wake function momentarily
(9 minutes); turn off the current sleep timer
RADIO/AUX – Select radio or AUX mode
WAKE –
OFF – Activate or change alarm settings
/WAKE1/WAKE2/
Wake 2 and clock time
– Slide switch to set Wake 1,
NAP – Activate nap function
SLEEP – Activate sleep function
For Canada Customers, please ship to:
Audiovox Return Centre
c/o Genco
6685 Kennedy Road,
Unit#3, Door 16,
Mississuaga, Ontario
L5T 3A5
Illustrations contained within this publication are for
representation only and subject to change.
The descriptions and characteristics given in this document
are given as a general indication and not as a guarantee.
In order to provide the highest quality product possible, we
reserve the right to make any improvement or modification
without prior notice.
Audiovox Electronics Corp.
Attn: Service Department.
150 Marcus Blvd.
Hauppauge N.Y. 11788
1-800-645-4994
Information FCC
Avant de commencer
Note: Cet appareil a été testé et fonctionne à l’intérieur
des limites déterminées pour les appareils numériques
de Classe B, en vertu de la section 15 des règlements
de la FCC. Ces normes sont conçues pour fournir une
protection raisonnable contre l’interférence nuisible dans
les installations domestiques. Cet appareil génère, utilise
et peut émettre de l’énergie sous forme de fréquences
radio et, s’il n’est pas installé conformément aux
instructions, peut causer de l’interférence nuisible pour les
communications radio. Cependant, il n’est pas assuré que
de l’interférence ne se produira pas dans une installation
spécifique.
Consultez la rubrique « Horloge » pour des
instructions sur le réglage de l’horloge.
Commandes générales
BIEN LIRE ET CONSERVER POUR RÉFÉRENCE ULTÉRIEURE
•
If you have not installed the 2 “AA” batteries in the
product, or the batteries runs out while AC power is
disconnected, all the settings (clock and alarm) will be lost.
After AC power is reconnected, the Digital Display will flash
to indicate that power was interrupted and you should
readjust the time settings.
This Warranty is in lieu of all other express warranties or
liabilities. ANY IMPLIED WARRANTIES, INCLUDING ANY
IMPLIED WARRANTY OF MERCHANTABILITY, SHALL BE
IMPORTANTES INSTRUCTIONS DE SECURITE
murale, consultez un technicien pour remplacer la prise
murale.
Assurez-vous que personne ne marche sur le cordon
d’alimentation ou qu’il n’est pas coincé près des fiches,
des prises et à la sortie des appareils.
N’utilisez que les accessoires spécifiés par le fabricant.
N’utilisez qu’avec le chariot,
support, trépied, crochet ou table
]
spécifiée par le fabricant ou
vendue avec l’appareil. Lorsque
vous utilisez un chariot, portez
attention lorsque vous déplacer le
Avertissement pour
chariot et l’appareil pour éviter les
transport par chariot
blessures dues au renversement.
Débranchez l’appareil pendant les orages ou si vous ne
l’utilisez pas pendant de longues périodes.
Confiez l’entretien à du personnel compétent.
Les réparations sont nécessaires si l’appareil a été
endommagé de quelque façon que ce soit, comme un
cordon d’alimentation ou une fiche en mauvais état,
si un liquide a été renversé sur l’appareil, si des objets
sont tombés sur l’appareil, si l’appareil a été exposé à
l’eau ou à l’humidité, si l’appareil ne fonctionne pas
normalement ou s’il est tombé.
Power failure indicator
Before you begin
•
However, there is no guarantee that interference will not
occur in a particular installation. If this equipment does
cause harmful interference to radio or television reception,
which can be determined by turning the equipment off and
on, the user is encouraged to try to correct the interference
by one or more of the following measures:
• Reorient or relocate the receiving antenna.
• Increase the separation between the equipment and
receiver.
Wake function
TIME ZONE
– Press
repeatedly to
select a time
zone
Connect the equipment into an outlet on a circuit
different from that to which the receiver is connected.
Consult the dealer or an experienced radio/TV
technician for help.
Battery back-up operation
Note: This equipment has been tested and found to
comply with the limits for a Class B digital device, pursuant
to Part 15 of FCC Rules. These limits are designed to
provide reasonable protection against harmful interference
in a residential installation. This equipment generates, uses,
and can radiate radio frequency energy and, if not installed
and used in accordance with the instructions, may cause
harmful interference to radio communications.
Selecting radio mode
AUX IN –
Auxiliary input
jack
Note: It is recommended to replace the batteries at least
once per year even if no power failures have occurred.
•
Help protect the environment - we recommend that you
dispose of used batteries by putting them into specially
designed receptacles.
Radio
1. Press and hold SLEEP.
2. While holding SLEEP, press
REV or FWD
to set
the time for sleep mode. The time range is up to 2
hours. The radio will then be switched on.
3. To view remaining time in sleep mode, press and hold
SLEEP.
4. To cancel the sleep function, press SNOOZE or OFF.
Before you begin
Ecology
General controls
TUNING –
Select radio
frequencies
FCC Information
•
Précautions importantes concernant la
pile
•
Toute pile peut présenter un risque d’incendie,
d’explosion ou de brûlure chimique si elle n’est pas
manipulée avec soin. N’essayez pas de recharger
une pile qui n’est pas conçue pour être rechargée;
n’essayez pas de l’incinérer ou de la percer.
• Les piles non rechargeables, comme les piles alcalines,
peuvent couler si elles sont laissées dans votre appareil
pendant une longue période. Retirez les piles de
l’appareil si vous ne l’utilisez pas pendant plus d’un
mois.
• Si votre appareil utilise plus d’une pile, ne mélangez
pas les types de pile et assurez-vous qu’elles
sont installées correctement. Si différents types
de piles sont mélangés ou si elles sont installées
incorrectement, elles pourraient couler.
• Jetez immédiatement les piles déformées ou qui
coulent. Les piles qui coulent peuvent causer des
brûlures et d’autres blessures.
• Aidez à protéger l’environnement en recyclant ou en
disposant des piles selon les réglementations fédérales,
provinciales et locales.
AVERTISSEMENT : La pile (pile, piles ou bloc-piles) ne doit
pas être exposée à une chaleur intense, telle que la lumière
du soleil, un feu, etc.
Environnement
Aidez à protéger l’environnement : nous vous
recommandons de disposer des piles en les déposant dans
les endroits prévus pour les recevoir.
Consommation électrique
Alimentation électrique : 120 V ~ 60 Hz
Consommation électrique : 4 watts
Si cet appareil cause de l’interférence nuisible à la réception
de signaux de radio ou de télévision, ce qui peut être
validé en fermant et en allumant l’appareil, l’utilisateur est
invité à corriger cette interférence par une ou plusieurs des
mesures suivantes :
• Réorienter ou déplacer de l’antenne de réception.
• Augmenter de la distance entre l’appareil et le
récepteur.
• Brancher de l’appareil dans une prise murale faisant
partie d’un circuit d’alimentation électrique autre que
celui du récepteur.
• Consultez votre revendeur ou un technicien radio/
télévision compétent pour obtenir de l’aide.
Les changements ou modifications non expressément
approuvés par Audiovox peuvent annuler le droit de
l’utilisateur d’utiliser cet appareil.
This Class B digital apparatus complies with Canadian
ICES-003.
Cet appareil numérique de la classe B est conforme à
la norme NMB-003 du Canada.
WAKE 1 WAKE 2
Alimentation par les piles de secours
•
•
•
Ce radio-réveil est muni d’un système de mémorisation
de l’heure qui peut être alimenté par deux piles AA
(fournies). Le circuit de protection contre les pannes
de courant ne fonctionne pas si les piles ne sont pas
installées.
Lorsque l’alimentation résidentielle normale est
interrompue ou que le cordon d’alimentation CA est
débranché, les piles alimentent le radio-réveil pour
maintenir les réglages de l’horloge et de l’alarme
programmés en mémoire.
Le fonctionnement normal reprend lorsque
l’alimentation CA est rétablie; ainsi, vous n’aurez pas à
régler l’horloge et l’alarme à nouveau.
Pour installer la pile :
1. Retirez le couvercle du compartiment de la pile (situé
sur le dessous de la radio) en appuyant avec votre
pouce sur la languette puis en soulevant le couvercle
hors du compartiment.
2. Insérez deux piles AA (fournies).
3. Replacez le couvercle du compartiment.
Remarque : Nous vous recommandons de remplacer les
piles chaque année même si aucune panne de courant
n’a eu lieu.
Indicateur de panne de courant
Si vous n’avez pas installé les deux piles AA dans l’appareil,
ou si les piles sont déchargées et que l’alimentation CA est
débranchée, tous les réglages (horloge et alarme) seront
perdus. Lorsque l’alimentation CA est rétablie, l’affichage
numérique clignote pour indiquer que l’alimentation a été
interrompue et que vous devez régler l’horloge et l’alarme
à nouveau.
Vue du haut
OFF – Fermeture de l’appareil
REV/FWD
– Réglage de l’horloge
SNOOZE – Désactivation momentanée de la fonction de
réveil (9 minutes); désactivation de la minuterie de sommeil
RADIO/AUX – Sélection du mode radio ou AUX
WAKE –
OFF – Activation ou modification des
réglages de l’alarme
Vue de
droite
Vue de
l’arrière
–VOLUME+
– Réglage du
volume
LUMINOSITÉ Sélection de la
luminosité de
l’affichage (Hi
ou Lo)
SYNTONISATION –
Syntonisation
de fréquences
radio
AUX IN – Prise
d’entrée auxiliaire
FUSEAU HORAIRE – Appuyer à
plusieurs reprises
pour sélectionner
un fuseau horaire
DST – Activation
ou désactivation
de la fonction
d’heure avancée
/WAKE1/WAKE2/
– Glisser le commutateur pour
régler le réveil 1, le réveil 2 et l’horloge
NAP – Activation de la fonction de sieste
SLEEP – Activation de la fonction de sommeil
Horloge
Réglage manuel de l’horloge
1. Glissez le commutateur
/WAKE1/WAKE2/
à
la position
pour passer en mode de réglage de
l’horloge.
2. Appuyez sur
REV ou FWD
pour régler l’heure.
• Appuyez et gardez enfoncé pour augmenter ou
diminuer rapidement la valeur affichée.
• En mode de réglage de l’horloge, « : » clignote sur
l’affichage.
• L’affichage de l’horloge est en format 12 heures. Le
témoin AM s’allume pour indiquer l’avant-midi.
3. Glissez le commutateur
/WAKE1/WAKE2/
à la
position
.
Consultez la boîte pour des instructions
sur l’utilisation de la fonction de réglage
automatique de l’horloge.