1
Y-308 56K Modem Module
For use with
Y-200 Series Electronic Boiler Sequencer
& Outdoor Reset Control System
Installation and Operating Manual
CATALOG NO. 5000.65A
Effective: 09-19-08
Replaces: 08-26-05
P/N 241263 Rev. 2
Installation and Operating Manual
Y-308 Modem Module
Contents
Introduction
Introduction.............................................................1
The Raypak Y-308 modem module provides
a method to communicate with the Y-200
controller and auxiliary equipment.
Communication speed is 56k.
Important Safety Instructions...................................1
Installation and Set-Up ............................................2
Limited Warranty....................................................4
IMPORTANT SAFETY
INSTRUCTIONS
IMPORTANT NOTICE: These instructions are
intended for use by qualified personnel who are specifically trained and experienced in the installation of
this type of equipment and related system components. Installation and service personnel may be required by some states to be licensed. If your state
requires certification, be sure your contractor bears
the appropriate license. Only qualified persons shall
attempt to repair this equipment. Repair must be according to these instructions.
WARNING: Improper installation, adjustment, alteration, service or maintenance may damage the
equipment, create a hazard resulting in asphyxiation,
explosion, fire, electric shock, personal injury or
property damage, and will void the warranty.
CAUTION: THIS APPLIANCE HAS PROVISIONS TO BE CONNECTED TO MORE THAN
ONE (1) SUPPLY SOURCE. TO REDUCE THE
RISK OF ELECTRIC SHOCK, DISCONNECT ALL
SUCH CONNECTIONS BEFORE SERVICING.
CAUTION: RISK OF ELECTRIC SHOCK. MORE
THAN ONE (1) DISCONNECT SWITCH MAY BE
REQUIRED TO DE-ENERGIZE THE EQUIPMENT BEFORE SERVICING.
1
Y-308 Modem Module
Installation and Operating Manual
Installation and Set-up
Note: A PCMCIA card might be necessary on some
laptop computers for proper operation.
Modem Board Installation
1.
Remove power from the Y-200 control.
2.
Install the plug-in modem module (P/N 601741)
on to connectors “J22” and “J23” as shown on
the PCB. (See Fig. #.)
3.
Plug an active phone line into “PJ1” on the modem board. (See Fig. #.)
4.
Record the phone line number: _____________.
5.
Restore power to the Y-200 control.
Computer Preparations and Dialing
1.
From the
menu, choose Programs,
Accessories, Communications, HyperTerminal.
(Make sure the Caps Lock is turned off when
using HyperTerminal.)
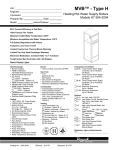
2.
In the Connection Description window, select a
name and icon for the connection and select OK.
(See example in Fig. 1.)
Fig. 1
3.
2
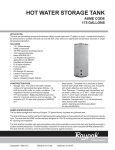
In the Connect To window, enter the area code
and phone number (no spaces, hyphens, etc.)
then select OK. (See Fig. 2.)
Fig. 2
If you have call waiting on your phone line, enter
*70 before the number. This will temporarily
turn off call waiting for the time your modem is
connected.
4.
In the Connect window, modify the number and
the dialing propriety if necessary.
5.
In the Connect window, click on the dial button
to dial the number.
6.
As soon as the computer makes a connection,
“Enter Password:” appears on the screen. (If it
does not prompt you for a password try typing
the “U” key or disconnect and try again till it
does.)
7.
Type “Y200” and <Enter>. (This password can
be changed on the Y-200 display window #29.)
8.
The first Y-200 display window (#1) of the
Y-200 will be placed on the screen.
9.
You can now operate or setup the Y-200 remotely, with the exception of screen # 30 which
is programmed at the Y-200 control only). If
you attempt to reprogram screen #30 remotely
the Y-200 will kick you off line.
Installation and Operating Manual
Y-308 Modem Module
Dialing into the Y-200 Programming
Keys and Operation
1.
The “U” key takes you up through the screen
displays and in the program mode changes the
character above the cursor scrolling up.
2.
The “D” key takes you down through the screen
displays and in the program mode changes the
character above the cursor scrolling down.
3.
The “P” key puts you into the program mode.
4.
The “M” key takes you out of the program mode.
5.
The “<”key moves the cursor to the left.
6.
The “>” key moves the cursor to the right.
7.
Now you can program or set up the Y-200 remotely.
8.
2.
Go into the program mode and enter the
phone number by using the keypad up or
down and left or right arrows.
c.
If you program in too many numbers and
you want to erase the extra numbers, insert a
“#” sign after the last number you want to
keep. To verify, exit the program mode and
screen #30 and then go back to screen #30.
The # sign indicates the end of phone number.
d.
Up to 16 numbers can be stored.
To program in the Alarm Call ID:
a.
Go to screen #31.
b.
Enter the ID code of the Y-200 location.
c.
If you program in too many characters and
you want to erase the extra characters, put
the “#” sign after the last number you want
to keep. To verify, exit the program mode
and screen #31 and then go back to screen
#31. The # sign indicates the end of the ID
code.
d.
Up to 16 numbers or letters can be stored.
To get into the password-protected windows
above #19 you must go to window #19 then type
“P” then “M” then use the “U” and “D” keys to
scroll through screens #20 through #33.
Dialing out from the Y-200 Computer
Preparation
1.
Activate the HyperTerminal on your computer
2.
Type “AT” then <Enter>.
3.
You should see the “OK” on your computer
screen.
4.
Type “ATS0=1” <Enter>.
5.
You should see another “OK” on your computer
screen. (Computer answers on one ring).
6.
The computer is now set up to receive calls from
the Y-200 when there is an alarm condition.
7.
The same thing can be accomplished by clicking
on the “Call” and then on the “Wait for a call”
button in the Hyper Terminal window.
Dialing out from the Y-200 (Alarm Notification) Programming and Operation
1.
b.
3.
4.
To program the Alarm Call Retry:
a.
Go to screen #32.
b.
Program in the number of times you want
the Y-200 to try and call out when there is a
fault condition (00 to 20).
c.
Modem activity is also displayed
To program the Alarm Call Event:
a.
Go to screen #33.
b.
Program in the alarm conditions you wish to
be enabled. The cursor appears under the
first “A” when in the program mode.
c.
Screen will change to an alarm condition
and at the end it will show weather it is in
the Enable or Disable condition.
To program in the phone number the Y-200
should notify in case of an alarm condition:
a.
Go to screen #30 (ON THE Y-200 CONTROL ONLY).
3
LIMITED WARRANTY
Y-308 Modem Module
for Y-200 Series Electronic Boiler Sequencer
& Outdoor Reset Control System
SCOPE OF WARRANTY
Raypak, Inc. ("Raypak") warrants to the original owner the Control System to be free from defects in materials and workmanship under
normal use and service for the applicable warranty period. In accordance with the terms of this Limited Warranty, RAYPAK will furnish a
replacement or repair, at our option, any defective part which fails in normal use and service during the applicable warranty period. The replacement or repair will be warranted for only the unexpired portion of the original Warranty Period.
APPLICABLE WARRANTY PERIOD
The effective date of warranty coverage is the date of original installation, of the Control System, by a qualified electrician or by a RAYPAK
authorized service technician. The Applicable Warranty Period is one (1) year from the effective date.
WARRANTY EXCLUSIONS
This Limited Warranty does not apply:
1.
2.
3.
4.
5.
6.
7.
If the control system is not properly installed by a qualified technician in ac cordance with manufacture's installation instructions,
applicable codes, ordinances and good trade practices;
To damage or malfunctions resulting from failure to properly install, operate or maintain the system in accordance with the manufacture's instructions;
If the rating plate(s) or serial number(s) are altered, defaced or removed;
If the System is modified in any way or used with any non-factory authorized accessories or components;
To damage or failure from abuse, accident, act of nature, fire, flood, freezing or the like;
To accessories, rubber or plastic parts, light bulbs or glass parts;
If the System is moved from its original installation site; or if the original owner no longer owns the site or the System.
LABOR AND SHIPPING COSTS
This Limited W arranty does not cover labor costs for service, removal or reinstallation of any part nor shipping charges to or from RAYPAK'S
designated repair center or to or from the installation site. All such costs are your responsibility.
HOW TO MAKE A WARRANTY CLAIM
To make a warranty claim, promptly ship (postage prepaid) or carry the defective part to a designated RAYPAK Service Dealer or Service
Station in the United States, supplying proof of purchase and date of installation and the model and serial numbers. If you cannot locate a
dealer, contact RAYPAK'S Service Department at the address/telephone listed below. Raypak reserves the right at all times to inspect
the claimed defect and verify warranty coverage at its factory.
EXCLUSIVE WARRANTY - LIMITATION OF LIABILITY
This is the only warranty given by RAYPAK. No one is authorized to make any other warranties on Raypak's behalf. ANY IMPLIED WARRANTIES, INCLUDING MERCHANTABILITY OR FITNESS FOR A PARTICULAR PURPOSE, SHALL NOT EXTEND BEYOND THE
APPLICABLE WARRANTY PERIOD SPECIFIED ABOVE. RAYPAK'S SOLE LIABILITY WITH RESPECT TO ANY DEFECT SHALL
BE AS SET FORTH IN THIS LIMITED WARRANTY. ANY CLAIMS FOR INCIDENTAL OR CONSEQUENTIAL DAMAGES (INCLUDING
DAMAGE FROM WATER LEAKAGE) ARE EXCLUDED. Some states do not allow limitations on how long an implied warranty lasts, or for
the exclusion of incidental or consequential damages, so the above limitation or exclusion may not apply to you.
THIS LIMITED WARRANTY GIVES YOU SPECIFIC LEGAL RIGHTS, AND YOU MAY ALSO HAVE OTHER RIGHTS WHICH VARY
FROM STATE TO STATE.
We suggest you immediately complete the information below and retain this Limited Warranty Certificate in case warranty service is needed.
Raypak, Inc., Service Department
2151 Eastman Avenue, Oxnard, California 93030
Telephone: (805) 278-5300 Fax (805) 278-5468
The following information must be provided when you write or call:
Original Owner
Model Number
Mailing Address
Serial Number
Date of Installation
City
Daytime Telephone Number
State
Zip Code
Installation Site
Contractor/Installer
www.raypak.com
Raypak, Inc., 2151 Eastman Avenue, Oxnard, CA 93030 (805) 278-5300 Fax (805) 278-5468
Litho in U.S.A.