1
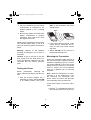
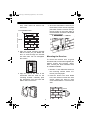
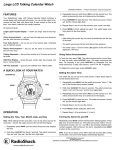
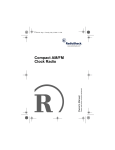
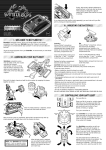
63-984.fm Page 1 Wednesday, September 8, 1999 4:42 PM
Cat. No. 63-984
Wireless Intercom Door Chime
Your RadioShack Wireless Intercom
Door Chime operates as a two-tone
doorbell and an intercom. The chime
is simple to install because it requires
no wiring. Your chime's two channel
switch and digital coding prevent other
transmitters or radio devices from
sounding the chime. To conserve
power, both the receiver and transmitter automatically turn off 30 seconds
after you stop using them.
The chime includes these features:
Indicators — light so you can easily
confirm the chime’s operation.
WARNING:
To reduce the risk of fire or
shock hazard, do not expose this product to rain
or moisture.
CAUTION
RISK OF ELECTRIC SHOCK.
DO NOT OPEN.
CAUTION: TO REDUCE THE RISK OF
ELECTRIC SHOCK, DO NOT REMOVE
COVER OR BACK. NO USER-SERVICEABLE PARTS INSIDE. REFER SERVICING
TO QUALIFIED PERSONNEL.
Separate Buttons for Bell and Intercom — let your callers first announce
their arrival and then communicate using the intercom.
This symbol is intended to alert
you to the presence of uninsulated dangerous voltage within
the product’s enclosure that might
be of sufficient magnitude to constitute a risk of electric shock. Do
not open the product’s case.
Receiver Volume Control — lets you
adjust the volume to a comfortable level.
2-Channel Transmitter and Receiver with Digital Code Selection — assure interference-free communication.
!
!
This symbol is intended to inform
you that important operating and
maintenance instructions are
included in the literature accompanying this product.
50-Foot Usable Operation Distance
— means you can install the transmitter and receiver virtually anywhere in
your home or business.
© 1999 Tandy Corporation.
All Rights Reserved.
RadioShack is a registered trademark used by Tandy Corporation.
63-984.fm Page 2 Wednesday, September 8, 1999 4:42 PM
PREPARATION
Connecting the Receiver to AC
Power
Setting the Channel and Code
Locate a standard AC outlet in the area
where you want to hear the chime and
use the intercom. Plug the receiver's
power cord into the outlet. POWER
lights.
The transmitter and receiver are
equipped with two selectable operation
channels and two selectable digital
codes, to ensure positive operation and
prevent interference from similar products nearby. Select the same channel
and code number for both the transmitter and the receiver.
Installing the Transmitter's
Batteries
The transmitter uses four AA batteries
(not supplied) for power. For the best
performance and longest life, we recommend RadioShack alkaline batteries.
To set the channel, slide CHANNEL A/B
on the side of the receiver to A or B, then
set the transmitter’s channel switch
(shown here) to the same setting.
Channel
Cautions:
Code
• Use only fresh batteries of the required size and recommended type.
• Do not mix old and new batteries,
different types of batteries (standard, alkaline, or rechargeable), or
rechargeable batteries of different
capacities.
Follow these steps to install batteries.
Note: If the door chime occasionally
sounds without anyone pressing BELL
on the transmitter, change the channel
settings.
To set the code, remove the battery
compartment cover and slide CODE to
either 1 or 2 on the receiver, then set the
transmitter’s code switch to the same
setting.
1. Use a flat blade screwdriver to
loosen the screw in the transmitter’s
battery compartment cover, then lift
the cover off.
2
63-984.fm Page 3 Wednesday, September 8, 1999 4:42 PM
2. Place the batteries into the battery
compartment as indicated by the
polarity symbols (+ and –) marked
inside.
BELL on the transmitter. The chime
should sound.
BELL
3. Be sure the rubber seal around the
battery compartment is properly
positioned, then replace the cover
and tighten the screw.
Replace all four batteries if the transmitter’s indicator lights dimly or not at all
when you press any button on the transmitter.
2. If the chime does not sound, make
certain that the transmitter and receiver are set to the same channel
and code.
Warning: Dispose of old batteries
promptly and properly. Do not burn or
bury them.
3. Adjust VOLUME on the receiver to
the desired listening level.
Mounting the Transmitter
Caution: If you do not plan to use the
door chime for a two week period, remove the batteries. Batteries can leak
chemicals that can destroy electronic
parts.
Mount the transmitter within 50 feet of
the receiver using the supplied mounting
hardware. Depending upon the mounting surface material of your home (wood
siding, brick face, and so on), you might
need to consult your local hardware
store for a different type of mounting
hardware.
Testing the Chime
Before permanently mounting the
chime, follow these steps to test the system
Note: While the transmitter is waterresistant, it is not waterproof. If you
are mounting the transmitter outdoors, select a location that provides
some shielding from the elements.
1. With the receiver plugged into a
standard AC outlet, adjust VOLUME
to its middle position. Then press
Follow these steps to mount the transmitter.
1. Drill four 3/16-inch diameter holes into
the mounting surface (as shown be-
3
63-984.fm Page 4 Wednesday, September 8, 1999 4:42 PM
4. Once the transmitter is securely on
the bracket, insert the two supplied
pan-head machine screws through
the two holes on the lower edge of
the transmitter and into the threaded
holes in the bracket.
low). Then insert an anchor into
each hole.
3/16
Inch Diameter Hole
50mm
85mm
2. Align the metal mounting bracket
with the holes you just drilled and
drive a screw through the bracket
into each hole. Do not overtighten
the screws.
Mounting the Receiver
To mount the receiver onto a typical
sheetrock wall, use the two supplied pan
washer screws and anchors. Otherwise, consult your local hardware store
for suitable hardware.
1. Drill two 3/16-inch diameter holes into
the mounting surface about 43/16
inches (106 mm) apart
3. Align the slot on the back of the
transmitter with the hook on the
mounting bracket. Carefully push
the transmitter onto the hook and
slide it down to secure it.
2. Insert an anchor into each drilled
hole, then thread a screw into each
anchor, letting the head of each
screw extend about 1/8 inch from the
wall.
1/8
4
Inch
63-984.fm Page 5 Wednesday, September 8, 1999 4:42 PM
CARE
3. Route the AC power cord beneath
the tabs on either side of the channel on the back of the receiver
To use your RadioShack Wireless Intercom Door Chime system for a long time:
4. Align the receiver's keyhole slots
with the screw heads and slide the
receiver down to secure it.
• Keep the system dry. If it gets wet,
wipe it dry immediately.
• Use and store the system only in
normal temperature environments.
OPERATION
• Handle the system gently and carefully. Do not drop either component.
Your caller presses BELL on the door
transmitter to sound the receiver’s
chime.
• Keep the system away from dust
and dirt, and wipe the system with a
damp cloth occasionally to keep it
looking new.
Note: If the chime sounds when the
transmitter's button is not pressed,
change the channel settings on both the
receiver and transmitter.
Modifying or tampering with the system’s internal components can cause a
malfunction and invalidate its warranty.
If your system is not performing as it
should, take it to your local RadioShack
store for assistance.
Hold down TALK on the receiver (the red
indicator lights) and speak in a normal
tone into the transmitter’s microphone
from about 2–3 inches away. When you
release TALK, the caller can reply by
holding down TALK on the transmitter.
THE FCC WANTS YOU TO
KNOW
Notes:
Your chime system might cause TV or
radio interference even when it is operating properly. To determine whether
the system is causing the interference,
remove the transmitter’s battery or unplug the receiver from AC power. If the
interference goes away, the transmitter
or the receiver is causing the interference. Try to eliminate the interference
by moving the TV or radio away from the
transmitter or contacting your local RadioShack store for help. If you cannot
eliminate the interference, the FCC requires that you stop using the system.
• The receiver and transmitter automatically turn off if no one presses a
button within about 30 seconds.
Pressing any button on either unit
turns on the power again.
• If the temperature approaches the
lower end of the intercom’s operating range (around 0°F), you might
notice some sound distortion. This is
not a malfunction.
• A wireless telephone operating at
49MHz can interfere with the system.
5
63-984.fm Page 6 Wednesday, September 8, 1999 4:42 PM
Dimensions (HWD):
Changes or modifications to this product
not expressly approved by RadioShack,
or operation of this product in any way
other than as detailed by this Owner’s
Manual, could void your authority to operate the product.
67/16 × 37/16 × 17/16 in
(163 × 88 × 36 mm)
Weight .............................................. 77/16 oz
(210 g)
RECEIVER
Channel Frequency:
Channel A ........................... 49.860 MHz
Channel B ........................... 49.890 MHz
SPECIFICATIONS
TRANSMITTER
Operating Temperature Range:
32° to 109.4°F (0° to 43°C)
Operating Voltage .............................. DC 6V
Power Requirements ......... AC 120V, 60 Hz
Channel Frequency:
Channel A ........................... 49.860 MHz
Channel B ........................... 49.890 MHz
Current ............................ 25mA (maximum)
Dimensions (HWD):
Operating Temperature Range:
–0.4° to 140°F (–18° to 60°C)
59/16 × 43/8 × 115/16 in
(142 × 111 × 50 mm)
Transmission Range .............. About 50 feet
(15.24 m)
Weight ............................................. 151/2 oz
(440 g)
Specifications are typical; individual units
might vary. Specifications are subject to
change and improvement without notice.
Power Requirements... 4 × 1.5V AA batteries
Alkaline Battery Life ...................... 6 months
Limited One-Year Warranty
This product is warranted by RadioShack against manufacturing defects in material and workmanship under normal use for one (1) year
from the date of purchase from RadioShack company-owned stores and authorized RadioShack franchisees and dealers. EXCEPT AS
PROVIDED HEREIN, RadioShack MAKES NO EXPRESS WARRANTIES AND ANY IMPLIED WARRANTIES, INCLUDING THOSE
OF MERCHANTABILITY AND FITNESS FOR A PARTICULAR PURPOSE, ARE LIMITED IN DURATION TO THE DURATION OF THE
WRITTEN LIMITED WARRANTIES CONTAINED HEREIN. EXCEPT AS PROVIDED HEREIN, RadioShack SHALL HAVE NO LIABILITY OR RESPONSIBILITY TO CUSTOMER OR ANY OTHER PERSON OR ENTITY WITH RESPECT TO ANY LIABILITY, LOSS OR
DAMAGE CAUSED DIRECTLY OR INDIRECTLY BY USE OR PERFORMANCE OF THE PRODUCT OR ARISING OUT OF ANY
BREACH OF THIS WARRANTY, INCLUDING, BUT NOT LIMITED TO, ANY DAMAGES RESULTING FROM INCONVENIENCE,
LOSS OF TIME, DATA, PROPERTY, REVENUE, OR PROFIT OR ANY INDIRECT, SPECIAL, INCIDENTAL, OR CONSEQUENTIAL
DAMAGES, EVEN IF RadioShack HAS BEEN ADVISED OF THE POSSIBILITY OF SUCH DAMAGES.
Some states do not allow the limitations on how long an implied warranty lasts or the exclusion of incidental or consequential damages,
so the above limitations or exclusions may not apply to you.
In the event of a product defect during the warranty period, take the product and the RadioShack sales receipt as proof of purchase date
to any RadioShack store. RadioShack will, at its option, unless otherwise provided by law: (a) correct the defect by product repair without charge for parts and labor; (b) replace the product with one of the same or similar design; or (c) refund the purchase price. All replaced parts and products, and products on which a refund is made, become the property of RadioShack. New or reconditioned parts
and products may be used in the performance of warranty service. Repaired or replaced parts and products are warranted for the remainder of the original warranty period. You will be charged for repair or replacement of the product made after the expiration of the warranty period.
This warranty does not cover: (a) damage or failure caused by or attributable to acts of God, abuse, accident, misuse, improper or abnormal usage, failure to follow instructions, improper installation or maintenance, alteration, lightning or other incidence of excess voltage or current; (b) any repairs other than those provided by a RadioShack Authorized Service Facility; (c) consumables such as fuses
or batteries; (d) cosmetic damage; (e) transportation, shipping or insurance costs; or (f) costs of product removal, installation, set-up
service adjustment or reinstallation.
This warranty gives you specific legal rights, and you may also have other rights which vary from state to state.
RadioShack Customer Relations, 200 Taylor Street, 6th Floor, Fort Worth, TX 76102
We Service What We Sell
09A99
04/99
Printed in Hong Kong
6