1
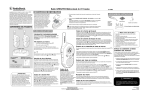
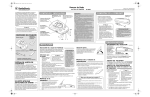
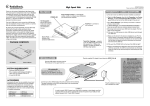
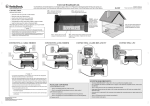
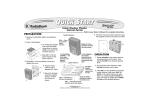
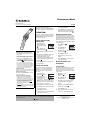
Thermometer Watch
www.radioshack.comSM
OWNER’S MANUAL —
Please read before using this equipment.
63-5048
Thank you for your purchasing the
RadioShack Thermometer Watch. It
functions as a watch with dual timekeeping,
alarm, timer, stopwatch, and thermometer.
OPERATION
Remove the protective film from the display
before use. To view the display in the dark,
press SPLIT/RESET. The backlight turns on
for about three seconds.
SETTING THE TIME
TEMPERATURE
AND
1. Repeatedly press
MODE until the time,
day, and date appear.
Ô
2. Press ADJUST. The
second digits flash. Ô
Ô NOTE Ô
Setting the Time and Temperature
• Press ST./STP. to toggle between day and
temperature.
• When you enter setting mode, the weekday
or temperature display changes to year.
• Repeatedly press SPLIT/RESET while in
time setting mode to select 12- or 24-hour
time format. PM appears for a PM hour in
12-hour time, 24H appears for 24-hour time.
• You can set the year from 1985 to 2029.
• For the most accurate temperature readings,
keep your watch away from warm surfaces.
• If you do not press a button within about two
minutes while in time/temperature setting
mode, the clock returns to time mode.
Setting the Alarm
The alarm sounds for about 20 seconds at the
set time. Press any button to silence the alarm.
Setting the Dual Time
Repeatedly press SPLIT/RESET to select 12or 24-hour time format.
3. Press ST./STP. to reset the seconds to
zero.
4. Repeatedly press MODE to set the hour,
minutes, year, month, date, and
temperature (Celsius versus
Fahrenheit), then repeatedly press and
hold down ST.STP. to set the digits as
desired. Ô
5. Press ADJUST when you are finished
setting the time.
SETTING
THE
ALARM
You can set the alarm to sound daily at a
preset time, or on a specified date at a
preset time. If you do not press a button
within two minutes, the watch returns to
alarm mode.
1. Repeatedly press
MODE until AL appears.
Using the Timer and Stopwatch
• In setting mode, press SPLIT/RESET to
toggle between normal counting and
repeated counting. Normal counting begins
from the time you set, and counts down to
zero. Repeated counting begins from the
time you set, counts down to zero, then
repeats the countdown sequence. AUTO
appears on the display when in repeated
counting mode.
2. Repeatedly press
SPLIT/RESET to turn on
or off the alarm or
hourly chime. i appears for the alarm,
! appears for the hourly chime. When
the hourly chime is on, the watch beeps
twice every hour on the hour.
• If 00:00’00 appears on the display, the clock
will count down from 23:59’59 automatically
after you press ST.STP.
3. Press ADJUST. The alarm hour flashes.
4. Repeatedly press or hold down ST./STP.
to set the alarm hour.
5. Press MODE to confirm.
6. Repeatedly press or hold down ST./STP.
to set the alarm minutes.
! IMPORTANT !
If an icon appears at the end of a paragraph, go to the box on that page with the corresponding icon
for pertinent information.
Ô — Note
7. Repeat steps 5 and 6 to preset a date
for the alarm if desired.
8. Press ADJUST when you are finished
setting the alarm. The alarm sounds
about 20 seconds at the set time. Ô
SETTING
THE
DUAL TIME
This features allows you to view time for a
city in another time zone. The time shown on
the upper half of the display is the current
local time; the time on the lower half of the
display is the dual time. If you do not press a
button within two minutes, the watch returns
to dual time mode.
1. Press MODE until DT
appears.
2. Press ADJUST. The
hour digits flash.
3. Repeatedly press or hold down ST./STP.
to set the hour. Ô
4. Press MODE to confirm.
5. Repeat steps 3 and 4 to set the
minutes.
6. Press ADJUST when you are finished
setting the dual time.
USING THE TIMER
STOPWATCH
AND
In Timer Mode
The timer function enables you to set a time
to count down from (up to 23 hours, 59
minutes, 59 seconds). If you do not press a
button within two minutes, the watch returns
to timer mode.
1. Repeatedly press
MODE until T’R
appears.
2. Press ADJUST. The
hour digits flash.
3. Repeatedly press ST./STP. to change
the selected digits to your desired
setting.
4. Repeatedly press MODE to select the
minutes and seconds. Ô
5. Press ADJUST to exit.
6. Press ST./STP. to start your timer. To
stop the timer, press ST./STP. again.
© 2003 RadioShack Corporation.
All Rights Reserved.
RadioShack and RadioShack.com are trademarks used by
RadioShack Corporation.
7. To reset your timer to your set time,
press SPLIT/RESET after you stop the
timer. Ô
In Stopwatch Mode
The stopwatch function enables you to count
time up to 23 hours, 59 minutes, 59
seconds.
1. Repeatedly press MODE
until ST appears.
Ô NOTE Ô
• When you split the stopwatch, the time at
which you presses SPLIT/RESET remains
on the display. The stopwatch continues
counting internally. Press SPLIT/RESET
again to view the the current countup time.
•
0 H on the upper display represents the
stopwatch hour.
2. Remove the insulation sheet from the
battery.
3. Use a pointed object, such as tweezers,
to unlock the battery plate and remove
the old battery.
4. With the watch face down, place a new
battery in the compartment with its
positive (+) side face up.
2. Press ST./STP. to start
the stopwatch. To stop,
press ST./STP. again.
The elapsed time appears on the
display.
Battery Lock
3. To split the stopwatch, press
SPLIT/RESET when the stopwatch is
running. Ô
4. To reset the stopwatch, press ST./STP.
Then press SPLIT/RESET.
5. Replace the battery plate and insulation
sheet.
6. Secure the back cover with the screws.
CARE
Keep the watch dry; if it gets wet, wipe it dry
immediately. Use and store the watch only
in normal temperature environments.
Handle the watch carefully; do not drop it.
Keep the watch away from dust and dirt, and
wipe it with a damp cloth occasionally to
keep it looking new.
Ô BATTERY NOTES Ô
•
Dispose of old batteries promptly and
properly.
•
Do not burn or bury batteries.
•
Use only a fresh battery of the required size
and recommended type.
•
If you do not plan to use the watch for
several weeks, remove the battery. Batteries
can leak chemicals that can damage
electronic parts.
SPECIFICATIONS
Power ............................... 1 x CR2032 (supplied)
Battery Life .................................... About 2 years
Water Resistance ...................................... 100 M
Thermometer Range ................. 15.8°F to 158°F
-9°C to 70°C
Thermometer Resolution ...................... 1°F (1°C)
REPLACING THE
BATTERY
Thermometer Accuracy:
Your watch comes with one CR2032 battery
for power. You can take your watch to a
RadioShack store for battery
replacement.Ô
Specifications are typical; individual units might
vary. Specifications are subject to change and
improve without notice.
32°F to 104°F (0°C to 40°C) ............... ±2°F (1°C)
Other Range ....................................... ±4°F(2°C)
1. Use a Philips screwdriver to remove the
four screws from the back of the watch.
Then remove the cover.
• Replacing the battery resets the watch.
• Keep button-cell batteries away from
children. Swallowing a button-cell battery can
be fatal.
Limited One-Year Warranty
This product is warranted by RadioShack against manufacturing defects in material and workmanship under normal use for one (1) year from the date of purchase from RadioShack company-owned stores and authorized RadioShack franchisees and dealers. EXCEPT AS PROVIDED HEREIN, RadioShack MAKES NO EXPRESS
WARRANTIES AND ANY IMPLIED WARRANTIES, INCLUDING THOSE OF MERCHANTABILITY AND FITNESS
FOR A PARTICULAR PURPOSE, ARE LIMITED IN DURATION TO THE DURATION OF THE WRITTEN LIMITED
WARRANTIES CONTAINED HEREIN. EXCEPT AS PROVIDED HEREIN, RadioShack SHALL HAVE NO LIABILITY OR RESPONSIBILITY TO CUSTOMER OR ANY OTHER PERSON OR ENTITY WITH RESPECT TO ANY LIABILITY, LOSS OR DAMAGE CAUSED DIRECTLY OR INDIRECTLY BY USE OR PERFORMANCE OF THE
PRODUCT OR ARISING OUT OF ANY BREACH OF THIS WARRANTY, INCLUDING, BUT NOT LIMITED TO,
ANY DAMAGES RESULTING FROM INCONVENIENCE, LOSS OF TIME, DATA, PROPERTY, REVENUE, OR
PROFIT OR ANY INDIRECT, SPECIAL, INCIDENTAL, OR CONSEQUENTIAL DAMAGES, EVEN IF RadioShack
HAS BEEN ADVISED OF THE POSSIBILITY OF SUCH DAMAGES.
Some states do not allow limitations on how long an implied warranty lasts or the exclusion or limitation of incidental or consequential damages, so the above limitations or exclusions may not apply to you.
In the event of a product defect during the warranty period, take the product and the RadioShack sales receipt as
proof of purchase date to any RadioShack store. RadioShack will, at its option, unless otherwise provided by law:
(a) correct the defect by product repair without charge for parts and labor; (b) replace the product with one of the
same or similar design; or (c) refund the purchase price. All replaced parts and products, and products on which a
refund is made, become the property of RadioShack. New or reconditioned parts and products may be used in the
performance of warranty service. Repaired or replaced parts and products are warranted for the remainder of the
original warranty period. You will be charged for repair or replacement of the product made after the expiration of
the warranty period.
This warranty does not cover: (a) damage or failure caused by or attributable to acts of God, abuse, accident, misuse, improper or abnormal usage, failure to follow instructions, improper installation or maintenance, alteration,
lightning or other incidence of excess voltage or current; (b) any repairs other than those provided by a RadioShack Authorized Service Facility; (c) consumables such as fuses or batteries; (d) cosmetic damage; (e) transportation, shipping or insurance costs; or (f) costs of product removal, installation, set-up service adjustment or
reinstallation.
This warranty gives you specific legal rights, and you may also have other rights which vary from state to state.
RadioShack Customer Relations, 200 Taylor Street, 6th Floor, Fort Worth, TX 76102
12/99
03A03
Printed in China
63-5048