1
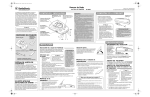
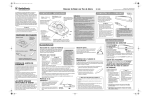
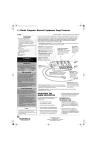
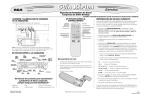
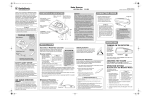
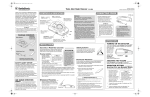
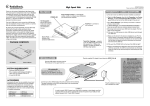
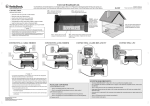
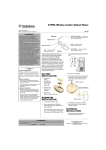
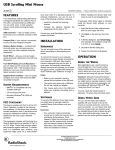
26-592_95.fm Page 1 Wednesday, March 5, 2003 10:11 AM
USB Mini Optical Mouse
with Glowing Wheel
www.radioshack.comSM
OWNER’S MANUAL —
Please read before using this equipment.
26-592
USB Connector — connects
easily to USB ports
PACKAGE CONTENTS
•
•
•
•
•
Optical Mouse
PS2 Adapter
Mouse Driver CD (Windows 95 only)
Velcro Tape for Cable Management
This Owner’s Manual
Right Button — accesses
pop-up menus
Left Button — performs
the CLICK, SELECT, and
DOUBLE CLICK
commands.
THE FCC WANTS YOU TO KNOW
This equipment has been tested and found to comply
with the limits for a Class B digital device, pursuant to
Part 15 of the FCC Rules. These limits are designed
to provide reasonable protection against harmful
interference in a residential installation. This
equipment generates, uses and can radiate radio
frequency energy and, if not installed and used in
accordance with the instructions, may cause harmful
interference to radio communications. However, there
is no guarantee that interference will not occur in a
particular installation. If this equipment does cause
harmful interference to radio or television reception,
which can be determined by turning the equipment off
and on, the user is encouraged to try to correct the
interference by one or more of the following
measures:
• Reorient or relocate the receiving antenna.
• Increase the separation between the equipment
and receiver.
• Connect the equipment into an outlet on a circuit
different from that to which the receiver is
connected.
• Consult your local RadioShack store or an
experienced radio/TV technician for help.
• If you cannot eliminate the interference, the FCC
requires that you stop using your mouse. Changes
or modifications not expressly approved by
RadioShack may cause interference and void the
user’s authority to operate the equipment.
FCC DECLARATION OF CONFORMITY
This device complies with Part 15 of the FCC Rules.
Operation is subject to the following two conditions:
(1) this device may not cause harmful interference,
and (2) this device must accept any interference
received, including interference that may cause
undesired operation.
Product: USB Mini Optical Mouse
with Glowing Wheel
Model: Cat. No. 26-592
Scroll Wheel with Blue LED — allows
you to scroll or zoom. The blue LED
lights when the mouse is operating.
True 400 DPI (dots per inch) Resolution — allows the mouse to move fluidly across
higher resolution monitors
Your RadioShack Illuminations USB Mini
Optical Mouse with Glowing Wheel is
designed specifically for notebook PCs or
PCs with either a universal serial bus (USB)
or PS/2 port. You can scroll, zoom, or click
using the scroll wheel and programmable
buttons. Its compact size makes it ideal to
carry with your notebook computer. Its
optical sensor receives 1500 signals per
second allowing it to detect movement
precisely without moving parts to clean or
replace.
Computer with PS/2 Mouse Port
SYSTEM REQUIREMENTS
Software (Windows 95 Only)
Hardware — IBM PC or compatible with
one available USB or PS/2 port.
To use all of the mouse features, you must
install the supplied driver software onto your
computer.
Software for operation with USB —
Microsoft Windows 98, Windows 2000,
Windows ME, or Windows XP.
Software for operation with PS2 —
Microsoft Windows 95, Windows 98,
Windows 2000, NT4.0, Windows ME, or
Windows XP.
Responsible Party: RadioShack
100 Throckmorton
Fort Worth, TX 76102
Phone: 817-415-3200
This product has been tested to comply with
International Standard IEC 825-1:1993
Supplied Driver CD — lets you quickly
configure your mouse with almost any IBMcompatible computer.
INSTALLATION
Hardware
Computer with USB Mouse Port
Ô NOTES Ô
• Refer to your computer’s owner’s manual for
the location of the USB or PS/2 port.
• The mouse will NOT work with a serial port
adapter.
USB to PS/2 Adapter — connects
mouse to PCs without a USB port
1. With the computer on, connect the
mouse cable’s rectangular USB plug to
the computer’s USB port.Ô
2. Follow the on screen instructions to
install the Windows mouse driver.
• Windows 98, 2000, ME, or XP is required to
use this mouse in a USB port.
1. Turn off the computer.
2. Connect the supplied PS/2 adapter plug
to the mouse cables’ USB plug.
3. Plug the mouse cable’s round PS/2 plug
to the computer’s PS/2 mouse port.
4. Turn on the computer.
5. Follow the on screen instructions to
install the Windows mouse driver.
1. Insert the supplied driver software CD
into your computer’s CD-ROM drive.
2. The mouse program will run
automatically. If not, click START on the
task bar, and then click RUN.
3. <D>:/Disk1/Setup.exe appears in the
Run dialog box. (If the software setup
CD is in drive D).
4. Click OK or ENTER. The Setup screen
appears. Follow the on-screen
instruction to proceed.
5. Remove the driver software CD from
the CD-ROM drive after finishing mouse
driver installation.
6. To paste the mouse icon on the
Windows’ desktop as a shortcut for
configuring the mouse properties later,
right click the mouse icon under
Windows’ Control Panel to open Create
Shortcut dialog box. Then follow the
onscreen instruction.
! IMPORTANT !
If an icon appears at the end of a paragraph, go to the box on that page
with the corresponding icon for pertinent information.
! — Important
Ô — Note
— Caution
© 2003 RadioShack Corporation.
All Rights Reserved.
RadioShack and RadioShack.com are trademarks
used by RadioShack Corporation.
26-592_95.fm Page 2 Wednesday, March 5, 2003 10:11 AM
OPERATION
Limited Ninety-Day Warranty
This product is warranted by RadioShack against manufacturing defects in material and workmanship under normal use for ninety (90)
days from the date of purchase from RadioShack company-owned
stores and authorized RadioShack franchisees and dealers. EXCEPT
AS PROVIDED HEREIN, RadioShack MAKES NO EXPRESS WARRANTIES AND ANY IMPLIED WARRANTIES, INCLUDING THOSE
OF MERCHANTABILITY AND FITNESS FOR A PARTICULAR PURPOSE, ARE LIMITED IN DURATION TO THE DURATION OF THE
WRITTEN LIMITED WARRANTIES CONTAINED HEREIN. EXCEPT
AS PROVIDED HEREIN, RadioShack SHALL HAVE NO LIABILITY
OR RESPONSIBILITY TO CUSTOMER OR ANY OTHER PERSON
OR ENTITY WITH RESPECT TO ANY LIABILITY, LOSS OR DAMAGE CAUSED DIRECTLY OR INDIRECTLY BY USE OR PERFORMANCE OF THE PRODUCT OR ARISING OUT OF ANY BREACH
OF THIS WARRANTY, INCLUDING, BUT NOT LIMITED TO, ANY
DAMAGES RESULTING FROM INCONVENIENCE, LOSS OF TIME,
DATA, PROPERTY, REVENUE, OR PROFIT OR ANY INDIRECT,
SPECIAL, INCIDENTAL, OR CONSEQUENTIAL DAMAGES, EVEN
IF RadioShack HAS BEEN ADVISED OF THE POSSIBILITY OF
SUCH DAMAGES.
Some states do not allow limitations on how long an implied warranty
lasts or the exclusion or limitation of incidental or consequential damages, so the above limitations or exclusions may not apply to you.
In the event of a product defect during the warranty period, take the
product and the RadioShack sales receipt as proof of purchase date
to any RadioShack store. RadioShack will, at its option, unless otherwise provided by law: (a) correct the defect by product repair without
charge for parts and labor; (b) replace the product with one of the
same or similar design; or (c) refund the purchase price. All replaced
parts and products, and products on which a refund is made, become
the property of RadioShack. New or reconditioned parts and products
may be used in the performance of warranty service. Repaired or replaced parts and products are warranted for the remainder of the original warranty period. You will be charged for repair or replacement of
the product made after the expiration of the warranty period.
This warranty does not cover: (a) damage or failure caused by or attributable to acts of God, abuse, accident, misuse, improper or abnormal usage, failure to follow instructions, improper installation or
maintenance, alteration, lightning or other incidence of excess voltage
or current; (b) any repairs other than those provided by a RadioShack
Authorized Service Facility; (c) consumables such as fuses or batteries; (d) cosmetic damage; (e) transportation, shipping or insurance
costs; or (f) costs of product removal, installation, set-up service adjustment or reinstallation.
This warranty gives you specific legal rights, and you may also have
other rights which vary from state to state.
RadioShack Customer Relations, 200 Taylor Street, 6th Floor,
Fort Worth, TX 76102
12/99
! IMPORTANT !
• Be sure to NOT use the optical mouse on a
desk which is made of glass, iron, black
velvet, or a mirror.
• A flat surface is necessary for the optical
sensor to work.
• If you use the mouse on a metal desk, use a
pad.
CAUTION Long periods of repetitive motion using a
mouse may be associated with physical
discomfort and injury in your hands, wrists,
arms, shoulders, neck, or back. To reduce the
risk of injury, we suggest you take frequent
short breaks.
Ô NOTES Ô
Auto Scroll
Auto Scroll does not function in Windows 95
when the mouse is connected with the PS/2
adapter.
Care
Your mouse is optical, and does not use a ball.
You do not need to clean the mouse.
RadioShack Corporation
Fort Worth, Texas 76102
USING THE SCROLLING WHEEL
Most applications use a scroll function to
move the cursor through text. Your mouse’s
wheel makes scrolling easier. ! Scroll
To scroll, rotate the wheel forward or
backward.
Auto Scroll
Your mouse’s auto scroll function lets you
automatically scroll through a document
without having to move the mouse or mouse
wheel.Ô
1. Press the scrolling wheel until · or ¸
appears.
2. Move the pointer vertically, horizontally,
or diagonally away from the original
mark to start auto scrolling. Auto scroll
speed increases as the pointer is
moved away from the original mark.
3. To stop auto scroll, press any mouse
button or rotate the wheel.
Zoom
Some Microsoft Office 97 compatible
applications (such as Microsoft Word 97)
have additional zooming functions. Use the
zooming function to “zoom in” for a closer
look at a page or “zoom out” to see more of
a page. To zoom in, hold down CTRL and
rotate the mouse wheel forward. To zoom
out, hold down CTRL and rotate the mouse
wheel backward.
MOUSE PROPERTIES
CONFIGURATION
To configure the mouse properties, double
click the mouse icon on the Windows
desktop to open the Mouse Properties
dialog box. Then click the desired Buttons,
Pointers, Motion tab for mouse
configuration.
TROUBLESHOOTING
If your mouse is not working as it should,
these suggestions might help you eliminate
the problem. If the mouse still does not
operate properly, take it to your local
RadioShack store for assistance.
Problem: The mouse was not detected by
my computer.
Solutions:
• Make sure the mouse is securely
plugged into your computer’s mouse
port.
• If you connect the mouse to the USB
port, check if your PC’s USB port is
working properly. Look on the Device
Manager of System Properties. If there
is a circled exclamation point through
the icon, it means this USB controller
has some problem. Try to remove and
re-install it or contact your PC
manufacturer’s technical support.
• If you connect the mouse to the USB
port, check the version of your
operating system. If you are not running
Windows 98, Windows 2000, Windows
ME, or Windows XP, update your
operating system so the USB device
can be enabled.
• If you connect the mouse to the USB
port, make sure the USB port was
enabled in the BIOS setup.
Problem: There is no pointer on the screen
or the pointer is not responding to the
mouse’s movement.
Solution: Your computer did not detect the
mouse. Make sure your mouse’s cable is
properly connected to the correct port.
CARE
Keep the mouse dry; if it gets wet, wipe it dry
immediately. Use and store the mouse only
in normal temperature environments.
Handle the mouse carefully; do not drop it.
Keep the mouse away from dust and dirt,
and wipe it with a damp cloth occasionally to
keep it looking new.Ô
Modifying or tampering with the mouse’s
internal components can cause a
malfunction.
If your mouse is not performing as it should,
take it to your local RadioShack store for
assistance.
If the trouble is affecting the telephone lines,
the phone company can ask you to
disconnect your mouse until you have
resolved the problem.
Problem: The scrolling functions of my
mouse are not working with my notebook.
Solution: Disable the trackball or touch-pad
in your notebook’s BIOS and enable the
external port to successfully use all the
mouse’s functions.
26-592
03A03
Printed in China