Transcript
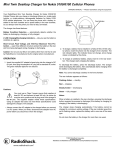
61-140
Wireless
Two-Bell Door Chime
Preparation
What’s Included
Wireless Door Chime
Bell 2
Remote Mounting Bracket (2)
M 3 Screw (4)
M 3.5 Screw (5)
Installing Batteries
1. Install three C batteries in your Wireless Door Chime as
indicated by the polarity symbols (+ and – ).
Wireless Door Chime
BELL 1
CHANNEL 3 2 1
2. Install three AAA batteries in each Remote Doorbell as
indicated by the polarity symbols (+ and – ).
ON/OFF
Switch
Remote Doorbell
Changing the Channel
In the event you need to change or reset the channel on your Wireless
Door Chime and Remote Doorbell, use the following instructions.
BELL
RF Emissions Information
This equipment has been tested and found to comply with the limits
for a Class B digital device, pursuant to Part 15 of the FCC Rules.
These limits are designed to provide reasonable protection against
harmful interference in a residential installation. This equipment
generates, uses, and can radiate radio frequency energy and, if not
installed and used in accordance with the instructions, may cause
harmful interference to radio communications. However, there is no
guarantee that interference will not occur in a particular installation. If
this equipment does cause harmful interference to radio or television
reception, which can be determined by turning the equipment off
and on, the user is encouraged to try to correct the interference by
one or more of the following measures:
2. Repeat step 1 for Remote Doorbell 2.
Note: If your Wireless Door Chime rings when no one presses one of
the remotes, you may be receiving interference. Switch the affected Wireless
Door Chime and Remote Doorbell to another channel.
Mounting Your Wireless Door Chime
1. Drill a ¼-inch hole and insert an anchor.
2. Screw an M 3.5 screw into the anchor, leaving the head
extended about 1/8-inch.
Using Your Wireless Door Chime and Remote Doorbells
3. Align the Wireless Door Chime’s rear keyhole slot to the
screw head and slide the chime down to lock in place.
1. Slide your Wireless Door Chime to ON. Slide to OFF when you don’t
want to hear it ring.
You can also set your Wireless Door Chime on a flat surface using
the attached metal stand.
2. Press one of your two Remote Doorbells. Your chime will “ding dong”
for Remote Doorbell 1 and play “Home Sweet Home” for Remote
Doorbell 2.
Mounting Your Remote Doorbell
1. Mark two holes using the mounting bracket. Drill a ¼-inch
hole at each mark. Insert an anchor in each hole.
¼” hole
2. Align your mounting bracket with the anchors and screw
a supplied M 3.5 screw into each anchor.
3. Slide your Remote Doorbell into the bracket. To lock the
Remote Doorbell in place, insert a supplied M 2.6 screw
into the bottom of the mounting bracket.
You can also carry your Remote Doorbell with you as a panic alarm or
to let someone you frequently visit (such as an elderly parent) know you
have arrived. If you want to use the supplied Lanyard:
1. Slip the thin, small end through the hole at the top of the Remote
Doorbell.
2. Thread the thick end through the loop at the thin end and pull
through.
©2008. RadioShack Corporation.
All rights reserved. RadioShack and RadioShack.com are trademarks used by RadioShack Corporation.
Frequency.............................................. 433.92 MHz ± 600 KHz
Doorbell current consumption ..................................... <10 mA
Chime current consumption ........................ <2 mA @ standby
........................................................................<130 mA @ chime
Chime battery low ................................................. 2.4 V ± 0.1 V
Chime audio power.......................... > 80 dBA @ 10 in (25 cm)
Doorbell operating temperature.......................–4° F to 140° F
...........................................................................(–20° C to 60° C)
Specifications are subject to change and improvement
without notice. Actual product may vary from the images
found in this document.
CHANNEL 1 2 3
1. Select the same channel (1, 2, or 3) in the Wireless Door Chime
(remove batteries in Wireless Door Chime to select channel) and
Remote Doorbell 1.
Bell 1
Lanyard
Anchor (5)
M 2.6 Brass Screw (2)
User’s Guide
Specifications
BELL 2
CHANNEL 3 2 1
Notes:
• Use only fresh batteries of the required size and type.
• Remove old or weak batteries that might leak and damage
electronic circuits.
• Don’t mix old and new batteries or battery chemistries.
Thank you for purchasing your Wireless Two-Bell Door Chime
from RadioShack. You can use it as a doorbell, remote pager,
or panic switch. Please read this user’s guide before installing,
setting up and using your new product.
Adding Another Alarm
Remote Doorbell
You can expand your doorbells to sound an
additional alarm. To do this, you will need
to wire one or both Remote Doorbell to an
alarm that contains a normally open contact.
Rear View
1. Connect both tips of a 2-conductor wire
(not supplied) to a doorbell, as shown,
using two M3 screws.
2. Connect both tips of the other end of
the 2-conductor wire to the extra alarm.
Now, when you press your Remote Doorbell,
both the Wireless Door Chime and the alarm
will sound.
• Reorient or relocate the receiving antenna.
• Increase the separation between the equipment and receiver.
• Connect the equipment into an outlet on a circuit different from
that to which the receiver is connected.
This device complies with Part 15 of the FCC Rules. Operation is
subject to the following two conditions: (1) this device may not cause
harmful interference, and (2) this device must accept any interference
received, including interference that may cause undesired operation.
Consult your local RadioShack store or an experienced radio/TV
technician for help. If you cannot eliminate the interference, the
FCC requires that you stop using your door chime. Changes or
modifications not expressly approved by RadioShack may cause
interference and void the user’s authority to operate the equipment.
Limited Warranty
This product is warranted by RadioShack against manufacturing
defects in material and workmanship under normal use for ninety
(90) days from the date of purchase from RadioShack companyowned stores and authorized RadioShack franchisees and dealers.
For complete warranty details and exclusions, check with your local
RadioShack store.
RadioShack Customer Relations
300 RadioShack Circle
Fort Worth, TX 76102
04/04
www.radioshack.com
Protect the environment by recycling used electronics. Go
to www.ecyclingcentral.com to find a recycling location
near you.
02A08
61-140
AO0305AAA1
Printed in China