1
OPERATING INSTRUCTIONS
INDASH AM/FM DVD/CD/MP3 PLAYER
MODEL PLDVD170
FEATURES
POWER
+20%
Operating voltage range: 12V -10% DC.
Low power consumption design.
COMPATIBILITY
This DVD player can play the following discs:
DVD, CD, VCD, DVCD, MP3, CD-R,CD-RW .
SYSTEM FUNCTIONS
VIDEO OUTPUT SYSTEM
System AUTO , NTSC, PAL or PAL M switchable.
TV TYPE
[4:3LB], [4:3PS] or [16:9] will be selected conforming to the actual monitor in use.
AUDIO OUTPUT
2 channel Dobly digital output and supports
analog output of MPEG-1, MPEG-2 layer 2 and MP3.
ADDITIONAL VIDEO FEATURES
Multi- angle, multi-view, multi-audio function
Multi-level forward, backward motion
program, resume stop and repeat function
Play position memory function
AUDIO SYSTEM
FM 15 preset stations, receiving frequency range (87.5 - 108 MHz)
MW 5 preset stations, receiving frequency range (530 - 1710 KHz)
LW 5 preset stations, receiving frequency range (144 - 279 Khz)
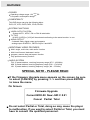
SPECIAL NOTE - PLEASE READ
If the Firmware Upgrade menu appears on the screen, be sure
to select [CANCEL] by pressing 3/4and then press ENTER
to leave the menu.
On Screen
Firmware Upgrade
Current:MC0.08 New:JHD C 0.91
Cancel Partial Total
Do not select Partial or Total, doing so may cause the player
to malfunction. If you want to select Partial or Total, you must
have to consult the qualified personnel.
TABLE OF CONTENTS
Introduction ------------------------------------------------------------------------------ 1-7
Safety precautions ------------------------------------------------------------------------------------Important instructions -------------------------------------------------------------------------------Precautions ---------------------------------------------------------------------------------------------Identification of controls -----------------------------------------------------------------------------When using remote control--------------------------------------------------------------------------
1
2
3
4-6
7
Connections -------------------------------------------------------------------------------------- 8-10
Outlet wires connection ------------------------------------------------------------------------------- 8
Connecting to an audio system or speakers and monitor input---------------------------- 9
AMP select------------------------------------------------------------------------------------------------ 10
Note on connecting ------------------------------------------------------------------------------------ 10
Playing a disc-------------------------------------------------------------------------------------- 11-13
Basic playback ------------------------------------------------------------------------------------ 11-12
Playing at various speeds---------------------------------------------------------------------- 13
Advanced playback------------------------------------------------------------------------------ 14-20
Resuming playback from the same location-------------------------------------------- 14
Playing from the desired location ----------------------------------------------------------- 14
Locating a specific title, chapter or track ------------------------------------------------ 15
Play mode ------------------- --------------------------------------------------------------------- 16
Playing repeatedly ---------------------------------------------------------------------------- 17
Playing without sound------------------------------------------------------------------------ 17
Selecting sound effect------------------------------------------------------------------------ 18
Selecting a playback audio setting----------------------------------------------------------- 19
Selecting the camera angle------------------------------------------------------------------ 20
Selecting subtitles ------------------------------------------------------------------------------- 20
Function setup ----------------------------------------------------------------------------------- 21-23
Using the on-screen display ---------------------------------------------------------------- 21
Customizing the function settings --------------------------------------------------------- 22-23
MP3 instruction--------------------------------------------------------------------------- 24
Radio operation--------------------------------------------------------------------------- 25-26
Others ------------------------------------------------------------------------------------------------ 27-32
Precautions ------------------------------------------------------------------------------------- 27
Notes on discs --------------------------------------------------------------------------------- 28
Troubleshooting ------------------------------------------------------------------------------- 29
Specifications ---------------------------------------------------------------------------------- 30
Accessories and Hardware------------------------------------------------------------------- 31
Note ----------------------------------------------------------------------------------------------- 32
SAFETY PRECAUTIONS
+20%
This digital versatile disc (DVD) video player uses 12V -10% DC.
For future reference, record the model and serial number
(located on the case of the DVD player) in the space provided.
S/N:
Date:
CAUTION:
THIS DVD VIDEO PLAYER IS A CLASS IIa LASER PRODUCT.
USE OF CONTROLS OR ADJUSTMENTS OR PERFORMANCE OF PROCEDURES OTHER
THAN THOSE SPECIFIED HEREIN MAY RESULT IN HAZARDOUS RADIATION EXPOSURE.
AS THE LASER BEAM USED IN THIS DVD VIDEO PLAYER IS HARMFUL TO THE EYES,
DO NOT ATTEMPT TO DISASSEMBLE THE CABINET.
REFER SERVICING TO QUALIFIED PERSONNEL ONLY.
WARNING : class IIa laser product - Avoid Long Term viewing of Direct Laser Radiation.
WARNING OF DEW FORMATION
Dew may form on the pickup lens in the following conditions.
- Immediately after a heater has been turned on.
- In a steamy or very humid room.
When the unit is suddenly moved from a cold environment to a warm one.
If dew forms inside this unit, it may not operate properly.
In this case, turn on the power and wait about 2 or 3 hours for the dew to evaporate.
In addition, when the unit is used under low temperatures,
the pick up lens might warm up very fast and dew will form.
In this case, turn on the power and wait a while for the dew to evaporate.
1
IMPORTANT INSTRUCTIONS
1. Owner's manual
11. Accessories
After unpacking this product, read the owner's
Any mounting of the product should follow the
manual carefully, heed all warnings and instrucmanufacture's instructions, and should use
tions given in this manual and those marked on the a mounting accessories recommended by the
unit ,and follow all the operating and other instrucmanufacturer. Make sure the player is
tions. Keep this booklet for future reference.
securely mounted. Quick stops, excessive
force, or improper installation may cause
2. Power sources
damage to the product.
When the product operates from the battery,
please refer to the operating instructions on
proper connections.
12. Damage Requiring Service
Unplug the unit and refer servicing to
3.Ventilation
qualified service personnel under the
This product requires proper ventilation as per the
following conditions:
manufacturers's instructions in order to ensure
a) If liquid has been spilled, or objects have
proper operation.
fallen into the product.
b) If the product has been exposed to rain
4. Heat
or water.
The product should be placed away from other
c) If the product does not operate normally
products (including amplifiers) that produce heat.
by following the operating instructions.
Adjust only those controls that are covered
by the operating instructions as an improper
5. Water and Moisture
adjustment of other controls may result in
Do not allow the product to come in contact with
damage and will often require extensive
water at anytime.
work by a qualified technician to restore the
product to its normal operation.
d) If the product has been dropped or damaged
6. Cleaning
in any way.
Disconnect power from this product before
e) When the product exhibits a distinct change
cleaning. Do not use liquid cleaners or aerosol
in performance - this indicates a need for
cleaners. Use a dry cloth for cleaning .
service.
13.Servicing
Do not attempt to service this product
yourself. Refer all servicing to qualified
service personnel.
7. Foreign objects
Never push objects of any kind into this
product through openings as they may touch
dangerous voltage points or short-out parts
that could result in a fire or electric shock.
Never spill liquid of any kind on the product.
14. Replacement parts
When replacement parts are required, be
sure the service technician has used
replacement parts specified by the
manufacturer or have the same
characteristics as the original part.
Unauthorized substitutions may result in
hazards.
8. Attachments
Do not use attachments not recommended
by the product manufacturer as they may
cause damage.
9. Please use care when installing the unit,
the unit may fall, causing serious damage
to the product.
10. Do not use a cracked, deformed, or repaired
disc. These discs are easily broken and may
cause serious personal injury and product
malfunction.
2
PRECAUTIONS
Notes on handling
When shipping the DVD player, the original shipping carton and packing materials must be used.
For maximum protection, re-pack the unit as it was originally packed at the factory.
Do not use volatile liquids, such as aerosol spray, near the DVD player. Do not leave any
plastic products in contact with the DVD player for a long period of time. They will leave marks on
the finish.
The top and rear panels of the DVD player may become warm after a long period of use.
This behaviour is normal.
When the DVD player is in use and the engine is off, do not turn on the player for a long time.
Doing so, you may run the battery to where your car will not start.
If you do not use the DVD player for a long period, the unit may not function properly in the
future. Turn on and use the DVD player occasionally.
Notes on locating
When you place this DVD player near a LCD, radio, or VCR(VCD), the playback picture
may become poor and the sound may be distorted. In this case, place the DVD player
away from any LCD, radio, or VCR.
Notes on Moisture Condensation
Moisture condensation damages the DVD player. Please read the following carefully.
Moisture condensation occurs, for example, when you pour a cold drink into a glass on a warm day.
Drops of water form on the outside of the glass. In the same way, moisture may condense on the
optical pick-up lens inside this unit, one of the most crucial internal parts of the DVD player.
Moisture condensation occurs during the following cases.
When you bring the DVD player directly from a cold place to a warm place.
When you use the DVD player in a room where you just turned on the heater, or a place
where the cold wind from the air conditioner directly hits the unit.
In summer, when you use the DVD player in a hot and humid place just after you move
the unit from an air conditioned area.
When you use the DVD player in a humid place.
Do not use the DVD player when moisture condensation may occur.
If you use the DVD player in such a situation, it may damage discs and internal parts.
Remove the disc, turn on the DVD player, and leave it for 2 or 3 hours . After 2 or 3 hours,
the DVD player will have warmed up and evaporated any moisture.
Notes on cleaning
Use a soft, dry cloth for cleaning.
For stubborn dirt, soak the cloth in a weak detergent solution, wring well and wipe. Use a dry cloth
to wipe it dry. Do not use any type of solvent, such as thinner or benzine, as they may damage
the surface of the DVD player.
If you use a chemical saturated cloth to clean the unit, follow that product's instructions.
To obtain a clear picture
The DVD player is a high technology, precision device. If the optical pick-up lens and disc drive
parts are dirty or worn down, the picture quality becomes poor. To obtain a clear picture, we
recommend regular inspection and maintenance (cleaning or parts replacement) every 1,000 hours
of use depending on the operating environment.
3
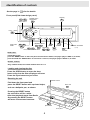
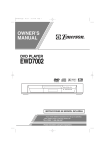
Identification of controls
See the page in
for the details.
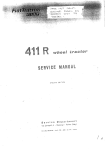
Front panel(Fold down design panel )
11
Display
POWER button
DVD/RADIO
12
5
12
OPEN button
VOL(+,-) button
18
SKIP button
SEEK
MEMORY/MUTE
15 24
26
11
26
12
12
17
PLAY, PAUSE, BAND button
17
18
ENTER
STOP
MENU
SCAN/SEL.
26
17
25
PRESET STATIONS
(1~5)
15
AUDIO
REPEAT
SKIP button
in DVD play mode,
press the SEEK button on the front panel and release the button, the player plays in SKIP 9, : mode;
press and hold the SEEK button for more than 1 second , the player plays in SCAN 7, 8 mode.
Number buttons
Only in Radio mode, the number buttons work as 1~5
Loading and ejecting the disc
Press the OPEN button to open the door.
Insert a disc into the Slot and player will start.
Press the Eject button to eject a disc.
Resetting the unit
RESET button
Fold down the front panel and
press the RESET button with a pointed object,
such as a ballpoint pen, as shown.
Disc slot
11
Pressing the RESET button
the unit will be off for a while .
After that playback starts from Radio.
So pressing the RESET button
will erase some stored contents.
Eject
Eject button
Front panel
4
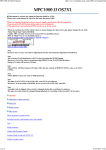
Identification of controls
DVD display
Repeat indicator
Band indicator
Operating status indicator
Dolby Digital indicator
MP3/DVD/VIDEO CD indicator
dts indicator
DVD
AMFM
Title indicator
Chapter indicator
ST
Total playing time/elapsed indicator
The indicators vary depending on the kinds of discs you play.
DVD video disc
Audio CD
VIDEO CD
When loading :
When loading :
When loading :
Example
Example
Example
DVD
Playing chapter
3 in title 2
Total number of tracks
Total playing time
of the disc
Total number of tracks
During playback:
During playback:
During playback:
Example
Example
Example
Total playing time
of the disc
DVD
Playing chapter
3 in title 2
Elapsed time of
the current title
Playing track 3
Elapsed time of
the current track
Playing track 3
Some DVD video discs may not display
the chapter numbers
Other indicators
: When playing back the same title, chapter , track or the entire disc repeatedly.
: During Dolby disc playback.
: During dts disc playback.
: When mute functions is engaged.
5
Elapsed time of
the current track
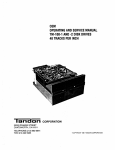
Identification of controls
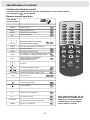
Full direction Remote control
The instructions in this manual describe the functions on the remote control.
See the page in
for the details.
Remote control operation
The button
on the remote
POWER
Power on/off .
11
MUTE
Playing without sound
Using the on-screen display
17
21
To play repeatedly
17
DISPLAY
RPT.
1
5
9
2
6
0
3 4
7 8
10+
CLEAR
SUB
Select the desired channel with
the number button directly
12
16
Clear the wrong number you entered
20
20
Selecting Subtitle
ANGLE
Selecting the camera angle
AUDIO
For DVD discs, to selecting a playback audio setting
For VCD discs, to change the audio channel
19
GOTO
Locate a location by entering its
corresponding track number,
chapter number or time
14
Joy Stick
13
To change the playback speed
To locate preceding/succeeding chapter or track 15
TITLE/MENU
SETUP
Locating a specific title chapter or track
15
Function setup
22
23
To pause playback/play
12
To stop playback
12
Joy Stick/Volume control/Band control
SEL
VOL+, PLAY MODE
AMP SEL
To select the audio functions
Joy Stick/Volume control/Band control
18
To control the volume
18
Play mode: PBC; Program;Off; Shuffle
16
To turn on or off the amp.
10
6
Note: Refer to the Page 26 for
the instruction in Radio mode;
Before you connect external
remote sensor to the player,
power off the unit first .
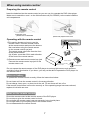
When using remote control
Preparing the remote control
Insert the batteries into the remote control so you can use it to operate the DVD video player.
Make sure to match the +and - on the lithium button cell(3V, CR2025) to the marks inside the
cell compartment.
1) Open the cover,
pull the cover as illustrated
2)Insert cell (3V),Close the cover
Operating with the remote control
1)This section shows you how to use the
remote control. Point the remote control
at the remote sensor and press the buttons.
Not used when using the remote sensor
on the remote control eye jack.
The remote range: about 4m from the front
of the remote sensor.
(Is) off axis: more than 30L in each direction
of the front of the remote sensor.
With about 4m
DVD player
2) Remote sensor and remote control eye jack
Connect the remote control eye jack to the
remote sensor unit.
Remote sensor
Remote eye jack
Double-side tape
Do not expose the remote sensor of the DVD player to a strong light source such as direct
sunlight or other illumination. If you do so, you may not be able to operate the DVD player via
the remote control.
Notes on battery
To operate the remote control correctly, follow the instructions below.
Do not insert cell into the remote control in the wrong direction.
Do not charge, heat, open, or short-circuit the cell. Do not throw cell into a fire.
If the remote control does not function correctly or if the operating range becomes reduced,
replace all cell with new one.
Notes on the remote control
Direct the remote control at the remote sensor of the DVD player.
Do not drop or give the remote control a shock.
Do not leave the remote control near an extremely hot or humid place.
Do not spill water or put anything wet on the remote control.
Do not disassemble the remote control.
7
Connections
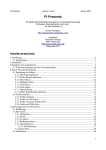
Outlet wires connection
(supplied)
ON
OFF
13
1
2
3
4
5
6
7
8
9
10
11 12
13
1 YELLOW CABLE [VIDEO/AUDIO]:
VIDEO OUT(YELLOW);
DIGITAL AUDIO OUT(ORANGE /YELLOW) [Go to page 9]
2 BLACK CABLE [AMPLIFIER] :
3 PURPLE CABLE :
4 PURPLE CABLE :
5 BROWN CABLE:
AUDIO OUT: Red right; White left [Go to page 9]
POWER
ANTENNA (Purple)
AMPLIFIER TURN ON(Purple with white stripe)
POWER
SCREEN
6 GREEN CABLE [FRONT LEFT SPEAKER] : GREEN(+);
GREEN WITH WHITE STRIPE(- )
7 GREY CABLE [FRONT RIGHT SPEAKER]: GREY(+)
GREY WITH WHITE STRIPE(-)
8 BROWN CABLE [REAR LEFT SPEAKER]:
BROWN(+)
BROWN WITH WHITE STRIPE(-)
9 BLUE CABLE [ REAR RIGHT SPEAKER]:
BLUE(+)
BLUE WITH WHITE STRIPE(- )
10 RED CABLE [POWER]:
11 BLACK CABLE [GROUND]:
12 YELLOW CABLE :
12VOLT(+), ACCESSORY/SWITCHED
GROUND
(+)12 VOLT, CONSTANT
13 BLACK BOX :
14 INSULATING COVER:
EQUIPPED WITH FUSE AND FILTER
SAME COLOR AS THE CABLE TERMINAL
8
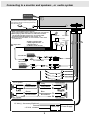
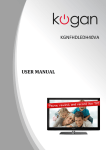
Connecting to a monitor and speakers , or audio system
Antenna jack
Remote sensor and remote control eye jack.
Connect the remote control eye jack to the
remote sensor unit.
Note:
1)Refer to the amplifier’s owner’ s manual
and set the Functions Setting ( Audio, Digital out)----See page 23.
2)When playing DVD video discs or audio CDs encoded
via the DTS recording, please use the coaxial cable .
And the Audio Setting please refer to page 19.
3)When using the audio cable ,do not connect the coaxial cable
or speaker cable.
Rear speaker
Center speaker
Rear speaker
Front speaker
Sub woofer
Amplifier equipped with
a Dolby digital decoder , or
a DTS decoder, or
an MPEG 2 audio decoder
Signal flow
Front speaker
(Sold separately)
TV or Monitor VIDEO OUT
FM modulator
or amplifier
75Ωcoaxial cable
AUDIO OUT
Power Antenna
Amplifier Turn On
Power Screen
Front speaker
Left
Green
Grey
Green/White
Grey/White
Brown
Blue
Brown/White
Blue/White
Front speaker
Right
Rear speaker
Rear speaker
12 Volt(+), Accessory/Switched
Ground
+12 Volt, constant
Filter/Fuse
9
Power Supply
Connecting
AMP Select
Press AMP SEL button on the remote repeatedly, select the amplifier mode
you need ( depending on the connection mode).
AMP mode
Connection mode
Press
AMP SEL
to select
the mode
you need
Display on pannel
I AP On
Using the speaker cables
Connecting PURPLE with white
stripe cable to the Remote eye
jack on the rear of Amplifier,
or using the Audio / coaxial cable
Connecting the Audio cable to
the monitor or audio system
(refer to page 9)
A AP OFF
Any connection mode
A AP On
E AP On
Note: Setting to ALL, the player will be in high consumption.
So we advise to select the right mode for your connection mode.
Note on Connecting
NOTE 1
1)THE DVD PLAYER USES 12V DC AND THE COVER IS GROUNDED.
2)THE DVD PLAYER HAS A HIGH-POWER 4 CHANNEL BUILT IN AMPLIFIER.
THE SPEAKER CABLES USED MUST BE A MINIMUM OF 18 GAUGE CABLE,
IF ONLY CONNECTING 2 SPEAKERS, YOU MUST CONNECT THE 2 FRONT
SPEAKERS (FL, FR ) OR 2 REAR SPEAKERS (RL , RR ).
3) THE UNUSED SPEAKER CABLES MUST BE PROPERLY INSULATED WITH TAPE OR
TERMINATING CONNECTORS TO AVOID A SHORT.
NOTE 2
1 Refer to the owner's manual for " the connected monitor " as well.
2 Connect the DVD video player to your monitor directly. If you connect the DVD player to a
VTR, TV/VTR combination or video selector, the playback picture may be distorted as DVD
discs are copy protected.(refer to " NOTE ON LOCATING" )
NOTE 3
1 Refer to the owner's manual of the connected equipment for additional information.
2 When you connect the DVD player to other equipment, be sure to turn off the power .
3 If you place the DVD near a tuner or radio, the radio broadcast sound might be distorted.
In this case, place the DVD player away from any other tuner or radio.
4 The output sound of the DVD player has a wide dynamic range. Be sure to adjust the
receiver's volume to a moderate listening level. Otherwise, the speakers may be damaged by
a sudden high output.
5 Turn off the amplifier before you connect or disconnect the DVD player's power leads.
If you leave the amplifier power on, the speakers may be damaged.
10
Playing a disc
This section shows you the basics on how to play a disc.
To obtain a higher quality picture
Occasionally, some picture noise not usually visible during a normal broadcast may appear on the
monitor screen while playing a DVD disc. This distortion is because the high resolution picture
depends on the monitor you use with this DVD player. You should generally reduce the sharpness
adjustment on your monitor when viewing DVD discs.
DVD
About
DVD
VCD
VCD
CD
CD
MP3
MP3
The
icons on the heading bar show the playable discs for the functions
described under that heading.
DVD
VCD
MP3
:You can use this function with DVD discs.
CD
:You can use this function with VIDEO CDs.
:You can use this function with MP3 discs .
:You can use this function with CDs .
DVD
VCD
CD
MP3
Basic playback
Preparations
When you want to view a disc, turn on the monitor and select the video input connected to the
DVD player.
When you want to enjoy the sound of discs from the audio system, turn on the audio system and
select the input connected to the DVD player.
For connection details, see"Connections".
1. Press PWR on the front panel or POWER on the remote
The DVD player turns on
2. Press the OPEN button to open the door.
Place the disc (with the playback side down) into the disc slot
Place the disc in the slot, the disc will go into the slot automatically. Do not push the disc into the
slot fast, doing so may cause the loader to malfunction.
The disc spins and playback starts.
If you insert a DVD disc that contains a title menu, or insert a PBC - equipped VIDEO CD,
a menu screen may appear.
--To start playback of a PBC- equipped VIDEO CD from the menu screen,
set"PBC" to "on" via the on-screen displays with MENU button.
--To start playback of a DVD disc from the menu screen,
press the TITLE or MENU button ( depending on the actual DVD discs.)
note: Do not put any objects other than discs into the disc slot, doing so may cause the player
to malfunction.
3. Press the OPEN button to open the door.
Press
button
The DVD player ejects the disc automatically.
Press
button again the disc goes into the slot automatically.
11
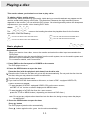
Playing a disc
To start playback from the menu screen
1 Press5/6/3/4 or the number buttons on the remote to select the title you want.
-- title number over 10
To input 13: press 1 and 3 .
-- MP3 discs
To input 25: press 2 and 5 ;
ENTER
SEEKTo input 112: press 1and 1then2.
SEEK+
2 Press ENTER button
The DVD player begins playback from the selected title.
When not using the menu screen of a PBC- featured VIDEO CD,
set "PBC" to "off " via the on-screen displays.
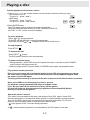
To pause playback
Press
or
during playback.
To resume normal playback, press this button again.
Each time you press
or
, change PAUSE, PLAY mode in turn.
To stop playback
Press STOP
.
To remove the disc
Press EJECT
button .
The DVD player ejects the disc automatically.
To power on/off the player
1 During playback , press PWR on the front panel more than 1 second or press POWER
on the remote. the player power off.
2 After the player power off, press PWR or POWER button again, the playback starts.
Play position memory function
Even if you turn power off or switch the ignition key to OFF during playback or change
the video source, playback will continue from the point where playback stopped when
the power is turned ON again.
The play position memory is released if the disc is removed or the Reset button is pressed.
Note: press PWR on the front panel less than 1 second,
the playback changes between DVD player and Radio mode.
If you do not power off the unit before turning off the ignition,
the unit will power on from the beginning regardless of the mode(DVD, Radio)
where you turned off the ignition.
About this owner's manual
This owner's manual explains the basic instructions of this DVD player. Some DVD
discs are produced in a manner that allows specific or limited operation during playback.
As such, the DVD player may not respond to all operating commands. This is not a
defect in the DVD player. Refer to the instruction notes of discs.
"
"may appear on the TV screen during operation.
A"
" means that the operation is not permitted by the DVD player or the disc.
12
Playing a disc
DVD
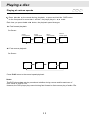
Playing at various speeds
VCD
Press 7or8 on the remote during playback, or press and hold the SKIP button
on the front panel for more than 1 second , the player plays in 7 ,8 mode.
Each time you press the7 or8 button, the playback speed changes.
8: Fast forward playback
On Screen
X2 the
normal speed
X2
X4 the
normal speed
X8 the
normal speed
X8
X4
X20 the
normal speed
X20
7: Fast reverse playback
On Screen
X2
X4
X8
X20
Press PLAY return to the normal speed playback .
Notes
The DVD player does not play sound and subtitles during reverse and forward scan of
DVD discs or VIDEO CDs.
However, the DVD player plays sound during fast forward or fast reverse play of audio CDs.
13
CD
Advanced playback
DVD
VCD
CD
MP3
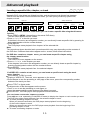
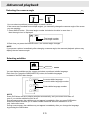
Resuming playback from the same location
You can stop playback and resume playback later from the same location on the disc.
1 Press STOP at the location where you want to
interrupt playback. The DVD player memorizes the location
where playback is stopped. STOP(Play to resume) appears on the screen.
2 Press PLAY
The DVD player resumes playback from the location where you stopped playback.
To start playback from the beginning regardless of the location where you stopped playback.
1 Press STOP twice.
The DVD player's memory is cleared.
2 Press PLAY.
Playback starts from the beginning of the disc.
Note
The DVD player's memory is also cleared when:
--the POWER turns off after you stop playback.
--You eject the disc .
DVD
VCD
CD
Playing from the desired location
You can play a disc from the desired location.
Locating a specific location by entering the track number, the chapter number or the time.
You can locate a specific location by entering its corresponding track number, chapter number,
or time( hours, minutes, seconds).
1 While playing press GOTO , for different discs the on-screen display changes as follows:
DVD
Search
TM/CH/TL
Time:
_ _:_ _:_ _
Chapter: _ _
Title:
__
Elapsed time
VCD(PBC OFF)/CD
Press GOTO:
Track Search
Time:
_ _:_ _:_ _
Press GOTO again:
Disc Search
Time: _ _:_ _:_ _
Track: _ _
VCD (PBC ON)
Track Search
Time:
_ _:_ _:_ _
2 Press ENTER
The DVD video player starts playback from the desired location your entered.
Note
Some discs may not respond to this process.
Some scenes may not be located precisely as you specified.
This method for accessing specific locations is available only within the current title of the
DVD disc or within the current track of the VIDEO CD/audio CD.
14
Advanced playback
DVD
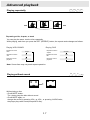
Locating a specific title, chapter, or track
VCD
CD
MP3
Normally, DVD video discs are divided into titles, and the titles are sub-divided into chapters.
VIDEO CDs and audio CDs are divided into tracks, you can quickly locate any specific title,
chapter, or track.
DVD disc
Title1
Chapter1
VIDEO CD/Audio CD
Title2
Chapter2
Chapter1
Chapter2
Track1
Chapter3
Nffff
Track2
Nffff
Track3
Nffff
Track4
Nffff
Track5
Nffff
If a DVD video disc contains a title menu, you can locate a specific title using the title menu
function.
1 Press TITLE or MENU. (depending on the actual DVD discs)
The title menu appears on the screen.
2 Press 5/6/3/4 to the title you want .
If the titles in the menu are assigned a number, you can directly locate a specific title by pressing its
designated number with the number buttons.
3 Press ENTER
The DVD player starts playback from chapter1 of the selected title.
Note
The instructions above describe basic procedures which may vary depending on the contents of
the DVD disc. If different instructions appear on the screen, follow those instructions.
If a DVD disc contains a chapter menu, you can locate a specific chapter using
the chapter menu function.
1 Press MENU .
The CHAPTER menu appears on the screen.
2 Press 5/6/3/4 to the chapter you want .
If the chapters in the menu are assigned a number, you can directly locate a specific chapter by
pressing its designated number with the number buttons.
3 Press ENTER
The DVD player starts playback from the selected chapter.
If a VIDEO CD contains a track menu, you can locate a specific track using the track
menu function.
Press MENU, in PBC on mode
1 Playing a VIDEO CD ,The track menu appears on the screen.
2 Press 9or: to see the preceding or next page of the menu, press the corresponding number
buttons of the track you want.
Press TITLE, in digest mode
The digest menu of the disc appears on the screen.
--Press 3or4to see the preceding or next digest, or
--press the corresponding number buttons of the digest you want
Press ENTER , the DVD player starts playback from the selection.
You can locate consecutive chapters or tracks.
Press skip 9 or : repeatedly (in title/PBC off mode) to display the chapter or track number you want.
The DVD video player starts playback from the selected chapter or track.
9: To locate preceding chapters or tracks.
When you press the 9 button, the DVD player starts playback from the beginning
of the current chapter or track.
When you press the 9 twice, the DVD player starts playback from the beginning of the
preceding chapter or track.
:: To locate succeeding chapters or tracks.
15
Advanced playback
DVD
Play Mode
VCD
CD
MP3
You can play in deferent mode.
In the stop mode, press the PLAY MODE button on the remote,
the following menu appears on the screen.
And with the ENTER button you can change the mode as: PBC( for VCD), Program, Off, Shuffle.
When you select one mode, move the cursor to OK then press ENTER.
1) For Program, the playback starts in program mode.
Play Mode
2) Press PLAY button,
For PBC, the playback starts in PBC on mode.
For Off, the playback starts in no mode.
For shuffle, the playback starts random.
Mode
PBC
OK
Cancel
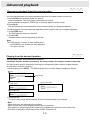
You can combine your favourite titles, chapters, or tracks and play them in any order.
You can program up to 16 selections into the memory. (program playback)
The DVD player automatically plays titles, chapters, or tracks in the order of your program.
1 Select PROGRAM play mode, the following menu appears.
Play DVD
Program Title/Charpter
Program Title/Charpter
1 _ _ _ _ 5 _ _ _ _ 9 _ _ _ _ 13 _ _ _ _
1 12 1
5 10 1
2 _ _ _ _ 6 _ _ _ _ 10 _ _ _ _ 14 _ _ _ _
2 __ __
6 _ _ _ _ 10 _ _ _ _ 14_ _ _ _
3 _ _ _ _ 7 _ _ _ _ 11 _ _ _ _ 15 _ _ _ _
3 __ __ 7__ __
11 _ _ _ _ 15 _ _ _ _
4 __ __
4_ _ _ _
12 _ _ _ _ 16 _ _ _ _
8 _ _ _ _ 12 _ _ _ _ 16 _ _ _ _
Play Program
Play VCD , CD
Clear All
Cancel
Program Track
9 4 2
8_ _ _ _
Play Program
13 _ _ _ _
Clear All
Cancel
Program Track
1 ___
5___
9 _ _ _ 13 _ _ _
1 15
2 ___
6___
10 _ _ _14_ _ _
2 ___6___
3 ___
7___
11 _ _ _ 15 _ _ _
3 ___7___
11 _ _ _ 15 _ _ _
4__ _
8_ __
12 _ _ _ 16 _ _ _
4 _ _ _ 8_ _ _
12 _ _ _ 16 _ _ _
Play Program
Clear All
Cancel
5
17
Play Program
9
1
13 _ _ _
10 _ _ _ 14_ _ _
Clear All
Cancel
2 Each time you press the5634button, the _ _ indication is highlighted in turn. Highlight where
you want to enter then press the number buttons( The selected number must be less than the title,
chapter or track number).
3 Move the cursor to Play Program and press ENTER button ,
The DVD video player starts program playback.
4 To change the programmed selections While the PROGRAM menu appears on the screen,
press the 56button to move the highlighted bar to the item you want to change, then you can
press the number buttons. Or press the CLEAR button.
5 To cancel the programmed selections,
With (Clear All) highlighted, press ENTER button.
6 To program during playback
If you enter the play mode during playback, and the program menu appears to accept your
programming.
NOTES
Some discs may not permit program playback operation.
If you press the REPEAT during program playback,
the DVD video player repeats current program playback.
If you press the SKIP9、:,the player will skip to the preceding or the next item.
You cannot select title, chapter, and track numbers not included on the disc.
The programmed selections will be cleared when:
--you turn off the DVD player, or
--you remove the disc.
16
Advanced playback
DVD
Playing repeatedly
VCD
CD
MP3
Repeating a title, chapter, or track
You can play the same track or disc repeatedly.
While playing, each time you press the RPT. (REPEAT) button, the repeat mode changes as follows.
Playing VCD/ CD/MP3
Repeats the same
track
Playing DVD
Single
Repeats the same
chapter
Repeats the entire
disc
All
Repeats the same
title
Title
Resumes normal
playback
Off
Resumes normal
playback
Off
Chapter
Note: Some discs may not permit repeat operation.
Playing without sound
DVD
While playing a disc
--Press MUTE button.
The player plays the disc without sound
--Press MUTE again, or
change the sound by pressing VOL+ or VOL-, or pressing AUDIO twice,
the player plays with sound(except MP3 disc).
17
VCD
CD
MP3
Advanced playback
DVD
Selecting sound
VCD
CD
MP3
With the VOL+, VOL- button, you can change the volume.
When the setting appears on the screen, press 34 to change the volume.
Volume changes from 0 to 36: Volume
36
In radio mode, VOL XX( volume level 0~36) appears on the front panel.
NOTE:
The VOLUME setting is not cleared when:
1) you turn the power off,
2) you eject the disc
3) you change the disc.
Adjust SOUND as you like:
To
Press SEL button repeatedly
the item you want to adjust appears
on the panel Display
Press the VOL +,- button
adjust the setting
as you like
Balance
BAl
xx
xx changes from -8~8
Bass
BAss
xx
xx changes from -7~7
Treble
trE
xx
xx changes from -7~7
Fader
FAd
xx
xx changes from -8~8
Loudness
Loud
x
0(or 1), press ENTER button
to select the item.
0 for loud off, 1 for loud on
NOTE:
Using the SEL button on the front panel, please press this button less than 0.5 seconds
and release the button to choose the sound effect.
18
Advanced playback
DVD
Selecting a playback audio setting
VCD
Good morning!
Bonjour!
!
Buenos dias!
FOR DVD DISCS
You can select a preferred language from those included on the disc.
1 While playing press AUDIO, the current audio setting appears.
2 Each time you press the AUDIO, the audio setting included on the DVD video disc changes.
1/4 Eng
2Ch
Audio channel
Recording system
Language
Total audio number
Current audio number
When playing the discs in the Dolby digital and DTS system, please select the AUDIO mode in Dolby.
If you select DTS, be sure to use the coaxial cable and connect to DTS equipped amplifier.
Please see page 9.
FOR VCD DISCS
With the AUDIO button and the instructions appear on the screen, you can change the AUDIO Mode.
Press the AUDIO button, the setting appears on the screen: L/R Mode
L/R mode highlighted,press ENTER to change the audio channel.
L/R mode changes as following: Stereo, Left, Right, Mix.
19
Stereo
Advanced playback
Selecting the camera angle
DVD
ANGLE [1/2]
ANGLE [2/2]
You can select a preferred camera angle to watch a scene.
If the scene was recorded from multiple angles, you can easily change the camera angle of the scene
you are watching.
1 Press ANGLE button , if the total angle number included on the disc is more than 1,
then the angle icon is displayed.
X/X
Total angle number
Current angle number
2 Each time you press the ANGLE button , the camera angle changes.
NOTE
If you pause a picture immediately after changing a camera angle, the resumed playback picture may
display the new camera angle.
Selecting subtitles
DVD
Good evening!
Bonsoir!
!
Buenas tardes!
You can display subtitles on the screen and select a preferred subtitle language.
Each time you press the SUB(SUBTITLE) button, the subtitle languages
included on the DVD disc change.
1/3 Eng
||||||||||||||||||
Current subtitle language
Current subtitle language number
2/3 Fre
Total subtitle language number
||||||||||||||||||
Off
||||||||||||||||||
NOTE
Some DVD discs are set to display subtitles automatically, and you cannot turn them off
even if you set the subtitle function to off.
During some scenes, the subtitles may not appear immediately after you press SUB button.
Some DVD discs will allow you to make subtitle selections and turn subtitles on or off
only via the disc menu.
During some scenes, the subtitles may not appear immediately after you change the language
by pressing the SUB button.
20
Function setup
DVD
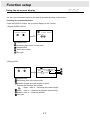
Using the on-screen display
You can view information about a disc and its operational status on the screen.
Checking the operational status
Press the DISPLAY button, the on-screen display on the screen.
1 Playing VIDEO CD/ CD
X:XX:XX X:XX:XX
VCD
X:XX:XX X:XX:XX
TRACK X / X
Elapsed time
Remaining time of the current track
Elapsed track
Total track number
Disc type
2 Playing DVD
X:XX:XX X:XX:XX
DVD
x:xx:xx x:xx:xx
Title x/x Chapter x/x
Angle 1/1
Audio
2Ch
Subtitle
1/4 Eng
||||||||||||||||||
1/3 Eng
Elapsed time
Remaining time of the current title
Elapsed chapter and total chapter number
Elapsed title and total title number
:Angle,refer to “Selecting the camera angle”
Audio: refer to “Selecting a playback audio setting”
Subtitle: refer to “Selecting subtitle”
Disc type
21
VCD
CD
Function setup
DVD
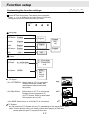
Customizing the function settings
Press SETUP during stop. The setting menu appears.
Press 5,6,3,4 button to move the cursor to the item,
then press ENTER to select the item you want.
Language
Language
Language Video
Audio
Rating
Audio Rating
OSD Menu
English
Subtitle
English
Audio
English
DVD Menu
English
OSD
Video
English
English
Auto
Off
English
English
On
Off
Video
Language Video
Audio Rating
TV Shape
4:3 Pan Scan
TV System
NTSC
4:3 Pan Scan
4:3 Letter Box
16:9
NTSC
PAL
PAL M
AUTO
TV Shape
--4:3 LETTERBOX: Select when 4:3 TV is connected
displays theatrical images with
masking bars above and below
the picture.
--4:3 PAN-SCAN:
Select when a 4:3 TV is connected.
Display pictures cropped to fill
your TV screen. Either or both sides
of the picture are cut off.
--16:9 WIDE: Select when a 16:9 wide TV is connected.
TV System
You can select the TV System for your TV, depending on the actual DVD discs.
Note: If some picture noise not usually visible while playing a DVD disc,
please pick the right TV system for this disc.
22
VCD
CD
MP3
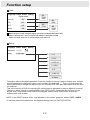
Function setup
Audio
Language Video Audio Rating
Digital Audio
Dolby D
Off
DTS
Off
MP3
Off
Others
Off
Off
PCM
Raw
Off
PCM
Off
Raw
Off
PCM
Raw
When using the coaxial cable(see page9), you should set Digital Out PCM or Raw.
Refer to the amplifier’s owner’s manual and make the setting Raw or PCM.
Select one mode, if there is no sound change to the other one.
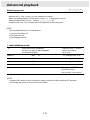
Rating
Language Video Audio Rating
Password
Rating
---1 Kid Safe
2. G
3. PG
4. PG-13
5. PG-R
6. R
7. NC-17
8. Adult
The player without the default password. Press the number button to create or change your 4-digital
security password to change the rating, input numbers are displayed” * ” . Then, you must enter the
correct password to change the rating or you can not play DVD video disc rated higher than the level
you selected.
This is the function of DVD for restricting the viewing age as stipulated by laws in different countries.
The way in which viewing is restricted differs from DVD to DVD. Sometimes the DVD can not be
played at all, other times certain scenes are skipped, and the other times certain scenes are
replaced with other scenes.
NOTE: Press EJECT button. While logo appears on the screen, press the buttons RPT. , AUDIO
on the front panel at the same time, the function settings return to FACTORY SETUP.
23
MP3 Instruction
Insert the MP3 disc then playback start, the MENU of elapsed track appears.
MP3
Track XX/XXX
XX:XX:XX
Total track number
Elapsed track
1
2
3
4
5
6
7
TRACK25
TRACK26
TRACK27
TRACK28
TRACK29
TRACK30
TRACK31
8
9
10
11
12
13
14
TRACK32
TRACK33
TRACK34
TRACK35
TRACK36
TRACK37
TRACK38
Set the MENU on or off by pressing the MENU button on the remote.
Mode
Press
9:
When the MENU is not on the screen,
To play the preceding or the next track
Play
Number button To select the track with the number button on the remote
ENTER button directly, then press ENTER button to play the track
Stop/
Play
34
To move the cursor to the track you want to play,
then press ENTER to play the track.
Number button To select the track with the number button on the remote
ENTER button directly, then press ENTER button to play the track
24
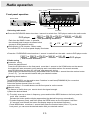
Radio operation
VOL(+,-) button
Front panel operation
PWR DVD/RADIO button
OPEN
PWR
MULTI-MEDIA DISC PLAYER RECEIVER
DVD/RADIO
ST
VOL
Current band
ST
FM
Current station
SKIP
SEEK
BAND
Current
frequency
MEMORY
SCAN
STOP
MENU
ENTER
RPT.
AUDIO
MUTE
SEEK button
BAND button
Storing Preset Station
MEMORY/MUTE
SCAN/SEL
1 Selecting radio mode
Press the DVD/RADIO button less than 1 second to switch from DVD player mode to the radio mode.
DVD player
FM F1 or FM F2 or FM F3 or MW A1 or LW A2
( the preceding situation)
Each time the BAND button is pressed ,
the selected band changes as shown below
(except in SCAN stations mode)
F1
F2
F3
A1
A2
While playing in FM situation Stereo mode,
the indicator ST on the front panel display illuminates
Press the DVD/RADIO button less than 1 second to switch from the radio mode to DVD player mode.
FM F1 or FM F2 or FM F3 or MW A1 or LW A2
( the current situation)
DVD player
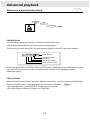
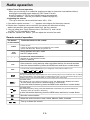
2 Radio tuning
Automatic tuning
Select the desired band.
Press the SCAN button on the front panel more than 1 second or the SCAN button on the remote
the system will start automatic tuning and play each receivable stations for several seconds,
press SCAN button less than 0.5 seconds, stop automatic tuning.
When playing the desired frequency, press MEM button more than 1 second then the number button
( from 1~5) , you can save the station with your desired number.
Selecting stored stations
The MEM(MEMORY) can be used to store 5 stations in each band(FM/MW/LW) for convenient
access to your favourite stations.
Select the desired channel (from ch1~ch5),
press one of the 1~5 number buttons on the front panel or on the remote.
Manual tuning
This feature is useful when you want to check the signal strength.
1)Select the desired band.
2)--To quickly scan up or down in frequency, press and hold the SEEK button on the front panel for
more than 1 second.
Release the button and the display approaches the desired frequency automatically ,
--To select frequency finely, each time press the SEEK button on the front panel less than
0.5 seconds, and release the button the display steps up the desired frequency .
--Press MEM button more than 1 second then press the number button( from 1~5) on the
front panel ,you can save the desired station with your desired number.
25
Radio operation
3 (Auto Travel Preset) operation
When you are driving in an unfamiliar location and want to memorize local stations without
changing the standard preset stations(5 FM F2 and 5 LW A2).
A total 10 stations (5 FM F2 and 5 LW A2) can be programmed.
To set the stations ....see the [ the RADIO TUNING on page 25]
4 Adjusting the volume
Turn up or down the volume with the button VOL+, VOL-.
1.If no station can be received, " ----- " appears in the display for the empty channel.
2.If fewer than 5 stations can be received, the system will memorize as many
stations as possible, then playback starts from the first channel.
3. You can select Auto Travel Preset mode in FM F2(or F3) and LW A2
or [FM F1(or F3) and MW A1] band.
4.Press the number SEL button, you can adjust the sound of the radio.
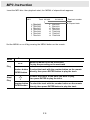
Remote control operation
The button
on the remote
Power on/off .
Power on from the beginning regardless of the mode
(DVD, FM, MW,LW) where you power off.
POWER
Switch between the radio mode
and DVD player mode.
DVD/
RADIO
1
2
5
3
Press the button on the remote
4
In radio mode, select the desired
channel (ch1~ch5) with the number
button (1~5)directly
SCAN
Start automatic tuning and play each receivable stations for several seconds
store the desired station by press the MEM button and favour number button .
BAND
In radio mode, Press the BAND button you change the current band to others in turn:
F1
F2
F3
A1
A2
In MW band, press SETUP button,
change to MW-530(10K), MW-531(9K)in turn. If the receiving range of your location is 531~1710K(Hz)
tuning step is 9K(Hz). If the range is 530~1710K,the step is 10K. If you are not sure the range of your
location, and you can not receive station in current range, try the other range.
1)In radio mode
2)To quickly scan up or down in frequency, press the SEEK button Release the button
and the display approaches the desired frequency automatically .
3) store the desired station by press the MEM button and favour number button
1)In radio mode
2)To select frequency finely, press the SKIP button. Each time you press the button the
frequency tune up or down in frequency.
3) store the desired station by press the MEM button and favour number button
Store the current station
Select the audio functions: bass, treble, balance, fader, loudness
Turn up or down the volume
26
Others
Safety
As the laser beam used in this unit is harmful to the eyes, do not attempt to
disassemble the unit. Refer servicing to qualified personnel only.
Should any solid object or liquid fall into the cabinet, unplug the player and
have it checked by qualified personnel before operating it any further.
Power sources
The operating voltage is indicated on the nameplate at the cover of the player.
If you are not going to use the player for a long time, be sure to turn off the unit.
Placement
Place the player in a location with adequate ventilation to prevent heat
build-up in the player.
Do not place the player in a location near heat sources, or in a place subject
to direct sunlight, excessive dust or mechanical shock.
Operation
If the player is brought directly from a cold to a warm location, or is placed in
a very damp room, moisture may form on the lenses inside the player.
Should this occur, the player may not operate properly. In this case, remove
the disc and leave the player turned on for about an hour until the moisture
evaporates.
Cleaning
Clean the unit, panel and controls with a soft cloth slightly moistened with a
mild detergent solution. Do not use any type of abrasive pad, scouring powder
or solvent such as alcohol or benzine.
27
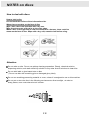
NOTES on discs
How to deal with discs
How to hold a disc
Do not touch the surface of the information side.
When there are stains on the face of disc
Wipe with a wet cloth and then with a dry one.
Wipe from the center of the disc to the outer edge.
When a disc is brought from a cold environment to a hot one, there could be
steam on the face of disc. Wipe with a dry, soft, smooth cloth before using.
Attention
Do not write on dics. Do not use pickup cleaning preparation. Phenyl, chemical solution,
dispersing solution, anti-static electricity solution or any other kind of solutions to clean disc.
Do not stick label or glue based note on disc
( Do not use disc with remaining glue or damaged gluey label).
Do not use scrathing-preventing material or cover, unless it is assigned to use on this machine.
Do not put or store the disc in the following environments: direct sunlight, at moist or
dusty places, near vents where hot air is blown.
28
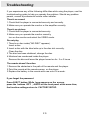
Troubleshooting
If you experience any of the following difficulties while using the player, use this
troubleshooting guide to help you remedy the problem. Should any problem
persist, consult a professional mobile video installer.
There's no sound
1 Check that the player is connected securely and correctly.
2 Make sure you operate the monitor or the amplifier correctly.
There's no picture
1 Check that the player is connected securely.
2 Make sure you operate the monitor correctly,
turn on the monitor and select the VIDEO mode.
Do not play
1 There's no disc inside("NO DISC" appears).
Insert a disc.
2 Insert a disc with the label side up in the disc slot correctly.
Clean the disc.
3 The disc has been shattered, change the disc.
4 Moisture has condensed inside the player.
Remove the disc and leave the player turned on for 2 or 3 hours .
The remote doesn't function
1 Remove the obstacles in the path of the remote and the player.
2 Point the remote at the remote sensor on the player.
3 Replace the battery in the remote with new one if it is weak.
If you forget the password
Press EJECT button. While logo appears on the screen,
press the buttons RPT. , AUDIO on the front panel at the same time,
the function settings return to FACTORY SETUP.
29
Specifications
Audio
Audio output(analog):
2±0.2V 100kΩ
Audio output(digital):
0.5V 75Ω
Signal-to-noise ratio: more than 90dB
Dynamic range:
more than 90dB
Distortion:
less than 0.05%
Video
Video output:
Resolution:
Speaker output load impedance:
Power
1±0.2V
more than 500
line
4Ω
+20%
Power requirement: DC 12V -10%
Power consumption: less than 15W ,
or less than 100W ( all speakers on , see CONNECTIONS )
TUNER SECTION
FM
Frequency range
Usable sensitivity
Signal-to-Noise ratio
Antenna impedance
MW/LW
Frequency range
87.5~108MHz
10dBf
50dB
75Ω
MW: 530KHz ~1710KHz
LW: 144~279 KHz
Usable sensitivity(S/N 20dB) MW: 35 μV
LW: 40 μV
S/N ratio
40dB
Antenna impedance
75Ω
General
Dimensions(approx.):
Weight:
178x50x177mm
(w/h/d) incl. Projecting parts
1.5Kg
Normal operating temperature range: 14 F to120 F
Design and specifications are subject to change without notice.
The illustrations in this manual may appear different
from the actual product due to printing conditions.
30
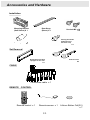
Accessories and Hardware
Installation
Mounting Bracket
(Half Sleeve) X 1
Rear Strap
(Brace) X 1
Hex bolt M5 x 14
X2
Mounting Screw M5
(equipped on the
rear of the unit)
X1
Mounting Grommet
X1
Set Removal
Removable Trim Ring
equipped on the unit
X1
Unlock Levers
X2
CABLE
Connection cable x 1
REMOTE
CONTROL
CLOCK
POWER
DI
RASPLAY
DIO/D VD
CLE AR
0
1
2
4
5
7
8
DIS PLAY
3
6
ANGLE
ST
9
BAND
PLAYMODE
S EEK-
+
E NTER
SETUP
SEEK +
GOTO
SCAN
SUB
3 V
MENU
TI TLE
MEM
+
VOL
AUDIO
_
SEL
MUTE
Remote control x 1
Remote sensor x 1
31
Lithium Button Cell(3V)
x1
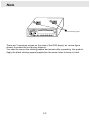
Note
Remove this CD
stopper before use.
Apply the paper
cover (supplied) on
the screw hole to
keep out dust.
Remove this CD
stopper before use.
Apply the paper
cover (supplied) on
the screw hole to
keep out dust.
Two black sticking papers
There are 2 mounting screws on the case of the DVD player( as above figure
shows) to protect the unit during shipping.
You need to remove the sticking papers and screws after unpacking this product.
Apply the black sticking papers(supplied)on the screw holes to keep out dust.
32