1
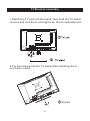
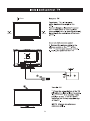
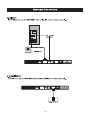
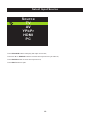
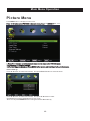
INSTRUCTION MANUAL
LED TV
RLED2445A-B
Table of Contents
Caution
2
Important Safety Precautions
3
Wall Mount Installation
4
TV Bracket assembly
5
Top/Side panel diagram
6-7
Remote Controller
Battery Installation
Using the Remote Control
8
Install TV
Set your TV
Connect Antenna and power
Turn On TV
Systems Connection
Select Input Source
9
Picture Menu
Audio Menu
Channel Menu
Parental Menu
Setup Menu
10
12
13-29
13-15
16-17
18-20
21-25
26-29
Help
30
Specifications
31
1
Caution
The lightening flash with arrowhead symbol, within an equilateral triangle is
intended to alert the user to the presence of un-insulated "dangerous voltage"
within the products enclosure that may be of sufficient magnitude to constitute a
risk of electric shock to the persons.
The exclamation point within an equilateral triangle is intend to alert the user to
the presence of important operating and maintenance (servicing) instructions in
the literature accompanying the appliance.
Cor rect disposal of this Product
W aste Electrical & Electronic Equipment (WEEE)
Your product is designed and manufactured with high quality materials and
components which can be recycled and reused.
This symbol means that electrical and electronic equipment, at their end-of-life,
should be disposed of separately from your household waste.
Please dispose of this equipment at your local community waste
collection/recycling centre.
In the European Union there are separate collection systems for used electrical
and electronic products. Please help us to conserve the environment we live in!
2
3
Wall Mount Installation
3.95” x 3.95”
100
100
8
3.95”
3.95”
4
4
TV Bracket assembly
1.Match the TV unit into the stand, then hold the TV stand,
revolve and lock the tv unit tightly as the arrowhead point.
2.Fix the screws into the TV stand after installing the tv
unit and tv stand.
3 screws
5
Top panel diagram
(IR) Infrared Receiver: Receives IR signals from the remote control.
(Power on/Standby) LED Indicator: Press to turn on and off
Indicator on(Red)
Standby mode
Indicator on(Green)
Power on mode
The functions of the buttons on the TV are as follows:
VOL
CH+/-:When watching TV: select channels.
MENU:
1.Press Menu.
2.Press SOURCE to enter.
3.Use CH+/- to shift UP/DOWN.
4.Press SOURCE to confirm,then press VOL+/-to adjust.
5.Press SOURCE to confirm
SOURCE External signal input selection and confirm the
item selected.
6
Side Panel Diagram
COAXIAL
(Left Side)
Y
Pb
Pr
Serv ice Port
(Back Side)
Name
Function Description
COAXIAL
Digital Audio Output
AV INPUT
EARPHONE
VGA IN
PC AUDIO IN
ANT 75Ω
HDMI IN
Service Port
YPbPr
Earphone output
VGA signal from computer output
PC audio input
Connect to ANT or cable source
Connect to HDMI of DVD or other equipment
For Upgrade Use
Connect to the composite terminal of your DVD/VCR
7
Remote Controller
Pr es s "- " to ent er a pr og ram numb er fo r mul tipl e pr og ram
ch an ne l, su ch as 2- 1 et c.
3
1
2
4
5
6
7
8
9
0
MENU
SOURCE
ENTER
TV
AV
Y Pb Pr
HDMI
PC
EXIT
DISPLAY
P.MODE
S.MODE
SLEEP
MTS
GUIDE
FAV
FAV-
FAV+
CH +/ - : Pr es s to sc an thr ou gh or to sel ec t a cha nn el .
V +/ -: Pr es s to inc rea se / de cr ea se the so un d le ve l.
S.MODE: Press to cycle through the different sound settings
P.MODE: Press to cycle through the different picture settings
SLEEP: Select amount of time before TV turn off
automatically.
MTS: Pr es s to se lec t the au di o mode ,yo u can se lec t st er eo ,
Mon o, or SAP( se co nd au di o pr og ram) .
GUIDE:
Universal remote code
This is the code for remote control of
RLED2445A-B,if you want to change to a
universal remote control,you can edit
this code into your universal remote control.
(1)Open the battery compartment cover
on the back side
(2)Insert two 1.5V batteries of AAA type
with correct polarity
(3)Close the battery compartment cover
on the back side
Universal Remote Control code:007F
(Universal Remote control is not included)
8
10cm
10cm
10cm
side
LED TV
3
indicator
9
COAXIAL
2
COAXIAL
Y
Serv ice Port
10
Pb
Pr
Y
Pb
Serv ice Port
Y
Serv ice Port
11
Pb
Pr
Pr
Select Input Source
Source
TV
AV
YPbPr
HDMI
PC
Press SOURCE button to display the input source list,
Press ▼ / ▲ or SOURCE button to select the input source you want to,
Press ENTER button to enter the input source,
Press EXIT button to quit.
12
Main Menu Operation
Picture Menu
Press MENU button to display the main menu.
Press ◄ / ► button select PICTURE in the main menu,then p ress ENTER / ▼ to enter.
1. Press ▼ / ▲ button to select the option that you want to adjust in the PICTURE menu.
2. Press Enter/◄ / ► button to adjust.
3. After finishing your adjustment, Press MENU button to save and return back to the previous menu.
Picture Settin gs
Press ▼ / ▲ button to select Picture Mode, then press Enter / ►button to enter sub-menu.
Press ▼ / ▲ button to select Picture Mode, then press◄ / ► button to select.
(Available Picture mode: Standard,Movie,User, Vivid).
TIPS: You can press PMODE button to change the Picture Mode directly.
13
Main Menu Operation
Brightness/ Contrast/ Sharpness/ Color/ Tint
Press ▼ / ▲ button to select option, then press ◄ / ► button to adjust.
Brightness Adjust the optical fiber output of the entire picture, it will effect the dark region of the picture.
Contrast
Adjust the highlight intensity of the picture, but the shadow of the picture is invariable.
Sharpness Aadjust the peaking in the detail of the picture.
Color
Adjust the saturation of the color based on your own like.
Tint
Use in compensating color changed with the transmission in the NTSC code.
HDMI Mode
Press ▼ / ▲ button to select HDMI Mode, then press◄ / ► button to select Auto,Video or PC.
It is aviliable only in HDMI Input.
Aspect Ratio
Press ▼ / ▲ button to select Aspect Ratio, then press◄ / ► button to select.
(Available Aspect Ratio: Normal,Wide,Cinema,Zoom).
Normal
Automatically adjust Aspect Ratio based on TV size and TV program.
Wide
Use to watch wide screen content.
Cinema
Stre tches image at edges but keeps a clear image in the center.
Zoom
Expands image to fill screen. Top and button maybe cut off.
Color Temp
Change the overall color cast of the picture.
Press ▼ / ▲ button to select Color Temp , then press◄ / ► button to select Normal/Warm/Cool.
Normal
Produces a vivid image.
Warm
Produces a red-hued image.
Cool
Produces a gentle blue-hued image.
Advanced Settin gs
Adjust advanced video features to fine tune the picture.
Press ▼ / ▲ button to select Advanced Settings , then press Enter / ►button to enter sub-menu.
Noise Reductio n
Set options to reduce video noise.
Press ▼ / ▲ button to select Noise Reduction , then press◄ / ► button to select .
Off
Select to turn off video noise detection.
Low
Detect and reduce low video noise.
Medium
Detect and reduce moderate video noise.
High
Detect and reduce enhanced video noise.
Mpeg NR
Set options to reduce MPEG noise.
Press ▼ / ▲ button to select Noise Reduction , then press◄ / ► button to select .
Off
Select to turn off MPEG noise detection.
Low
Detect and reduce low MPEG noise.
Medium
Detect and reduce moderate MPEG noise.
High
Detect and reduce enhanced MPEG noise.
14
Main Menu Operation
Dynamic Contrast
Automatically adjust picture detail and brightness.
Press ▼ / ▲ button to select Dynamic Contrast , then press◄ / ► button to select .
(Available Aspect Ratio: Off,Low,Medium,High).
PC Settings
Press INPUT to select PC source.
Press M ENU to enter the main menu,then press ◄ / ► button to select PICTURE menu.
Press ENTER / ▼ to enter and press ▼ to select PC Settings.
Press ▼ / ▲ button to select PC Settings, then press◄ / ► button to adjust .
Hposition
Adjust the horizontal position of the picture.
Vposition
Adjust the vertical position of the picture.
Phase
Minimize horizontal distortion.
Clock
Minimize vertical stripes in the screen image.
Auto Adjustment
Adjust to the PC signal timing automatically.
Press M ENU / ► button to enter.
15
Main Menu Operation
Audio Menu
Press MENU button to display the main menu.
Press ◄ / ► button select AUDIO in the main menu,then p ress ENTER / ▼ to enter.
1. Press ▼ / ▲ button to select the option that you want to adjust in the AUDIO menu.
2. Press Enter/◄ / ► button to adjust.
3. After finishing your adjustment, Press MENU button to save and return back to the previous menu.
Audio Mode
Press ▼ / ▲ button to select Audio Mode , then press Enter / ►button to enter sub-menu.
Sound Mode
Press ▼ / ▲ button to select Sound Mode, then press◄ / ► button to select.
(Available Sound mode: Standard, Soft, User, Dynamic).
You can change the value of Treble,Bass and Balance when the sound is in User mode.
TIPS: You can press SMODE button on the remote control to change the Sound Mode directly.
Treble/Bass/Balance
Press ▼ / ▲ button to select option, then press ◄ / ► button to adjust.
16
Main Menu Operation
Audio Effe ct
Press ▼ / ▲ button to select Audio Effe ct , then press◄ / ► button to select On or Off.
AVL
Set the auto volume contro l.
Press ▼ / ▲ button to select AVL , then press◄ / ► button to select On or Off.
Analog Language
Configures the multi-tra ck sound. It is only available in ATV.
Press ▼ / ▲ button to select Analog Language , then press◄ / ► button to select Mono,Stereo or Sap.
Mono
Sets the sound to mono.
Stereo
Sets the sound to stereo when stereo is not available, the sound is automatically switched to mono.
Sap
Sets the sound to the second audio program.
Digita l Language
Select the language supporte d by the chosen digital channel . It is available Only in DTV.
Press ▼ / ▲ button to select Digital Language , then press◄ / ► button to select English , French ,Spanish .
Digita l Audio Output
Send the audio output type of coax or optical termical.
Press ▼ / ▲ button to select Digital Audio Output , then press◄ / ► button to select Off,R AW or PCM.
EQ Settin gs
Adjust the curve of 7 bands equalizer.
Press ▼ / ▲ button to select EQ Settings , then press Enter / ►button to enter sub-menu.
EQ Mode
Press ▼ / ▲ button to select EQ Mode, then press◄ / ► button to select.
(Available EQ mode: Off,Rock,Pop,Jazz,User).
17
Main Menu Operation
Channel Menu
Press MENU button to display the main menu.
Press ◄ / ► button to select CHANNEL in the main menu,then p ress ENTER / ▼ to enter. .
1. Press ▼ / ▲ button to select the option that you want to select in the CHANNEL menu.
2. Press Enter button to enter sub-menu.
3. Press MENU button to return back to the previous menu.
Signal Type
Press ▼ / ▲ button to select Signal Type , then press ◄ / ► button to select Air or Cable.
Auto Search
Press ▼ / ▲ button to select Auto Search , then press Enter / ►button to start the auto searching.
It will search analog channels first,then digital channels.
Before execute auto channel search,please confirm your antenna type is Air or Cable.
Wrong setting of Signal Type maybe cause finding no channel.Found numbers do not include
encryption programs.
18
Main Menu Operation
Channel List
Press ▼ / ▲ button to select Channel List , then press Enter / ►button to enter sub-menu.
You can view all the channels and choose one quickly.
Press ▼ / ▲ button to highlight a channel and press ENTER to view it.
Favorite List
Press ▼ / ▲ button to select Favorite List , then press Enter / ►button to enter sub-menu.
All of your favorite channels are listed in this menu,and you can choose them quickly.
Channel Edit
Press ▼ / ▲ button to select Channel Edit , then press Enter / ►button to enter sub-menu.
Skip
Set the channel to be skipped when using CH+/CH- to view channels.
Favorite
Set the channel to your favorite list.
Press ▼ / ▲ button to select the channel you want to set.
Press ◄ / ►button to highlight corresponding item,and press ENTER to set or cancel.
19
Main Menu Operation
Channel Label
Press ▼ / ▲ button to select Channel Label , then press Enter / ►button to enter sub-menu.
Label
Rename label of the channels.
Press ▼ / ▲ button to select the channel and ENTER to enter the edit state.
Press ▼ / ▲ button to select the character, press◄ / ► to move the cursor.
20
Main Menu Operation
Parental Menu
Press MENU button to display the main menu.
Press ◄ / ► button select PARENTAL in the main menu,then p ress ENTER / ▼ to enter.
1. Press ▼ / ▲ button to select the option that you want to adjust in the PARENTAL menu.
2. Press Enter/◄ / ► button to adjust.
3. After finishing your adjustment, Press MENU button to save and return back to the previous menu.
Default password is 0000,and if forget what you set, please call the service center.
21
Main Menu Operation
Change Password
Press ▼ / ▲ button to select Change Password , then press Enter / ►button to enter sub-menu.
At first you should enter the correct old password,then e nter a 4-digital number you want to set twice.
Keypad Lock
Set to prevent it from being used by young children,or other unexpected usage.
Press ▼ / ▲ button to select Keypad Lock, then press◄ / ► button to select On or Off.
System Lock
Set to lock the using of specified source.
Press ▼ / ▲ button to select System Lock, then press◄ / ► button to select On or Off.
Source lock
Press ▼ / ▲ button to select Source lock , then press Enter / ►button to enter sub-menu.
Press ▼ / ▲ button to select Source,then press ENTER button to set the Source lock.
Unrated Block
Press ▼ / ▲ button to select Unrated Block , then press◄ / ► button to select On or Off.
22
Main Menu Operation
Rating Setup
Press ▼ / ▲ button to select Rating Setup , then press Enter / ►button to enter sub-menu.
US
For the United States, the rating setting basically include the following options: MPAA,TV.
MPAA
This system defines the rating control which come from MPAA rules.
Rating
Define
G
General audience. All ages admitted.
PG
Parental guidance suggested.Some material may not be suitable for children.
PG 13
Parents strongly cautioned. Some material may be inappropriate for children under 13.
R
Restricted. Children under 17 require accompanying parent or adult guardian.
NC 17
No one 17 and under admitted.
X
Adult audience only.
23
Main Menu Operation
US TV Rating
The TV rating compose of two aspects: age-based and content-based.
Age
Define
Content
Define
TV-Y
General audience
FV
Fantasy violence
TV-Y7
Parental guidance suggested
D
Suggestive dialogue
TV-G
Parents strongly cautioned
L
Strong language
TV-PG
Retricted
S
Sexual situations
TV-14
No one 17 and under admitted
V
Violence
TV-MA
Adult audience only
Note: The content ratings will increase depending on the level of the age-based rating. For example,
a program with a TV-PG V(violence) rating may contain moderate violence, while a TV-14 V(violence)
rating may contain intense violence. So locking a higher level option will automatically cause locking
the options that has more sensitive level.
24
Main Menu Operation
Canada
For Canada, the rating setting include the following options: English Rating, French Rating.
Canadian English
These ratings are for programs which are using English rating system.
Rating
Defined as
E
No Rating
C
Children
C8+
Children 8 years and older
G
General programming
PG
Parental guidance
14+
Viewers 14 and older
18+
Adult programming
Canadian French
The ratings are for programs which are using French rating system.
Rating
Defined as
E
No Rating
G
General
8 ans+
Not recommended for
younger children
13 ans+
Not recommended for
children under age 13
16 ans+
Not recommended for
ages under 16
18 ans+
This program is restricted
to adults
Download Rating
Control the RRT5 setting which are valid only at some digital cable channels.
Clear Download Data
Select to clear the previous downloadable rating data.
25
Main Menu Operation
Setup Menu
Press MENU button to display the main menu.
Press ◄ / ► button select SETUP in the main menu,then p ress ENTER / ▼ to enter.
1. Press ▼ / ▲ button to select the option that you want to adjust in the SETUP menu.
2. Press Enter/◄ / ► button to adjust.
3. After finishing your adjustment, Press MENU button to save and return back to the previous menu.
Menu language
Adjust TV Menu options.
Press ▼ / ▲ button to select Menu language, then press◄ / ► button to select English / Español/ Français .
Menu Transparency
Adjust the tra nsparency of the OSD (on screen display) menu.
Press ▼ / ▲ button to select Menu Transparency, then press◄ / ► button to select.
(Available Menu Transparency : 0%,20%,40%,60%,80%,100%).
Blue Back
Set the screen background color blue or not when no valid signal input. When analog TV input and
has no signal, snow noise will display if this option is cleared.
Press ▼ / ▲ button to select Blue Back , then press◄ / ► button to select On or Off.
Audio Only
When you highlight the item, the system will note you that “Press any key to exit audio only”,
and if you are sure not need to view (backlight is turned off),
S elect Yes to confirm. As the attention, if you want to wake up the video, please press any key.
26
Main Menu Operation
Caption
Adjust Closed Captioning settings. Only available under TV and AV source.
Press ▼ / ▲ button to select Caption , then press Enter / ►button to enter sub-menu.
CC Mode
Turn Closed Captioning on/off.
Press ▼ / ▲ button to select CC Mode , then press Off , On or On Mute.
Analog CC
Set Closed Captioning for standard(analog) program.
Press ▼ / ▲ button to select Analog CC ,p ress ◄ / ► button to select.
( Available Analog CC: CC1 / CC2 / CC3 / CC4 / TEXT1 / TEXT2 / TEXT3 / TEXT4).
CC1,2,3,4 Displays corre sponding caption channel of a analog program.
(Usually be set to CC1 for most programs.)
Text1,2,3,4 Displays corre sponding text service channel of a analog program.
Digita l CC
Set Closed Captioning for digital program.
Press ▼ / ▲ button to select Digital CC ,p ress ◄ / ► button to select.
( Available Digital CC:Auto/ Service1 / Service2 / Service3 / Service4 / Service5 / Service6).
Service1,2,3,4,5,6 These are diffe rent service data channels.
Digita l CC Style
Press ▼ / ▲ button to select Digital CC Style , then press Enter / ►button to enter sub-menu.
Mode
Set the look of digital Closed Captioning. Automatic uses broadcaster’s style.
Press ▼ / ▲ button to select Mode, p ress ◄ / ► button to select.by Custom or by Program.
If set to by Custom, Digital CC Style is available.
27
Main Menu Operation
FG Color
Adjust the color of the digital Closed Captioning font.
Press ▼ / ▲ button to select FG Color , p ress ◄ / ► button to select.
( Available FG Color:by Program, Black ,White , Red , Green , Blue ,Yellow , Cyan, Magenta).
BG Color
Adjust the digital Closed Captioning background color.
Press ▼ / ▲ button to select FG Color , p ress ◄ / ► button to select.
( Available FG Color:by Program, Black ,White , Red , Green , Blue ,Yellow , Cyan, Magenta).
FG Opacity
Adjust the transparency of the digital Closed Captioning font.
Press ▼ / ▲ button to select FG Opacity , p ress ◄ / ► button to select.
( Available FG Opacity:by Program, Solid , Flashing , Translucent, Transparent).
BG Opacity
Adjust the digital Closed Captioning background transparency.
Press ▼ / ▲ button to select B G Opacity , p ress ◄ / ► button to select.
( Available B G Opacity:by Program, Solid , Flashing , Translucent, Transparent).
Time Settings
Press ▼ / ▲ button to select Time Settings , then press Enter / ►button to enter sub-menu.
OSD Time
Press ▼ / ▲ button to select OSD Time , press ◄ / ► button to select.
( Available OSD Time:Off,10sec,20sec,30sec,60sec).
Sleep Time
Set a timer for the TV to turn off automatically.
Press ▼ / ▲ button to select Sleep Time , p ress ◄ / ► button to select.
( Available Sleep Time:Off ,10min, 20min, 30min, 60min, 90min, 120min, 150min, 180min).
Auto Clock
Press ▼ / ▲ button to select Auto Clock , p ress ◄ / ► button to select On or Off.
If set it to ON , the TV will sync the local clock according to the DTV broadcasting time automatically.
Otherwise you can set the time manually.
Time Setup
Set Auto Clock to Off, then you can set the time manually .
Note: In the case of loss of power, the clock setting will be lost.
Time Zone
Select your time zone.
Press ▼ / ▲ button to select Time Zone,p ress ◄ / ► button to select.
( Available Time Zone: Eastern ,Central , Mountain , Pacific , Alaska , Hawaii ,Samoa, Newfoundland ,Atlantic).
28
Main Menu Operation
Daylight Saving Time
Set the daylight saving time for your area.
Press ▼ / ▲ button to select Daylight Saving Time , p ress ◄ / ► button to select On or Off.
Day of Week
The TV will calculate curre nt day of week according to the time.
Default Settin g
Reset TV to factory default.
Press ▼ / ▲ button to select Default Setting , then press Enter / ►button to enter sub-menu.
If you are sure to reset,press Yes to reset.
29
Help
30
Specifications
VGA
Resolution
Vertical frequency hz
640x480
800X600
1024x768
1360x768
60HZ
60HZ
60HZ
60HZ
1920x1080
60HZ
HDMI
Format
Vertical frequency hz
480 i/P
576 i/P
720 P
1080 i/P
60HZ
50HZ
50HZ/60HZ
50HZ/60HZ
Parameter specification
Screen Size
24”
NTSC / ATSC
PAL, NTSC
1253
IN:TV, AV, YPbPr, PC AUDIO,VGA, HDMI.
OUT: COAXIAL,EARPHONE.
5W+5W
AC 100-240V~ 50/60Hz
48W
NOTE:
This user s manual is for reference only .Specications are subject to change
without notice
31