1
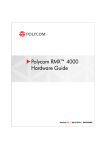
RMX™ 1000
First-Time Power-up and Connection to RMX 1000
Installation Quick Start Guide for RMX 1000
Basic Setup
Before installing the RMX 1000 and performing the basic setup, please read the
General Safety Precautions described in the Polycom RMX 1000 Getting Started
Guide.
1
Connect your PC to the LAN1 port (the LAN1 port is enabled by default) of the
RMX 1000, or connect your PC and RMX 1000 to the same switch in the LAN.
2
Turn on the power switch at the RMX 1000.
3
Configure the IP address for your PC, which is in the same network segment as the
IP address of the RMX 1000.
– IP address - 192.168.1.254
– Subnet mask - 255.255.255.0
– Default gateway IP address - 192.168.1.1
You can also view the current address information of the product using the RMX
1000 Discover tool:
a
b
Run the RMX 1000Discover.exe tool located in the CD provided with the
product. You can also get it from the Polycom Web site (Link to Support ->
Network -> RMX 1000).
Click Discover.
The Product Activation dialog box displays automatically.
Click Polycom Resource Center
to connect to Polycom web site
(http://portal.polycom.com) and
register your system.
Follow the on screen instructions
to obtain the Product Activation
Key.
Enter or paste the Product
Activation Key obtained.
The default IP address of the RMX 1000 is:
Front Panel
Power Status
LED
6
Click Save
7
The system will display a message asking whether to restart the system or not.
Click Restart Now to validate the activation.
Modifying the Default IP Address of RMX 1000
After the system restarts, you can enter the RMX 1000 Web configuration interface to
modify the default IP address for the system based on the settings of your local
network.
LAN1&LAN 2
Status LEDs
Click IP Network Services,
then double click LAN 1 item.
Rear Panel
1
4
Power Cable
Run the Web browser on the PC. Enter http://<RMX 1000 IP address> in the
address bar, and then press Enter.
Off/On Switch LAN1 Connection
If you want to shut off the device, please first turn off the power switch. Do not directly
cut off the power supply or unplug the power cable.
Enter POLYCOM
Enter POLYCOM
Click Login
2
Set the IP parameters using the
information supplied by your
network administrator:
• IP address, subnet mask and
gateway
Select Set as Default if you
want to set the gateway as the
default route
• NAT IP (Optional)
• DNS server IP address
(Optional)
• The speed/duplex modes for
LAN1 port (Default Auto)
5
1
3725-32799-002
RMX™ 1000
Configuring Other Network Options (Optional)
Set the transport layer protocol
used for communicating with the
SIP server.
If necessary, you can configure other network parameters according to the following
procedure:
Check the option to register to SIP
Server
Set the Primary/Alternate SIP
server parameters. Primary
/Alternate Server filed indicates
whether or not the device is
registered successfully.
Enter the user name and password
provided by the SIP server.
Click IP Network Services,
then double click LAN 1 item.
Optional: Set the IP address and
port number for the outbound
proxy server.
9
1
2
.
Click the Routers tab.
Set the IP address for the sending
router of packet transmission
Set the target network address for
packet transmission
Set the subnet mask for the target
network
3
Connecting to a Conference via Remote Control
A user can directly dial in to the ongoing conference or meeting room using the remote
control. In this way, the user must obtain the conference ID and password (if the
conference password or chairperson password is set) first.
H.323 Participants
H.323 participants dial:
<RMX 1000 Prefix in Gatekeeper><Conference ID>[##Conference Password or
Chairperson Password].
Here, the character in [ ] is optional.
For example:
RMX 1000 prefix in gatekeeper: 925
10 Click OK.
ID of the conference to be dialed in: 1001
The system is now ready for use. For additional configuration instructions, please refer
to the Polycom RMX 1000 System User Guide.
Then, the endpoint dials 9251001
Starting a Conference via Remote Control
The RMX 1000 conference platform offers several ways to start a conference.
Participants can dial into a meeting room configured by the administrator or create
their own conference ID on-the-fly and invite additional participants by adding their
endpoint numbers to the dial string. The following sections describe how to start a
simple conference using a dial-in string the user created to initiate a conference.
If the conference to be dialed in is set with the conference password 1111 and
chairperson password 2222
Then, the regular participant dials 9251001##1111
The conference chairperson dials 9251001##2222
SIP Participants
SIP participants dial:
H.323 Participants
<Conference ID> [$$Conference Password or Chairperson Password]<@RMX 1000
Static Route Domain Name>
4
If your IP network type is SIP only, go to step 8.
H.323 participants dial:
Here, the character in [ ] is optional.
5
To register the system to the gatekeeper, click the Gatekeeper tab.
<RMX 1000 Prefix in Gatekeeper><Conference ID>[##Conference
Password][##Chairperson Password]
For example:
Here, the character in [ ] is optional.
ID of the conference to be dialed in: 1001
For example, if RMX 1000 prefix in gatekeeper is 925, to create a conference which ID is
1001, dial 9251001. At the meantime if want to set a conference password 1111 and a
chairperson password 2222, dial 9251001##1111##2222
Then, the endpoint dials 1001@ polycom.com
SIP Participants
Then, the regular user dials 1001$$1111@ polycom.com
SIP participants dial:
The conference chairperson dials 1001$$2222@ polycom.com.
Choose an IP network type for the
RMX 1000 system to make a call
Check the option to register to GK
and set the following parameters
Set the Primary / Alternate
Gatekeeper parameters.
Primary/Alternate Gatekeeper filed
indicates whether or not the device
is registered successfully
Set the E.164 prefix / H.323 alias
for the system
6
If the conference to be dialed in is set with the conference password 1111 and
chairperson password 2222
<Conference ID>[$$Conference Password][$$Chairperson Password]@<RMX 1000
Static Route Domain Name>
Here, the character in [ ] is optional.
7
If your IP network type is H.323 only, go to step 10.
8
To configure the SIP server, click the SIP Server tab.
2
RMX 1000 static route domain name: polycom.com
For example, if RMX 1000 static route domain name is polycom.com, to create a
conference which ID is 1001, dial 1001@ polycom.com. At the meantime if want to set a
conference password 1111 and a chairperson password 2222, dial
[email protected]
3725-32799-002