1
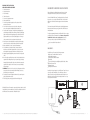
XRt12
reference
TUNER
Owner’s
Manual
IMPORTANT SAFETY INSTRUCTIONS
READ BEFORE OPERATING EQUIPMENT
1.
2.
3.
4.
5.
6.
7.
Read these instructions.
Keep these instructions.
Heed all warnings.
Follow all instructions.
Do not use this apparatus near water.
Clean only with dry cloth.
Do not block any ventilation openings. Install in accordance with the
manufacturer's instructions.
8. Do not install near any heat sources such as radiators, heat registers,
stoves, or other apparatus (including amplifiers) that produce heat.
9. Do not defeat the safety purpose of the polarized or grounding-type plug. A
polarized plug has two blades with one wider than the other. A grounding type
plug has two blades and a third grounding prong. The wide blade or the third
prong are provided for your safety. If the provided plug does not fit into your
outlet, consult an electrician for replacement of the obsolete outlet.
10. Protect the power cord from being walked on or pinched particularly at plugs,
convenience receptacles, and the point where they exit from the apparatus.
11. Only use attachments/accessories specified by the manufacturer.
12. Use only with the cart, stand, tripod, bracket, or table specified by the
manufacturer, or sold with the apparatus. When a cart is used, use caution
when moving the cart/apparatus combination to avoid injury from tip-over.
13. Unplug this apparatus during lightning storms or when unused for long periods
of time.
14. Refer all servicing to qualified service personnel. Servicing is required when the
apparatus has been damaged in any way, such as power-supply cord or plug is
damaged, liquid has been spilled or objects have fallen into the apparatus, the
apparatus has been exposed to rain or moisture, does not operate normally, or
has been dropped.
15. WARNING: To reduce the risk of fire or electric shock, this apparatus should not
be exposed to rain or moisture and objects filled with liquids, such as vases,
should not be placed on this apparatus.
16. To completely disconnect this equipment from the mains, disconnect the power
supply cord plug from the receptacle.
17. The mains plug of the power supply cord shall remain readily operable.
WELCOME TO THE WORLD OF XM SATELLITE RADIO
What could be better than digital quality, commercial free music played
through your own home audio system? (That’s a rhetorical question.)
Your new Polk Audio XM Reference Tuner brings the world of satellite radio
into your home, so you can enjoy XM Satellite Radio’s critically acclaimed
digital music and talk radio channels through your own home entertainment
system.
For information about other Polk Audio products, including high performance
loudspeakers that will enhance your enjoyment of XM Satellite Radio, visit
www.polkaudio.com.
For the latest programming information from XM Satellite Radio, or to activate
your XM subscription, visit www.xmradio.com. You must activate your XM
Satellite Radio service in order to use this product. You can also
activate your service by calling 1-800-XM-RADIO (1-800-967-2346).
Service is not available in Alaska and Hawaii.
BOX CONTENTS:
Your XM Reference Tuner contains the following components:
XM Reference Tuner with built-in AC Power Cord
XM High-Gain Home Antenna
XM Remote Control, Batteries Included
Optical Cable
3-connector RCA Analog Stereo Audio/(Composite)Video Cable, 2 Meters
XM Channel Reference Card
This Owner’s Manual
Online Registration Information
If anything is missing or damaged, or if your XM Reference Tuner fails to operate, notify your dealer immediately, or if your XM Reference Tuner was
shipped to you directly, notify your shipper immediately. Polk Audio recommends that you keep your original carton and packing materials in case you
need to ship the unit in the future.
select
display
memory
Polk Audio XM Reference Tuner requires separate subscription and activation from XM
Satellite Radio, Inc. Go to www.xmradio.com for details. Not available in AK or HI. XM
and XM Reference Tuner are trademarks of XM Satellite Radio, Inc.
menu
category
enter
XM Reference Tuner
XM Reference Tuner
select
cat.
cat.
select
Stereo Audio/(Composite)Video Cable
mute preset/direct jump
1
2
3
4
5
6
7
8
9
menu
display
Optical Cable
0
XM High-Gain Home Antenna
XM Remote Control, Batteries Included
2
Contact Polk Audio Customer Service 1-800-377-7655 (Outside US: 410-358-3600) Monday-Friday, 9:00 AM-6:00 PM Eastern Time, [email protected]
f o r m o r e i n f o r m a t i o n v i s i t o u r w e b s i t e a t w w w. p o l k a u d i o . c o m
3
Overview of the Set-Up Process
I. Connect the XM Reference Tuner to your home audio equipment.
II. Position the High-Gain Antenna for the best signal.
III. Activate your XM Satellite Radio subscription.
XM TUNER SET-UP
FIGURE 1
XM HOME ANTENNA SET UP
Set up your XM Reference Tuner as follows:
1. Connect your XM Reference Tuner’s audio output to your
pre-amp/receiver using either the supplied 3-connector
RCA Analog Stereo Audio/(Composite)Video Cable or a
TOSLINK Digital Audio Cable connection. You may also
use a Digital Coaxial RCA-type Cable (not included).
See Figure 1.
2. Be sure to maintain consistency by matching red-to-red
and white-to-white when connecting the RCA cable.
3. Connect the XM High-Gain Home Antenna to the jack
labeled “ANTENNA” on the rear panel of the XM Reference Tuner.
4. You may wish to connect your XM Reference Tuner to your television via the Yellow
Connector of the (supplied) 3-connector RCA Analog Stereo Audio/(Composite)Video
Cable. This will allow you to view the XM Display on your television (if you are using
Digital Audio, do not connect the Analog Audio output).
5. The Power Cord of the XM Reference Tuner must be plugged into a standard 120V home
outlet. You may also plug the Power Cord of the XM Reference Tuner into the switched AC
Outlets of your pre-amp/receiver, if available.
About the RS-232C Connection:
The RS-232C Connection is provided to allow the XM Reference Tuner to be controlled by
compatible 3rd party control systems. Polk Audio recommends that this connection only be
used by experienced professional system installers. DO NOT connect the RS-232C Connection
to a computer. This connection IS NOT compatible with personal computers.
Contact Polk Audio Customer Service 1-800-377-7655 (Outside US: 410-358-3600) Monday-Friday, 9:00 AM-6:00 PM Eastern Time, [email protected]
II. Antenna Aiming signal-strength indicator
1. A higher-resolution signal-strength indicator screen is available to allow you to optimally
aim your XM High-Gain Home Antenna. To access and use this screen:
2. Press the MENU button on the face of the XM Reference Tuner and select the “Antenna
Aiming” option. A screen similar to Figure 4 will appear.
3. Adjust the antenna location until the maximum number of “SATELLITE” bars is filled in.
Your XM Reference Tuner will receive programming as long as either the satellite or
terrestrial signal has two bars filled in; selecting a position with the maximum number
of “SATELLITE” bars displayed will ensure a consistently strong signal.
4. Press the MENU button once to return to the menu screen. Press the MENU button
again to return to the normal play screen.
FIGURE 4
I. Basic Signal-Strength Indicator
Your XM Reference Tuner display has a basic signal-strength indicator visible at the top
of the display screen during normal listening (Figure 3). The signal strength is indicated
by up to three vertical bars; three bars represent the strongest signal. (Zero bars represent
a weak signal.)
Using The Remote
1. The Remote Control included with your XM Reference Tuner does not control system
volume. The pre-amp/receiver to which you have connected your XM Reference Tuner will
control the system volume. (If the XM Reference Tuner signal is too high or too low, use the
Line Level Out menu command on Pg. 9 to adjust the audio signal level of the
XM Reference Tuner.)
2. Install the batteries (included) as shown in Figure 2.
3. If the remote control’s range begins to shorten, replace both batteries with new ones.
4. Direct sunlight or light from a high-frequency fluorescent lamp may cause the remote sensor
on the XM Reference Tuner front panel to not function properly. If this happens, move the XM
Reference Tuner out of this direct light.
4
FIGURE 3
Your XM Reference Tuner display has two different signal-strength indicators which
will help you optimize your antenna’s position.
FIGURE 2
After powering up, if the display reads “ANTENNA,” check that the antenna connection is
secure and completely pushed in. Next, change channels (from 0 to 1, or from 1 to 0 if the
Tuner is not activated yet). If the “ANTENNA” message remains, power down the Tuner, unplug
the antenna and look for any obvious damage. If no damage is detected, reconnect the antenna,
turn the unit back on and change channels again. If the message still appears, contact your
retailer or Polk Audio Customer Service at 1-800-377-7655.
Aiming your XM High-Gain Home Antenna
If the XM Reference Tuner display says, “NO SIGNAL,” the antenna needs to be
repositioned. In addition, even if you are receiving the XM signal, it is recommended
that you optimize the position of your XM High-Gain Home Antenna as described in
this section enabling you to receive the strongest possible signal and
consistent reception.
Positioning The High-Gain Home Antenna
The antenna that comes with your XM Reference Tuner is a High-Gain Antenna that easily
receives the XM signal from the XM Satellites and, depending on where you live, the XM
Terrestrial Repeater System. It is recommended that your antenna be positioned near a
South-facing window or at least a clear view of the southeastern sky in order to receive the
strongest satellite signal.
To position your antenna, first connect your XM Reference Tuner to your audio system as
described earlier. Next, position the antenna until you receive the strongest possible satellite
signal. If the satellite signal is not available, you can optimize for the terrestrial signal
(where available).
f o r m o r e i n f o r m a t i o n v i s i t o u r w e b s i t e a t w w w. p o l k a u d i o . c o m
5
Indoor installation on a flat surface
1. To aim your antenna at the satellites:
2. Set the antenna flat against its base on a flat (horizontal) surface.
3. Turn the base of the antenna so that XM Logo is facing to the South/Southwest if you are in
the Eastern half of the US, and to the South/Southeast if you are in the Western half of the US.
4. Use the “Antenna Aiming” screen, as described earlier, to optimize antenna tilt angle
and position.
5. If necessary, experiment with different locations near South-facing windows.
memory
menu
1. Holding your antenna up, find a wall location that ensures a strong signal. It is recommended
that you use an extension cord to temporarily locate your High-Gain Home Antenna outdoors
while optimizing the antenna location with the “Antenna Aiming” screen.
2. Attach four screws to the wall using the Screw-Locator Pattern in Figure 5. Use screws with
head sizes small enough to fit in the center of each of the four holes but large enough not to
pop out of the elongated sections. Leave 1/8-inch of the screw shanks behind the heads
sticking out of the wall.
3. Tilt the antenna fully back on the base, place the antenna base on the four screw heads with
the antenna pivot at the top and pull down approximately 1/4” inch until the base is firmly
secured. Note that the XM Logo will be upside down when the antenna is properly installed.
4. Tilt the antenna away from the wall/base until the signal strength is optimized.
FIGURE 5
NOTE: Do not cut the antenna cable and attempt to splice it or attach alternative connectors
or cable. The cable and connectors used in your XM Reference Tuner are specifically chosen
and attached at the factory to ensure that they will work with XM’s unique frequency band.
Use an XM-approved extension kit (Polk Audio model number XAE-1, available from
your retailer or http://shop.polkaudio.com) with your XM Reference Tuner System.
Failure to do so could damage your unit.
Getting Started
1. To quickly begin enjoying XM Satellite Radio in your home, follow these simple steps:
2. Set up your XM Reference Tuner as described in the previous section.
3. Press the POWER button to turn your XM Reference Tuner ON and verify that it is playing
on Channel 1, the XM Preview Channel.
4. Select Channel 0. The XM Reference Tuner’s eight character XM Satellite Radio ID Number
will appear on the display. Write the Number HERE: _________________________
NOTE: Carefully check the XM Radio ID. The letters I, O, S, and F are not used.
5. Activate your XM Satellite Radio service. To subscribe, make sure you have a major credit card
and your XM Satellite Radio ID Number handy and contact XM at http://activate.xmradio.com.
You can also activate your service by calling 1-800-XM-RADIO (1-800-967-2346).
select
category
enter
XM Reference Tuner
MEMORY
DISPLAY
MENU
ENTER
YOUR XM REFERENCE TUNER
Controls
Your XM Reference Tuner has seven convenient control buttons right on its face.
MEMORY
Memory saves whatever information is on the display screen for later recall.
Press and hold the Memory button to recall information.
MENU
Press MENU to select and change tuner configuration options.
ENTER
The ENTER button is used to select channels and menu options.
SELECT
Use the SELECT and to scroll through and select a channel or menu option.
Select search times out after 6 seconds if no options are selected, returning
you to the display. You must press ENTER to confirm your selection.
CATEGORY
Use CATEGORY and to enter the Category search and to display channels
grouped by category. Continued presses step through available categories. Category
search times out after 6 seconds if no channels are selected, returning you to the
display. You must press ENTER to confirm your selection.
DISPLAY SCREEN
While tuned to an XM Channel, the XM Reference Tuner default display contains
information about that channel and your XM Reference Tuner settings. See Figure 6.
Your XM Reference Tuner display can be customized. See the next section, “Menu
Settings & Commands.”
THE XM REFERENCE TUNER REMOTE CONTROL
Your XM Reference Tuner Remote Control has nine control buttons.
POWER
Turns your XM Reference Tuner ON and OFF.
CATEGORY
Use CATEGORY (which appear on the remote as < and >; this is the designation we
will use in this manual to clearly delineate CATEGORY from SELECT) to enter the
Category search and to display channels grouped by category. Continued presses
step through available categories. Category search times out after 6 seconds if no
channels are selected, returning you to the display.
SELECT
Use the SELECT and to scroll through and select a channel or menu option.
Select search times out after 6 seconds if no options are selected, returning you
to the display.
ENTER
The ENTER button is used to select channels and menu options.
MUTE
Mutes the audio.
PRESET/DIRECT
Switches between DIRECT entry, Preset A and Preset B.
JUMP
Use the JUMP button to instantly return to the previous channel.
POWER
SELECT
ENTER
CATEGORY
select
cat.
cat.
PRESET/DIRECT
JUMP
MUTE
mute preset/direct jump
1
2
3
4
5
6
7
8
DISPLAY
NUMBER KEYS
Number keys are used to select a channel directly (when in DIRECT entry mode) by
entering its number. Or, use Number keys to Select presets (when in Preset A or
Preset B mode) by entering the number of the preset channel.
DISPLAY
With normal channel display, the display button toggles between normal display, large
channel number and large scrolling text display options. When on the channel navigation screen, the
display button toggles between channel name, artist name and song title.
MENU
Press MENU to select and change tuner configuration options.
9
menu
display
Contact Polk Audio Customer Service 1-800-377-7655 (Outside US: 410-358-3600) Monday-Friday, 9:00 AM-6:00 PM Eastern Time, [email protected]
DISPLAY SCREEN
DISPLAY
With normal channel display, the display button toggles between normal display, large
channel number and scrolling text display options. When on the channel navigation
screen, the display button toggles between channel name, artist name and song title.
select
6
CATEGORY
POWER
Turns your XM Reference Tuner ON and OFF.
Outdoor installation or Indoor Wall Mounting
The antenna can also be attached vertically to an external or internal wall if that is more
convenient than placing it on a horizontal surface.
ACTIVATING YOUR XM SYSTEM
display
SELECT
FIGURE 6
Your High-Gain Home Antenna comes with 20 feet of cable. If that is not sufficient to locate the
antenna where there is a strong XM signal, purchase a 50-foot cable extension (Polk Audio model
number XAE-1) from Polk Audio (http://shop.polkaudio.com) or your retailer. Up to two extensions
can be used together for up to 120 total feet of cable.
POWER
0
MENU
f o r m o r e i n f o r m a t i o n v i s i t o u r w e b s i t e a t w w w. p o l k a u d i o . c o m
7
BASIC OPERATIONS
Turning your XM Reference Tuner ON and OFF
Press POWER on the XM Reference Tuner unit or on the XM
Reference Tuner Remote Control. When first turned on, the
receiver will automatically tune to the last channel listened
to and recall the previous settings.
Basic Channel Selection
The XM Reference Tuner allows you to select a channel by
directly entering its number, using a preset key, or by tuning
up and down to reach the channel.
Direct channel entry by number:
1. Verify that your XM Reference Tuner is in DIRECT entry mode.
“DIRECT” should appear in the upper right corner of the display.
If A or B appears, press the PRESET/DIRECT button on the
remote control until the display says “DIRECT.”
2. Enter the channel number using the Number Keys.
Select Channel by Channel Presets
Your XM Reference Tuner can store up to 20 Preset channels. They
are organized into two different groups (or memory banks), Preset
A and Preset B, each with 10 channels corresponding to the 10
Number Keys.
Press PRESET/DIRECT until A or B appears in the upper right corner
of the display. Press the Number Key corresponding to the desired
preset on the remote keypad.
Setting Channel Presets
1. Tune in the channel you want to register as a preset.
2. Select either Preset A or Preset B by pressing PRESET/DIRECT
until A or B appears in the upper right hand corner of the display.
3. Press and hold the Number Key on the remote corresponding to
the preset you would like to set. The channel name and number
will highlight and the audio will mute for 2 seconds to indicate
that the preset is registered.
Tune To A Channel
Tune up and down the channel list using the SELECT function on
either the XM Reference Tuner or the Remote Control unit. Press
ENTER to confirm your selection.
Skip channels in the lineup by using the Channel Skip/Add function
described in “Menu Commands and Settings.” This will allow you
to tune across only the XM channel you listen to regularly.
Preview And Select A Channel Based On Channel Name Or
The Current Song Or Artist
While listening to a channel, you can scan through the XM channel
lineup, see what channels are available and what is currently playing, and then decide if you want to leave your current channel.
2. Press /\ or \/ repeatedly (or press and hold to move quickly)
to scroll through the channel lineup.
3. Press DISPLAY to change the channel information displayed from
the channel name to artist name or song title.
4. Select the highlighted channel with ENTER. If you do not select a
channel, the display will time out and return to the channel you
were originally listening to.
Select A Channel By Category
Press either of the CATEGORY buttons (< and >) to enter
category search.
1. Continue pressing one of the Category keys (< and >) until
a category in which you are interested appears.
2. Use the SELECT buttons (/\ and \/) to highlight a channel
within the given category.
3. Press ENTER to select a channel.
4. If you do not select a channel, category search will time
out after several seconds.
Preview Favorite Channels
You can use the preset keys and category search to preview
the artists and songs currently playing on your favorite channels
before deciding whether or not to select any of them.
1. Set your favorite XM channels as presets as explained above.
Your XM Reference Tuner will automatically create new
categories, called Preset A and Preset B, when presets are
set in either memory bank.
2. Press the Category keys (< and >) to enter Category search, and
continue pressing it until either Preset A or Preset B appears on
the display.
3. Press DISPLAY to display the channel name, artist name or song
title for each preset.
4. Your XM Reference Tuner will remember if you were in the
preset section of the category search so that the next time you
press a Category key (< and >) it will immediately display the
information on those preset channels.
Save And Recall Artist Name And Song Title
You can save the artist name and song title on the current
channel for future reference.
1. Press and release MEMORY to save the current screen
information. Up to 10 different artist names/song titles can be
saved at once, after which any new information that is saved
will replace the oldest information in the memory.
2. To recall saved artist name/song title information, press and
hold MEMORY for 2.5 seconds. Next use the SELECT function
to display each saved artist name/song title.
LINE LEVEL OUT
Use this to adjust the XM Reference
Tuner’s analog audio level output so
that it matches other sources in your
audio system. Most users will NOT
need to change this level from the
factory setting. Default setting is
HIGH. This is not a volume control.
You will set your volume control
using the audio system to which your
XM Reference Tuner is connected.
HIGH
MEDIUM
LOW
DISPLAY BRIGHTNESS & CONTRAST
This control allows you to adjust the brightness and contrast
of the display.
AUTO SHUTDOWN
You can set the XM Reference Tuner to automatically shut itself
off if a button is not pressed in 30, 60 or 90 minutes. This function
does not affect the pre-amp/receiver that the XM Reference Tuner
is connected to, it merely turns the XM Reference Tuner off after a
predetermined time.
When Auto Shutdown is activated, the display screen will show a
countdown warning 10 seconds before the XM Reference Tuner
shuts itself down. Pressing any button on the unit or the remote
control during this countdown will cancel the Auto Shutoff process
and restore normal operation for the predetermined length of time
before Auto Shutoff is reinitiated.
MEMORY RECALL
This is an alternative way of entering memory recall mode.
It functions the same as pressing and holding MEMORY.
ANTENNA AIMING
You can optimize the position of your High-Gain Antenna using this
screen. Press MENU to return to the main play screen.
CHANNEL SKIP/ADD
You can skip channels in your XM Reference Tuner channel list
to prevent from being accessible in search modes (SELECT or
CATEGORY). “Deleted” channels can still be accessed by DIRECT
entry or by using a preset key. They can also be added back to
the search list later.
FACTORY DEFAULT
Selecting this option restores all of the settings to their original factory setting. This is useful if you alter a number of settings and then
change your mind but don’t know how to eliminate the changes
you’ve made. Don’t you wish life were like this? Remember: restoring the factory settings will erase all of your presets. You will have
to reset them if you restore the factory-default settings.
Menu Commands and Settings
Pressing MENU on either the XM Reference Tuner or the remote
control unit enters the menu section of the display. Here, you can
change each of the following operations using the SELECT function
and the ENTER key. While in the menu section, the MENU button
acts as a “back” button, allowing you to “back out” of existing
sections. The following are the settings that can be changed:
To completely block your XM Reference Tuner from receiving a channel, call XM Customer Service 1-800-852-9696.
Enlarging Display Text
Your XM Reference Tuner display can be reconfigured to be more
readable from a across the room.
1. Press DISPLAY while on a normal play screen to switch to
larger-text channel number configuration.
2. Press DISPLAY a second time to continuously scroll the artist and
song title information across the display in large-sized text.
3. Press DISPLAY again and return to the default display.
1. Press /\ or \/ on the remote control to enter channel search and
display the current channel plus the two channels above and the
two below it in the lineup.
8
Contact Polk Audio Customer Service 1-800-377-7655 (Outside US: 410-358-3600) Monday-Friday, 9:00 AM-6:00 PM Eastern Time, [email protected]
f o r m o r e i n f o r m a t i o n v i s i t o u r w e b s i t e a t w w w. p o l k a u d i o . c o m
9
XM REFERENCE TUNER SPECIFICATIONS
TROUBLESHOOTING
Your XM Reference Tuner is designed and built to provide trouble-free performance without the need for
service. If it does not appear to be functioning correctly, please follow these troubleshooting tips.
1. Make sure all connectors are properly attached to the rear panel of the XM Reference Tuner and
to your home audio system.
2. Make sure that the unit is plugged into a standard 120V home current. You may also plug the Power
Cord of the XM Reference Tuner into the switched AC Outlets of your pre-amp/receiver, if available.
3. Make sure you have activated your XM Satellite Radio subscription. You must activate your XM Satellite
Radio service in order to use this product. To activate your XM Satellite Radio service, make sure you
have a major credit card and your XM Satellite Radio ID Number handy and contact XM at
http://activate.xmradio.com. You can also activate your service by calling 1-800-852-9696.
Signal to Noise Ratio
Total Harmonic Distortion + Noise
Channel Separation
Dimensions (with feet)
Remote
Product Weight
Inputs
Outputs
Color
If you see this on the display,
NO SIGNAL
Cause: The XM signal is out of range.
ANTENNA
OFF AIR
Cause: The channel selected is not
currently broadcasting.
>80dB
<0.1%
>50dB
17” W x 2.3” H x 10.5” D
432mm x 58.4mm x 266.7mm
2.25" W x 5.375" H x .9" D
6.5 lb.; 2.9 kg
XM Antenna – 1 SMB connector
RS-232C Controller Port
Analog Audio – RCA plugs
Digital – Coax and Optical/Toslink
Video – Composite video
Black
You should:
Reposition your High-Gain Antenna.
Make sure your antenna is securely attached to the
rear of the unit, that the antenna cable is unkinked
and undamaged. Turn the XM Reference Tuner off
and then back on to reset this message.
Tune in to another channel.
If this happens,
You should:
CONTACTING CUSTOMER SERVICE
You can only receive XM channels 0 and 1.
Cause: Your XM Reference Tuner is not activated.
Contact XM as described in the
ACTIVATING YOUR XM SYSTEM section.
Subscription Issues
If you still need assistance, contact XM Satellite Radio by calling 1-800-XM-RADIO (1-800-967-2346).
The audio sounds distorted.
Reduce the audio output level as described in the
Menu Commands and Settings Line
Level Out section.
Hardware Issues
Contact Polk Audio Customer Service 9am-6pm EST 1-800-377-7655, or email [email protected].
The audio level is too low.
Increase the audio output level as described in the
Menu Commands and Settings Line
Level Out section.
You cannot tune in to a channel.
(See “Channel Skip/Add.”)
1. Make sure the channel has not been “skipped.”
2. Verify that you are authorized to receive that
channel as part of your subscription with XM and
that you have not asked XM to block that channel
on your XM Reference Tuner.
No song title or artist name displays.
Nothing is wrong with your receiver. This is normal
on many talk and news channels where there is no
song playing. Also, this information may not yet be
in the database for some music channels.
10
Contact Polk Audio Customer Service 1-800-377-7655 (Outside US: 410-358-3600) Monday-Friday, 9:00 AM-6:00 PM Eastern Time, [email protected]
Care And Feeding of Your XM Reference Tuner
Use only a soft dry cloth to clean cabinet of your XM Reference Tuner.
Do not use any solvents, chemicals or cleaning solutions containing alcohol, ammonia or abrasives.
Do not allow liquids to spill on the unit.
Do not use sprays near your XM Reference Tuner.
Keep your XM Reference Tuner out of direct sunlight or other sources of extreme heat.
Make sure your XM Reference Tuner has adequate ventilation.
Failure to follow these instructions may result in damage to your XM Reference Tuner and may
void the warranty.
f o r m o r e i n f o r m a t i o n v i s i t o u r w e b s i t e a t w w w. p o l k a u d i o . c o m
11
NOTES
Use this page to keep a record of your Product Information and connection schematics for future reference.
SERIAL # ___________________________________________
XM RADIO ID # _____________________________________
To activate your XM Satellite Radio service, make sure you have a major credit card and your XM Satellite
Radio ID Number handy and contact XM at http://activate.xmradio.com. You can also activate your service
by calling 1-800-XM-RADIO (1-800-967-2346).
"XM Reference Tuner, the XM name and related logos are trademarks of XM Satellite Radio, Inc."
LIMITED ONE YEAR WARRANTY
Polk Audio, Inc., warrants to the original retail purchaser only. This warranty will terminate
automatically prior to its stated expiration if the original retail purchaser sells or transfers
the Product to any other party.
Polk Audio, Inc., warrants, to the original retail purchaser only, that this XM Reference Tuner
XRt12 will be free from defects in material and workmanship for a period of one (1) year from
the date of original retail purchase from a Polk Audio Authorized Dealer.
To allow Polk Audio to offer the best possible warranty service, please register your new
product online at: www.polkaudio.com/registration or call Polk customer service 800-377-7655
in the USA within ten (10) days of the date of original purchase. Be sure to keep your original
purchase receipt.
Defective Products must be shipped, together with proof of purchase, prepaid insured to
the Polk Audio Authorized Dealer from whom you purchased the Product, or to the Factory
at 2550 Britannia Boulevard, Suite A, San Diego, California 92154. Products must be shipped
in the original shipping container or its equivalent; in any case the risk of loss or damage in
transit is to be borne by you. If upon examination at the Factory or Polk Audio Authorized
Dealer it is determined that the unit was defective in materials or workmanship at any time
during this Warranty period, Polk Audio or the Polk Audio Authorized Dealer will, at its
option, repair or replace this Product at no additional charge, except as set forth below.
All replaced parts and Products become the property of Polk Audio. Products replaced
or repaired under this warranty will be returned to you, within a reasonable time,
freight prepaid.
or service, repair, or modification of the Product which has not been authorized or
approved by Polk Audio. This warranty shall terminate if the Serial number on the
Product has been removed, tampered with or defaced.
This warranty is in lieu of all other expressed Warranties. If this Product is defective
in materials or workmanship as warranted above, your sole remedy shall be repair or
replacement as provided above. In no event will Polk Audio, Inc. be liable to you for
any incidental or consequential damages arising out of the use or inability to use the
Product, even if Polk Audio, Inc. or a Polk Audio Authorized Dealer has been advised of
the possibility of such damages, or for any claim by any other party. Some states do not
allow the exclusion or limitation of consequential damages, so the above limitation and
exclusion may not apply to you.
All implied warranties on this Product are limited to the duration of this expressed
Warranty. Some states do not allow limitation on how long an implied Warranty lasts,
so the above limitations may not apply to you. This Warranty gives you specific legal
rights, and you also may have other rights which vary from state to state.
This Warranty applies only to Products purchased in Canada, the United States of
America, its possessions, and U.S. and NATO armed forces exchanges and audio clubs.
The Warranty terms and conditions applicable to Products purchased in other countries
are available from the Polk Audio Authorized Distributors in such countries.
This warranty does not include service or parts to repair damage caused by accident,
disaster, misuse, abuse, negligence, inadequate packing or shipping procedures,
commercial use, voltage inputs in excess of the rated maximum of the unit, cosmetic
appearance of cabinetry not directly attributable to defect in materials or workmanship,
Polk Audio, 5601 Metro Drive, Baltimore, Maryland 21215, USA 800-377-7655, Fax: 410-764-4817, www.polkaudio.com
“Polk Audio,” “The Speaker Specialists,” “ARC Port,” “Casket Basket,” and “Dynamic Balance” are trademarks of Britannia Investment Corporation used under license by Polk Audio Inc.
12
Contact Polk Audio Customer Service 1-800-377-7655 (Outside US: 410-358-3600) Monday-Friday, 9:00 AM-6:00 PM Eastern Time, [email protected]