1
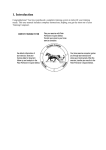
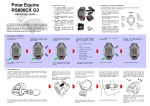
CS600X Trotting 1. Contents of the set 2. How to use the CS600X receiver A. A CS600X receiver: receives, displays and records all the data measured by the WearLink transmitter and the speed sensor. - Quick start guide - The CS600X receiver has 5 navigation buttons and an infrared window to communicate with the PC via the IRDA adapter. Use UP and DOWN to scroll through the different menus and adjust values (a bit like + and - buttons). B. A speed sensor with its magnet: measures speed and distance in real time. Use OK to enter a menu, to validate a value and to start the stopwatch. C. A WearLink transmitter and its Equine belt: measures the horse’s heart rate in real time. The Polar Equine CS600X Trotting is the most complete trotting training system for horses available. It is an evolution of the "human" CS600X training system and requires a good understanding of the user manual to use all its capacities fully. If you just bought this training system and want to try it straight away, the following quick start guide is what you need! Use STOP to exit a menu, to return to the previous display (when you made a mistake while adjusting a value) and to stop the stopwatch. D. A ProTrainer 5 Equine edition software: displays a training log, graphs, tables and reports on your PC to further analyse the data recorded during training. Press LIGHT once and the backlight is activated for 5 seconds when you press any other button. You can also lock the buttons by pressing and holding the LIGHT button for 2 seconds. E. (In option, an IRDA USB adapter: uses infrared connexion to transfer the recorded data from receiver to PC.) 3. Starting the CS600X By default, the CS600X receiver is switched off to save the battery. Press UP or DOWN to select english as the language to be used. The following settings must be done, to make sure the speed measurements are accurate. Use the UP and DOWN buttons to customize the following sulky settings. Press OK to validate your settings. Number of sulkies (1, 2 or 3) Wheel size for Sulky 1 (in mm) Wheel size for Sulky 2 (in mm) if you use a second sulky. Wheel size for Sulky 3 (in mm) if you use a third sulky. Note: Wheel size settings are a prerequisite for correct speed information!! Use the following method to measure the wheel size in the most accurate way: use the valve to mark the point where the wheel touches the ground. Draw a line on the ground to mark that point. (If you got wrong somewhere, press STOP to return to the previous setting.) Move your sulky forward on a flat surface for one complete rotation. The tire should be perpendicular to the ground. Draw another line on the ground at the valve to mark a full rotation. Measure the distance between the two lines. Subtract 4 mm to account for your weight on the sulky to get your wheel circumference. Press OK twice to activate it. Press OK to validate. If you don’t do these sulky settings, the CS600X will remind you to set them before every exercise. Enter this value in the CS600X receiver. 4. Placing the speed sensor The following settings must be done, even though they don’t concern the horse. Use the UP and DOWN buttons to customize the following basic settings. Press OK to validate your settings. Time display (24h/12h) Time Date (day/month/year month/day/year) Units (kg/cm/km or lb/ft/mi) Once the settings are done, the CS600X returns automatically to the time display. Attach the rubber part to the sensor. Pass the cable ties through the speed sensor and rubber part holes. Adjust the sensor to the sulky bar so that the POLAR logo faces outwards. or 5. Placing the CS600X on the sulky The support has been designed so that the CS600X receiver is always facing you (not perpendicular) wherever you install it on the sulky. Position the CS600X receiver on to the support. Turn the CS600X receiver clockwise until you hear a click. It is now ready for use! Place the rubber part on the sulky bar or stem and insert the support on top of it. Adjust the ties loosely. Do not tighten them yet. (If you got wrong somewhere, press STOP to return to the previous setting.) If you don’t do these basic settings, the CS600X will remind you to set them before every exercise. If your settings are good, select Yes. Press OK to validate. Attach the magnet to a spoke at the same level as the sensor. Fasten the magnet to the spoke and tighten it with a screwdriver. The speed sensor is turned off by default to save the battery. Make sure it is activated by checking in menu SETTINGS -> Sulky -> Sulky 1/2/3 -> Speed -> ON. Teaching a new sensor is not needed. Fine-tune the positioning of both the magnet and the speed sensor so that the magnet passes close to the sensor but does not touch it. Pass the cable ties over the support and adjust them around the sulky bar/stem. You can release the CS600X receiver by pressing it down and simultaneously turning it counter clockwise. Secure the bike mount firmly and cut off any excess cable tie ends. 6. Placing the WearLink belt and transmitter Place the WearLink belt as indicated, with the transmitter pocket on the left side of the horse. By doing so, you ensure the electrodes of the belt are in the right position. Clip the transmitter to its contact points, as indicated. Then close the pocket by using the velcro straps. This pocket protects your transmitter from shocks and scratches and prevent it from falling off the belt. The range of the WearLink transmitter is over 10m, therefore you can follow your horse’s heart rate when working with a leash. Using contact gel on the electrodes of the WearLink belt is highly recommended. It ensures a better detection of the horse’s heart rate. The gel should be placed on the electrodes located at the back of the WearLink transmitter. Put a "dab" of gel on the top electrode... ... And on the bottom electrode (under the transmitter pocket). You can now install the sulky, your WearLink belt and transmitter are now ready for use! Each display shows 3 rows of data and is named after the bottom row. You can also zoom on a data to make it larger on the display. To stop the exercise, press STOP twice. The CS600X returns to time display. For more detailed information on how the CS600X Trotting works, please check the user manual included in the box. The hypo-allergenic and chloride-free electrode gels ensure a better conductivity. Non-thinning formula will not break down or irritate after lengthy contact. Here is an example of conductive gel recommended by the biggest electrodes manufacturers, to be used on multifunctional electrodes. 7. Starting training You are now ready to start. Starting from the time display, press OK twice. For more tips of use, training advices and more information on Polar Equine products, visit www.polar-equine.com For more information on Polar products, visit www.polar.fi Enjoy your ride! The stopwatch starts, a heart symbol blinks and the horse’s heart rate is displayed in the bottom of the screen. From now on, the CS600X is recording your exercise. To check the data you are most interested in, change display by pressing UP or DOWN. (6 different displays are set by default but can be customized – see user manual) Press and hold UP for 2 seconds to zoom in the data of the top row, or DOWN for 2 seconds to zoom in the data of the bottom row. Press and hold the same button for 2 seconds to zoom out. All the data has been recorded and can be retrieved in the file. To access the file, press UP once from time display and then validate by pressing OK.